My headlight project was finally completed last week. As stated above, my intent was only to open the headlights to install a silver carbon fiber trim that I bought from Marc (MDS82) over the amber reflectors. I had WiessLicht angel eye bulbs from JLevi ready to install. But during the process of removing the lens, I cracked both angel eye rings on the passenger side. Knowing what not to do, I didn't break anything when opening the other side, but one broken ring might as well be all four since they cannot be replaced. I was faced with a decision: re-install my broken and repaired rings even though they weren't quite as bright now, go without any angel eyes at all or get an LED set from Umnitza. After quite a bit of research I chose option three. I spoke with Matt at Umnitza at length before making the decision and he was nice enough to answer all my questions. I considered sending my headlights down to them and having them install the LED rings. But that was more downtime, $250 in additional labor costs and additional shipping costs. Matt and I agreed that, at this point, I have the headlights open and I've done the hard part so I might as well just buy the rings and install them myself. This was wrong - the hard part had only begun.
Here's a very very long review of the process opening the headlights, installing LED angel eyes and covering the reflectors and sealing the headlight back up. My write up is so long because the process is so long, I'll so I'll summarize it by saying DON'T ATTEMPT THIS YOURSELF. It's a shit load of work and there are so many ways in which it can go wrong. The reason I'm writing this is because I received so many inquiries about how to do it. Perhaps this will illustrate the difficult nature of the install and persuade other DIY'ers to let the pros handle it. Oh and the usual "I'm not responsible for whatever stupid shit you do to yourself or your car" applies. Here goes.
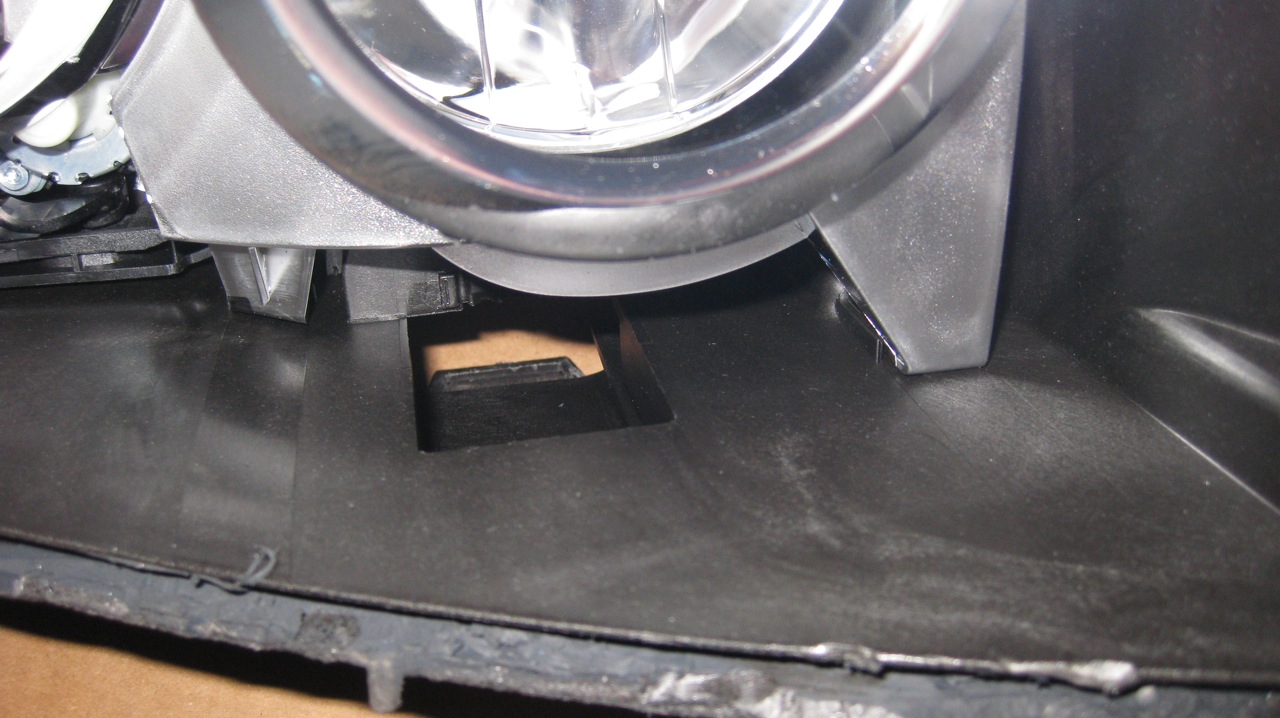
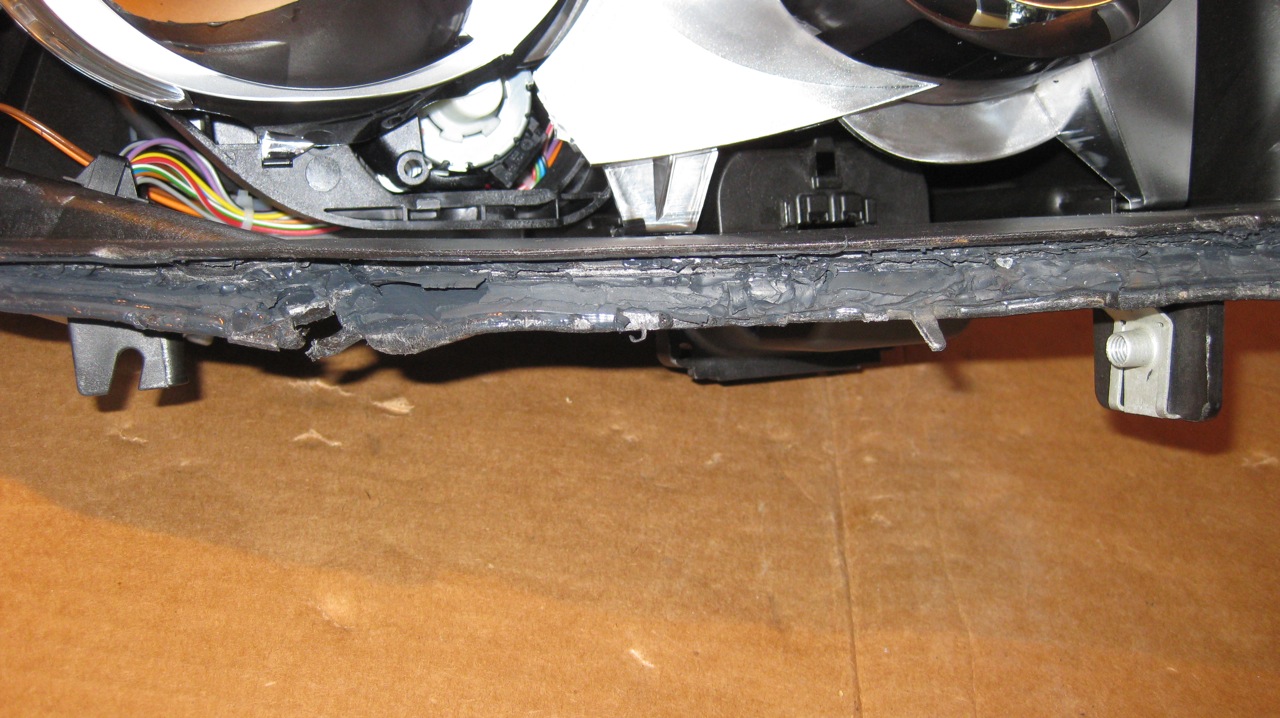
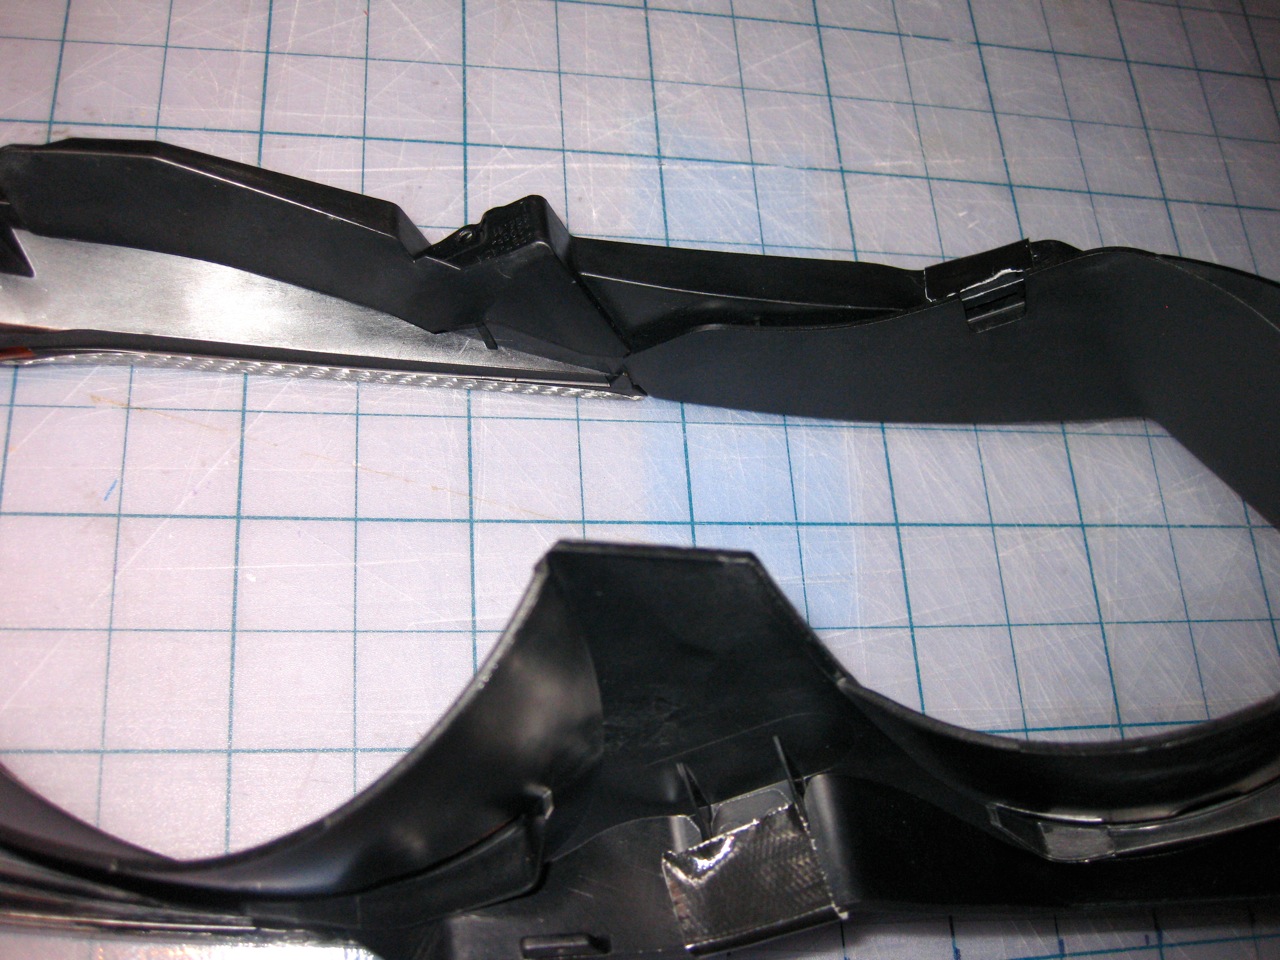
Opening the headlight. Longtran's DIY is pretty good but leaves out a crucial step for those who have angel eyes. Before you begin, unclip the little cover on the back bottom of the housing and remove the angel eye bulb. Once the bulb is out you will see the back of the angel eye ring stems - the part that runs down from the ring back to the bulb to pick up light.

Opening where the angel eye stems go back to meet with the bulb.
These stems clip to the housing. You must unclip them, otherwise when you remove the lens in front you're pulling the rings front the front and back, and something's gotta give.
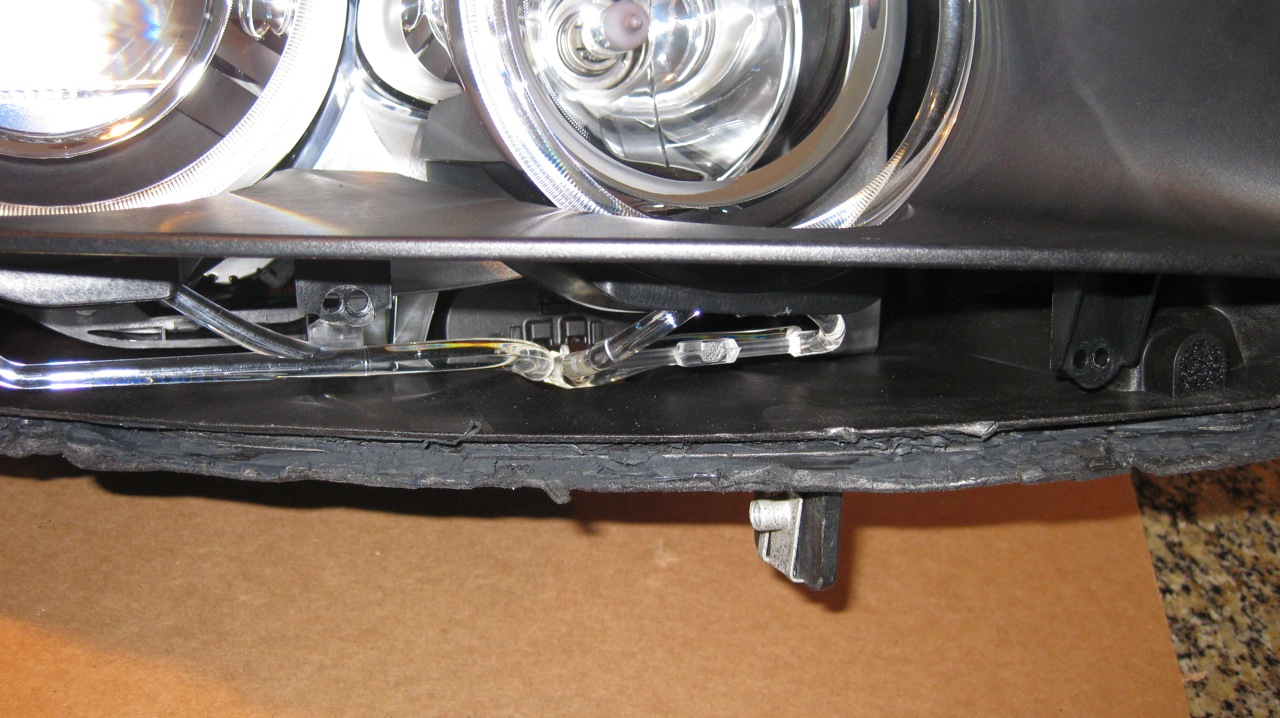
The stem on the left side is clipped in, the one on the right is unclipped.

To begin opening the light, use a heat gun (I used a Wagner 1000 degree model) and work one 4-5" section at a time. Move the heat gun back and forth until the plastic starts to change texture. Work a wide flathead screwdriver parallel to the seam, prying the plastic lip up and back.

Working parallel rather than perpendicular will help you avoid punching through the back of the groove - try to avoid doing this:
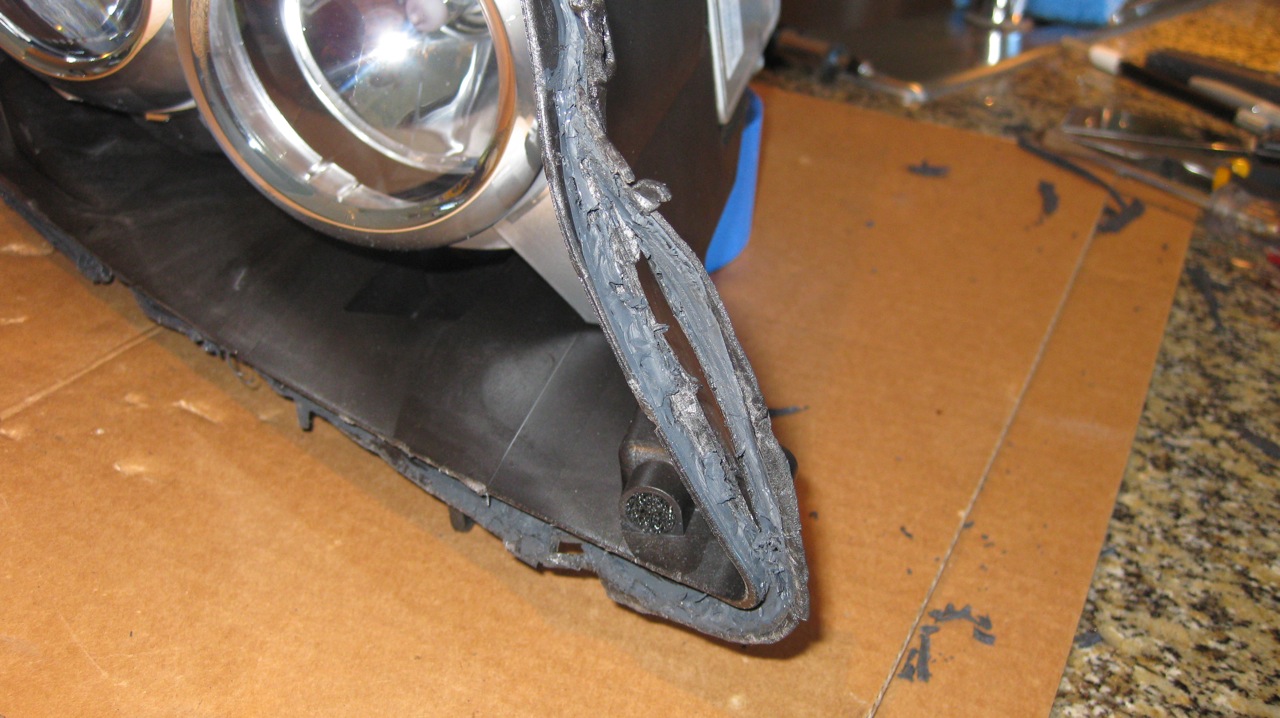
Get your screwdriver to the back of the groove to break the adhesive between the lens and housing. There's no substitute for time and patience here - I think I spent over an hour on each light just doing this. Once you've gone all the way around and gotten it to start coming open, keep slowly working the areas that are stuck. The outer corner is pretty difficult because of the shape. I don't think mangling it can be avoided really, but you can reshape it later:
Don't pull the lens at an angle and try to pry it open from one side as Longtran suggested - this will break your angel eye rings too. Once you've broken up all the adhesive, pull the lens straight forward. Whew, step one of 10,000 complete.
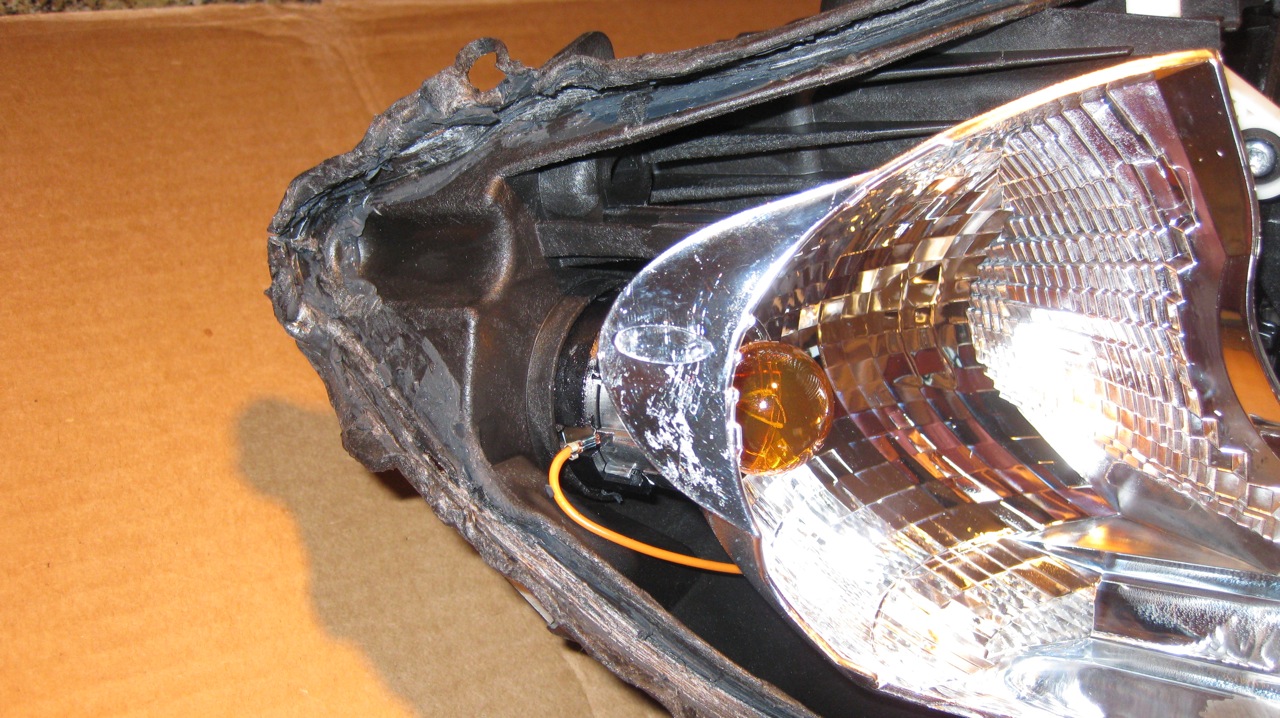
Cleaning and reshaping. I used a utility knife to scrape out all of the old seal from both the lens and the housing.
Longtran suggests using a Dremel with a sanding bit. I tried this but all that dust and debris gets EVERYWHERE. Including into the back of the housing and into places you'll have a hard time cleaning it out. Better to use a knife to minimize the mess. Be sure no debris or rubber shavings get behind the bulb housings. The chrome parts surrounding the low and high beams aren't sealed so debris can enter from the back. If you have particles behind the lens, blow it out using canned air with the straw attached so you can curve it around the back.
Clean the glue very thoroughly from both the groove in the housing and both sides of the lens edge. It took about one hour for both housings and 45 minutes for both lenses. It's an extremely tedious process, but better to put in the time now than have a poor seal and have moisture in your headlight later.
Once the old seal is all out, use your heat gun to reform everything to its original shape. It doesn't have to be perfect, but the closer it is to original shape the better seal you'll get. Again, take your time - I spent a couple of hours per side reshaping everything. I used a combination of pliers, flathead and thick rubber work gloves to reshape. There's no magic technique, just use your judgement. Cleaned out and re-shaped:
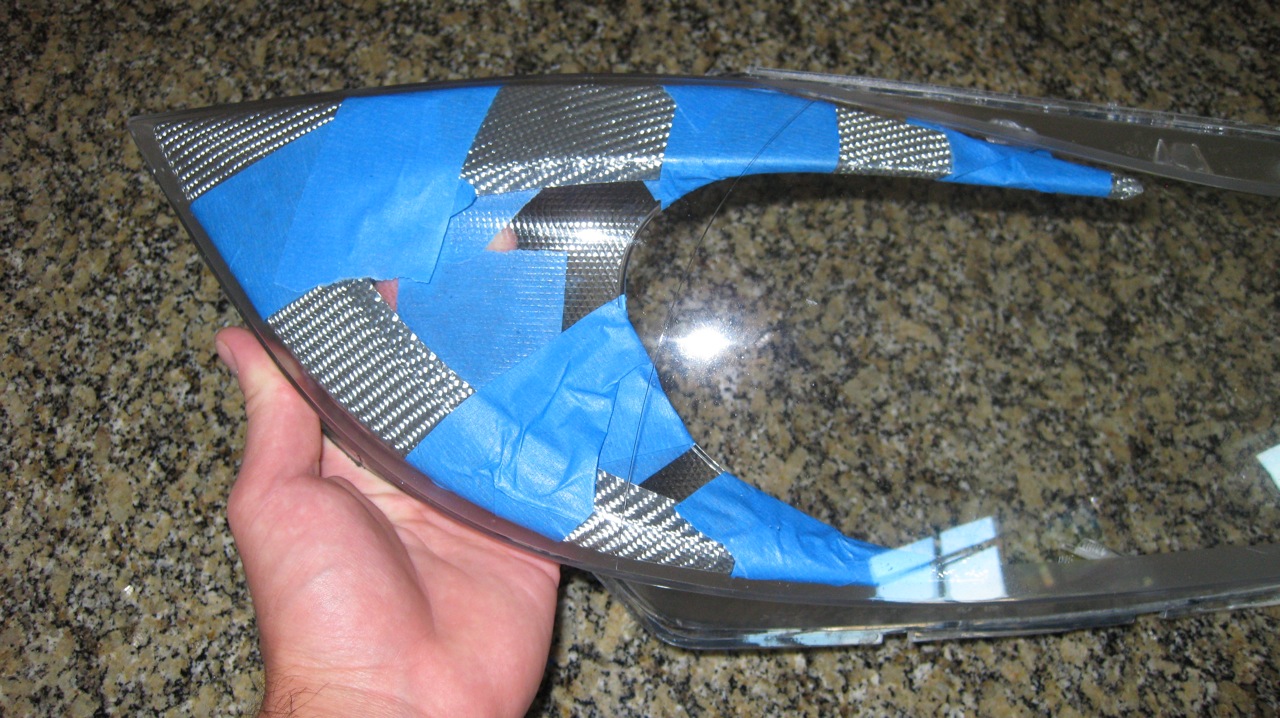
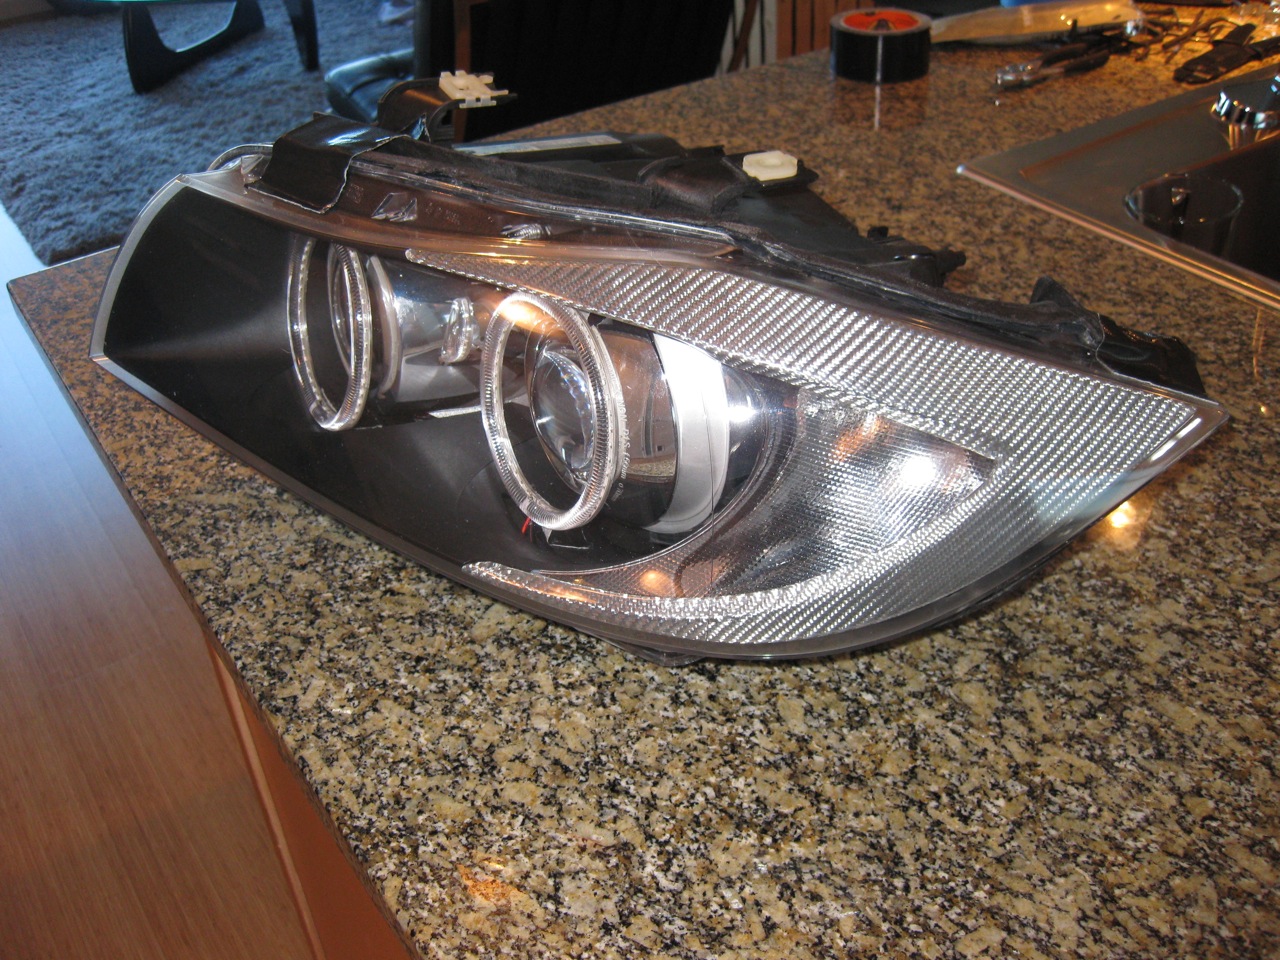
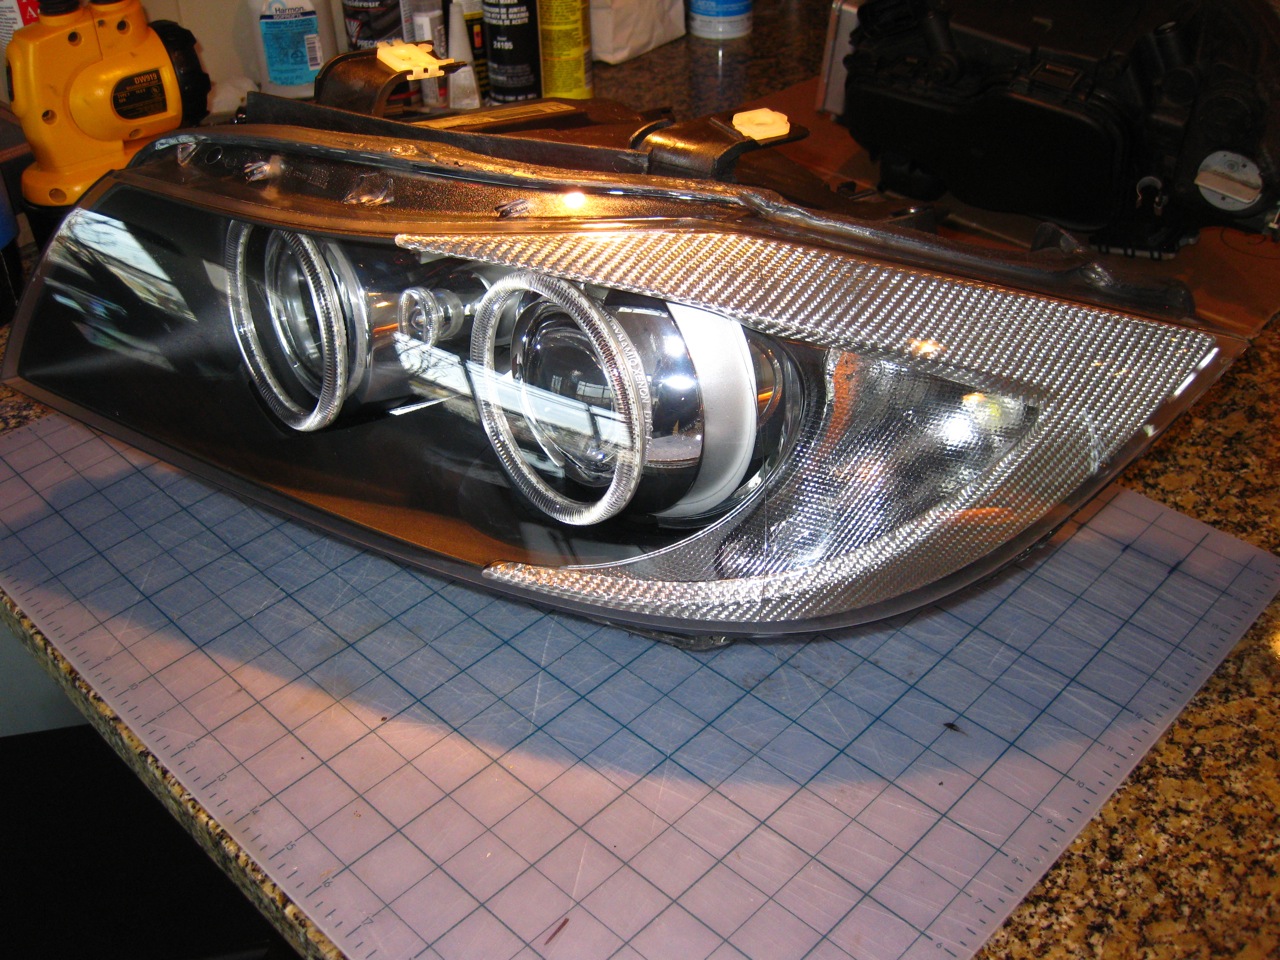
Covering the amber reflector. This section assumes that you've ordered carbon fiber covers from Marc like I did. The reflector unclips from the headlight housing trim - it's pretty obvious how to do this. Once it's off, you'll need to mask the clear part on the back of it and spray paint the backside of the amber black. This is so no light will shine though, so be sure to get good coverage, 3 coats or so. Flat black is best. You may also need to paint the front side of the bottom tip of the reflector, as my CF covers didn't go all the way over it. Once it's dry, test fit your CF covers so you're familiar with how they go on. I used a clear silicone to make a bead tracing the perimeter of the reflector, then just laid the cover over it. I used blue painter's tape to secure them together, making sure no silicone seeped out. If it does it can easily be wiped off with warm water. Clear silicone is best in case you get some oozing out. Let it dry per the instructions.
Alternatively, you could paint both sides of the amber and go for a black out look. I prefer the silver CF because it looks like a Euro reflector, but it's a matter of preference. However you choose to delete the amber, once it's done you can snap it back onto the headlight trim and remount the trim to the lens. Also, as long as I was at it I painted the little metal trim strip next to the turn signal black.
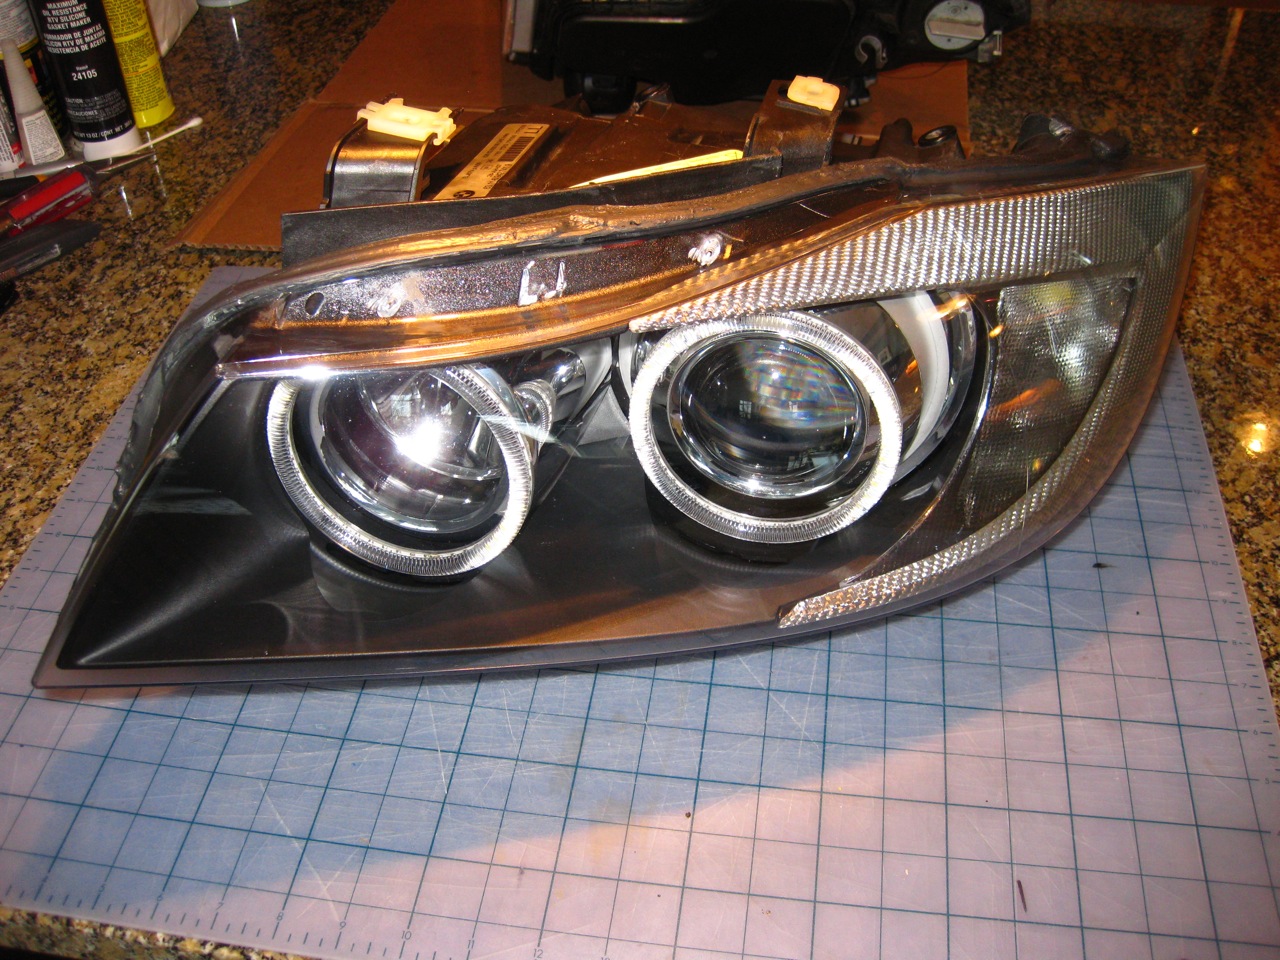
Selecting LED rings. Basically there is no "kit" for this car (or really any BMW as far as I can tell). Umnitza sells this as a kit for E92 and E60 but it's by no means a direct fitment. The LED rings are universal and can be used for any car, so it takes quite a bit of time and patience to determine how to fit and mount them to the headlight. There are several sizes of rings available. For reference, on an E90 sedan the stock outer ring is 11.8 cm (outside diameter) and the inner ring is 10.7 cm. What I initially received (as suggested by Matt) were rings sized 10.5 cm for the outer and 9.2 cm for the inner. This is about 1.3 cm smaller than stock for both rings, and I didn't think it looked right.
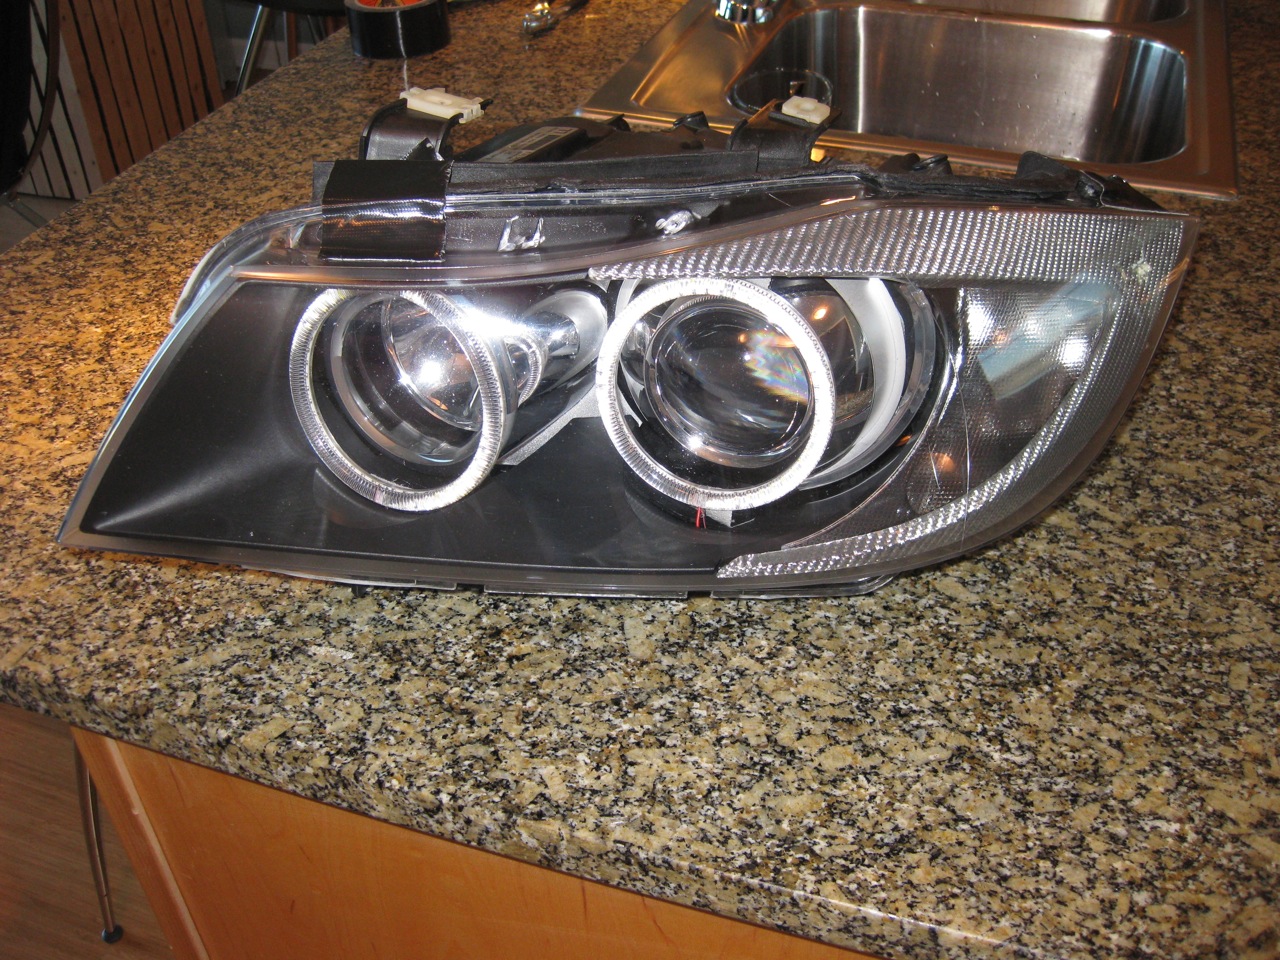
Test fitting the 9.2 cm and 10.5 cm rings:


I wanted to stay as close to OEM as possible. However, the OEM outer ring is about 12 cm, and there is no 12 cm LED ing that's a complete circle - they're open at the top like a horseshoe. It's a matter of personal preference, and I don't like the horseshoe look as well as a complete ring.
The three ring sizes - 9.2 cm, 10.5 cm and 12.5 cm horseshoe:
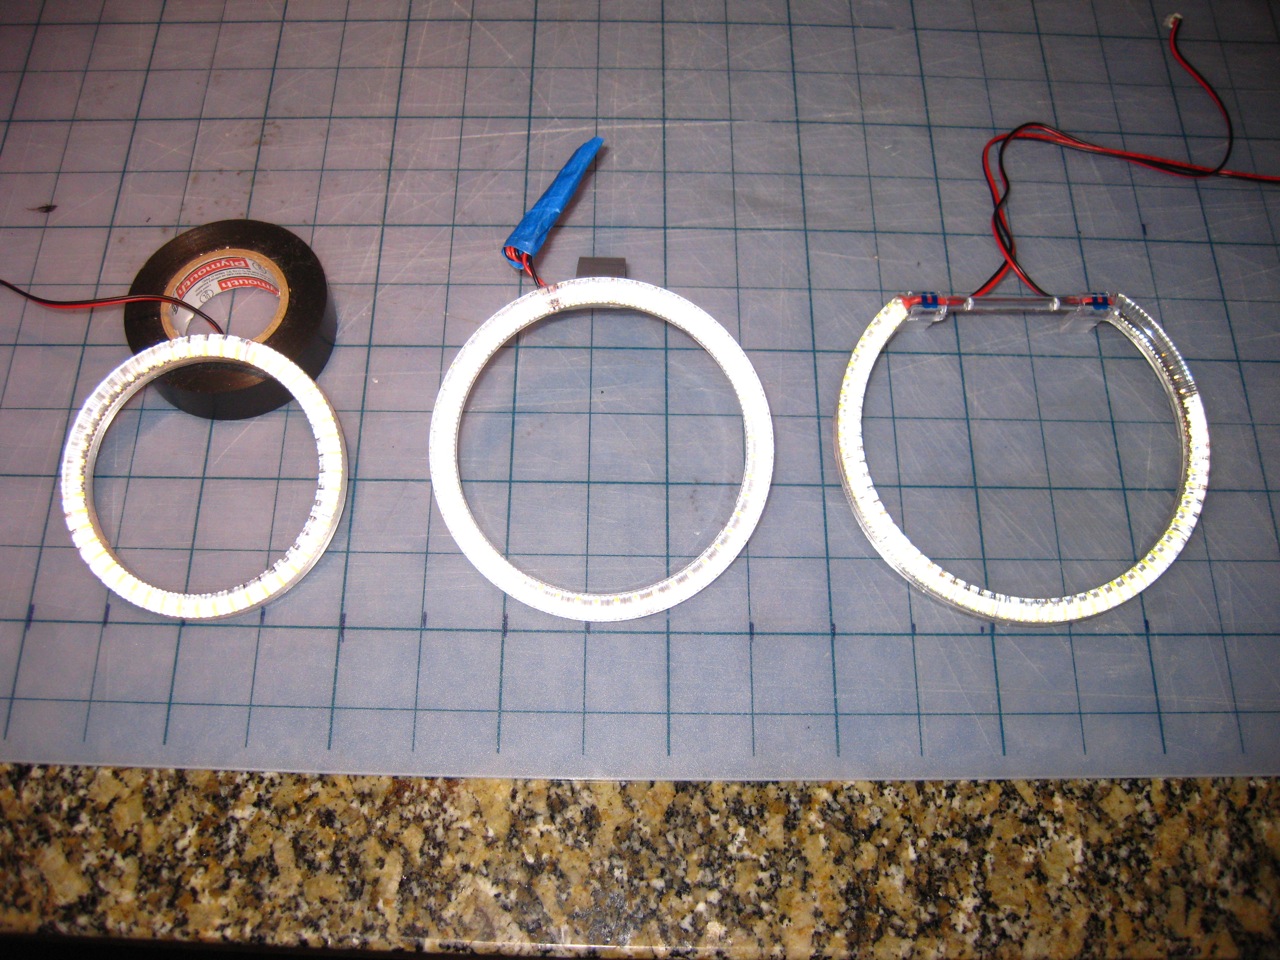
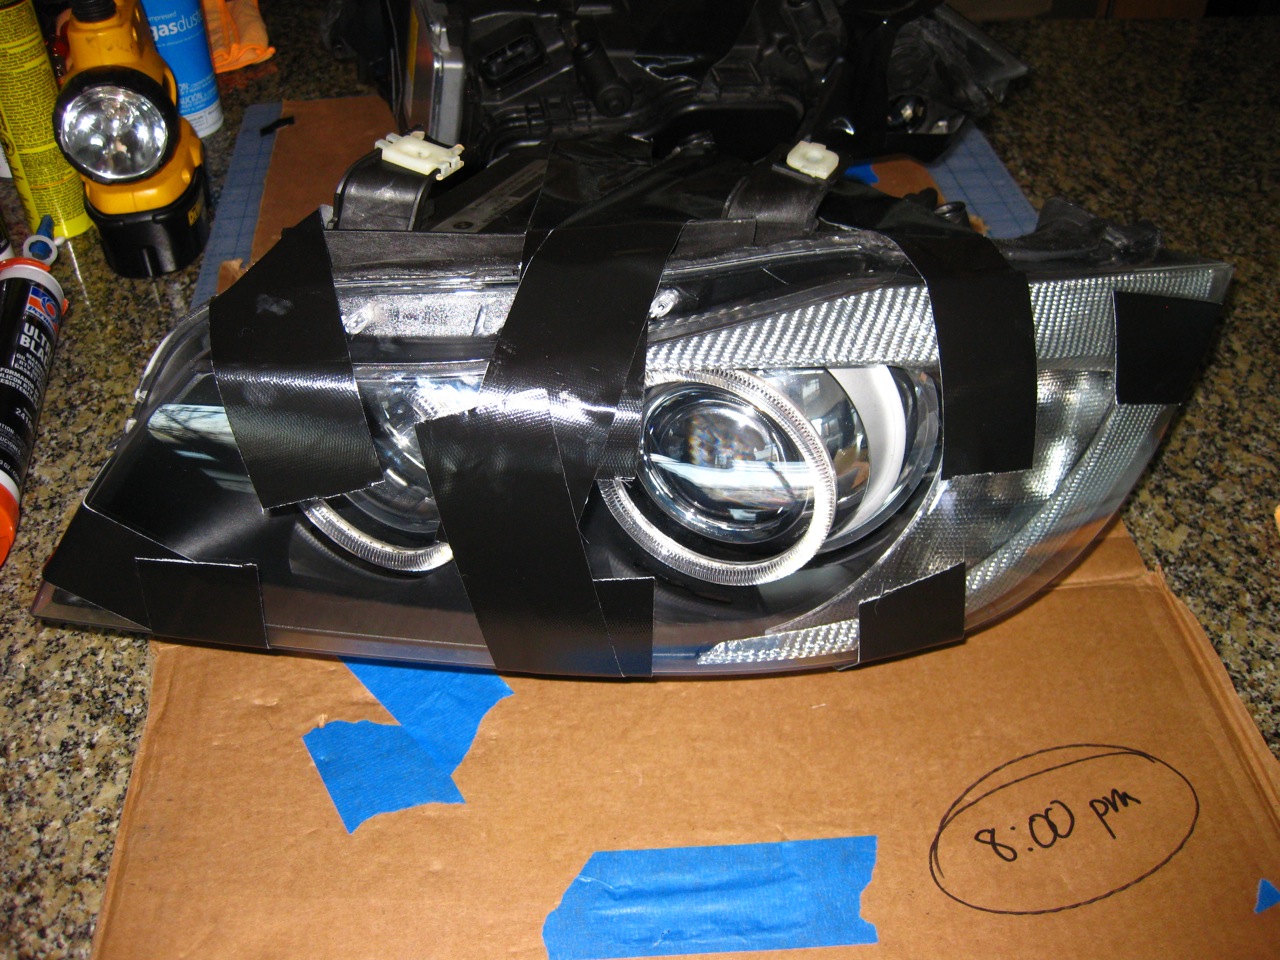
I chose to do the 10.5 cm rings both inside and out as I felt that's the most aesthetically pleasing look and closest to stock. Yes, I'd have preferred a larger outer ring but not at the cost of having a full circle. So I ordered two additional 10.5 cm rings from Matt and a few days later I have all my parts to proceed. Test fitting dual 10.5 cm rings, taped in place:
 Fitting the rings.
 The next challenge is the fact the rings have nothing, literally nothing, to attach a bracket to. It's all up to you to glue it carefully and thoroughly - use enough that it will hold permanently (because what could be worse than a ring falling off inside your sealed headlight) but not so much that it oozes out and looks messy. I used Liquid Nails PL construction adhesive. It's extremely strong and should easily be a permanent hold. Umnitza uses either this or Loctite roofing adhesive. But before you can glue, you have to figure out how the hell you're going to mount these things. When I initially talked to Matt and asked about this he said we'll send you brackets and you'll see how to do it, it'll be obvious, it's easy, etc. The only thing that was obvious was these brackets are in no way made to fit my car or any car specifically. They're just general purpose black metal brackets. The OEM angel rings attach with small screws to the top of the black headlight trim that's attached to the inside of the lens.

The problem with trying to do this is there's no easy way to mount a bracket to this trim due to weird angles, and if you attach the ring to the lens you can't be sure that it will center over projector housing when you re-attach the lens.

So the only real option was to mount the rings to the headlight housing. Luckily there are a couple of flat points on top of the xenon projector housing and the DRL housing. Mounting points indicated by the red dots.


I bent the brackets to approximate shapes, cut them to size and bent some more. I used 3M adhesive tape to attach the ring to my bracket for test-fitting, test-fitting and more test-fitting. This isn't easy to do - the bracket needs to clear the headlight trim because with Adaptive/Dynamic headlights the projector housing moves and therefore the ring will move with it. So clearance is crucial. See the tight fit:

You also need to make sure it's centered left to right, top to bottom, straight up and down and is the right distance from the headlight itself. A note on that topic: E92 angel eye rings mount directly to the headlight housings themselves, there's no gap. E90 rings are actually pushed out about .5" from the headlights, so you must "float" them in front using the hidden brackets mounted above.
After much test-fitting I had my brackets finalized (I marked them D or P to for driver and passenger to ensure I applied the right bracket to the side that I initially fit it to).
Attaching the rings and brackets. Sorry I don't have any pics for the gluing and brackets section, but it will vary by install anyway. I glued the rings to the brackets. To do this I laid the rings flat on my work space and propped the bracket up against a heavy box. This way the bracket would be supported as the adhesive dried. After about 12 hours I applied a thin second layer of adhesive just to be sure. When it was dry I test fitted the ring/bracket to the headlights again. I didn't align the bracket to the ring perfectly and had to make some more adjustments to the bracket to re-center the rings. Definitely much better to adjust your brackets BEFORE you glue them to the headlight. Adjusting them once it's all glued together risks breakage or damage. Once they were perfect I glued the brackets to the headlights themselves. Before I glued to the housing I used rubbing alcohol on a Q-Tip to remove the chrome coating in the area I was gluing to. This way I was adhering directly to the plastic.
Part of my bracket design incorporated a "hook" on the inside which went around the back of the housing (sorry, I didn't take any pics of the brackets for some reason). This helped the bracket support itself while the glue dried. The reason I did this is the glue takes at least an hour before it starts to set up, and until then it will allow the bracket to slide off. Taping the bracket is very difficult because you have wet glue spilling out the sides and you can't really tape to the chrome housing because the chrome coating peels right off and you'll damage it. So bending the end of the bracket around into a hook anchors it until the glue dries. After about 12 hours I applied another layer of adhesive to the housing. You will never see the glue up there anyway, so might as well use a little more to be sure it's secure.
Wiring. I mounted the white junction box that the rings plug into to the inside top of the headlight housing, between the DRL and xenon where this is plenty of clearance. Because the wires that come off the rings aren't very long, it was necessary to keep the junction box close. I ran the wires from the junction box down behind the DRL and to the recess at the bottom of the headlight housing where the OEM angel bulb was. I used insulated "quick connectors" to hard wire the junction box to the OEM bulb wires. This was plug and play, just wire them together and it worked. I mounted the rings with the wires at the top so they're not visible. I pushed the wires back into the headlight housing, then plugged them into the junction box up top. The only downside to this is that I should have painted the junction box black - if you get low you can see the white box reflection in the chrome beam housing. No big deal though.
 Re-attaching the lens.
 Once all the glue is dry it's time to replace the lens. I test fitted the lens several times before to make sure my fitment was good. But now I had to be sure that the trim inside cleared the rings I'd just mounted. As I slid the lens/trim over the housing and rings I was very careful to keep it straight and not to knock into the rings - the inner ring is the same size as OEM and it's a very tight fit within that trim (the xenon ring was less of an issue since it was now smaller than OEM giving more clearance). Luckily my precise bracket-work paid off and it centered perfectly within the trim. I used Permatex RTV silicone gasket maker (in black) as recommended by Marc. It was easy to work with, cleaned up with soap and water OK if you got to it quickly and was a pretty good match to the black plastic housing. It's actually a very dark gray, but blends well. I filled the groove in the housing about 3/4 of the way full, leaving room for the lens to press into it. Carefully re-assembled the lens and snapped it in. Once it was together I went around again with the adhesive and filled any obvious gaps. I pressed the lens hard into the housing as I applied Gorilla Tape to hold them together. I had about 10 pieces of Gorilla Tape in 8" lengths already torn so I didn't have to do that while holding the light together.
The Silicone fully cures in 24 hours, so I left it for about 18 hours before removing the tape. Then I went over it again with more silicone and smoothed it out. Also, since I'd torn open the groove in a few spots while initially opening the headlight, I used some silicone on the backside of the groove to ensure it was sealed there as well. I gave it about 12 hours to be nice and dry before re-installing on the car.
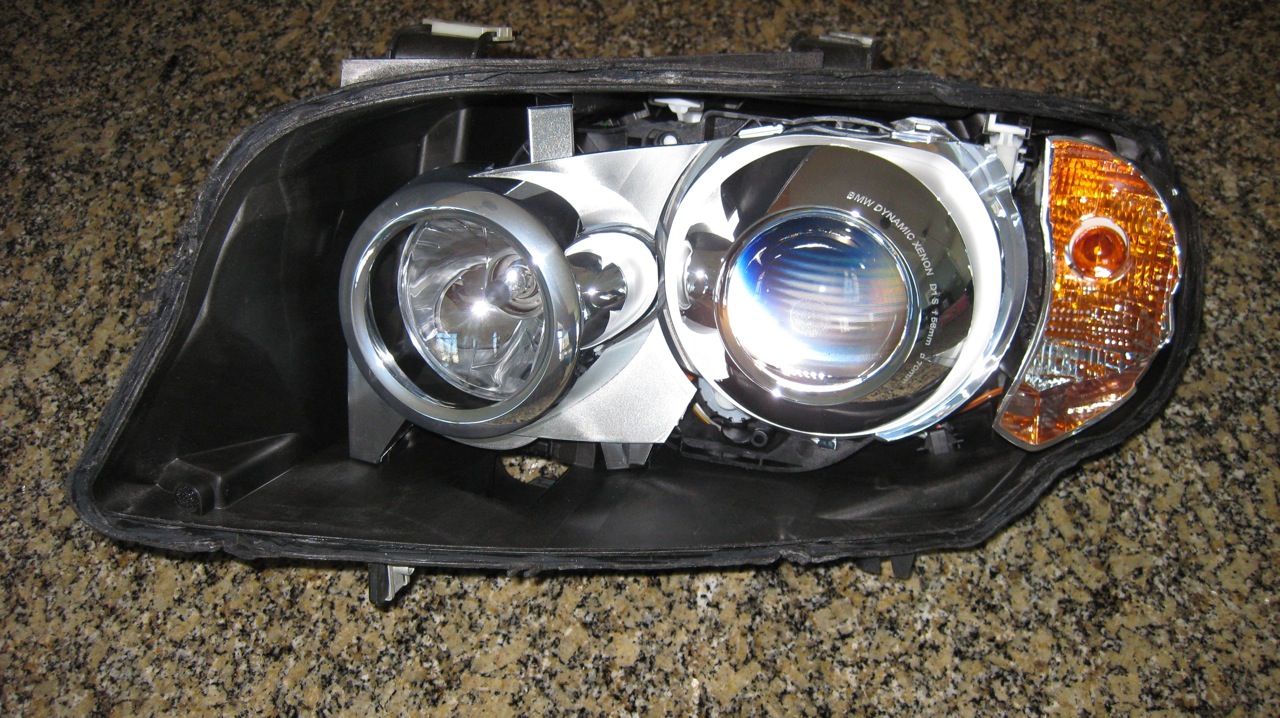
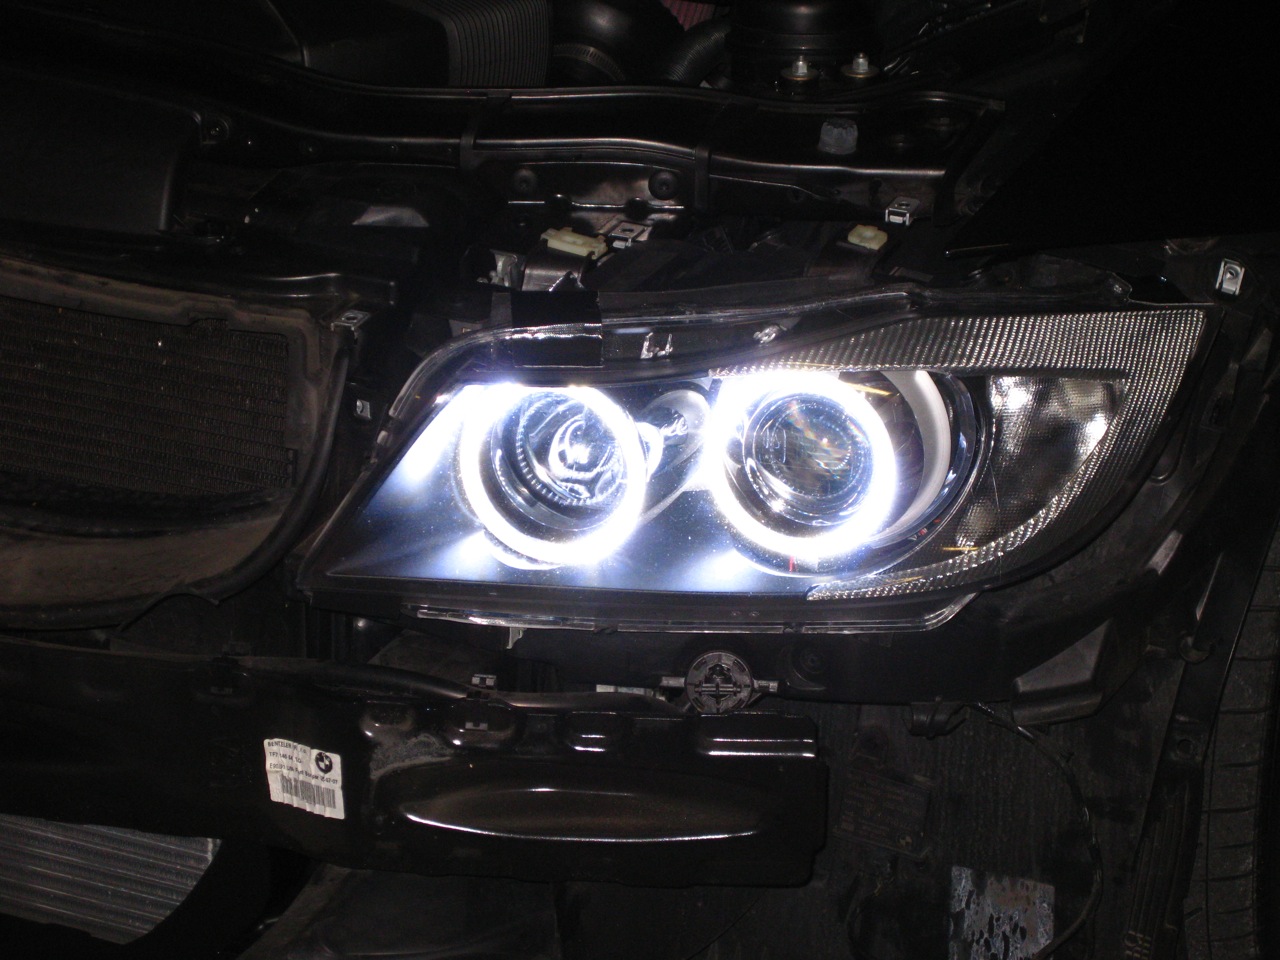
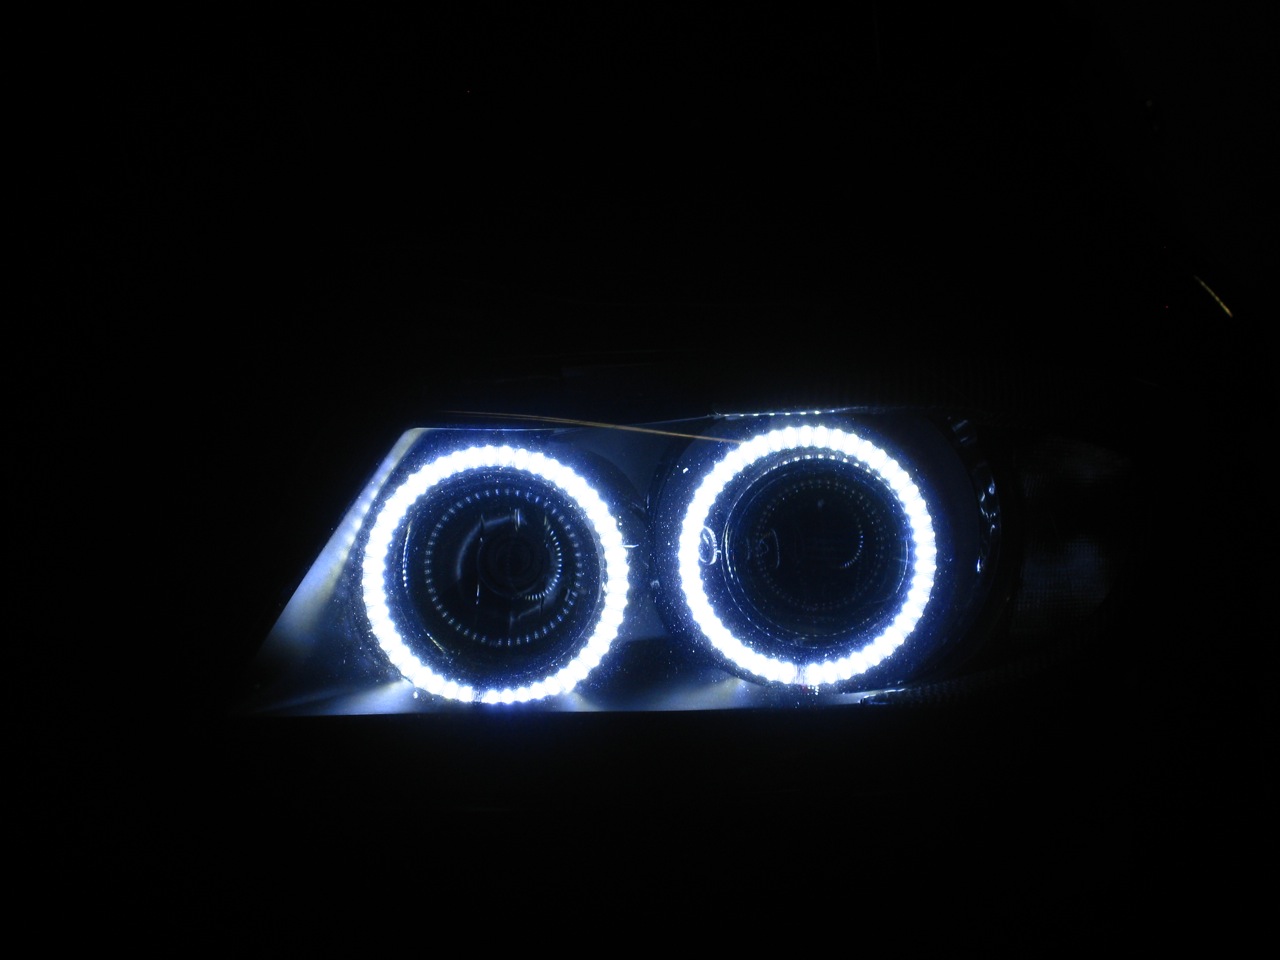
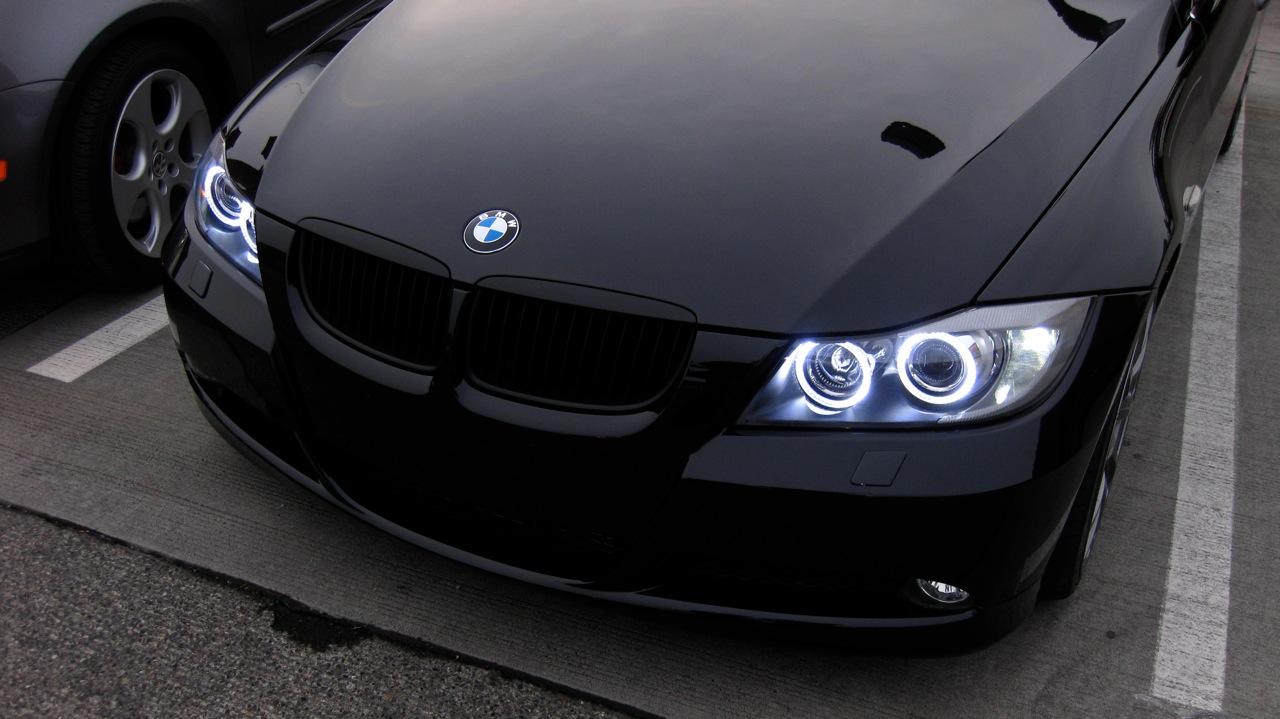
Overcast day:

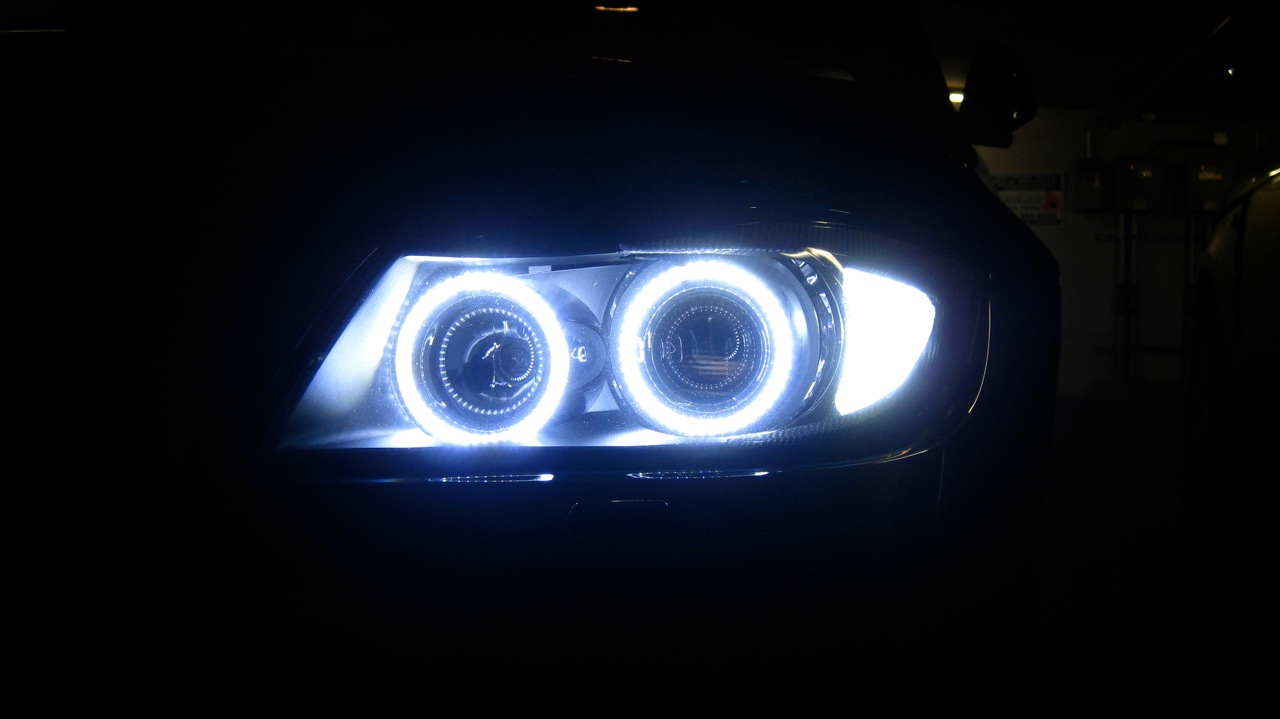
Garage, straight on:
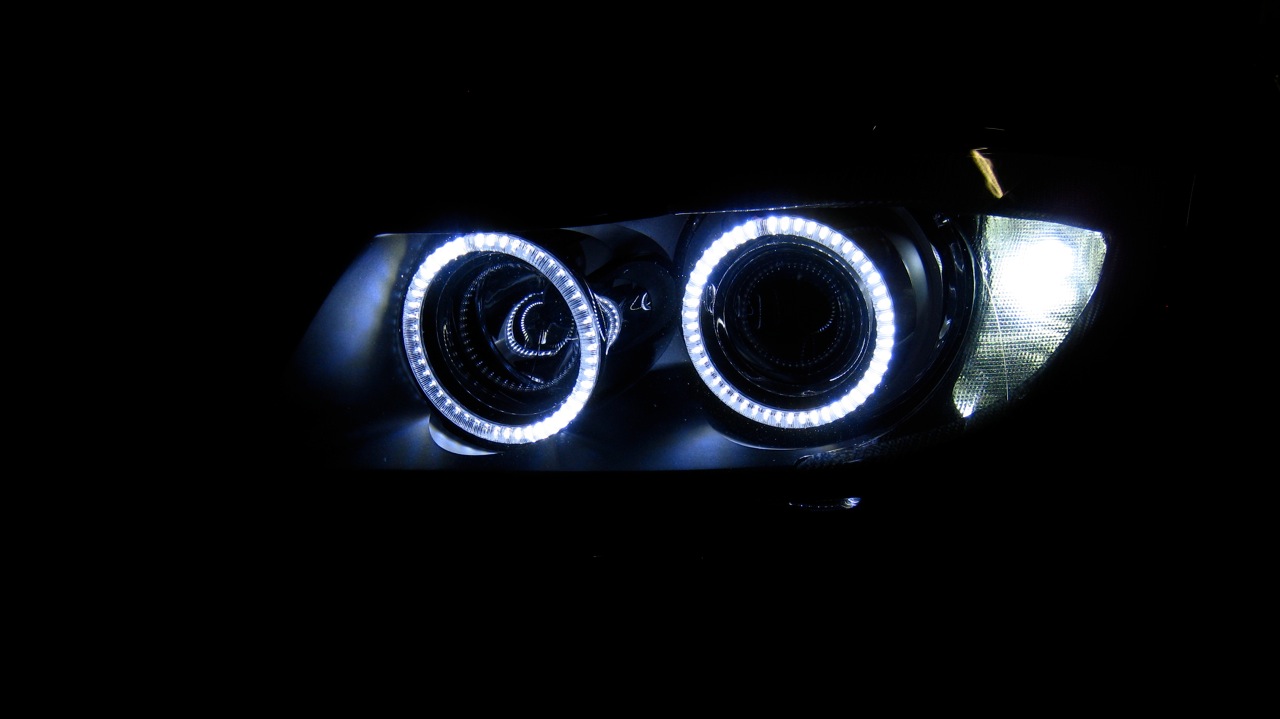
Garage, exposure turned down to capture the beaded look:
 Consclusion.
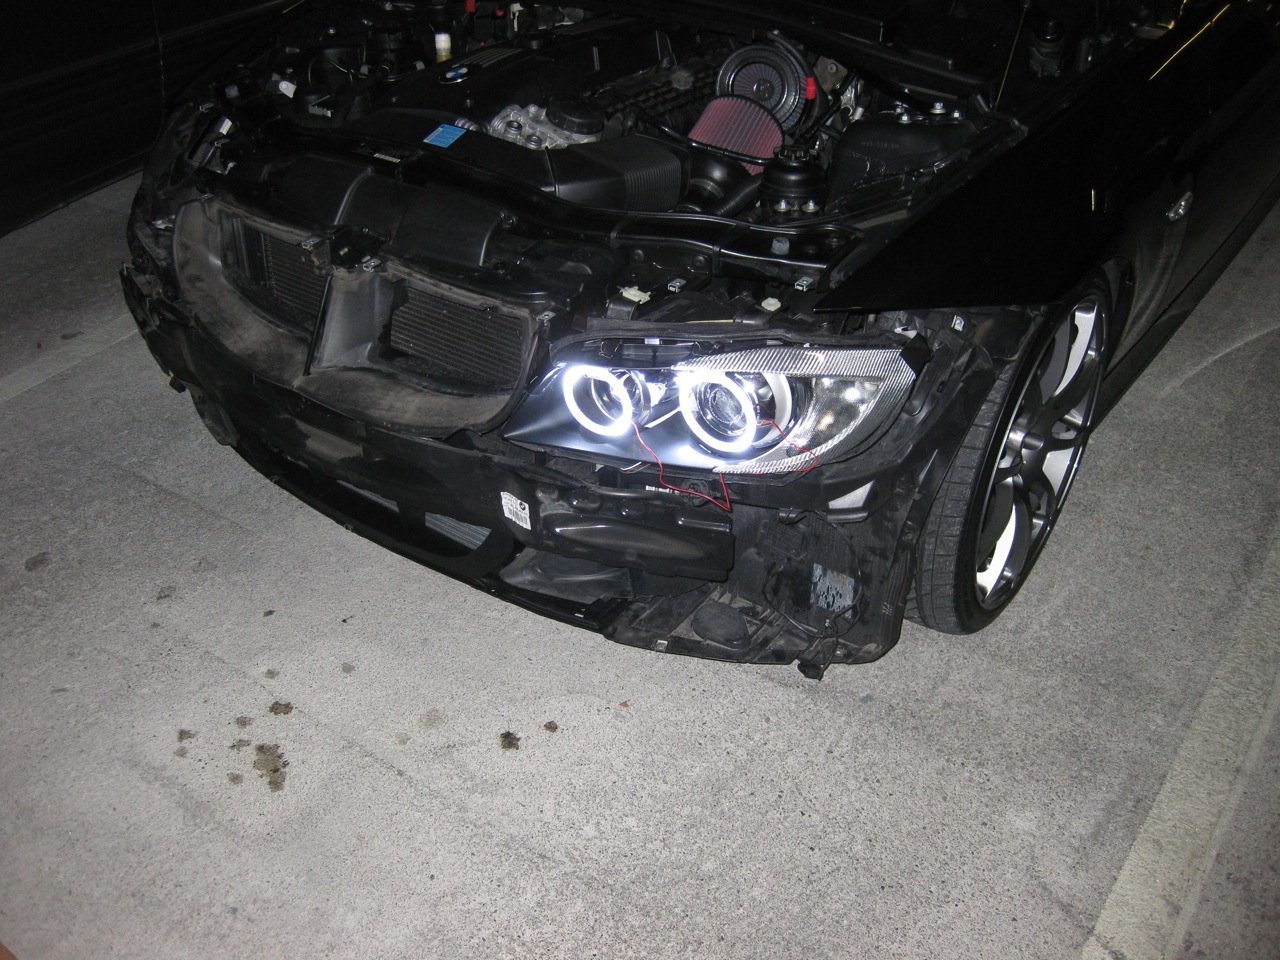
 This is probably one of the most difficult mods you can do. Why? Because things like downpipes, turbos, intercoolers are all meant to be removable. Your headlights were designed to sealed forever. If you break a clip while installing your intake you can buy another. If you break an angel eye ring or your headlight trim while attempting this, too bad, no replacements except a new headlight and start over. So basically there's a huge learning curve, a lot of ways to fuck it up and no room for errors. In the end, I'm glad I did it myself for only one reason - if I had just sent my headlights down to Umnitza and gone with their recommendation of 9 cm and 11 cm rings I wouldn't have been happy. But I'd have already shipped my lights down, waited, paid and had them sent back, so I'd be stuck with small rings. Having done it myself, I had all the ring sizes available to try and see what looked best and I got what I wanted. But other than that, the $250 that Umnitza or other shops charge for install is an amazing bargain for all the work involved. I highly recommend anyone else considering this just let a shop do it. In the end, I'm extremely happy with the way my lights look with both clear corners and LED rings. It was a serious pain in the ass, but actually worth it. While I was doing all these upgrades I went ahead and did LED front turn signals and side markers. Well worth it - chrome coated turn signal bulbs just don't hold up against the LED angel eyes. The LED signals are bright, crisp and look great with LED rings. I love the way the front of my car looks now.
Miscellaneous notes if you're still insane enough to DIY.
Don't touch the chrome coating around the headlights or in the reflector around the turn signal bulb. It picks up finger prints and can't be cleaned off very easily (the chrome coating comes right off if you try to clean it with anything).
Blow out the entire housing before putting back together with compressed air.
Be careful not to scratch your beam housings while scraping off the old glue. Keep careful control over your blade, otherwise it may slip and cause damage.
This may vary by model/year, but on my 7/07 build the OEM angel eyes would fade on when the car was unlocked (AKA "welcome lights") if the light switch is in the auto position. This functionality is retained with the LED rings, and no errors are shown on the dash. However if you leave the light switch in any other position it will trigger a bulb out warning (until you turn the lights on), which in turn causes the angels not to fade on when unlocked. So I just leave it in Auto position.
The light these rings puts out will really magnify any pitting and imperfections in the headlight lenses. It lights up every little pit and scratch, looks pretty bad. To fix this I wet-sanded and polished my headlights with good results. I didn't do a perfect job, but it looks about 50-60% better.