
|
|
 |
 |
 |

|
 |
BMW Garage | BMW Meets | Register | Today's Posts | Search |
 |

|
BMW 3-Series (E90 E92) Forum
>
[N55] 335i (e90) FMIC Install
|
 |
| 05-04-2013, 08:04 PM | #1 |
|
M3 Driver

56
Rep 369
Posts
Drives: 2015 ///M3 Black/Black
Join Date: Oct 2011
Location: Dallas, TX
|
[N55] 335i (e90) FMIC Install
[Pics to come next]
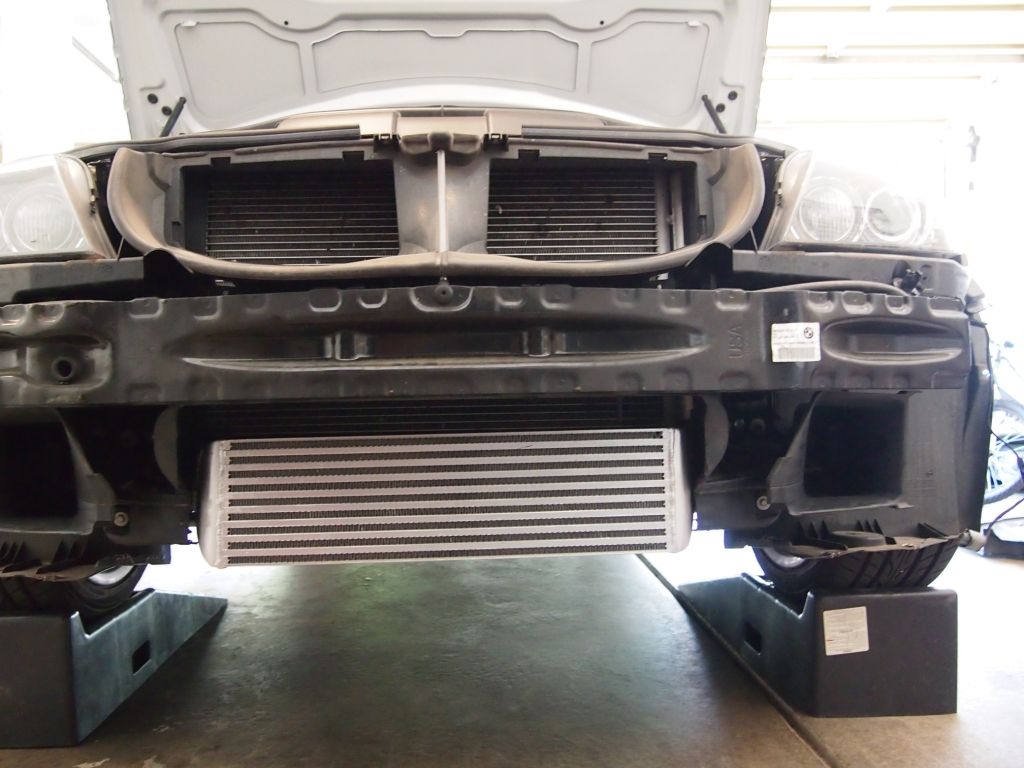
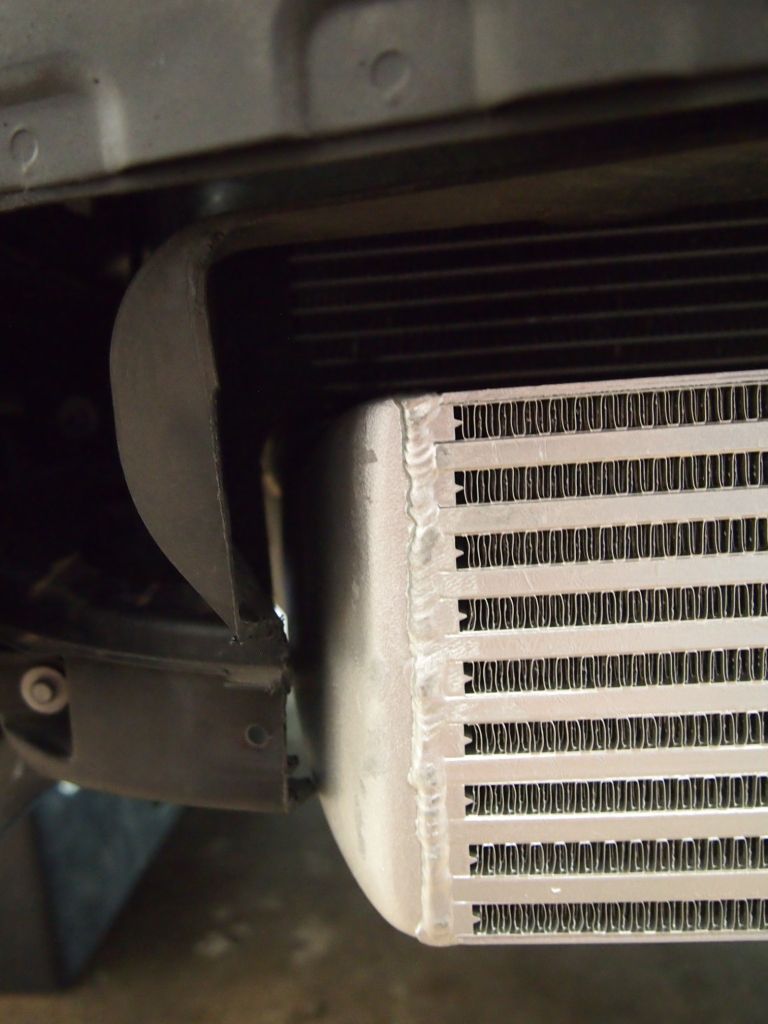
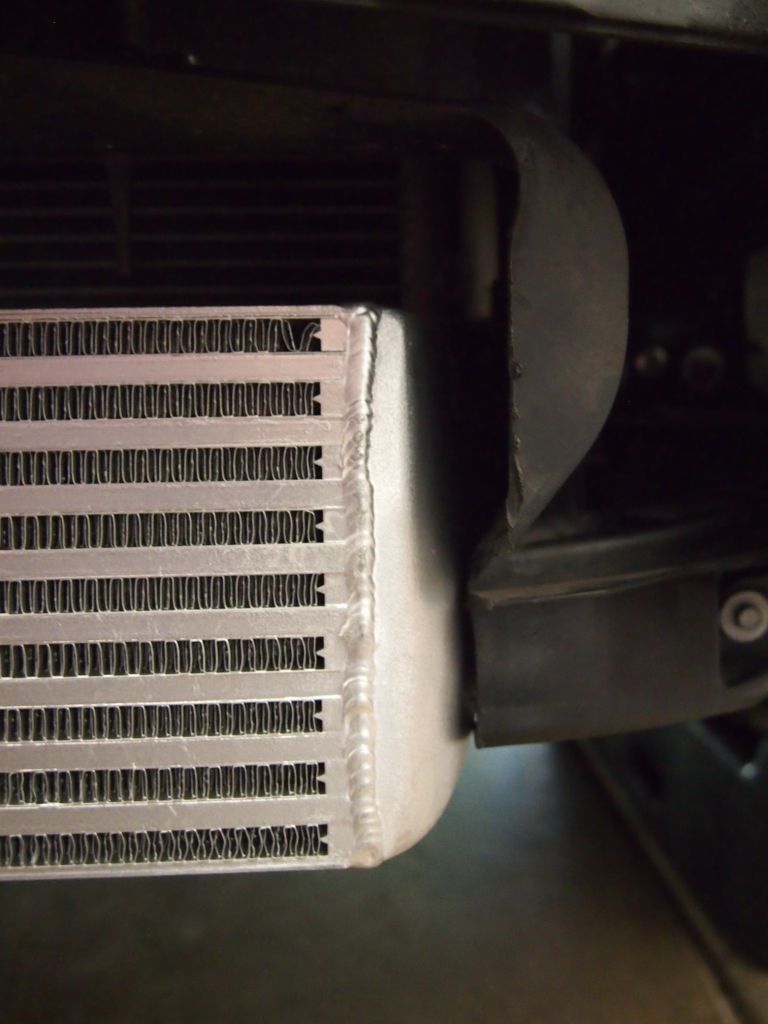
So today I dove over the deep end and I decided to install my FMIC. I have a 2011 N55 335i (e90) and I was installing the AA FMIC Sport (not the larger race). There were a few things that were a little different, but the install overall was very straightforward. The first thing I did was put the car on ramps. I have some basic Ryno ramps that I purchased from Wal-Mart. They aren't the largest Ryno Ramps, but they got the job done. Next I went ahead and removed the front bumper. I know people talked about not having to remove it, and if my ramps were a bit higher I'm sure it would have been just fine staying on, but in hindsight I'm very glad I removed it. Just makes things easier. To remove the bumper you'll remove 4 screws along the top, roughly 6 along the bottom that connects to the splash guard, and there are three in each front wheel well that holds the mudflap to the bumper. Very important: After you undo the three for each mudflap you need to push the mud flap back. Up where in the top corner of the bumper on the inside you'll see two bolts holding the bumper to the car. These can be a bit of a PITA to get to, I did all 4 in about 5ish minutes, but you can remove the wheel from each side if you so choose to make it easier. I think it would've taken longer to remove the wheel and do it than it was to just have a little patience and know how to use my tools. After the bumper was removed I unhooked the fog lights from each side and sat it out of the way in my garage...you do not want to set it outside unless it is firmly braced because one quick gust of wind and that sucker will get all scratched up as it is blown across cement. The next thing to do is to unbolt the 8mm bolts that hold on the splash guard under the car. I did not remove the entire guard. I just removed enough bolts so that the front of the guard hung down onto the driveway and allowed me room to get to the intercooler. At this point I recommend reading this doc on how to remove the intercooler ( http://www.activeautowerke.com/pdf/A...structions.pdf ). It has some great pictures and instructions on getting that sucker out of there. The only thing to note is that when it comes to using your dremel to remove the iron band, there is only one on our cars. The hose on the passenger side that connects the intercooler to the blow off valve pipe has a factory welded clamp on the blow off valve side. Do not try to save this band, there is no way to do so. Some people just go crazy wild and cut the damn thing off and be damned the rubber hose that connects the BOV pipe to the intercooler (just do not cut the BOV pipe). I was a little more careful and I slowly sawed away from the band until I could get a screwdriver in there to break it. Once all this crap is out of the way you'll need to fix the pipe that connects to the Chargepipe. Just get rid of the pipe that connects the stock FMIC to the CP, because the FMIC comes with a new one. At this point I'll go ahead and note that I have an ER Chargepipe. Once the old connector pipe is removed insert the new one that came with the FMIC and get it clamped. All set? Great! Now go ahead and push the rubber hoses that connects each side of the FMIC to the car up onto the car side of the pipes. Use a little lube to get them on, make sure they are up far enough, and then tighten those suckers up. DO IT NOW! It is so much harder to do later. Finished? Okay, this is optional. You see your cooling fan, right? GREAT. You see there is a gap in front of the fan where the FMIC slides up, right? Excellent! Now you see that there is the fan, a gap, and then a shroud on the front of the car. This shroud along the bottom has a lip that goes the length of the shroud and protrudes out towards the fan. Some people dremel this off because it makes a tight fit. I personally left it. Just means you have to slightly push the fan towards the engine a bit, and muscle the FMIC up into position. Okay, so get your FMIC and do just that! Push it up into the very tight gap. I will note that the AA is a 6" thick FMIC...there are some that are 7" and some that are 5". The 5" will fit very nicely and the 7" will def require you to cut! Go ahead and muscle that sucker up there, making sure to line up the hoses on each side and get the FMIC pipes to slide up in them. Push push push until you get the intercooler brackets setting flush with the car. Now hold very tight and put the bolts in. Get these suckers nice and tight. The passenger side for me required a small bit of flex to get the holes to line up. Just get them nice and tight and the bolts will pull the FMIC into position. All done? Great! Now make sure the hoses are set over the intercooler pipes to your satisfaction and then tighten those babies up. At this point do not freak about how much the FMIC hangs. If you got those brackets nice and flush when you bolted it there is nothing else you could do, you've done it right. It also doesn't hang as bad as you think, just remember that you have the bumper off so it appears worse than it is. Okay, put the splash guard back on. Guess what...the FMIC is going to push slightly against the splash guard. IT IS GOING TO PUSH AGAINST THE SPLASH GUARD. This is just a fact. I spent probably 30 minutes, wasted really, trying to see if I did something wrong. At the end of the day the FMIC only bolts onto the car one way and you can only push it so far up. It isn't that bad. It just looks bad. Wait til you re-assemble the rest of the car...you'll see. Now replace the bumper on the car. DO NOT FORGET THE FOG LIGHTS! Just follow the same process you used to get the bumper off the car. Let's recall something really fast...the bumper comes down OVER the edge of the splash guard...as in the bumper hides the edge of the splash guard. All done? Now, you see what I mean? You can see a SMALL bit of a bump in the center of the bumper underneath where the intercooler isn't quiet flush, but it isn't horrible. Unless you know to look for it, the average person will not notice anything. Now pull the car off your ramps and you're all done...unless you have a Cobb AP and then the first thing you'll want to do is upgrade that map to the Stage # + FMIC  I think that is really all I've got for you. I'll get pictures posted soon! I've got to pull them off the iPhone, touch them up, and get them into a reso that the boards will allow/support. I hope that this helps! I know that us e90 N55 owners are lacking some DIY guides that are specific to us. Sure it is a lot like the N54, but there are some minor difference. Such as noticing that I didn't have to cut the shroud.
__________________
2015 M3 // Black Sapphire Metallic / Black Extended Merino Leather / Carbon Fiber Trim / Executive Package / M Double-Clutch Transmission w/ Drivelogic / 19" Black Light-Alloy Wheels / Adaptive M Suspension / Harman Kardon surround sound
Other // Shell Rotella T6 5w40 |
| 07-03-2014, 04:44 PM | #2 |
|
Second Lieutenant
 117
Rep 241
Posts
Drives: F80 M3, F15 X5 50i
Join Date: Feb 2011
Location: Colorado Front Range
|
I took advantage of this write up during the install of a 7" VRSF FMIC. I went the route of removing the bumper as soon as I got the lower belly pan off. It was obvious that the bumper removal was going to greatly simplify things. It will give you way better access and is well worth the effort. You'll waste more time futzing around with it on that the install/removal time takes so just go ahead and do it. I used the AA link provided here and it stepped right through the process. Two of the screws holding the bumper cover to the front quarter panels are a PITA. All the rest are super simple though. I didn't have to do any work beyond the bumper cover removal even though the AA directions talk about rotating the actual crash bar that is behind the bumper.
When you pull the bumper off you'll get a shower of crap coming from it. Dead bugs, road debris, misc crap. You'll have to vacuum that up. Then removal of the stock FMIC is super easy except for the hoses which are kind of a pain. The driver's side appears to have room to work but the space is in all the wrong places. Removal of that pipe was a pain. Removal of the short pipe on the passenger side was easy with a dremel and cutting wheel. I just cut right through the band clamp and it was off. Shroud Cutting: This was super simple. I have an M-Sport car and the bumper is a bit different than a std or sport model bumper. I was worried about dorking around with this part of the install for a long time but it was super easy. You basically cut through the two struts running vertically and then the shroud gets a vertical cut on the right and left side. It is easy to see what width you need to cut when you lift the new FMIC up in place. You can see the fitment from my photos below. I have a RotoZip type oscillating cutter which made it like a hot knife through butter.    As the initial poster mentioned, get the new inlet/outlet pipes in place and tightened before you attempt to install the FMIC. You will have slightly more space that way. You'll want to be 100% sure that you have the pipes inserted far enough into the hoses and that the band clamps tight enough otherwise they will blow off and you'll get a second attempt at this install to perfect it. This was not my first intercooler install so I knew to tighten them "tight as hell" which is a technical term meaning slightly more than "tight enough". When I got the FMIC up and in place, the two screws that secure it to the mounting brackets didn't get much thread to bite into the hard plastic brackets. Maybe just two or three full revolutions. That didn't seem like a lot but apparently it's enough. After that you tighten the band clamps holding the rubber hoses to the FMIC tight as hell and reinstall the bumper. I thought this was going to be really easy and that the shroud cutting would be the most time consuming part. Turns out that the shroud cutting was super easy but the install was not. It took me 4 hrs and I thought it would take more like 2.5. It was still worth not having to pay someone for me. But then again, I am a cheapskate who refuses to pay anyone to do anything for me. So if you opt to pay someone else a couple hundred bucks to do it then it isn't that bad of an option. |
|
Appreciate
0
|
 |
| Bookmarks |
|
|