|
|
|
|
 |
|
 |
BMW Garage | BMW Meets | Register | Today's Posts | Search |
 |

|
BMW 3-Series (E90 E92) Forum
>
DIY - Britalman Primary Catback Exhaust Install - E92 335i
|
 |
| 06-11-2007, 09:06 PM | #1 |
|
Major General
 
576
Rep 6,750
Posts |
DIY - Britalman Primary Catback Exhaust Install - E92 335i
Britalman Primary Catback Exhaust Installation Instructions - BMW E92 335i Coupe
Important Notes before installing* - Inspect parts upon receiving. - Please read all instructions carefully before removing or installing anything. - Remember that this is a bolt-on kit; no cutting or welding is required! - DO NOT DISCARD any OEM parts, bolts, etc. You will be re-using most of the OEM bolts and hangars! - DO NOT MIX UP HANGARS! - You will be reinstalling them in original positions! - For safety reasons, it is recommended that this system be installed by professional mechanics and/or a muffler shop. Approx. install time = 1.25 hours Tools required: Car lift Impact and ratchet set Ratchet extension Ratchet swivel 12mm 13mm 15mm 18mm 9/16" wrench Torx bit T-50 (see pics below) Tools recommended: Rubber mallet WD-40 Pry bar 2 person install team Specs: 6" round mufflers 2.5" inlet diameter (muffler) 14" long (muffler) Tubing is 2.5" vs 2.36" stock Tips are 3.5" vs 3" stock 304 stainless steel 48 lbs vs 76 lbs stock (approx. 37% weight savings over stock) Balance chamber in middle of tubing System is adjustable to ensure best look High luster polish (entire system) Laser engraved Britalman logos on tips 100% bolt-on exhaust sytem (no cutting or welding required) Made in USA 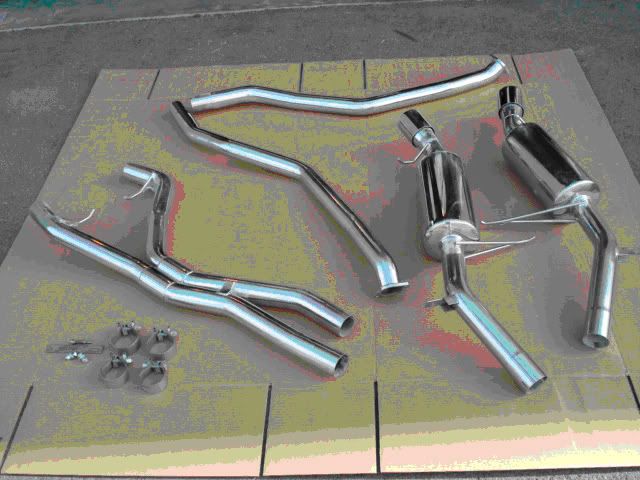 Parts List: Front section (x 2 pipes) mid xpipe section (x 2 pipes w/ balance chambers) rear section (x 2 mufflers) 2 x slip fit connectors 57.2mm 2 x slip fit connectors 63.5mm rear support brace w/ supplied 9/16" bolts, flat washers, lock washers & nuts. 8mm x 2 3/4" bolt for OEM transmission support brace vacuum plug Britalman limited edition 335i T-shirt Britalman baseball cap Britalman license plate frame DYNO DATA: best gain of +14.9 HP & +16.9 torque at the 4500-rpm range. Overall there was approx. +8 to +12 HP gain and +10 to +15 torque gain throughout the power band! Peak Before: Peak HP 279.9 @ 6,149 RPM Peak torque 301.2 ft/lbs. @ 3,505 RPM. Air temp. 54.8F Recorded on 04-13-07 at 08:34:53am Peak After: Maximum HP was 287.5 HP @ 5,924 RPM Maximum Torque 307.9 ft/lbs. @ 3,495 RPM Air temp. 71.3F Recorded 04-13-07 @ 14:38:39 pm Note* (air temp is hotter during Britalman test run!)
__________________
Last edited by ksfrogman; 06-11-2007 at 10:13 PM.. |
| 06-11-2007, 09:07 PM | #2 |
|
Major General
576
Rep 6,750
Posts |
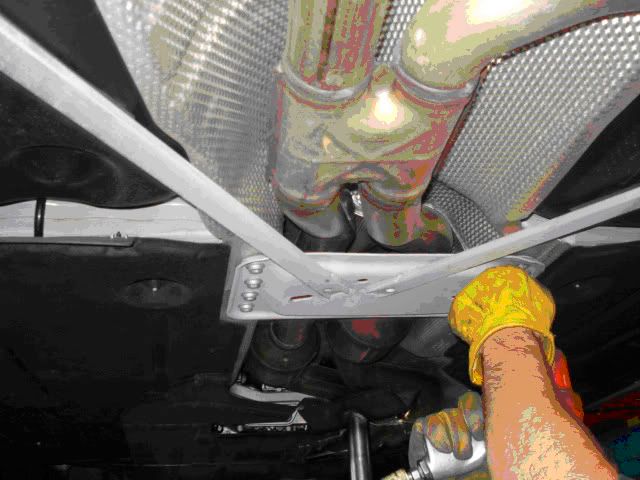 1. Remove center frame support (requires use of T-50 torx bolt for removal, see T-50 attached pics below for tool reference) 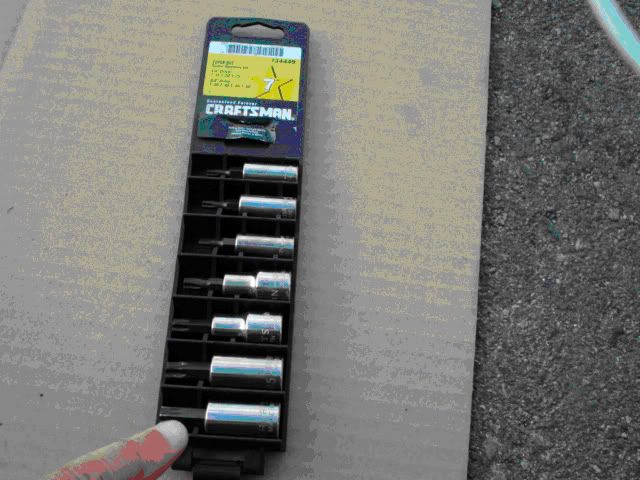 Reference pic close up of T-50 Torx bit (not supplied) 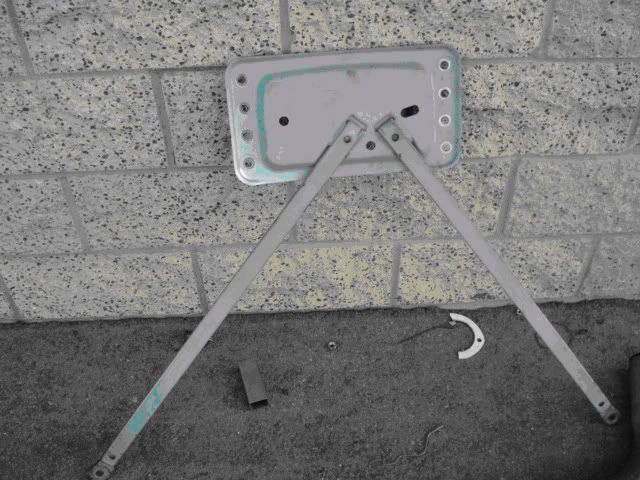 Reference pic - Center frame support removed, DO NOT discard, you will re-install this part later 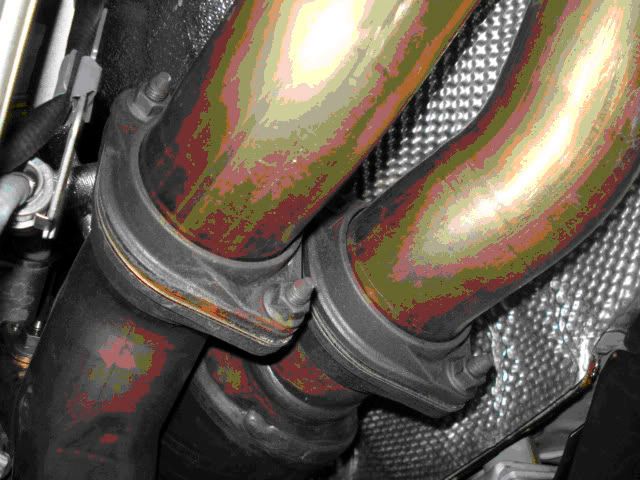 2. Unbolt front flanges, between primary cats and exhaust pipe (requires 12mm and swivel attachment. Impact is also strongly recommended) 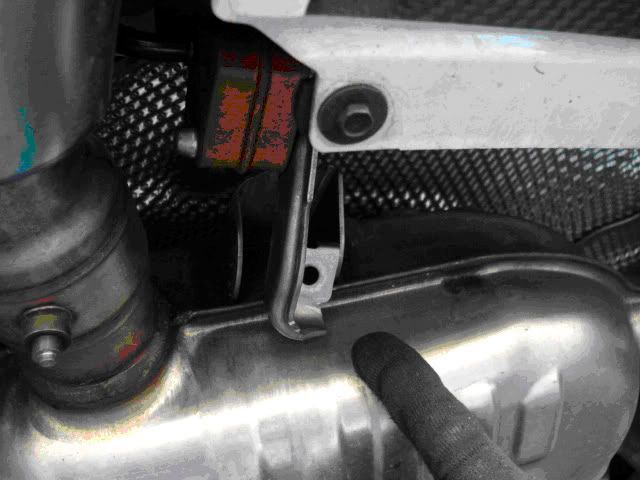 3a. Unbolt rear hangars (on both mufflers) from noted positions (requires 13mm) NOTE* - DO NOT MIX UP HANGARS! You will be re-installing them in original positions! 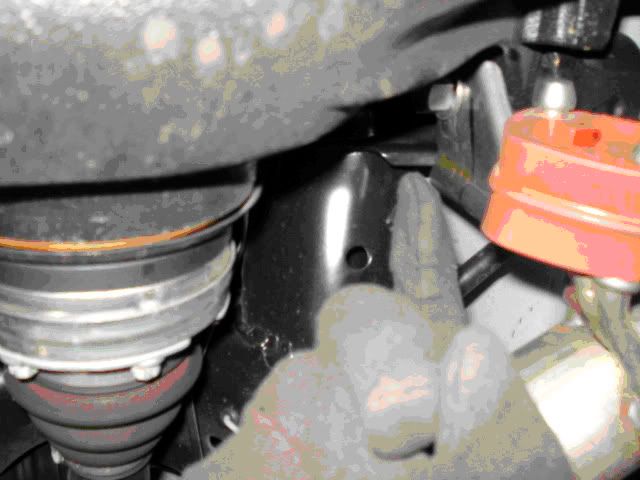 3b. Continue unbolting rear hangars from noted positions (requires 13mm) NOTE* - DO NOT MIX UP HANGARS! You will be re-installing them in original positions! 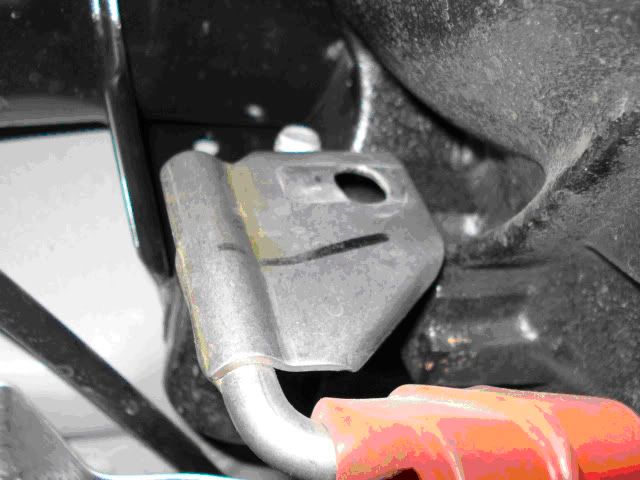 3c. Unbolt front hangars (requires 18mm) NOTE* - DO NOT MIX UP HANGARS! You will be re-installing them in original positions! 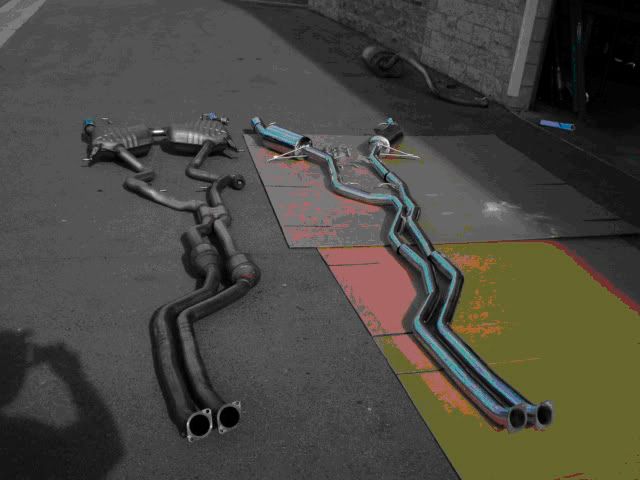 5. Carefully remove entire system (will be all in one piece), by sliding it out from underneath the car. (Requires 2 persons) It should look like this in above pic, (note OEM exhaust is on left side in pic) when removed. 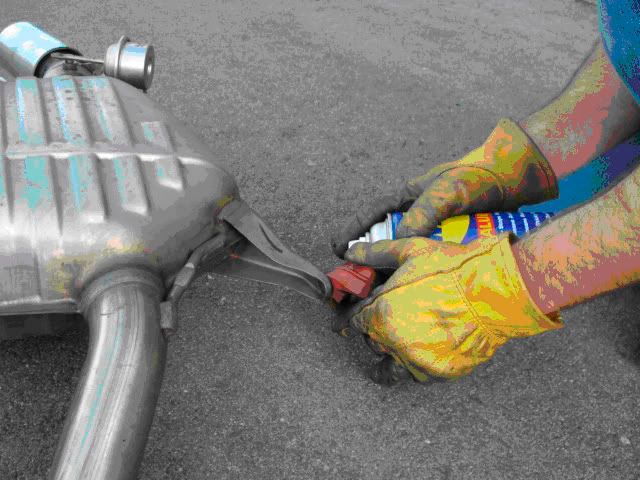 6a. Remove hangar bushings from stock OEM exhaust. (Recommend use WD40 and pry bar for easier removal) NOTE* - DO NOT MIX UP HANGARS! You will be re-installing them in original positions! 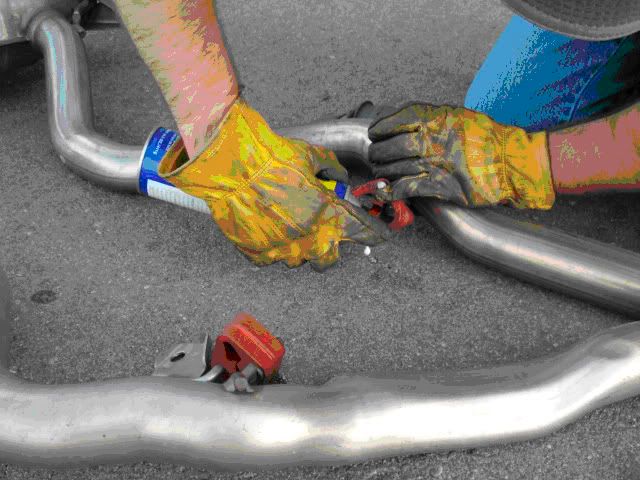 6b. Continue removing hangar bushings from stock OEM exhaust. (Recommend use WD40 and pry bar for easier removal) NOTE* - DO NOT MIX UP HANGARS! You will be re-installing them in original positions! 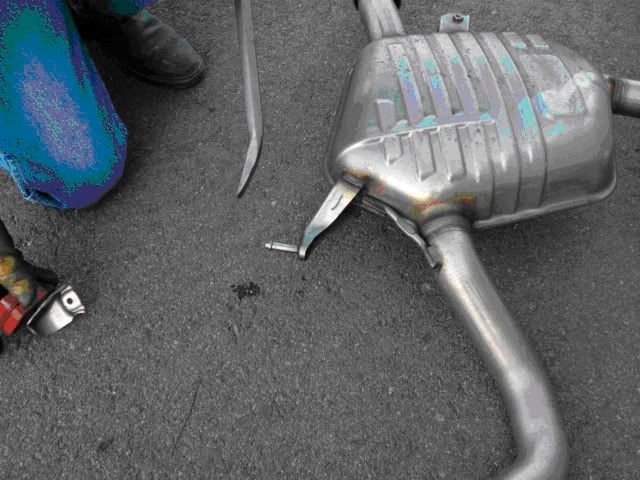 6c. Continue removing hangar bushings from stock OEM exhaust mufflers. (Recommend use WD40 and pry bar for easier removal) NOTE* - DO NOT MIX UP HANGARS! You will be re-installing them in original positions! 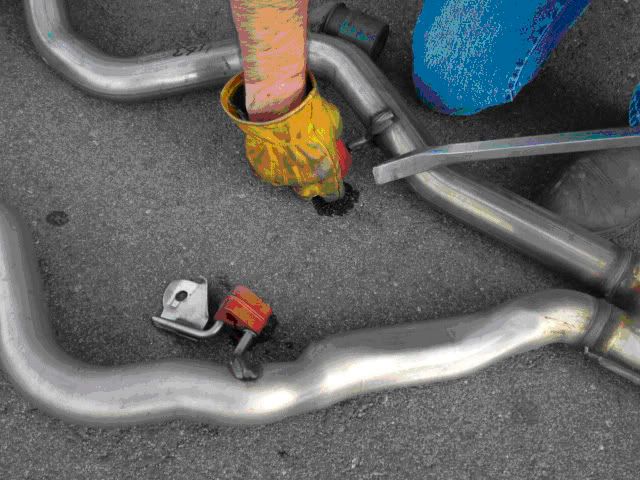 6d. Continue removing hangar bushings from stock OEM exhaust piping. (Recommend use WD40 and pry bar for easier removal) NOTE* - DO NOT MIX UP HANGARS! You will be re-installing them in original positions! 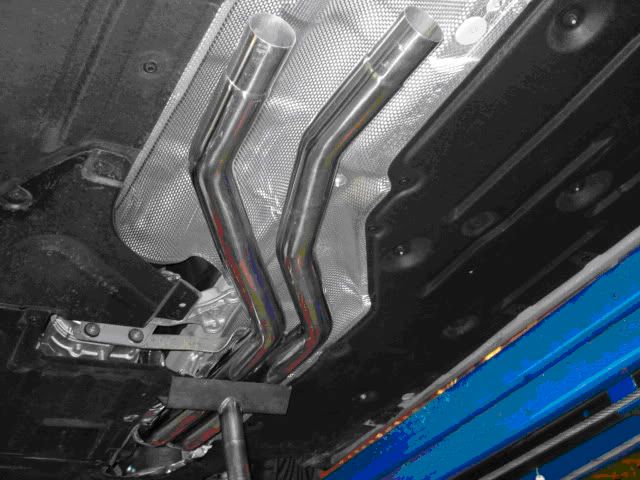 7a. Install Britalman front section by bolting flanges together, but KEEP LOOSE! DO NOT TIGHTEN YET!  7b. Reference pic to show flanges again DO NOT TIGHTEN YET! 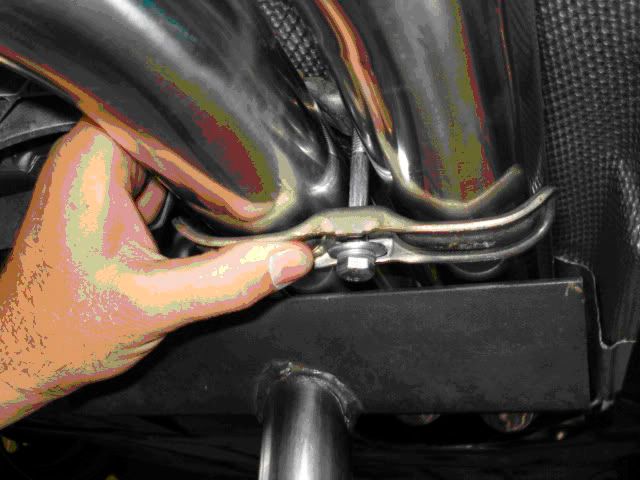 8a. You will re-install OEM transmission support brace. You WILL NOT reuse the OEM bolt. Instead, you will use the supplied 8mm x 2 ¾ bolt which is longer. (See pics below) Bolt on, however DO NOT TIGHTEN YET! 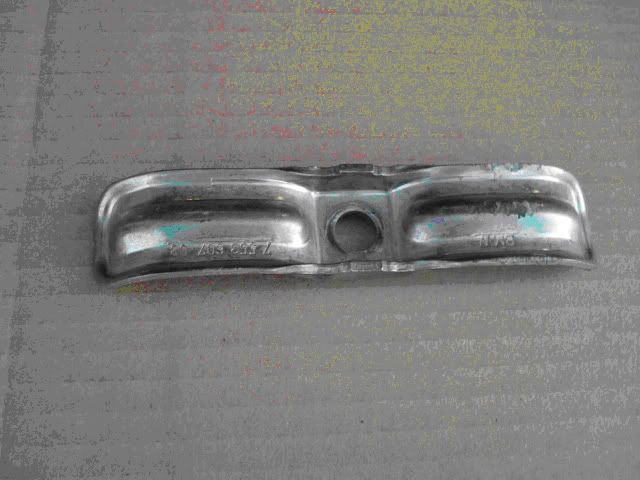 8b. This is how the OEM transmission support brace looks. You will reuse this part for Britalman installation. 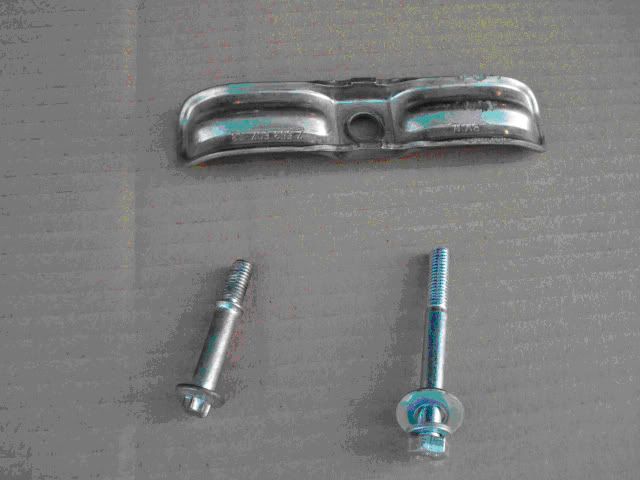 8c. You will use the supplied longer bolt, which is on the right side in this pic. The OEM bolt (on left side) will not be used, as it is too short.
__________________
Last edited by ksfrogman; 06-11-2007 at 10:25 PM.. |
|
Appreciate
0
|
| 06-11-2007, 09:07 PM | #3 |
|
Major General
576
Rep 6,750
Posts |
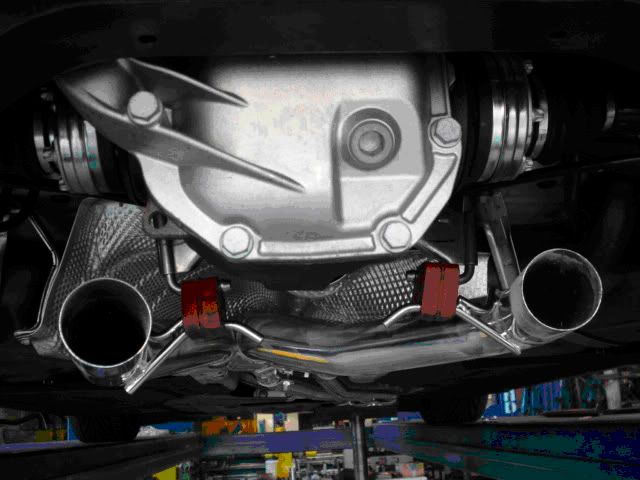 9a. Install mid xpipe section, using original OEM rubber hangars, OEM supports, and Britalman supplied slip fit connectors 57.2mm. DO NOT TIGHTEN, keep a little loose! (requires 15mm) 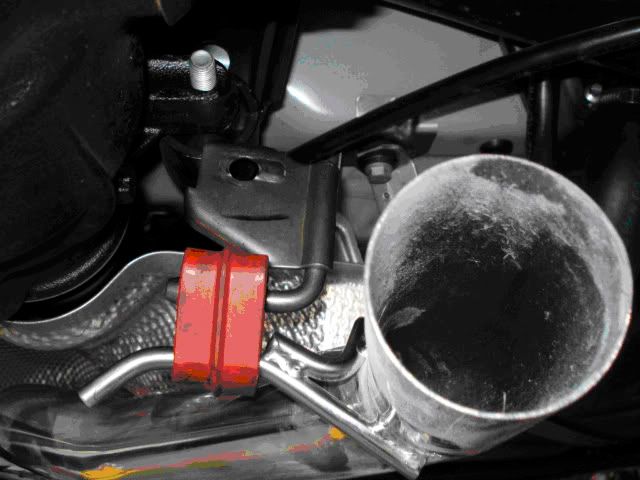 9b. Reference pic for install 9a 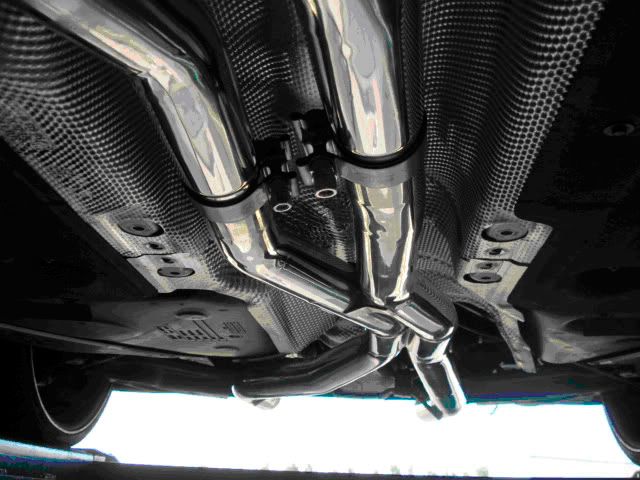 9c. Reference pic for install 9a 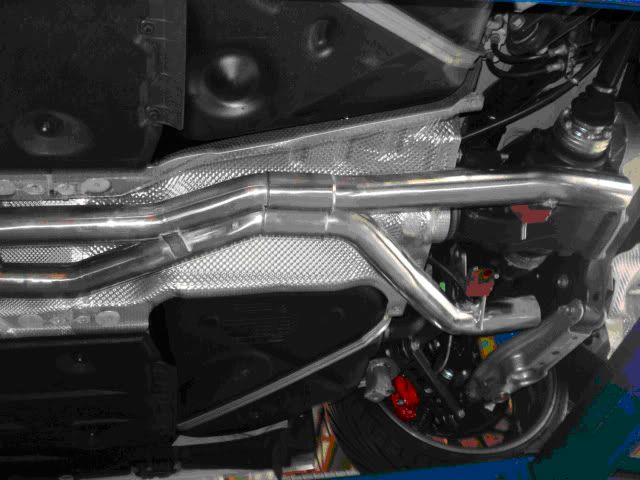 9d. reference pic for install 9a 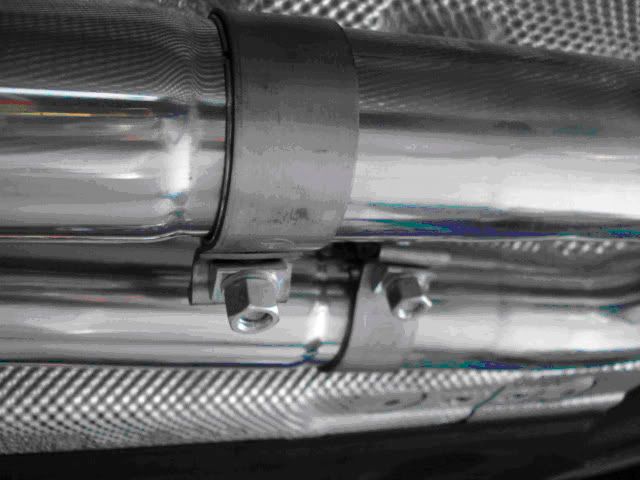 9e. reference pic for install 9a 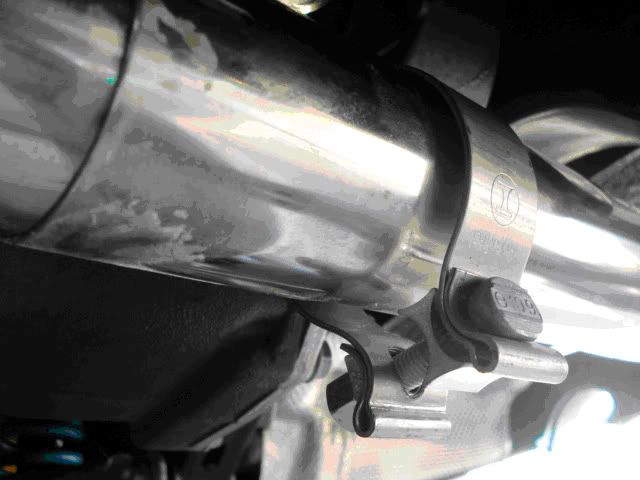 10a. Install rear section mufflers with supplied 63.5mm slip fit connections. Re-install OEM rubber hangar bushings. NOTE* - YOU WILL NOT RE-USE rear hangar brackets which are located on back of stock OEM mufflers (see attached pic) DO NOT TIGHTEN! 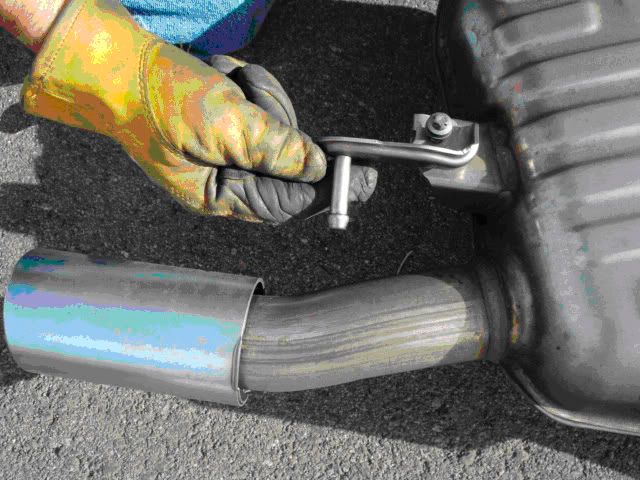 Reference pic for 10a DO NOT RE-INSTALL THIS PART! - Reference pic for 10a DO NOT RE-INSTALL THIS PART! - OEM REAR MUFFLER BRACKET, THIS WILL NOT BE RE-USED!  Reference pic for 10a. AGAIN, DO NOT RE-INSTALL THIS OEM REAR MUFFLER BRACKET. IT WILL NOT BE RE-USED! 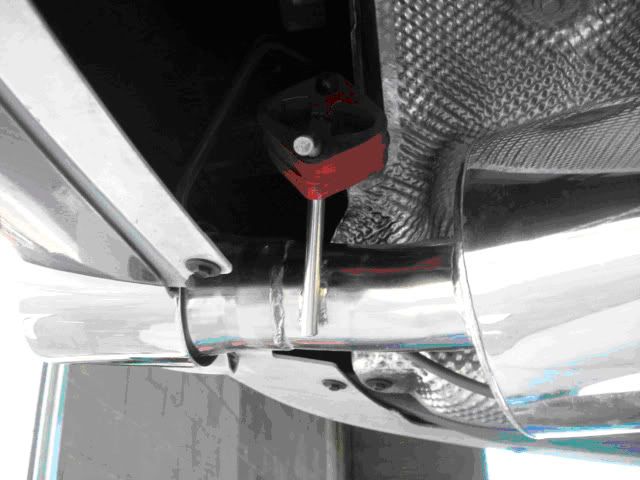 10b. Reference pic for rear muffler install 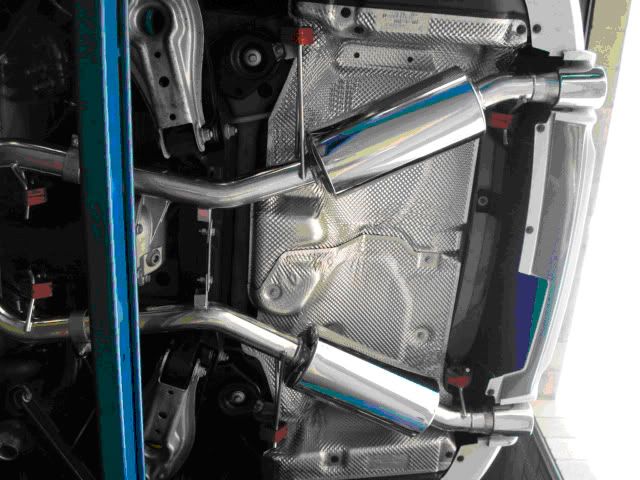 10c. Reference pic for rear muffler install 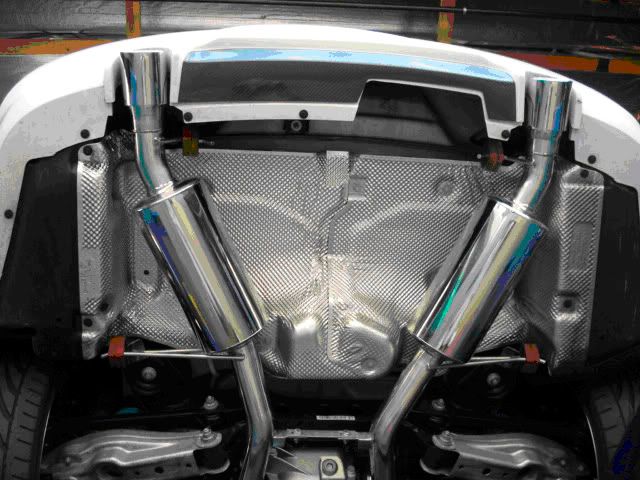 10d. Reference pic for rear muffler install 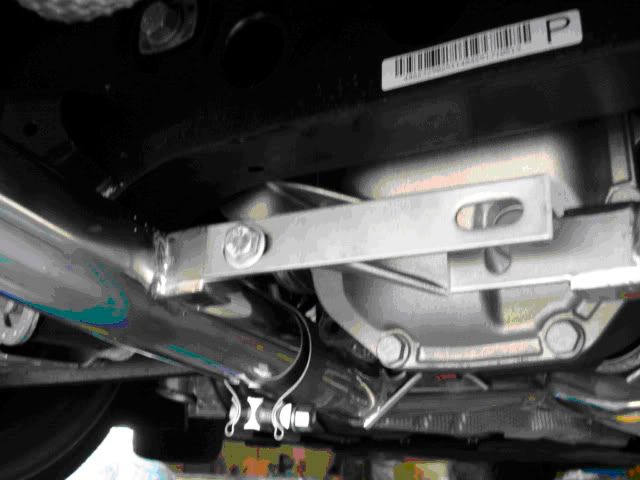 11. Install rear support brace with supplied 9/16 bolts w/ flat washer on each side and lock washer next to nut. DO NOT TIGHTEN! KEEP LOOSE! 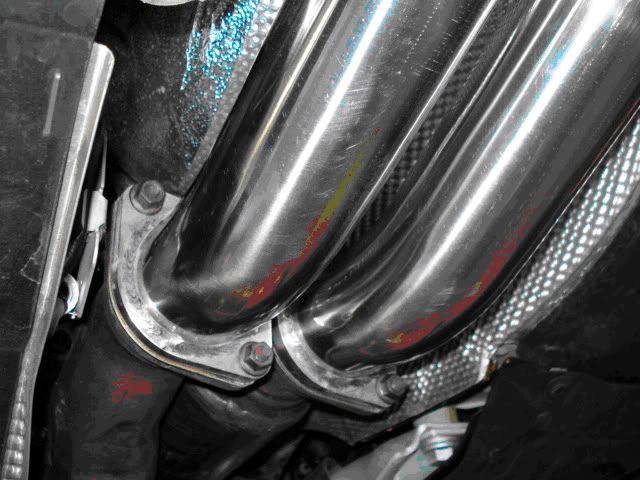 12a. Now you may start tightening, by starting from front of car, and go back towards rear. Tighten front exhaust flanges first! 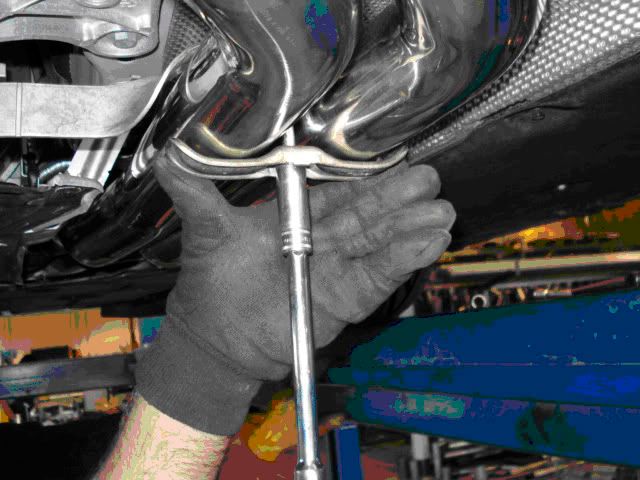 12b. Tighten from front of car, and go backwards, make sure not to miss anything. 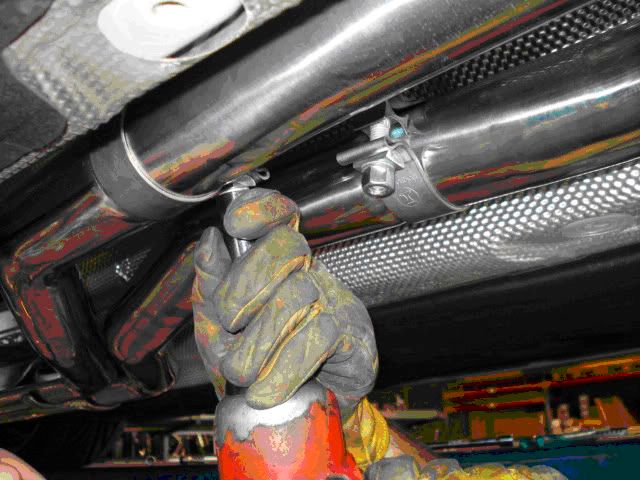 13. Tighten slip fit connections, first 57.2mm, and then the 63.5mm (Adjust as necessary) 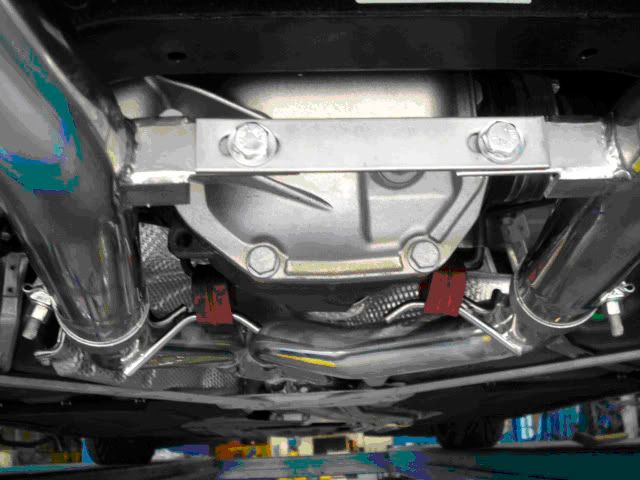 14. Tighten support brace bolts (Adjust as necessary) 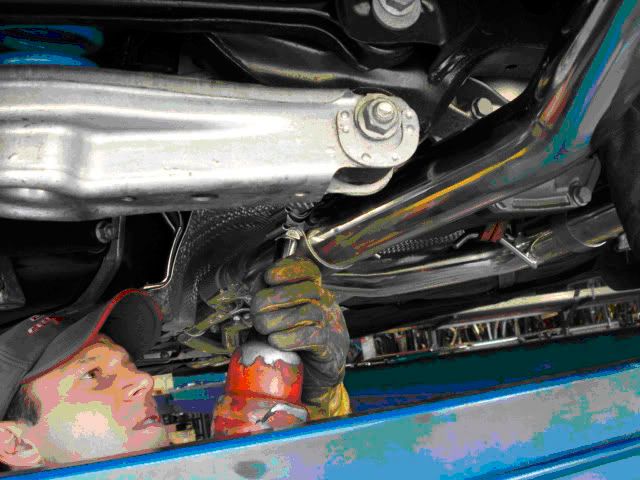 15. Tighten up the rest of the exhaust system 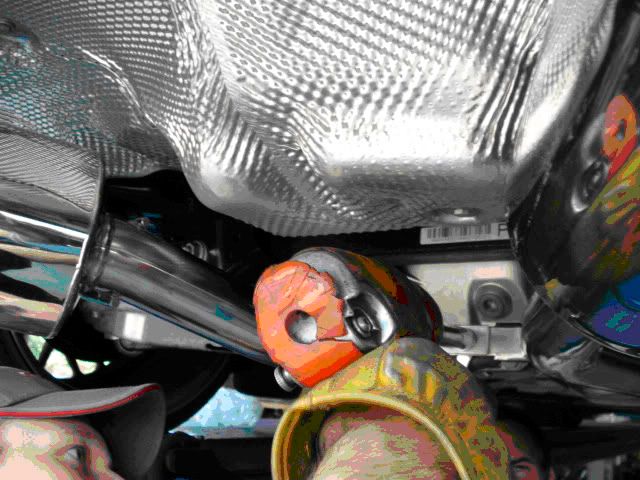 Reference pic tighten up the rest of the system 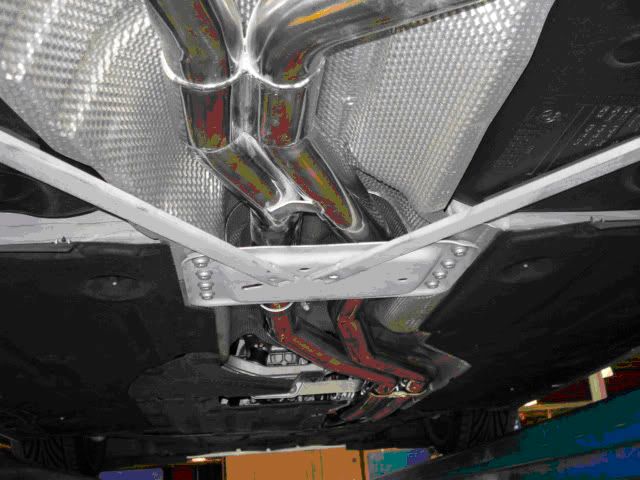 16. Re-install OEM center frame support using OEM T-50 torque bolts. 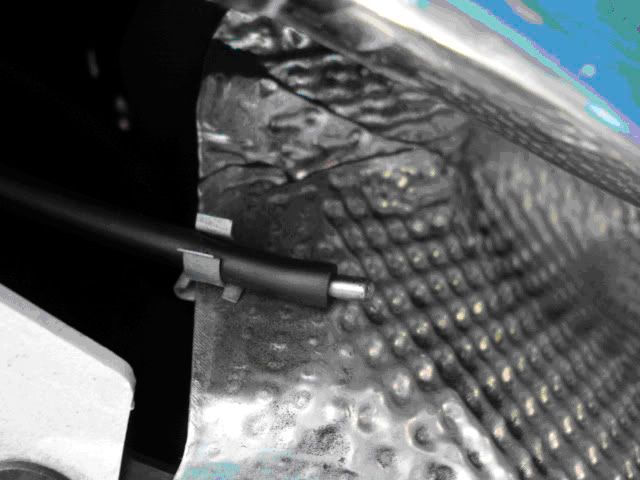 17. Plug vacuum line with supplied plug. (plug in this pic is for reference only, a better plug will be supplied with Britalman exhaust system) 18. Drive for approx. 500 miles, re-check all connections, re-adjust if necessary.
__________________
Last edited by ksfrogman; 06-11-2007 at 10:35 PM.. |
|
Appreciate
0
|
| 06-11-2007, 09:08 PM | #4 |
|
Major General
576
Rep 6,750
Posts |
Note* Upon initial driving after install, you may see some white smoke from rear of the car, DO NOT be alarmed, as this is the dust burning off from inside of the exhaust system, this happens with all brand new exhaust systems after installation for the first few moments of driving after your installation.
Note* - Aftermarket rear valances (Example: Vorsteiner), may require additional adjusting for a nice fit. Britalman exhaust was originally designed for use on OEM factory rear bumpers. We find some aftermarket rear valances are not perfectly aligned when measured, they are slightly off. This in turn may make it more difficult when adjusting your exhaust for perfect fitment. Britalman Warranty information: Britalman offers a lifetime warranty against defects and craftsmanship. Warranty is not valid if you slam your car, basically it is so low you damage your exhaust going up driveways and/or speed bumps. Warranty is not valid if there is an accident (collision) or error in judgment (example: backing into a wall or parked car) resulting in damage to the undercarriage of your vehicle and/or mufflers and tips. Warranty is not valid concerning incorrect installation, amateur installation, and if you break something or do not tighten something down in the correct manner, and do not take all necessary safety precautions to ensure a clean install. Warranty is not valid if neglect of vehicle maintenance or abuse. Britalman is not responsible for other aftermarket parts installed including rear valances. Example would be an aftermarket rear valance, the fitment will probably be tight, and it can result in the paint melting if the tips are right up against your aftermarket valance. Please use common sense! Please direct any questions, warranty questions, or general inquires to info@britalman.com
__________________
Last edited by ksfrogman; 06-11-2007 at 10:36 PM.. |
|
Appreciate
0
|
| 06-11-2007, 09:12 PM | #5 |
|
boku no namae ha...
336
Rep 11,025
Posts
Drives: 2006 BS 330i
Join Date: Feb 2006
Location: S. Bay Area, CA + Newark, NJ + ChiCity + True Blue
|
did you guys do this on long's e92?
__________________
looking for a PreLCI Black Sapphire e90 front bumper without license plate holes
"Akimbo shotguns. Broken wrists anyone? And don't give me that 'it's just a game' bull****. Where the **** are my akimbo interventions then?! One scope on each eye mother****er!!" |
|
Appreciate
0
|
| 06-12-2007, 06:31 AM | #10 | |
|
Major General
576
Rep 6,750
Posts |
Quote:
14" long (muffler) Tubing is 2.5" vs 2.36" stock Tips are 3.5" vs 3" stock
__________________
|
|
|
Appreciate
0
|
| 06-12-2007, 08:47 AM | #11 |
|
Brigadier General
133
Rep 4,764
Posts |
Excellent post. Thanks for taking the time to share.
|
|
Appreciate
0
|
| 06-24-2007, 06:00 PM | #13 |
|
Brigadier General

125
Rep 4,172
Posts |
Thanks for this ksfrogman, great info. Hey question for you - with the relatively small size of the muffler (width), do you think it'd be possible to put quads on this exhaust? Mine will be here soon so I guess I will find out, just thought I'd ask.
|
|
Appreciate
0
|
| 06-24-2007, 07:45 PM | #15 |
|
Never Lose

50
Rep 1,145
Posts |
Any pictures / soundclips of the finished product???
__________________
'11 Melbourne Red Metallic / Black/Fox/Fox 6MT E92 ///M3
ZCP | Convenience Package | Premium Package 2 | Heated Seats | Enhanced Premium Sound l BMW Apps |
|
Appreciate
0
|
| 06-24-2007, 09:35 PM | #16 |
|
Moderator
133
Rep 6,775
Posts
Drives: TiAg E92 335
Join Date: Oct 2006
Location: Raleigh, NC
|
That is an excellent DIY.
 Great post! Great post! 
__________________
-Michael.
Berlina Black S2000 CR is now in the garage   l 19" Rial Daytona Race l KW V2 l Eisenhaus Race Exhaust l |
|
Appreciate
0
|
| 06-25-2007, 06:52 PM | #18 |
|
Brigadier General
125
Rep 4,172
Posts |
Guys, just search Britalman; there are two threads full of pics, dynos, sound clips, pics of the exhaust installed, a video of it installed...
|
|
Appreciate
0
|
| 06-26-2007, 09:07 AM | #19 |
|
Never Lose
50
Rep 1,145
Posts |
Those are of the beta product it looks like...I wanna see some better sound clips before I buy an exhaust
__________________
'11 Melbourne Red Metallic / Black/Fox/Fox 6MT E92 ///M3
ZCP | Convenience Package | Premium Package 2 | Heated Seats | Enhanced Premium Sound l BMW Apps |
|
Appreciate
0
|
 |
| Bookmarks |
|
|