

|
|
|
|
 |
|
 |
BMW Garage | BMW Meets | Register | Today's Posts | Search |
 |

|
BMW 3-Series (E90 E92) Forum
>
DIY: TVandNav2Go
|
 |
| 07-02-2006, 04:54 PM | #23 | ||
|
Second Lieutenant
 15
Rep 292
Posts |
Quote:
 Quote:
__________________
330i Jet Black on Black, ZSP, ZPP, Steptronic, Clear Bra, Comfort Acess, Sirius, OEM Alarm
Mods:20% Tint F/R, Xenon Interior Lights, Xenenis Tru-match Fog Lights, , V1 (hardwire), Black and White Roundels, Blackline Tailights, White Angel Eyes (PMB), (2) 12'' Kicker L7,TvandNav2go, Playstation 2, ACS Roof Spoiler, 5 Series iDrive Leather Knob, Brex kit |
||
|
Appreciate
0
|
| 07-02-2006, 07:00 PM | #24 | |
|
First Lieutenant

18
Rep 370
Posts
Drives: E90 325xi
Join Date: Jun 2005
Location: Fremont, CA
|
Quote:
Edit: yeah, I just realized what your question was after reading your post again... yes it looks like Long's using the cig lighter wire for the ACC/remote wire... and he probably has the yellow, fused connection wired to the fuse box. But still, the switched source of the cig lighter is not on until you're in "ignition" mode. Same problem still exists.
__________________
 Last edited by xcalibr; 07-02-2006 at 09:17 PM.. |
|
|
Appreciate
0
|
| 07-03-2006, 01:07 AM | #25 | |
|
Second Lieutenant
15
Rep 292
Posts |
Quote:

__________________
330i Jet Black on Black, ZSP, ZPP, Steptronic, Clear Bra, Comfort Acess, Sirius, OEM Alarm
Mods:20% Tint F/R, Xenon Interior Lights, Xenenis Tru-match Fog Lights, , V1 (hardwire), Black and White Roundels, Blackline Tailights, White Angel Eyes (PMB), (2) 12'' Kicker L7,TvandNav2go, Playstation 2, ACS Roof Spoiler, 5 Series iDrive Leather Knob, Brex kit |
|
|
Appreciate
0
|
| 07-03-2006, 02:17 AM | #26 |
|
Second Lieutenant
23
Rep 295
Posts |
NICE WORK
__________________
2007 E90 335i Jet Black/Beige/Poplar, ZSP, ZPP, CWP, NAV, AT/STEP, OEM Rear Spoiler, TINT 20/20, 19" ACS Type IV Bi-Color, http://www.e90post.com
2006 DENALI Painted Red (custom color)/Sandstone, 22's GenX Desperado, Too many adds to list http://www.cardomain.com/ride/2124062 |
|
Appreciate
0
|
| 07-03-2006, 05:29 PM | #28 |
|
Second Lieutenant
15
Rep 292
Posts |
anyone know how to remove the sift knob on a auto.step car? i tried pulling straight up..doesnt seem to work..
EDIT: nevermind..i got it..just pull straight up..with a little force..
__________________
330i Jet Black on Black, ZSP, ZPP, Steptronic, Clear Bra, Comfort Acess, Sirius, OEM Alarm
Mods:20% Tint F/R, Xenon Interior Lights, Xenenis Tru-match Fog Lights, , V1 (hardwire), Black and White Roundels, Blackline Tailights, White Angel Eyes (PMB), (2) 12'' Kicker L7,TvandNav2go, Playstation 2, ACS Roof Spoiler, 5 Series iDrive Leather Knob, Brex kit Last edited by saini023; 07-03-2006 at 06:17 PM.. |
|
Appreciate
0
|
| 07-03-2006, 07:39 PM | #29 |
|
Major General
 
383
Rep 7,952
Posts |
finalyl hooked it all together...took me 3 tries
 but it all works great...will work the sound in tomorrow cause the ones i have arent long enuff...schweetness...excellent write up and follow up with the power xcalibr..really helped a lot...except i didnt ground it to the bolt...i grounded it to one of the screws that holds the gear shifter in place... im so happy now but it all works great...will work the sound in tomorrow cause the ones i have arent long enuff...schweetness...excellent write up and follow up with the power xcalibr..really helped a lot...except i didnt ground it to the bolt...i grounded it to one of the screws that holds the gear shifter in place... im so happy now |
|
Appreciate
0
|
| 07-04-2006, 03:16 AM | #31 | |
|
First Lieutenant
18
Rep 370
Posts
Drives: E90 325xi
Join Date: Jun 2005
Location: Fremont, CA
|
Quote:
I think I'll do a DIY part 4 for backup cam tomorrow... well backup-cam prep... because I don't have the backup cam just yet, but I have all the wires necessary to pre-wire for when I do get a backup cam. Also maybe a DIY part 5 in a couple of weeks after I come back from Taiwan and get a DVD/DivX player. I have a slim ps2 installed right now, but it's just using the cigarette adapter for power, so nothing difficult about that to warrant a DIY.
__________________
|
|
|
Appreciate
0
|
| 07-04-2006, 08:29 AM | #32 |
|
Administrator

40828
Rep 21,240
Posts |
Great write-up and pics. Added to DIY master list - http://www.e90post.com/forums/showthread.php?t=1721
__________________
Check on the Latest BMW News
Become a fan of Bimmerpost Facebook Follow us on Bimmerpost Twitter Subscribe to Bimmerpost Youtube Channel |
|
Appreciate
0
|
| 07-04-2006, 03:55 PM | #33 |
|
195 PONIS!!!!

0
Rep 32
Posts |
|
|
Appreciate
0
|
| 07-04-2006, 04:37 PM | #34 |
|
Second Lieutenant
15
Rep 292
Posts |
installed mine yesterday..pretty simple install thanks to this DIY..great job xcalibr...all i have to do is the sound..shouldnt be to difficult from what i hear..i did have one question..when i turn off my car now..the idrive screen does not got all the way black no more..it stays on whatever was displayed before i turned off the car..and it will slowly fade away..it takes about a mintue to go all black..never did this before..any insights? Also how are you guys putting your module..mine is under the glove box..but i cant get the black plastic panel back on properly..
__________________
330i Jet Black on Black, ZSP, ZPP, Steptronic, Clear Bra, Comfort Acess, Sirius, OEM Alarm
Mods:20% Tint F/R, Xenon Interior Lights, Xenenis Tru-match Fog Lights, , V1 (hardwire), Black and White Roundels, Blackline Tailights, White Angel Eyes (PMB), (2) 12'' Kicker L7,TvandNav2go, Playstation 2, ACS Roof Spoiler, 5 Series iDrive Leather Knob, Brex kit |
|
Appreciate
0
|
| 07-04-2006, 05:11 PM | #35 | |
|
First Lieutenant
18
Rep 370
Posts
Drives: E90 325xi
Join Date: Jun 2005
Location: Fremont, CA
|
Quote:
__________________
|
|
|
Appreciate
0
|
| 07-04-2006, 06:03 PM | #36 |
|
First Lieutenant
18
Rep 370
Posts
Drives: E90 325xi
Join Date: Jun 2005
Location: Fremont, CA
|
DIY: TVandNav2Go part 4 (backup cam pre-wire)
Tools needed:
BMW screwdriver Torx #20 screwdriver Materials needed 15 ft. RCA cable 15 ft. 14-18 gauge remote wire 2-3 ft. 14-18 gauge power wire Electrical tape, zip ties wire hanger (optional) 1. Pop the trunk and pop off the pins holding in the trunk lid lining. 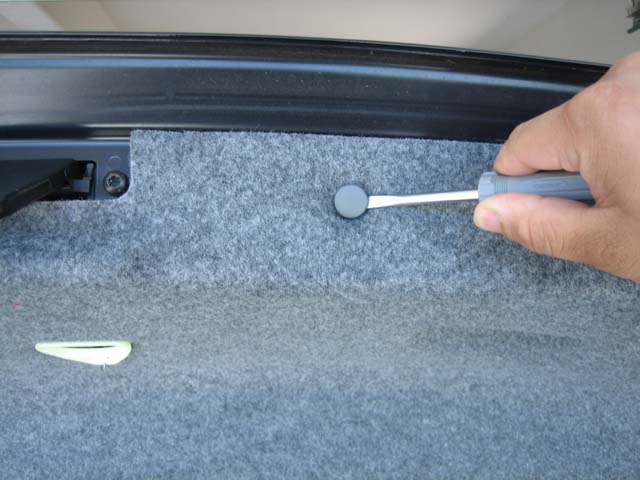 2. Remove the emergency trunk release handle by pushing the plastic tab to remove the wire. The lining can now be completely removed. 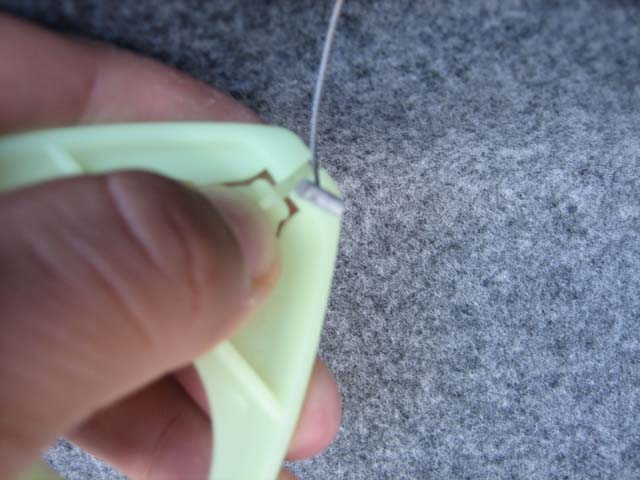 3. Gently unseat the rubber conduit containing reverse and brake light wires from both the trunk lid and the car body. The RCA cable and remote wiring have to go through this conduit as well. 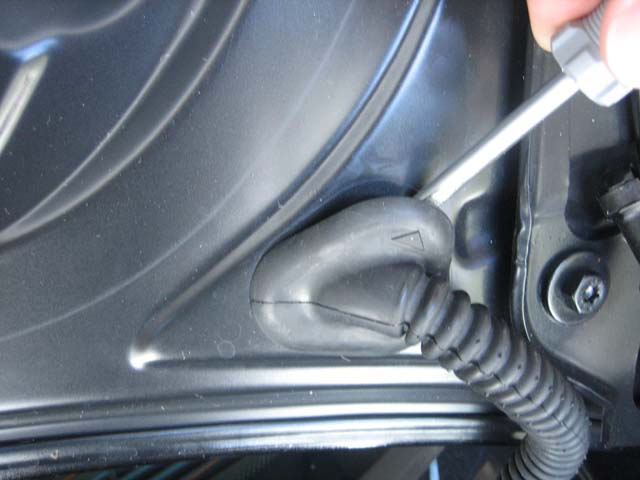 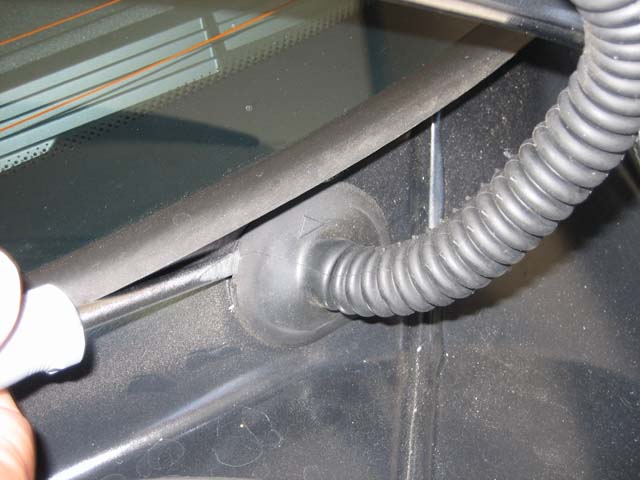 4. Thread the RCA cable from the reverse light housing hole down to the conduit hole in the trunk lid. 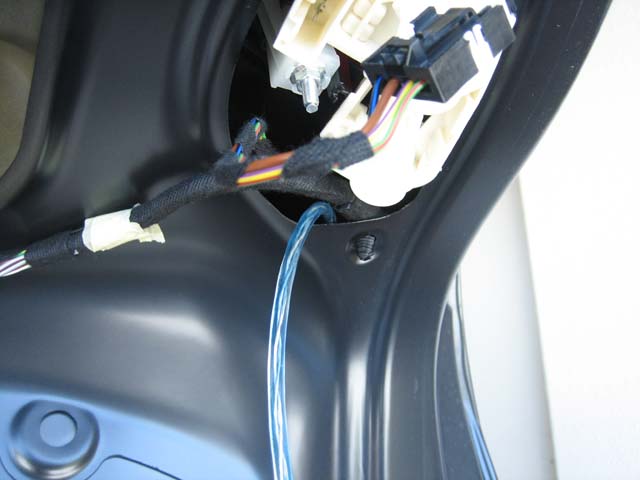 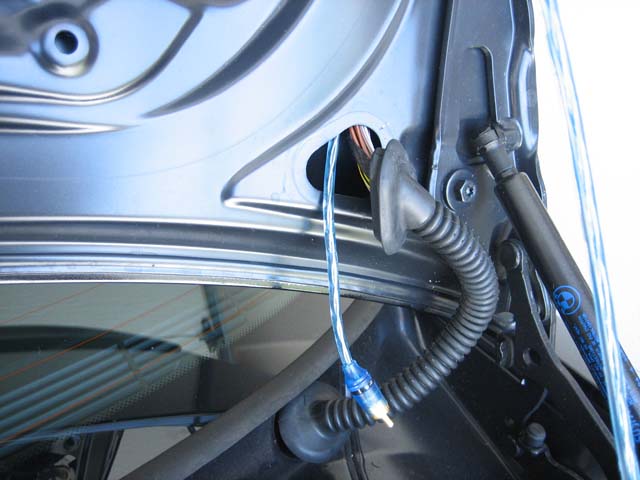 5. Tape the remote wire to the RCA cable and pull that through as well 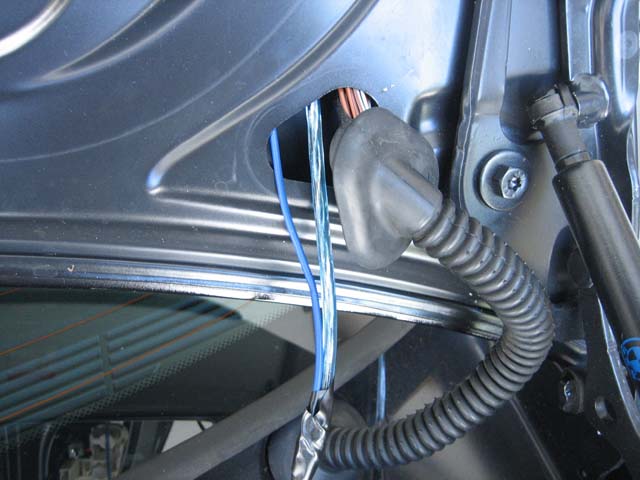 6. Now here's the difficult part: Thread the RCA cable and remote wire through the conduit. I had to end up cutting the head off of the RCA cable and reattaching it afterwards to get it through the conduit. The wire hanger really comes in handy here. 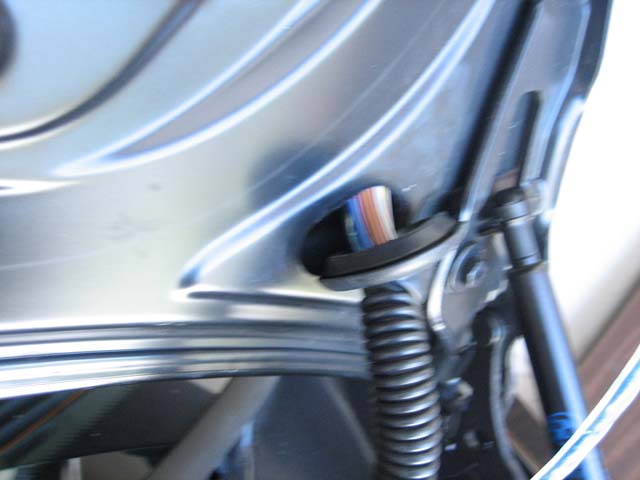 7. Thread the the RCA cable and remote wire through the top of the trunk (car body) through the same hole the rear lighting wires go through. Once you've got it through, you can put pop the conduit ends back into the trunk-lid and car body. 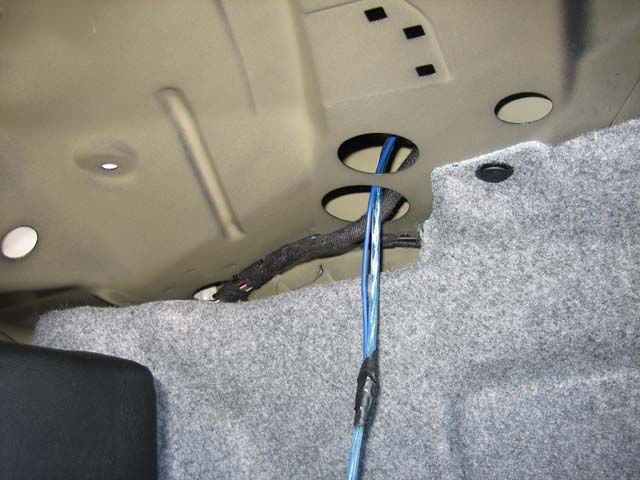 8. Thread the other end of the RCA toward the center of your trunk lid. The camera will probably be mounted on the license plate frame and the wiring for it will probably go through the hole for the license plate light housing. 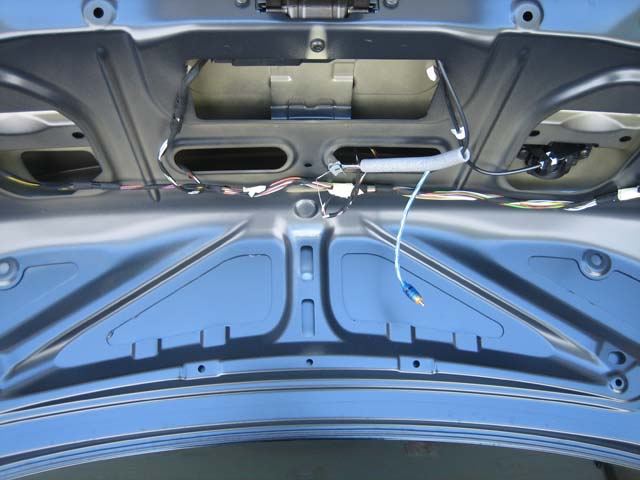 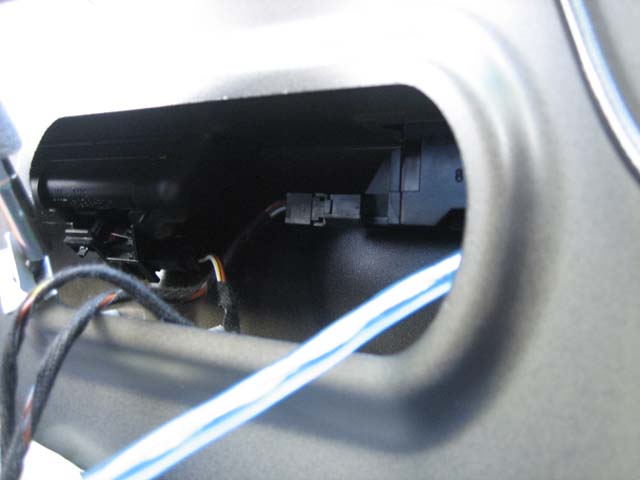 9. Wire the remote wire to the top-most (blue and black) wire of the lighting connector on the passenger side. This is the positive lead for the revserse lights. It will have a +12V when you are in reverse. 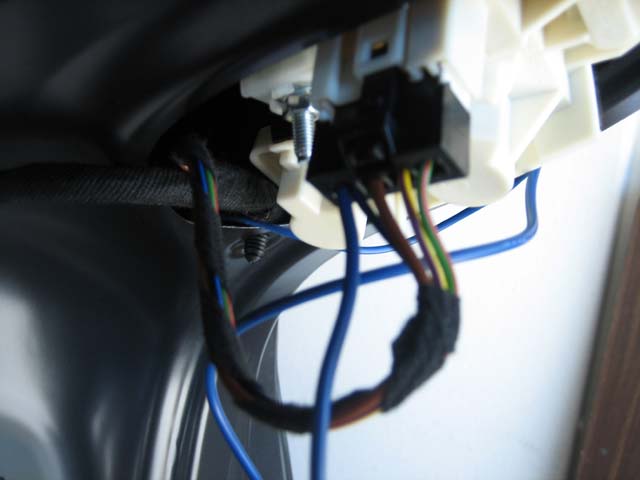 10. Wire the power wire to the top-most (purple and black) wire of the lighting connector on the driver's side. We'll use this side's positive lead for powering the camera. You'll have to find a place on the trunk lid to use for a ground. 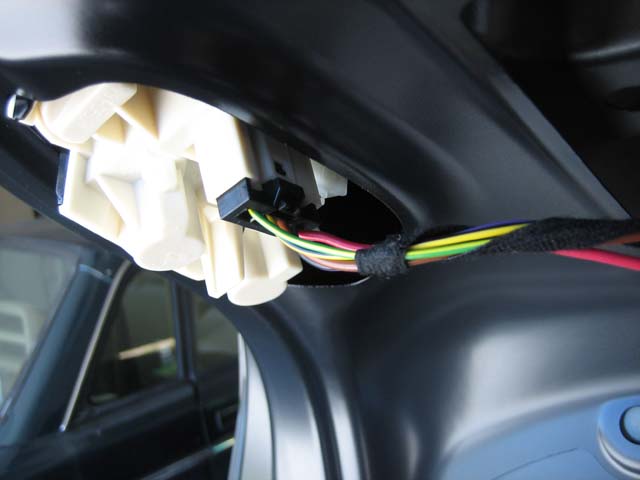 Now you've got the power and RCA cable ready for the camera. 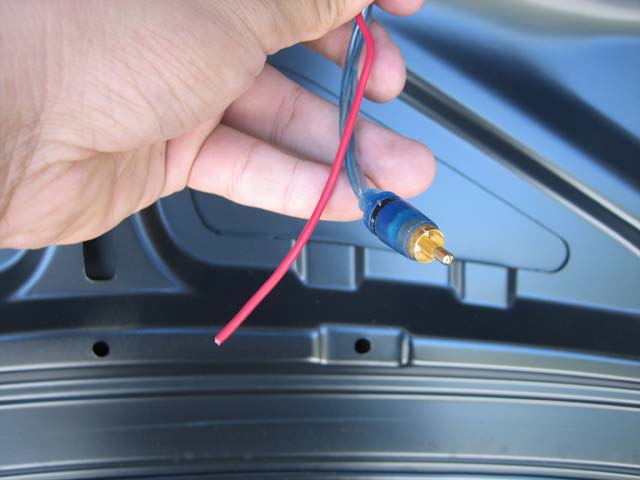 Edit: After driving my car around for a day, I've discovered that the reverse cam display does not stay on the reverse display if it does not detect a video signal. This could prove to be a problem if we use the other reverse light as the power source for the camera. We'll have to wait til I get my reverse cam to find out for sure, but it would sure suck to have to run another power cable from the trunk to the trunk lid. Edit 2: Using the left reverse light for the power source for the camera is OKAY. Actually I used the ground for the light assembly (left side, brown wire) for my camera ground as well --hopefully I don't blow anything this way. I recommend that you sand down a portion of the trunk lid and use that for a ground. 11. Remove the right license plate light housing by inserting a flat head screw driver into the slit. DO NOT PRY --rather, gently push toward the right and pull at the edge of the assembly. The entire housing should pop out. 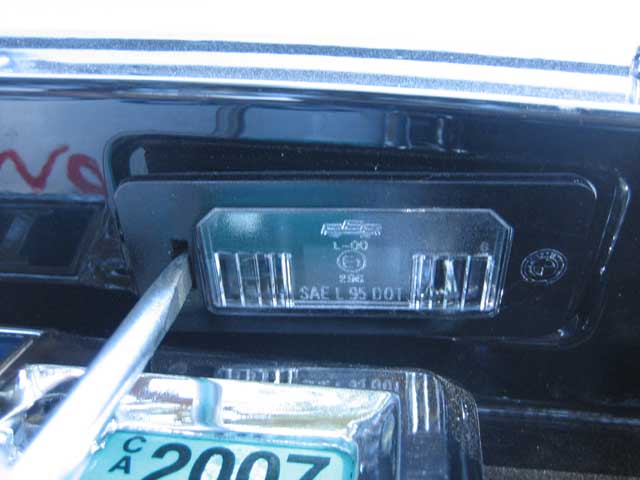 12. Run the power and video cable of the camera through the housing hole. There's a slight notch in the lower left-hand corner that looks like it was made to hold a thin wire. Roughly estimate where you're going to mount the camera and pull the excess wiring through to the trunk interior. 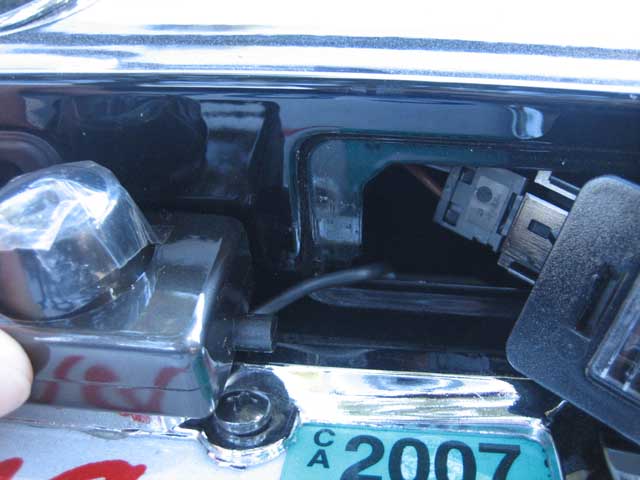 13. Now that you've got the wires inside, connect the RCA video cable. DON'T CONNECT POWER JUST YET! It's better if you wait til the TVandNav2go module is wired up first before wiring power to the camera. 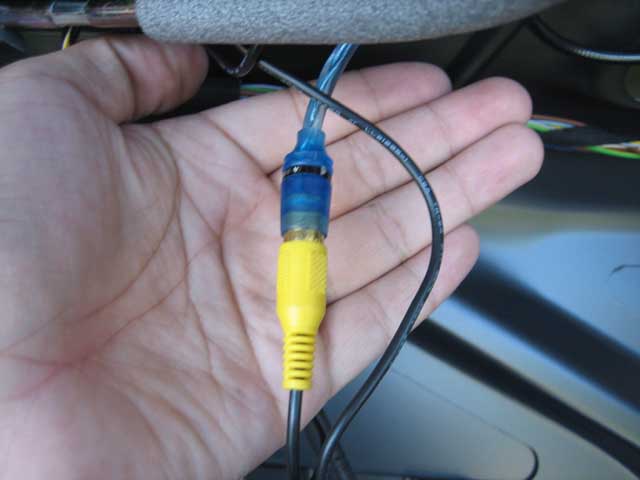 14. Now you have to get this RCA cable and remote wire up to your TVandNav2go module. First, remove the back seat. There are no screws or bolts --only two clips holding the seat in. Pull directly up from under each side to unclip the seat. 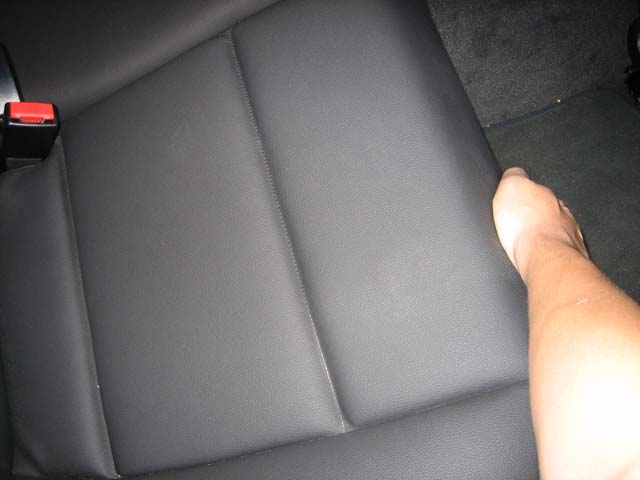 15. Run the RCA cable and remote wire from the trunk through the gap between the seat-back and the bottom of the trunk. You should see the wire come through with the seats out. (This is so much easier if you have fold down seats... damn, why didn't I get that option?!??). 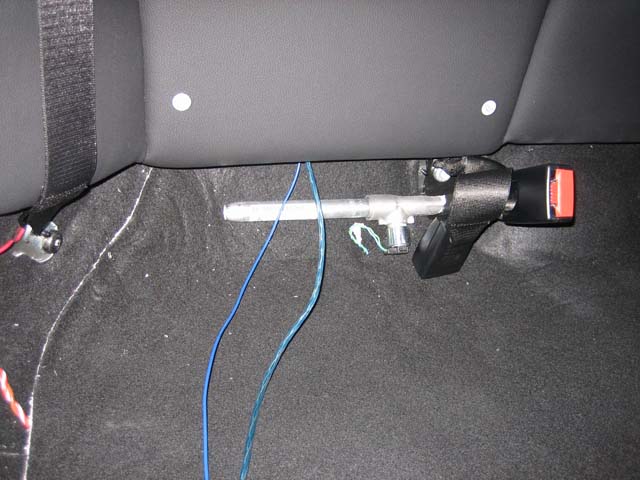 16. Run the RCA cable and remote wire along the passenger side, under the plastic trim and to the glove box. Wire the remote line to the gray wire from the Nav2Go power harness labeled "LAMP-RV" and plug the RCA (after reattaching the head) into the RCA input labeled "REAR-C". 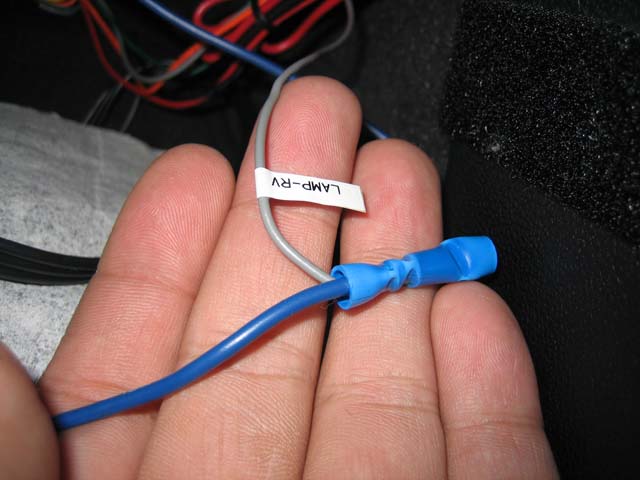 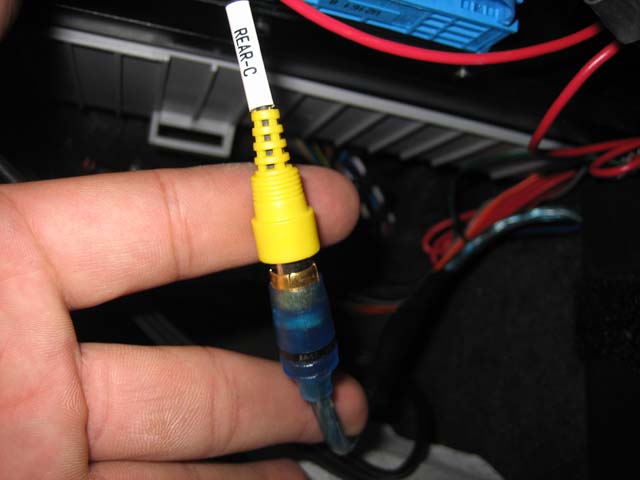 17. At this point it's okay to plug in the power for your reverse cam if you've got one... or I used my mini-DV cam just to test... start your car and throw it in reverse. If the image changes by itself to the rear camera view, then you've done everything correctly and you can put everything back together. 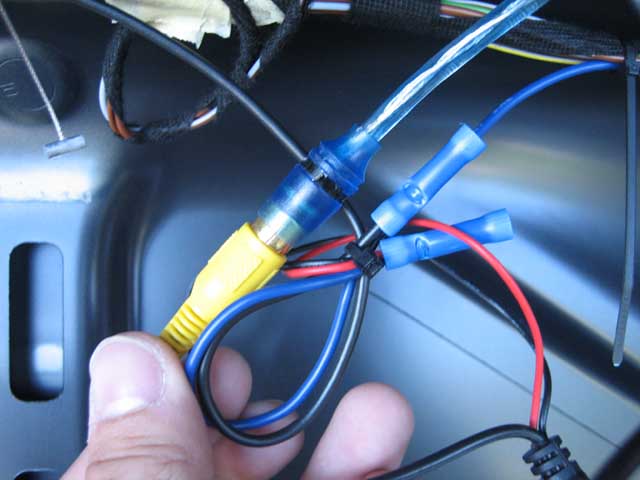 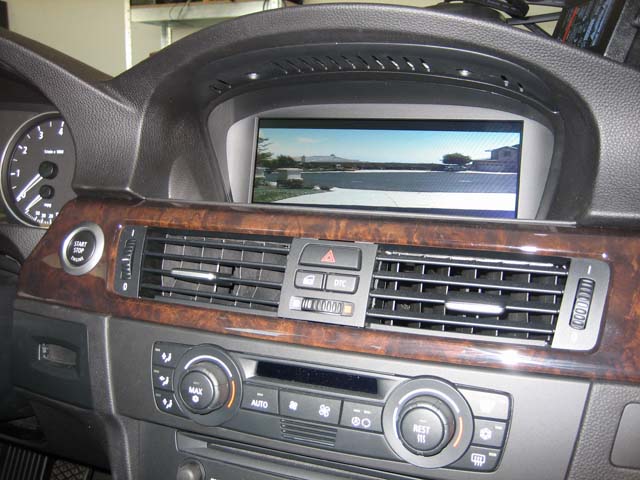 That's it... you're done! Note: the image displayed is NOT reversed... so you have to get a camera that has it reversed. The finished product: 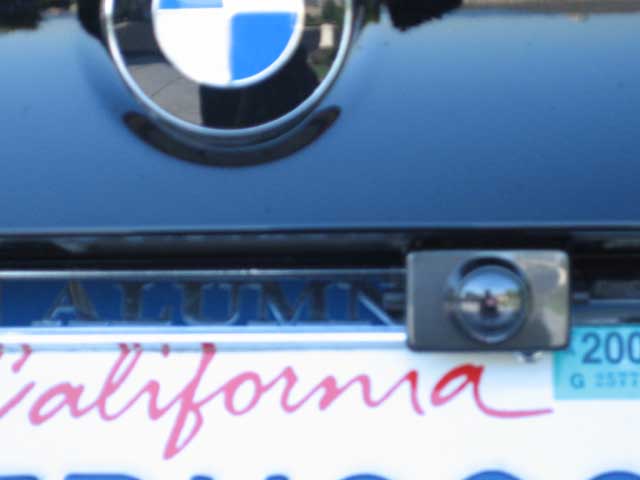
__________________
Last edited by xcalibr; 08-08-2007 at 12:22 AM.. |
|
Appreciate
0
|
| 07-05-2006, 01:48 AM | #37 | |
|
Second Lieutenant
15
Rep 292
Posts |
Quote:
__________________
330i Jet Black on Black, ZSP, ZPP, Steptronic, Clear Bra, Comfort Acess, Sirius, OEM Alarm
Mods:20% Tint F/R, Xenon Interior Lights, Xenenis Tru-match Fog Lights, , V1 (hardwire), Black and White Roundels, Blackline Tailights, White Angel Eyes (PMB), (2) 12'' Kicker L7,TvandNav2go, Playstation 2, ACS Roof Spoiler, 5 Series iDrive Leather Knob, Brex kit |
|
|
Appreciate
0
|
| 07-05-2006, 04:23 AM | #38 | |
|
First Lieutenant
18
Rep 370
Posts
Drives: E90 325xi
Join Date: Jun 2005
Location: Fremont, CA
|
Quote:
__________________
|
|
|
Appreciate
0
|
| 07-05-2006, 05:31 AM | #39 | |
|
Major General
383
Rep 7,952
Posts |
Quote:
 |
|
|
Appreciate
0
|
| 07-05-2006, 03:09 PM | #40 | |
|
Second Lieutenant
15
Rep 292
Posts |
Quote:
__________________
330i Jet Black on Black, ZSP, ZPP, Steptronic, Clear Bra, Comfort Acess, Sirius, OEM Alarm
Mods:20% Tint F/R, Xenon Interior Lights, Xenenis Tru-match Fog Lights, , V1 (hardwire), Black and White Roundels, Blackline Tailights, White Angel Eyes (PMB), (2) 12'' Kicker L7,TvandNav2go, Playstation 2, ACS Roof Spoiler, 5 Series iDrive Leather Knob, Brex kit |
|
|
Appreciate
0
|
| 07-05-2006, 04:52 PM | #42 | |
|
First Lieutenant
18
Rep 370
Posts
Drives: E90 325xi
Join Date: Jun 2005
Location: Fremont, CA
|
Quote:
I haven't even gotten the camera yet --I just did a prewire DIY for anyone who could get a backup camera before I could. I haven't even ordered my camera yet, but I will tonight --so I'll post up a picture when I have it installed sometime next week.
__________________
|
|
|
Appreciate
0
|
| 07-05-2006, 05:06 PM | #43 |
|
Major General
383
Rep 7,952
Posts |
damn it!!!! fuse tapped the son of a gun and still the same...power light is on and nothing else on the dvd player...im all outta ideas..
|
|
Appreciate
0
|
| 07-05-2006, 05:24 PM | #44 | |
|
First Lieutenant
18
Rep 370
Posts
Drives: E90 325xi
Join Date: Jun 2005
Location: Fremont, CA
|
Quote:
__________________
|
|
|
Appreciate
0
|
 |
| Bookmarks |
|
|


 thanks man...you saved us a lot of time..you did an awesome job on this...


