|
|
|
|
 |

|
 |
BMW Garage | BMW Meets | Register | Search | Today's Posts | Mark Forums Read |
 |

|
BMW 3-Series (E90 E92) Forum
>
Dakota Gray Leather with Piano Black Trim and Matte Black Cntr. Console (pics inside)
|
 |
| 04-28-2014, 11:55 PM | #1 |
|
New Member
23
Rep 23
Posts |
Dakota Gray Leather with Piano Black Trim and Matte Black Cntr. Console (pics inside)
Hi Guys,
I never really cared for my wood poplar interior trim and knew when I bought the car that I'd be changing it some day to better suit the Dakota gray seats. There was just too much of that gloss wood trim everywhere. I wanted the high gloss piano trim but I knew I didn't want it on the center console area because it would show too much dust/dirt/prints with all the shifting activity and such going on in that area. So I decided to make the front and rear center console areas matte black with a vinyl wrap and stick with the much loved piano black on the traditional trim areas. Afterall, the radio area is already matte black from BMW so why not carry it down the center console? I am very happy with the results and so far it's been easier to maintain than factory. I removed the trim pieces and brought them to a local auto painter and showed him pics of the high gloss I was seeking. He did a great job and as you can see, it reflects perfectly with no orange peel. Wrapping the rear center piece was much more difficult than I thought it would be so I had the dealer wrap the large front center piece for me and I'm glad I did because he did a perfect job. Check out the two "before" pics as well at the end. Sooo much better now. What do you think? The car is a 335i with sport package. (The orange front reflectors were changed out long ago.) |
| 04-29-2014, 12:09 AM | #2 |
|
YouTube.com/TvTara

6453
Rep 4,715
Posts |
That looks awesome! I have dakota gray too and would love to change out my trim the exact same as yours. Very nice!
__________________
|
|
Appreciate
0
|
| 04-29-2014, 09:59 AM | #6 |
|
Lieutenant Colonel
 
69
Rep 1,766
Posts |
We need more tasteful mods like this around here.

__________________
JBD @ 100% | KW ST Coilovers | M3 rep. front bumper | 888Concepts AE Upgrade | GP Thunder 7500k fogs | Cyba 4" carbon tips | BSW Stage 1 | APEX ARC-8 W/ Michelin PSS | Ziza LED interior | Weisslicht LED side lenses | Sprint Booster | Euro side mirrors | M-Sport semi-conversion | Coded | LOTS of carbon fiber
|
|
Appreciate
0
|
| 04-29-2014, 11:38 AM | #8 |
|
Major

56
Rep 1,464
Posts
Drives: 2009 BMW 335xi
Join Date: Feb 2012
Location: Maryland
|
This is something I considered as well but I already have the glacier silver trim. I got the black floor mats and was considering the black arm rest. I would really love to trade for the carbon fiber trim but not a big deal I guess.
|
|
Appreciate
0
|
| 04-29-2014, 12:50 PM | #10 |
|
Second Lieutenant
 
8
Rep 212
Posts
Drives: 2007 E90 328xi
Join Date: May 2013
Location: Indiana
|
That was a weird idea by BMW to put the burled walnut with the grey. I like what you did, the piano black in the middle would've gotten grimy so fast.
|
|
Appreciate
0
|
| 04-29-2014, 04:26 PM | #12 |
|
Major
345
Rep 1,012
Posts |
Looks really sharp!
Good idea not to do the center console. I have a piano black center console and it is horrible for fine little scratches, almost like swirl marks. |
|
Appreciate
0
|
| 04-30-2014, 07:33 AM | #13 |
|
New Member
23
Rep 23
Posts |
Thanks for all of the great comments and feedback! I'm really happy with the results....it's pretty much exactly what I was looking for! I had always felt my factory trim was unappealing, so doing this completely resolved the issue for me. Now every time I open the driver's door I'm greeted with great driving enthusiasm
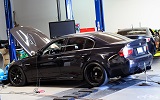
 It goes awesome with my Space Gray exterior now when the windows are down. It goes awesome with my Space Gray exterior now when the windows are down.I realized the interior had alot of the Dakota Gray and needed as much black as I could inject....so making the trim black helped to "pull" my black dashboard down more. If I had went with brushed aluminum etc. it would have added more gray. Using the black rubber floor mats also accomplishes this and they are awesome easy to keep clean. I think the entire thing only cost me about $250 ($150 paint and $95 vinyl wrap and labor). Dyno - Also, I just dynoe'd 416 hp and 429 torque at the wheels on a Dyno Jet (490hp and 505tq at the engine) so I'm overall pretty syked with the car. That was on 93 octane only. It's a rocket now with a power to weight ratio of 7.2. Not to mention 50/50 weight balance, strong braking, fuel mileage, useable rear seats and trunk, etc. Keep lovin' it!  |
|
Appreciate
0
|
| 04-30-2014, 08:18 AM | #15 |
|
Out Boosting...
242
Rep 3,987
Posts |
taking my trim to body shop this week to get it all painted piano black, question for you-- Can i remove with just a flathead and a soft cloth so it doesnt scratch it up? Anything have bolts holding it on etc...? LMK!
__________________
Alpine White M-Sport F30
|
|
Appreciate
0
|
| 04-30-2014, 08:41 AM | #16 | |
|
New Member
23
Rep 23
Posts |
Quote:
The rear pieces and the door trim are easy....just a cloth and a flat screw driver and start lifting at the ends that are hidden from view. No screws holding them. The best is to use a plastic pry tool which won't scratch just in case. They just pressure clip/lift away. Tape up the pressure pins for your painter so he doesn't muck them up with paint. There are some you tube videos and removal pictures on line if you search. For the drivers vent use the same puddy knife/tool idea and try to start lifting on one side. Mine was real tight and a little bit scary but it released. Once off use a small screwdriver to release the a/c vent from the back of the trim. The large trim is more complicated...I got mine to lift from near the steering wheel and worked it over. You'll have to reach up underneath to unplug the hazard switch stuff. Then take it inside the house and slowly unclip both vents from the inside of the trim. This part took much longer than I thought it would. If you get frustrated with any of it take a break and come back to it rather than breaking stuff. Again, look for DIY online but for the center console (it's easy)...open the armrest up and grab on the driver's side and lift it straight up. Mine is a manual so then I just unclipped the boot. Same for the rear center piece, lift it up and then for both use a star key to unscrew the ashtrays. You'll then need to remove the ashtray lids. I was able to get my rear off but could never get the front tray lid off so I guess my installer did. You want to make sure you remove the silver accent piece on the ashtray lid as well so I used a small blade to cut away the clue from underneath then it lifted off. The only parts held in by screws are attaching the vents to the trim itself and attaching the ashtrays to the trim. |
|
|
Appreciate
0
|
 |
| Bookmarks |
| Thread Tools | Search this Thread |
|
|


 looks really good