

|
|
|
|
 |

|
 |
BMW Garage | BMW Meets | Register | Search | Today's Posts | Mark Forums Read |
 |

|
BMW 3-Series (E90 E92) Forum
>
Interior Refresh DIY
|
 |
| 08-16-2014, 07:20 PM | #1 |
|
Fuck it dude, let's go bowling.
881
Rep 2,477
Posts |
Interior Refresh DIY
This DIY documents my own project to update/refresh the interior on my '07 e90 335i, Dakota Beige, steptronic. Your results may vary - try this at your own risk. This project involved wrapping my wood grain trim and adding black accents throughout:
- installing new black OEM carpet mats (not part of this DIY) - wrapping the wood grain trim with 3M 1080 Matte Charcoal - wrapping the OEM steptronic shifter in gray carbon fiber - replacing the OEM lighted plastic shifter panel with an alcantara manual shift boot - recoloring plastic door trim pieces in satin black (speaker grilles, window switches, door handle recesses) - replacing the door pulls in OEM black - dying the armrests black - dying the console cover/armrest black - dying the hand brake boot black - dying the seatback nets black There is a LOT of ground covered in here - I'm just going to try putting it together and improving it over time. It jumps around a bit because this is not necessarily a beginning-to-end process. For example, the step where I dye the armrests black assumes you've already learned how to remove the door panels during the step where I recolor the plastic door trim pieces. Anyway, if you can think of a better approach, I'm all ears  These photos show the end result. In the last photo you will see the rear panel of my console is off-color. I have a [fail] DIY on this. Dakota Beige is near-impossible to match. I plan to either purchase that panel new (OEM) or remove and paint the entire console black. 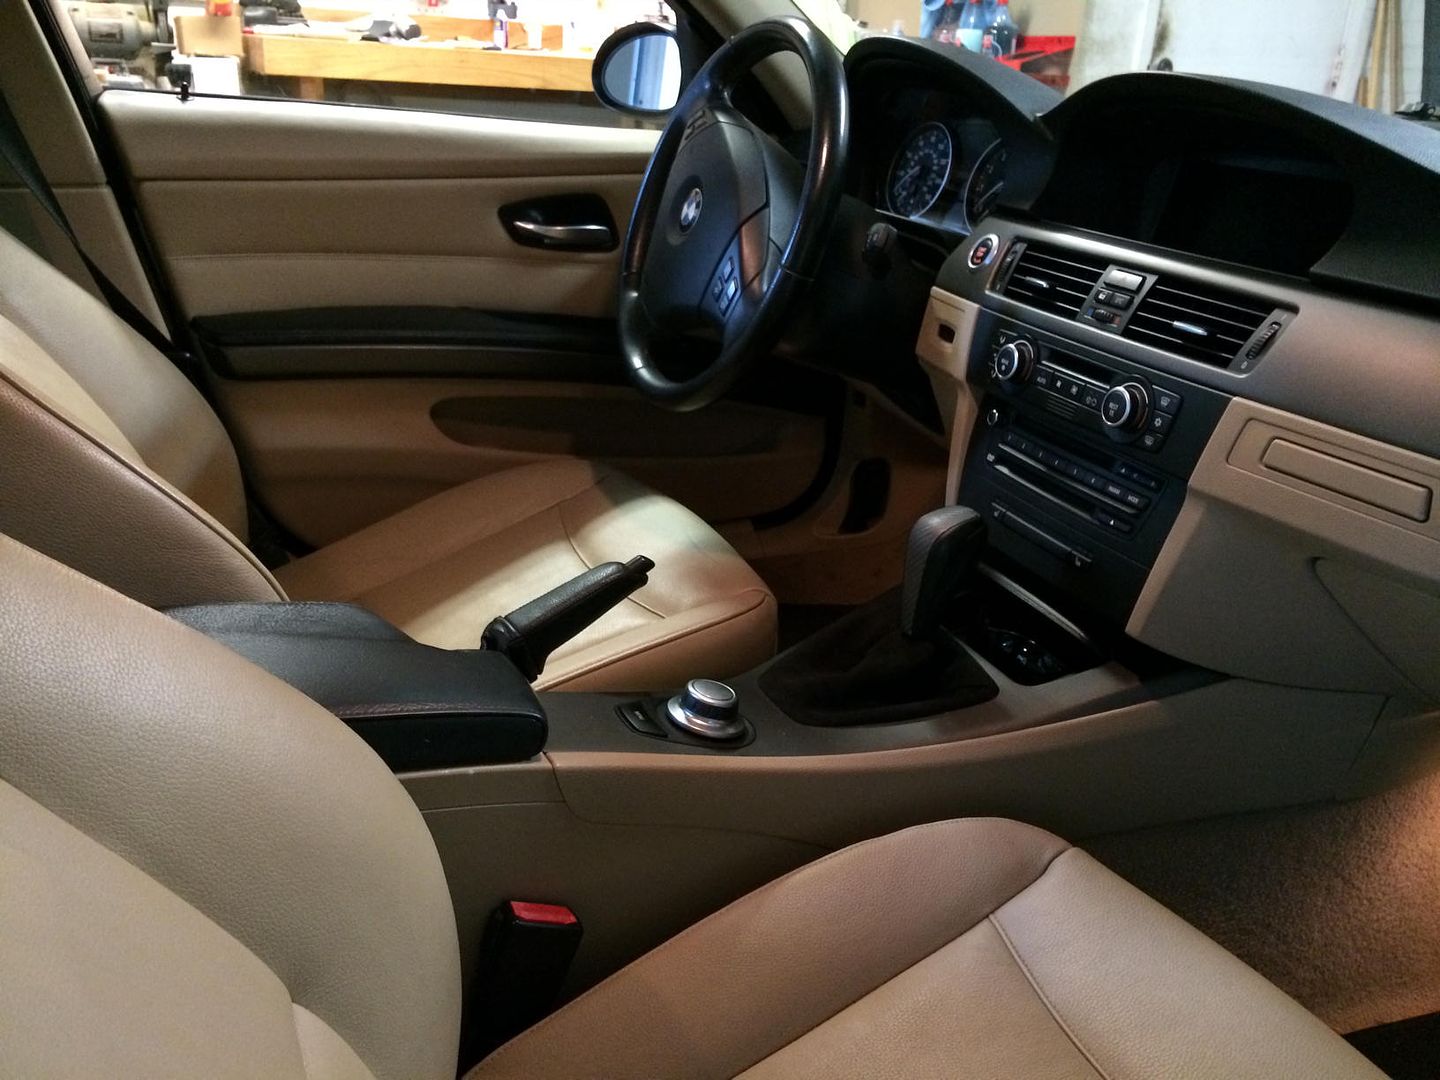 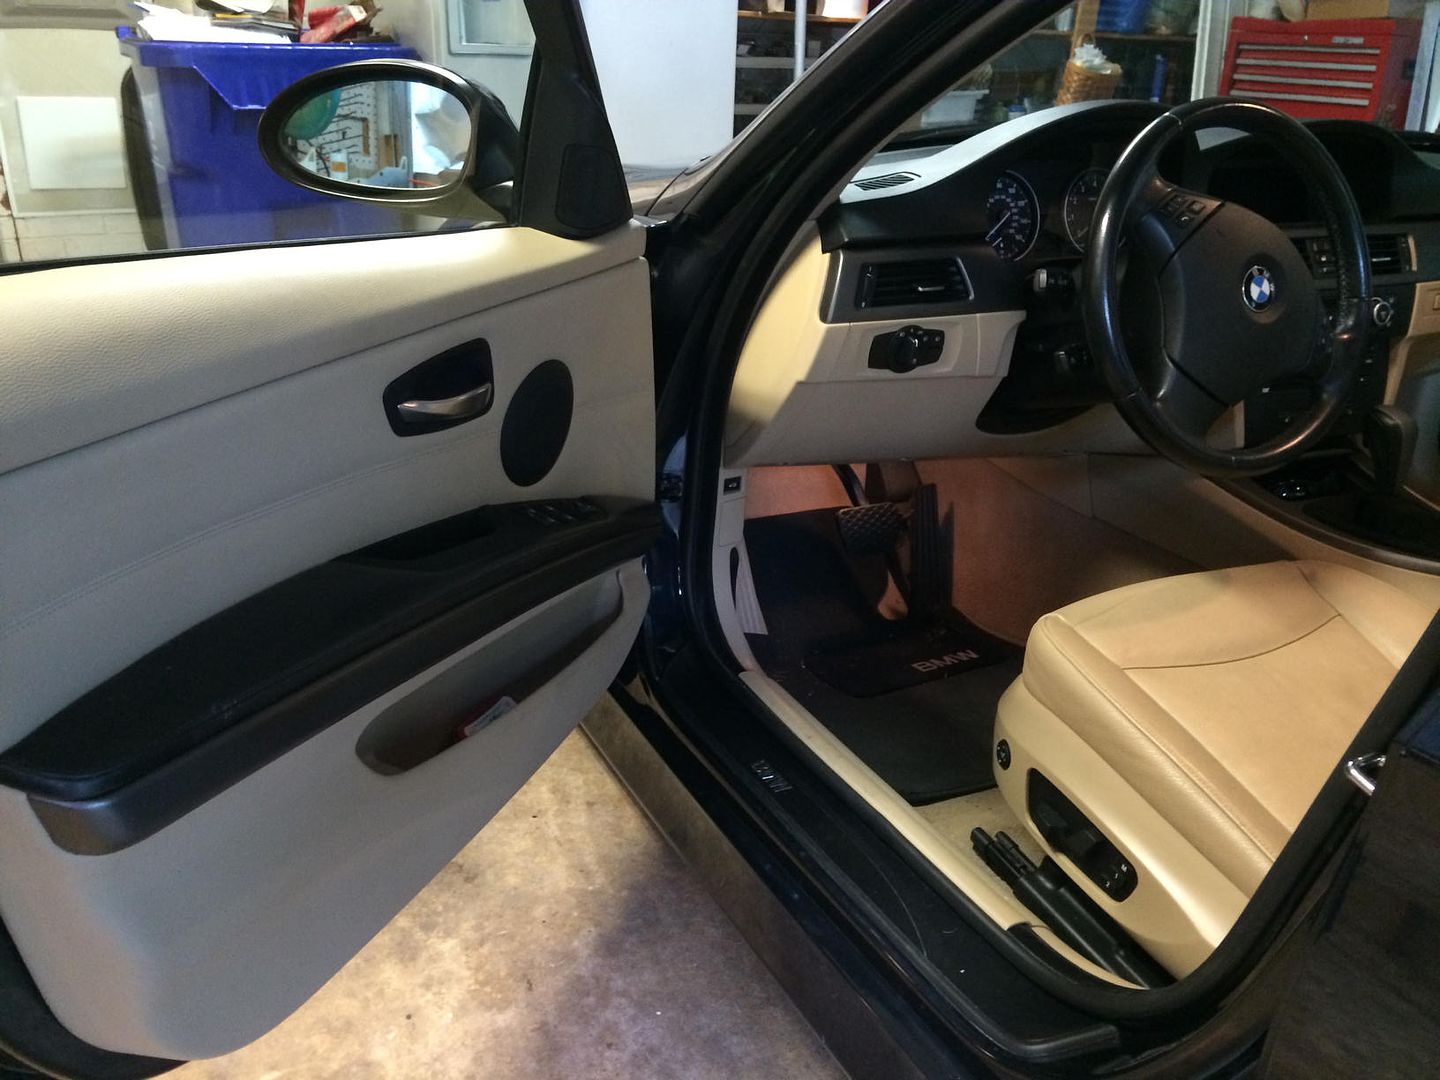 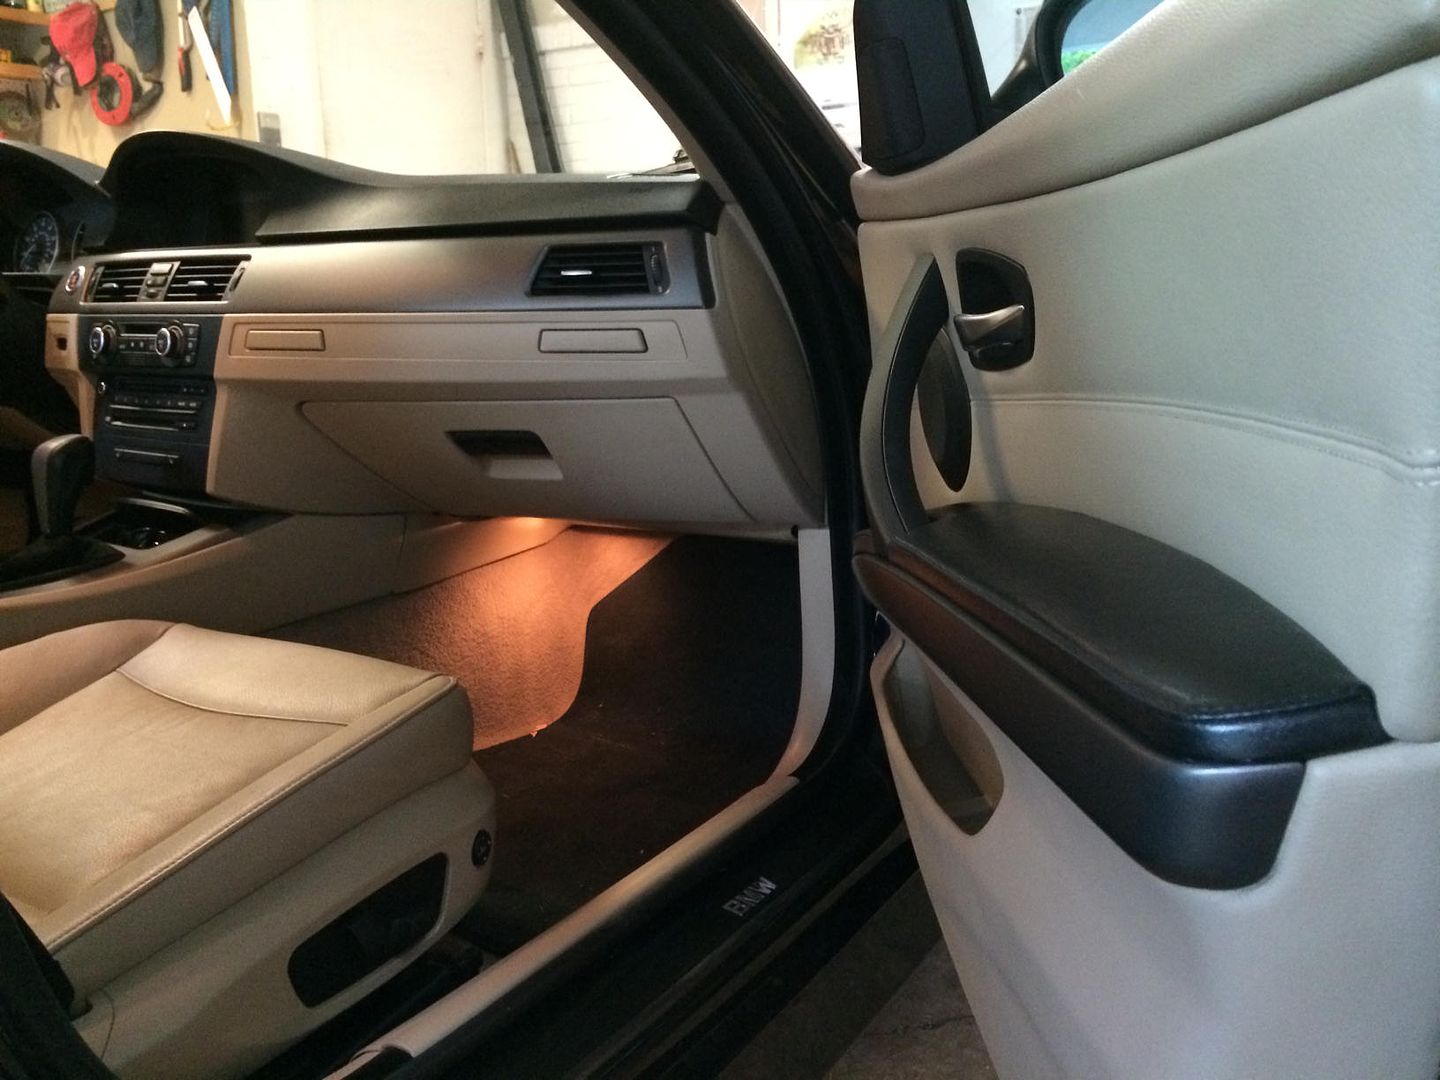 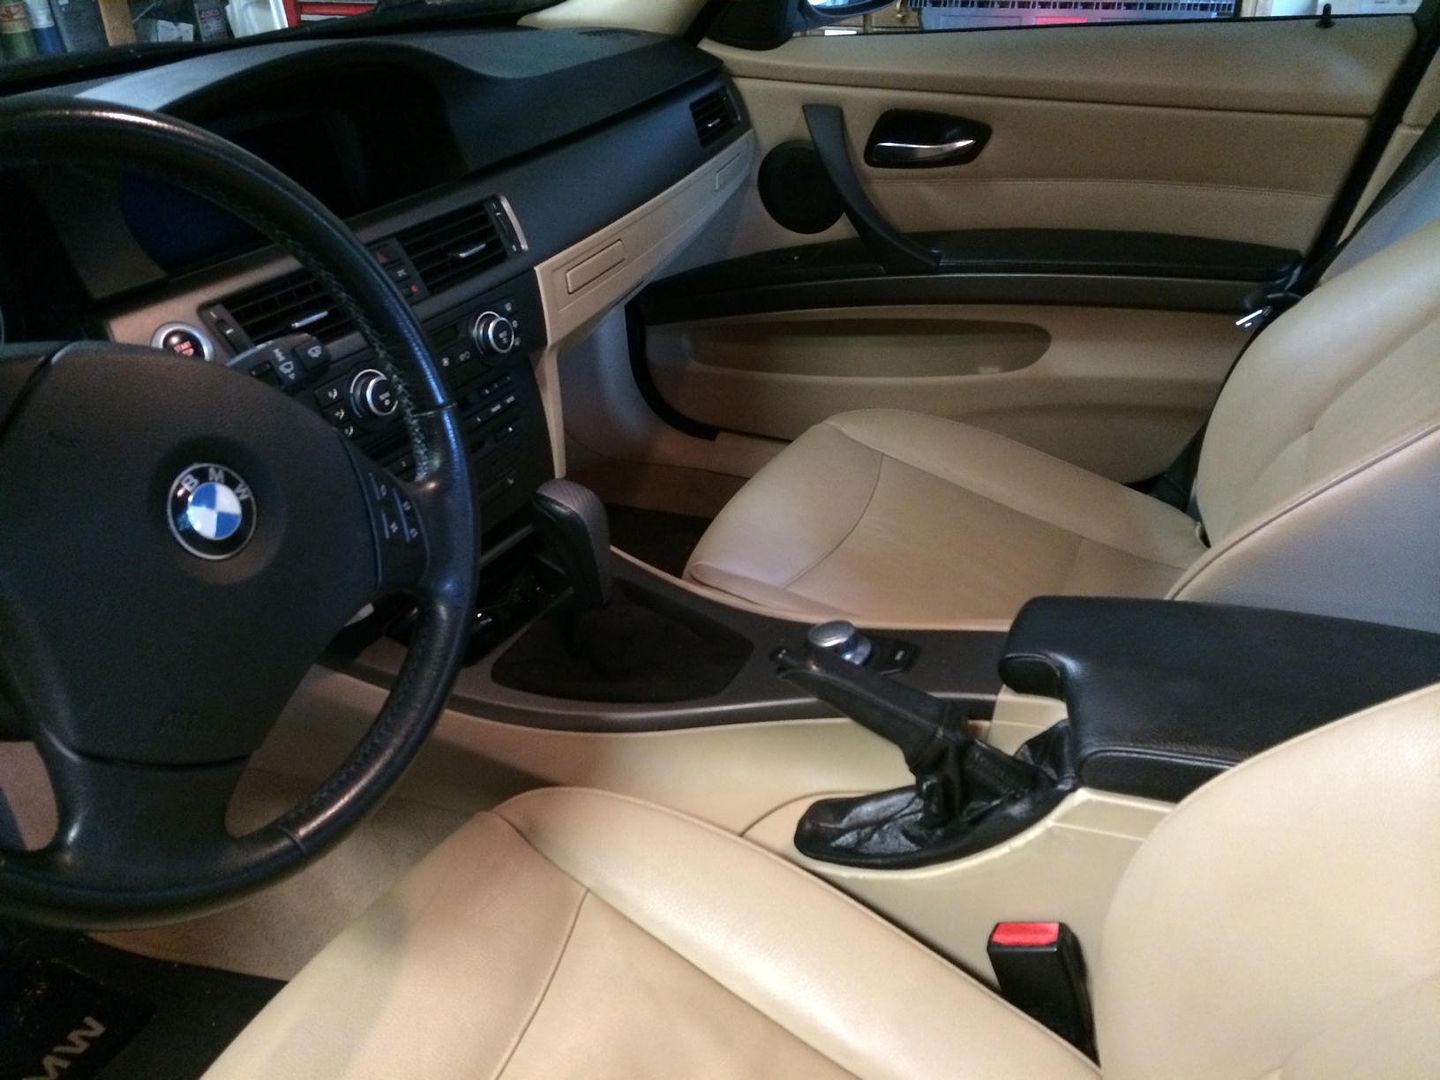 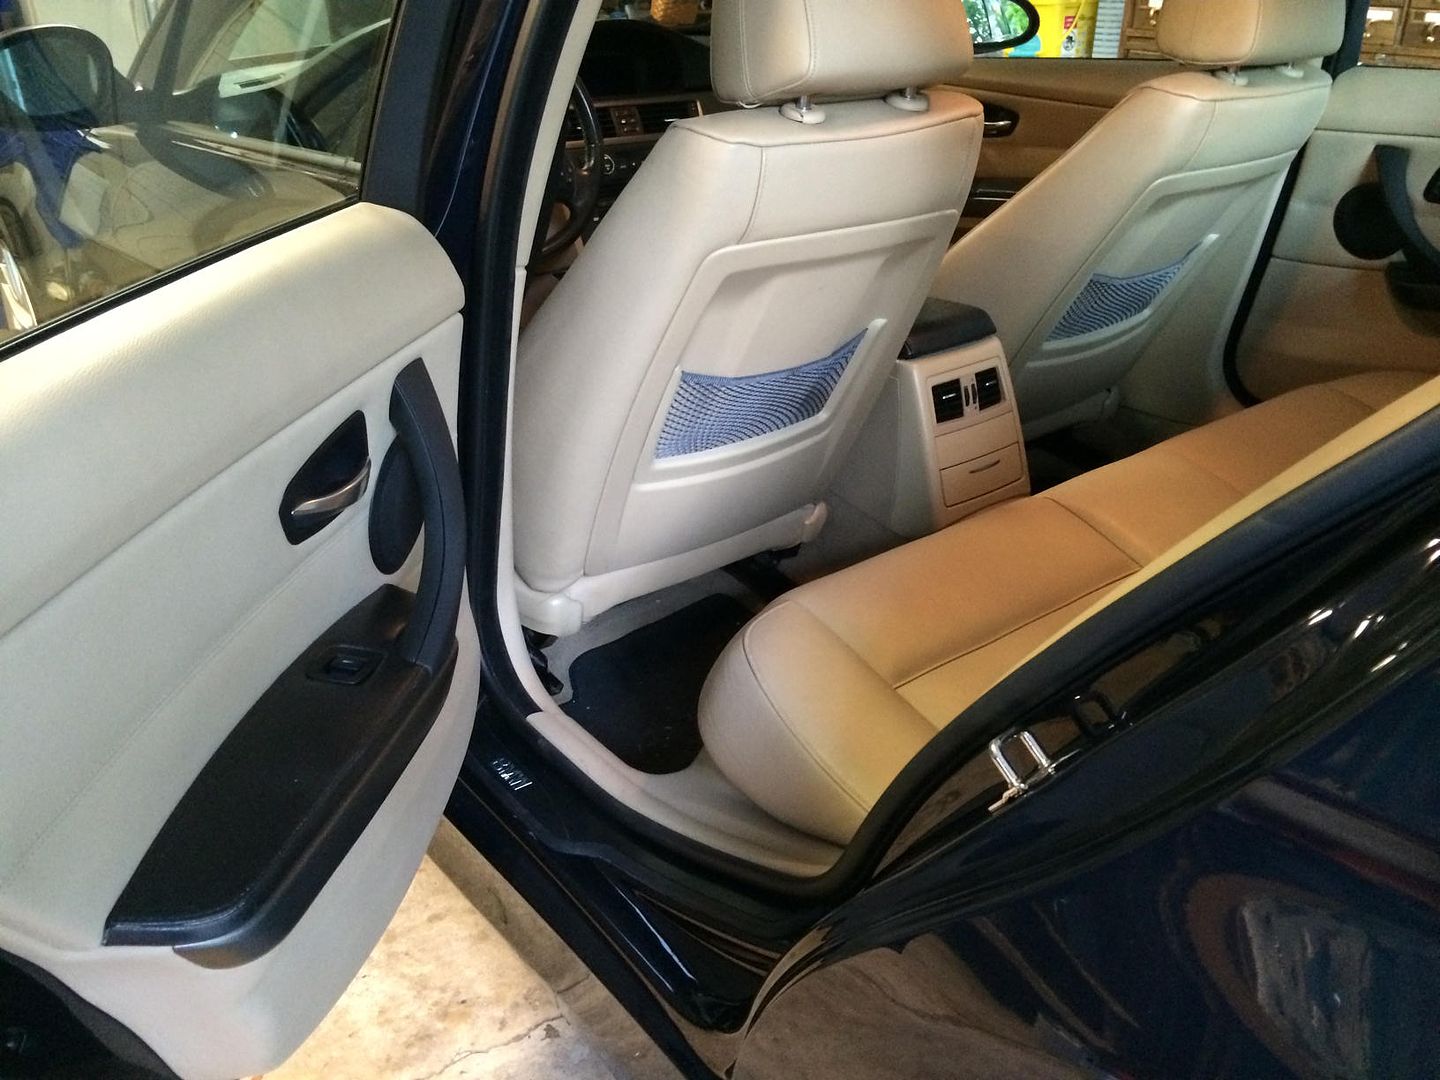 Wrapping the wood grain trim Here's the thing about wrapping trim - your first time, better order more material because you're going to make mistakes! It takes a little trial and error before you get the hang of it. Don't skimp on the material on your first order. You will need a heat gun for this process - heating up the wrap helps you stretch it over tight curves. There are DIYs on interior wrapping, but most show the use of spray-on glue. I believe the newer 3M wrapping materials all come with adhesive already applied, so those DIYs are out-of-date. You can start by removing the trim pieces from the dash. I have a DIY for replacing the center AC vent that shows removing the dash trim: http://www.e90post.com/forums/showthread.php?t=889143. Or you can just search the DIYs. The key to wrapping is this: make sure you have sufficient material to wrap around edges/corners, and apply heat to get a good stretch. Do NOT cut the material too close to the edges/corners - you need to wrap it around to the back side of the trim. There are also DIYs for removing/replacing the door panel and trim. I have one here for the rear door: http://forums.bimmerforums.com/forum...-Panel-Removal. The front is basically the same, except you begin removing the trim piece from the front-side of the door, not the rear. For the center console, start by removing the shifter handle. Put the car in neutral and pull up hard on the handle - it will come off with some force. Then remove the shifter plate - here is a good video for this: http://www.bimmian.com/Updated-Look-...r-E91-3-Series. Once you have the shifter plate off, you can remove the console trim. Here's a decent DIY for removal: http://www.e90post.com/forums/showthread.php?t=7049. When I pulled mine, some of the trim backing broke apart: 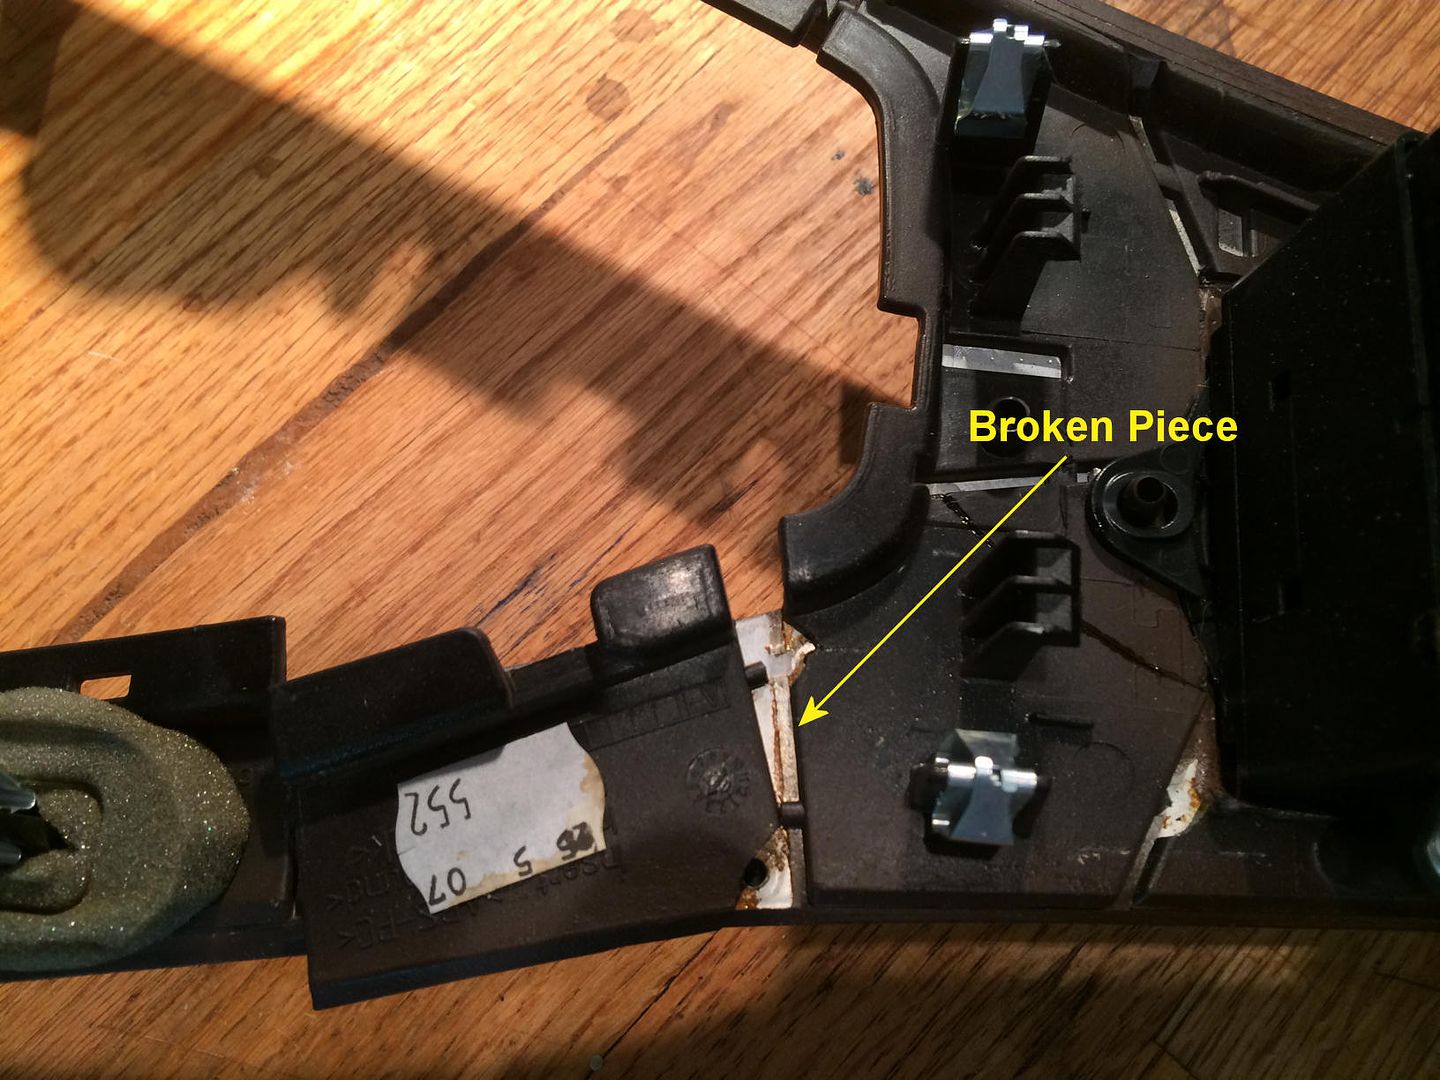 I used some epoxy to reset it. Once you have the console trim removed, you can remove the ashtray assembly (screws underneath the trim) and wrap that separately. Start by cleaning the trim and wiping it down with alcohol. Cut a piece of wrap with at least 2" of overlap on all sides of the console trim - more is better. Begin by peeling back a section of the wrap like this: 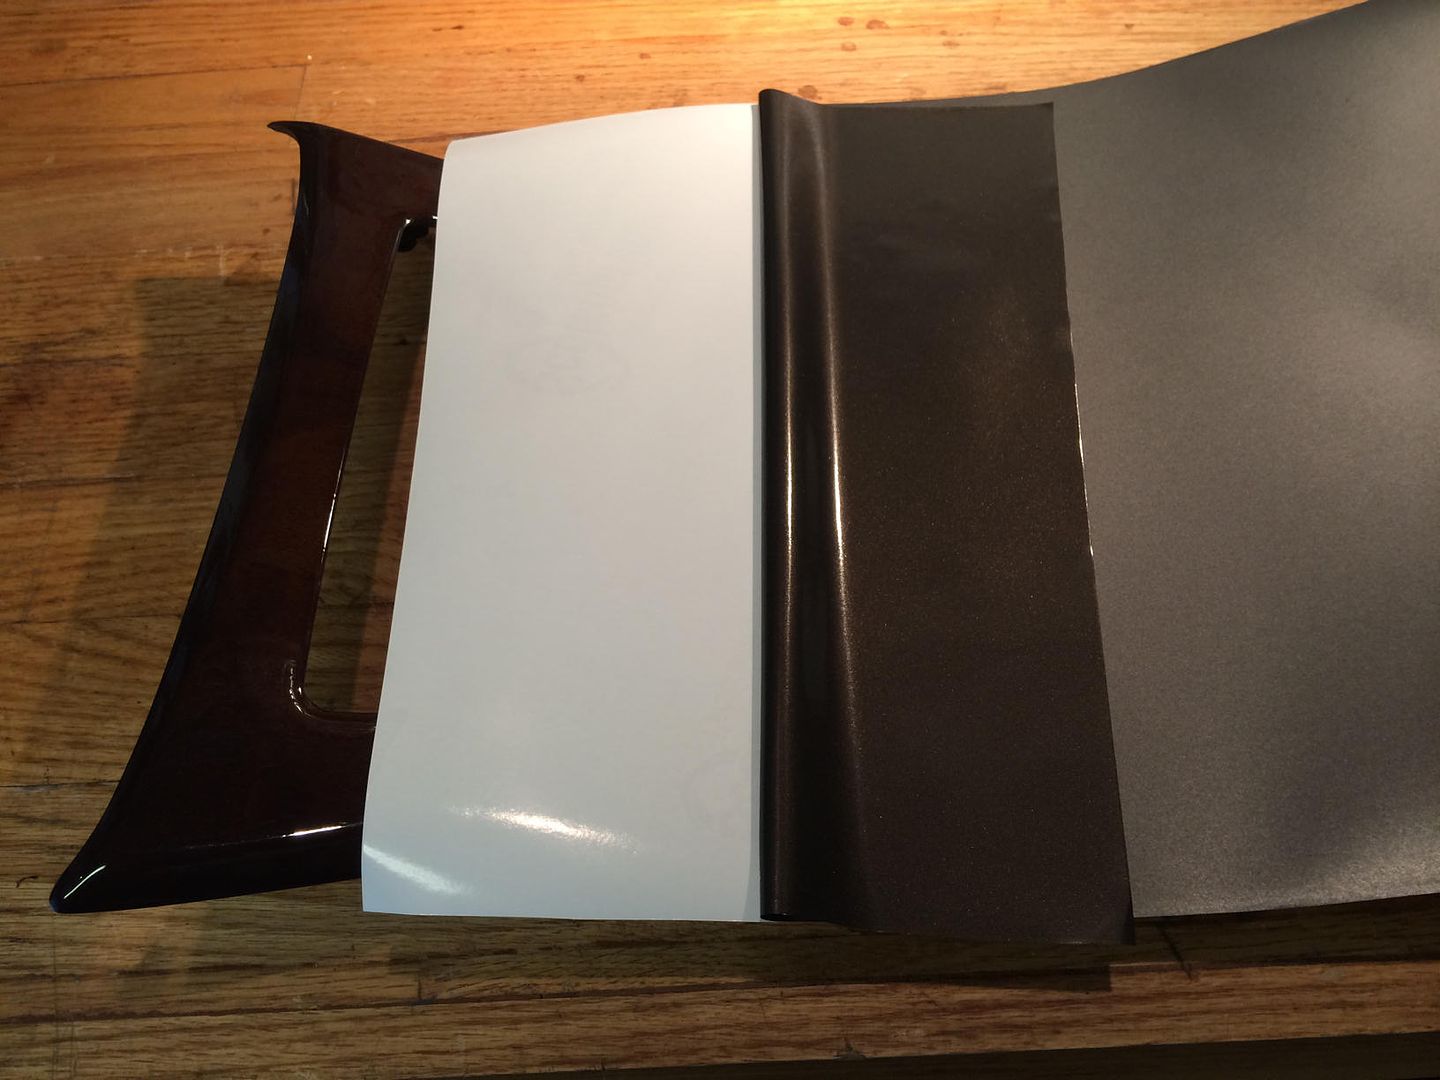 Then apply it to one end of the trim piece like this: 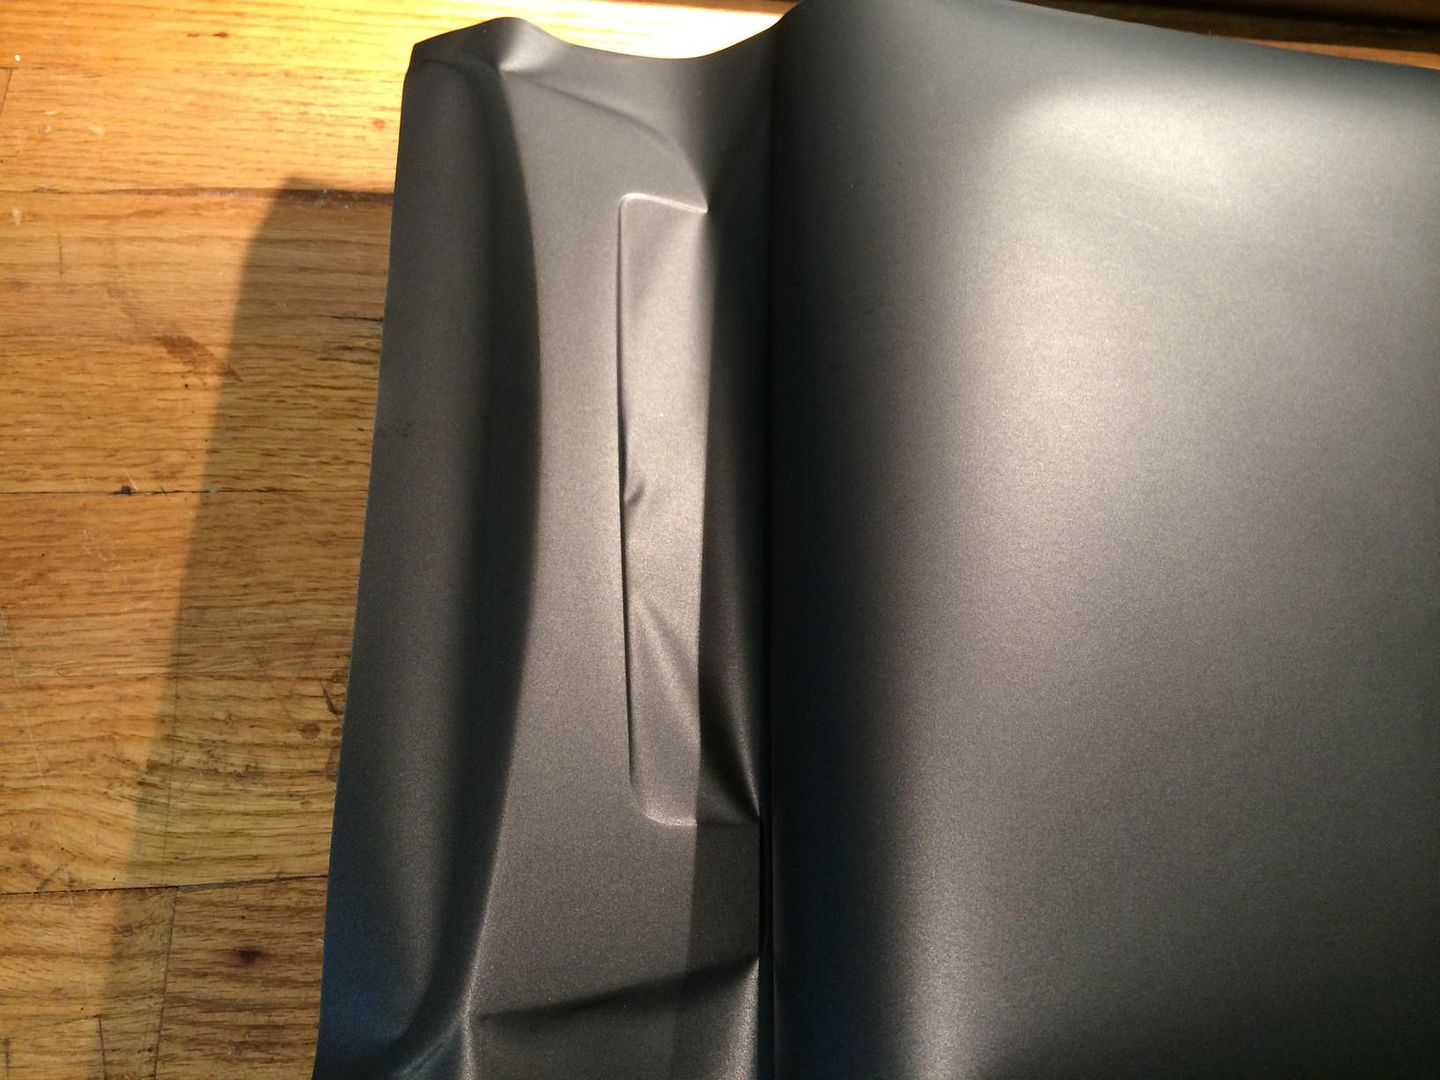 Note that in the previous photo I really didn't have sufficient overlap - wrapping is one case where MORE ACTUALLY IS MORE!! Make sure you have AT LEAST 2" overlap on every side. Then begin pulling the backing so the film settles onto the console as you go. I used a tool I purchased from metrostyling.com to "squeegee" the wrap as I went - it has a felt side that's great for flattening as you go. 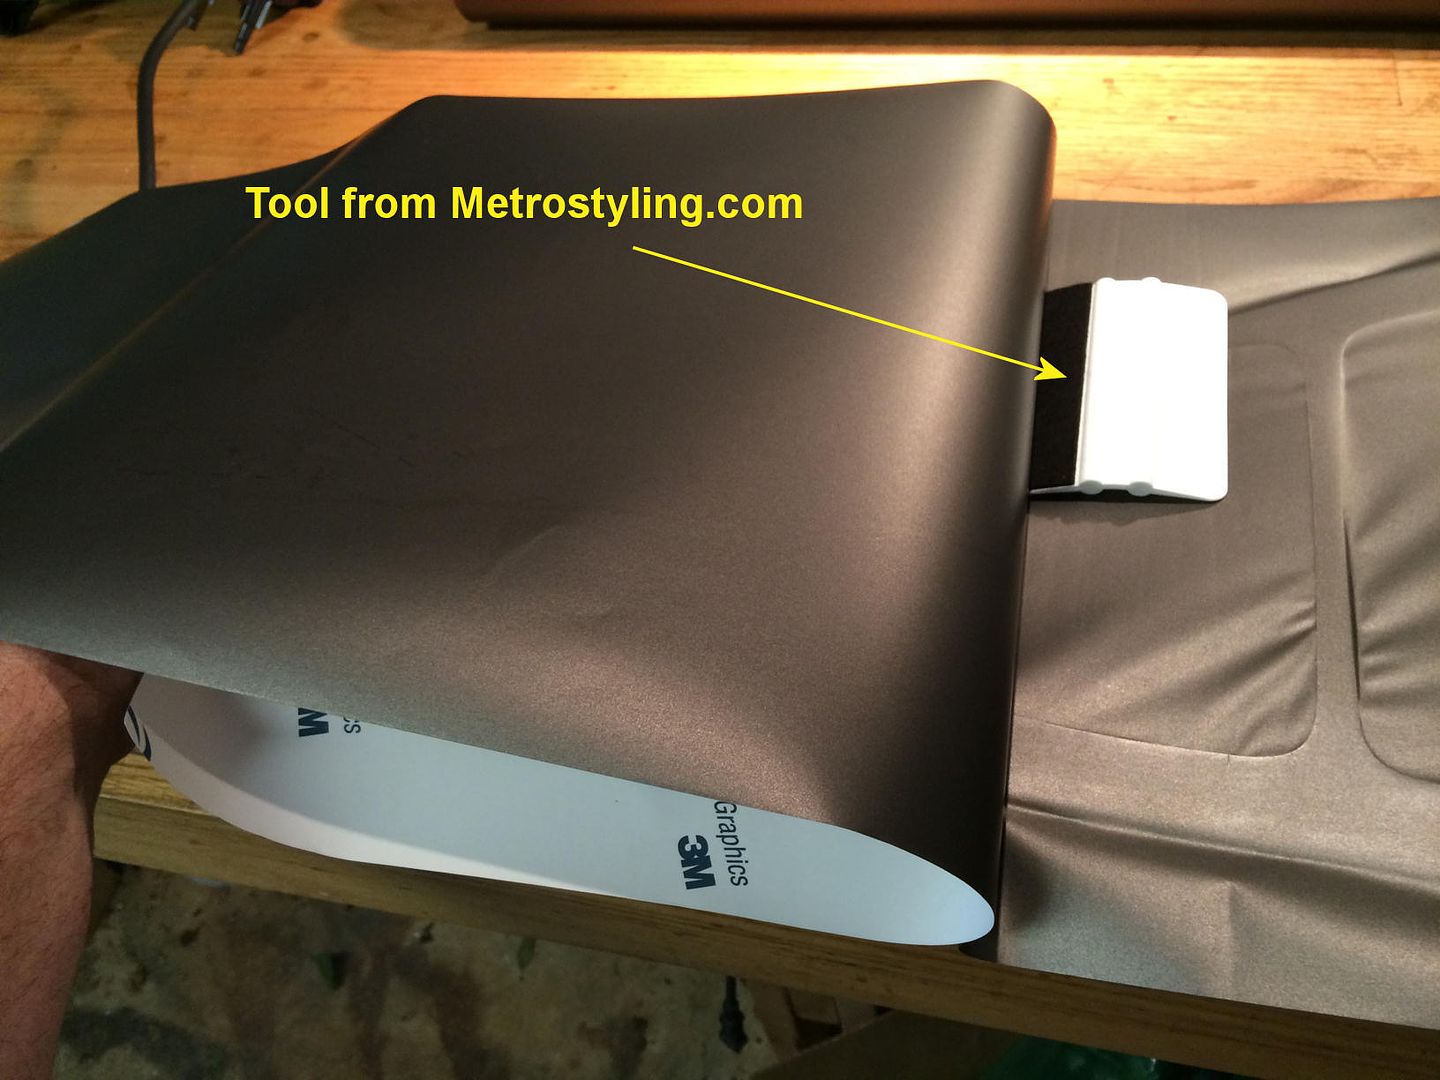 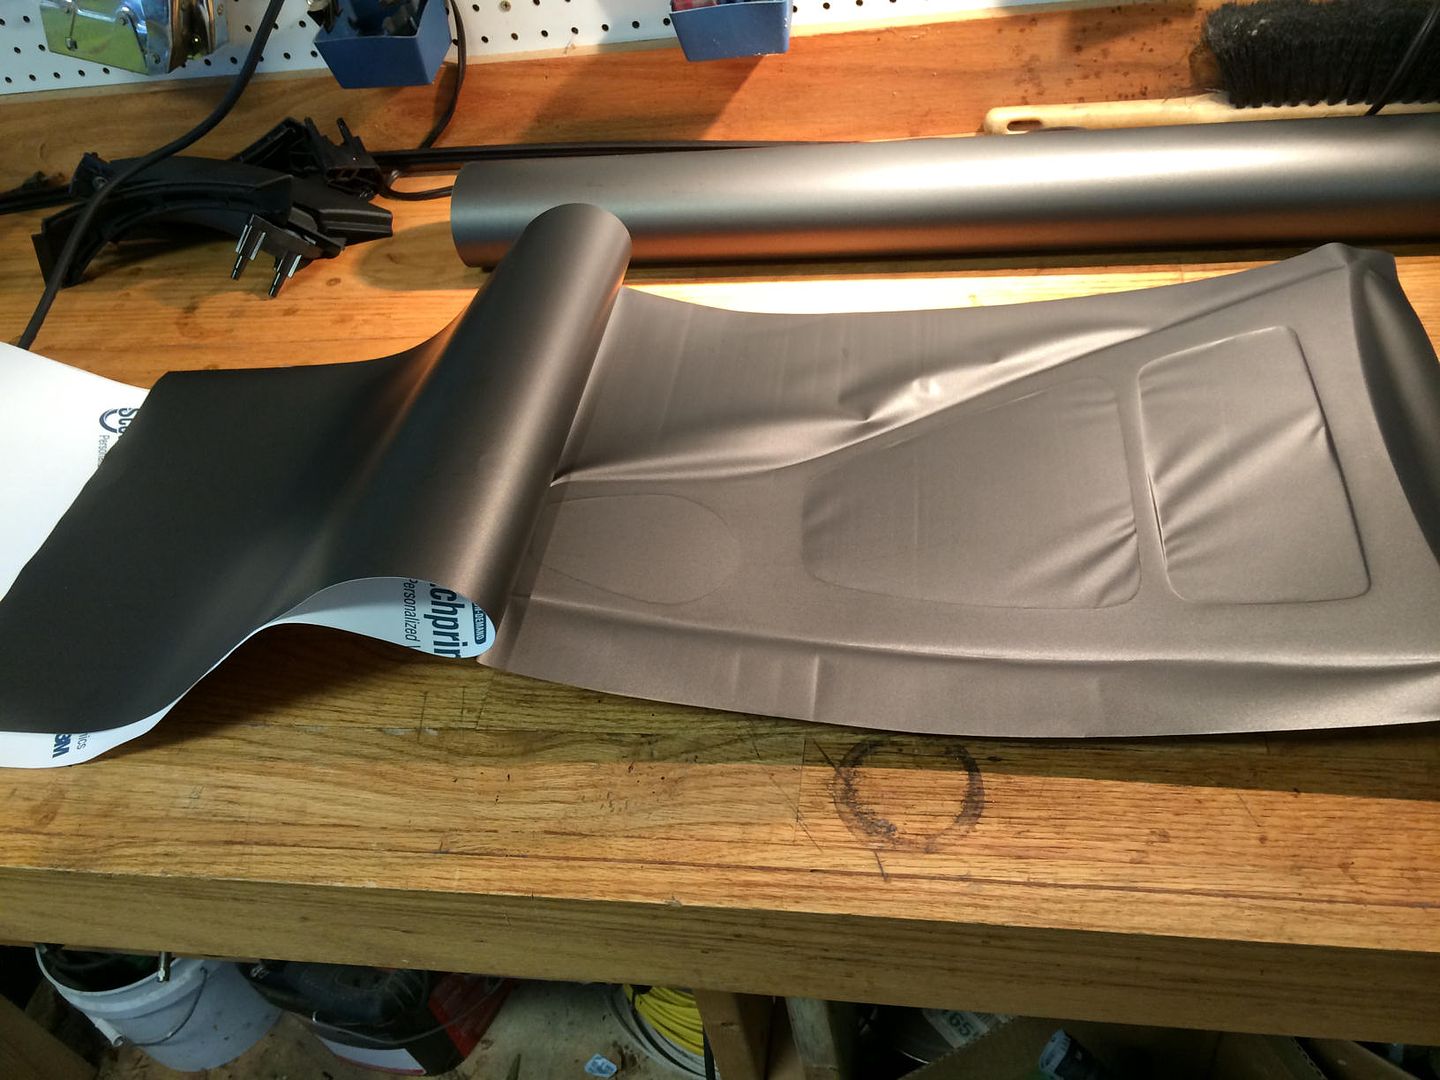 There should be no wrinkles. If you get a wrinkle you can pull the wrap up off the trim and re-stretch it tight - use a little heat if you must. When you're done, you can make some slits in the openings and apply heat to stretch it over the sides. Do NOT cut too close to the sides! You stretch the wrap over those tight corners by heating it, not by cutting it close. Leave sufficient overlap to wrap it completely around to the back side of the trim. For the ashtray, you have to remove the ashtray cover. This can be a little tricky. Basically it is held on by a lip on the front and 5 tabs on the back - see photo: 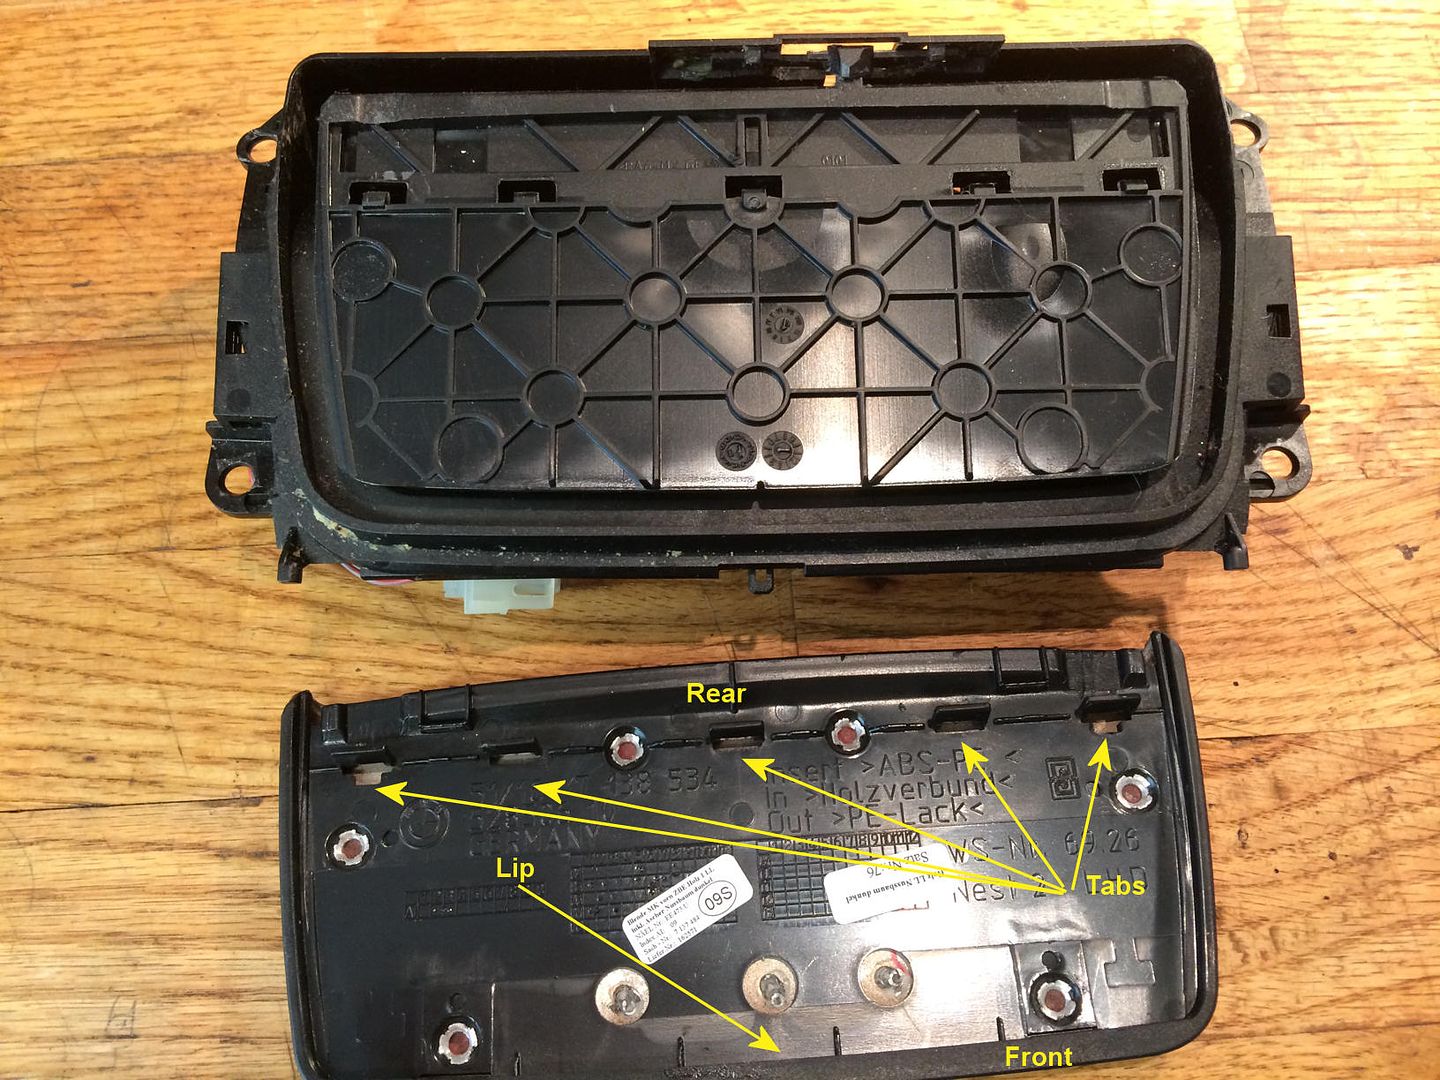 You have to pry up on the rear tabs. I think I used a small putty knife, and I remember it took me a little while to get it figured out - sorry I didn't record how I did it. I wrapped the cover and then used a credit card to sharpen the creases around the aluminum trim piece, then cut around the aluminum trim with a razor blade to remove the wrap there. I also took the opportunity to replace my ashtray with the sunglass tray option. For my car the part number was 51-16-7-132-376, but your car may be different. Here is the completed console: 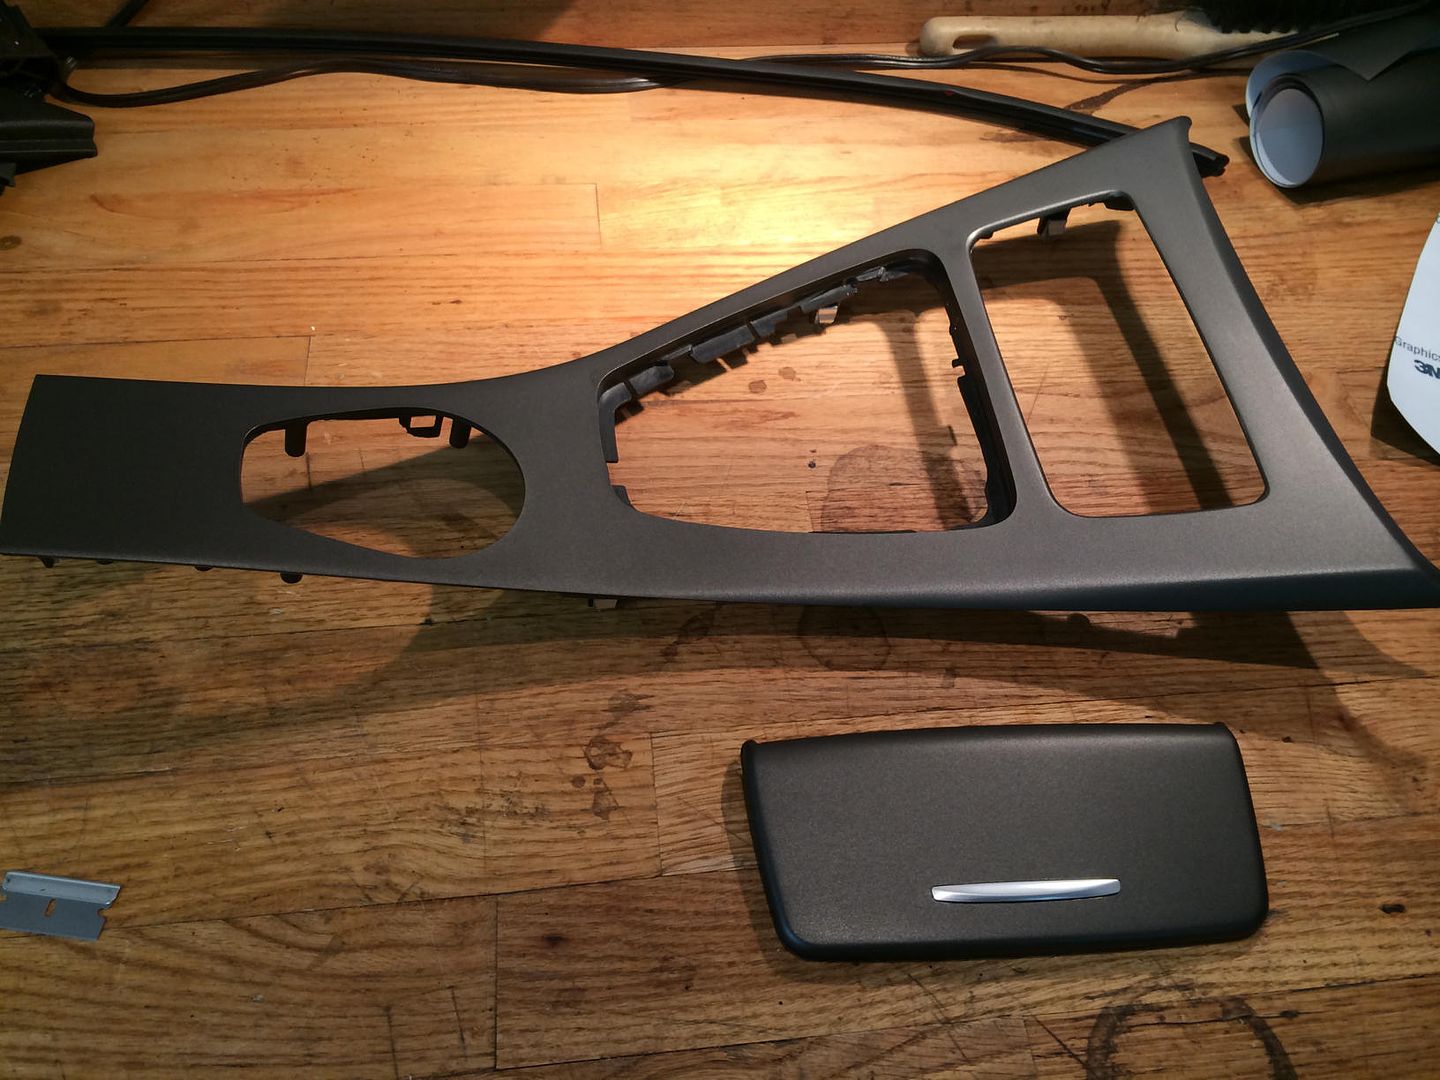 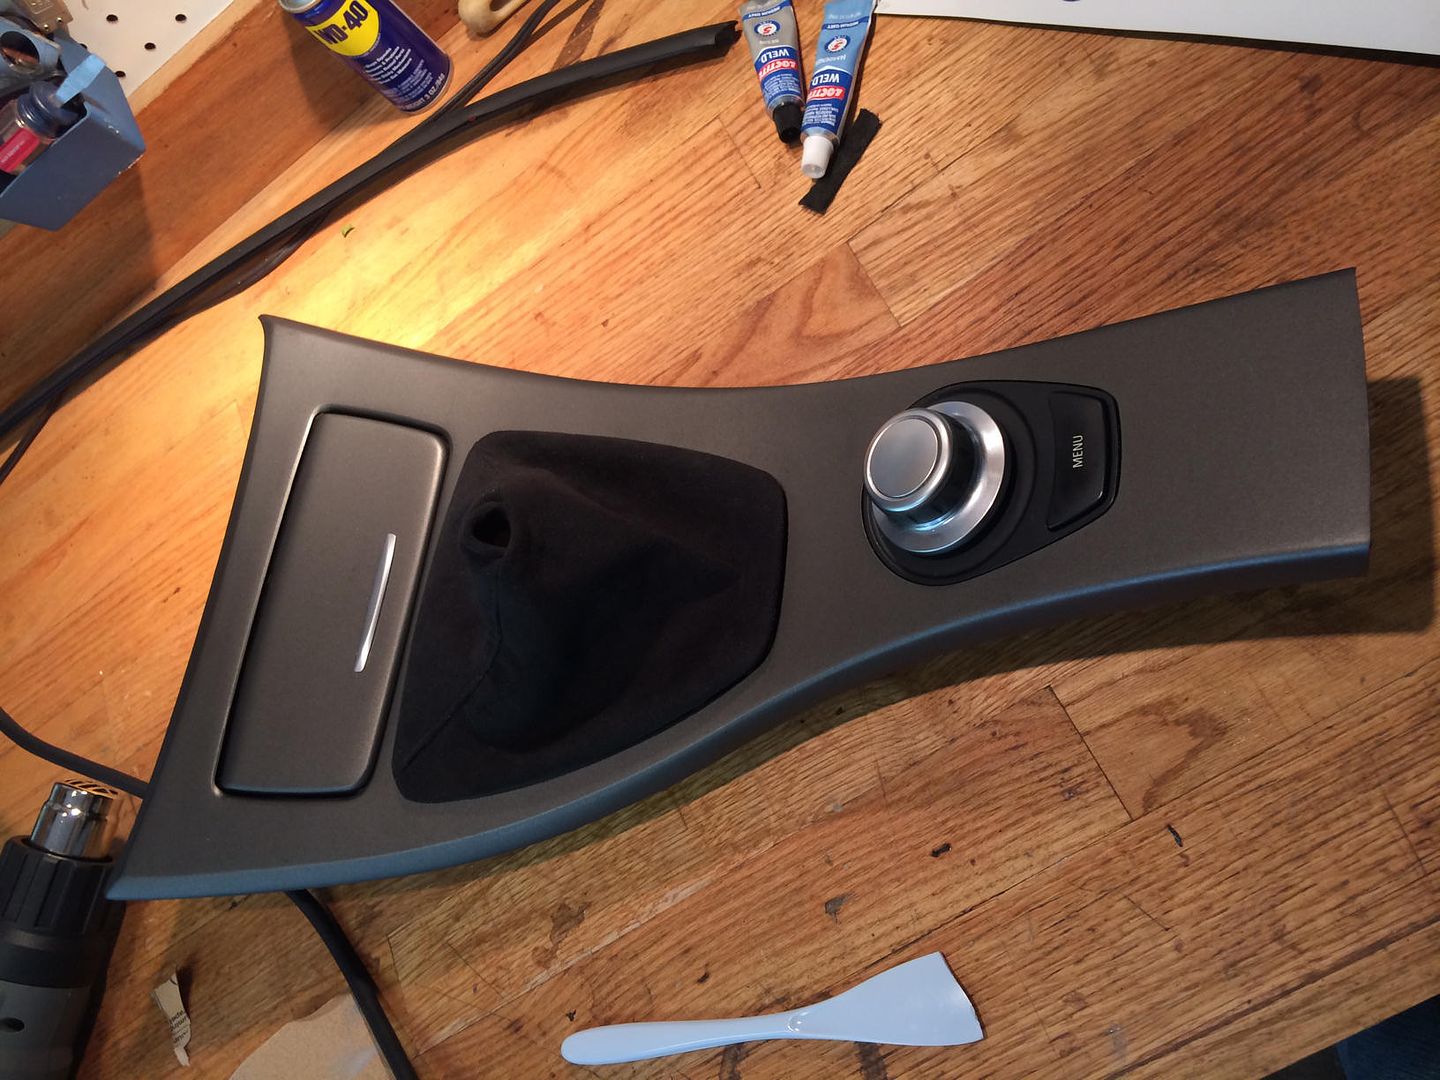 Wrapping the OEM steptronic shifter and replacing the lighted shifter panel with a manual boot I purchased an alcantara boot, which is a direct snap-in replacement for the original lighted plastic panel/boot. There are videos out there on how to replace the shifter, and they will help you figure out how to remove the shifter and panel. Check out the Bimmian F30 shifter install video here: http://www.bimmian.com/Updated-Look-...r-E91-3-Series. The shifter simply pulls off the stalk - put the car in neutral and pull straight up HARD. The plastic shift panel has snap clips on it identical to the manual boot you have purchased - inspect your new manual boot in order to see where they are, and that will help you remove the OEM one. The only tricky part is the wiring for the lights. There is a harness that passes through the console - it picks up the lighted shift indicators on the OEM shift panel, and continues on to the shift indicators in the dash instrument panel. You don't want to break continuity on this, as your instrument panel will not work properly in DS/+/- modes. The easiest way to solve this is to remove the lighted shift indicator from the OEM shift panel (a couple of screws) and just tuck it up under the new manual boot - make sure it doesn't interfere with the movement of the shifter. The indicator will continue to illuminate the current shift position, but no one will ever see it! In terms of wrapping the shift handle, honestly I can't remember much about this. The shifter has two parts - the leather-wrapped base, and a plastic trim piece (mine was painted aluminum). The plastic trim piece can be removed for wrapping. I recall that it was relatively easy to get off, but difficult to get back on. I believe it comes off by pushing/prying upward. Sorry I didn't record the process! Once separated, just wrap the piece and reinstall it. I wrapped mine with a 99-cent sample of 3M 1080 Carbon Fiber from metrostyling.com. When finished, put the car in neutral, insert the shift handle into the boot, align the handle back into the stalk, and pop it down in by rapping hard on the top with your fist. It should be tight. If it's not completely tight (try shifting), then you didn't seat it - try again. Once it's seated, then you can snap your shift boot back into the console. 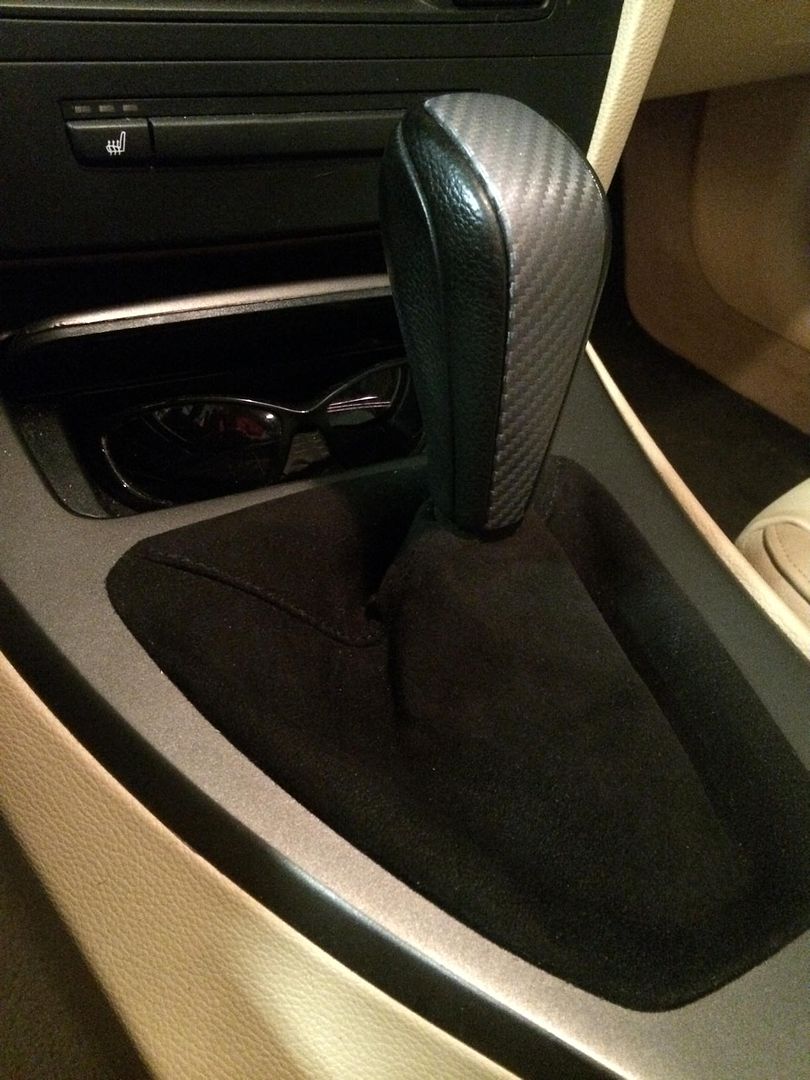 Recoloring plastic door trim pieces in satin black (speaker grilles, window switches, door handle recesses) For this part, you need to remove the door panels and take them completely apart. This involves permanently cutting off the door pulls and armrests. Be aware that once you remove the door panels, you are committed to a process that takes several days if you are removing and dying the armrests! I reattached my door cables and zip-tied them to the speaker wires so that I could continue to use my car - I just pulled down on the cable to open the door. There are DIYs out there for removing the panels. I created one for the rear door panel: http://forums.bimmerforums.com/forum...-Panel-Removal. Just note that the front door panel, while similar, is slightly different in that you begin popping off the trim piece from the front of the door, not the back. The absolute best way to recolor plastic parts is to dye them on the stovetop. This produces a beautiful piece that is permeated with color so it can't scratch off. However, I discovered that not all plastic parts are created equal! For example, the speaker grills and window switches will NOT accept dye in this method. But the door handle recesses will come out beautifully and be permanently recolored. Beginning with the speaker trim, once the door panel is off you can remove the speaker (three nuts) to gain access to the back of the trim piece. Just depress the clips going around the trim to get it off. I sanded my speaker trim, wiped it down with alcohol, sprayed it with two coats of satin back and two coats of satin clear sealer (Grumbacher, from an art store). For my project, since I began by attempting a stovetop dye, I removed the metal grille (6 clips must be bent) and foam backer from the trim. This should not be necessary for a simple spraying. Note that when you go to reinstall the trim piece, the clip pattern is not symmetrical. Rotate the trim piece around the opening while viewing from the back of the panel in order to line it up properly before snapping back into place. For the window switch trim, if you removed the door panel correctly (using the DIY above) you also removed the window switch assembly. Now remove the actual switch from the trim housing. For the small single switches (passenger doors), there are two small tabs on each side - I used a jeweler's screwdriver to pry them out one side at a time. For the driver's side door, the master switch panel has the same concept though the wiring connector is a little different - it has a levered clip that "rocks" the connector on and off. Sorry, I didn't take pictures of the wiring clip - only the receptor! 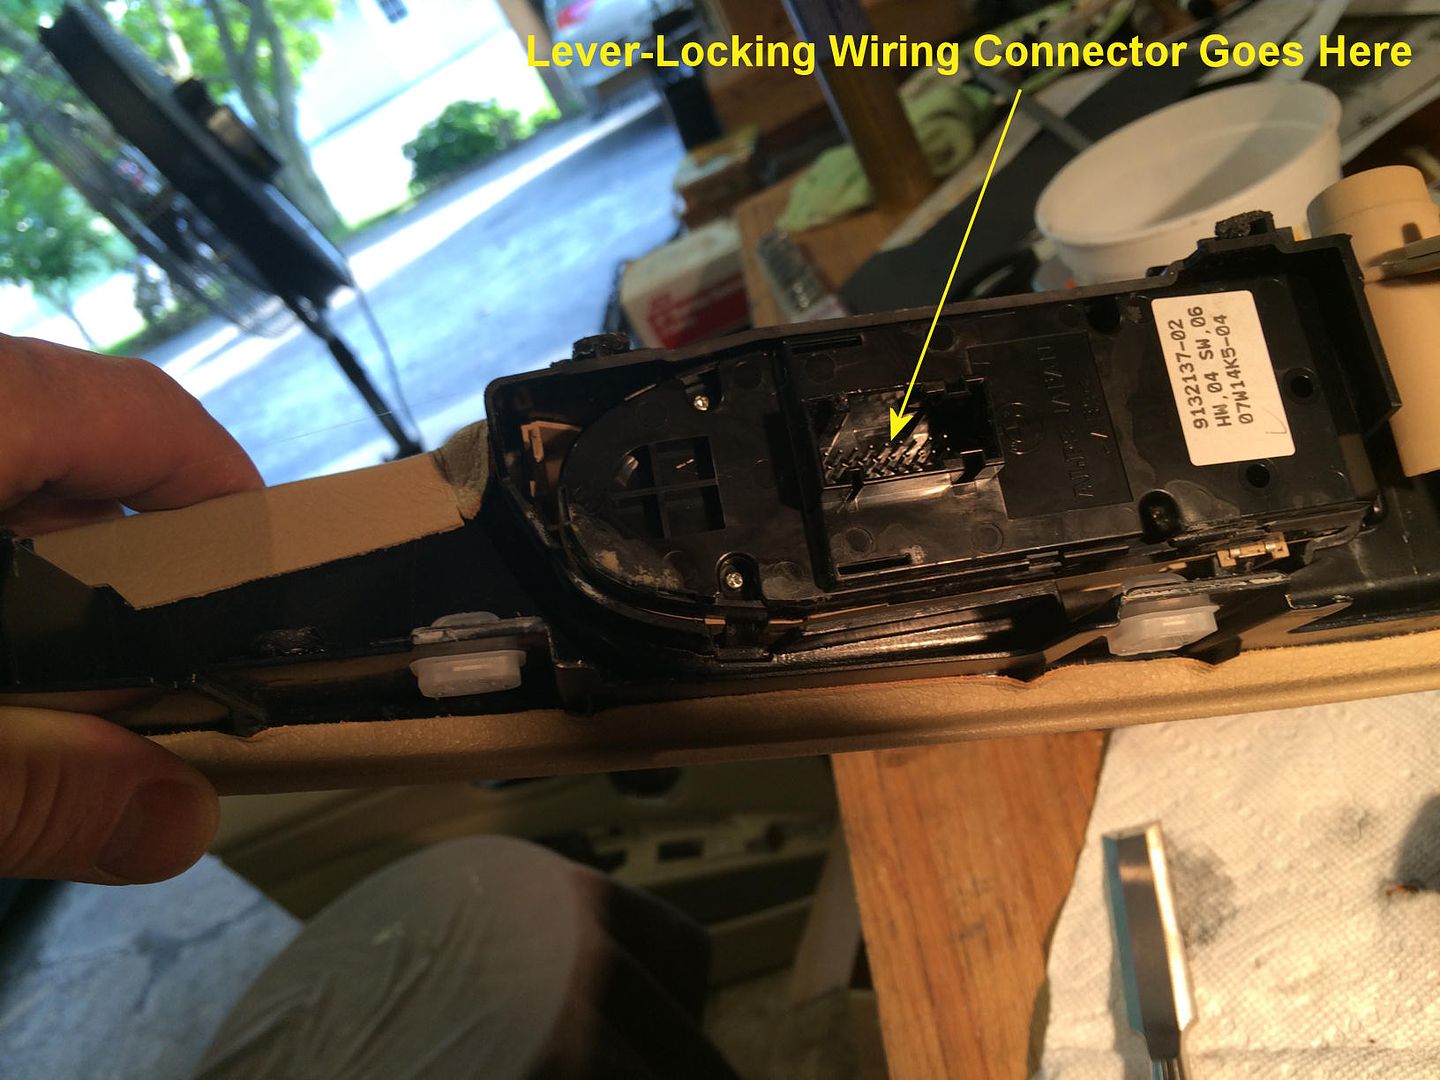 But you can see from the photo below that the switch panel is held into the armrest with four metal pressure tangs, and the switch assembly is held to the trim piece with locking tabs. It's pretty easy to get apart. 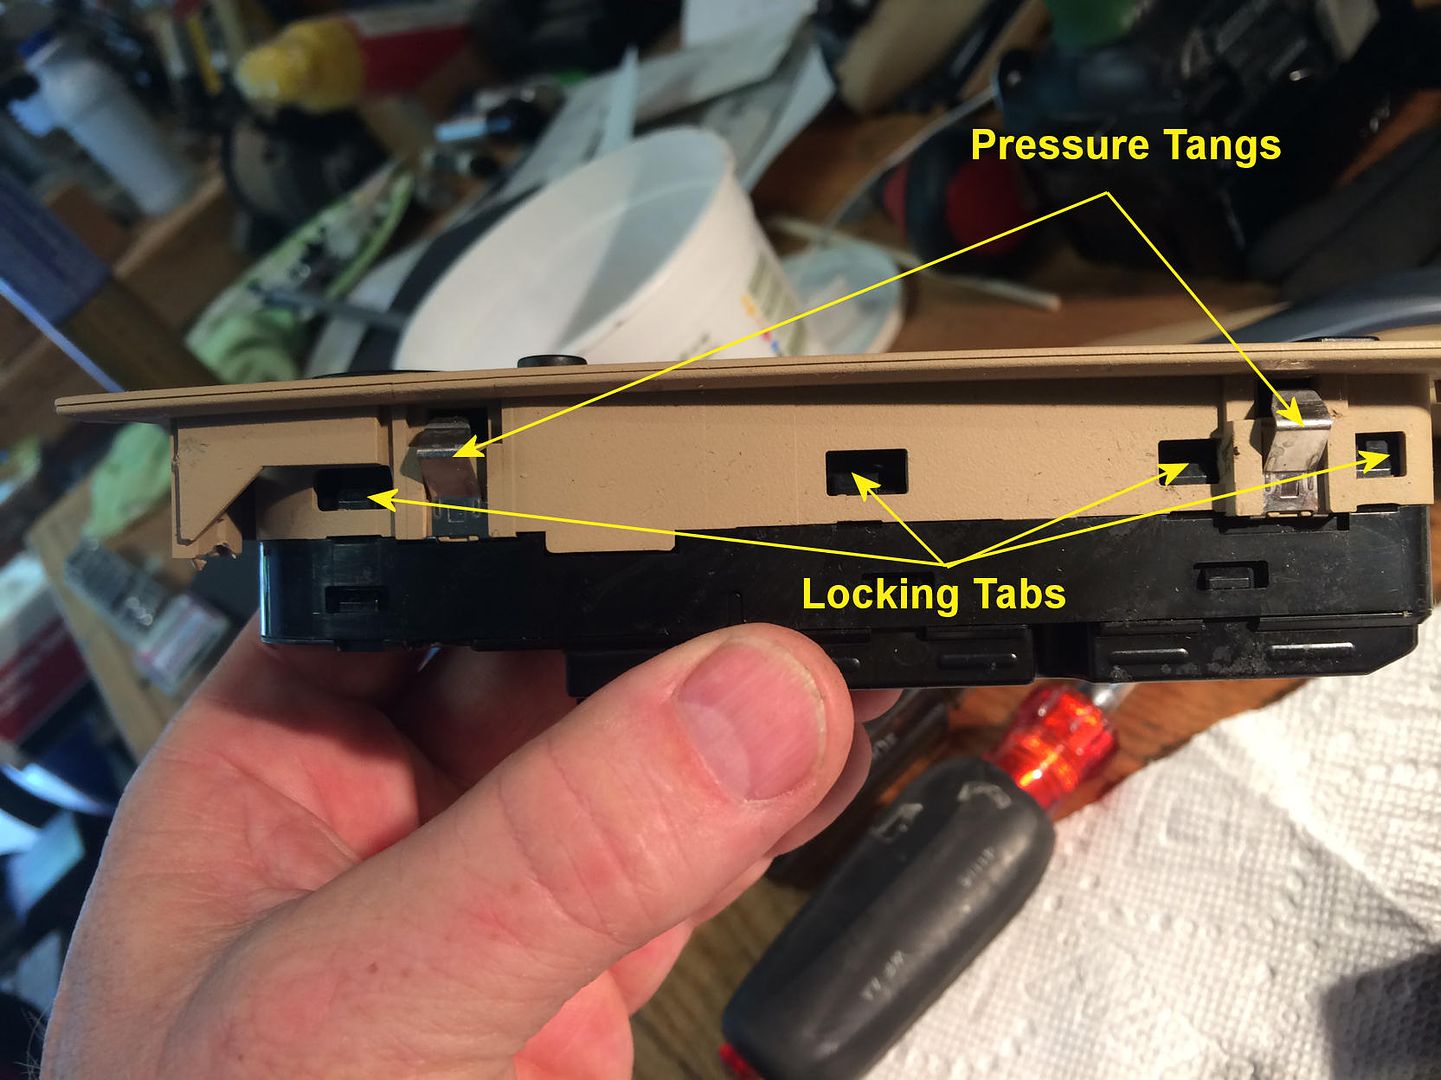 I sanded the switch trim pieces, wiped with alcohol and sprayed the same way as the speaker grilles above. You will see that the rocker switch easily separates from the plastic holder so that you can spray just the holder (the rocker switches are already black, with the white window graphic on it which you wouldn't want to spray over). 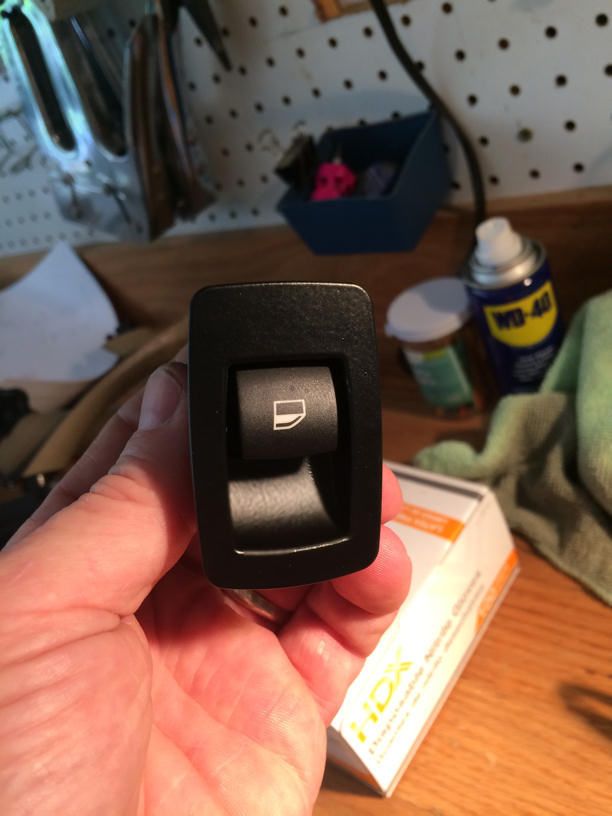 Note that the driver's side door pull is integrated onto the armrest on the door panel. You will need to remove the armrest from the door panel, and then remove the door pull from the armrest in order to spray it. See the armrest redye process below for the armrest remove/replace procedure. The door pull is held onto the armrest with heat-pressed plastic rivets, which must be cut off in the same manner as the armrests. 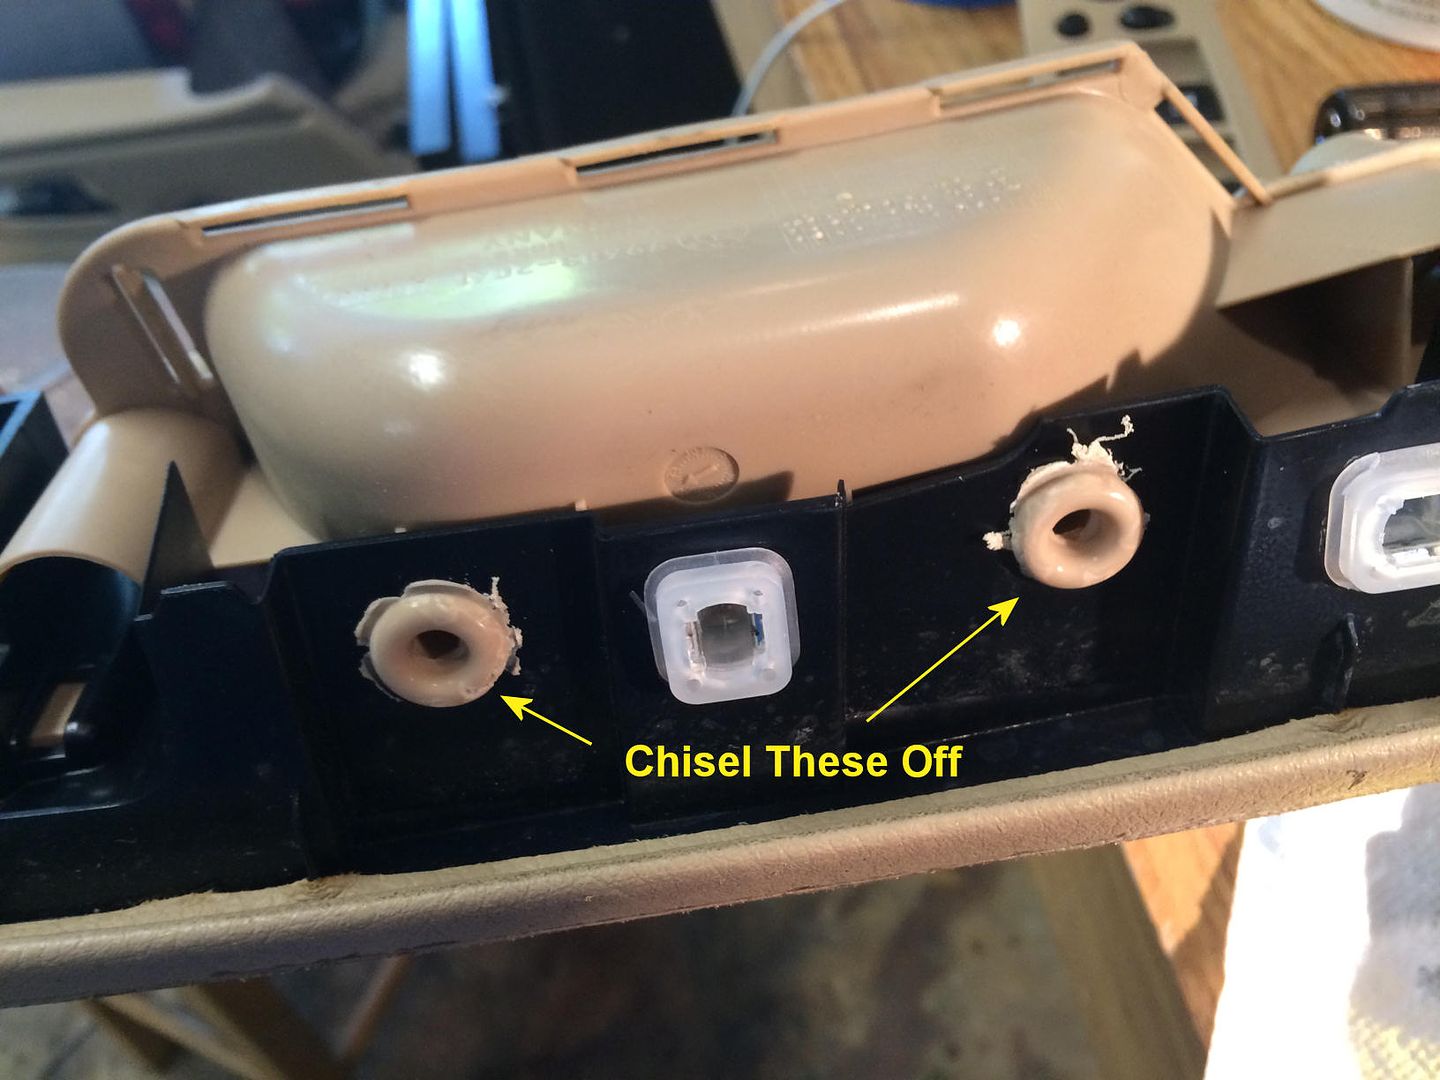 Be aware that putting the driver's side door pull back on is not quite the same as the other door pulls and/or armrests. You will use screws, but the diameter of the plastic posts on the driver's door pull is too large for tapping and screwing. Therefore, you will need to fill these with epoxy and allow to dry overnight - then you can drill a pilot hole and fasten it to the armrest panel with 10x5/8 #8 automotive trim screws which you can get at the hardware store.  Anyway, once you get the door pull removed, it will come apart into two pieces - the pull cup and a backer plate. Just spray it in the same manner as above. 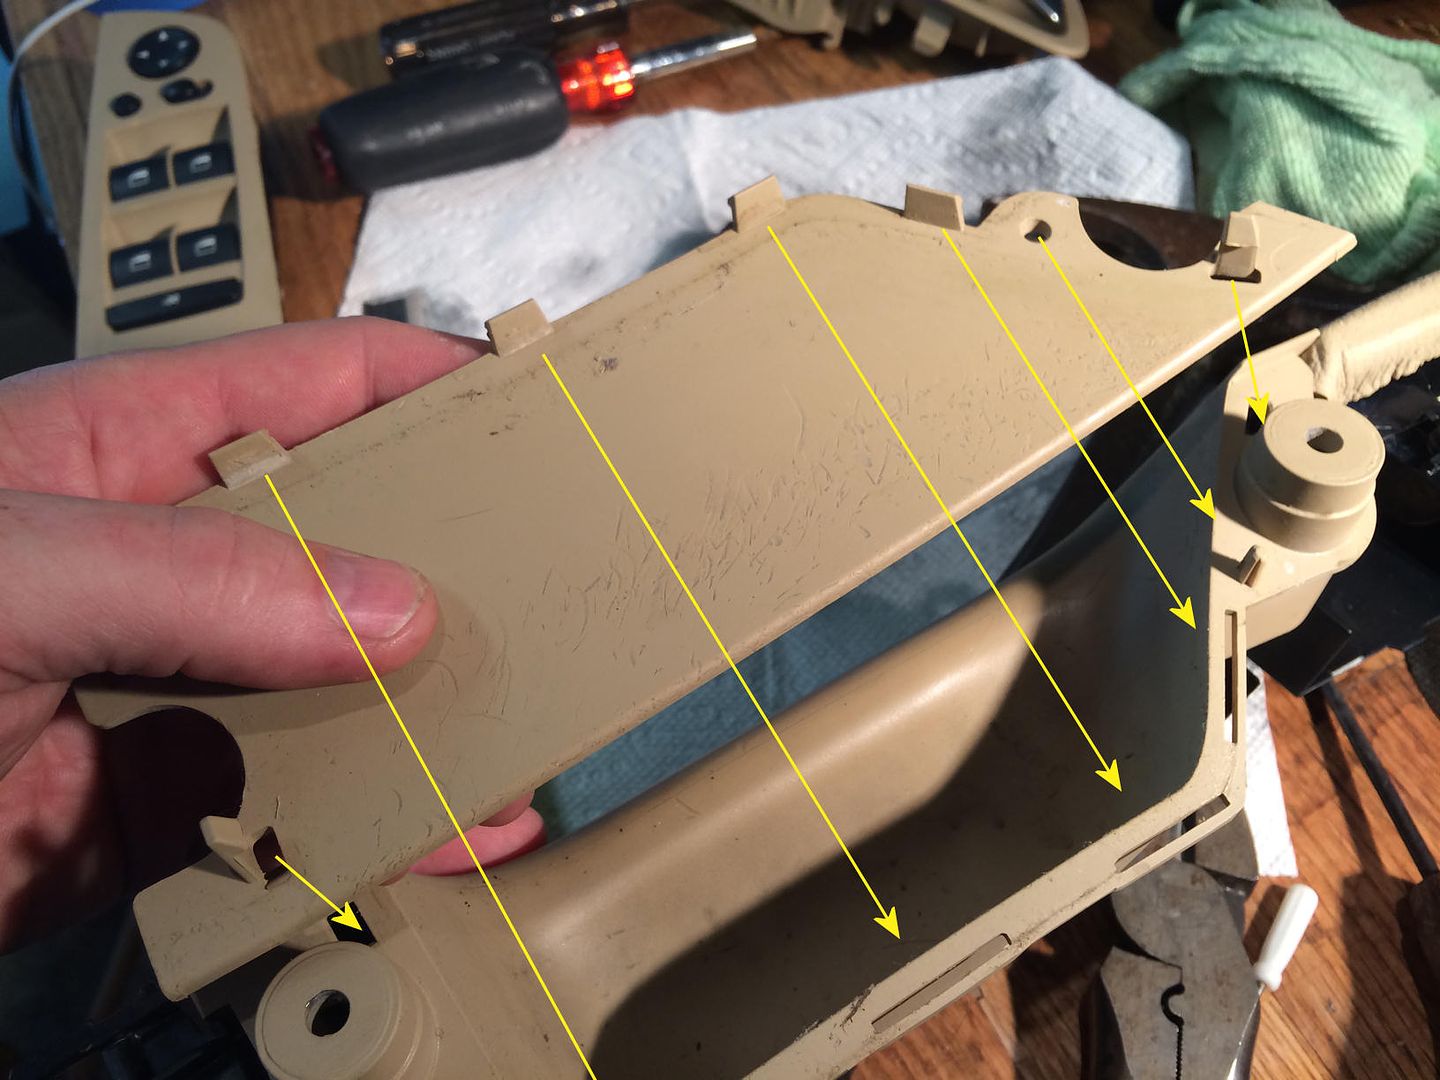 For the door handle recesses, I used the stovetop dying method. Begin by removing the cable from the door handle. This is held onto the handle recess trim with a white plastic cover. There is one clip that you have to pry gently to get the cover off and remove the cable. The recess trim itself is held onto the door panel with some gnarly clips - you have to bend some plastic tangs back in order to get the clips to release. This will be obvious when viewed from the back of the door panel. Once you get the recess trim off, you can use a punch to get the handle out - it is held in place with a plastic pin. I used grocery store RIT dye, but I'm sure there are others that would work. Follow the manufacturer's directions for stovetop. Just make sure you do all four at once so they come out the same. I used one whole package in a medium-sized pan, brought it to a simmer and removed from heat, dumped the trim pieces in, stirred for a couple of minutes, and they came out beautiful. 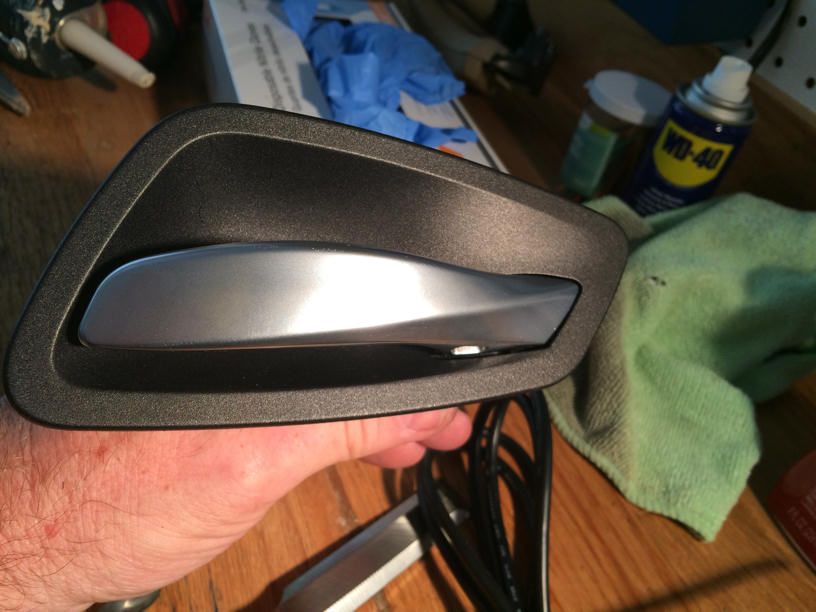 Replacing the door pulls in OEM black I ordered my replacements from Tischer (Getbmwparts.com). My part numbers may differ from yours, so get your part number from realoem.com, then go shopping on Tischer. There are only three pulls, one for each passenger door - the driver door has an integrated one. The pulls are held onto the door panel with four heat-pressed plastic posts - two on top, and two on the bottom. Cut these off with a chisel as in the photo below. 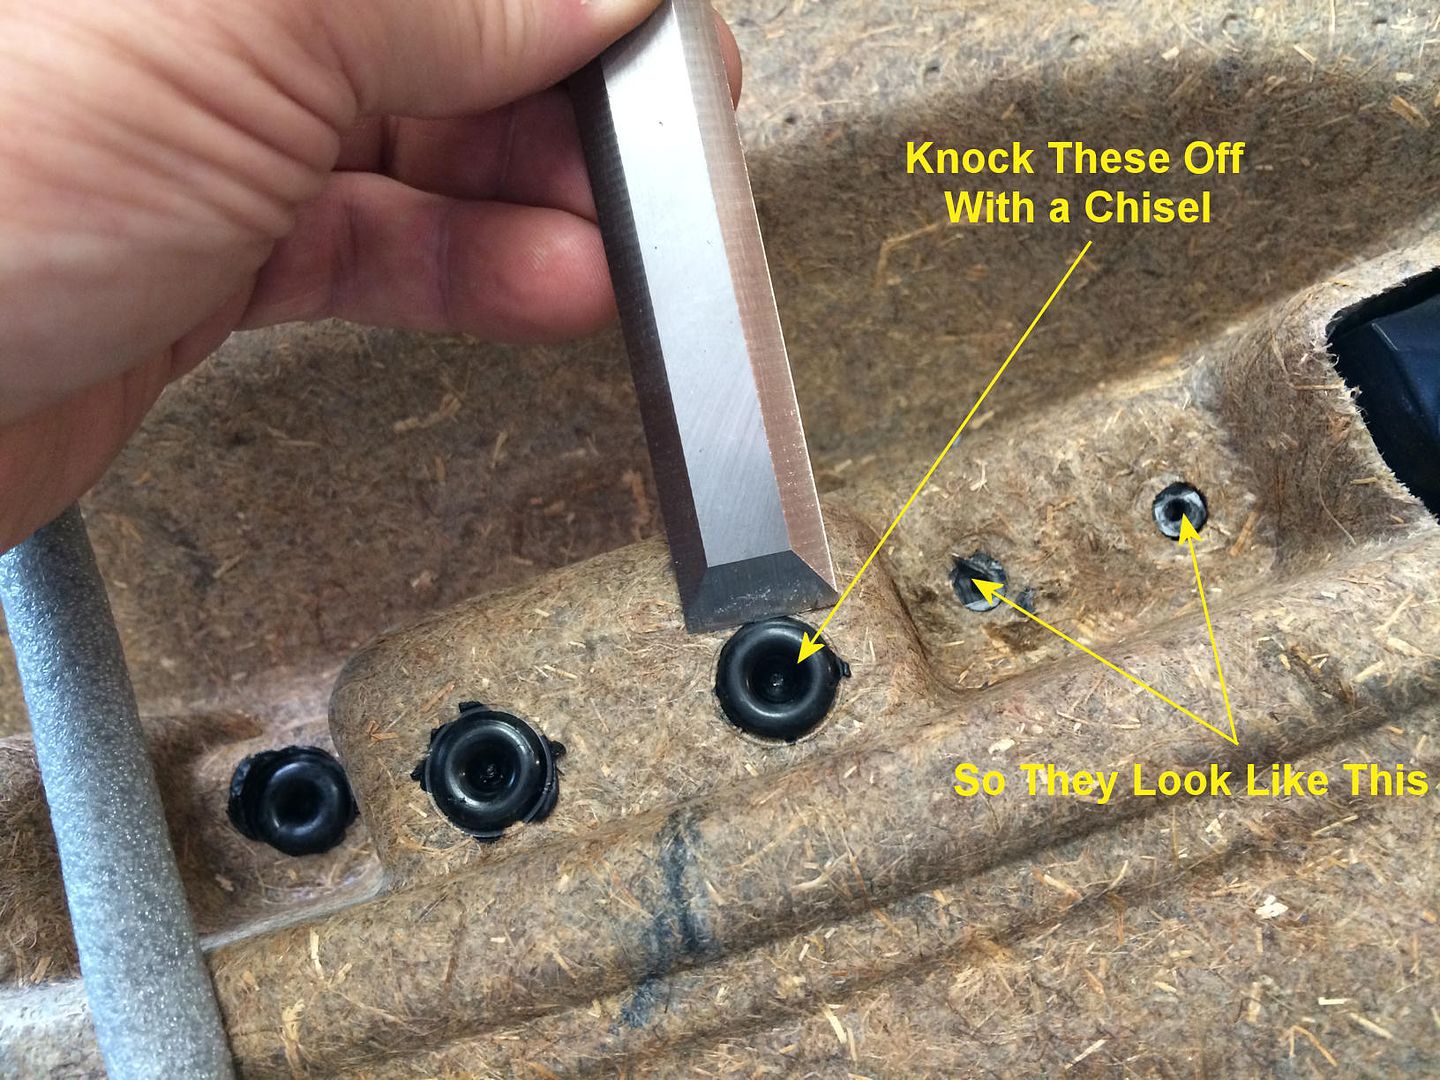 Once you remove the pulls, you will be able to remove the armrests for the dying process. Note that installing the new door pulls is the last step in reassembling and installing the door panels. When ready to install the new door pulls, unless you have the tool to heat-press the posts back in like factory, you will have to cut the plastic posts down and screw them in as shown in the second photo below. The idea is to cut them so they are flush with the door panel when installed. Drill pilot holes in the four plastic posts with a 1/8 drill bit. Then use four 10x5/8 #8 automotive trim screws (which you can get at the hardware store - see photo below) to fasten the door pull to the door panel, as in the photo below. 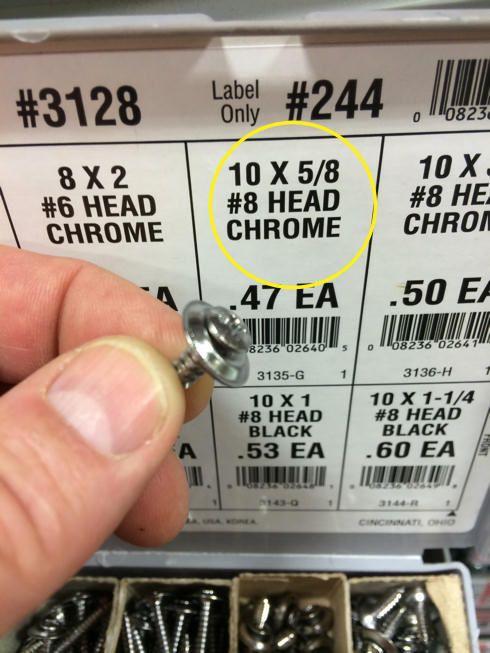 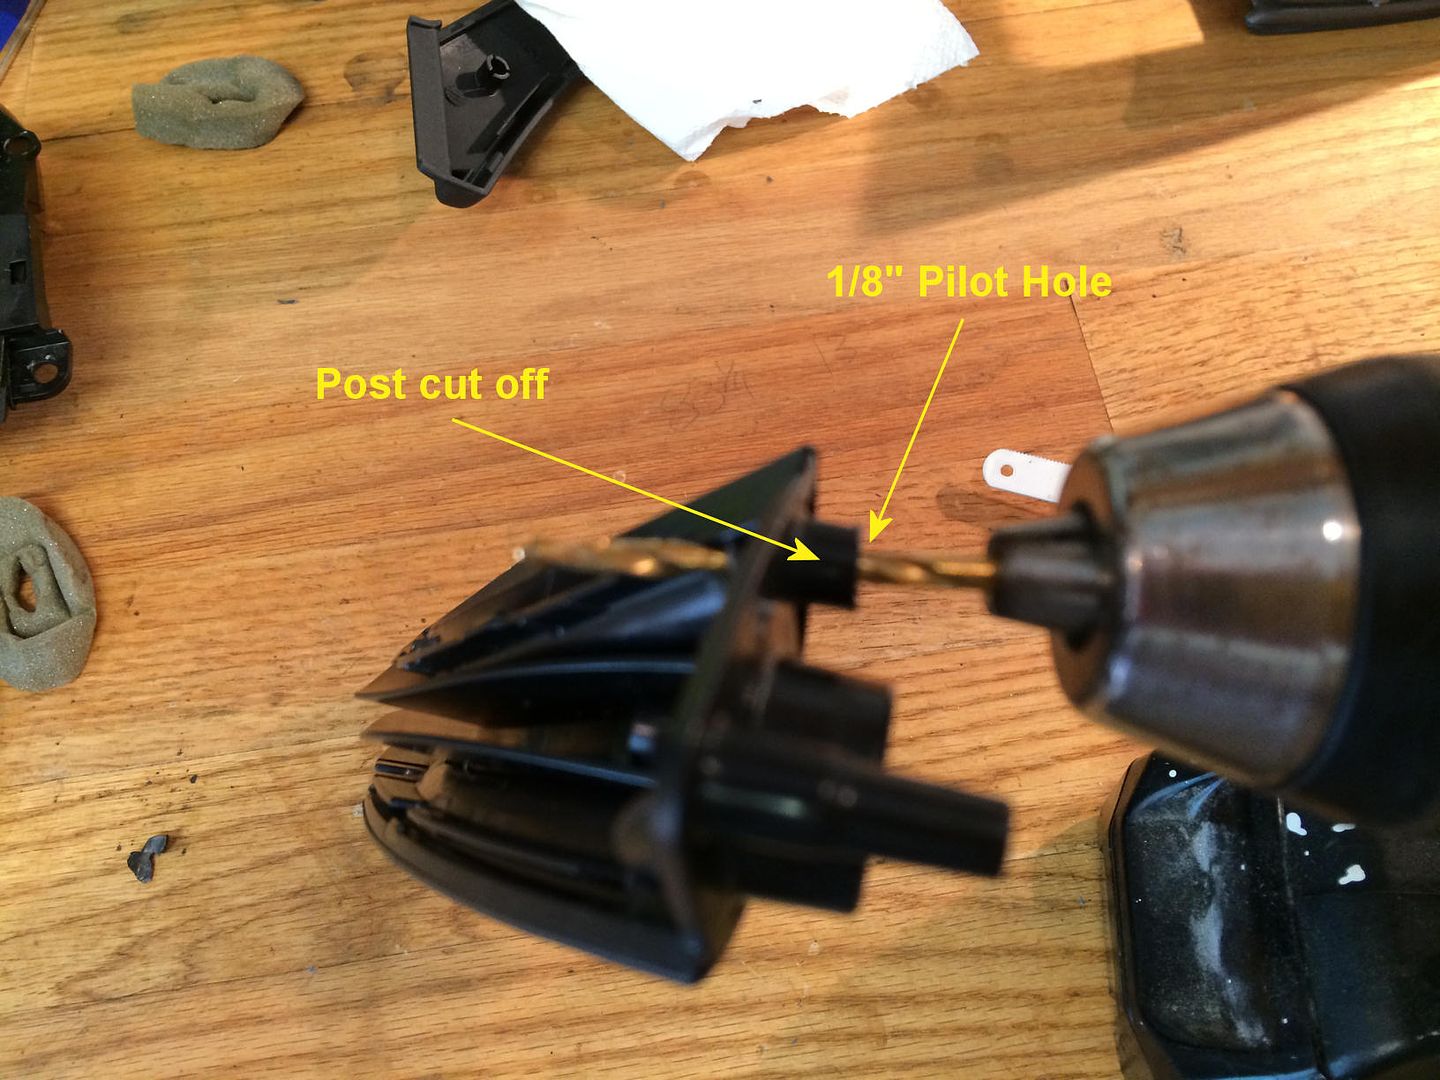 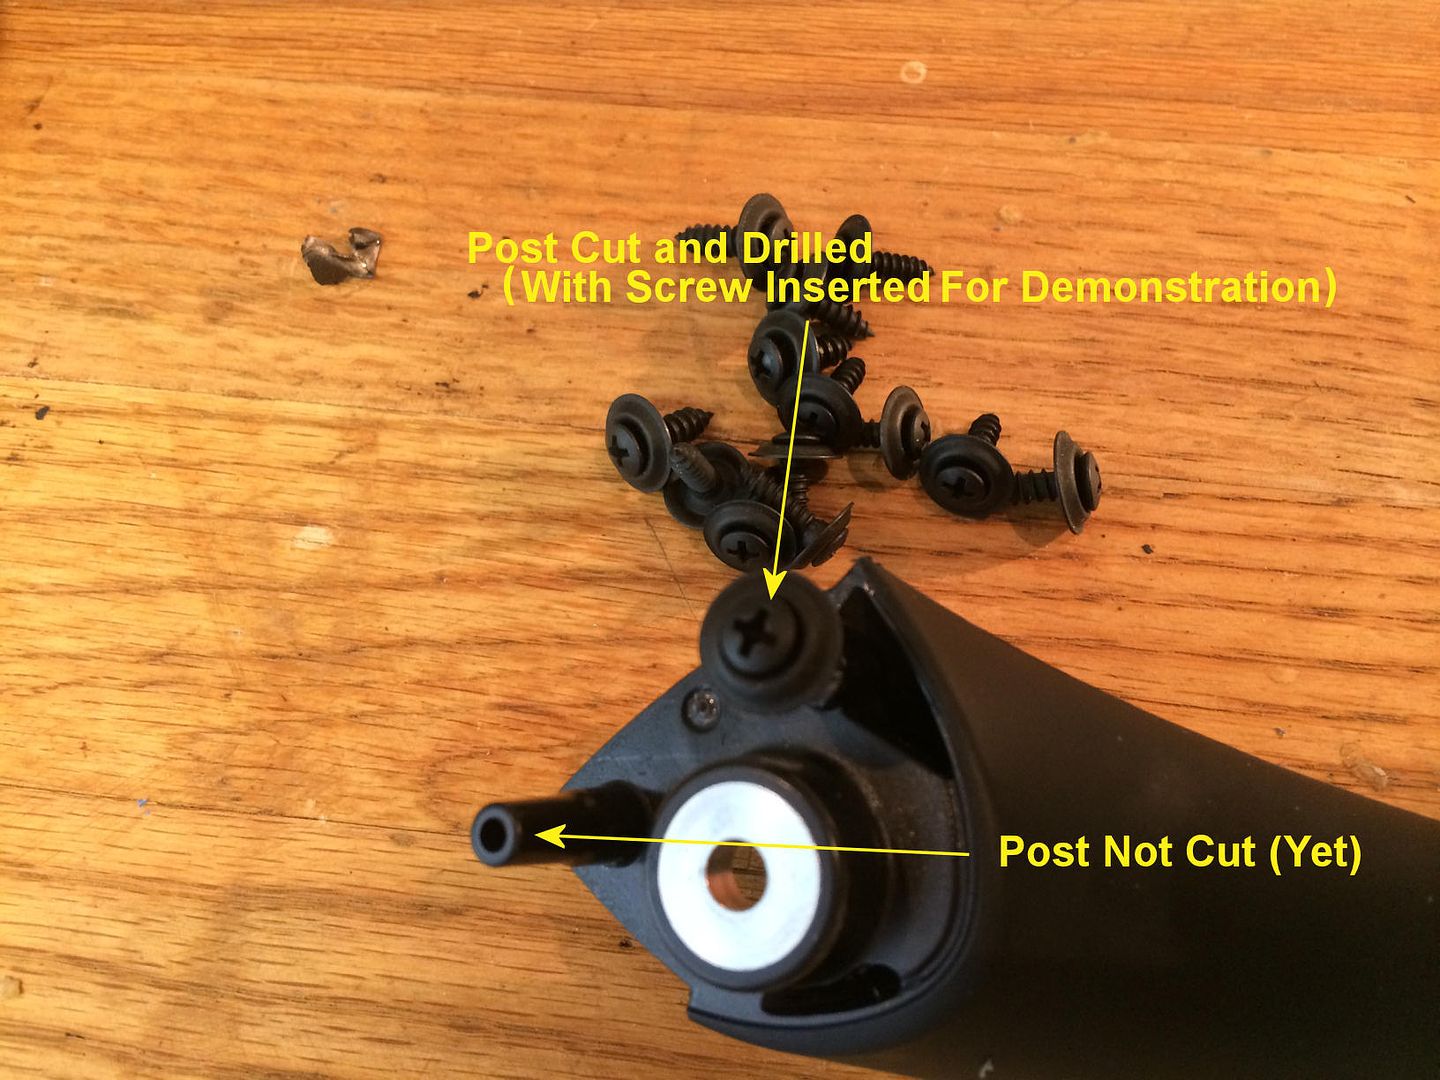 Dying the armrests, console cover/armrest, and handbrake boot This is where things get interesting. It took some real trial and error to figure out the dying process. I used Leatherique dye - I highly recommended their product, but NOT their instructions! Note that this process takes time and patience for a good result. Here is a video of using Leatherique dye in a sprayer: Anyway, I don't own a sprayer, so I used a different application technique. Here is what worked for me: Start by removing the armrest panels. You must begin by removing the door pulls. Both the door pulls and armrest panels are held onto the door panel with heat-pressed plastic posts. Cut these off with a chisel as in the photo below. Remove the handbrake boot by first popping the boot - in the photo below you can see that it has seven tabs - one at the bottom, two at the top, and two on each side. I started at the bottom, then the top, then the sides. Push the base in on the bottom to release the tab, then do the same for the two tabs on top. Scrunch the leather together to make the sides easier to push in and release. Once the boot is released, you can simply grab the handle and pull with force to release the whole assembly. 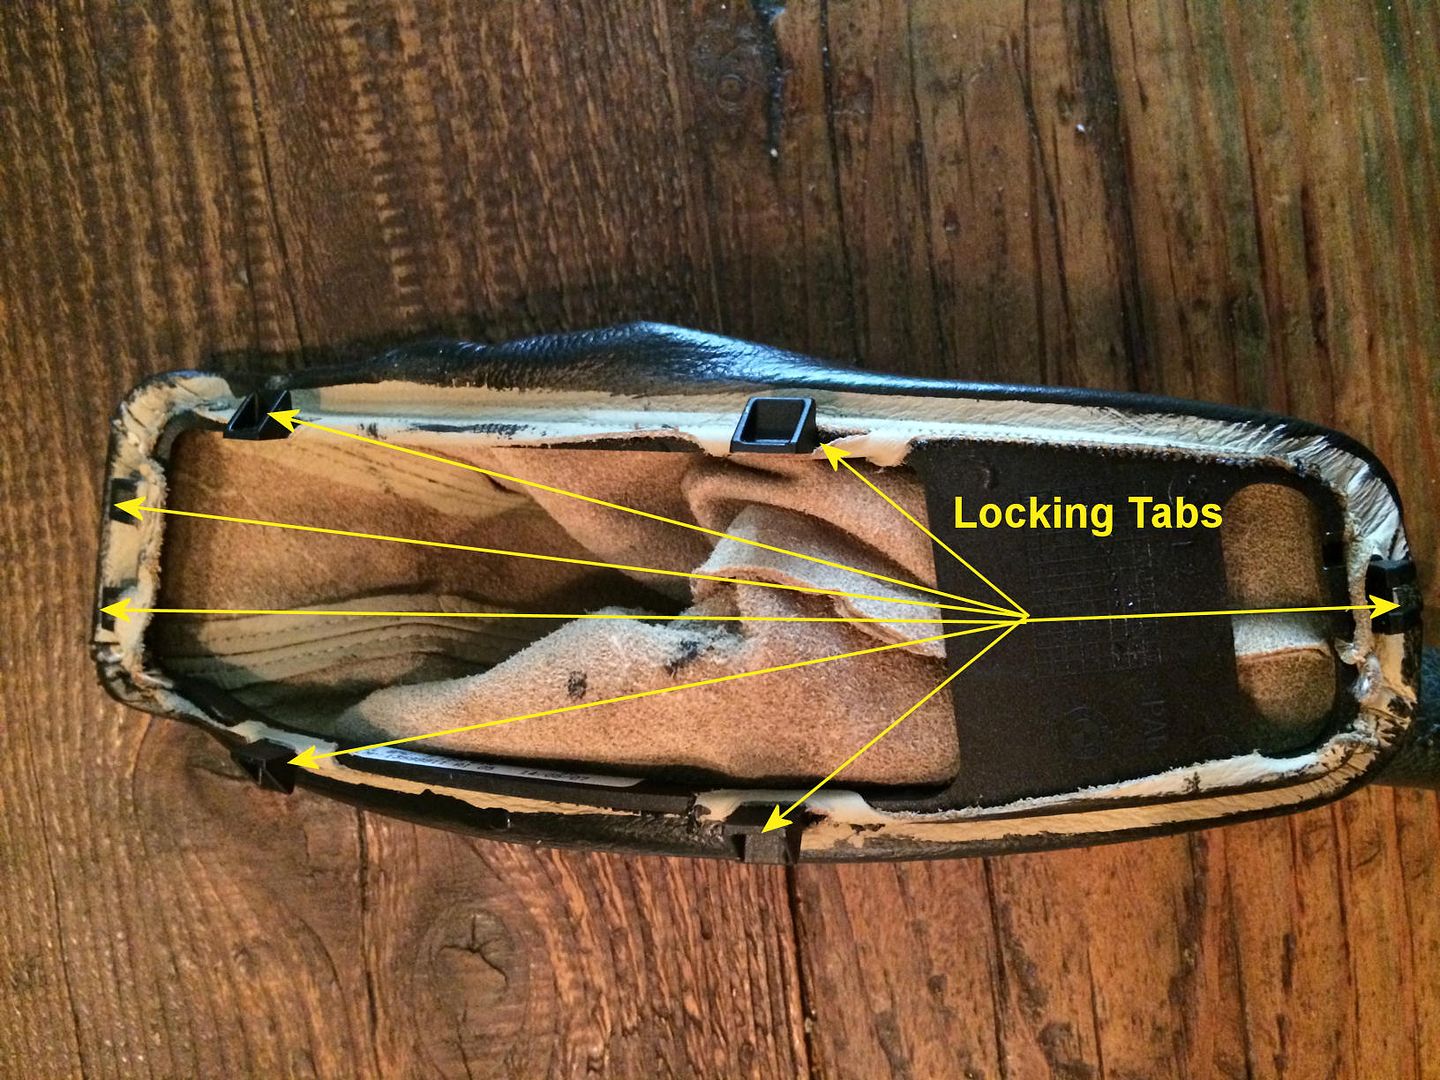 To remove the console cover/armrest, you must first remove the rear console panel. I have a DIY on this here: http://www.e90post.com/forums/showthread.php?t=883564. It is tricky, and as you can see from my DIY I broke my tabs. However, it still stays in place and I've never had a problem - in fact it's much easier to remove mine now! Anyway, with the rear console panel removed, you will see that the console cover/armrest is hinged on two pins. These pins have each have one knurled end, which is on the end toward the outside of the console. So they must come out toward the doors - that is, using a punch you will tap them from the inside of the rear console outward toward each door. That is all there is to removing the console cover/armrest. Prepare each piece by first cleaning it. I used Leatherique products: Rejuvenator Oil (not really oil) and Prestine Clean. Preparation is a two-night process! The first night you will apply the RO, wrap it in plastic and put it in a warm place - I used a heat lamp overnight. The next day, wipe it down, spray it with PC and wipe/buff it. Then, let it dry overnight. Next, remove the old dye. I used Leatherique Prepping Agent. Dip 600 grit wet sandpaper into the PA and sand the leather, being careful not to raise the grain. Basically, except for worn areas on the armrests, I just sanded the shit out of it. Then wipe the old dye off with a clean cloth or paper towels. Repeat. Let dry overnight - this is important as the leather must be "dry-before-you-dye".Now that you're ready, you will apply the dye in multiple steps. In step one, you will use a small artist paint brush to apply dye to the cording/stitching areas. In the next steps, you will apply three or more *light coats* of dye over the large areas, allowing it to dry overnight each time. I know this *may* be overkill, but my first attempts turned out badly, and a little birdie told me to do it this way. The Leatherique website led me to believe that I could do it all in one coat using a paint brush, but trust me, this will not work! The result is glossy, tacky and prone to scratching off. Use a clean cloth (I used old white socks) to apply the dye in light coats. Here is what mine looked like after one coat: 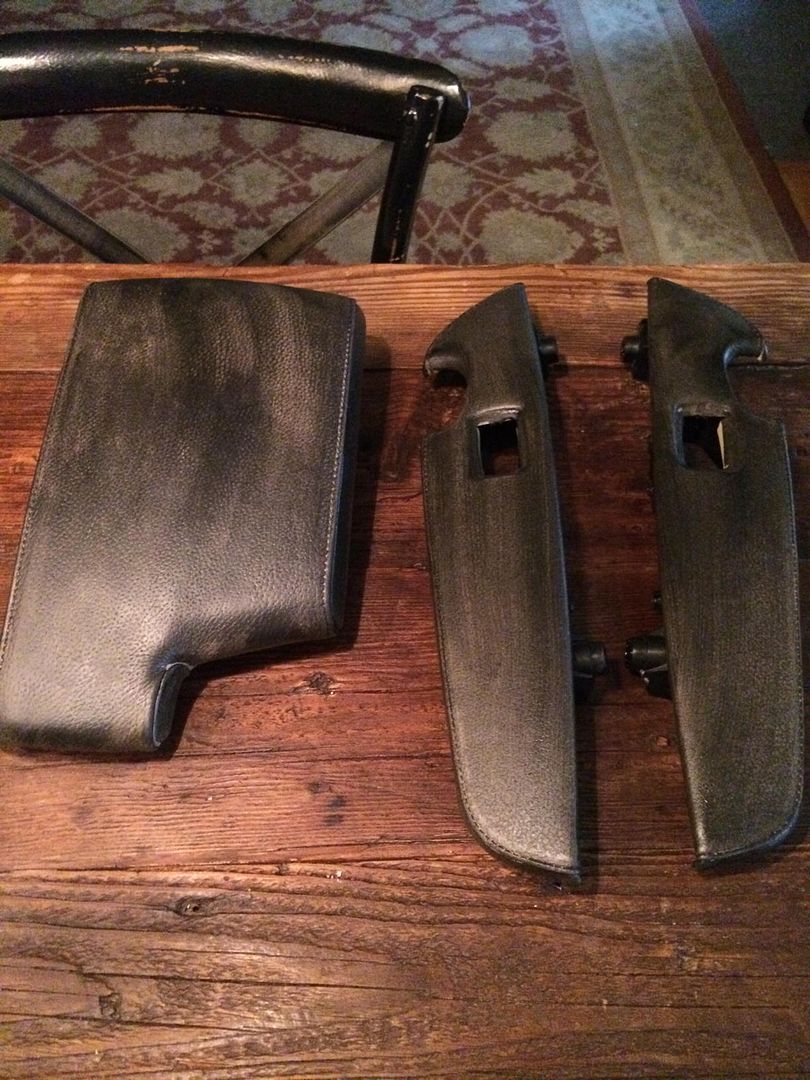 I think you could even go lighter. Anyway, let this dry overnight and repeat.  Let that dry overnight and repeat. At that point you should be good, but feel free to repeat again if you don't think the coverage is right. Here is my final result: 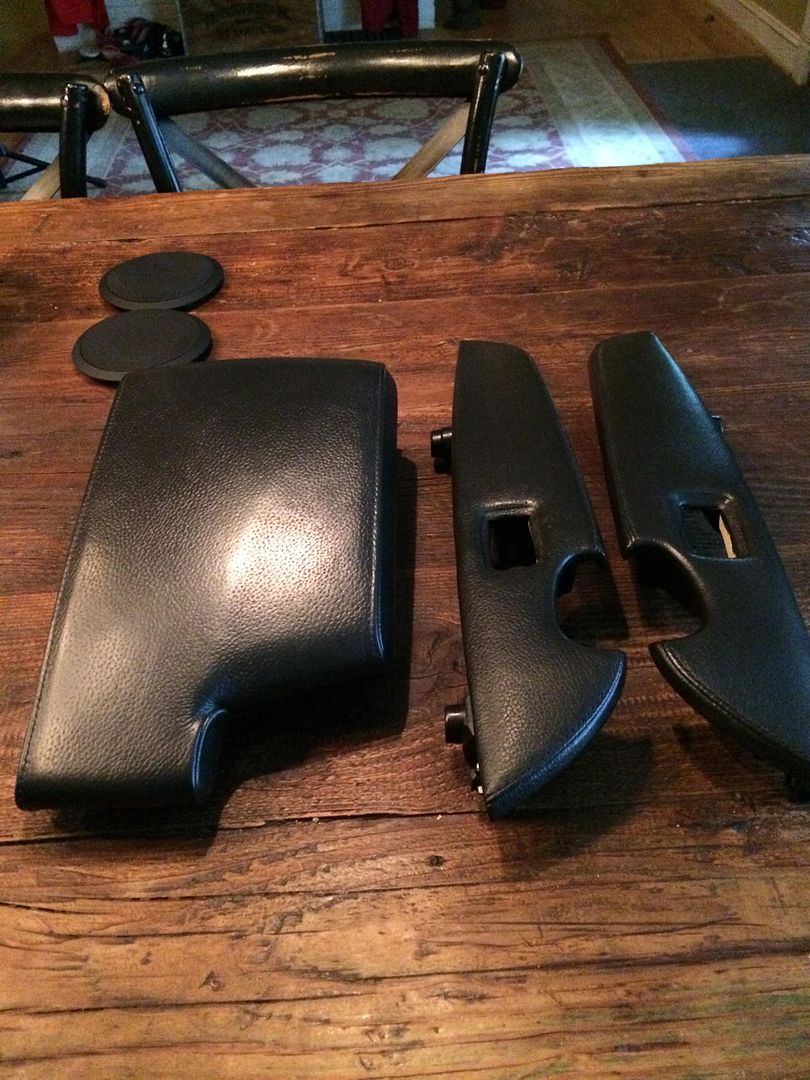 EDIT 2/2016: after 18 months, the dye is holding up like a champ. I drive with my arm resting on the console cover all the time, and it has not worn one bit. Dying the seatback nets black I did a separate DIY on this: http://www.e90post.com/forums/showthread.php?t=1007168.
__________________
1M. Previously: '13 135is; '07 E90 335i; '02 325i; '99 Z3; '98 328is; '87 L6; '77 320i
 Last edited by NGEE; 07-24-2021 at 08:19 PM.. |
| 08-16-2014, 09:50 PM | #2 |
|
Major
 
136
Rep 1,192
Posts
Drives: 2011 335i MT
Join Date: Mar 2014
Location: Austin, TX
|
Wow! That is amazing. Thanks for sharing.
__________________
PTF Map, Pure Turbo Stage 1, GFB DV+, Mfactory LSD, AA FMIC, B12 Pro Kit, M3 FCA, AR DP and
Dynavin N6, Mosconi AS100.4, AS100.4, AS200.2, Micro Precision tweeters & woofers, Esotar2 1200 |
|
Appreciate
0
|
| 08-21-2014, 05:34 AM | #3 |
|
Colonel
 205
Rep 2,349
Posts |
That is unreal, This is awesome I cant wait to try this! Anyone else tried it? And the results?
__________________
07 E92
Jb4-G5 - Sport Exhaust - Titek BOV BBS Lm reps - AFE dual cone intake |
|
Appreciate
0
|
| 08-25-2014, 11:27 PM | #4 |
|
Lieutenant
 
42
Rep 551
Posts |
Good work on all that man. I think dying the center portion of the seats would really set off the whole contrast idea.
__________________
2006 Sonora Metallic 330xi.
DIY: Charcoal Delete, K |
|
Appreciate
0
|
| 08-26-2014, 04:14 AM | #5 |
|
Fuck it dude, let's go bowling.
881
Rep 2,477
Posts |
Thanks guys! I think the center-seat thing might push the contrast theme over-the-top, but I may eventually get the full seat-backs in black since the price of a new set is fairly reasonable. I have also GOT to do something about that rear console. I may just pull the whole console and spray or dye it black.
And since I finished this job, every time I get in the car it screams "sport wheel please!" There's just so many other things I could spend a grand on. 
__________________
1M. Previously: '13 135is; '07 E90 335i; '02 325i; '99 Z3; '98 328is; '87 L6; '77 320i
Last edited by NGEE; 09-15-2014 at 06:55 AM.. |
|
Appreciate
0
|
| 06-03-2015, 08:05 PM | #7 |
|
Engineering the World
0
Rep 14
Posts |
Just came across this thread. I really like the idea of replacing the shift bezel with a manual one. All the mods look great.
|
|
Appreciate
0
|
| 09-09-2015, 03:46 PM | #8 |
|
Registered
0
Rep 4
Posts
Drives: 2007 BMW 328xi
Join Date: Aug 2015
Location: West Michigan
|
This was very helpful in restoring my interior - thanks for putting in the effort and attention to detail into this DIY!
|
|
Appreciate
0
|
| 02-02-2016, 02:24 PM | #10 | |
|
Fuck it dude, let's go bowling.
881
Rep 2,477
Posts |
Quote:
__________________
1M. Previously: '13 135is; '07 E90 335i; '02 325i; '99 Z3; '98 328is; '87 L6; '77 320i
|
|
|
Appreciate
0
|
| 02-05-2016, 10:18 AM | #11 |
|
Lieutenant
164
Rep 598
Posts |
Really like the wrap over the woodgrain... how much wrap do you think I should order (I have an E90 too)?
And what's your opinion of the durability of the 3M wrap since you've had it for awhile. |
|
Appreciate
0
|
| 02-05-2016, 11:14 AM | #12 | |
|
Fuck it dude, let's go bowling.
881
Rep 2,477
Posts |
Quote:
In terms of durability, I'm not gonna lie - it's not great. I mean it holds up to wear and tear, but the edges want to get wonky when the car sits in the sun/heat. I've got to redo mine. Next time I'm using the primer to keep that shit in place permanently. I've been getting my materials through MetroRestyling.com. They also sell the primer. I used the primer on some larger projects at work - wrapping desks and long conference tables in carbon fiber. Put that primer down and that wrap is staying in place. However, I'd recommend not using primer until you know what you're doing. Wrap your console or whatever, get a sense of how to do it, live with it for a while, and if you decide to go permanent, redo it with primer. 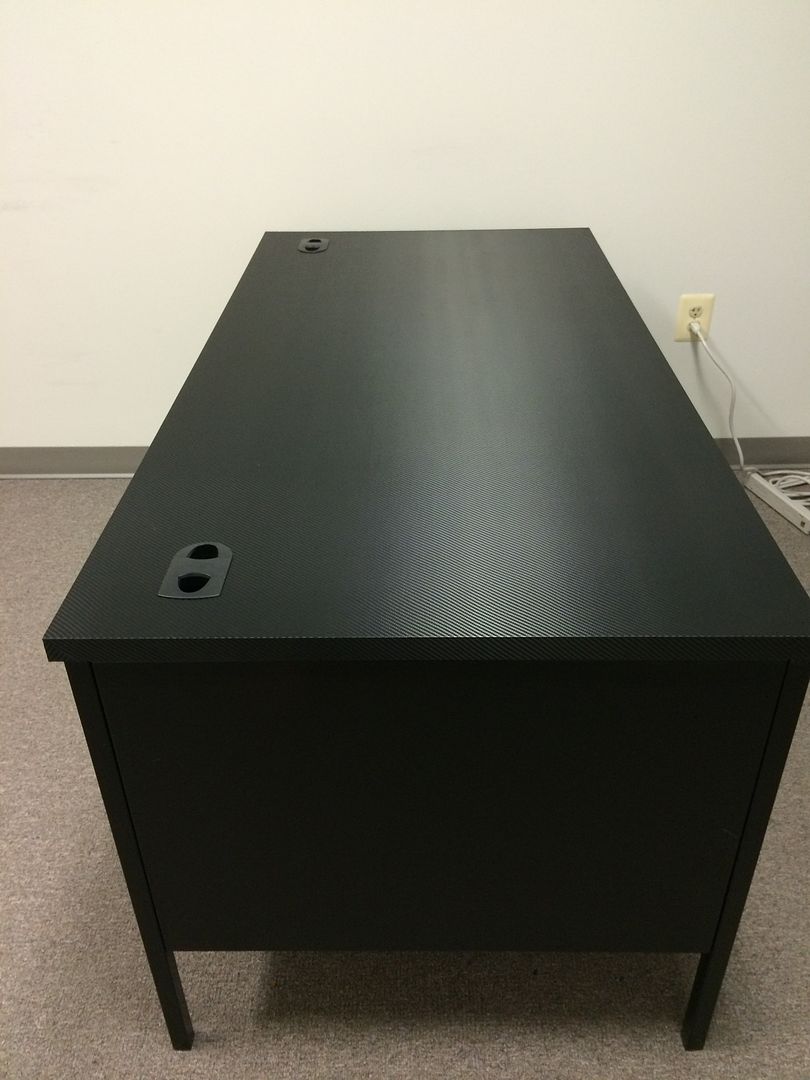 
__________________
1M. Previously: '13 135is; '07 E90 335i; '02 325i; '99 Z3; '98 328is; '87 L6; '77 320i
|
|
|
Appreciate
0
|
| 02-06-2016, 12:56 PM | #13 |
|
Lieutenant Colonel
 
421
Rep 1,643
Posts |
This diy guide is awesome, thanks for being so detailed.
Personally, I would never wrap my wood grain - it's looks much more classy than any other type of interior (including carbon fiber and the plain silver finish, or gloss piano blacks). They use good quality wood. The other materials make the interior look more like a modern ford or Honda.
__________________
2007 E92 335i MT
|
|
Appreciate
0
|
| 07-13-2016, 12:13 AM | #14 |
|
Registered
0
Rep 3
Posts |
This is amazing.
Has anyone tried to do dye the seats and the middle portion of the door panels corral red? Really curious on how this would look on a gray interior. |
|
Appreciate
0
|
| 02-27-2018, 09:32 PM | #15 |
|
Banned
601
Rep 2,703
Posts
Drives: 2009 335i - Sport PKG
Join Date: Jun 2009
Location: NY
|
these plastic areas broke, how to fix them??
|
|
Appreciate
0
|
| 02-28-2018, 02:26 PM | #16 | |
|
Fuck it dude, let's go bowling.
881
Rep 2,477
Posts |
Quote:
RealOEM lists two parts for that, and I don't know which is which. As cheap as they are, you could just order both. http://www.realoem.com/bmw/enUS/show...diagId=51_5718 Part numbers: 51457152442 07149158194
__________________
1M. Previously: '13 135is; '07 E90 335i; '02 325i; '99 Z3; '98 328is; '87 L6; '77 320i
|
|
|
Appreciate
0
|
| 02-28-2018, 05:55 PM | #17 | |
|
Banned
601
Rep 2,703
Posts
Drives: 2009 335i - Sport PKG
Join Date: Jun 2009
Location: NY
|
Quote:
|
|
|
Appreciate
0
|
 |
| Bookmarks |
| Thread Tools | Search this Thread |
|
|


