|
|
|
|
 |
|
 |
BMW Garage | BMW Meets | Register | Today's Posts | Search |
 |

|
BMW 3-Series (E90 E92) Forum
>
DIY E90 N54 Valve Cover Gasket
|
 |
| 01-31-2016, 11:13 AM | #199 |
|
Major General
 
1903
Rep 6,968
Posts
Drives: 2007 Black/Black 335i e90
Join Date: Apr 2011
Location: Holly, MI
|
Bentley repair manual states you should use Glycerin to put a light coat of anti-friction compound in the groves where the gasket goes in the valve cover, on the gasket once the gasket has been installed and on the cylinder head anyplace where the gasket will come in contact with it. Also, one should use a quality silicone sealant at metal to metal seams such as the timing cover to the engine block.
8.5 Nm is the torque used on the 26 bolts in a criss-cross pattern. Any bolt that tightens down the valve cover to the cylinder head is tightened to 8.5 Nm. Fuel line on driver's side = 13 Nm Passenger side = 23 Nm You have to hold the injector (passenger side) with a separate wrench as you tighten to 23 Nm. I would think a small but precise torque wrench would be a MUST with this job. Prior to initially removing the fuel lines, unscrewing the gas cap is advised to help relieve pressure in the lines. You can lightly tap the fuel line to help relieve pressure. Also, make sure any excess fuel is cleaned up immediately and the fuel holes where the lines went should be covered. The obvious would be to work on a cold engine and to undo the negative line on the battery, prior to starting any work. Strut brace at the center is 74# + 90 degrees. at the passenger side - 30# + 60 degrees. There are only 2 bolts the Bentley Repair manual says to replace are the are the strut tower bolts (M12 & M10). I think it would be wise to have a cobalt bit set, a tool and die set, and a spline style bolt removal kit handy just in case you over tighten a bolt or two and snap one off. Also, you should probably buy a few extra bolts just in case. You can get the part numbers for such bolts on bmwfans.info. Note they are pricey. |
|
Appreciate
1
IN54NITY86.00 |
| 02-01-2016, 12:44 PM | #200 |
|
Lieutenant
 111
Rep 408
Posts |
First thanks to Rob for this. Saved me a lot in labor fees.
Echoing both the previous posters comments. The VC was a bitch to get off. The gasket acts like glue and the threads catch. question for you guys It was late and cold by the time I had the cover off. I did the best I could with a rag and a razor blade and my fingernail to clean the head surface. For some f'ing stupid reason I forgot I could use a scotch brite pad. The surface was smooth to the touch and free of gasket pieces except the finest finest residue left in a couple spots. Think I'm ok? |
|
Appreciate
0
|
| 02-08-2016, 04:45 PM | #201 |
|
I'd hit it
1065
Rep 1,106
Posts |
Great write up. Going to give this a try in the next couple days.
Is this the kit I'd want for the N54? https://www.ecstuning.com/News/BMW_E..._2010/ES18622/ |
|
Appreciate
0
|
| 02-08-2016, 08:27 PM | #202 | |
|
Lieutenant
111
Rep 408
Posts |
Quote:
|
|
|
Appreciate
1
|
| 02-10-2016, 03:06 PM | #203 |
|
Lieutenant
111
Rep 408
Posts |
Something I forgot to ask, searched lots and can't find this anywhere. Looking at this left photo:
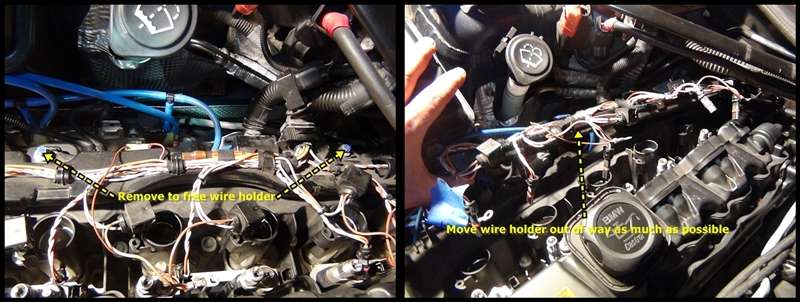 1.) Are these (non-reuse) bolts part # 13627530413 or part # 11137544768? RealOEM says 1 of each(?) but I could swear it was 2 of the same bolt. 2.) What's the torque spec on these? Thanks |
|
Appreciate
0
|
| 02-13-2016, 07:18 PM | #204 |
|
Enlisted Member
 9
Rep 46
Posts |
tip - check your new gasket against the one in the pic before starting work. I got a Felpro I ordered from O-Reilly only to find out it wouldn't fit after I pulled the cover. Fortunately it was a Sat and BMW was still open so I drove 3 hrs, paid the premium and will finish on Sun.
|
|
Appreciate
0
|
| 02-27-2016, 05:21 PM | #205 |
|
Instagram: @skrskrt.tv
13
Rep 182
Posts
Drives: BMW 435i GC
Join Date: Aug 2013
Location: Columbus, OH
|
Difficulty removing bolts
Anyone else have difficulty removing the bolts holding down the valve cover?They seem to be a real pain to access and remove. Also the one in the rear corner on the passenger side seems to be stripped. Any advice?
__________________
435i GC
Injen Intake VRSF Catless DP, Intercooler, chargepipe CF Spoiler CF Diffuser CF/Stainless tips BM3 Stage 1 |
|
Appreciate
0
|
| 02-28-2016, 07:37 AM | #206 |
|
Lieutenant
140
Rep 476
Posts |
I don't know if it's recommended, but since I was changing the whole valve cover I just pulled the bolts out of the old valve cover. After that the cover came right off.
|
|
Appreciate
0
|
| 02-28-2016, 07:39 PM | #207 |
|
Supreme Galactic Commander (one galaxy over...)
672
Rep 1,778
Posts |
Great DIY, I intend to accomplish this coming weekend. Got the entire valve cover kit (part #11127565284 ) from tisher, which has all bolts installed in the VC, however, I didn't see any "different" sized bolts in the corners like the OP. Am I missing something? Thx.
__________________
Best,
Andy  '12 E82-PS2,Stoptechs,Clubsports+M3 bits,Accusump,Wagner DP+EVO III FMIC,ERCP,BMS Intake,Mason Strut Bar,Wedge Tune |
|
Appreciate
0
|
| 02-29-2016, 03:41 PM | #208 | |
|
Lieutenant
111
Rep 408
Posts |
Quote:
|
|
|
Appreciate
0
|
| 02-29-2016, 04:27 PM | #209 |
|
Private First Class
 21
Rep 178
Posts |
What a pain in the ass job. I managed to get through it breaking only one of the injector power clips and only dropping one thing into my engine compartment though, which I thought was nice.
|
|
Appreciate
0
|
| 02-29-2016, 07:20 PM | #210 | |
|
Supreme Galactic Commander (one galaxy over...)
672
Rep 1,778
Posts |
Quote:
__________________
Best,
Andy '12 E82-PS2,Stoptechs,Clubsports+M3 bits,Accusump,Wagner DP+EVO III FMIC,ERCP,BMS Intake,Mason Strut Bar,Wedge Tune |
|
|
Appreciate
0
|
| 04-26-2016, 07:38 PM | #217 |
|
Supreme Galactic Commander (one galaxy over...)
672
Rep 1,778
Posts |
I just realized I did not do the glycerine coating or the silicon sealant on the "metal to metal" section (don't even remember seeing any contact point not supported by gasket). Figure I didn't need the glycerine as I got the whole VC with gasket, so it was already installed. Should I be worried about not putting the sealant on the "metal to metal" section?
__________________
Best,
Andy '12 E82-PS2,Stoptechs,Clubsports+M3 bits,Accusump,Wagner DP+EVO III FMIC,ERCP,BMS Intake,Mason Strut Bar,Wedge Tune |
|
Appreciate
0
|
| 04-27-2016, 09:20 PM | #218 |
|
Private First Class
26
Rep 186
Posts |
Regarding the deep socket to remove the 3 ground posts. I have 2 sets of deep sockets. One set was too narrow to fit around the ground post to work. 2nd set did work, so be aware if your socket does go all the way down you're not the only one. BTW. Both sets I have both Craftsman.
__________________
 '11 E92, MSport 3 Pedal 3.1L Stroker Z |
|
Appreciate
0
|
| 05-06-2016, 10:45 AM | #219 |
|
Registered
0
Rep 1
Posts |
Needing some help. This diy was a life saver. However on the underside of the valve cover there is a small valley or breather tube that clips on and has 3 small holes in it. Does anyone know what this is or have a part number as mine broke removing it for the new cover
|
|
Appreciate
0
|
| 05-12-2016, 06:43 AM | #220 | |
|
Registered
0
Rep 2
Posts |
Quote:
 , though I see a very small, and I mean small amount of oil on the heat shield, should I torque the bolts again as some of the guys in here did? I cleaned the crap out of the block where the Gasket would sit so it was super clean and had not issues with Gasket falling out. , though I see a very small, and I mean small amount of oil on the heat shield, should I torque the bolts again as some of the guys in here did? I cleaned the crap out of the block where the Gasket would sit so it was super clean and had not issues with Gasket falling out. |
|
|
Appreciate
0
|
 |
| Bookmarks |
|
|