

|
|
|
|
 |

|
 |
BMW Garage | BMW Meets | Register | Today's Posts | Search |
 |

|
BMW 3-Series (E90 E92) Forum
>
DIY - Repainting a small area
|
 |
| 10-31-2010, 02:05 PM | #23 |

77
Rep 1,208
Posts |
Sorry a bit late for the reply.
It's ok to feather a bit onto the existing finish but you don't want to go over too much since you won't get really good adhesion there. A bit of overspray will stick to existing clearcoat and the paint particles that won't stick will come off when you clean the area later. So it'll work itself out in the end. As for the wheel color code, it's BMW Reflex Silver, Color Code A44 It was a perfect match for me. This is for the standard silver wheels, not the new black or gunmetal ones. |
|
Appreciate
0
|
| 11-02-2010, 12:06 PM | #24 |
|
77
Rep 1,208
Posts |
Had some requests to follow-up on this. I told some other members I took my cheap guitar and repainted it using the above techniques too using the leftover paint from this job and some other vehicles I've done for friends. Here are the photos:
Wrapping the pickups. I could have removed them but it was easier to wrap them since they were soldered onto the board.  Masking out the head:  Sanding and masking the body:  Two coats of paint color code A51 (matched to BMW Montego Blue) applied with flat white. After cleaning down the sanded body, I applied a coat of primer and then sprayed the blue paint on until it matched the color depth I wanted. I let that all dry overnight, then remasked the entire body again leaving three open areas for the stripes. Sprayed it with the white then.  I decided to feather/mist the corners with silver paint (from a Jeep that I fixed up a while ago for a scratched bumper). This shows the masking job I used to isolate the edges.  I then did a whole body mist from the neck side only with white paint to give it a bit of a gradient look. From the other end, I misted it with blue to put a bit of misting over the white stripes. Gives it a bit of a grungy look. Afterwards (not shown in photo) I went with the white paint on the other side where the white stripes start to give that area more of a mist (see final product photo).  This is the head repainted:  Final product clear coated:  |
|
Appreciate
0
|
| 08-23-2011, 11:40 AM | #26 |
|
77
Rep 1,208
Posts |
Just adding an extra tip on this one.
Painting some smaller parts (like the finishing rods). To make your own mini spray booth, take a cardboard box and mount your piece inside. You can then close the box and put it in your garage to dry without worrying about getting overspray everywhere in the garage. Also, it allows you to control the environment a lot better and makes the process pretty much mess-free. |
|
Appreciate
0
|
| 06-08-2012, 03:01 PM | #27 |
|
Lieutenant Colonel
 
57
Rep 1,906
Posts
Drives: black 335i e90 PRE-LCI
Join Date: Apr 2006
Location: somewhere
|
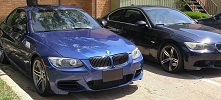
Great DIY, came in very handy for me....thanks ANDY M for your help and posting this.....
here's some pics from my project...
__________________
 |
|
Appreciate
0
|
| 02-12-2014, 09:24 AM | #28 |
|
New Member
1
Rep 10
Posts |
sorry to revive such an old post. But I was wondering, I´m not sure what you mean by "spray bomb". Do you have like a compressor with a gun sprayer? or you are just using a simple plastic sprayer?
|
|
Appreciate
0
|
| 03-07-2019, 08:58 PM | #30 | |
|
ahat

1034
Rep 2,592
Posts |
Quote:
But damn good effort.
__________________
 '13 335IS N54 (1 of 373 LeMans Blue out of 3597 total production e92)- Grey interior (1 of 24 in LMB with any trans- 1 of 14 with DCT)-MODS -MFactory LSD/MHD-BQ custom Tune/ATM-IC/AFE Momentum GT Intake/Konis/Mfront&HeimJoint Rear rods&arms/Brembos. https://photos.app.goo.gl/Lo6aHZRo7XqtPkhL8 |
|
|
Appreciate
0
|
 |
| Bookmarks |
|
|


