

|
|
|
|
 |

|
 |
BMW Garage | BMW Meets | Register | Today's Posts | Search |
 |

|
BMW 3-Series (E90 E92) Forum
>
Pictures: Electric water pump + thermostat replace
|
 |
| 12-06-2013, 06:03 PM | #199 | |
|
New Member
1
Rep 14
Posts |
Quote:
Cali |
|
|
Appreciate
0
|
| 12-07-2013, 03:57 PM | #200 | |
|
Lieutenant Colonel
 
200
Rep 1,834
Posts
Drives: '05 E90 330i Manual
Join Date: Aug 2010
Location: Cape Town, South Africa
|
Quote:
__________________
BMW E90 330i (M) '05 (His) | (Hers) BMW E46 320i f/l (M) '03
 |
|
|
Appreciate
0
|
| 12-20-2013, 12:04 PM | #201 |
|
Enlisted Member
 43
Rep 30
Posts |
http://www.ebay.com/itm/BMW-Engine-W...a519b7&vxp=mtr
Pierberg water pump + haman thermostat for 360$ on ebay? buy or pay more for a bmw one? http://www.ebay.com/itm/BMW-Thermost...c86661&vxp=mtr 466$ for this one? |
|
Appreciate
0
|
| 02-15-2014, 11:09 PM | #202 |
|
***** noob


1368
Rep 10,479
Posts
Drives: 325xi>M235i>428GCx Mspor
Join Date: Sep 2005
Location: Boston
|
__________________
2006 325xi (Sold)
2014 M235I (Current) 2015 428xi Gran Coupe (STB) |
|
Appreciate
0
|
| 02-15-2014, 11:10 PM | #203 |
|
***** noob
1368
Rep 10,479
Posts
Drives: 325xi>M235i>428GCx Mspor
Join Date: Sep 2005
Location: Boston
|
__________________
2006 325xi (Sold)
2014 M235I (Current) 2015 428xi Gran Coupe (STB) |
|
Appreciate
0
|
| 03-23-2014, 02:37 PM | #204 |
|
Captain
 
34
Rep 715
Posts |
I wonder if anyone here could help with part # for the US version connector used to connect to the water pump. That and the pins and grommets parts #.
Bought the US version water pump with square 4 pin socket , not the wide 4 pin European version.
__________________
Vargas S2 turbos|VAC S3 Cylinder head|RR DPs|RR MPs|Supersprint X pipe|Remus Quad Sport mufflers|aFe Stage 2 Si with scoops|Forge DVs|ER CP|BMS meth elbow|Aquamist HFS-4|Walbro 450 E85 LPFP|AA FMIC|BMS OCC|MHD|P3 Boost Gauge|Ohlins Road & Track + camberplates|M3 sways F/R+ Ground control endlinks|Vorsteiner v303 19"|Michelin PS2 sport|Quaife LSD|Vorsteiner V35 CF hood|CF CLS trunk|Duke Dynamics quad diffusor
|
|
Appreciate
0
|
| 04-16-2014, 05:12 AM | #206 | |
|
General

17278
Rep 18,720
Posts |
Quote:
|
|
|
Appreciate
1
vespa216.50 |
| 04-20-2014, 08:49 PM | #207 |
|
Lieutenant

106
Rep 483
Posts |
Just did this myself last thrusday, super easy for sure. Just over 2 hours on my back in the driveway. Scored a cash n carry deal at dealer got both water pump and thermostat for 571$ out the door.
__________________
 |
|
Appreciate
0
|
| 06-01-2014, 01:58 PM | #208 |
|
Registered Bro
18
Rep 197
Posts |
I'm in the middle of replacing my pump/stat now. Everything has gone smoothly so far, except for getting the hoses off the thermostat. Has anyone else run into difficulty prying loose the hard plastic hoses off the tstat? Mine seem stuck.
__________________
 |
|
Appreciate
0
|
| 06-15-2014, 11:03 AM | #209 |
|
Colonel

103
Rep 2,783
Posts |
Finished this last night: some thoughts/tips
1) Taking the fan off is a must. Good pdf writeup can be found within this thread. The only thing missing was there is another torx screw holding the auto trans cooler to the fan. You need to remove that screw (easy, no big deal). The person who wrote that probably doesn't have auto. 2). Someone also suggested on here to take off the passenger side wheel well. I did and I think it gave me better viewing angles (maybe even more room). 3) you must watch the bav auto videos within this thread posted by someone. Very informative with great ideas. 4) I removed the T-stat bolts and water pump bolts later on in the project. When removing hoses you don't want everything moving around (better leverage). 5) I believe the video talks about silicone spray. Well, YOU NEED IT. Hoses are all fused on. Here is how I tackled the hoses: Hoses with clamps: Pried up the hose using a long skinny screwdriver, then sprayed silicone spray in gap. This helps with removing the hose by either with your hands or prying it out with the screwdriver. Hoses with quick-connects. Pull up on quick-connect metal holder, then remove it. Place silicone spray in any openings in quick connect. Now the tricky part: use a pry bar (yes pry bar; not screwdriver) and GENTLY pry up the hose from the sides that have the small bump sticking out. Do a little prying on one side (sometimes this works). If not, then start prying from the other side. 6) silicone spray the heck out of every hose connection ( and even within the hose; where the hose connects to the part) prior to reconnecting. I also sprayed all the hose connections on the pump and t-stat. Makes everything go in much easier. Attached are the pics for the craftsman pry bar and the silicone spray. I believe I used the middle pry bar. 7) If you decide to connect the T-stat hoses first then you will need to have a 10mm ratchet wrench to get the hard to reach water pump bolt. Note: for the water pump bolts I used a 12 point 10mm socket. Good luck everyone! Thanks for everyone's input.
__________________
If no codes are being thrown use Chevron Techron fuel injector cleaner (concentrate). It solves rpm fluctuating upon cold start-up. Also, for most BMW problems start off by scanning your car with the Peake Research Tool. It contains the actual BMW codes. If you want to register a newly installed battery for free (just buy a $10 cable) and google/download BMWLogger
|
|
Appreciate
0
|
| 06-15-2014, 11:03 AM | #210 |
|
Colonel
103
Rep 2,783
Posts |
Here is the silicone spray I used.
__________________
If no codes are being thrown use Chevron Techron fuel injector cleaner (concentrate). It solves rpm fluctuating upon cold start-up. Also, for most BMW problems start off by scanning your car with the Peake Research Tool. It contains the actual BMW codes. If you want to register a newly installed battery for free (just buy a $10 cable) and google/download BMWLogger
|
|
Appreciate
0
|
| 06-15-2014, 12:09 PM | #211 | |
|
Lieutenant
106
Rep 483
Posts |
Quote:
I believe taking the fan off a a waste of time, I opened the hood to only add coolant. Also taking the wheels off and wheel wells also a waste. Long flat head and snap on pry bars are a must. Long 1/4 inch extensions and universal are a must. If many people are to work on their own cars, just invest in E series sockets. I've read many many DIY on this forum and 90% say they take more time than it really does. I was able to do my DP and waterpump / thermostat in 4 hours. Proper tools makes all the diffrence.  |
|
|
Appreciate
0
|
| 06-16-2014, 09:12 AM | #212 |
|
Guest
0
Rep n/a
Posts
Drives:
|
The only thing that I might add to what has already been said is that if you're thinking about replacing the motor mounts any time soon, do it at the same time you do the water pump + tstat! Those those two parts out of the way, it makes it MUCH easier to get the old mount out/new mount in on the passenger side, etc. Well worth the extra few hours needed to get those parts refreshed as well.
|
|
Appreciate
0
|
| 09-01-2014, 01:22 PM | #213 |
|
Private
 4
Rep 69
Posts |
Just adding to the discussion. Changed my healthy 2006 pump and stat after 91k as a preventive maintenance item. Not too bad, but I don't see how that one guy could have done it in two hours! Took me about 4.5 hours (spread out over the course of 3 days!) I took plenty of time to remove stuff in hopes of making the job easier. I think it takes 15 minutes alone to remove the belly pan. Add another 15 to install it. So you're already at 30 minutes. There are some great recommendations throughout this thread, so I will just comment on what worked for me.
The job isn't too hard, just time consuming and trying of one's patience. Just stay calm and take your time and study all the DIY's in this thread. Thanks to everyone over the years who took the time to write up their experiences. Rob |
|
Appreciate
0
|
| 10-01-2014, 12:14 PM | #215 | |
|
Second Lieutenant
20
Rep 209
Posts |
Quote:
|
|
|
Appreciate
0
|
| 02-14-2015, 02:14 PM | #216 |
|
Registered
0
Rep 1
Posts |
Thank You!
For anyone who isn't sure about doing this on their own - go for it. With key help from my neighbor, we were able to use the information on this post and replace a water pump (2007 328i) and thermometer and I have zero experience working on cars. Plan on a full day, well worth the savings.
The posts and the videos (and a friend) are all you need. What we found most helpful: 1) Pull the fan. I don't know how else I would have got the top bolt on the pump out. 2) Use the silicone spray - the hoses were the long pole in the tent and I didn't have it. 3) Anyone in the Hampton Roads area: I found good value on parts at Bap Geon. 4) Buy an E12 Torx - found it at Napa Auto Parts. 5) If you have a push button start, to enable the test mode and self-purge the air, press the start button without stepping on the brake, then do the heater / gas pedal dance. 6) Buy the replacement parts first so you can mock it up and understand how the system works. This helped put all the pictures and videos into context before we pulled the first screw. Thanks again for everything to all who wrote before me - follow the guidance and save a buck or two. Last edited by Paul_F; 02-14-2015 at 02:31 PM.. Reason: grammar / update |
|
Appreciate
0
|
| 02-19-2015, 03:04 PM | #217 |
|
Lieutenant Colonel
200
Rep 1,834
Posts
Drives: '05 E90 330i Manual
Join Date: Aug 2010
Location: Cape Town, South Africa
|
For those like me that just need to replace the thermostat, hopefully this will help. I took a few pics, but will mostly describe what I did. I found the attached document on the Water Pump & Thermostat Install - N52 thread by ENINTY very very helpful.
With 4 litres of BMW antifreeze, 4 litres of distilled water and a new BMW OEM thermostat I set to work on this. Just to make things easy, when I refer to a location "left", I mean left side of the car as it is if you are sitting in the car, and right same thing etc. Preparation: Gather all the tools that you will need, get the car up onto ramps or stands high enough so that you can work comfortably under there. I recommend lifting the rear too so that the car is fairly level. Remove the engine underpan as well as the underpan beneath the radiator. Remove the electric cooling fan, you will need to remove the intake in order to do this. Open the coolant reservoirs and then with an appropriate size catch can in place, drain the coolant from the bottom of the radiator by carefully removing the blue plastic screw plug - this is located on the bottom left of the radiator (left side of the car). It helps to place an old towel or something to catch some coolant that will splash as the flow reduces. Getting the thermostat out: 1.) I suggest pouring the coolant that was drained into a container(s) for safe disposal. At this point I also suggest replacing the blue screw drain plug (some opt to replace with a new one). It does not need to be tightened up all that much since it does not rely on how tight it is in order to seal. Place the catch can under the right side of the car for the coolant that will come out of the thermostat. I recommend lots of cloths and old towels because there will be spillage. I also recommend wearing some safety glasses (I am not someone that generally bothers with that sort of thing, but coolant splashing on your face and specifically in your eyes is not fun). 2.) From under the car, carefully unplug the electrical connector to the thermostat and move it aside. To gain extra slack, you can unclip the cable harness for this from the clip at the water pump. Next loosen the metal hose clamp on the big hose that connects onto the thermostat (the U-pipe that connects the water pump to the thermostat). Slide it up and out of the way so that you can work the hose off. This was particularly messy and ended up getting fairly soaked in coolant. The hose is usually fairly bonded to the connector on the thermostat, so it needs some careful finessing. There is a fair amount of coolant that needs to come out of the thermostat and water pump, so as you work the pipe off the soaking begins. Eventually this actually helped break the bond and the hose came off with relative ease, some more coolant drains out. Slide the metal hose clamp off the hose and put it aside. 3.) From above locate the BMW plastic hoses and remove the metal clips by using thin needle pliers. This prevents the chance of losing the clips which is something you want to do. Remove the clips and put them aside. With a careful rotating force, pull the large BMW plastic hose until it pops off. You can carefully push it down and out of the way. With the same technique, remove the smaller BMW plastic hose. In both cases, some more coolant will drain out. 4.) From under the car, you can now remove the two bolts holding the thermostat onto the water pump. Back up to the engine bay, you can now carefully manoeuvre the thermostat out so that the metal hose clamp on the smaller hose can be loosened and then removed, and again, slide the metal hose clamp off and put aside. You now have the thermostat out of the car. Fitting the new thermostat: 1.) Start by putting the metal clips back onto the BMW plastic hoses and clip all the way down. Put the small metal hose clamp back onto small hose and connect to the new thermostat on the appropriate connector. Without tightening the small metal hose clamp, manoeuvre the thermostat into position ensuring that the hoses are not twisted or snagging in any way. Get under the car to double check that the small hose is not twisted. Back to the engine bay, carefully get the thermostat back out again ensuring that the hose does not twist or change how it is orientated. Make sure that the hose is all the way onto the connector and then tighten the small metal hose clamp securely. Again, manoeuvre the thermostat back into position ensuring that the hoses are not twisted or snagging in any way. 2.) From under the car slide the large metal hose clamp onto the large hose and fit onto the thermostat connector. Secure the thermostat to the water pump with the two bolts. Make sure that the large hose is all the way on and then tighten the large metal hose clamp securely. Plug the electrical connector back onto the thermostat and the cable harness back into the clip. 3.) From above attach the the two BMW plastic hoses back onto the thermostat. You will need to push them on firmly until you hear a click, it's on. The thermostat is now fitted and all hoses are connected. At this point I suggest verifying that everything is securely fitted and tight. Reassembly: To make fitting the electric cooling back into the engine bay, you can undo the thin over-flow coolant hose from the coolant reservoirs and move aside. Get the electric cooling back into place and secure, putting everything back where it belongs. Refit the thin over-flow coolant hose onto the reservoirs. Refit the intake and all electronic connectors. Refilling coolant: Open the bleed screw 4 or so turns and slowly pour in the pre-mixed coolant up to the bottom of the filler neck until some coolant comes out of the bleed screw without and air bubbles (use some cloth or paper towel to soak this up). Close the reservoirs and perform the vent procedure (ignition on with the climate control on max temperature and lowest fan speed, throttle pedal to the floor for 10 seconds - this takes 12 minutes, so pay attention to the time when starting this). Check for any leaks. Once the vent procedure is finished, open the reservoirs and top up if necessary. Repeat the vent procedure again. You can recheck the coolant level once more if you want and repeat the vent procedure one last time. It is a good idea to put the battery on charge while doing this in order to prevent the battery from running down. Finishing up: Refit both the underpans and you can now get the car back down onto the ground. With the hidden menu activated, start the engine and keep an eye on the coolant temperature, check for leaks too. Some pics: Don't lose these metal clips. 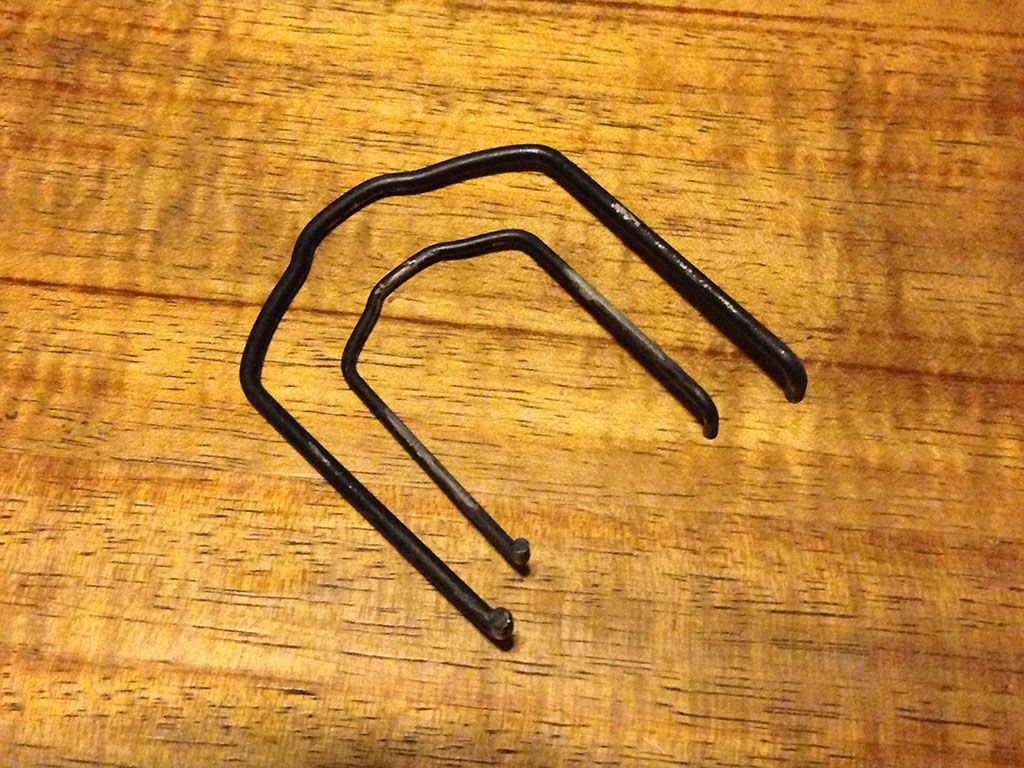 The new thermostat located to get the correct hose orientation before being manoeuvred into position. 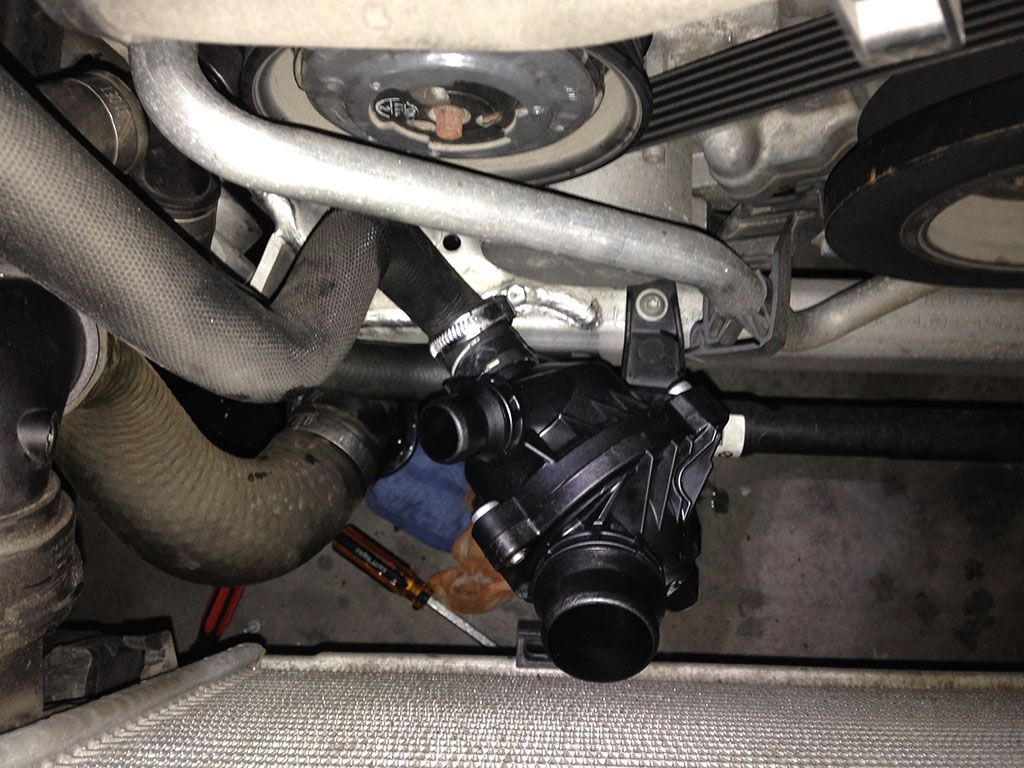 The new thermostat fitted in position with all the hoses now connected. 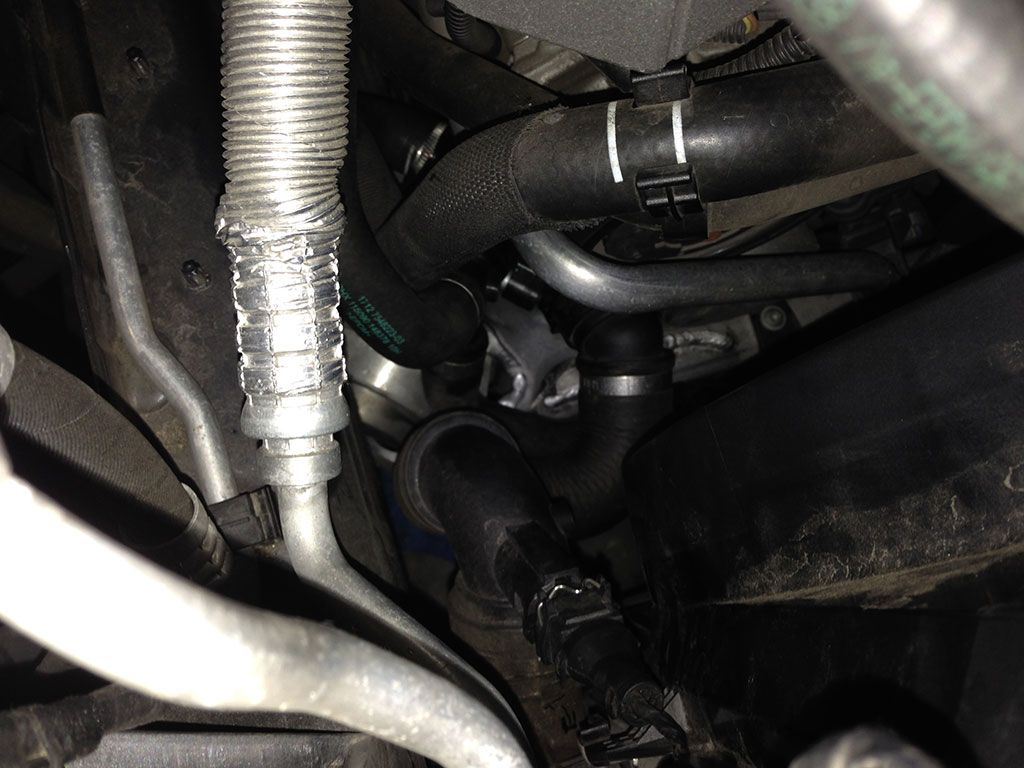 From under the car, the new thermostat fitted.  Hopefully I have covered everything here, but I strongly recommend using the document on the linked thread. Sadly my over-cooling persists, I really have no idea why. I replaced the temperature sensors a while back, so was convinced that it was the thermostat that was faulty.
__________________
BMW E90 330i (M) '05 (His) | (Hers) BMW E46 320i f/l (M) '03
Last edited by Three_thirty_I; 02-19-2015 at 03:17 PM.. |
|
Appreciate
0
|
| 05-17-2015, 07:08 PM | #218 |
|
Private First Class

7
Rep 104
Posts |
Mine just went out at 82000 miles. 2007 335i. Original part. 10 hour DIY job. Disappointed @ BMW engineering with regard to this part. Removal of fan recommended to other DIY'ers. Unbolting of power steering line, too. Care must be taken with the rubber mount on the p/s line or it will tear. Unbolting the sway bar is unnecessary IMO.
|
|
Appreciate
0
|
| 04-15-2016, 04:25 PM | #219 |
|
Lowlife Republic
15
Rep 111
Posts
Drives: 06 325XI Monaco Blue
Join Date: Sep 2005
Location: NYC
|
My 2006 325xi 89000 miles on it, I brought both new themostat and the waterpump and ask an indyshop to help me replace them. for 3 month no issue, but now I got a P0128 code Coolant Themostat Temperature below thermostat with a regular scan app, but with the carlybmw scan app I got - Fault: Map-controlled thermostat, mechanical
- Code: 002EF4, I will clear the code and drive see what happen,
__________________
06 Monaco Blue Metallic 325xi
|
|
Appreciate
0
|
| 04-15-2016, 05:50 PM | #220 | |
|
Lieutenant Colonel
200
Rep 1,834
Posts
Drives: '05 E90 330i Manual
Join Date: Aug 2010
Location: Cape Town, South Africa
|
Quote:
__________________
BMW E90 330i (M) '05 (His) | (Hers) BMW E46 320i f/l (M) '03
|
|
|
Appreciate
0
|
 |
| Bookmarks |
|
|


