

|
|
|
|
 |

|
 |
BMW Garage | BMW Meets | Register | Search | Today's Posts | Mark Forums Read |
 |

|
BMW 3-Series (E90 E92) Forum
>
DIY - MTech E92 Front Bumper retrofit guide
|
 |
| 10-11-2010, 04:27 AM | #1 |
|
Captain
 
71
Rep 801
Posts |
I've been wanting to change my OEM front bumper to the MTech one for a while. I haven't seen any DIY guide on this retrofit so I decided to take pictures throughout the process and create one. I have a 335i E92 with oil-cooler.
First of all, there is a bunch of parts required for the upgrade and not all vendors will include everything you need. Your best bet and my recommendation is to buy the MSport bumper kit from Tischer BMW. This one includes all the parts for the retrofit you need. All that is left is to take the bumper cover and have it painted by a reputable body shop. If you however decide to buy from somewhere else just make sure what parts are included in the kit (read: ASK). Very reputable vendors in this forum will sell you the kit without the MSport air ducts, underpanel and wheel covers and say that "it's fine" and it mounts ok, I don't want to mention names but it happened to me. IT DOESN'T, the air ducts will be blocked and while you can force fit the cover, well, you already made the investment so get everything you need and mount it right. This image shows how the air ducts look on the OEM bumper: 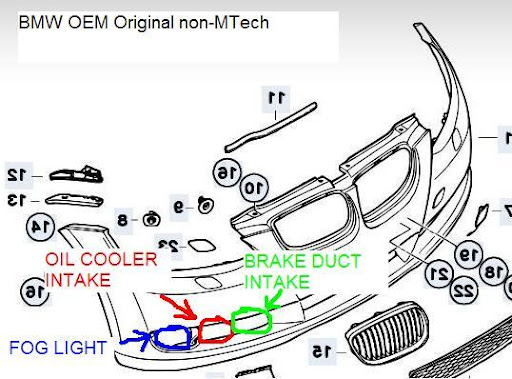 You can compare that to this one, the MTech front bumper:  As you can see if you use the same air ducts the brake one would end up blocked by the new bumper. You need the MSport air ducts so that air reaches the brakes and oil cooler correctly. This is the "simplified" kit that some vendors sell: 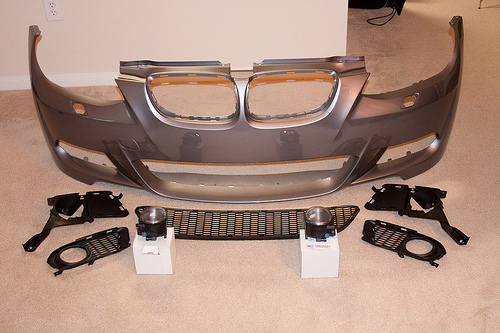 The 3 air ducts and lower engine cover are missing as well as both plastic fender covers/liners. This kit here is also for the 328i coupe, the 335i will have an opening in the passenger's side fog light support to allow the oil cooler duct to get air, although it only costs $5 (pictures and explanation further down). This is the list of all parts and part numers needed: 63-17-6-906-915 FILLISTER HEAD X 4 51-74-8-045-348 AIR DUCT FRONT (OIL COOLER) 51-74-8-045-363 FRONT LEFT BRAKE DUCT 51-74-8-045-364 FRONT RIGHT BRAKE DUCT 51-75-8-046-333 UNDERHOOD SHIELD 51-11-8-041-179 GRID, CENTER 51-11-8-043-230 SUPPORT, FOG LAMP 51-11-8-044-377 SUPPORT, FOG LAMP 51-11-8-041-181 GRID LATERAL LEFT 51-11-8-041-182 GRID LATERAL RIGHT 63-17-7-839-865 FOG LIGHTS, LEFT 63-17-7-839-866 FOG LIGHTS, RIGHT 51-71-8-045-399 COVER, BOTTOM L 51-71-8-045-400 COVER, BOTTOM R 51-11-8-044-661 PRIMED FRONT BUMPER You'll also need to raise the car to change the undercover engine shield and you'll need a Motor Tool (pictures below) to cut slighlty a plastic support to fit the MSport air ducts. All screws are size 8mm hex and a couple of the nuts are 10mm. The 4 top screws that hold the bumper over the grilles are Torx T-27 size. Legal stuff first, I take no responsibility for any damages or injury to you or your resulting in any way from following this guide. This is just a guide of what I did intended to help others looking into doing this mod. So let's get started! The first step is to unmount your current OEM front bumper. You can follow this great link for a DIY guide on how to do it, tons of pictures and easy to follow up: http://www.billswebspace.com/e92FrontBumperRemoval.htm One thing missing is the headlight washer sprayers removal. Check out the pictures further down this guide on how to remove this BEFORE taking off the old bumper! Otherwise you can damage the springs, washer mechanism, etc. This is how my car looked when we started (I had unmounted the fogs before): 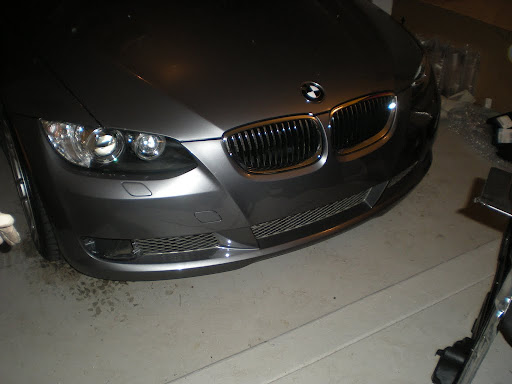 It is pretty straight forward to unmount, 4 T-27 torx screws on the top and 9 8mm hex on the bottom. The tricky ones are two extra ones on each side that hold the sides to the fenders. These were a pain to unscrew and tighten but if you bend the lining/fender cover as in the link above it'll be fine. Bending the fender cover: 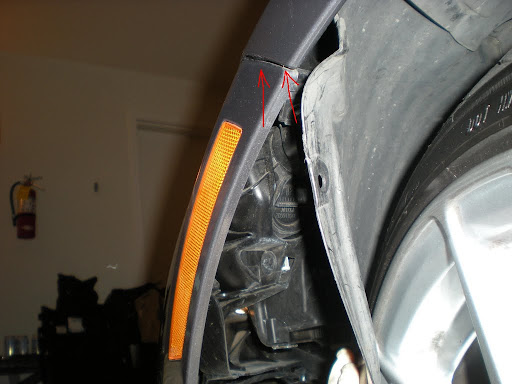 Once all screws are out you can pull the bumper off. But wait! First you need to remove the headlight washer covers as I mentioned earlier! If you forget about it you'll damage the springs that hold them and you'll have to buy each cover from the dealer. I used my nylon trim prying tool to avoid scratching the paint. Use the tool to pull the sprayer out and hold it with your fingers (from the sprayer, not the cover!). It's pretty strong but you have to hold it out and with your free hand push the springs down without damaging them. Check out the next three pictures: 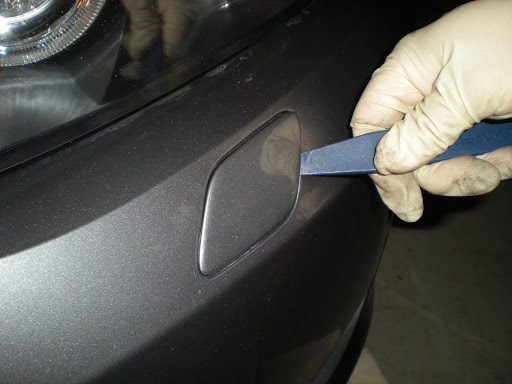 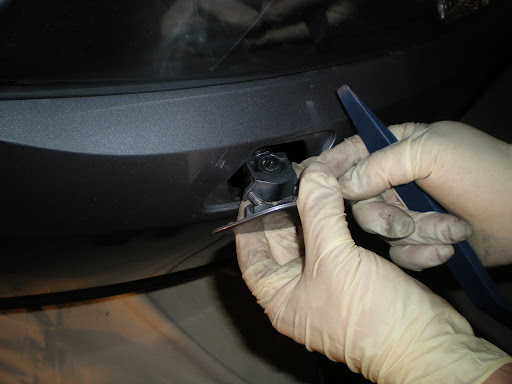 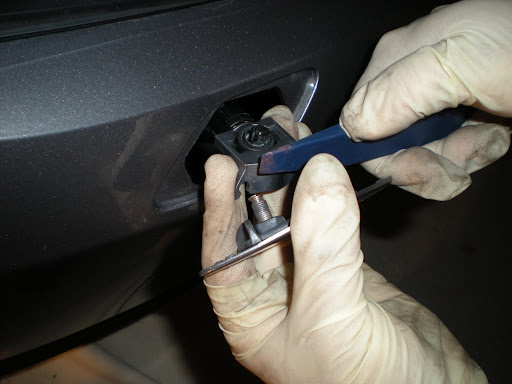 Before pulling the bumper cover off lie down a painter's canvas or a carpet or something in front of the car so that you can lay it down on it. Now you are ready to pull the bumper cover off. Do it carerfully! You need to pull it out slowly because the fog lights are still connected. Push the tabs on each side of the fog lights connectors and pull down. Once they are disconnected you are free to take it off. The next step is to take the plastic fender covers off. They have a few screws underneath and a few inside the wheel wells. I didn't take a picture of them but they are easy to see. This next picture shows the new cover which you'll be replacing. They do not cover the whole wheel well, only the front half and are a direct replacement. The passenger's side has the oil cooler and this is how it looks. To reach all screws inside you'll need to turn the steering wheel completely to either side for access. The most tricky screws where the top ones and the 10mm nut that holds the cover to the engine bay. 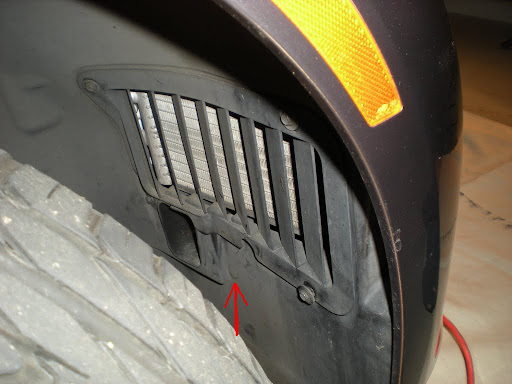 The red arrow shows the location of a "expanding rivet" which holds a plastic electronics box. I'm not sure what this box is but you can see it here in this picture. There's one on each side of the car:  These need to be mounted in the same way on the new fender covers. De-attach them from the fender covers by pushing the pin of the expanding rivet out. Push it with a small screw driver or allen wrench towards the tire so that you can push the rivets off. Once done proceed to remove the fender covers. Now it's time to remove the engine under cover shield. You'll need to raise the car for this, either with a jack and jack stands or using ramps, please be safe when raising the car and working underneath. I used my home made ramps that I use for doing my oil changes:  The shield cover is held up by about 10 screws. Just get underneath and take them all off, pretty straight forward. Picture of the engine cover: 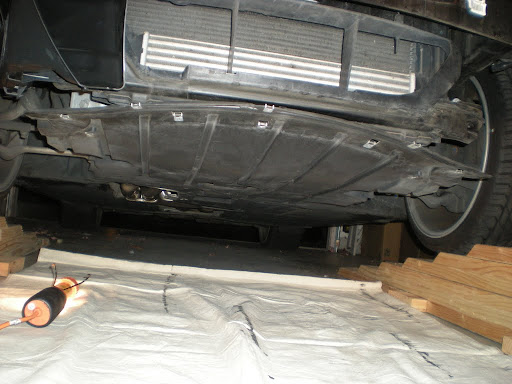 Here's a comparison of the MSport cover and the OEM one. The MSport matches the fender covers and has a strip attached to it that holds the MTech bumper (2nd pic below, new shield in place). 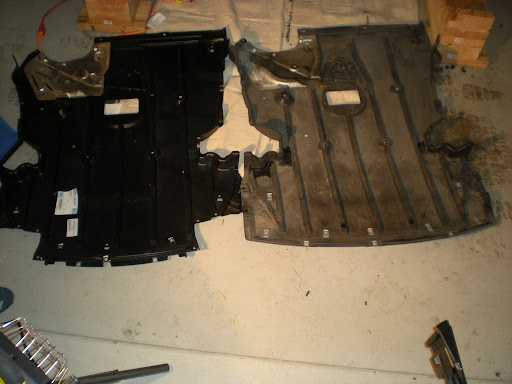 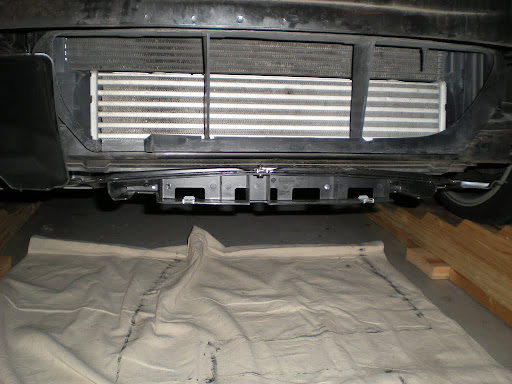 This will be a good time to remove the old air ducts. Remove the brake ducts (that used to go into the fender covers) on each side and remove the air duct that goes to the air cooler. This is a picture of the old air ducts on the passenger side (brake and oil radiator): 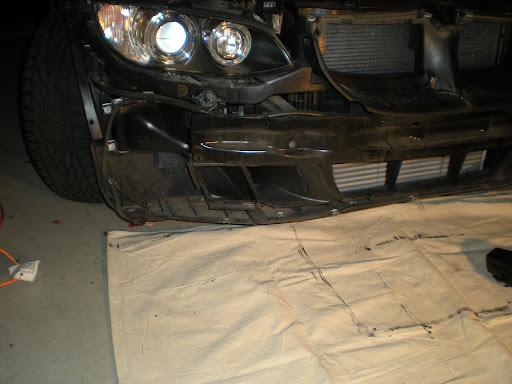 They are held in place by a single screw. The brake ducts have this one underneath: 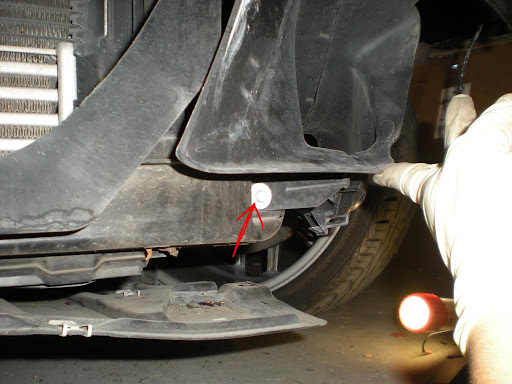 The screw holding the oil cooler duct on the passenger side is on the tire side, next to the oil radiator: 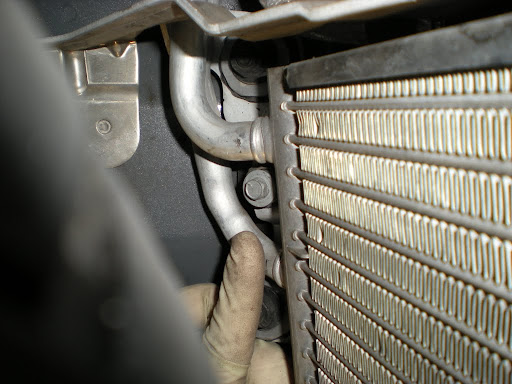 With the air ducts off and the new engine shield cover on you can install the MSport fender covers. Don't worry if you can't reach all the screws inside to tighten them, my car was raised on ramps so I couldn't turn the wheels to each side to reach all screws. I tightened them once the car was lowered again. You can however screw all the screws underneath the car and attach the covers to the engine shield. The MSport covers do not have the holes to mount the electronic boxes the old ones had as I showed in one of the pictures above. You need to drill holes in the same locations to mount them: 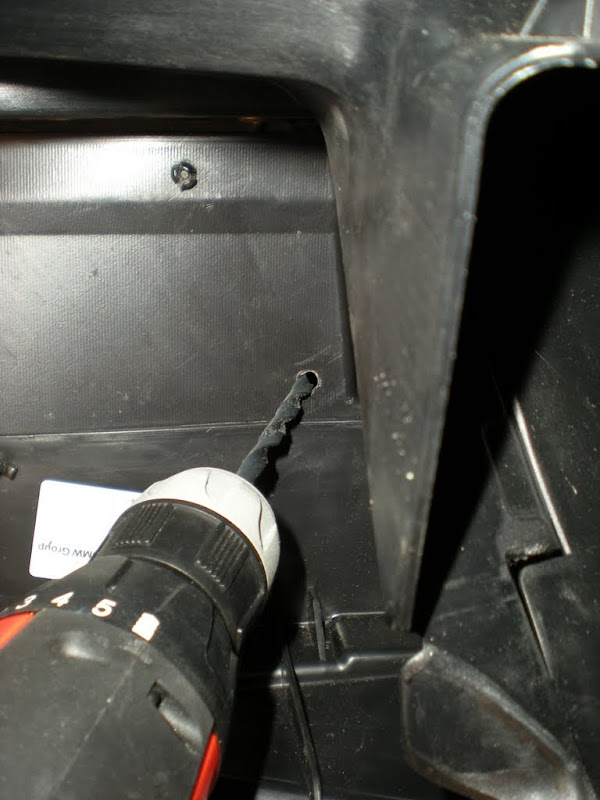 Reuse the expanding rivets for this purpose, just like it was before: 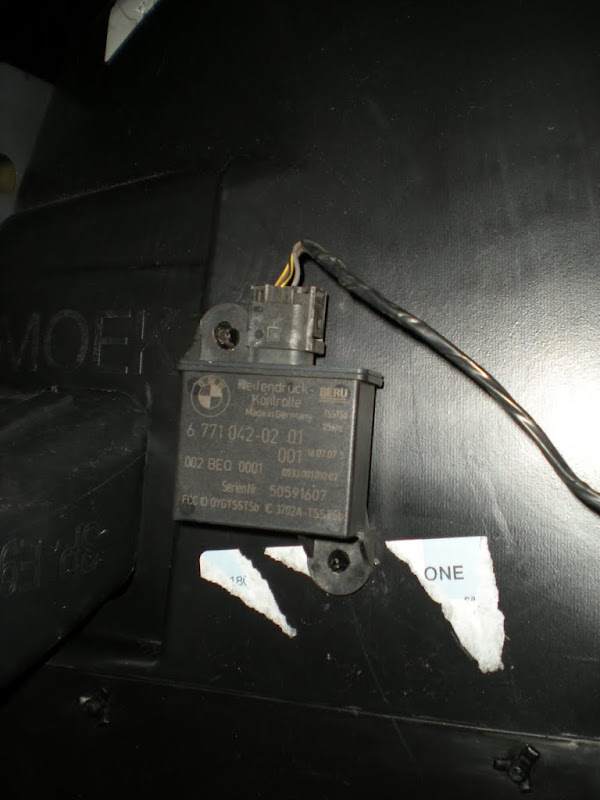 Now here comes the tricky part and the most time consuming. It's not difficult but you just need a little patience. The new MSport air ducts do not fit perfectly around the plastic support that goes around the Intercooler/radiator. This support does not allow either brake duct to sit well. You could buy the specific MSport plastic support that goes around the intercooler but I've heard this is in the $200 range and is actually a pain to replace as you'll need to disassemble a bunch of the front of the car. There's no need to do this as it serves no structural support were we need to modify it slightly and it just goes around the intercooler opening. The new air ducts will lie against it so there will be no openings remaining after cutting. Check this picture to see why the new MSport brake duct doesn't fit: 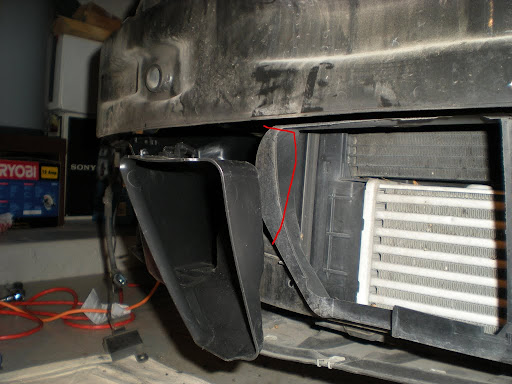 The red line shows how you'll need to cut this support in order for the duct to fit properly. Here's a picture of both passenger side ducts. The oil radiator one has no problems but you can see the brake (inner) one is off. 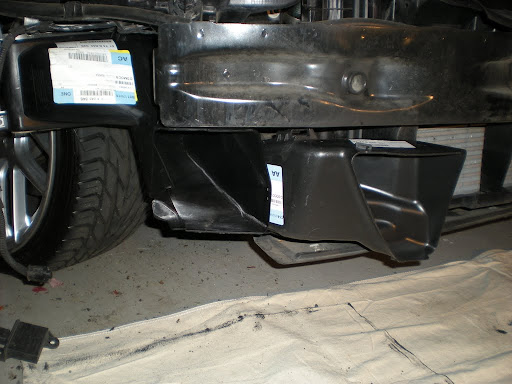 We want the screw underneath that holds the brake duct to fit perfectly. Without cutting it won't make it: This picture is after some cutting, a little left to go: 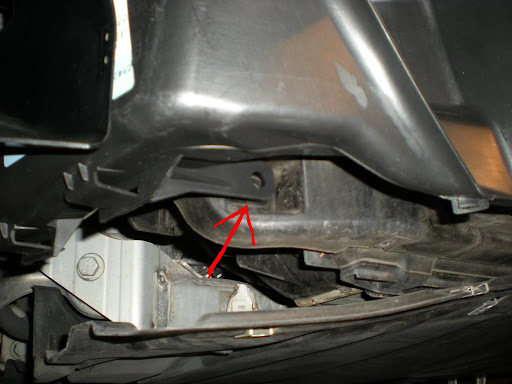 Make sure that when you are test fitting the air ducts that the pins that hold them in place are in correctly in the corresponding holes. You'll understand once you see them: 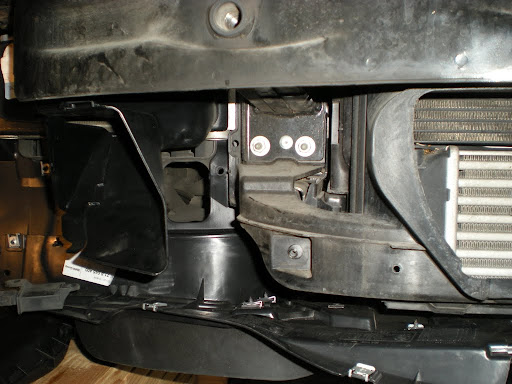 Also insert the brake ducts correctly in the fender covers. 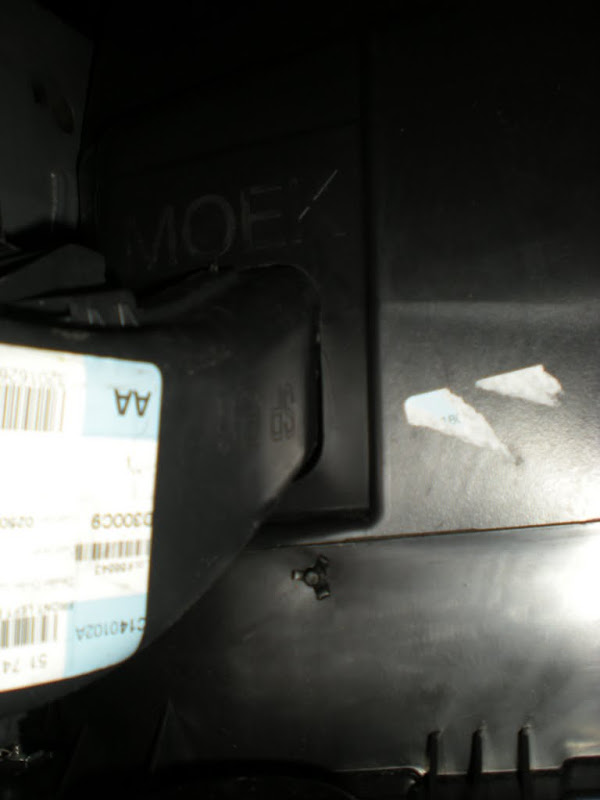 Time to start cutting! I used a Motor tool like shown here. Please wear eye protection! It definitely proved useful as plastic pieces flew everywhere and was melting hot. 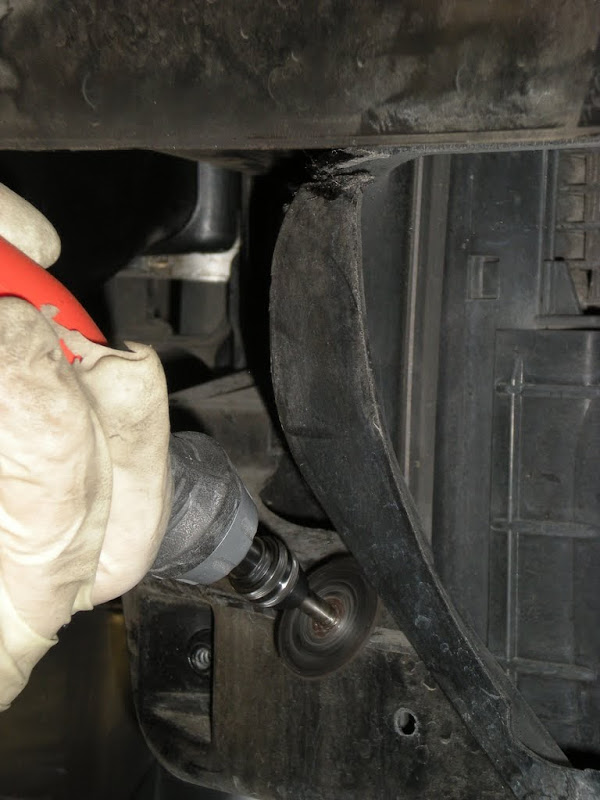 Also there's a little trimming needed here: 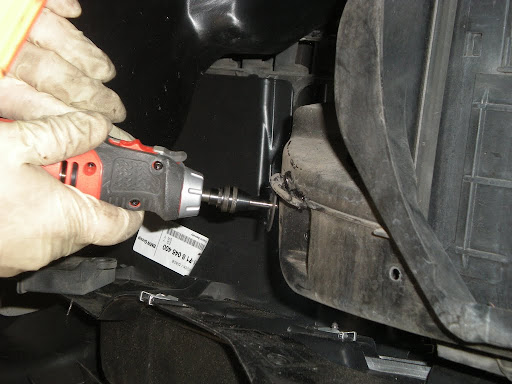 Ends up looking like this: 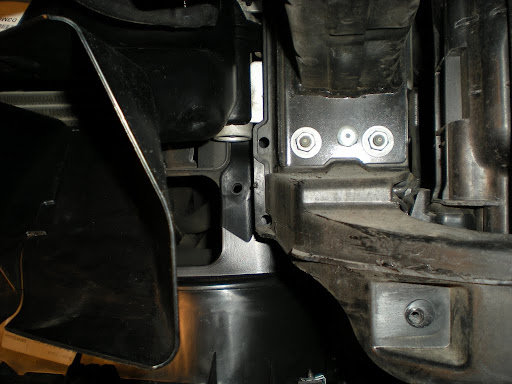 After all the necessary cutting was done this is how the passenger side looks: 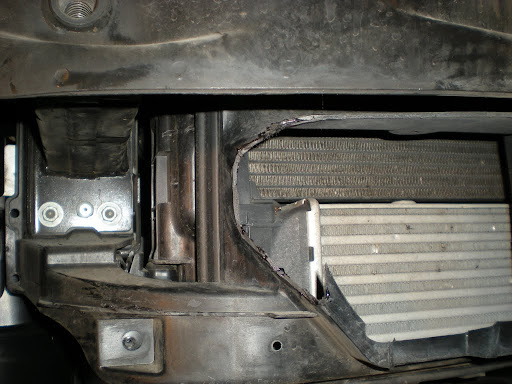 Both air ducts fitted correctly, passenger side (my friend is here fitting them): 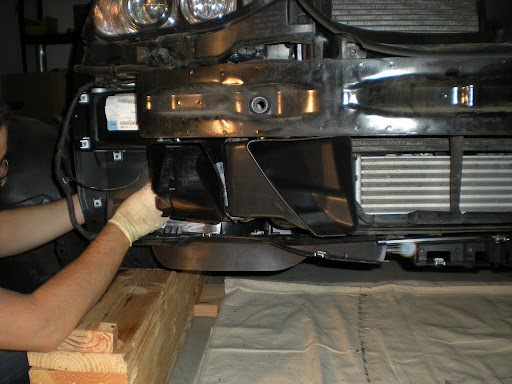 Here's the driver's side brake duct, and the screw we want to reach correctly after some cutting with the new Msport duct This is me cutting for the first time: 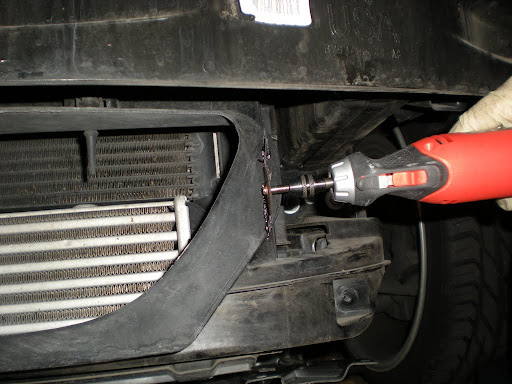 A lot more cutting would be needed; this is the end result with the duct in place: 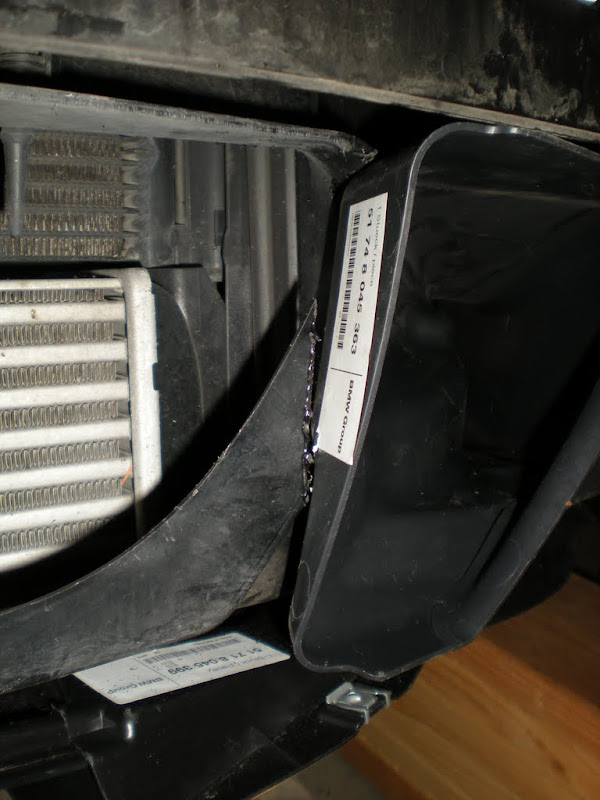 We are almost done! All that is left is to prepare the new bumper for mounting. The corner where the screws held it to the fenders needs a metal strip inside that you need to take off from the old bumper and mount to the new one. Check out these two pictures from the outside and inside to see what I am talking about: 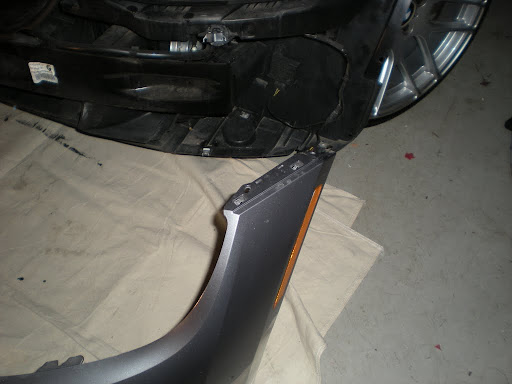 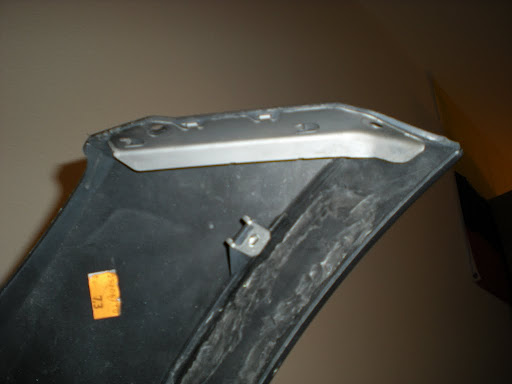 And the easiest part, mounting the lower grills and the kidney grills. Make sure all taps are correctly in place: 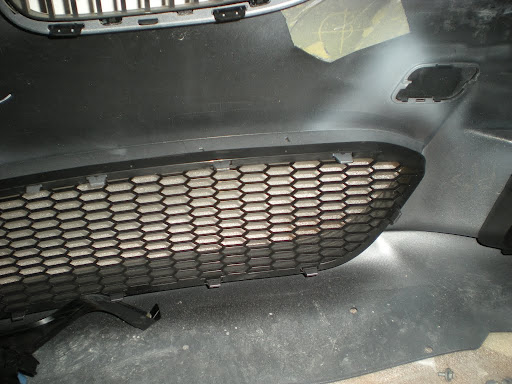 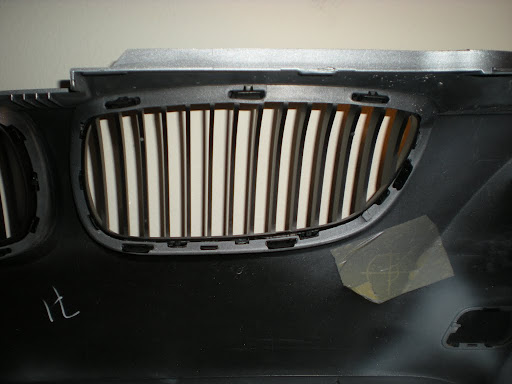 You will also need to mount the fog light supports and grill. First attach the fog light to each fog light support using the 2 Fillister Screws (part # above). Mount the side grills to the bumper: 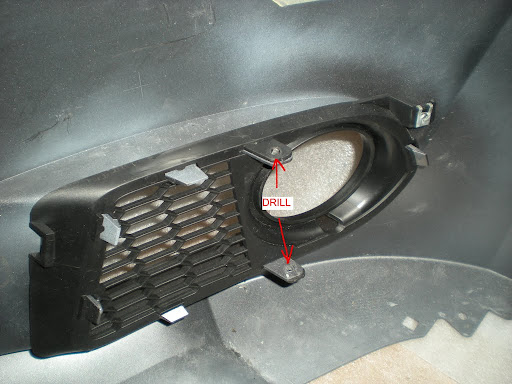 To mount the fog light support to the grills however you need to drill two holes through the bumper taps as shown above. Use the old fog lights screws and body nuts to screw the new fog lights to the bumper like this: 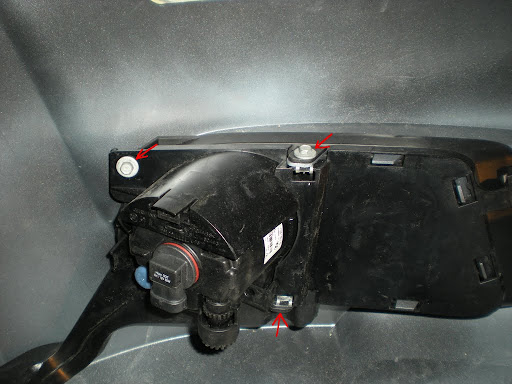 You are done! All you have to do is mount the new bumper cover. Take your time. Here's were having a friend around is helpful by holding the bumper close and almost in place while you reconnect the fog lights. The lower side of the bumper goes below (over) the undercover engine shield and strip. Screw all screws underneath. Don't tighten the top 4 torx screws, close the hood and check the fit as you can adjust and pull out or push in a little the bumper for the perfect fit. Test fit the headlight washer covers to ensure they go in the correct way and pull the headlight washers again with your fingers and press the springs in place. Final step is to lower your car and tighten up all the fender cover screws (turn the steering wheel completely as necessary) and the two side screws which hold the bumper to the fenders (which are a pain to tighten!!). All that is left is a few beers for you and your friend/s helping out and a very much deserved test drive! Hope this helps.  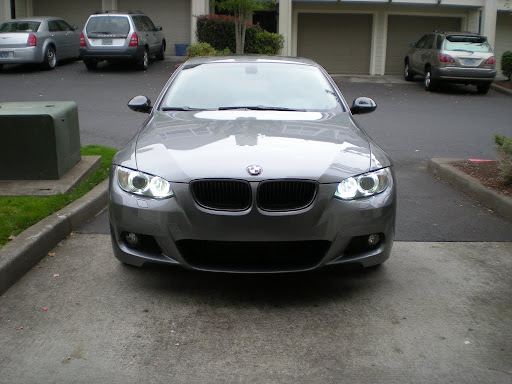 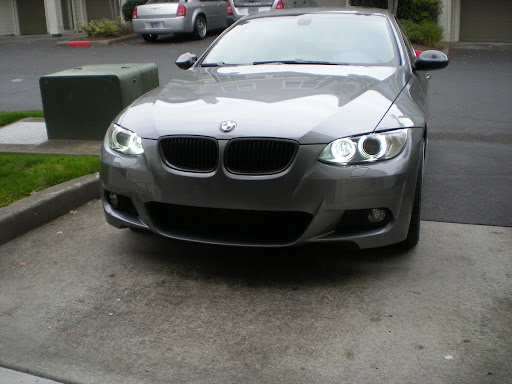 Last edited by Castel; 10-13-2010 at 12:23 PM.. |
| 10-11-2010, 07:45 AM | #2 |
|
Banned
262
Rep 5,018
Posts
Drives: VALNCYA
Join Date: Jan 2009
Location: Jersey
|
Awesome job !
|
|
Appreciate
0
|
| 10-11-2010, 01:03 PM | #4 |
|
Professional Moose Racer

316
Rep 7,509
Posts |
Thanks for this!!
__________________
Visit my blog anytime: http://www.sfpayments.com
 BMW Dream Team PNW Chapter, member #1  |HP Autowerks | AR DESIGN | BMW PERFORMANCE | STOP TECH | Volk Racing| AMS | ARKYM |
|
Appreciate
0
|
| 10-11-2010, 01:07 PM | #5 |
|
Professional Moose Racer
316
Rep 7,509
Posts |
Def not a bolt on job.
__________________
Visit my blog anytime: http://www.sfpayments.com
BMW Dream Team PNW Chapter, member #1 |HP Autowerks | AR DESIGN | BMW PERFORMANCE | STOP TECH | Volk Racing| AMS | ARKYM |
|
Appreciate
0
|
| 10-12-2010, 01:44 PM | #6 |
|
Major

450
Rep 1,369
Posts
Drives: F80 M3 6MT
Join Date: Oct 2008
Location: Birmingham, MI
|
amazing write-up man!!! very detailed and extremely helpful for those of us considering doing this down the road.
__________________
15 F80 M3 Mineral Grey/Black 6MT
 |
|
Appreciate
0
|
| 10-14-2010, 12:03 AM | #10 | |
|
Captain
71
Rep 801
Posts |
Quote:
http://www.trademotion.com/partlocat...catalogid=4462 If you however decide to buy it from another vendor just ask for the complete parts list to avoid surprises. I did the homework and included all the exact parts and part numbers here so that you can cross-check. Good luck! Last edited by Castel; 03-17-2011 at 02:38 AM.. |
|
|
Appreciate
0
|
| 03-15-2011, 06:06 PM | #12 |
|
New Member

3
Rep 19
Posts |
Hi castel
your post is very interesting.  But Do you think it's possible to use the original (non M) wheels fender and engine shield? does it's possible to put the new M air cooler on the original wheels fender? If yes, I think it's possible to fix the original engine shield on the M Bumper. because the price of this parts are expensive! thanks in advance
__________________
French E92 335I \ REMUX Duplex exhaust \ Parrot HandFree KIT installed \19" VMR wheels \sparkling graphite \ Shadowline
|
|
Appreciate
0
|
| 03-17-2011, 02:30 AM | #14 |
|
Captain
71
Rep 801
Posts |
DJDay, Sparky66, sorry I couldn't reply earlier. With the new fenders the fit is guaranteed. Tischer sells the kit with the fenders, undercover and everything needed, last time I checked. I would email them and ask for the parts and part #s included, just cross-check with the list I showed in my original post.
Check these two pictures from my mod to compare the M fenders and the original non-M fenders: New M Fenders that come with the kit:  Old non-M fenders: 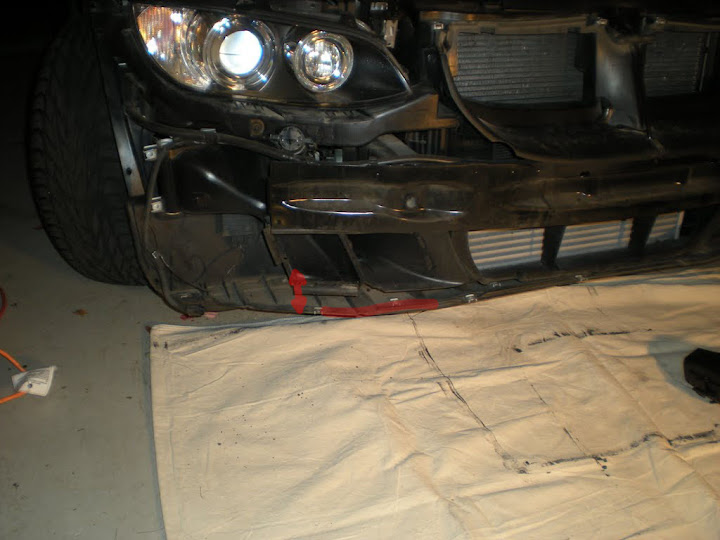 I am highlighting the difference in shape and the distance to the border. I guess you can force the old one to fit (some vendors here do) but when I was mounting it myself I couldn't force it and decided I wasn't going to do it that way and bought the fenders and undercover to mount it "right" . The M engine shield undercover only works with the M fender covers. Good luck! |
|
Appreciate
0
|
| 03-17-2011, 02:41 AM | #15 |
|
Captain
71
Rep 801
Posts |
DJday, if you have doubts go ahead and buy it without the engine shield and covers and try it, I did. You need the air ducts though, don't forget those. I'm not sure if they would fit the old fenders since I didn't try. You might be able to force it and fit the bumper (maybe cutting the under cover a little is needed?) but I decided not to do it that way.
|
|
Appreciate
0
|
| 03-17-2011, 03:14 AM | #16 |
|
New Member
3
Rep 19
Posts |
ok thank you
I think I go this way (without M covers) and I will try to adapt the original. I will put my comments When work is done.
__________________
French E92 335I \ REMUX Duplex exhaust \ Parrot HandFree KIT installed \19" VMR wheels \sparkling graphite \ Shadowline
|
|
Appreciate
0
|
| 03-17-2011, 09:44 AM | #17 |
|
3298
Rep 22,755
Posts |
Nice DIY post!!!
We also recommend getting the full retrofit kit so you get everything required. We run them on special here!
__________________
Evan Winstead · Internet Parts Director
 Contact Us | Facebook | Twitter | New: Shop Porsche & Audi parts! |
|
Appreciate
0
|
| 03-20-2011, 03:01 PM | #20 |
|
Captain

45
Rep 809
Posts |
Castel,
Do we need these two parts for E92 USA version? 51-71-8-045-399 COVER, BOTTOM L 51-71-8-045-400 COVER, BOTTOM R I looked earlier on realoem and it said for Euro M-Sport E92. Thanks, J- |
|
Appreciate
0
|
| 03-20-2011, 08:06 PM | #21 |
|
Professional Moose Racer
316
Rep 7,509
Posts |
iirc, Those are the wheel wells. You will need it for the bumper to bolt onto the wheel wells correctly.
__________________
Visit my blog anytime: http://www.sfpayments.com
BMW Dream Team PNW Chapter, member #1 |HP Autowerks | AR DESIGN | BMW PERFORMANCE | STOP TECH | Volk Racing| AMS | ARKYM |
|
Appreciate
0
|
| 04-05-2011, 07:50 AM | #22 |
|
First Lieutenant
31
Rep 376
Posts |
This is a great write up and used it for my M-Sport bumper retrofit. You should all know that it is completely unnecessary to purchase and install the following parts:
51-74-8-045-348 AIR DUCT FRONT (OIL COOLER) 51-74-8-045-363 FRONT LEFT BRAKE DUCT 51-74-8-045-364 FRONT RIGHT BRAKE DUCT 51-75-8-046-333 UNDERHOOD SHIELD 51-71-8-045-399 COVER, BOTTOM L 51-71-8-045-400 COVER, BOTTOM R Please save yourselves the trouble and money!! Unless you are using your car on a track where your car must have superior oil and brake cooling, then you don't need this! This is what it looks like without the parts above. Can you tell the difference? 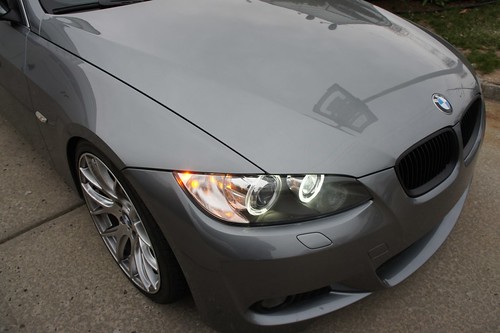 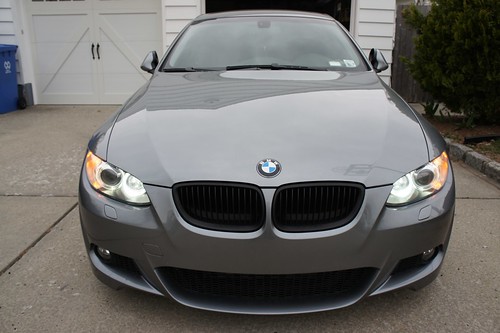 Last edited by JRZM3_; 04-05-2011 at 07:58 AM.. |
|
Appreciate
1
niksss10.00 |
 |
| Bookmarks |
| Thread Tools | Search this Thread |
|
|


