

|
|
|
|
 |

|
 |
BMW Garage | BMW Meets | Register | Today's Posts | Search |
 |

|
BMW 3-Series (E90 E92) Forum
>
How many hours to replace turbo?
|
 |
| 03-18-2014, 06:15 PM | #1 |
|
Colonel
 
426
Rep 2,136
Posts |
How many hours to replace turbo?
Hello guys, I have a stuck wastegate on my rear turbo and I'm going to attempt to replace the turbo myself. I have a lift and overhead crane and air tools. Those of you who have done it yourself, how many hours did it take you?
__________________
 JB4 G5 w/ Backend flash - Walbro 450lpfp - VRSF DPs - VRSF 5" stepped IC - DCI - ER CP w/ Tial BOV - 335is clutch |
| 03-18-2014, 06:36 PM | #2 |
|
Brigadier General

914
Rep 3,456
Posts
Drives: Harrop E90 M3
Join Date: May 2011
Location: Colorado Springs
|
First set, about 10-11 hours. Currently about 5
|
|
Appreciate
0
|
| 03-18-2014, 06:56 PM | #4 | |
|
Major General
456
Rep 6,478
Posts |
Quote:
__________________
E88 N54 Alpinweiss/Coral Red/Motiv HTA 3586r Tial .82AR/Other stuff...652WHP
F30 N55 XDrive EBII |
|
|
Appreciate
0
|
| 03-18-2014, 07:17 PM | #5 | |
|
Colonel
426
Rep 2,136
Posts |
Quote:
Question: Has anyone employed this method to support the engine while the engine mount is removed? Put the tow hook in the slot behind the oil filter housing, and use a ratchet strap as depicted below... 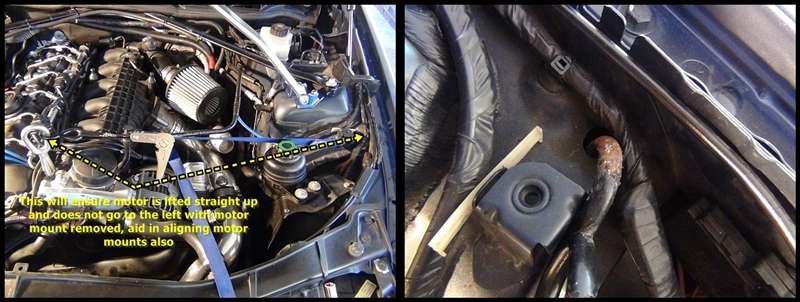 |
|
|
Appreciate
0
|
| 03-18-2014, 07:47 PM | #6 | |
|
Colonel
426
Rep 2,136
Posts |
Quote:
I'm trying to process all the steps in my head first so I know what to do the day I decide to do the work, and not waste any time. |
|
|
Appreciate
0
|
| 03-19-2014, 06:45 AM | #8 | |
|
Colonel
426
Rep 2,136
Posts |
Quote:
|
|
|
Appreciate
0
|
| 03-19-2014, 07:35 AM | #9 |
|
Lieutenant
 143
Rep 567
Posts |
I just removed mine and am waiting for mine to get rebuild. I have around 10 hours in removal but that is taking my time and taking pics and notes so I can make a how to. I will try to organize my notes and type up the removal steps for you. This is on jack stands
__________________
07 335 6MT
|
|
Appreciate
0
|
| 03-19-2014, 07:57 AM | #10 | |
|
Major General
456
Rep 6,478
Posts |
Quote:
__________________
E88 N54 Alpinweiss/Coral Red/Motiv HTA 3586r Tial .82AR/Other stuff...652WHP
F30 N55 XDrive EBII |
|
|
Appreciate
0
|
| 03-19-2014, 08:13 AM | #11 |
|
Lieutenant
143
Rep 567
Posts |
Rob has a ton of great tips that I used but there is not a full how to for the job. It was not as bad as I thought. The worst part is getting the lines off the turbos. They are super tight and you have to pull straight out. Putting liquid wrench helps a good bit.
__________________
07 335 6MT
|
|
Appreciate
0
|
| 03-19-2014, 08:45 AM | #12 |
|
Major
 76
Rep 1,071
Posts |
???? first time, 4 jack stands, in my driveway, 4hrs to remove (since i had no idea how to), 5hrs to install taking my sweet ass time and refilling all the fluids.
__________________
FFTEC 6466 Gen2, MHD Flash Tuned by Wedge, BMS PI Kit, FUEL-IT Stg 3 pump, HALTECH PS-1000, MFactory LSD w/lock down brace, ECS Trailing Arms, M3 control arms, M3 brace, DGR Coilovers, N20 tmap sensor, BMS OCC, VRSF exhaust w/4" tips, VRSF CP, Tial BOV. BigTom FMIC, Msport front & rear, m3 sides skirts.
|
|
Appreciate
0
|
| 03-19-2014, 08:46 AM | #13 | |
|
Major
76
Rep 1,071
Posts |
Quote:
__________________
FFTEC 6466 Gen2, MHD Flash Tuned by Wedge, BMS PI Kit, FUEL-IT Stg 3 pump, HALTECH PS-1000, MFactory LSD w/lock down brace, ECS Trailing Arms, M3 control arms, M3 brace, DGR Coilovers, N20 tmap sensor, BMS OCC, VRSF exhaust w/4" tips, VRSF CP, Tial BOV. BigTom FMIC, Msport front & rear, m3 sides skirts.
|
|
|
Appreciate
0
|
| 03-19-2014, 10:47 AM | #14 | |
|
Colonel
426
Rep 2,136
Posts |
Quote:
Edit: nevermind I found it. Is it absolutely necessary to remove the motor mount to get the job done? Last edited by Gizm0; 03-19-2014 at 11:44 AM.. |
|
|
Appreciate
0
|
| 03-19-2014, 12:52 PM | #15 |
|
Lieutenant
143
Rep 567
Posts |
Yes but no need to drop the subframe. The motor mount takes maybe 15 min to remove. Remove the top nut, jack up engine, remove the 2 bolts to mount, pull out mount and then remove the bracket from the block. I will try to type up a write up for you on removal tonight.
__________________
07 335 6MT
|
|
Appreciate
0
|
| 03-19-2014, 01:05 PM | #16 | |
|
DIYER
614
Rep 5,521
Posts |
Quote:
__________________
JB4 G5, Stage 3 LPFP, Stage 2 MOTIV PI, VM 6466 ST, Custom OCC W/ SS lines, ER FMIC, ER CP W/HKS BOV, M3 control arms, M3 guide rods, M3 upper links, M3 front & rear sway-bars, HPA rear toe arms, Wavetrac LSD, HPF Gen 2, DEFIV kit, KW clubsport, Delrin solid SF bushings, stoptech rotors, Rogue Tranny Mounts, 1M bumper, M3 CF hood, M3 fenders, M3 OEM sideskirts, Mtech rear bumper, CSL trunk, MORR VS8.2 rims 245/295
|
|
|
Appreciate
0
|
| 03-19-2014, 01:21 PM | #17 | |
|
DIYER
614
Rep 5,521
Posts |
Quote:
__________________
JB4 G5, Stage 3 LPFP, Stage 2 MOTIV PI, VM 6466 ST, Custom OCC W/ SS lines, ER FMIC, ER CP W/HKS BOV, M3 control arms, M3 guide rods, M3 upper links, M3 front & rear sway-bars, HPA rear toe arms, Wavetrac LSD, HPF Gen 2, DEFIV kit, KW clubsport, Delrin solid SF bushings, stoptech rotors, Rogue Tranny Mounts, 1M bumper, M3 CF hood, M3 fenders, M3 OEM sideskirts, Mtech rear bumper, CSL trunk, MORR VS8.2 rims 245/295
|
|
|
Appreciate
0
|
| 03-19-2014, 01:24 PM | #18 |
|
DIYER
614
Rep 5,521
Posts |
Here is my DIY/install thread. I did but remove subframe in the DIY...but would suggest it.
http://www.e90post.com/forums/showthread.php?t=769313
__________________
JB4 G5, Stage 3 LPFP, Stage 2 MOTIV PI, VM 6466 ST, Custom OCC W/ SS lines, ER FMIC, ER CP W/HKS BOV, M3 control arms, M3 guide rods, M3 upper links, M3 front & rear sway-bars, HPA rear toe arms, Wavetrac LSD, HPF Gen 2, DEFIV kit, KW clubsport, Delrin solid SF bushings, stoptech rotors, Rogue Tranny Mounts, 1M bumper, M3 CF hood, M3 fenders, M3 OEM sideskirts, Mtech rear bumper, CSL trunk, MORR VS8.2 rims 245/295
|
|
Appreciate
0
|
| 03-19-2014, 01:27 PM | #19 | |
|
DIYER
614
Rep 5,521
Posts |
Quote:
__________________
JB4 G5, Stage 3 LPFP, Stage 2 MOTIV PI, VM 6466 ST, Custom OCC W/ SS lines, ER FMIC, ER CP W/HKS BOV, M3 control arms, M3 guide rods, M3 upper links, M3 front & rear sway-bars, HPA rear toe arms, Wavetrac LSD, HPF Gen 2, DEFIV kit, KW clubsport, Delrin solid SF bushings, stoptech rotors, Rogue Tranny Mounts, 1M bumper, M3 CF hood, M3 fenders, M3 OEM sideskirts, Mtech rear bumper, CSL trunk, MORR VS8.2 rims 245/295
|
|
|
Appreciate
0
|
| 03-19-2014, 01:28 PM | #20 | |
|
DIYER
614
Rep 5,521
Posts |
Quote:

__________________
JB4 G5, Stage 3 LPFP, Stage 2 MOTIV PI, VM 6466 ST, Custom OCC W/ SS lines, ER FMIC, ER CP W/HKS BOV, M3 control arms, M3 guide rods, M3 upper links, M3 front & rear sway-bars, HPA rear toe arms, Wavetrac LSD, HPF Gen 2, DEFIV kit, KW clubsport, Delrin solid SF bushings, stoptech rotors, Rogue Tranny Mounts, 1M bumper, M3 CF hood, M3 fenders, M3 OEM sideskirts, Mtech rear bumper, CSL trunk, MORR VS8.2 rims 245/295
|
|
|
Appreciate
0
|
| 03-19-2014, 10:22 PM | #22 | |
|
Brigadier General
914
Rep 3,456
Posts
Drives: Harrop E90 M3
Join Date: May 2011
Location: Colorado Springs
|
Quote:
As far as the replacement goes, I leave all of the lines in the block and remove them from the turbo. With a pry bar or long y shaped trim tool you can reach behind the turbos and get on the oil supply line. Lightly tap on it with your palm to remove the line and as someone else mentioned, a penetrating oil of some kind helps out greatly to free up the lines. Spray all of the fasteners holding the turbos to the head as well with penetrating oil and most of the nuts should come off leaving the studs in place. I also leave the turbo inlet pipes, fan and subframe in place. Just gently pry the turbos out from the studs at top and pull outward from the middle of the engine to allow the front wastegate actuator to clear the webbing on the block. The turbos will roll out of the inlet pipes nicely, just be nice and easy as well as patient. The rear one should come out first and be installed last to maximize working space. Definitely pull the engine mount and bracket out as this will make removal of the water pump and thermostat much easier. I pull the steering rack out of the subframe also and remove the heat shield above it to allow easy access to the downpipes and the water pump/t stat. No need to remove the subframe or even the lines or tie rods from the rack, just the mounting bolts. Pulling it forward out of the subframe makes for a ton of extra access and is very easy to do. This applies to the i models only, not the x drive 3 series, that's a totally different setup. Any others questions, feel free to ask. I've done a lot of turbo replacements and I am very familiar with the job. Enjoy! |
|
|
Appreciate
0
|
 |
| Bookmarks |
|
|


