

|
|
|
|
 |

|
 |
BMW Garage | BMW Meets | Register | Search | Today's Posts | Mark Forums Read |
 |

|
BMW 3-Series (E90 E92) Forum
>
DIY Addendum: Oil Filter Housing Gasket with OEM Oil Cooler
|
 |
| 01-23-2014, 02:02 PM | #1 |
|
Master Gunner
77
Rep 435
Posts
Drives: 2008 335i Sport
Join Date: Aug 2013
Location: Sandy Eggo
|
The various OFHG DIY's available don't incorporate the OEM Oil Cooler, aka S840A High Speed Synchronization package, as part of their original DIY posts. Although there may be a comment added later by another poster that described replacing the "other" gasket, I actually never came across those buried comments until after I had already performed my OFHG and Oil Thermostat Housing, aka Oil Filter Control Housing hereafter referred to as OFCH, gasket R&R. So I decided to create a stand-alone DIY as an addendum to other OFHG DIY's.
For this forum, I will refer you to e90 - N54 Oil Filter Housing gasket replacement (2007 335i automatic) to R&R the OFHG itself. I performed these procedures on a 2008 335i Sedan Automatic, but this should be applicable to all 135/335, N54/N55 models with an OEM Oil Cooler package. In addition to the materials and tools listed in that DIY, I used the following: Oil Filter Control Housing Gasket, PN 11427525335 Carburetor or Brake Cleaner (to clean all mating surfaces) E-10 External Torx Socket (for OFH bolts) E-12 External Torx Socket (for OFCH bolts; 10mm 12-point socket will also work but will be a little loose) 8mm 12-point Ratcheting Wrench (for front-lower OFH bolt; standard 12-point box-end wrench will also work) 12mm Socket (for oil cooler line H-plate clamp) Air Ratchet (for fast and easy work, especially the above H-plate clamp) Air Compressor (to power Air Ratchet, duh) Razor Blade (to help dig out the flattened, embedded gaskets) 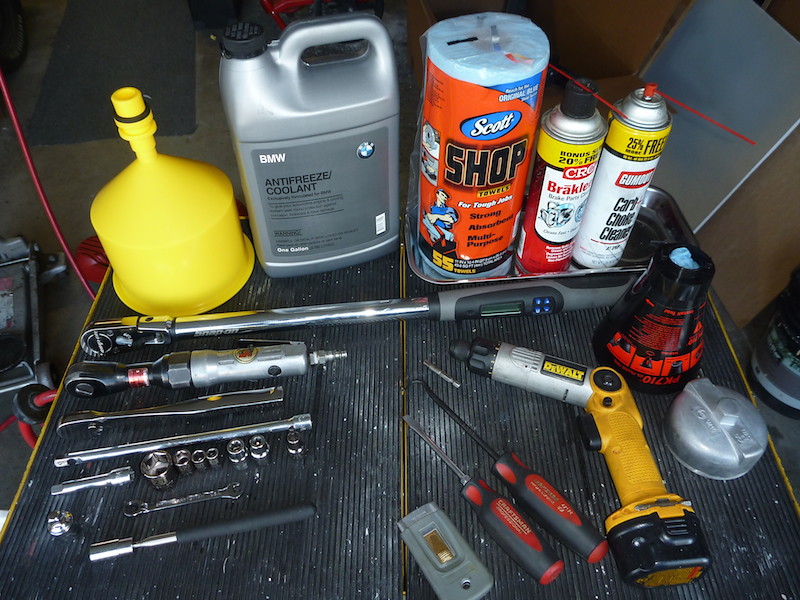 The day before the project, I power washed the entire engine to ensure I started with as clean a slate as possible. You could also use a spray can of engine degreaser and water hose.. Oil Filter Control Housing Gasket Removal & Replacement Procedures: Step A: Place some rags below the OFCH to catch dripping oil and remove the oil cooler lines from the OFCH by unbolting the H-plate clamp with a 12mm socket then pulling the fittings down evenly. There's not a whole lot of room to work the inverted ratchet so a finely-pitched one would be better; an air ratchet makes it absurdly easy. 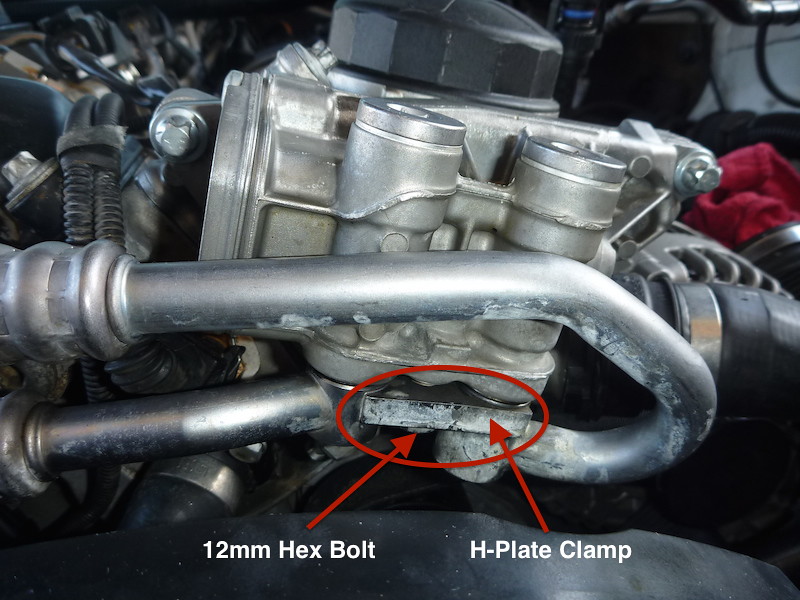 Step B: Wrap the hose ends in clean rags and lay on top of the radiator support. You can invert the ends first to empty out residual oil in the lines to prevent them from later spilling out and making a mess. Also, the fittings are loosely held in place on the H-plate, so be mindful not to bump the hoses while working on the OFH; you can temporarily bind the assembly together with tape. Step C: Using an E-12 Torx socket or 12-point 10mm socket, break loose the 3 OFCH bolts to make it easier for disassembly later after the OFH assembly is removed. If you decided to completely remove the OFCH now, be prepared for more oil spillage. Step D: Proceed with the OFHG DIY steps 1 through 22, noting the following suggestions: Step 17- Place a strong magnetic pick-up tool below the fasteners while loosening them. Once the fastener is free and keeping the magnetic tool in place, remove the socket. You can then use the pick-up tool to carefully and safely remove the fastener to keep it from dropping down onto the side of the engine and getting lost. I wish I did that for the rearward OFH bolt... 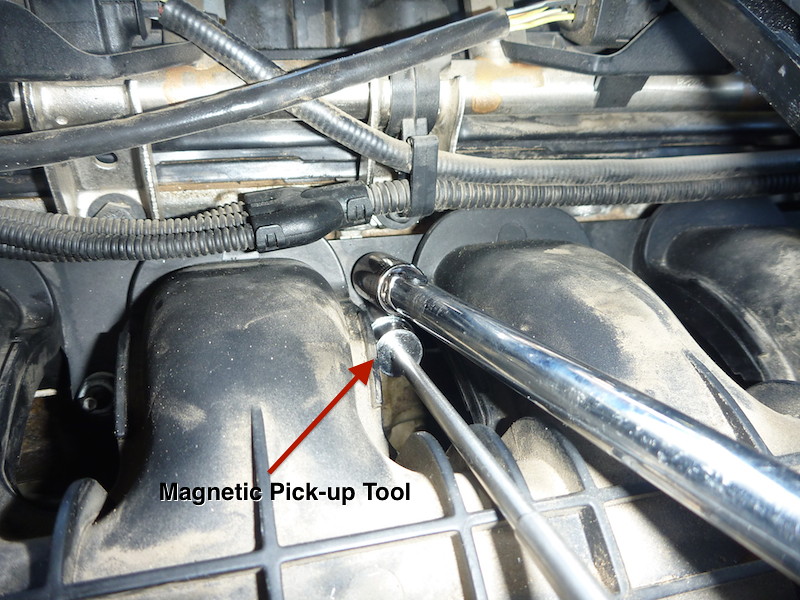 Step 18- Just pull the intake manifold out far enough to clear the mounting studs. That should give you plenty of room to access the rear OFH bolt. Step 20 (a&b)- I did not find it necessary to remove the cylinder head coolant supply as I was able to break loose the front lower OFH bolt with my little 8mm 12pt wrench; no need to get an oversized E-10 Torx socket and ratchet on it, which there really wasn't any room to use anyways. The key to removing this easily is to first have the other OFH bolts completely removed, then as this last bolt is being loosened, gradually pull the OFH away from the cylinder head. This will ensure that clearance is maintained from the cylinder head coolant supply fitting to loosen and remove the bolt. 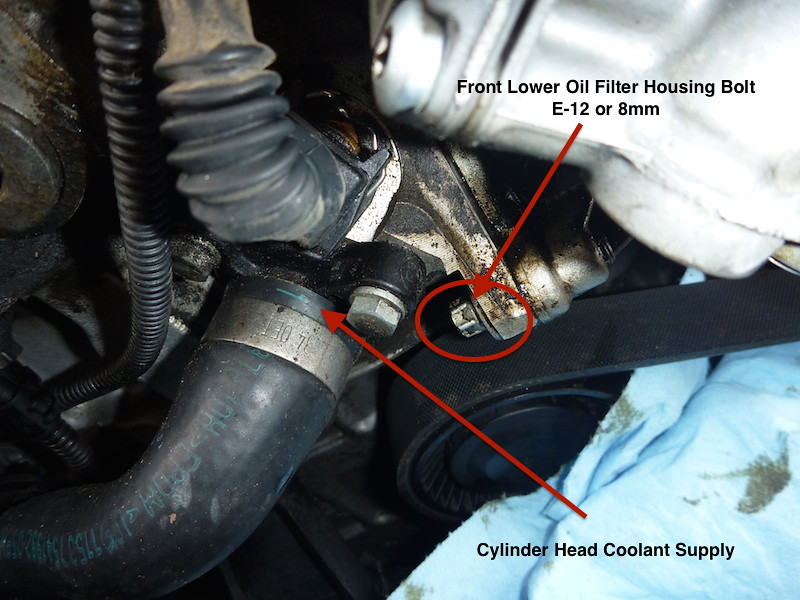 Step E: If you haven't already, remove the OFCH bolts and separate the housings. I didn't take any pictures with mine disassembled, so I swiped the pictures from landsharklager off another forum to provide as reference: 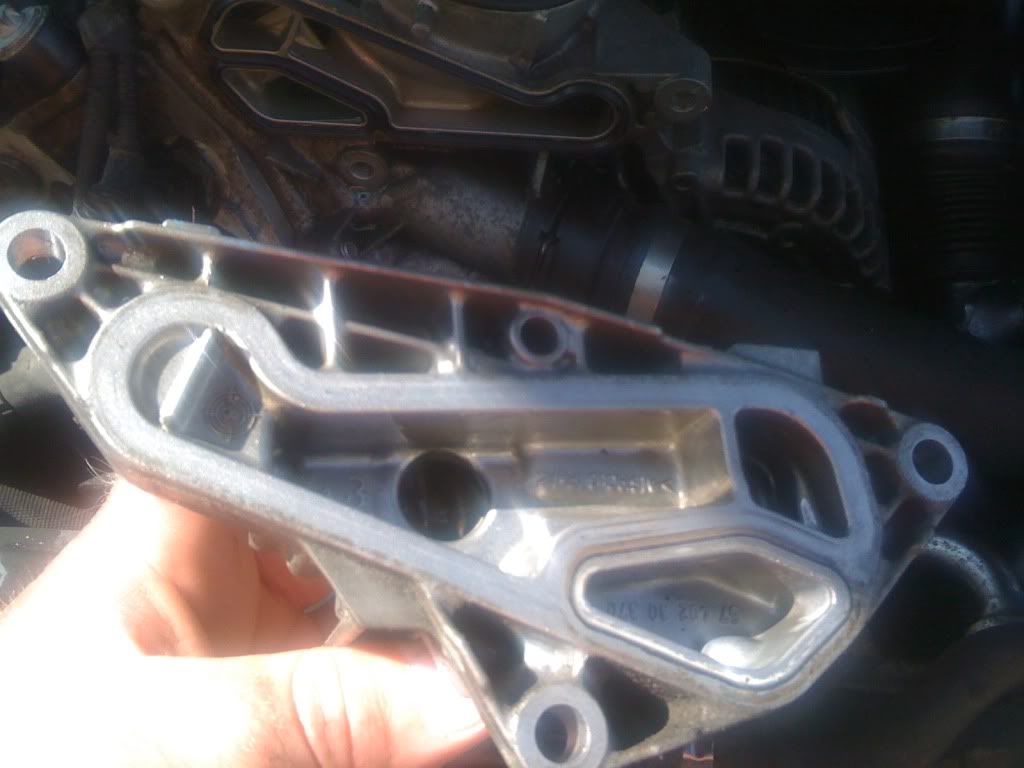 Step F: Remove the old gaskets. I used both a razor blade and pick awl to pry out the flattened, stubbornly embedded gaskets. The fact that the gaskets were no longer very pliable and flattened deeply into the housing groves, I'm sure the replacement gaskets will eventually deteriorate at the same rate and need replacing after 75-100k miles. Mine were at 109k when I replaced them but were leaking long before that. Step G: Clean all housings and mating surfaces with carb/brake cleaner and install the new gaskets. Photo again courtesy of landsharklager (he only replaced the OFCH gasket which is why the OFH is still attached to the engine): 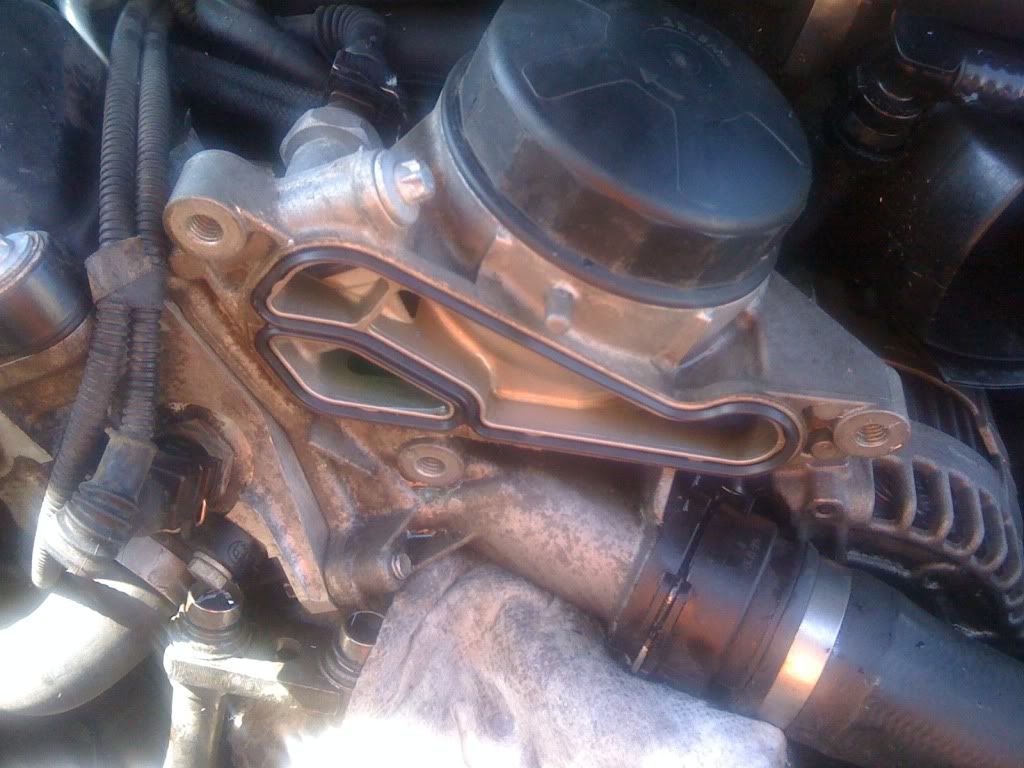 Step H: Assemble the OFCH to the OFH and hand tighten the bolts. Step I: Attach the OFH assembly according to step 23 of the OFHG DIY. Step J: With the OFH mounted, finally torque the OFCH bolts down. I couldn't find a torque spec specifically published for these bolts, but a BMW general torque specifications document stated that 24 Nm is the recommended torque for an M8x25 8.8 grade bolt; FWIW, the OFH bolts are torqued to 22 Nm, and those bolts are smaller. Step K: Attach the oil cooler lines to the OFCH and torque the H-plate clamp bolt to 19 Nm. Step L: Finish up with the remainder of the OFHG DIY from step 24 onwards, with the final torque on the intake manifold fasteners at 15 Nm in step 25b. Finito! Last edited by Augster; 07-05-2017 at 11:46 AM.. Reason: To replace Image Host links |
| 02-10-2014, 06:58 AM | #4 | |
|
Master Gunner
77
Rep 435
Posts
Drives: 2008 335i Sport
Join Date: Aug 2013
Location: Sandy Eggo
|
Quote:
Essentially, it's much easier to simply remove the oil lines to gain unfettered access to the housings and their bolts, the oil lines are only held in by one bolt, and they come off quick and painlessly.
__________________
2008 335i Alpine White Sport Sedan AT | Avant Garde M364 Staggered 19"
Last edited by Augster; 02-10-2014 at 07:11 AM.. |
|
|
Appreciate
0
|
| 02-10-2014, 07:32 PM | #6 |
|
Master Gunner
77
Rep 435
Posts
Drives: 2008 335i Sport
Join Date: Aug 2013
Location: Sandy Eggo
|
You could replace the pair of o-rings, PN 17222245358, if you wish; they're only a buck each. Mine looked to be in completely serviceable condition so I reused them. They are so easy to get to and change that if they do leak, it would be no trouble to quickly change them out, but again, since they are so cheap it certainly is a sound choice to replace them along with the gaskets.
__________________
2008 335i Alpine White Sport Sedan AT | Avant Garde M364 Staggered 19"
|
|
Appreciate
1
TheMidnightNarwhal2632.50 |
| 02-10-2014, 08:05 PM | #7 | |
|
Master Gunner
77
Rep 435
Posts
Drives: 2008 335i Sport
Join Date: Aug 2013
Location: Sandy Eggo
|
Quote:
__________________
2008 335i Alpine White Sport Sedan AT | Avant Garde M364 Staggered 19"
|
|
|
Appreciate
0
|
| 04-21-2014, 03:46 PM | #9 |
|
Private
 0
Rep 96
Posts
Drives: e92 n54 LSD....
Join Date: Nov 2011
Location: southeast
|
Does coolant have to be drained before the job? Will coolant spill a lot when the OFH is getting removed?
|
|
Appreciate
0
|
| 04-21-2014, 09:13 PM | #10 |
|
Master Gunner
77
Rep 435
Posts
Drives: 2008 335i Sport
Join Date: Aug 2013
Location: Sandy Eggo
|
You don't have to drain the coolant entirely; you can just disconnect the upper radiator hose and let whatever is trapped up high drain out, but there will be coolant draining out again when you separate the OFH from the cylinder head with no easy way of catching it so it will be a bit messy doing it that way.
__________________
2008 335i Alpine White Sport Sedan AT | Avant Garde M364 Staggered 19"
|
|
Appreciate
0
|
| 04-22-2014, 09:47 AM | #11 |
|
Private
0
Rep 96
Posts
Drives: e92 n54 LSD....
Join Date: Nov 2011
Location: southeast
|
Thanks. I guess i better try to drain as much as I can. Just didn't want to remove FMIC and all that.
|
|
Appreciate
0
|
| 04-22-2014, 09:52 AM | #12 | |
|
Master Gunner
77
Rep 435
Posts
Drives: 2008 335i Sport
Join Date: Aug 2013
Location: Sandy Eggo
|
Quote:
You just twist the plastic knobs to undo and remove the long, narrow bumper-to-IC air guide, remove two screws, unclip the IC hoses and pry them slightly loose (this is the only cumbersome aspect of the removal as it's in a confined area and depends on how "stuck" the IC hose ends are on the IC), then lower away.
__________________
2008 335i Alpine White Sport Sedan AT | Avant Garde M364 Staggered 19"
|
|
|
Appreciate
0
|
| 04-22-2014, 09:57 AM | #13 |
|
Private
0
Rep 96
Posts
Drives: e92 n54 LSD....
Join Date: Nov 2011
Location: southeast
|
i actually have the aftermarket fmic. Not gigantic, but heavy. I didn't remove my bumper while installing, so I assume that I might be able to pull it out w/o bumper removal. It's just a bit of PITA having another person for help.
|
|
Appreciate
0
|
| 04-22-2014, 10:12 AM | #14 |
|
Master Gunner
77
Rep 435
Posts
Drives: 2008 335i Sport
Join Date: Aug 2013
Location: Sandy Eggo
|
Yea, all of my friends and family don't live close by (at least 20 minute drive away) so it sucks having to rely on someone to help out...
__________________
2008 335i Alpine White Sport Sedan AT | Avant Garde M364 Staggered 19"
|
|
Appreciate
0
|
| 04-22-2014, 10:16 AM | #15 |
|
Private
0
Rep 96
Posts
Drives: e92 n54 LSD....
Join Date: Nov 2011
Location: southeast
|
Thanks for all the replies. I am going to try w/o removing the fmic. I think I have read somewhere doing it that way.
|
|
Appreciate
0
|
| 04-22-2014, 10:21 AM | #16 |
|
Master Gunner
77
Rep 435
Posts
Drives: 2008 335i Sport
Join Date: Aug 2013
Location: Sandy Eggo
|
Draining the coolant prior to OFHG replacement is strictly optional. The only reason for doing it is to prevent messy spills when disconnecting the upper radiator hose and when separating the OFH from the cylinder head.
Since I was also replacing the engine block coolant pipe, I had to drain the coolant system anyways. If you don't mind a little cleanup afterwards, then just do it the "messy" way! I ended up power washing the engine and compartment afterwards again because I bumped the oil filter lines a couple times spilling oil all over the front of the engine, and after removing the OFH, I noticed a bunch of crude underneath which I hit with carb cleaner causing the residual gunk to drain down everywhere else. I wanted a super clean engine in order to confirm that the OFHG replacement solved my "driveway lubrication" issue.
__________________
2008 335i Alpine White Sport Sedan AT | Avant Garde M364 Staggered 19"
|
|
Appreciate
0
|
| 04-22-2014, 10:29 AM | #17 |
|
Private
0
Rep 96
Posts
Drives: e92 n54 LSD....
Join Date: Nov 2011
Location: southeast
|
how do you clean the entire engine bay? Don't you have to cover some areas like dme and alternator? My mech friend actually attempted the OFH but ended up just doing the thermostat housing only. during the process, he spelt quite amount of messy crude to the belt and pulleys. He then sprayed bunch of brake cleaner to the pulleys and the belt. Obviously when we removed the lower belly shield, it was full of black crude.
|
|
Appreciate
0
|
| 04-22-2014, 10:34 AM | #18 |
|
Master Gunner
77
Rep 435
Posts
Drives: 2008 335i Sport
Join Date: Aug 2013
Location: Sandy Eggo
|
I put a plastic trash bag over the alternator but otherwise, kept away from the electronics box or anything else around the base of the windshield; I didn't have to touch the top of the engine because it was already clean, but if I did, I would have covered the valve cover area because I wouldn't want to get water forced under the coils into the spark plug wells. Basically I just power washed from the cylinder head down, and underneath.
__________________
2008 335i Alpine White Sport Sedan AT | Avant Garde M364 Staggered 19"
|
|
Appreciate
0
|
| 04-22-2014, 01:30 PM | #19 |
|
Private
0
Rep 96
Posts
Drives: e92 n54 LSD....
Join Date: Nov 2011
Location: southeast
|
What do you mean cylinder head down? I wish I could see you were doing it.
|
|
Appreciate
0
|
| 04-22-2014, 01:31 PM | #20 | |
|
Master Gunner
77
Rep 435
Posts
Drives: 2008 335i Sport
Join Date: Aug 2013
Location: Sandy Eggo
|
Quote:
__________________
2008 335i Alpine White Sport Sedan AT | Avant Garde M364 Staggered 19"
|
|
|
Appreciate
0
|
| 04-22-2014, 01:47 PM | #21 |
|
Private
0
Rep 96
Posts
Drives: e92 n54 LSD....
Join Date: Nov 2011
Location: southeast
|
oh....i see.
|
|
Appreciate
0
|
| 04-22-2014, 03:02 PM | #22 |
|
Private
0
Rep 96
Posts
Drives: e92 n54 LSD....
Join Date: Nov 2011
Location: southeast
|
I still don't know about the power wash nor I have any compressor, but I will def spray cans of brake cleaners once all the job was done to degrade the crude splashed over steering hoses and all that.
|
|
Appreciate
0
|
 |
| Bookmarks |
| Thread Tools | Search this Thread |
|
|


