|
|
|
|
 |
|
 |
BMW Garage | BMW Meets | Register | Today's Posts | Search |
 |

|
BMW 3-Series (E90 E92) Forum
>
Cheap Walnut Blasting Solution
|
 |
| 06-20-2016, 09:17 PM | #1 |
|
Private First Class
 40
Rep 198
Posts |
Cheap Walnut Blasting Solution
Hey guys I'm not sure sure if anyone has made a DIY about using a HF gravity feed blaster, but I set one up using this method and it worked perfectly for me.
I believe the gravity feed blaster is $20 from HF and the 25 lb box of fine grade walnut shells you will need is $25. Also the BMW blaster wand and vacuum adapter will run you about $100. And you will need a washer that will fit the BMW blast nozzle to the HF gravity feed blaster. So assuming you already have an air compressor and shop vac you're looking at less than $150 to blast your car and friends cars if you're a nice guy I guess.  Tools/Items Required: 1. HF Gravity Feed Blaster 2. HF 25 lb box of fine grade walnut shells 3. BMW blaster wand 4. BMW vacuum adapter 5. T8 torx bit 6. Drill bit set or at least a 1/4" bit 7. Washer- 3/4" OD, 5/16" ID Here goes. First you will need to modify the blaster. Step 1- Use a T8 torx socket to remove the two pins that hold the feeder to the blaster. May have to purchase this one separately because it's such a small size torx bit it may not come in a basic set. 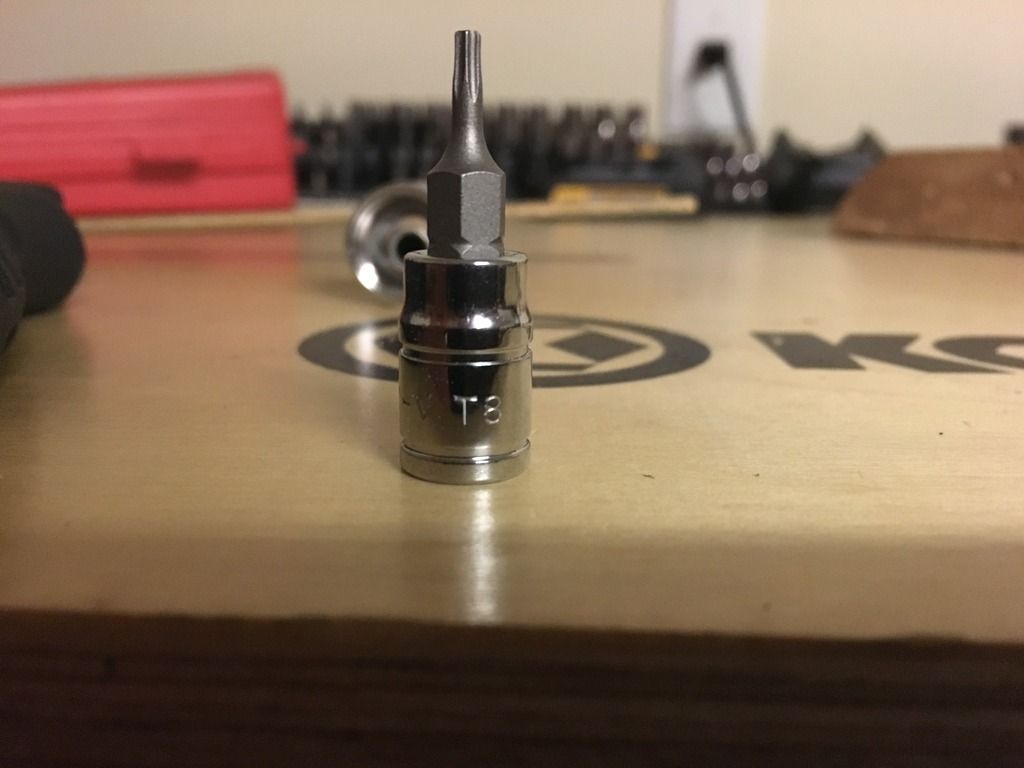 Step 2- Enlarge the holes in the feeder and blaster that the blast media flows through. Without this step the blaster will barely work if at all. I started small and worked up to a 1/4" drill bit. Make sure to drill through the rotating cam lever when you're drilling out the blaster. 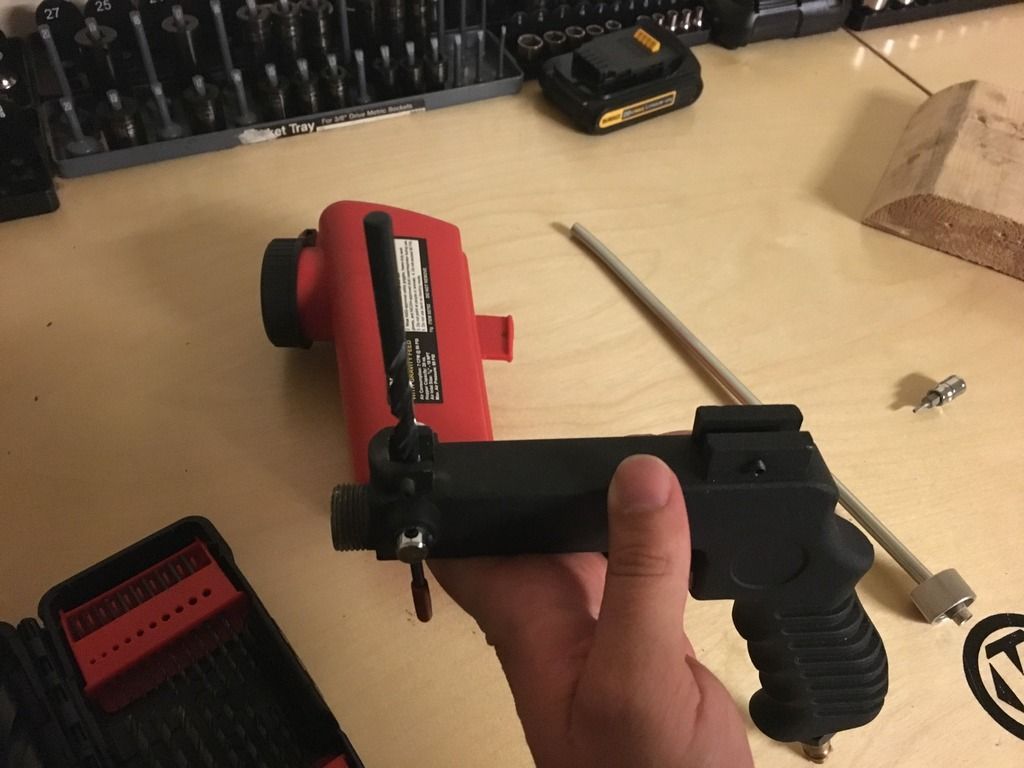 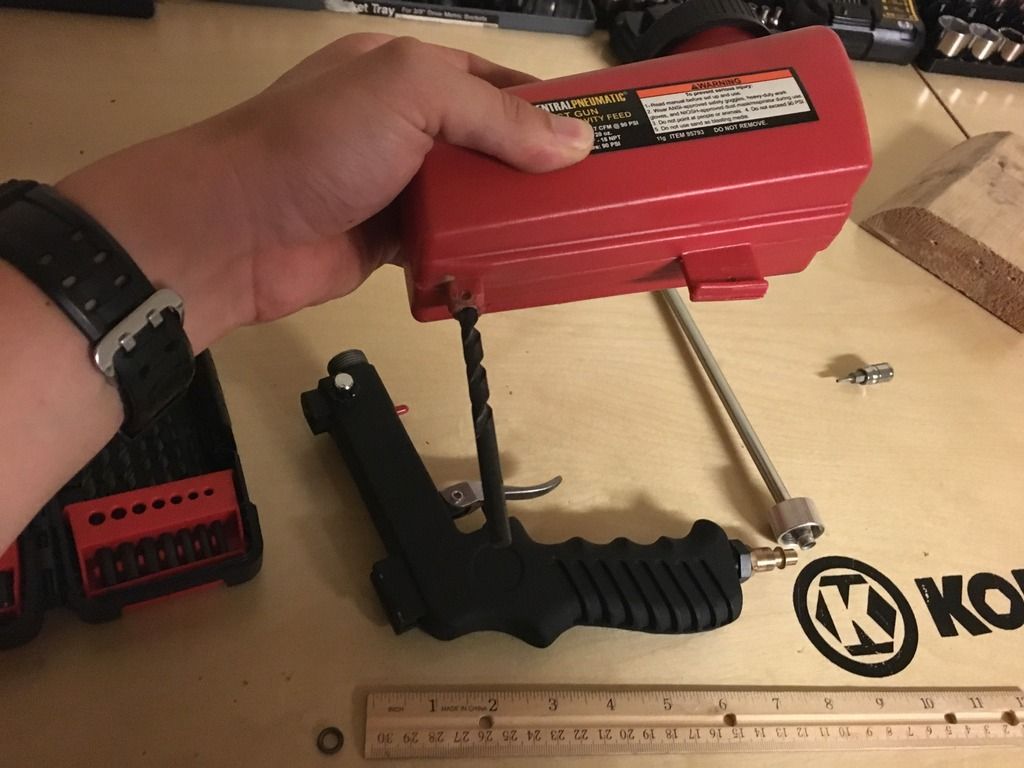 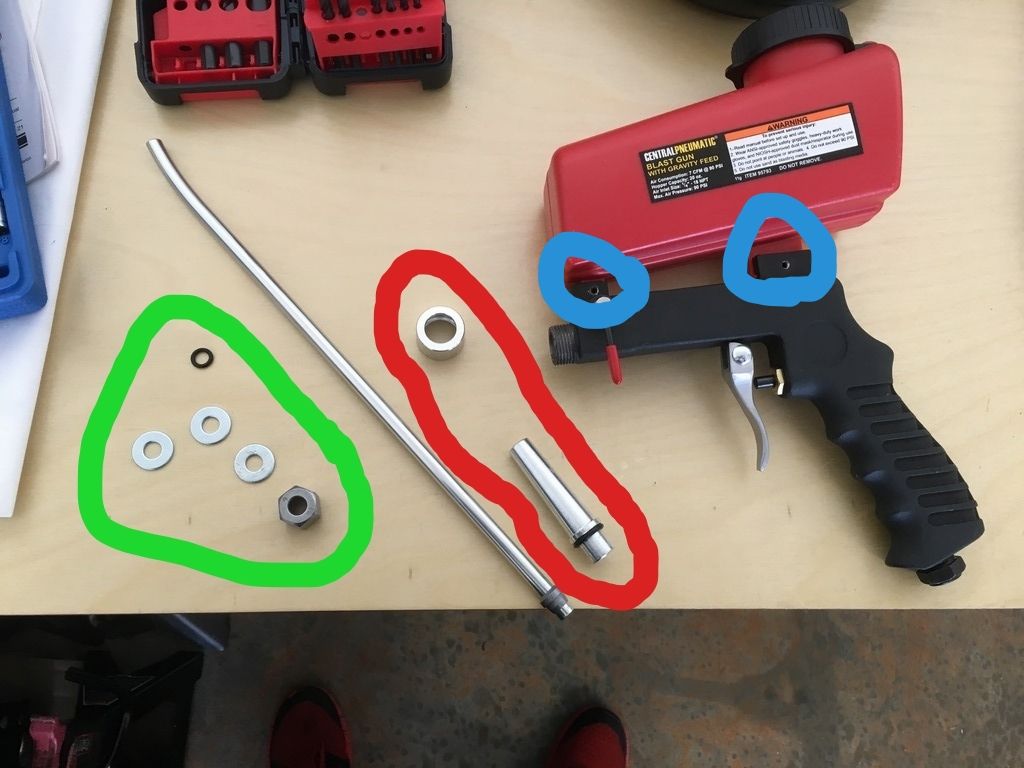 Red- Nozzle that comes with the adapter and fitting that will be reused. Green- The fitting and o-ring that came with the BMW nozzle that won't be used and also the washer I used. I bought a few. Blue- Pins that hold the hopper to the blaster. Step 3- Use the correct size washer that has a small enough outer diameter to just barely fit in the fitting that came with the blaster so that it catches the lip on the fitting and an inner diameter that fits snug around the BMW blaster nozzle so that the lip on the nozzle catches on the inner part of the washer. Just measured the one I used and it was 3/4" OD, and 5/16" ID. 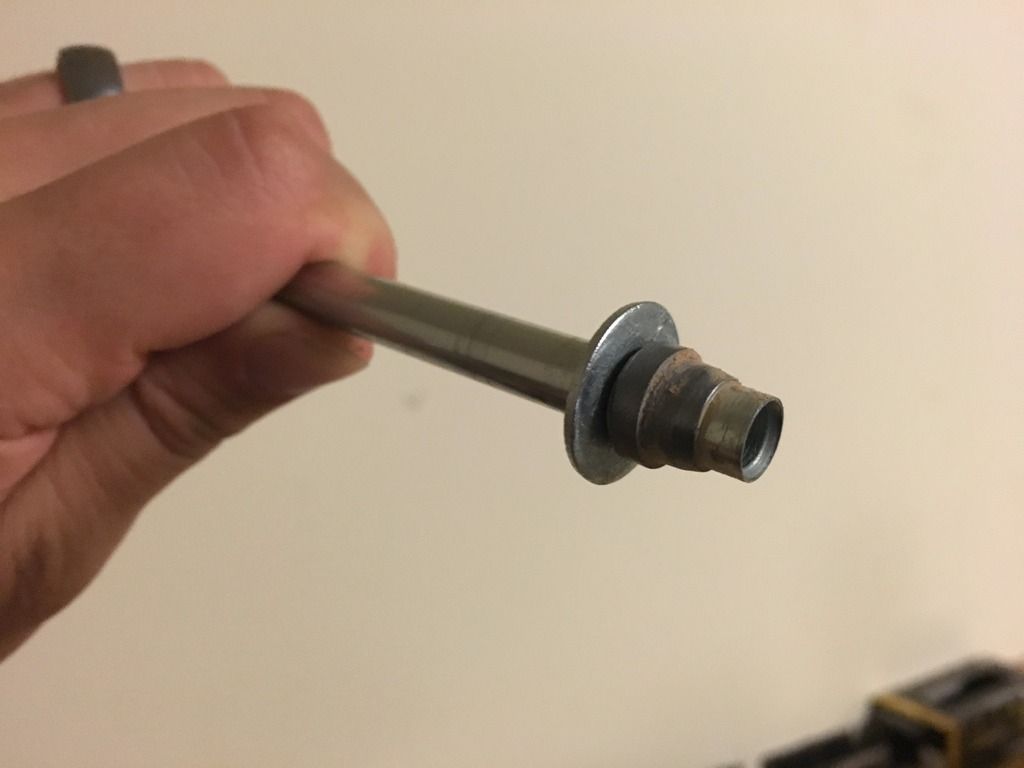 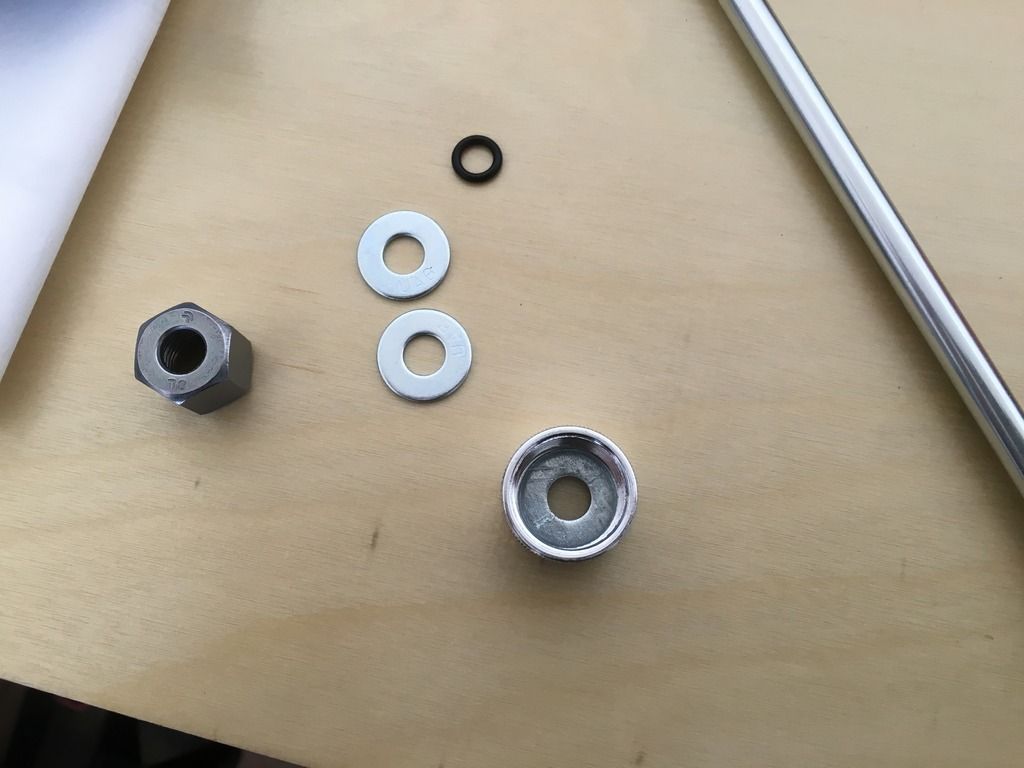 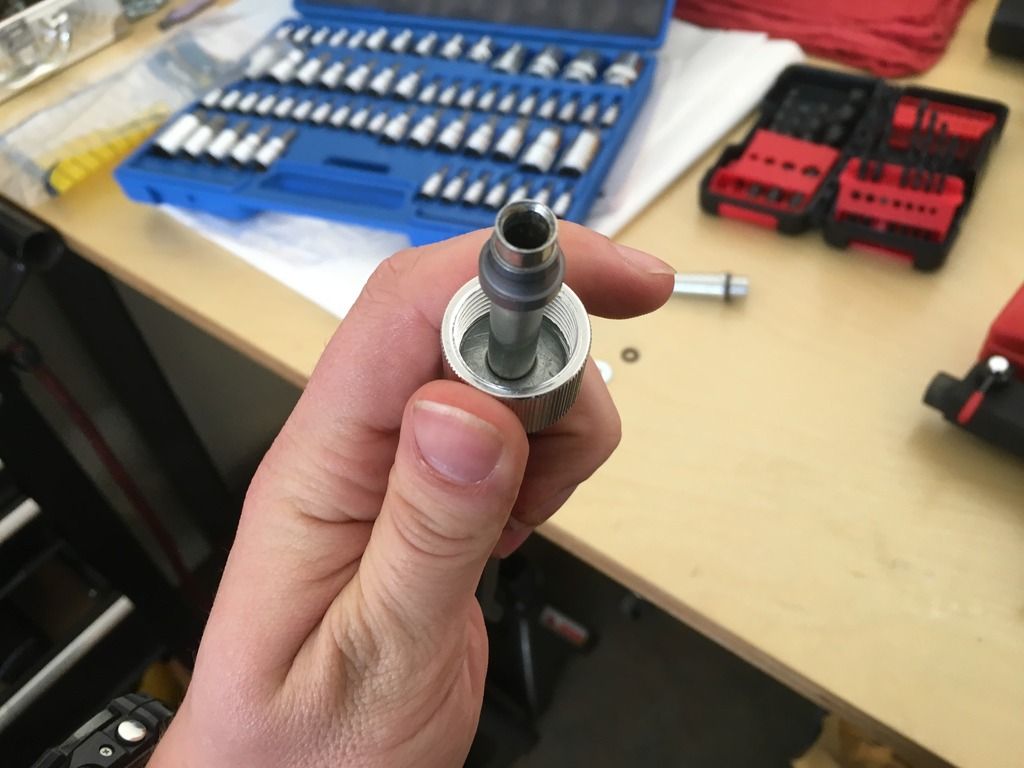 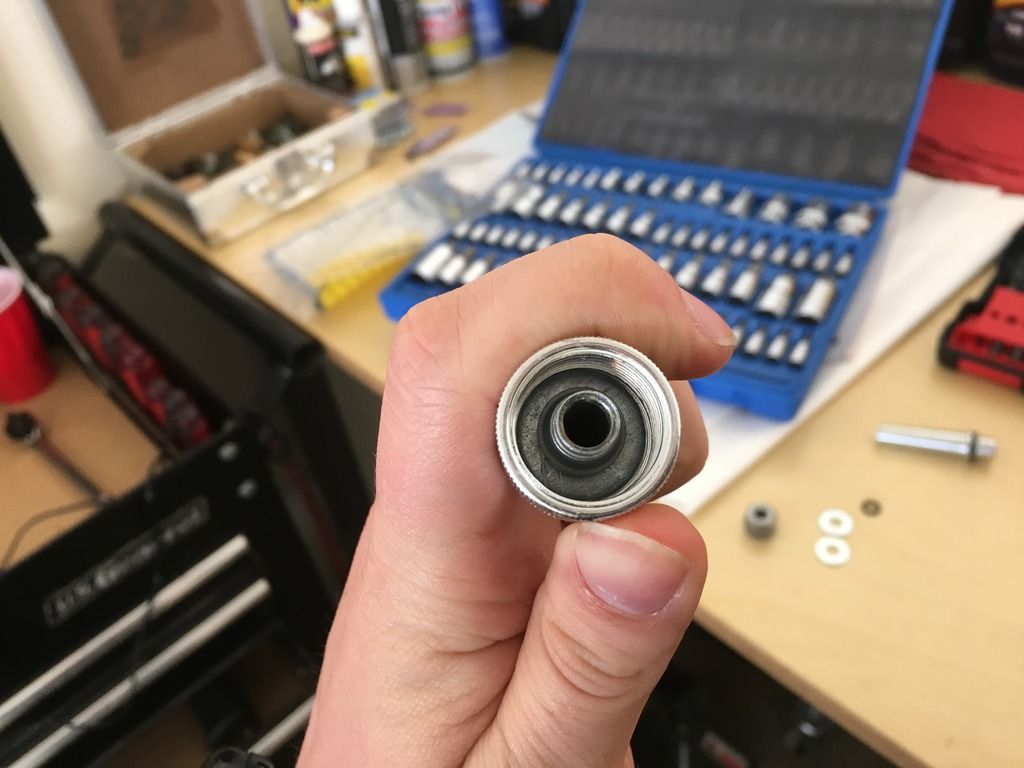 Step 4- Put your new nozzle on your modified blaster and you're all done with setting up the blaster other than putting an air fitting on it. 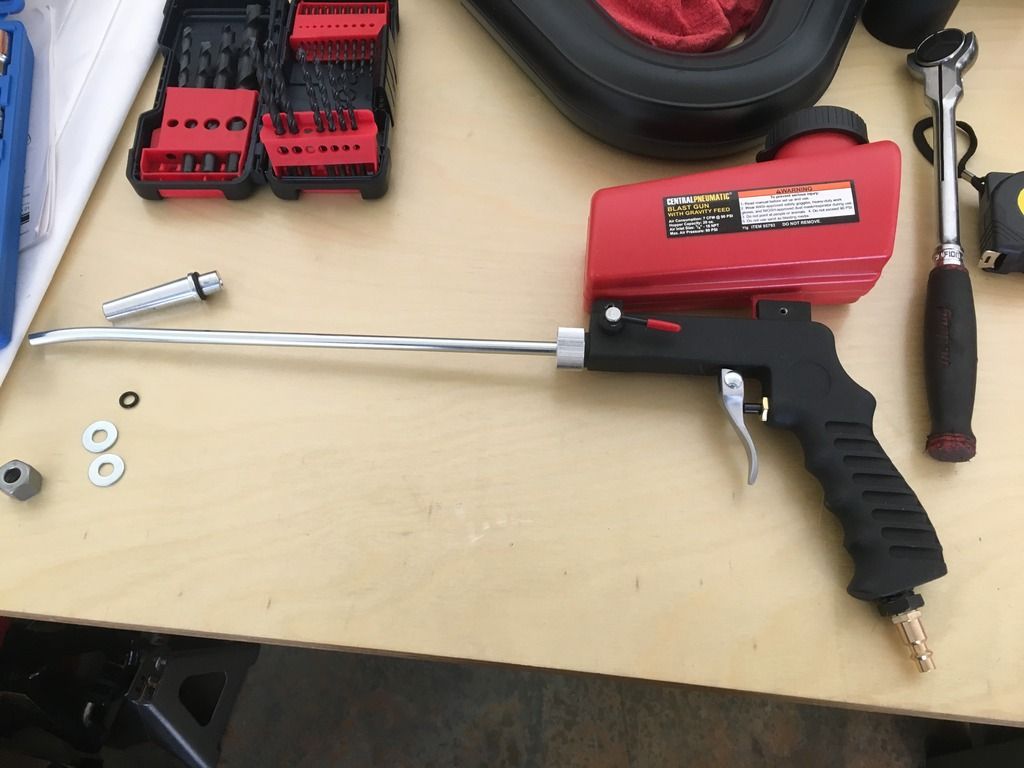 Here is a view of both the nozzle that comes with the blaster and the BMW nozzle. As you can see the inner diameter is the same and the lip is the same which allows for a leak free fitment. Also if you need to change the angle of the tip of the blaster it's as easy as loosening the fitting a bit, changing the angle and re-tightning. There's no messing with the flow rate and clogging of a pressure blaster which is why I decided to go this route since my buddy had such a hard time with the HF pressure blaster. 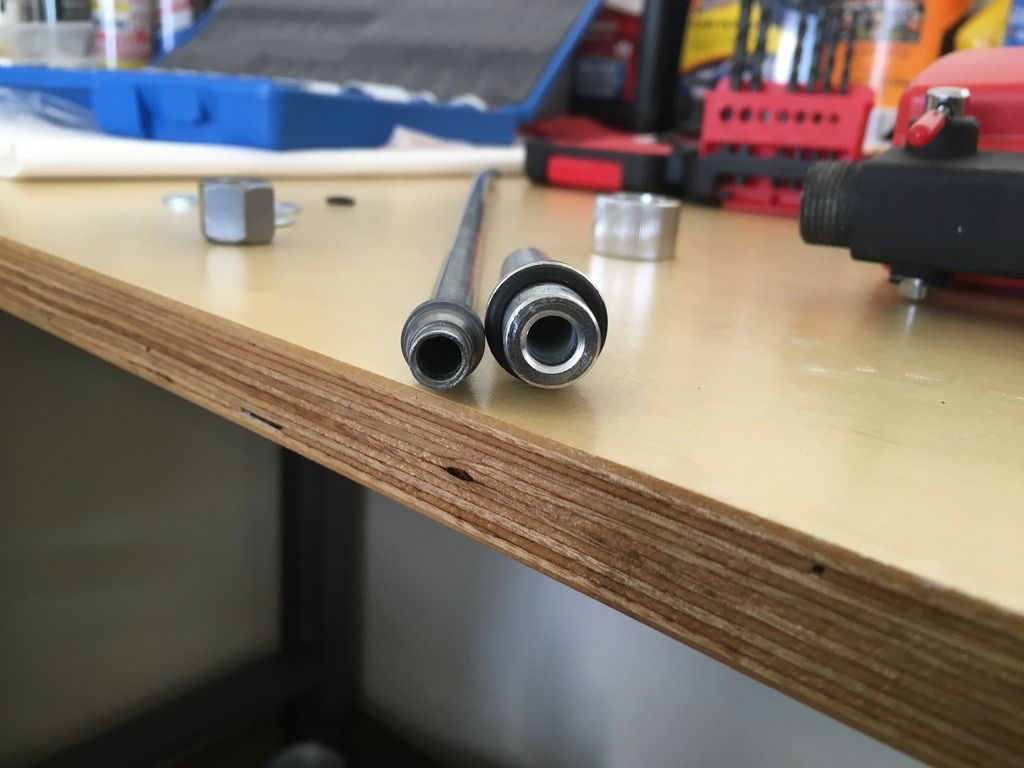 Here are some before pictures. My car had 63k on it when I bought it and I'm assuming the valves had never been cleaned lol.  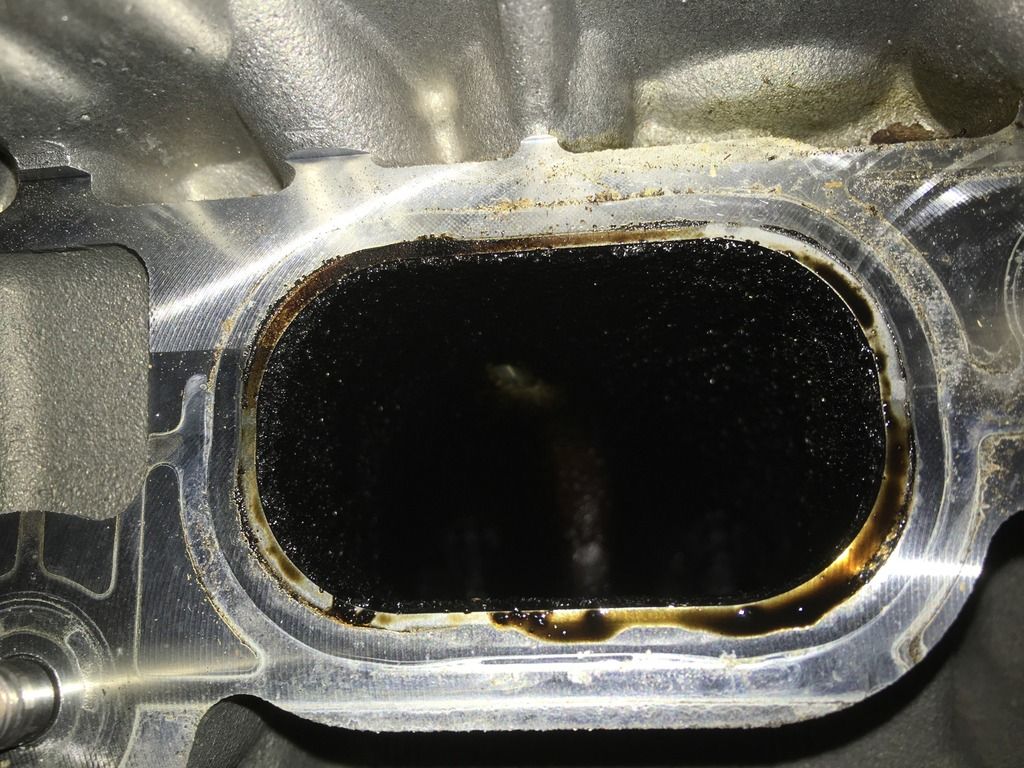 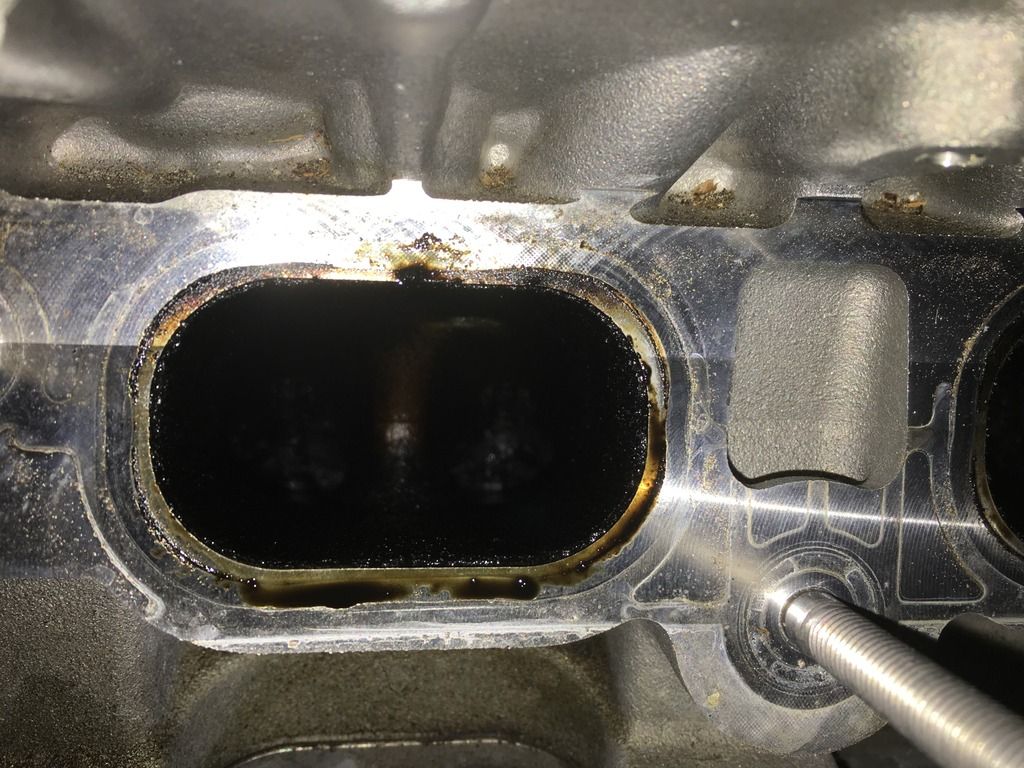 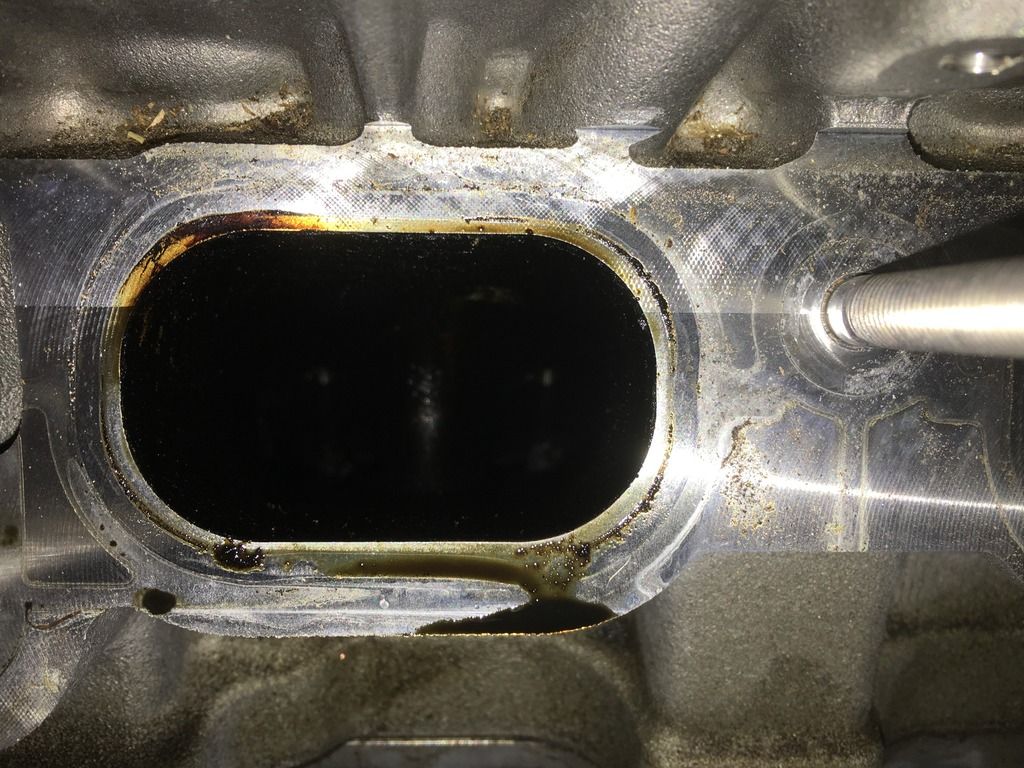 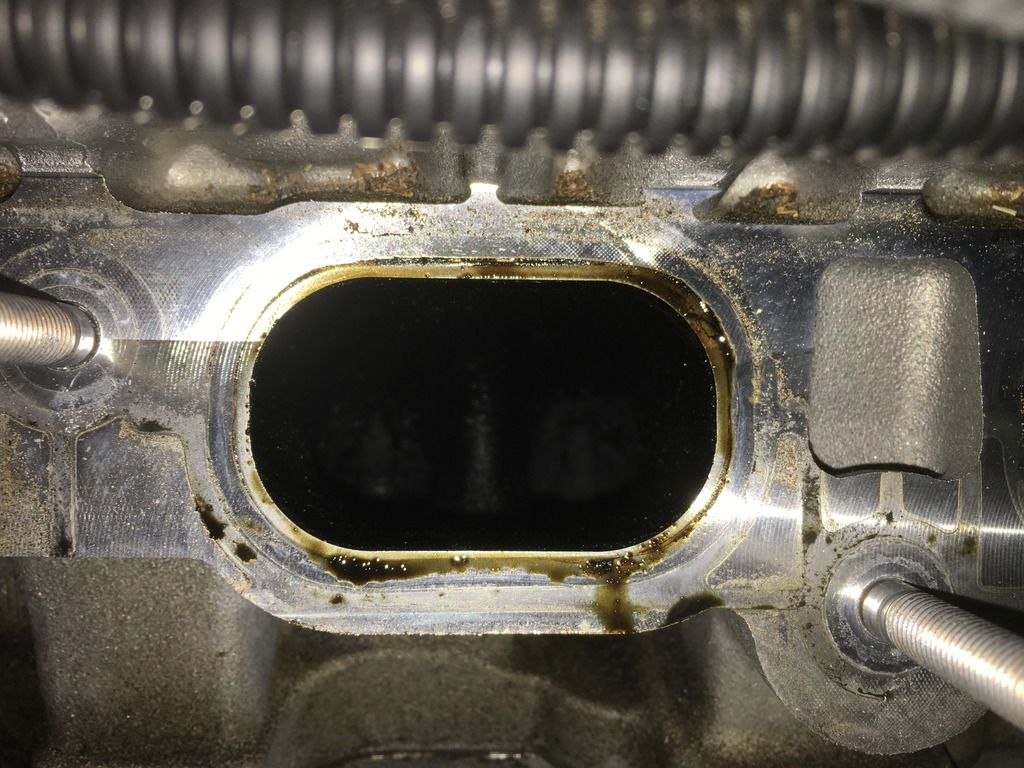 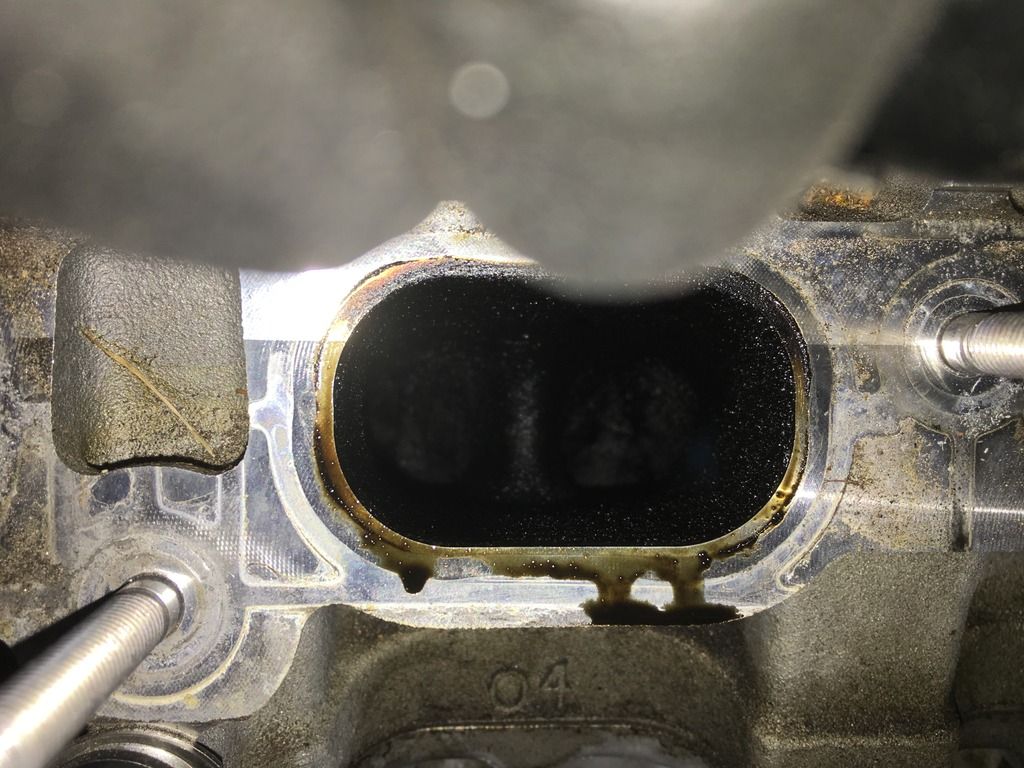 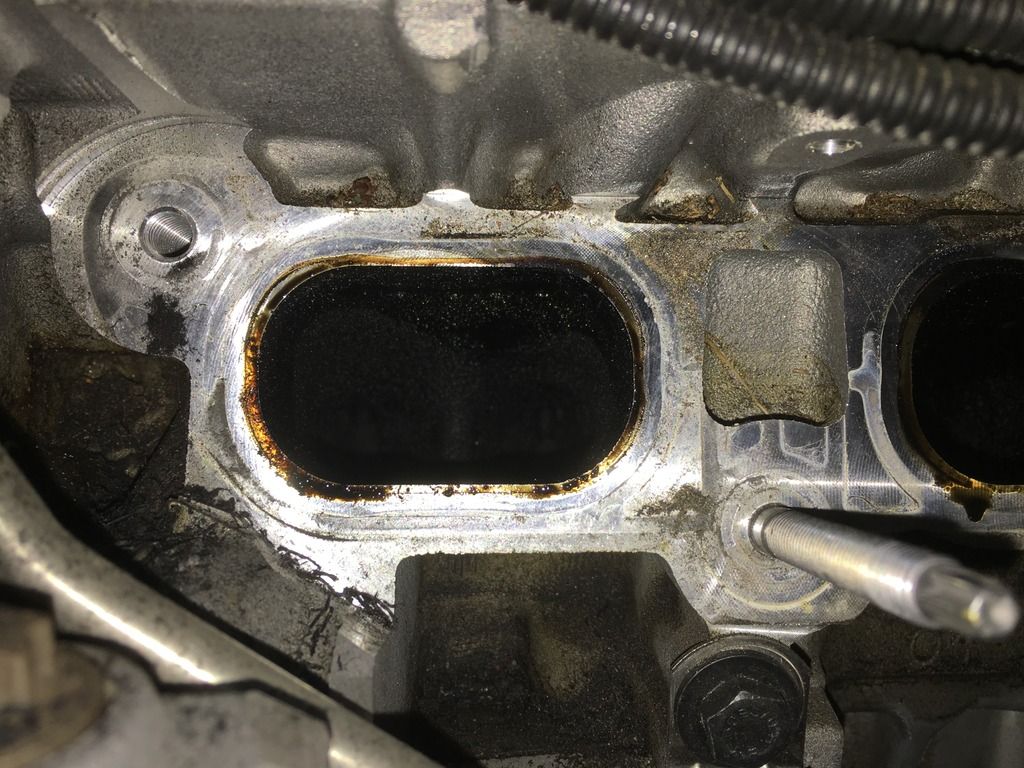 And here are the after pics. What do you know you can actually see the valves and more importantly the blaster worked beautifully.  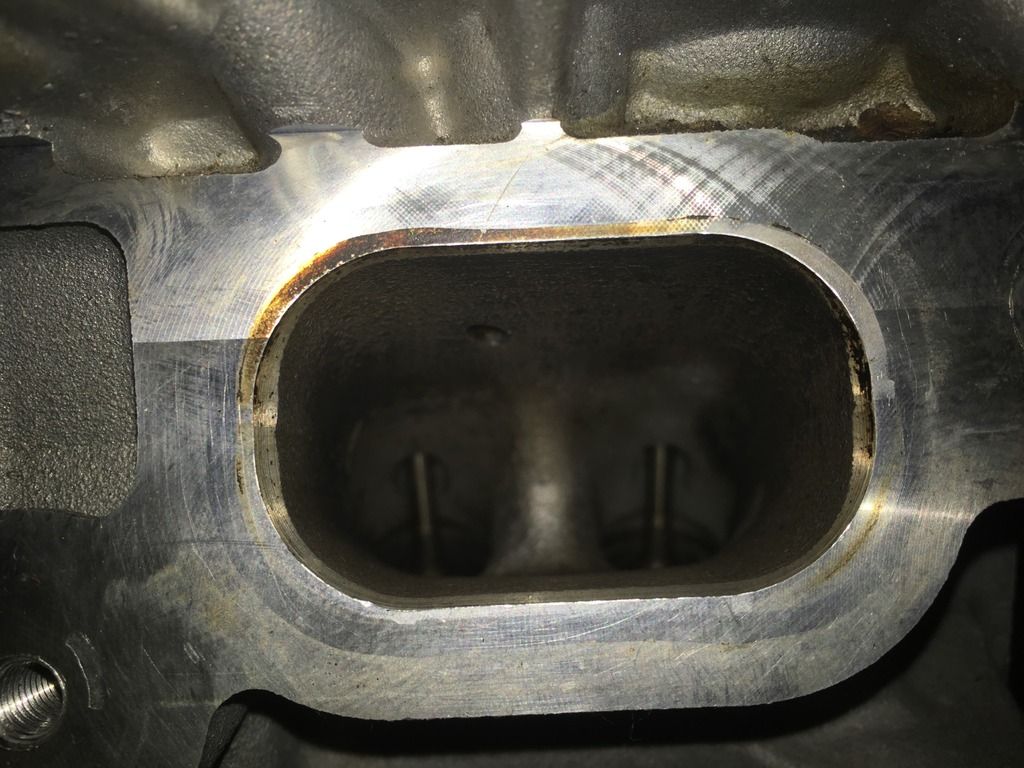 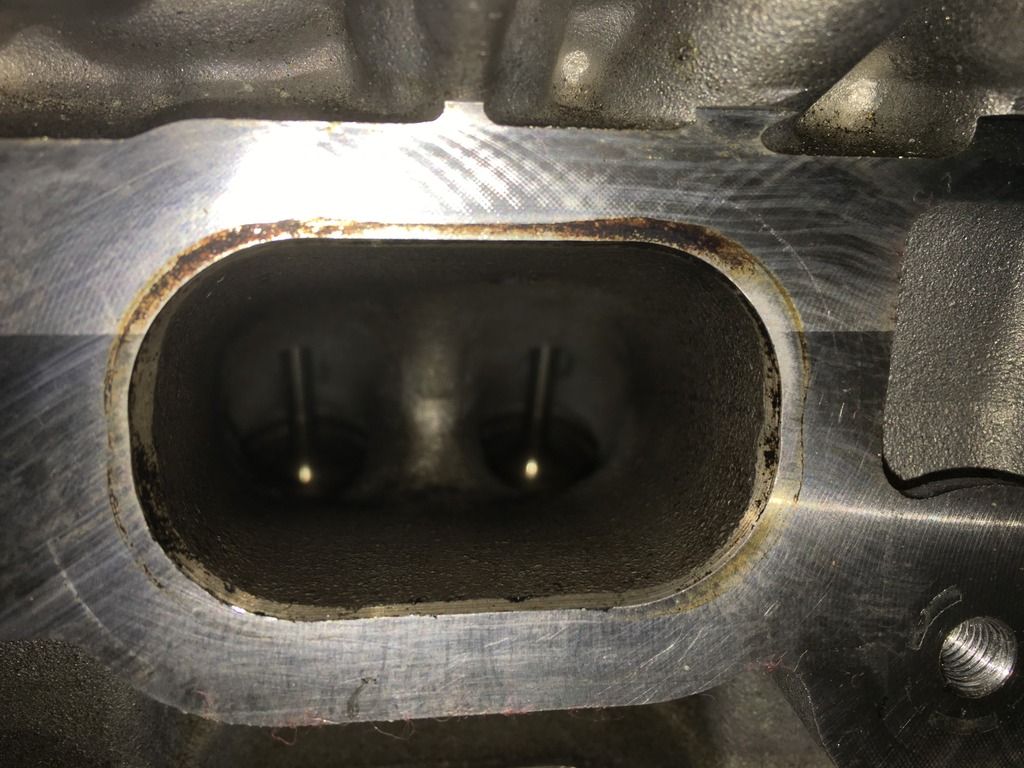 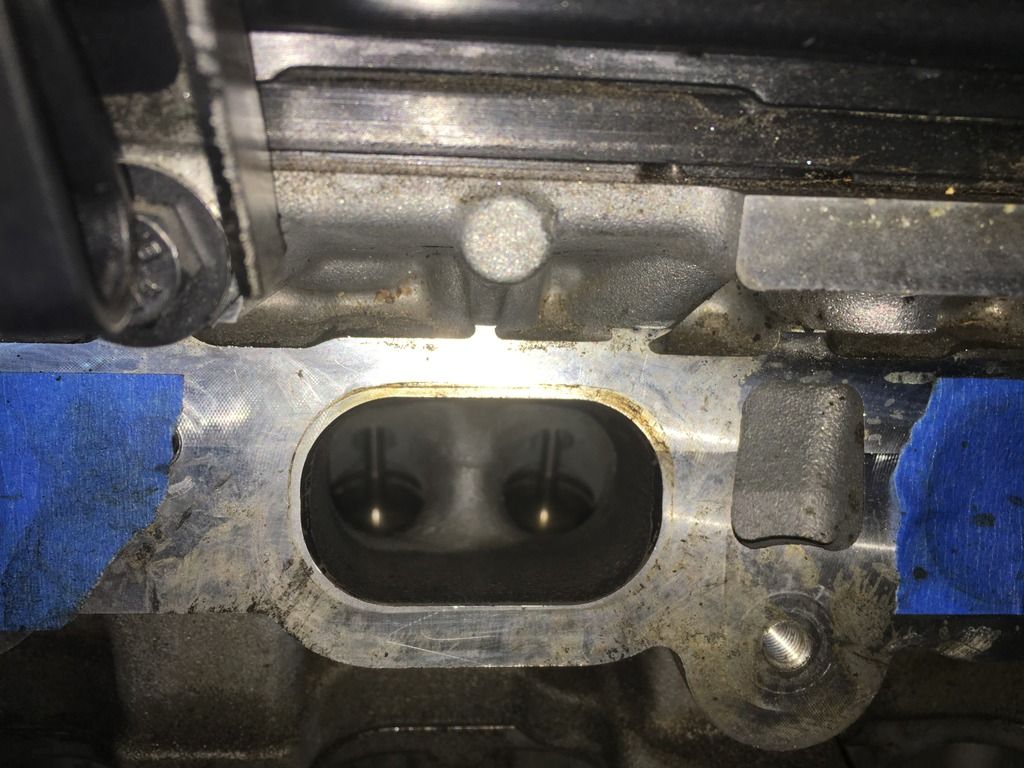 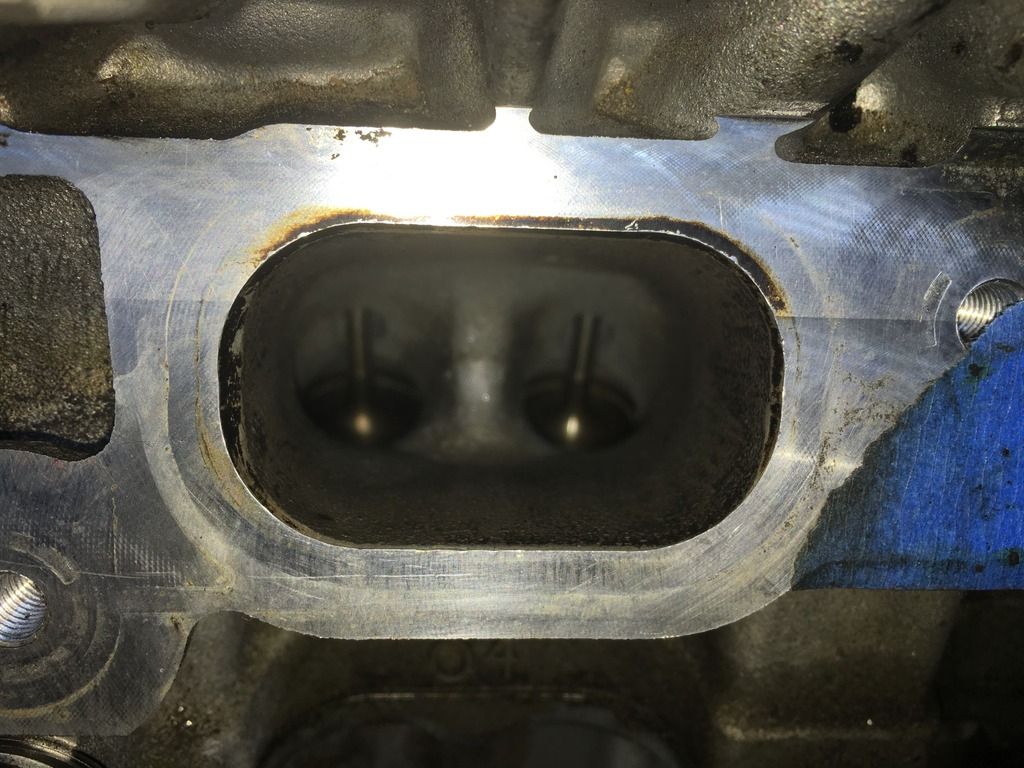 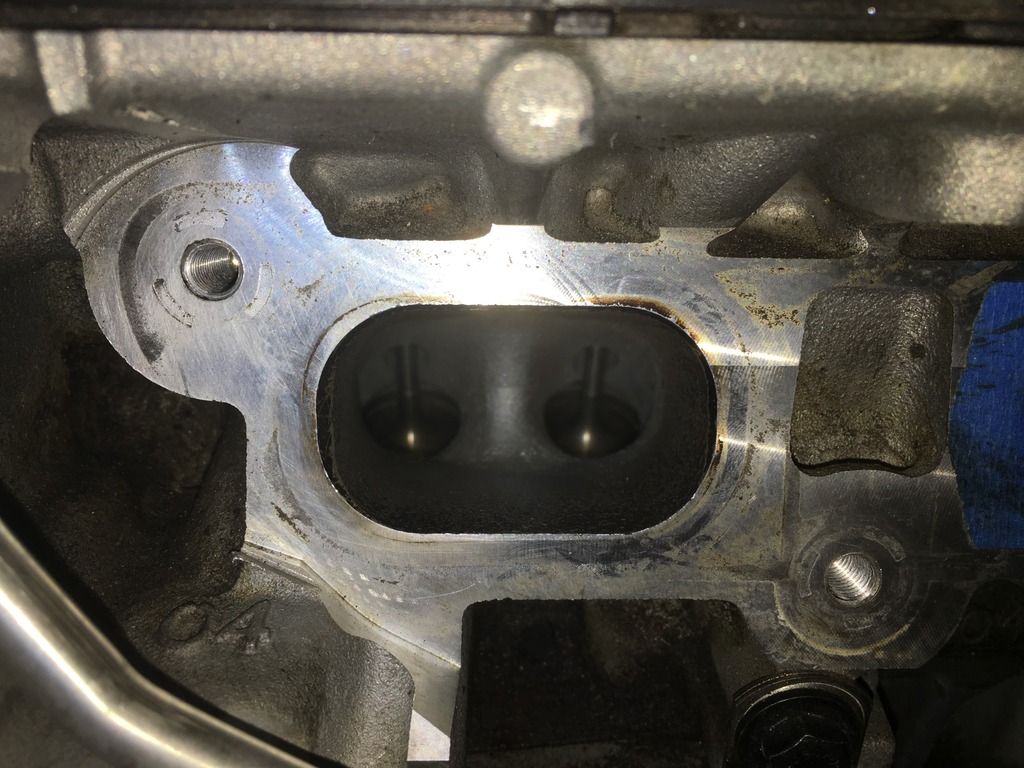 Guess I forgot to snap a picture of the 6th cylinder lol. Also this was after first scraping with a combo of picks and flathead screwdrivers to get a lot of the gunk dislodged and then blasting each cylinder for about 10-15 minutes. I went back afterwards and hit each one again to make them almost perfect to satisfy my ocd. Here is a shot of the vacuum adapter ghetto green duct taped to my shop vac. 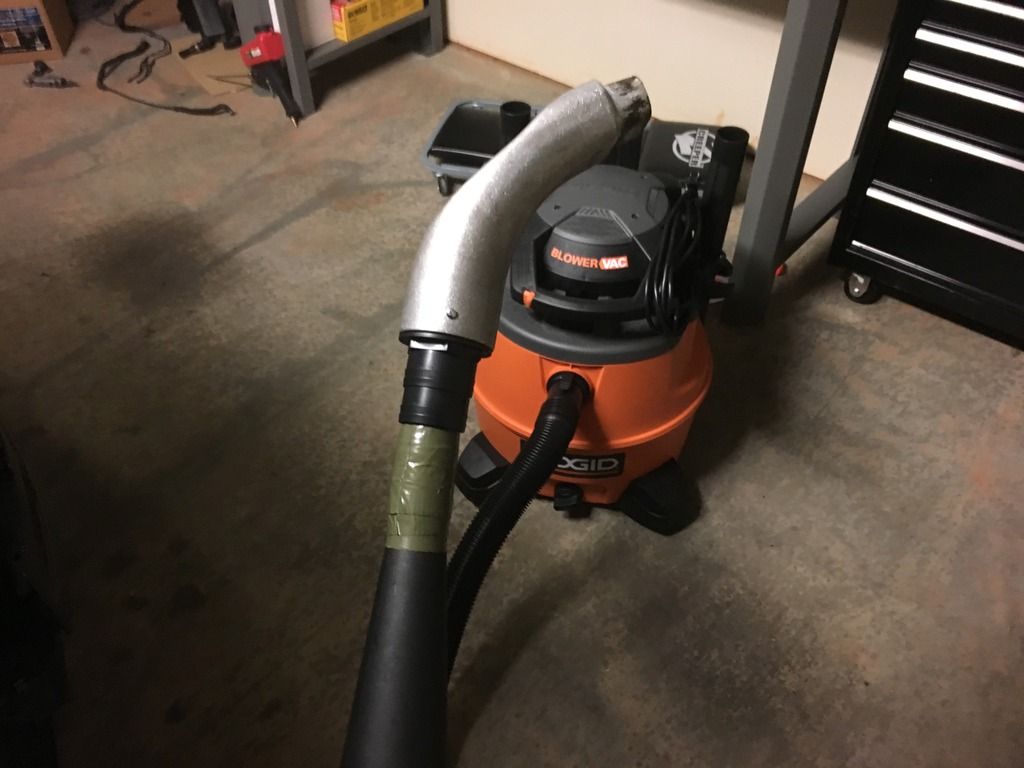 Also the compressor I used is a 5.5 hp, 25 gallon unit that flows 6.4 scfm @ 90 psi. It kept up barely, so I would say these specs should be about the minimum of what you need if you don't want to be standing around waiting all day for your compressor to catch up. 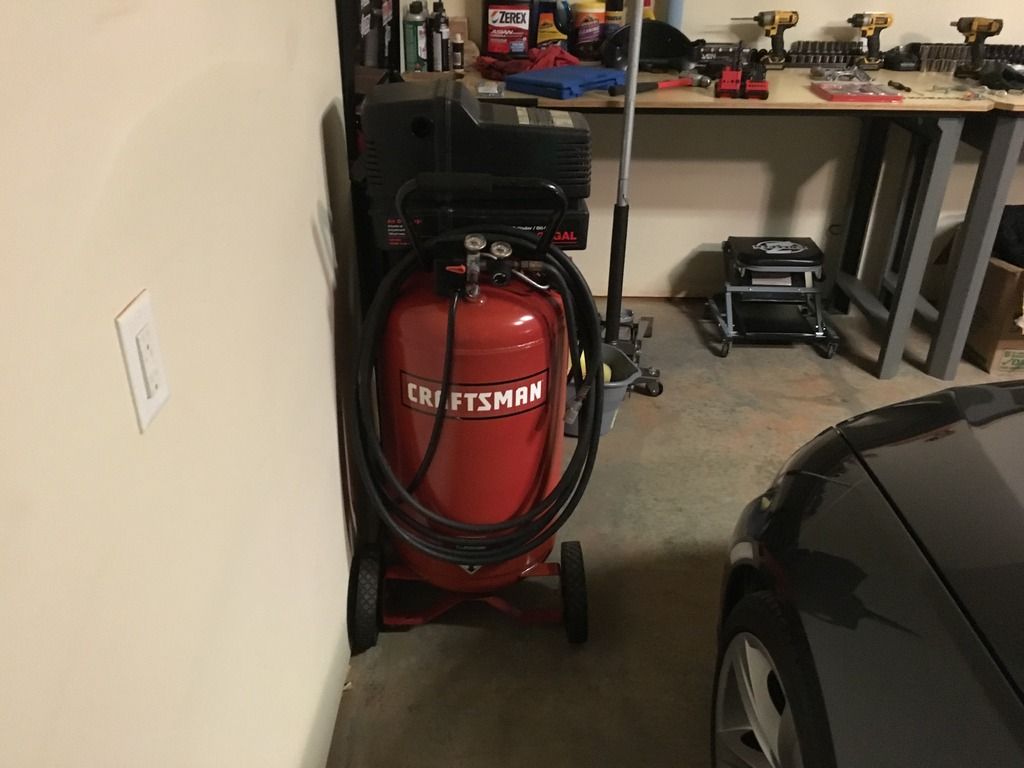 Thanks for taking a look guys and I hope this helps some people out. Last edited by SilverStreak18; 06-21-2016 at 07:58 PM.. |
| 06-21-2016, 04:57 PM | #4 |
|
First Lieutenant
 163
Rep 376
Posts |
for thoroughness sakes, what is the size of the washer?
__________________
2010 E92 Monaco Blue 335i / Gray Dakota Leather / Steptronic / Sport / Premium / Navi / L7 / 18" Performance Wheels / HPFP fail @ 8400 miles (replaced with #933 pump) // MODS: Mishimoto OCC | VRSF CP + Turbosmart Dual Port BOV | RB PCV Valve // Maintenance: Walnut Blast @ 56k | Spark Plugs Replaced @ 56k | Addons: BN2000 Combox // Andream Carplay // Rear Camera // Spark Plugs (.022 gap) and Coils Replaced 73.1k
2019 G01 Carbon Black X3 M40i / Premium / Driver Assist / 21" on Bridgestone Alienza RFT |
|
Appreciate
0
|
| 06-21-2016, 08:06 PM | #5 | |
|
Private First Class
40
Rep 198
Posts |
Quote:
|
|
|
Appreciate
0
|
| 06-21-2016, 08:17 PM | #6 | |
|
First Lieutenant
163
Rep 376
Posts |
Quote:
 Thanks. Thanks. Also, installing an RB PCV Valve + Oil Catch Can is a must to prevent carbon build up in the intake valves.
__________________
2010 E92 Monaco Blue 335i / Gray Dakota Leather / Steptronic / Sport / Premium / Navi / L7 / 18" Performance Wheels / HPFP fail @ 8400 miles (replaced with #933 pump) // MODS: Mishimoto OCC | VRSF CP + Turbosmart Dual Port BOV | RB PCV Valve // Maintenance: Walnut Blast @ 56k | Spark Plugs Replaced @ 56k | Addons: BN2000 Combox // Andream Carplay // Rear Camera // Spark Plugs (.022 gap) and Coils Replaced 73.1k
2019 G01 Carbon Black X3 M40i / Premium / Driver Assist / 21" on Bridgestone Alienza RFT |
|
|
Appreciate
0
|
| 06-22-2016, 06:18 PM | #7 | |
|
Private First Class
40
Rep 198
Posts |
Quote:
|
|
|
Appreciate
0
|
| 06-22-2016, 11:11 PM | #8 | |
|
First Lieutenant
163
Rep 376
Posts |
Quote:

__________________
2010 E92 Monaco Blue 335i / Gray Dakota Leather / Steptronic / Sport / Premium / Navi / L7 / 18" Performance Wheels / HPFP fail @ 8400 miles (replaced with #933 pump) // MODS: Mishimoto OCC | VRSF CP + Turbosmart Dual Port BOV | RB PCV Valve // Maintenance: Walnut Blast @ 56k | Spark Plugs Replaced @ 56k | Addons: BN2000 Combox // Andream Carplay // Rear Camera // Spark Plugs (.022 gap) and Coils Replaced 73.1k
2019 G01 Carbon Black X3 M40i / Premium / Driver Assist / 21" on Bridgestone Alienza RFT |
|
|
Appreciate
0
|
| 06-24-2016, 03:01 PM | #9 |
|
E39

134
Rep 286
Posts |
I've done plenty of walnut blastings using the harbor freight $30 blaster kit. Did the same thing by rigging up the blasting wand to the gun and it worked like a charm. But as of late I purchased their pressurized blaster and it's so much more efficient. I can get a car done start to finish in about 2-2.5 hours. I'm planning on doing mine soon and I'm gonna set up my knock off go pro in the garage to do a time lapse so everybody can see what's involved. Should make for a pretty cool video. I'll post up in a new thread once I do.
|
|
Appreciate
1
|
| 06-25-2016, 04:21 PM | #10 | |
|
Private First Class
40
Rep 198
Posts |
Quote:
|
|
|
Appreciate
0
|
| 06-25-2016, 05:16 PM | #11 | |
|
Colonel
 

648
Rep 2,011
Posts |
Quote:
__________________
335i e92 TPC 19Ts
|
|
|
Appreciate
0
|
| 06-25-2016, 06:13 PM | #12 | ||
|
First Lieutenant
163
Rep 376
Posts |
Quote:
__________________
2010 E92 Monaco Blue 335i / Gray Dakota Leather / Steptronic / Sport / Premium / Navi / L7 / 18" Performance Wheels / HPFP fail @ 8400 miles (replaced with #933 pump) // MODS: Mishimoto OCC | VRSF CP + Turbosmart Dual Port BOV | RB PCV Valve // Maintenance: Walnut Blast @ 56k | Spark Plugs Replaced @ 56k | Addons: BN2000 Combox // Andream Carplay // Rear Camera // Spark Plugs (.022 gap) and Coils Replaced 73.1k
2019 G01 Carbon Black X3 M40i / Premium / Driver Assist / 21" on Bridgestone Alienza RFT |
||
|
Appreciate
0
|
| 06-25-2016, 06:43 PM | #13 | |
|
Colonel
648
Rep 2,011
Posts |
Quote:
__________________
335i e92 TPC 19Ts
|
|
|
Appreciate
0
|
| 07-08-2016, 10:53 PM | #15 | |
|
Private First Class
40
Rep 198
Posts |
Quote:
|
|
|
Appreciate
0
|
| 02-19-2018, 12:54 PM | #16 |
|
Second Lieutenant
34
Rep 295
Posts |
Excellent thread! Especially since I already have this exact blasting gun and a compressor that's up for the task. I just ordered the wand
The only thing I need is a shop vac. Which model or how much suction power is required for this? Thank you, Kaz |
|
Appreciate
0
|
 |
| Bookmarks |
|
|