|
|
|
|
 |

|
 |
BMW Garage | BMW Meets | Register | Search | Today's Posts | Mark Forums Read |
 |

|
BMW 3-Series (E90 E92) Forum
>
DIY: Front License Plate Bumper Plugs
|
 |
| 12-03-2012, 12:54 AM | #1 |
|
Shenanigans


80
Rep 1,252
Posts |
DIY: Front License Plate Bumper Plugs
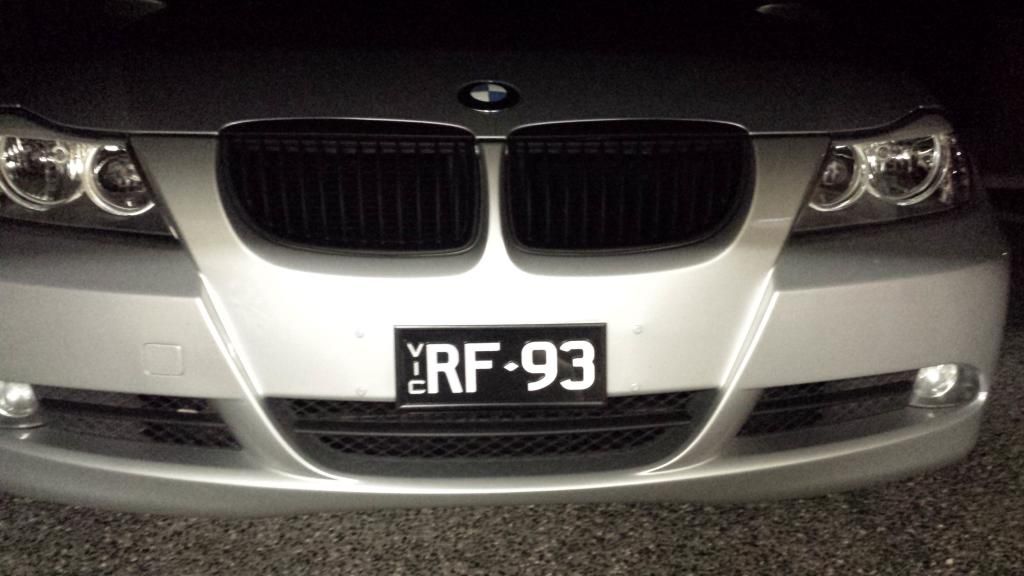
Many people have cars that have front license plate bracket that are drilled into the bumper, either by the dealer or by a previous owner. Case in point, my car:
 Most people would agree that a car looks better without the bracket. I was always a little bit leery about going without since TX law requires a front plate. However, due to a (unintentional??) change to the law earlier this year, not having a front plate no longer has any punishments. So I decided to finally do it. But the problem is, what to do with the holes in the bumper? There are several options: 1. Use bumper plugs 2. Fill the holes yourself with fillers and paint over them. In fact, there is an excellent DIY guide here: http://www.e90post.com/forums/showthread.php?t=755220 3. Get your bumper professionally filled and repainted 4. Buy a new bumper Like many people, I decided to take the easiest and least expensive route, with bumper plugs. Most people order theirs from bumperplugs.com. However there are disadvantages: 1. Not super cheap - they charge $25 per pair plus $8 shipping. (Although after making them myself, I understand the amount of labor it takes. So now I don't think it's unreasonably priced) 2. They require you to ENLARGE the existing holes. This means the operation is not reversible - you cannot reinstall the license plate bracket after the fact. 3. Their plug caps, in my opinion, are quite large. So I decided to make my own. Step 1: Take the front license plate bracket off to assess the damage.  OUCH! Not only are there 4 holes instead of 2 (bottom 2 are not necessary due to the bracket's design), the edges of the holes are raised up due to the use of self-tapping screws. Step 2: Remove the raised edges around the holes. We want to remove the raised edges because we want the plugs to be able to sit flush with the bumper. Using an x-acto knife, VERY carefully trim away the raised edges around the holes. Do not trim too deep into the holes, as we still want to be able to reinstall the license plate brackets later if we need to. Step 3: Purchase the plugs. I would recommend going to Lowe's. I went to Home Depot, Advanced Auto, and Lowe's. Home Depot didn't have anything, Advanced had a small selection, where as Lowe's has a ton to choose from. I picked up the two smallest GM trim fasteners:  They are both made by Hillman, one is 881201, the other is 881192. The both have the same sized stems, but one has a larger diameter but flatter cap whereas the other has a smaller diameter but thicker cap (you will see in the later pictures). I bought 6 of each, in case I break any in the process (I ended up breaking one of the bigger ones). Ignore the one in the orange box, that's from Adanced Auto and is the same as the Hillman 881192 from Lowe's. Step 4: Trim the stems. Since I did not want to enlarge the existing holes, I needed to make sure that the plugs fit them. They do not - they are too big. So I used a dremel to carefully trim down the plug stems. To make sure I trim them down to the correct size, I used one of the self tapping screws I took off from the bracket and drilled a hole in a plastic CD spindle cover and used the hole as a size guide. Be careful not to use too much force, the trimmed down stems can break if too much force is applied. That's how I broke one of the plugs. Results:  Step 5: Paint prep. Get a cardboard box, drill a bunch of holes in them ( I used the self tapping screw), and then put your plugs in it.  Step 6: Apply primer. You can get all of your touch up paint supplies from paintscratch.com or automotivetouchup.com. You can also get them from a number of other places online. The primer and the clear coat you can get locally in your auto parts store, but the base coat needs to match the exact color of your car, so you will have to order it from one of those aforementioned places, or from the dealership's parts department. Apply the primer to the plugs. I used a touch up paint bottle brush here. One coat is enough, as long as it covers all of the bare plastic surfaces.  Step 7: Apply base coats. Wait about 30 minutes to let the primer dry. Then apply 2 coats of base coat, waiting 30 minutes between each coat. I used a touch up pen here, because that's all I had at the time. DO NOT USE A TOUCH UP PEN! They are terrible and you will never be able to put down an even coat with it on anything other than a tiny scratch. Use a brush instead (or even better, spray it with an air brush if you have the equipment). Step 8: Apply clear coats. Let the base coats dry over night. The next day, apply 3 coats of clear coat, waiting 30 minutes between each coat. You can also do 4 coats, but no more than that.  Step 9: Wet sand and polish. Let the clear coats dry for two to three days. Put some water in a bucket. I added some Optimum No Rinse for lubrication, but you can also use a few drops of dish soap. Soak a piece of 2000 grit sandpaper (I used 3M) for 15 minutes.  Wet the surface of the plug cap, then use the sandpaper to lightly sand the surface back and forth in a single direction. Stop to rinse the cap frequently. I sanded each plug for about a minute. Dry with clean microfiber towel. At this point the paint surface should look hazy. Now use a polishing compound to polish the paint surface. I used Meguiar's Ultimate Compound. Dab a little bit of the compound on a clean microfiber towel. Use medium pressure (careful not to break the plugs) and polish in a circular motion for about 90 seconds for each plug. Final product:  Step 10: Test fit. Now that we have two sets of finished plugs. Let's go test them! Turned out that I trimmed too much off of the stems and the fit is quite loose. No problem, it lets me do the test fit easily. Smaller/thicker plugs:  Bigger/thinner plugs:  After comparing the two, I decided the smaller plugs looked a little bit better. Step 11: Final install. Since the stems were too small, which resulted in a loose fit, I wrapped thread seal tape around them until they were thick enough for a secure fit in the holes. The end result:   As you can see from the picture, it's barely visible at close range and completely invisible further away. I did a some highway driving just to test the fit and the plugs didn't budge at all. It's a lot of work to be sure, but I'm pretty happy with the results 
__________________
[Current] Tesla Model 3 Performance [Retired] Audi R8 V10 6MT, BMW i3 BEV, BMW i3 REx, BMW Z4 sDrive35i DCT, BMW 335i Coupe 6MT Last edited by InsanePineapple; 12-03-2012 at 01:51 AM.. |
| 03-28-2013, 02:11 PM | #2 |
|
Private
 29
Rep 91
Posts
Drives: BMW 335i // Black // MT
Join Date: Dec 2012
Location: Vancouver, BC
|
why wouldn't they just invent a front sticker license plate instead of the steel ones :s...
It breaks my heart to see the bumper drilled </3
__________________
BMW 335i // Black // MT with Short Gear Shifter
 |
|
Appreciate
0
|
| 03-28-2013, 02:53 PM | #3 | |
|
Shenanigans
80
Rep 1,252
Posts |
Quote:
__________________
[Current] Tesla Model 3 Performance [Retired] Audi R8 V10 6MT, BMW i3 BEV, BMW i3 REx, BMW Z4 sDrive35i DCT, BMW 335i Coupe 6MT |
|
|
Appreciate
0
|
| 04-07-2014, 09:32 PM | #5 | |
|
Shenanigans
80
Rep 1,252
Posts |
Quote:
__________________
[Current] Tesla Model 3 Performance [Retired] Audi R8 V10 6MT, BMW i3 BEV, BMW i3 REx, BMW Z4 sDrive35i DCT, BMW 335i Coupe 6MT |
|
|
Appreciate
0
|
| 04-08-2014, 03:14 AM | #6 | |
|
Lieutenant
 
96
Rep 577
Posts |
That's great news!
I've just ordered some trim fasteners on ebay... Should be on their way to me shortly! Quote:
|
|
|
Appreciate
0
|
| 09-17-2014, 06:59 PM | #8 |
|
First Lieutenant
95
Rep 318
Posts |
Hey thanks for the tutorial! I know this is kind of old, but do you have a clearer photo of the trimmed stems? Or does anyone else who has done it have a clearer picture?
|
|
Appreciate
0
|
| 09-17-2014, 10:16 PM | #9 | |
|
Shenanigans
80
Rep 1,252
Posts |
Quote:
Just as an update, they are still holding up very well! No visible damage to them at all.
__________________
[Current] Tesla Model 3 Performance [Retired] Audi R8 V10 6MT, BMW i3 BEV, BMW i3 REx, BMW Z4 sDrive35i DCT, BMW 335i Coupe 6MT |
|
|
Appreciate
0
|
| 09-18-2014, 05:39 AM | #10 | |
|
First Lieutenant
95
Rep 318
Posts |
Quote:
|
|
|
Appreciate
0
|
| 09-18-2014, 07:53 AM | #11 | |
|
Lieutenant
96
Rep 577
Posts |
Quote:
Hope this helps  [IMG]  [/IMG] [/IMG]Last edited by Fuji; 09-18-2014 at 07:59 AM.. |
|
|
Appreciate
0
|
| 09-18-2014, 11:38 AM | #13 |
|
Shenanigans
80
Rep 1,252
Posts |
That turned out really well ryuunfujihara!
__________________
[Current] Tesla Model 3 Performance [Retired] Audi R8 V10 6MT, BMW i3 BEV, BMW i3 REx, BMW Z4 sDrive35i DCT, BMW 335i Coupe 6MT |
|
Appreciate
0
|
| 09-18-2014, 02:21 PM | #14 | |
|
First Lieutenant
95
Rep 318
Posts |
Quote:
By the way, is this primer able to be used? http://www.autozone.com/autozone/acc...er=550103_0_0_ Sorry, I don't want to mess it up too bad.  |
|
|
Appreciate
0
|
| 09-18-2014, 02:55 PM | #15 |
|
Shenanigans
80
Rep 1,252
Posts |
Just go to any auto parts store's touch up paint isle. You should be able to find small tubes of primer and clear coat there. The base coat you should order it from one of the places mentioned in my guide, so it's matched to your car.
__________________
[Current] Tesla Model 3 Performance [Retired] Audi R8 V10 6MT, BMW i3 BEV, BMW i3 REx, BMW Z4 sDrive35i DCT, BMW 335i Coupe 6MT |
|
Appreciate
0
|
| 09-18-2014, 04:27 PM | #16 | |
|
First Lieutenant
95
Rep 318
Posts |
Quote:
|
|
|
Appreciate
0
|
| 09-19-2014, 02:24 PM | #17 |
|
First Lieutenant
95
Rep 318
Posts |
Dangit...looks like I can't do this to my car.
 I took off the front license plate holder, and holy #$#@$# its in bad shape under there! The previous owner definitely did something wrong under there. Theres the two mounting holes and a small, circular indentation that looks like the previous owner tried to screw in the mount straight into the bumper! Also, theres a long line under there missing some paint. I think I'll keep mine on until I can get the bumper replaced...bummer... I took off the front license plate holder, and holy #$#@$# its in bad shape under there! The previous owner definitely did something wrong under there. Theres the two mounting holes and a small, circular indentation that looks like the previous owner tried to screw in the mount straight into the bumper! Also, theres a long line under there missing some paint. I think I'll keep mine on until I can get the bumper replaced...bummer... |
|
Appreciate
0
|
| 09-19-2014, 08:55 PM | #18 | |
|
Lieutenant
96
Rep 577
Posts |
Quote:
Gl with it |
|
|
Appreciate
0
|
| 09-21-2014, 11:50 AM | #19 | |
|
First Lieutenant
95
Rep 318
Posts |
Quote:
|
|
|
Appreciate
0
|
 |
| Bookmarks |
| Thread Tools | Search this Thread |
|
|