

|
|
|
|
 |
|
 |
BMW Garage | BMW Meets | Register | Today's Posts | Search |
 |

|
BMW 3-Series (E90 E92) Forum
>
335i limp mode party at the track
|
 |
| 06-29-2011, 01:41 PM | #487 | |
|
Lieutenant Colonel
 
81
Rep 1,510
Posts |
Quote:
|
|
|
Appreciate
0
|
| 06-29-2011, 01:53 PM | #488 |
|
I sweat pheromones
203
Rep 2,103
Posts |
So, I figured out an easy way for a partial flush on AT equipped cars. I say partial because using this method removed about 1.5 gallons of coolant. I say easy because this does not require removing your fmic so it saves a lot of time.
According to the Bentley Manual, the coolant capacity is 2.23 gallons. Therefore, after draining, I left about .75 gallons of oem 50/50 mix. The end result after refilling... 24 oz of water wetter (2 bottles), 48 oz of coolant, and 213 oz of distiller water. I guess that's about 18/82 coolant/water mix plus the water wetter. Edit: I probably removed closer to 1.25 gallons. That would then put the mix closer to 25/75 plus ww. I will attach pictures when I have more time but simply said... 1) remove under tray. 2) release clip and remove hose running to transmission heat exchanger. 3) open reservoir cap and complete drain. 4) refill. 5) bleed system. 6) fill as necessary. All said, this can be done in 20 minutes which includes 12 of car controlled bleeding. Last edited by dbjb; 06-29-2011 at 02:16 PM.. |
|
Appreciate
0
|
| 06-29-2011, 01:58 PM | #489 | |
|
I sweat pheromones
203
Rep 2,103
Posts |
Quote:
|
|
|
Appreciate
0
|
| 06-29-2011, 08:55 PM | #490 | |
|
Lieutenant Colonel
81
Rep 1,510
Posts |
that's great news, can you post a pic of #2 below so we have a reference of where's the hose you're detaching.
The realoem diagrams split out the components so there's no complete view of the cooling system. Quote:
|
|
|
Appreciate
0
|
| 06-29-2011, 09:00 PM | #491 | |
|
Major
 
231
Rep 1,473
Posts |
Quote:
|
|
|
Appreciate
0
|
| 06-30-2011, 02:15 AM | #492 |
|
pew pew
166
Rep 6,781
Posts |
OK guys here's what I'm planning on doing:
Taken from marcel_b's thread with regards to using the larger 335is oil cooler ducts, I'm going to remove the foglight and install these 335is air ducts and hack them or do whatever I need to do in order to make them fit on my E90 sedan. Here's a comparison of the stock 335i vs 335is ducts: 335i: 335is:
__________________
CSL replicas are now CSL counterfeits. Jesus saves, like Valentine1.
|
|
Appreciate
0
|
| 06-30-2011, 03:18 AM | #493 |
|
I sweat pheromones
203
Rep 2,103
Posts |
I posted this in the DIY section but figured it should be here too. Hope this helps...
1) Allow vehicle to cool down then raise using jacks or ramps. 2) Remove the undertray (approx 20 8mm screws) 3) Grab your 5 gallon bucket and place under AT heat exchanger. 4) Unclip hose as shown. 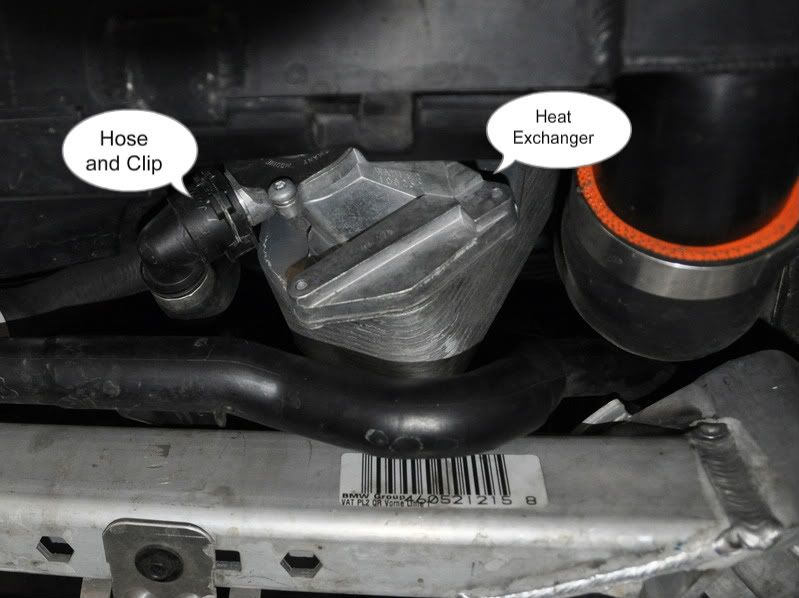 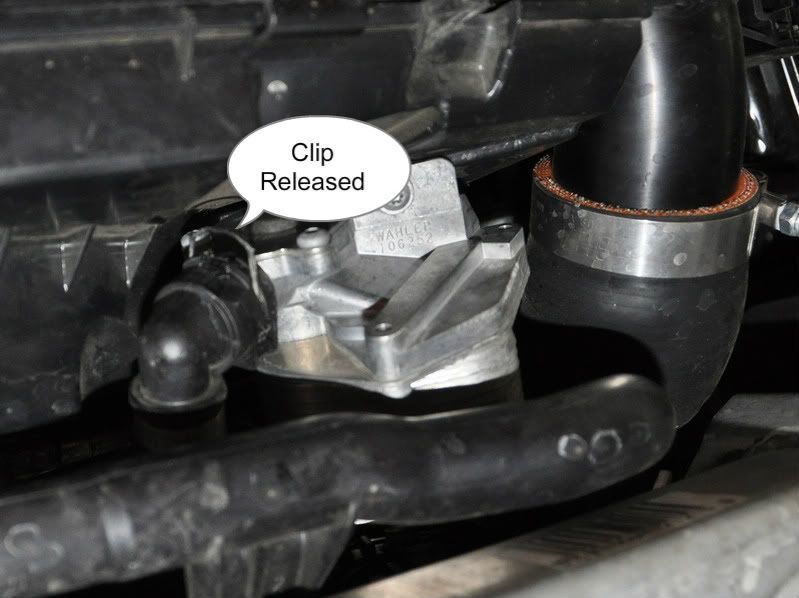 5) Slowly pull hose off heat exchanger. Coolant will begin to trickle. 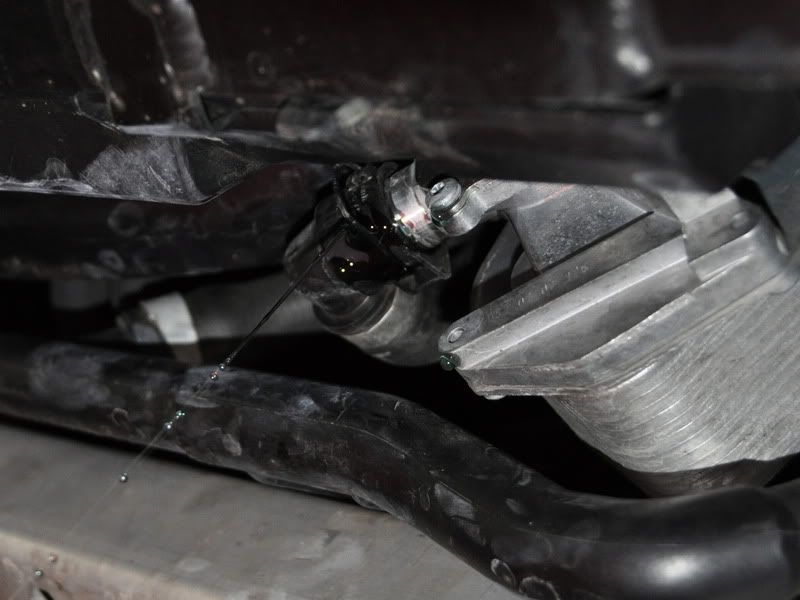 6) Open hood and remove Coolant Reservoir Cap. Caution: drainage changes from a slow trickle to full flow. 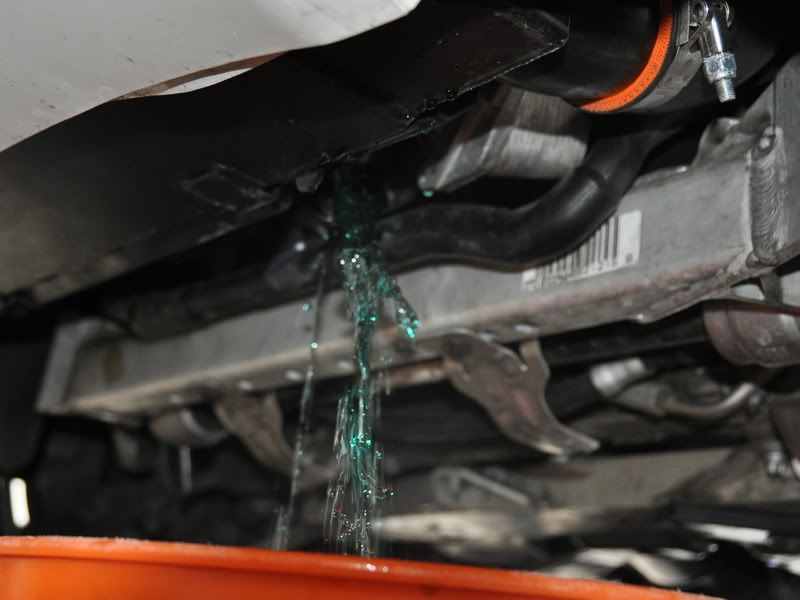 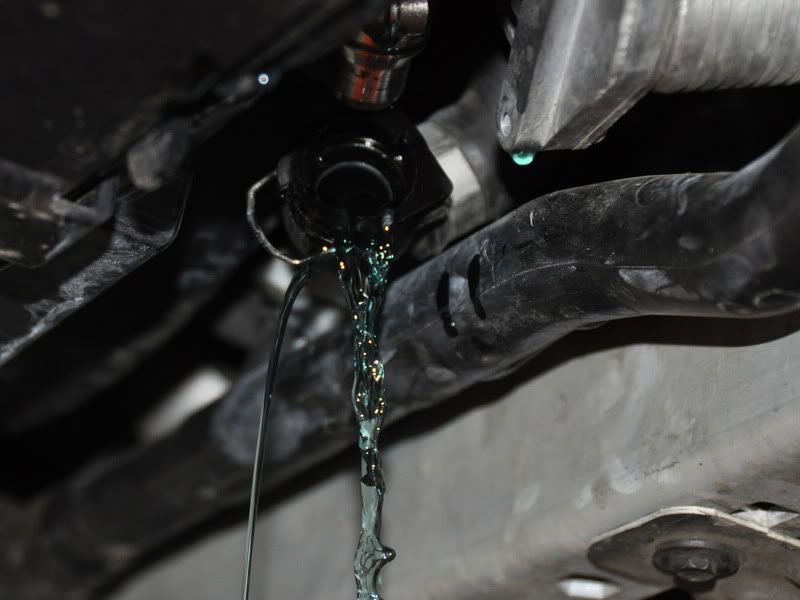 7) Place hose back on and secure clip. These next few steps are taken from the Bentley Manual: 8) Open Coolant Reservoir Cap and bleed screw. 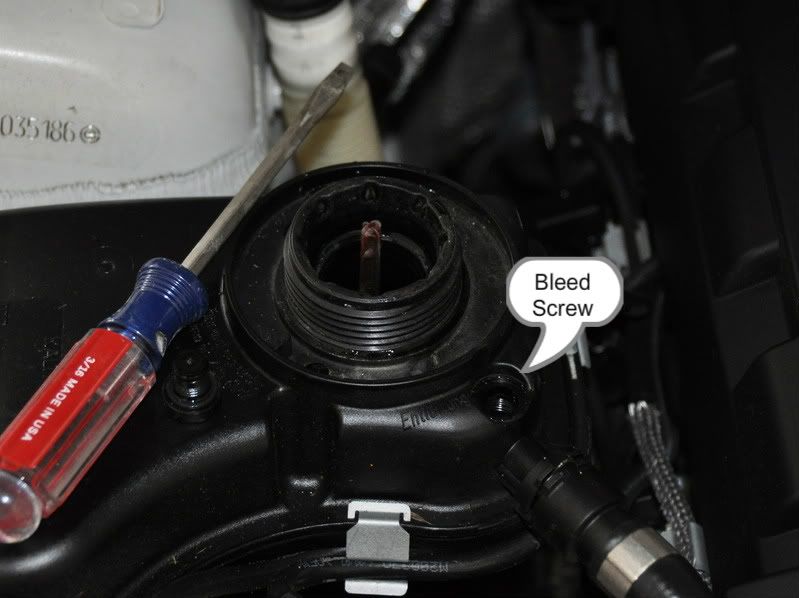 9) Fill until coolant starts to emerge from bleed screw. This will either be the standard 50/50 mix or your own. For track purposes in the warm valley, I used 25/75 coolant/distilled water plus two 24oz bottles of Water Wetter. 10) Close bleed screw. 11) Fill Reservoir to lower edge of filler neck. 12) Close cap and perform following to bleed system. Bentley recommends connecting a battery charger. I didn’t have one so I turned most evertything off to conserve power. 13) Switch ignition on. 14) Set heater to max temperature and turn fan to lowest speed. 15) Press accelerator pedal to floor for 10 seconds. 16) Bleeding procedue begins and takes approximately 12 minutes. (Electric coolant pump turns ON and OFF automatically). Caution: Do not open reservoir cap while pump is on. 17) Fill coolant tank 100ml above MAX 18) Check for leaks. 19) Replace undertray. That’s it. Again, using this method results in draining approximately 1.25-1.5 gallons. AT vehicles have a 2.23 gallon capacity. MT vehicles have 2.17 gallons. If desired, you can complete a full flush. This will require the removal of your FMIC and eliminates steps 4-7. Instead, after removing the FMIC, you should find the radiator drain plug. Open and drain. Then continue on to step 8. Regards. |
|
Appreciate
0
|
| 06-30-2011, 04:00 AM | #494 |
|
pew pew
166
Rep 6,781
Posts |
That's awesome, thanks for the pics. I'll be doing the coolant drain on my MT soon and I'll post where I removed a hose on the MT for reference.
__________________
CSL replicas are now CSL counterfeits. Jesus saves, like Valentine1.
|
|
Appreciate
0
|
| 06-30-2011, 02:21 PM | #496 |
|
king of the hills

92
Rep 2,915
Posts
Drives: 2011 M3 w/ESS55, 2001 540i/6
Join Date: Dec 2006
Location: Arvada, CO
|
Excellent write up! Thanks!
|
|
Appreciate
0
|
| 07-01-2011, 02:40 AM | #499 |
|
pew pew
166
Rep 6,781
Posts |
Alright, got a oil cooler duct installed! Instead of the 335is oil cooler duct which was backordered for weeks and would have to be shipped from Germany, I got the transmission cooler duct for an M3. The M3 uses the same radiator in the same location for it's transmission as we do for our oil coolers. It bolts right into place, but trimming was required on the opening of the duct and brake duct to make it fit with the stock E90 bumper. The passenger side foglight is removed.
The part number for the duct: 51747900824, about $50 online. Here's a picture of the front bumper off, with the stock 335i oil cooler duct still attached:  Jumping ahead, here's the M3 trans cooler duct attached, BEFORE trimming it to get the E90 bumper to fit.  And after trimming away quite a bit of the duct to fit the E90 bumper. Note foglight bulb still attached and zip tied in a baggie.  A comparison of the two ducts out of the car, this is the view of the opening of both ducts:  Another comparison that shows the huge difference in width of the opening of the 2 ducts (the top of the photo is the side that faces the bumper):  And finally, a view of the front of the car with everything buttoned up.  It ain't the prettiest thing, but the duct extends nearly all the way to the foglight opening and the opening is at least twice as big as the stock 335i one. I'm confident more air is going to the oil cooler, but if that actually helps oil temps will remain to be seen. The pretty much useless brake ducts do fit with A LOT of trimming of the brake duct. I may have just left it off if I were to do it again. Hope this helps some folks if they decide to try it. And yes, I have pink carpet in my garage. Don't hate.
__________________
CSL replicas are now CSL counterfeits. Jesus saves, like Valentine1.
Last edited by Chowbow; 07-01-2011 at 02:48 AM.. |
|
Appreciate
0
|
| 07-01-2011, 03:15 AM | #500 |
|
Lieutenant Colonel

79
Rep 1,617
Posts |
Nice! You should definitely notice an improvement in oil temps.
I have ordered the 335is airducts over two months ago, which are indeed on backorder from the factory. Once I get them (I was told they would arrive in July) I will upgrade to the M-tech bumber at the same time.
__________________
Performance Seats, Exhaust, Splitters, Pedals, Steering Wheel / RB Turbos / M3 CF Roof / Brembo GT BBK 355/345 / Rollcage / Forge FMIC / Quaife LSD / Öhlins Road & Track / M3 Suspension Parts / Solid Subframe Bushings / Vorshlag Camberplates / Megan Racing Toe Links / LeatherZ Gauges / Extended M3 DCT Paddles / ER Sports OC / AR OC / Aux Radiator / AR DPs / Alpina TCU / COBB Pro-Tune
|
|
Appreciate
0
|
| 07-01-2011, 05:40 PM | #501 |
|
Captain

60
Rep 910
Posts |
OK I did my first day at the track in my 2008 335xi. No Aux oil cooler.
Track: NHMS Ambient Temp: ~74 F Oil Temps: Got as high as ~275. No limp mode or loss of power all day. Coolant temps. I didn't check these as I should have so I don't have those numbers. Sorry about that, spent most of my time listening to the instructor and learning the track. This was my first time on this track and the first time tracking this car. I'd say I am intermediate, but I really felt like a beginner out there. The car was really hard for me to get used to and I was learning the track at the same time. I took it easy. I need to spend more time on the track in this car to get used to it. The instructor told me that he was feeling serious under steer and that I need to learn to apex later as this car will be faster around the track apexing later. Had a ton a fun and learned a lot. Thanks for all the help on the thread. You guys gave me the confidence to get me back on the track with this car. Cheers! |
|
Appreciate
0
|
| 07-03-2011, 11:31 AM | #502 | |
|
I sweat pheromones
203
Rep 2,103
Posts |
Quote:
PS, that carpet is fabulous. |
|
|
Appreciate
0
|
| 07-03-2011, 08:16 PM | #503 | |
|
pew pew
166
Rep 6,781
Posts |
Quote:
I didn't remove the driver's side foglight, so it looks pretty stupid right now. Will likely just remove it so it doesn't look like 1 side is broken. And thanks, the carpet is a godsend during winter DIY projects. :P
__________________
CSL replicas are now CSL counterfeits. Jesus saves, like Valentine1.
|
|
|
Appreciate
0
|
| 07-05-2011, 01:09 AM | #504 |
|
pew pew
166
Rep 6,781
Posts |
Here's what I did to replace (most) of the coolant on an MT. I'd say I got at least 1.5 gallons out. I put pure distilled water in, and after running the bleed procedure twice, checked the coolant and it was still slightly blue. I'm guessing the mix is in the 70-80% water range.
I pulled the hose from the water pump. Really easy to access, took about 45 minutes from removing the belly pan to putting it back on. Location for reference. The power steering lines are just sitting along there for seemingly no reason (it runs in a big U), and I disconnected them from the mount to get access:  View of the hose I removed - has a simple hose clamp on it.  While I had the system out, I replaced the plastic bleed screw with the brass one. Learned from my E36 that these can break anytime. 
__________________
CSL replicas are now CSL counterfeits. Jesus saves, like Valentine1.
|
|
Appreciate
0
|
| 07-05-2011, 10:42 AM | #505 | ||
|
I sweat pheromones
203
Rep 2,103
Posts |
Quote:
Quote:
|
||
|
Appreciate
0
|
| 07-05-2011, 11:53 AM | #506 |
|
pew pew
166
Rep 6,781
Posts |
I'm not sure if it's a BMW part, but I get a lot of stuff from autohausaz.com and just threw one into my order a while back and it had been sitting around.
The plastic ones snap sometimes and you get a nice little blue fountain in your engine bay. Make sure you don't over tighten the brass one either though, or you'll need to buy a new tank.
__________________
CSL replicas are now CSL counterfeits. Jesus saves, like Valentine1.
|
|
Appreciate
0
|
 |
| Bookmarks |
|
|


