

|
|
|
|
 |

|
 |
BMW Garage | BMW Meets | Register | Today's Posts | Search |
 |

|
BMW 3-Series (E90 E92) Forum
>
N52 Vanos Check Valves DIY??
|
 |
| 12-18-2014, 03:40 PM | #1 |
|
Lieutenant Colonel
 
200
Rep 1,834
Posts
Drives: '05 E90 330i Manual
Join Date: Aug 2010
Location: Cape Town, South Africa
|
N52 Vanos Check Valves DIY??
Has anyone replaced these? Tips, advice?
I gather they are both on the exhaust side of the cylinder head just in front of bank 1 exhaust manifold, but I cannot see them let alone feel them since there are too many things in the way. To explain exactly what I am talking about, it is part 7 as per this pic:  And this is what these Check Valves look like:  As I understand it, the job of these Check valves is to control and filter the oil flow to the intake and exhaust Vanos solenoids and prevent the oil from leaving the cylinder head when the engine is turned off. It also seems that these are often responsible for many of the metal ticking HVA issues, and they also seem to get dirty from oil sludge or other muck in the oil (thanks BMW for stupid lengthy service intervals). If there is a blockage, then it will prevent proper oil supply to the Vanos on either the intake or exhaust side, or both. They are fairly cheap parts (a first), but I am not sure exactly what needs to be done when replacing, or for that matter, removing and cleaning them. Assuming they are working properly in terms of keeping oil in the cylinder head, how much oil will drain out when removing? Problem is, there is so little space there to safely catch any oil spillage, so it really depends on just how much oil will come out. If it's like the Vanos solenoids, then nothing to worry about. But don't really want to make a complete mess of my otherwise spotless engine. Any advice??
__________________
BMW E90 330i (M) '05 (His) | (Hers) BMW E46 320i f/l (M) '03
 |
| 12-19-2014, 07:14 AM | #2 |
|
Brigadier General
 
616
Rep 3,194
Posts
Drives: E92 325i MSport Coupe
Join Date: Apr 2012
Location: UK South East
|
I've never read of anyone attempting this before. Certainly the holes in the non-return valve shank look extremely small, so you'd think they'd be very susceptible to being blocked by material in the oil.
However, the complete lack of anything on the web suggests they're rarely an issue (though I notice ECS claim they're a '...common source of emission-related problems'). As their function is to provide adequate oil supply to the vanos solenoids on engine start-up, I'm not quite clear why they should cause HVA noise in the event of a malfunction - certainly not once the engine is running. If you're convinced yours might be blocked, maybe the use of a flushing oil would be a first step? I'm not usually a fan of this, but it might just clean out the holes in the check valves? I think before I started removing such an inaccessible (and relatively trouble-free) part, I'd want to discuss it with a technician from an engine shop with expertise in BMW engines for a second opinion... Keep us posted on how you get on.
__________________
E92 pre-LCI 325i - Ohlins R&T; H&R spacers; M3 strut brace; Swift thrust sheets; 3 x chassis braces; diff brace; N53 V-brace; 034 subframe inserts; BMS clutch stop; BMS CDV; RE g/box mounts; Delrin shift bushes; Saikoumichi OCC; Cyba scoops; BMW Perf Exhaust; HEL s/steel brake hoses; M3 rear spoiler; Recaro Sportster CSs; M3 white dash LEDs; LED Angels; LED side repeaters; BMW Perf black grille; CSL reps; SSDD carbon diffuser; Monster Wrap black roof/clear front
|
|
Appreciate
0
|
| 12-23-2014, 08:55 PM | #3 |
|
Lieutenant Colonel
200
Rep 1,834
Posts
Drives: '05 E90 330i Manual
Join Date: Aug 2010
Location: Cape Town, South Africa
|
Well, this information was actually from talking to a parts guy at a dealer when I described my car's symptom which is still the annoying pinging and hesitations. I have done so much and replaced plenty of typical associated parts, cleaned all sorts of items, you name it, but never this. So while cleaning the Vanos solenoids is good, what's the point if these Check Valves' filters are all blocked up...
With regards to the HVA issue (I am not affected by that interestingly), the problem is often caused by the Check Valve not working as intended in that it is suppose to be a non-return valve and keep engine oil in the head when the engine is switched off. The problem is that one or both fail to do this and you have the head run dry everytime the engine is stopped - oil does return on start up, but the HVA has been dry and possibly developed air pockets, hence the often talked about bleeding procedure (talk about a band-aid solution if this is indeed true). His theory is that if these filters on the Check Valves are blocked, it will prevent the Vanos from adjusting the timing properly or at all. The only way that I can see this DIY being possible to avoid a nasty mess (really not sure how much oil would flow out) is to remove the forward inner wheel liner on the exhaust side of the car, then you should be able to see and access it better from the wheel well in order to place sufficient absorbent material and also for cleaning up any spilt oil. I reckon access from above within the engine bay is not really a problem since you can feel your way to them with the torx bit, but you simply cannot see it - had to use my phone in lit video mode to spot and confirm the location of these two items. I am going to wait until the new year before I do anything, was just hoping on the odd chance that there was someone here who had already done this before with some tips and experience to share...
__________________
BMW E90 330i (M) '05 (His) | (Hers) BMW E46 320i f/l (M) '03
|
|
Appreciate
0
|
| 12-24-2014, 08:58 AM | #4 |
|
Brigadier General
616
Rep 3,194
Posts
Drives: E92 325i MSport Coupe
Join Date: Apr 2012
Location: UK South East
|
I guess if the check valves have failed you won't get much mess, because they will have allowed the oil to drain back...
P.S. I cured my hesitation/pinging issues by six new (re-designed by Delphi) coils. Car now drives better than at any time in the last 40K miles! Can't believe how transformed it feels. I'd honestly come to the conclusion that intermittent hesitation was designed in to this engine!
__________________
E92 pre-LCI 325i - Ohlins R&T; H&R spacers; M3 strut brace; Swift thrust sheets; 3 x chassis braces; diff brace; N53 V-brace; 034 subframe inserts; BMS clutch stop; BMS CDV; RE g/box mounts; Delrin shift bushes; Saikoumichi OCC; Cyba scoops; BMW Perf Exhaust; HEL s/steel brake hoses; M3 rear spoiler; Recaro Sportster CSs; M3 white dash LEDs; LED Angels; LED side repeaters; BMW Perf black grille; CSL reps; SSDD carbon diffuser; Monster Wrap black roof/clear front
|
|
Appreciate
0
|
| 12-24-2014, 10:41 AM | #5 |
|
EXPAT

65
Rep 889
Posts |
For pics of a failed check valve, check out this thread:
http://www.e90post.com/forums/showthread.php?t=900394 |
|
Appreciate
0
|
| 12-24-2014, 11:23 AM | #6 |
|
Resident Tamed Racing Driver
298
Rep 4,697
Posts |
Yet another reason to change oil at more sane intervals.
As to cleaning vs replacing, just replace them. Parts are cheap and because I suspect they are Alu, they are one use only. Plus you get fresh gaskets this way.
__________________
2005 E46 M3 Interlagos/Cinnamon with Sunroof Delete
|
|
Appreciate
0
|
| 12-24-2014, 05:16 PM | #7 | |
|
Lieutenant Colonel
200
Rep 1,834
Posts
Drives: '05 E90 330i Manual
Join Date: Aug 2010
Location: Cape Town, South Africa
|
Quote:
Was wondering about that, being aluminium and so on, but that also makes me think about those bolts for the Vanos solenoids, surely they are aluminium too, and therefore I wonder if people ever replace those when DIY cleaning the Vanos solenoids. I would most likely just buy two new Check Valves and replace anyway since they aren't that expensive at all.
__________________
BMW E90 330i (M) '05 (His) | (Hers) BMW E46 320i f/l (M) '03
|
|
|
Appreciate
0
|
| 12-24-2014, 05:43 PM | #8 | |
|
Brigadier General
616
Rep 3,194
Posts
Drives: E92 325i MSport Coupe
Join Date: Apr 2012
Location: UK South East
|
Quote:
The check valve shown in the other thread looks like the classic sludge as seen in the valve trains of engines with oil change intervals that are waaay to long.
__________________
E92 pre-LCI 325i - Ohlins R&T; H&R spacers; M3 strut brace; Swift thrust sheets; 3 x chassis braces; diff brace; N53 V-brace; 034 subframe inserts; BMS clutch stop; BMS CDV; RE g/box mounts; Delrin shift bushes; Saikoumichi OCC; Cyba scoops; BMW Perf Exhaust; HEL s/steel brake hoses; M3 rear spoiler; Recaro Sportster CSs; M3 white dash LEDs; LED Angels; LED side repeaters; BMW Perf black grille; CSL reps; SSDD carbon diffuser; Monster Wrap black roof/clear front
|
|
|
Appreciate
0
|
| 12-24-2014, 05:51 PM | #9 | |
|
Lieutenant Colonel
200
Rep 1,834
Posts
Drives: '05 E90 330i Manual
Join Date: Aug 2010
Location: Cape Town, South Africa
|
Quote:
__________________
BMW E90 330i (M) '05 (His) | (Hers) BMW E46 320i f/l (M) '03
|
|
|
Appreciate
0
|
| 02-09-2016, 07:26 PM | #10 |
|
Lieutenant Colonel
200
Rep 1,834
Posts
Drives: '05 E90 330i Manual
Join Date: Aug 2010
Location: Cape Town, South Africa
|
So I have finally tackled this and a bit disappointed with my findings (but also happy with my findings for another reason).
First of all, on the older N52 this is really an easy job. You need to lift the front right side of the car off the ground and remove the wheel, then remove the forward wheel well liner. With that removed, you can then access these Check Valves through the wheel well - seems odd, but it's the only practical way to do this and also see what you are doing. There was only a small amount of oil that came out, but the car drove last about a week ago, so I suppose some of the excess oil may have slowly seeped down. I removed the Vanos solenoids first and set them aside since I wanted to clean them too. I then started with the lower of the two Check Valves (I suspect this is the one for the exhaust side). You will need to unscrew it quite a bit until it comes out, and then you will see a small amount of oil coming out, but luckily not much, and once the Check Valve is out you can put some tissue paper there to soak it up and any that may still come out. The upper Check Valve is the same, just a little trickier to see. Now for the disappointment - I was really hoping to find some dirty Check Valves when I removed these, but they were actually very very clean (never been removed and still the original ones). They literally just had oil on them as expected, but no caked on muck or any signs of being blocked at all. This is what they looked like after a quick dip in some clean petrol and a wipe with some tissue paper. 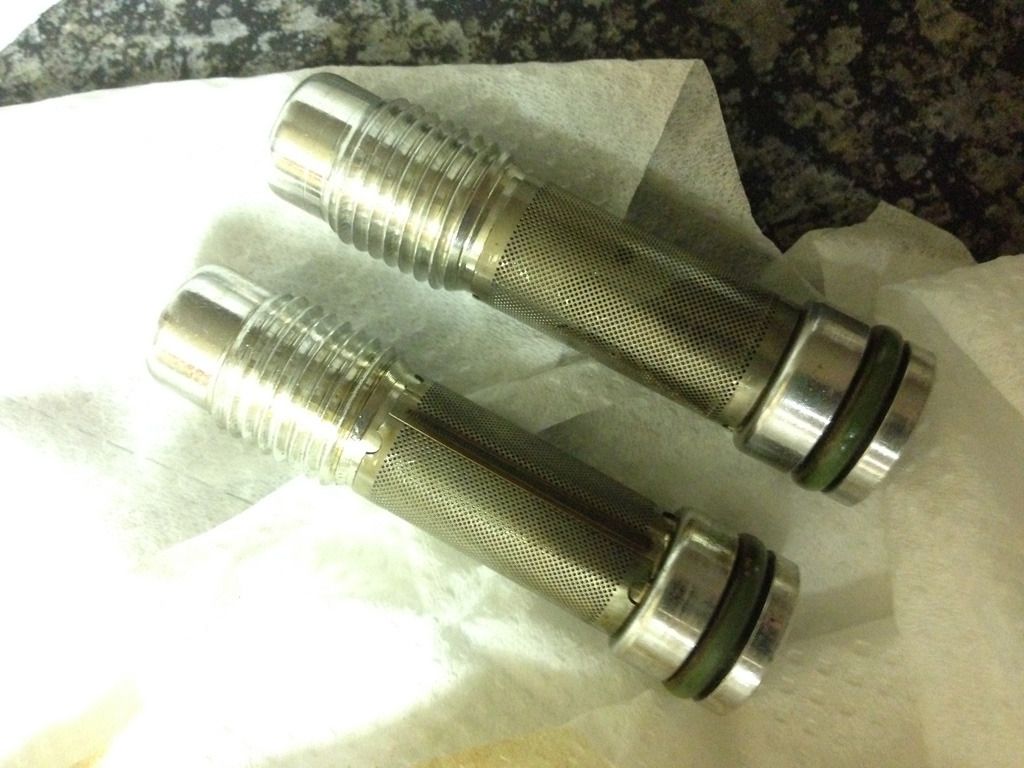 I then cleaned the two solenoids and wanted to use a variable power supply to try and actuate them, but luckily I checked the voltage with my multimeter before attempting this, for some reason my variable power supply is not working properly and supplying over 14 volts. So just gave them a good soak while agitating but they seemed pretty clean (cleaned them last about a year or so ago). I then let them stand to dry/evaporate. Back to the Check Valves - I noted that you can suck air through both of them, and you cannot blow air through them (if that makes sense), so the internal valve is functioning as it should. I also did this to help clean any possible blockages that maybe can't been seen. I sprayed them with some carb cleaner then wiped dry, more sucking of air through them, then a final dip in petrol before letting them dry. All nicely cleaned Check Valves and Vanos solenoids ready to be refitted:  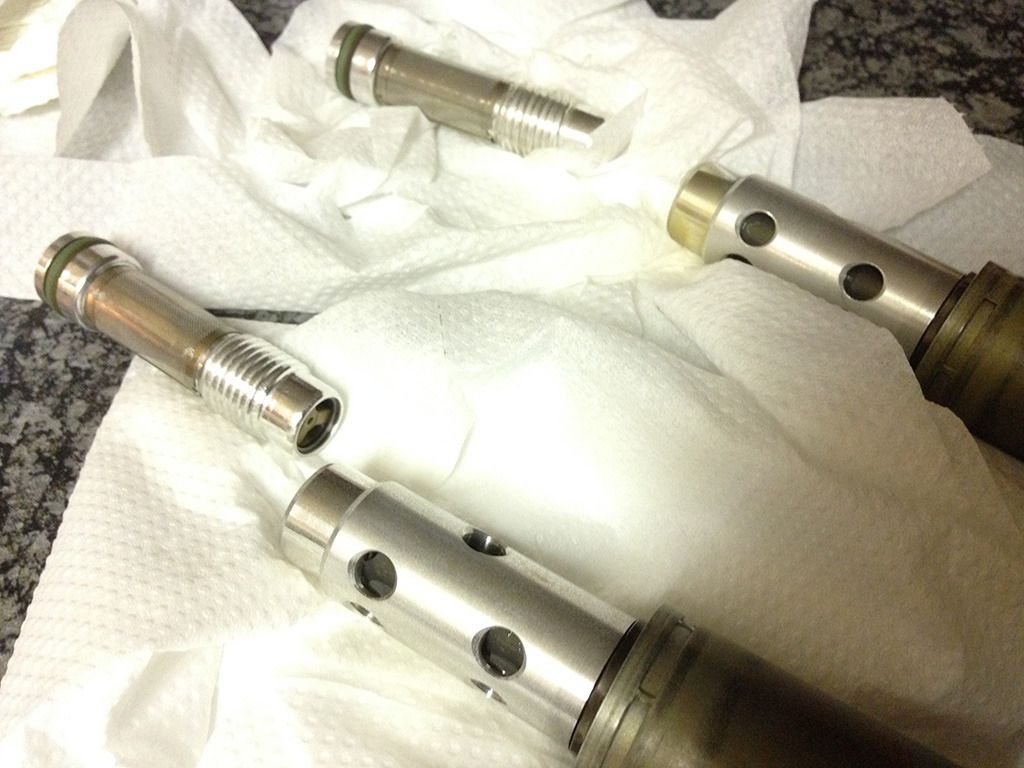 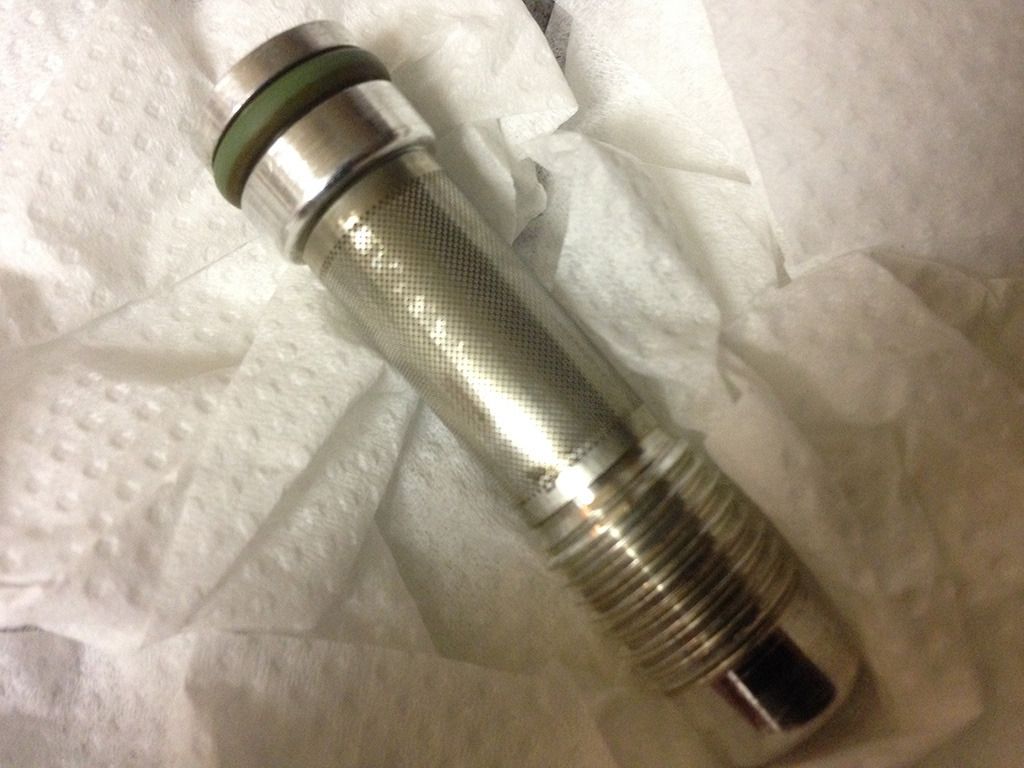 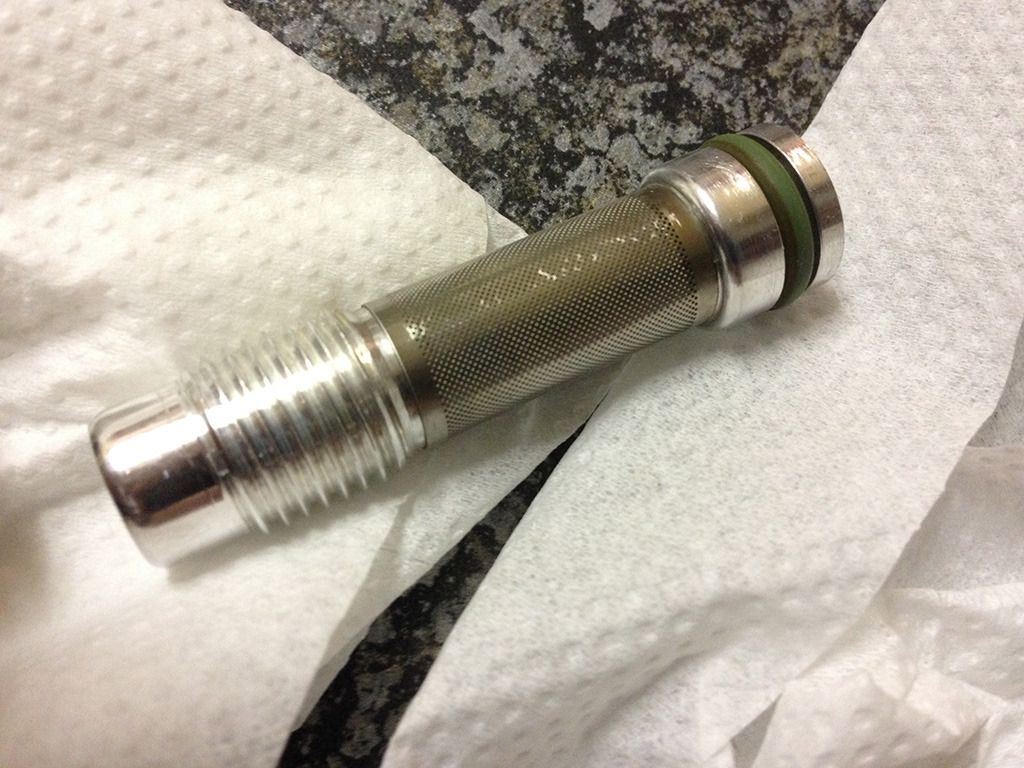 I put the Check Valves back in their original locations since I can't see any reason not to, but swapped the Vanos solenoids around (they are now back to their original factory positions). I will have to see how the car behaves when I drive it tomorrow. If I notice a positive behaviour that might be short lived, then it is possible that one of the solenoids is faulty or not working correctly. But at least it shows that my engine is still very clean generally thanks to the more frequent oil changes. And it is in fact now due for an oil change which is why I had to do this job now.
__________________
BMW E90 330i (M) '05 (His) | (Hers) BMW E46 320i f/l (M) '03
|
|
Appreciate
2
StradaRedlands4940.50 |
| 02-10-2016, 04:46 PM | #11 |
|
Lieutenant Colonel
200
Rep 1,834
Posts
Drives: '05 E90 330i Manual
Join Date: Aug 2010
Location: Cape Town, South Africa
|
So I did take the car for a good drive this afternoon, sadly lots of traffic, so I wasn't able to do all the things I wanted to do along the route I had chosen, but it is strange. When I started the car I was expecting the engine to do weird things upon initial start up (I hadn't "primed" the solenoids or Check Valves in oil, just refitted them), but no issues. Let it idle for a few minutes while checking that there are no oil leaks.
Now in the past whenever I have pulled the solenoids and given them a clean, I have noticed some degree of improvement or change in engine behaviour, problem is, is it imagined, or just a random thing? This car seems to have its good and bad days too. When I drove off climbing a gentle hill I heard it pinging a bit more than normal (and the engine was at this point still technically warming up) - haven't really had this for a while, but it then seemed to settle as the car continued to gain speed. The overall feel of the engine seemed better and a bit more eager with less dips and didn't seem to have the being held back feeling. Once I was happy that operating temperature was reached, I gave it a few brief WOT through some of the lower gears and she pulls fine. I didn't experience any low rev stumbles when accelerating, but I wasn't able to properly test that due to the traffic conditions, so will have to keep an eye on that. The throttle also feels a bit smoother, but only a bit, again, will need to drive it some more and see. And I think at some point I must then swap the solenoids back again and compare. I am wondering if one of them is not causing problems, but no way am I throwing more money at this car, so have to see how it goes. Other than that, I am also considering the Eccentric Shaft sensor as a possible culprit since there was years ago some or other Valvetronic issue and I was talked into replacing the Valvetronic motor (no change whatsoever). If this is the case, then obviously I would have the timing checked and set when this is done. But let's not get too excited. Will update once I have done some more driving though.
__________________
BMW E90 330i (M) '05 (His) | (Hers) BMW E46 320i f/l (M) '03
|
|
Appreciate
1
StradaRedlands4940.50 |
| 02-10-2016, 04:57 PM | #12 |
|
Major General
3973
Rep 7,215
Posts |
out of curiosity, I pulled these out of my 250k mile engine I'm rebuilding. One was sparkling clean, the other was about half blocked with sludge. not enough that it should affect the engine but I'm betting after some time it would have eventually plugged it up entirely.
|
|
Appreciate
1
|
| 02-10-2016, 05:17 PM | #13 |
|
Lieutenant Colonel
200
Rep 1,834
Posts
Drives: '05 E90 330i Manual
Join Date: Aug 2010
Location: Cape Town, South Africa
|
I suppose like the solenoids, it's usually the lower of the two which is the exhaust side that is the dirtier of the two. Not exactly sure why, maybe simply because it is the lower of the two and the dirt settles there more than the ones higher up. But I was kinda hoping to find some decent amount of dirt on these that came out, but they were clean. So I have a new spare set which I never needed to get, but they're not expensive so not too bothered.
__________________
BMW E90 330i (M) '05 (His) | (Hers) BMW E46 320i f/l (M) '03
|
|
Appreciate
0
|
| 10-04-2016, 04:16 AM | #14 |
|
Private

29
Rep 71
Posts |
Have you progressed any further with this fault?
I also have an E90 330i and am having a similar issue (stumbling at low engine speeds, not feeling as powerful as it should, occasional engine light for sticking vanos solenoids). I have removed, cleaned and swapped the Vanos solenoids and the fault has moved with the solenoid, so I am hoping that it is a faulty solenoid. I also plan to clean the check valves as well as they look like they are a trap for any particles in the oil. |
|
Appreciate
0
|
| 10-06-2016, 09:30 PM | #15 |
|
Lieutenant Colonel
200
Rep 1,834
Posts
Drives: '05 E90 330i Manual
Join Date: Aug 2010
Location: Cape Town, South Africa
|
Sadly not, but it comes and goes. But never had an engine light or error code to suggest anything is wrong. Since the fault has moved to the new location of the possibly faulty solenoid, chances are that it is the cause, or contributing factor to your car's problem, and especially the engine light. I would say you can't go wrong replacing that solenoid (and possibly the other one), but I would also consider replacing the check valves in that case. They are cheap enough to replace, but if they are decently clean like mine were, then you could also probably just give them a clean.
Very easy DIY actually, check here: DIY: VANOS Check Valve Replacement
__________________
BMW E90 330i (M) '05 (His) | (Hers) BMW E46 320i f/l (M) '03
|
|
Appreciate
0
|
| 10-06-2020, 09:31 AM | #16 |
|
Private First Class
 119
Rep 158
Posts |
I just removed and cleaned the vanos filters on my 100 000 mile 325i.
They had nothing but clean fresh oil on them. No dirt or sludge. So I guess they're not really a service part if you change your oil regularly. |
|
Appreciate
0
|
| 10-06-2020, 12:46 PM | #17 | |
|
Banned
1998
Rep 2,026
Posts
Drives: 2008 E92 328xi
Join Date: Nov 2019
Location: Miami
|
Quote:
|
|
|
Appreciate
1
DialedIn119.00 |
| 10-08-2020, 08:40 AM | #18 | |
|
General
17314
Rep 18,737
Posts |
Quote:
|
|
|
Appreciate
0
|
| 10-08-2020, 09:39 AM | #19 | |
|
Major General
3973
Rep 7,215
Posts |
Quote:
The engine I posted about earlier in this thread was pretty hammered on the inside, looks like they hadn't changed the oil in like 30,000 miles. If your engine looks clean from inside the oil cap I doubt you have this issue. |
|
|
Appreciate
0
|
| 10-08-2020, 10:49 AM | #20 | ||
|
Banned
1998
Rep 2,026
Posts
Drives: 2008 E92 328xi
Join Date: Nov 2019
Location: Miami
|
Quote:
|
||
|
Appreciate
0
|
| 10-12-2022, 04:29 AM | #21 |
|
Captain
 
724
Rep 929
Posts
Drives: 2019 F87 M2C, 2023 G87 M2
Join Date: Mar 2018
Location: North America
|
Old thread but I just replaced both my VANOS check valves/filters and the top one was clean. The bottom one (exhaust?) was a little dirtier. I had no error codes and the car I thought ran pretty well and idle was smooth. But after changing these, I can tell the acceleration is much much improved and the car just pulls and pulls! I would recommend doing these for anyone who has never done it on their N52. I was able to do it fairly easily from the top side. Just needed to use the camera on my phone to locate and place the T40 into the bolts. The top one was a PITA to take out once loose as it sat flush with the engine. Tried several ways to take it out and no success…. At the end, I gave the engine a very short crank and it pushed it right out along with some oil! (If you try this make sure you place a big towel in the engine bay)… don't forget to torque these to 15 Nm!
|
|
Appreciate
0
|
| 11-04-2022, 09:12 AM | #22 | |
|
Lieutenant Colonel
200
Rep 1,834
Posts
Drives: '05 E90 330i Manual
Join Date: Aug 2010
Location: Cape Town, South Africa
|
Quote:
__________________
BMW E90 330i (M) '05 (His) | (Hers) BMW E46 320i f/l (M) '03
|
|
|
Appreciate
0
|
 |
| Bookmarks |
|
|


