

|
|
|
|
 |

|
 |
BMW Garage | BMW Meets | Register | Today's Posts | Search |
 |

|
BMW 3-Series (E90 E92) Forum
>
DIY E90 N54 Valve Cover Gasket
|
 |
| 04-16-2014, 03:19 PM | #89 |
|
Objects in the mirror are losing

105
Rep 1,133
Posts
Drives: 2007 BMW 335i E92 AW/CR 6MT
Join Date: Mar 2011
Location: Socal (OC/Riverside)
|
Rob, thanks for the DIY first and foremost...About to tackle this VCG but just wondering if you guys lube the gasket with some oil before reinstallation? Thanks for all the tips and pictures
__________________
 PERFORMANCE: JB4 G5 \ Backend Flash \ DCI \ BMS Downpipes \ CX FMIC \ ER Chargepipe \ Synapse BOV \ KW V2 \ Muffler Delete \ CDV \ ZHP Shifter \ Cyba Scoops FUN: M3 Front \ Mtech Rear \ JL 10W6 \ ModMyNav \ V1 Hardwired \ LUX H8 \ Gloss Black Trim \ Gloss Black Roof \ Cyba Quads \ Cyba Mtech Diffuser |
|
Appreciate
0
|
| 04-16-2014, 06:01 PM | #90 | |
|
DIYER
614
Rep 5,521
Posts |
Quote:
__________________
JB4 G5, Stage 3 LPFP, Stage 2 MOTIV PI, VM 6466 ST, Custom OCC W/ SS lines, ER FMIC, ER CP W/HKS BOV, M3 control arms, M3 guide rods, M3 upper links, M3 front & rear sway-bars, HPA rear toe arms, Wavetrac LSD, HPF Gen 2, DEFIV kit, KW clubsport, Delrin solid SF bushings, stoptech rotors, Rogue Tranny Mounts, 1M bumper, M3 CF hood, M3 fenders, M3 OEM sideskirts, Mtech rear bumper, CSL trunk, MORR VS8.2 rims 245/295
|
|
|
Appreciate
0
|
| 04-17-2014, 01:20 PM | #91 |
|
Objects in the mirror are losing
105
Rep 1,133
Posts
Drives: 2007 BMW 335i E92 AW/CR 6MT
Join Date: Mar 2011
Location: Socal (OC/Riverside)
|
Ok perfect...Thanks again Rob I will update in a week or two if I get a chance on how it went...Just ordered parts today
__________________
PERFORMANCE: JB4 G5 \ Backend Flash \ DCI \ BMS Downpipes \ CX FMIC \ ER Chargepipe \ Synapse BOV \ KW V2 \ Muffler Delete \ CDV \ ZHP Shifter \ Cyba Scoops FUN: M3 Front \ Mtech Rear \ JL 10W6 \ ModMyNav \ V1 Hardwired \ LUX H8 \ Gloss Black Trim \ Gloss Black Roof \ Cyba Quads \ Cyba Mtech Diffuser |
|
Appreciate
0
|
| 04-17-2014, 09:55 PM | #92 | |
|
Lieutenant Colonel
 
421
Rep 1,643
Posts |
Quote:
__________________
2007 E92 335i MT
|
|
|
Appreciate
0
|
| 04-20-2014, 02:55 AM | #94 |
|
Lieutenant Colonel
294
Rep 1,834
Posts
Drives: 08 E90 335xi TiAg
Join Date: Dec 2012
Location: Sacramento, CA
|
Replace it all. You don't want to pull it all apart twice. Totally worth doing it all for peace of mind.
|
|
Appreciate
0
|
| 04-20-2014, 10:44 AM | #95 | |
|
DIYER
614
Rep 5,521
Posts |
Quote:
__________________
JB4 G5, Stage 3 LPFP, Stage 2 MOTIV PI, VM 6466 ST, Custom OCC W/ SS lines, ER FMIC, ER CP W/HKS BOV, M3 control arms, M3 guide rods, M3 upper links, M3 front & rear sway-bars, HPA rear toe arms, Wavetrac LSD, HPF Gen 2, DEFIV kit, KW clubsport, Delrin solid SF bushings, stoptech rotors, Rogue Tranny Mounts, 1M bumper, M3 CF hood, M3 fenders, M3 OEM sideskirts, Mtech rear bumper, CSL trunk, MORR VS8.2 rims 245/295
|
|
|
Appreciate
0
|
| 04-20-2014, 10:45 AM | #96 | |
|
DIYER
614
Rep 5,521
Posts |
Quote:
__________________
JB4 G5, Stage 3 LPFP, Stage 2 MOTIV PI, VM 6466 ST, Custom OCC W/ SS lines, ER FMIC, ER CP W/HKS BOV, M3 control arms, M3 guide rods, M3 upper links, M3 front & rear sway-bars, HPA rear toe arms, Wavetrac LSD, HPF Gen 2, DEFIV kit, KW clubsport, Delrin solid SF bushings, stoptech rotors, Rogue Tranny Mounts, 1M bumper, M3 CF hood, M3 fenders, M3 OEM sideskirts, Mtech rear bumper, CSL trunk, MORR VS8.2 rims 245/295
|
|
|
Appreciate
0
|
| 04-27-2014, 09:31 AM | #97 |
|
Fuck it dude, let's go bowling.
881
Rep 2,478
Posts |
Thanks for the excellent DIY OP!! You really took some care with the photos and all, and that is a great service to the forum. Major props to you sir!
I did this job twice, over two weekends. WTF you say?  Well my reason will become clear in my observations below. Well my reason will become clear in my observations below.00 - N54 owners, for the love of god and all that is holy, just get a new valve cover already. These plastic covers do not last with the heat this engine generates. You will hate yourself if, after changing the VCG,your shit still leaks. Ask me how I know. My car has 200k+ miles and I've had to replace the VCG twice. Both times I had to do it F#$%ing twice because after changing it I found out the valve cover was cracked  0 - In general it's a good idea to put step numbers in a DIY; makes it much easier for commenters to refer to specific steps (not detracting at all from this great write-up, just a suggestion) 1 - Do not remove the bolts from the valve cover unless you are replacing them - they are held in place with a sleeve, and not meant to be removed. Just loosen them all and when you remove the valve cover leave the bolts and sleeves in place. 2 - Forget #1. Just replace the aluminum bolts. Did you read all the comments in this thread about broken bolts? You're going through all this trouble and saving hundreds, why cheap out on the single-use bolts? It's about $90 for the set at getbmwparts. Buy the valve cover (see #00 above) and it comes with the gasket and bolts. 3 - Now that you've committed to the cost of the bolts, better think also about replacing that nasty PCV and vent pipe. Those vent pipe connectors are SO ANNOYING that you will not want to have to do that again. And the PCV is what provides crankcase ventilation, and they do go bad. It's so much easier to replace it with the valve cover off - that goofy rear-facing plastic cap is a bugger to connect. 4 - Now that you've committed to the cost of the bolts and the PCV and the vent pipe, just go ahead and buy the new valve cover - see #00 above. Why? First, these VCs are NOTORIOUS for cracks. In fact, it turned out my gasket with 120k miles was in perfect condition, but the VC had a hairline crack. A new VC comes with a gasket, bolts and a brand new PCV (which, according to getbmwparts, is only available as part of a new VC anyway). So for another $100 or so ($350 total at getbmwparts), after all that work you'll have the peace of mind that everything is tip-top. 5a - When removing the engine cross-brace, you don't have to completely remove that larger bolt under that round cap in the cowl. Just loosen it and you can pull the brace out. It's not worth the chance of dropping that bolt down into the cowl. 5b - Use bungees to keep all the wires as far out of the way as possible - this makes removal/installation so much easier. I had four bungees doing the job. 6a - Be extremely careful once you get that cover off. You don't want anything falling down into that sexy motor! Cover it up if you leave the job temporarily, and exercise EXTREME care when handling nuts and bolts and other little bits over top of the exposed motor. When you get the valve cover off, remove those spark plug inserts and inspect them. Each one has a snap-ring in the bottom (which you would never know was there unless you look). Make sure they are all accounted for. Once you get everything back together and you discover one of them is missing, you may need to do the job ALL OVER AGAIN just so you can sleep at night After doing the job for the second time, I found the missing ring down inside the spark plug chamber.6b - When installing the VC, be patient when working it into place. The gasket may have a tendency to succumb to gravity and droop down/fall out. Just make sure it's securely pressed into the VC before you start, and you should be ok. I've had luck spraying the gasket with tacky 3M spray adhesive just to get it to stick. 7 - Don't try to reinstall the VC with the spark plug sleeves in - you will lose your mind and probably break things. Save the sleeves for later, just before you reinstall the coil packs. 8 - When installing the coil packs, make sure the orientation is correct. The rubber tab at the top of the coil should sit down in the little depression in the VC at about 1:00. You'll see what I mean when you get there. If you don't seat it properly you may have issues later. Also, when installing the wire plugs into the coil pack, make sure you push them in to full stop, and then make sure you hear a *click* when you close the cap down. It's easy to mess this up and not get it tight - you will be posting back here asking what's wrong later. 9 - Using only a socket extension, I hand-snugged my bolts all around three times before setting torque - each time hand-tightening a little more securely. Yes, that's 69 times for those keeping count. You will be surprised each time around that they feel loose again, because tightening one side of the VC loosens the other side. If you do it in this manner, you won't need to worry about tightening pattern. 10 - When you're finished, treat yourself to an M3 cowl for about $160 (including carbon filter set from ebay). It will make removing that engine cover SO MUCH EASIER next time. (see here: http://www.e90post.com/forums/showpo...0&postcount=35) 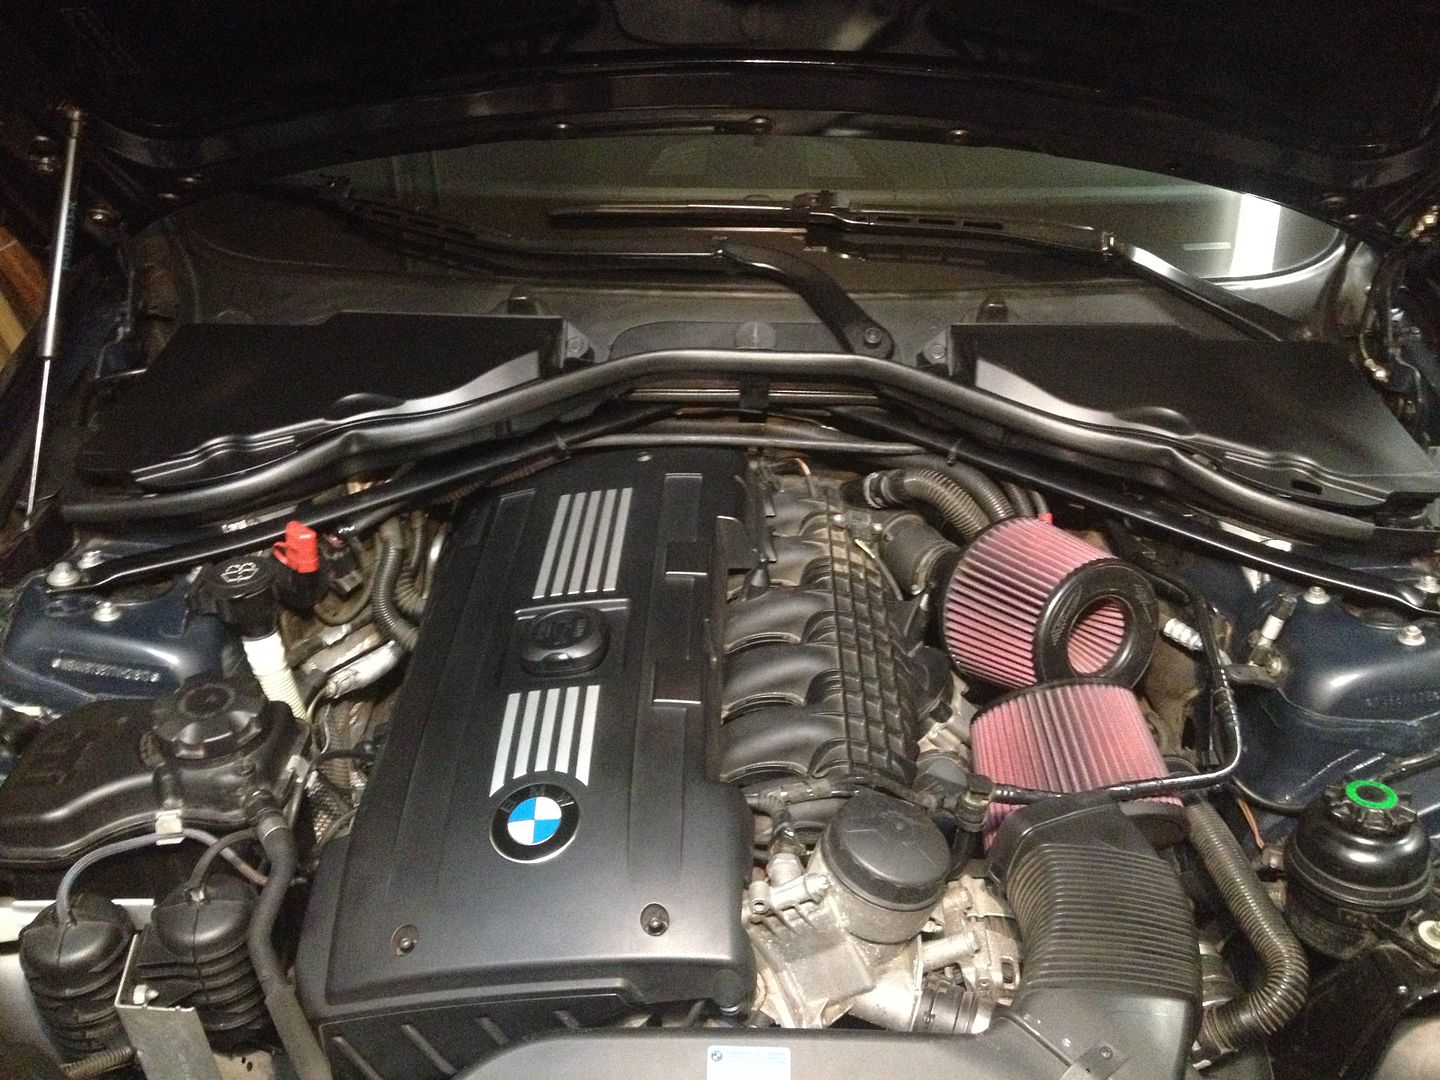
__________________
1M. Previously: '13 135is; '07 E90 335i; '02 325i; '99 Z3; '98 328is; '87 L6; '77 320i
 Last edited by NGEE; 02-25-2022 at 06:05 PM.. |
|
Appreciate
1
Bent_remy137.50 |
| 04-27-2014, 09:21 PM | #98 |
|
Guest
0
Rep n/a
Posts
Drives:
|
NGEE: Great follow-up to an AWESOME DIY!
Quick question about using gasket sealer...RB recommends using sealant around the pressurization ports: http://www.rbturbo.com/products/accessories/rbpcv Has anyone else used ANY type of sealant here or around the rest of the gasket at all? |
|
Appreciate
0
|
| 04-28-2014, 04:07 PM | #99 |
|
Boosted

28
Rep 183
Posts |
Great DIY write up. Thanks for taking the time. Question though. How are you guys tightening up the fuel lines back to the fuel injectors? I was looking at TIS and it shows a special tool that goes over the nut and allows you to use a torque wrench to snug the fuel lines onto the injectors at a specific torque. Are you guys just muscling it with a wrench and getting in the ball park based on how difficult it was to remove the nut?
__________________
2012 135i
|
|
Appreciate
0
|
| 05-02-2014, 01:54 PM | #100 |
|
Lieutenant Colonel
217
Rep 1,909
Posts |
One thing to add, cover injectors with plastic wrap or tape, dirt shouldn't go in there ... Also add rtv esp if ure tuned, works great
|
|
Appreciate
0
|
| 05-05-2014, 10:56 AM | #101 | |
|
Private
 0
Rep 96
Posts
Drives: e92 n54 LSD....
Join Date: Nov 2011
Location: southeast
|
Quote:
|
|
|
Appreciate
0
|
| 05-05-2014, 11:07 AM | #102 | |
|
Lieutenant Colonel
217
Rep 1,909
Posts |
Quote:
|
|
|
Appreciate
0
|
| 05-05-2014, 03:21 PM | #104 | |
|
Boosted
28
Rep 183
Posts |
Quote:
__________________
2012 135i
|
|
|
Appreciate
0
|
| 05-05-2014, 08:05 PM | #107 |
|
Enlisted Member
 14
Rep 35
Posts |
Thanks for the help and the DIY...did this today and everything seems to be in working order.
A couple of notes that I will make: 1) Don't forget to put shop towels down around the fuel lines - mine had a good bit left in there and it would have made a big mess if I hadn't planned for it. 2) ^^^see above for directions on how to get that tricky hose off the valve cover! 3) Didn't need to replace bolts NOR valve cover - my car is at 92k (but the gasket was the PITS) 4) DEFINITELY install the spark plug guides after the valve cover, this was way way easier And lastly, a concern - I managed to break the plastic tip that the vacuum lines go into (the piece right next to the airbox) as the lines were brittle. In retrospect, I should have just cut them and worked off the remainder from the plastic tips. Instead, I managed to break one - which means that I now have an open vacuum line in my car that goes nowhere and my turbos do not give me enough pressure. Can anyone help point me to a DIY that may involve replacing the vacuum lines or this part that they "plug" into? Not even sure of the part number, I cannot find it on Realoem. |
|
Appreciate
0
|
| 05-06-2014, 05:53 PM | #108 | |
|
Lieutenant Colonel
421
Rep 1,643
Posts |
Quote:
__________________
2007 E92 335i MT
|
|
|
Appreciate
0
|
| 05-06-2014, 06:41 PM | #109 |
|
Enlisted Member
14
Rep 35
Posts |
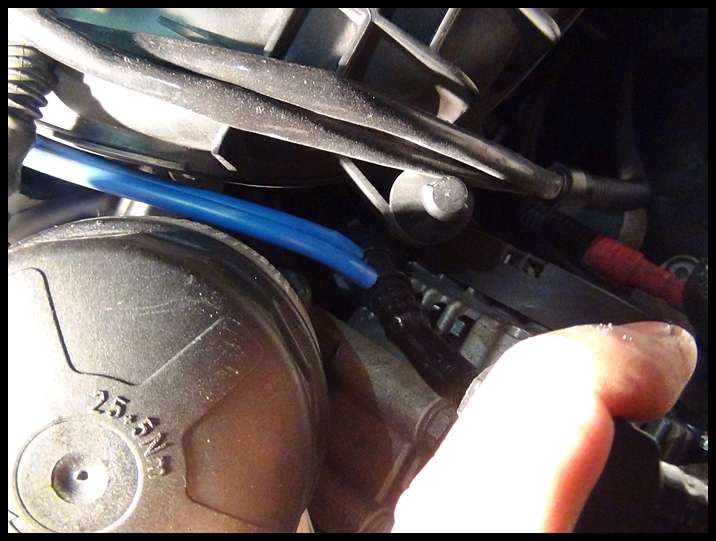 Where the blue vacuum lines connect here, to the black tube where his thumb is - I broke one of the two "nubs" that are sticking out that connect to the blue lines. After much painstaking research, I found the part #11666769086 - it's part of the "Brake servo unit", which is odd. Apparently it's a pressure tube that's shared between both that creates a vacuum. Looks like I will be able to replace it fairly easily (surprisingly) with the part, which was less than $30 at my local dealer. Currently, the car is drivable but it sputters and shakes a little, which I'm hoping is completely due to the loss of vacuum power in the turbos. If not, I'll have to look at my coil packs again as perhaps I didn't seat them properly? It drives worse when I accelerate more than a snail's pace, but once I'm up to speed it is fine. |
|
Appreciate
0
|
| 05-07-2014, 10:08 AM | #110 |
|
Enlisted Member
14
Rep 35
Posts |
Problem solved - the part was fairly easy to replace, it just has squeeze tabs on the bottom.
As for the stutter in the car, I believe this is because of a fouled ignition coil that wasn't seating properly (the rubber boot on the bottom had broken off and was stuck around the spark plug). |
|
Appreciate
0
|
 |
| Bookmarks |
|
|


