|
|
|
|
 |
|
 |
BMW Garage | BMW Meets | Register | Today's Posts | Search |
 |

|
BMW 3-Series (E90 E92) Forum
>
DIY - E90 LCI Caliper and Hub Paint - How-to
|
 |
| 04-13-2010, 03:25 PM | #1 |
|
BMW Addict

101
Rep 792
Posts |
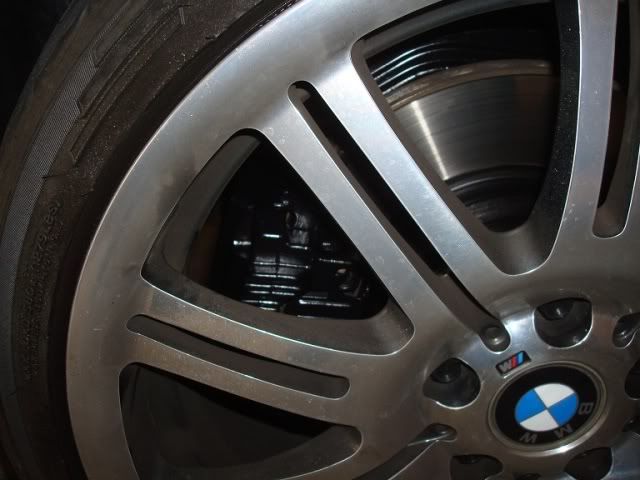
I decided to dress up my calipers with a little paint. Also, I've had a recurring problem with my hubs rusting - especially in the front, so I decided to paint them silver in an attempt to remedy the rust issue.
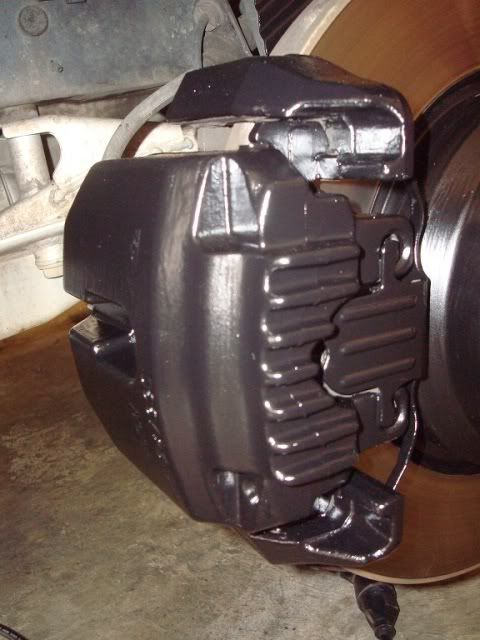
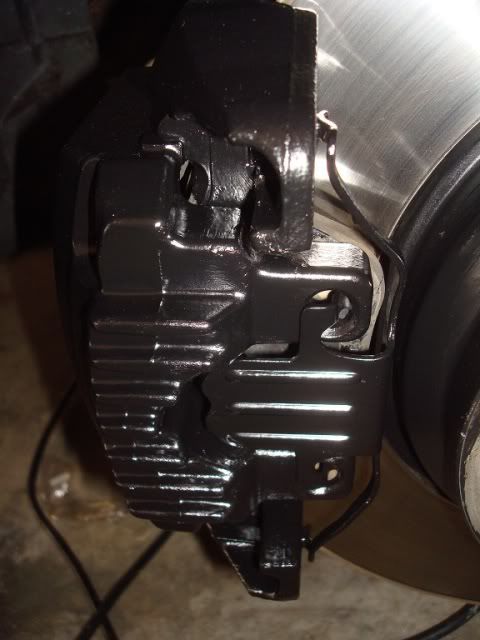
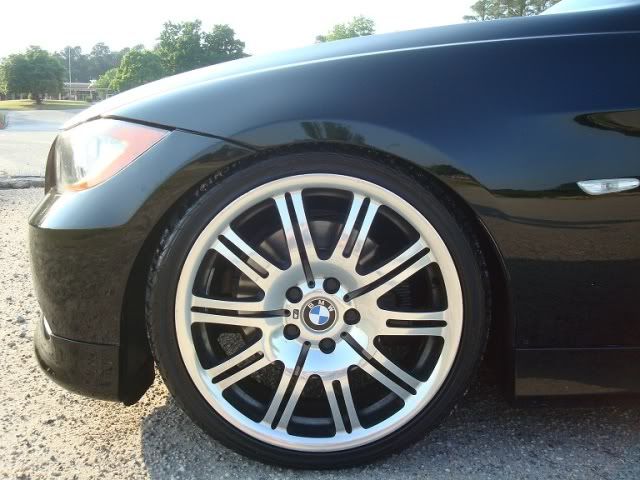
I used G2 brushable caliper paint - black for the calipers and silver for the hubs. The kit includes everything you need to paint four calipers or hubs. See pics below:   The process is very straight forward, you'll start by jacking up your car and placing it on jack stands. Remove the wheels and start the cleaning and prep work. Hub Cleaning As I mentioned above, I've had issues with my hubs rusting. Like many folks, my wheels (OEM 179's) leave much of the rotor/hub/caliper exposed to view and the rust on the hubs is EXTREMELY unsightly. So to prep the hubs before painting, I used a 3" wire brush chucked in a drill to remove all the rust. See pics below: Hubs and calipers prior to cleaning:   Using the wire brush to clean:   All clean!   Caliper Cleaning After cleaning up the hubs, I moved on to the calipers. I decided to remove the anti-rattle clips on both the front an rear calipers before cleaning. I think this is definitely the right move, if you paint the calipers without removing them, you'll end up painting the clips onto the caliper and they will have to be pried off when the pads need to be changed in the future. I suspect the paint will most likely chip when removing the clips as a result. Just go ahead and remove them, it's a simple process to remove and reinstall. See pics below: Front Use a screwdriver to pry off the clip. Hang on to the clip while prying so it doesn't go flying off when it comes loose.   Rear Use channel locks or other pliers to pry the rear clip loose. Note: these are my sprinkler head adjusting pliers for my irrigation system, so they're a bit rusty...    Once the clips have been removed, clean the calipers (and hubs if you're painting them as well) with the included brake cleaner - just spray it on and let it run off / evaporate. Place some newspaper or cardboard underneath the calipers to catch the cleaner runoff. Don't forget to clean the anti-rattle clips also. Painting Mix the reactor and the paint together using the included stirring stick, do this only when ready to start painting. Once the paint and the reactor are mixed together, the epoxy will begin to harden and you'll be on the clock. Depending on the temperature, (56°-70° F is the recommended working temp), you should have between 4-6 hours of working time. Check out the complete instructions here. Do yourself a favor and wear latex gloves while applying the paint...if you don't, you'll end up with paint all over your grubby mitts...take it from me... ") I did not tape off anything before painting. The areas that could have benefited from tape (the back of the pads) are basically impossible to tape off. I just took my time when painting around areas that I wanted to avoid getting paint on. Go slow and use a steady hand and you won't have any problems. As the instructions indicate, apply multiple thin coats, waiting at least 15 minutes between coats. I painted the calipers first - two coats, then moved on to the hubs, hitting them with three coats. One additional tip I would give regarding equipment, it's probably wise to grab some extra acid brushes - they're cheap and should be available at any hardware store. The one brush that's included will begin to stiffen up during application of the second coat - this makes applying the paint more difficult. I just started with a fresh brush at the beginning of each coat to make application as easy as possible. Don't forget to paint the anti-rattle clips - for these, I held by hand and painted the majority of the clip, then I hung them on a hook and painted the last bit. Let everything cure thoroughly before replacing the clips and mounting the wheels. It took me roughly three hours to paint the calipers and hubs, that doesn't include the setup and cleaning time. You'll want to devote a full day to this project and just count on your rig being out of commission for a day. I painted on a Saturday afternoon and let the paint cure overnight before attempting to reinstall the clips and wheels the next morning. The Results Front     Rear   Hub  Here's some shots after I mounted the wheels. With my choice of black for the calipers I ended up with a fairly understated OEM look. Obviously, if you go with a brighter color, you will make a louder statement. I'm very pleased with the results and would highly recommend the G2 brushable paint.         
__________________
'11 Black Sapphire F10 550i l ZSP l Avant Garde 20" M310
Last edited by zzzbullseye; 04-13-2010 at 05:23 PM.. |
| 04-14-2010, 11:33 AM | #2 |
|
Major General

422
Rep 8,003
Posts
Drives: '08 E90 335i, '99 E36 M3
Join Date: Apr 2009
Location: Houston, TX & Atlanta, GA
|
Good DIY. Thanks. Might use it in the future.
|
|
Appreciate
0
|
| 04-14-2010, 02:01 PM | #3 |
|
I'm feeling much better now, Dave
5
Rep 305
Posts |
Looks really sharp!
Thanks for the effort of putting together a well laid out DIY !!!
__________________
-=] 2008 335i e92 Montego Blue & Black; Prem; Sport; AT-paddles
-=] Mods= VEI Digital Boost Gauge in RiXeffects custom Pod -=] Tinted (front: 3M Crystalline 70); (rear: Johnson InsulatIR 40 ceramic); 3M ClearBra |
|
Appreciate
0
|
| 04-14-2010, 05:20 PM | #6 | |
|
BMW Addict
101
Rep 792
Posts |
Quote:
__________________
'11 Black Sapphire F10 550i l ZSP l Avant Garde 20" M310
|
|
|
Appreciate
0
|
| 04-25-2010, 11:00 PM | #7 |
|
happy.
138
Rep 464
Posts |
This DIY is perfect! I was wondering if there were any options for making my stock brake set up look nicer as I just ordered some new wheels and they'll definitely be more visible.
I'll probably be doing this in the near future.. thanks for the write up!
__________________
'09 Jet Black E90 335i | BMS DCI | Forge DV | VRSF CP, DP, 7" FMIC, Exhaust | MHD Stg 2 / 93 Oct | Koni Yellow / H&R Sport | Mooooarrrrrr
this list is getting too long..... |
|
Appreciate
0
|
| 04-26-2010, 08:58 AM | #8 | |
|
BMW Addict
101
Rep 792
Posts |
Quote:

__________________
'11 Black Sapphire F10 550i l ZSP l Avant Garde 20" M310
|
|
|
Appreciate
0
|
| 04-26-2010, 08:17 PM | #9 |
|
Major General
2067
Rep 5,373
Posts |
Great job. Black wouldn't be my color choice, but it looks very professional.

__________________
///| g87 | f87 Comp | g29 M40i | f97 Comp | f80 Comp | f80 | f30 | e92 | tt | S5 | e92 | 350z | e90 |
|
|
Appreciate
0
|
| 04-26-2010, 08:36 PM | #10 |
|
General

663
Rep 26,878
Posts
Drives: 2-325 330 2-335 2-Z4 2-135 X5d
Join Date: Mar 2007
Location: Huntington Beach, CA
|
Very nice work!
|
|
Appreciate
0
|
| 04-27-2010, 07:57 AM | #11 | ||
|
BMW Addict
101
Rep 792
Posts |
Quote:
Quote:
__________________
'11 Black Sapphire F10 550i l ZSP l Avant Garde 20" M310
|
||
|
Appreciate
0
|
| 05-02-2010, 05:16 AM | #13 |
|
Registered
0
Rep 3
Posts |
Great DIY
Saw your post and just finished following it exactly-no issues, came out great. Added some Neverseize to 'contact points' on interior of wheels to avoid coming close to breaking my foot next time.
|
|
Appreciate
0
|
| 05-02-2010, 07:53 AM | #14 |
|
Second Lieutenant

29
Rep 262
Posts |
Looks great! Did this to my brothers car, let us know how the paint is in a couple months... he suffered some chipping even after many coats and clear coat :-\
|
|
Appreciate
0
|
| 05-02-2010, 10:19 AM | #15 | ||
|
BMW Addict
101
Rep 792
Posts |
Quote:
Quote:
__________________
'11 Black Sapphire F10 550i l ZSP l Avant Garde 20" M310
|
||
|
Appreciate
0
|
| 05-02-2010, 07:06 PM | #16 |
|
Major
 

130
Rep 1,028
Posts
Drives: 2019 440xi Gran Coupe
Join Date: Jan 2010
Location: Montreal, Canada
|
I would probably choose red or some other color so that it can standout more. Black it nice up close.
|
|
Appreciate
0
|
| 05-11-2010, 07:09 PM | #17 |
|
Registered
0
Rep 3
Posts |
Requeste Pics
A few quick pics of how mine came out (very similar). Your right on, give yourself a solid long afternoon. I let cure overnight as well.
 Before Rear:  Before Front:  After Rear:  After Front:  Mounted:   |
|
Appreciate
0
|
| 05-11-2010, 07:12 PM | #18 |
|
Registered
0
Rep 3
Posts |
Have you replaced your ashtray with the sunglass holder? If so, any advice (2008 335i vert). I have seen other posts but a little spooked on prying out the center assembly.
|
|
Appreciate
0
|
| 05-11-2010, 07:51 PM | #19 |
|
Second Lieutenant
34
Rep 273
Posts |
Cant help but notice your car is on jack stands...care to share how you did this?
Where did you jack the car up? Front/Rear Location? Where did you place the stands? Front/Rear Location? Thanks |
|
Appreciate
0
|
| 05-11-2010, 11:03 PM | #20 | |||
|
BMW Addict
101
Rep 792
Posts |
Quote:
Quote:
Quote:
__________________
'11 Black Sapphire F10 550i l ZSP l Avant Garde 20" M310
|
|||
|
Appreciate
0
|
| 05-12-2010, 10:43 AM | #22 | |
|
BMW Addict
101
Rep 792
Posts |
Quote:
 Hey...may as well use up all the paint, it's not like you can seal it up and use it later! Hey...may as well use up all the paint, it's not like you can seal it up and use it later!
__________________
'11 Black Sapphire F10 550i l ZSP l Avant Garde 20" M310
|
|
|
Appreciate
0
|
 |
| Bookmarks |
|
|