

|
|
|
|
 |
|
 |
BMW Garage | BMW Meets | Register | Today's Posts | Search |
 |

|
BMW 3-Series (E90 E92) Forum
>
Digital Boost Gauge Vent install - DIY (56k beware!)
|
 |
| 05-03-2007, 06:57 PM | #1 |
|
Too many Alex's, from now on, call me Beaufort

342
Rep 6,188
Posts |
Digital Boost Gauge Vent install - DIY (56k beware!)
OK, I finally got around to uploading all the photos for this.
I wanted to install a boost gauge but couldnt find a suitable place to put it. Im done with the a-pillar look. I tried to fabricate something that would work on the steering column but that failed. I went back to what I really wanted and that was to mount it in a vent like I had in my Audi A4. Heres how I did it. First off, I got the digital gauge here http://www.dynotunenitrous.com/store...?idproduct=131 because I decided I had no clue where I would put a round one and liked this idea. Here in picture one, you can see the whole vent and duct attached. Its not hard to pull this off the dash, just be careful if you have the aluminum as it will bend. You can use a flat screwdriver with tape on the end to pull it away, I just used my fingers it was that easy. 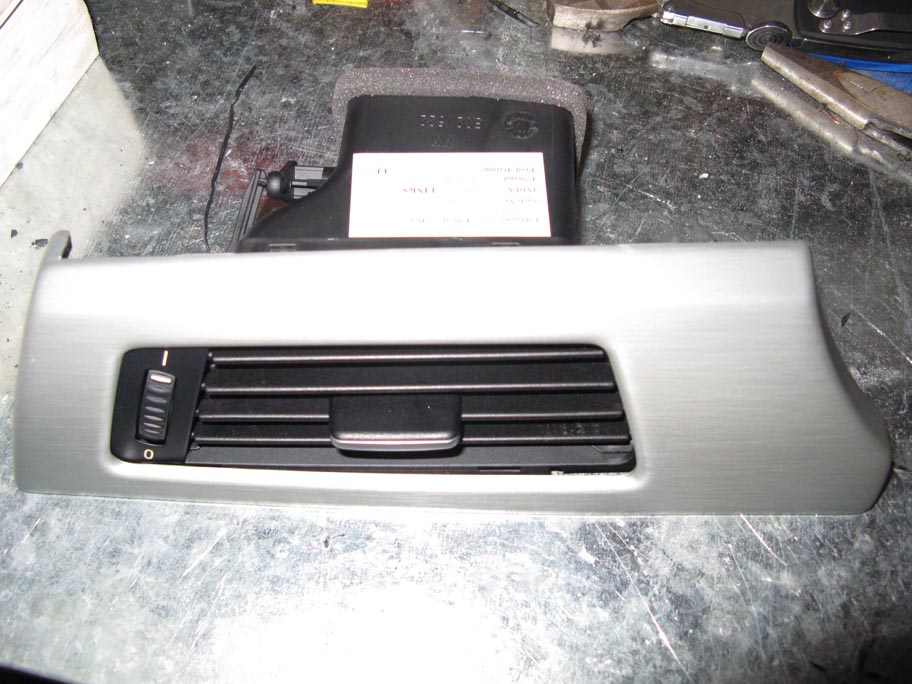 In order to get at the opening of the vent, I had to remove the whole ducting. Luckily, all the louvers are attached to that too so it was one big piece. You can see where I marked it with the arrows, you need to get a flathead screwdriver in these three places and try to pull up softly. 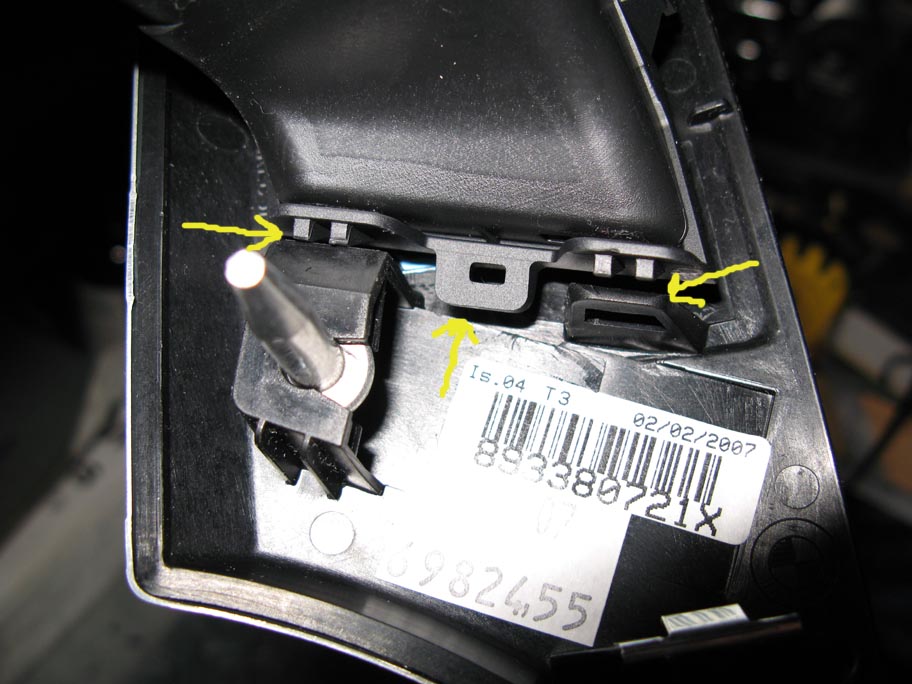 Here you can see 4 little prongs that hold down the ducting. Again, use a small flathead screwdriver to just raise these while softly pulling away. There are a couple easier ones on the other side as well but I forgot to take a pic of that. Once you have it past all those prongs on the three sides, slide and pull away from the silver pin used to go into the dash. 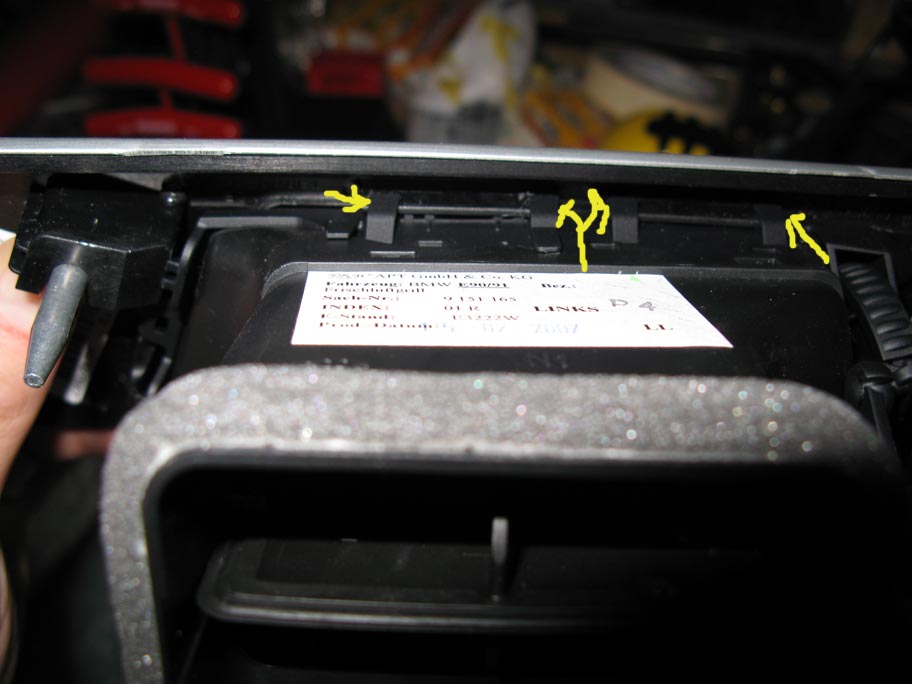 Here you can see the back of the trim with the whole ducting removed. Nice easy space to work with. 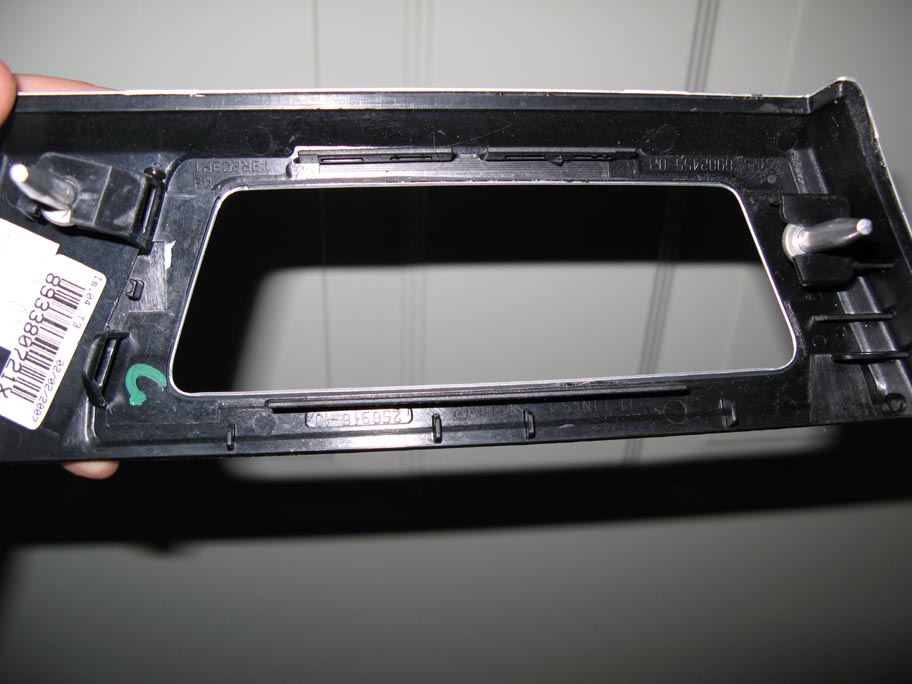 Heres a picture of both pieces removed. 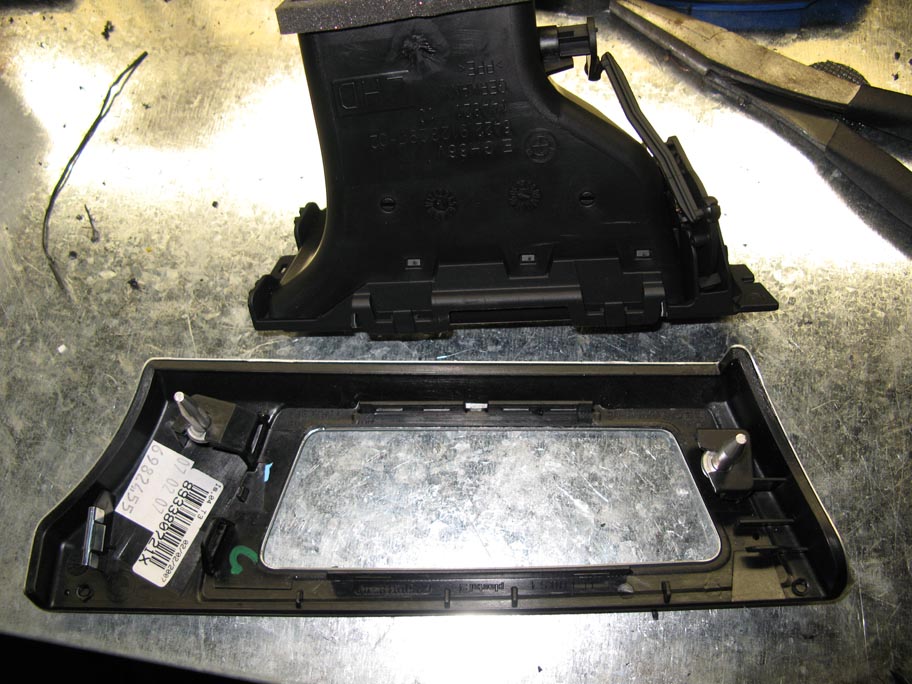 Heres a pic of the metal mesh screen I found at home depot. 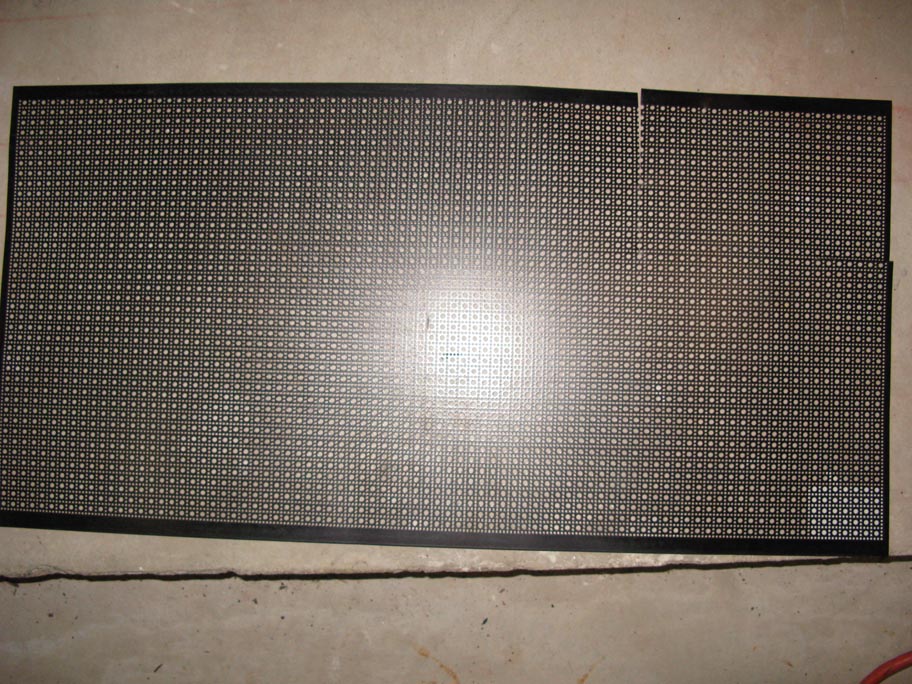 Heres a pic of the part number in case you have the desire to get the same thing. 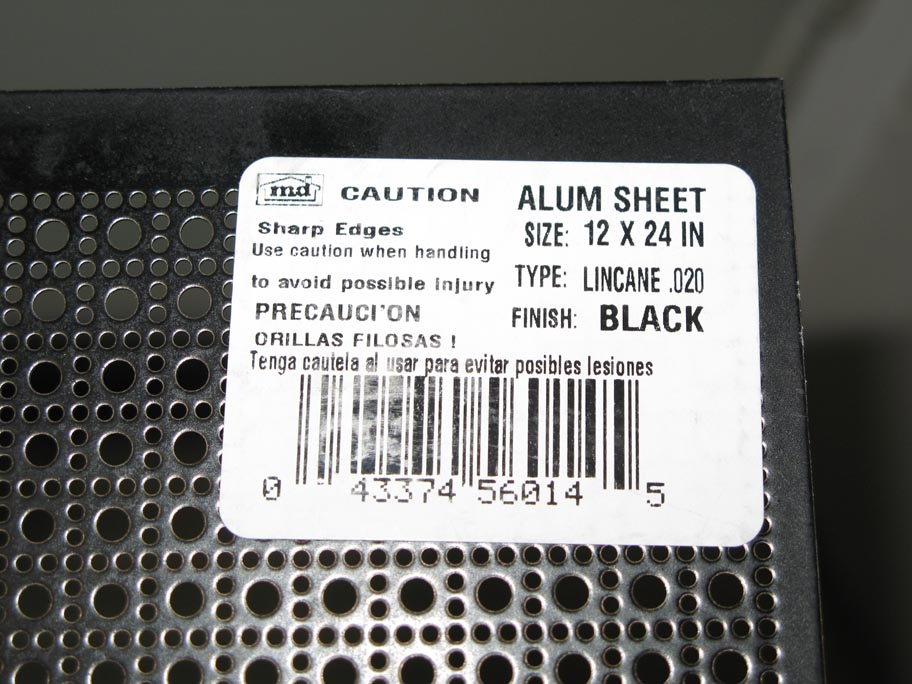 Now we have a picture of my cut screen to fit into the back of the trim. I used metal shears to cut and that made it easier. 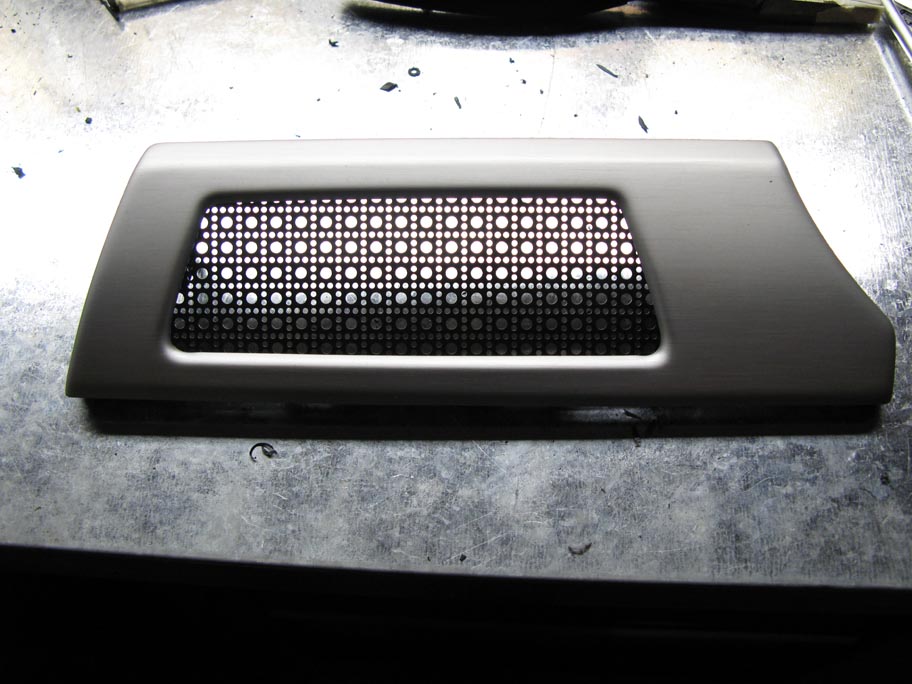 After measureing the back of the gauge and taping off where I wanted to mount it, I got to cutting. First I used larger drill bits to make the holes larger. Then I used the shears again to cut the rectangle. It was quite angular so I used a metal file to make all the edges flat and smooth. Kept doing this until the gauge fit flush. You can see it here. 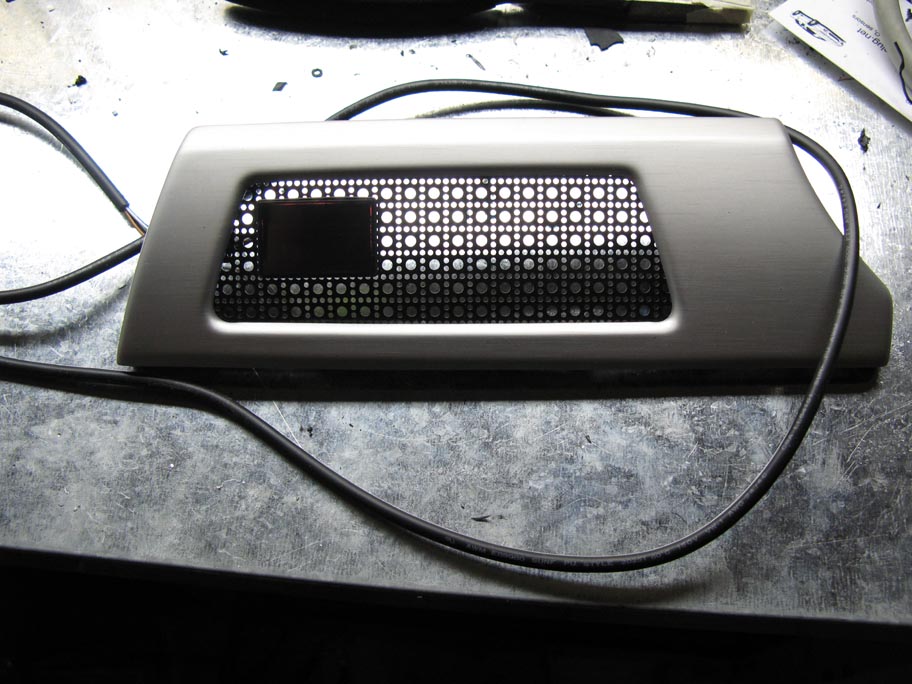 After I was sure this is how I wanted it, I did 4 dabs of hot glue(found glue gun at $1 store FTW!) on the corners. You can see that marked here. 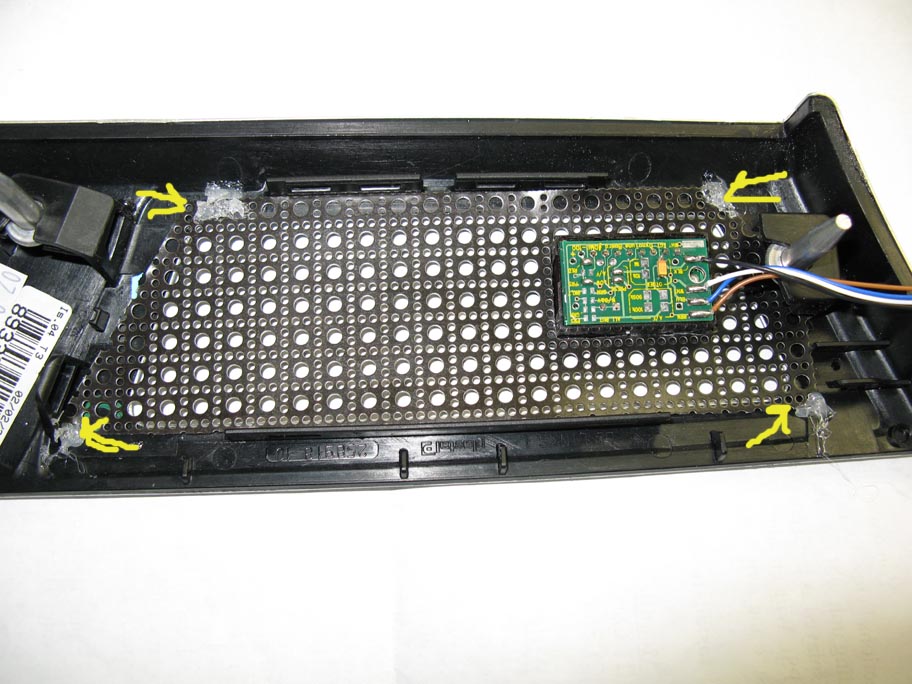 Now it came to taking the engine compartment apart. First thing you need to do is (1) remove the 6 8mm screws and take off the air filter. Then pull the wire strip (2) towards you. It will come undone easily. Next pull these three (3) tabs down which hold in place the plastic tubing. Lastly pop off the side pods (4). This will get you to 2 more 8mm screws on either side. Now just pull off that bottom piece towards you and put it with the rest of the crap you just took off.  Now figure out how you want to run your wires and tubing. Heres a pic of the engine bay with out all the stuff you just removed and how much more room you have to work with. 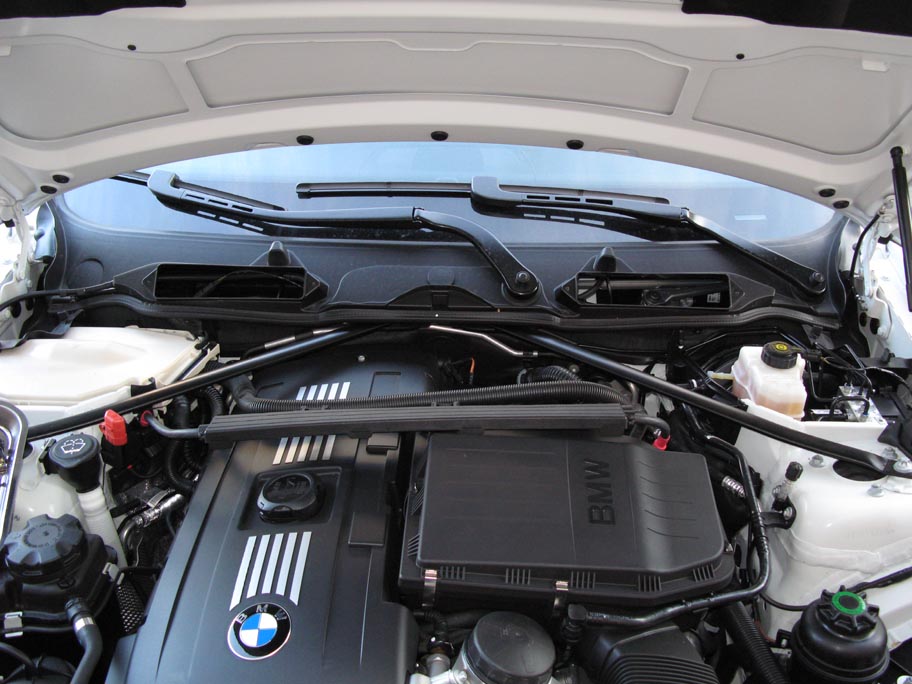 Next we want to tap into the vacuum lines for the gauge. I found the lines running between the factory diverter valves and just tugged gently. This brought the main vacuum line into sight. Intelligently, BMW used a T fitting in the middle. I just yanked the main line off this and attached it to my own T. Then I cut off some extra tubing I had and attached that to one side of the new T, and to the empty line of the factory T. 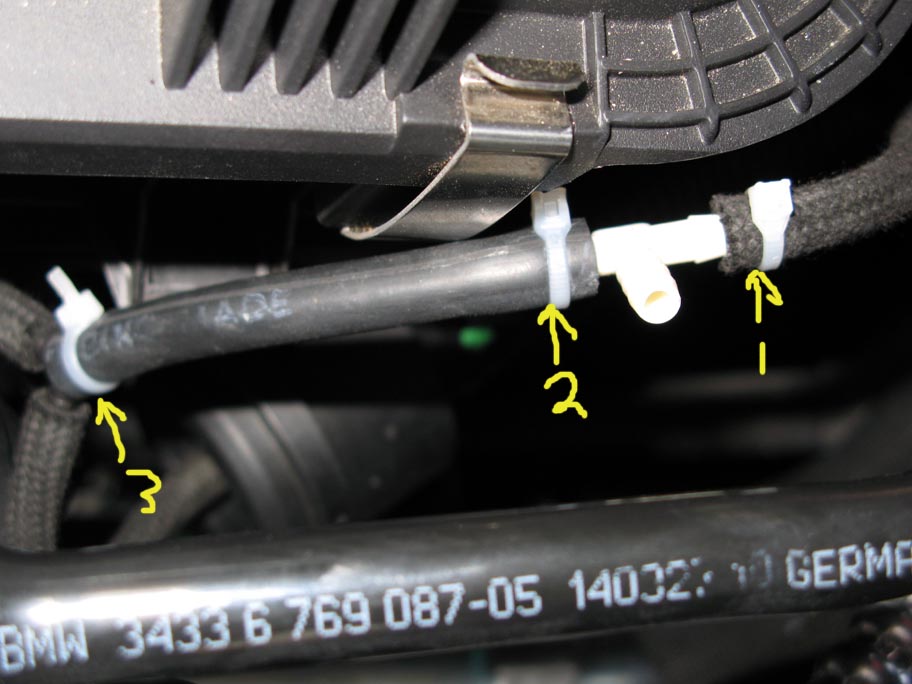 Now you can see how I ran that boost vacuum line back and around the engine bay along the firewall. I put in a T where I used a ziptie to attach the hose to an existing pipe. Make sure not to pull the ziptie too tight or youll inhibit the flow to your boost gauge. 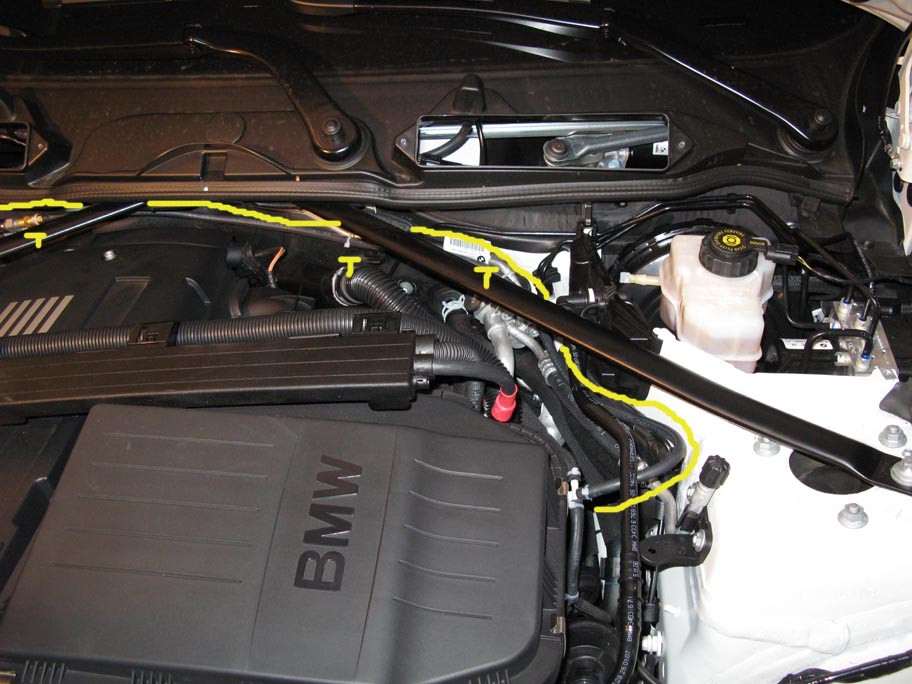 I routed the main part where the tubing connects to the digital sending connector behind the ECU compartment. I kept this under the pod so as to keep any water away. I electrical taped the connectors just in case. 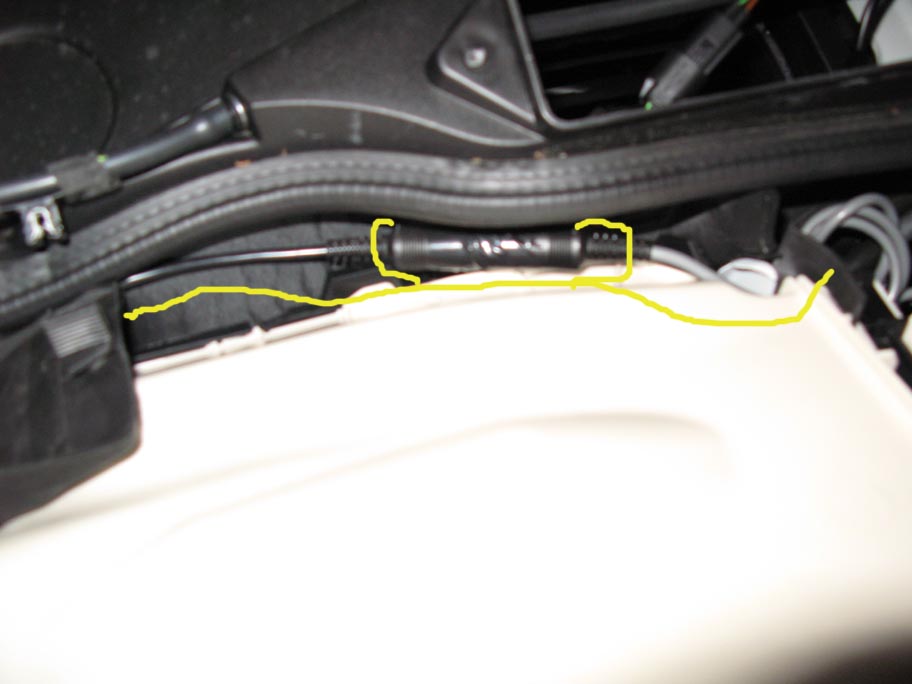 Then I ran the electrical wires over and through the side door. I honestly couldnt find a place to run it through the firewall and this made it easier for removal in the future anyway. 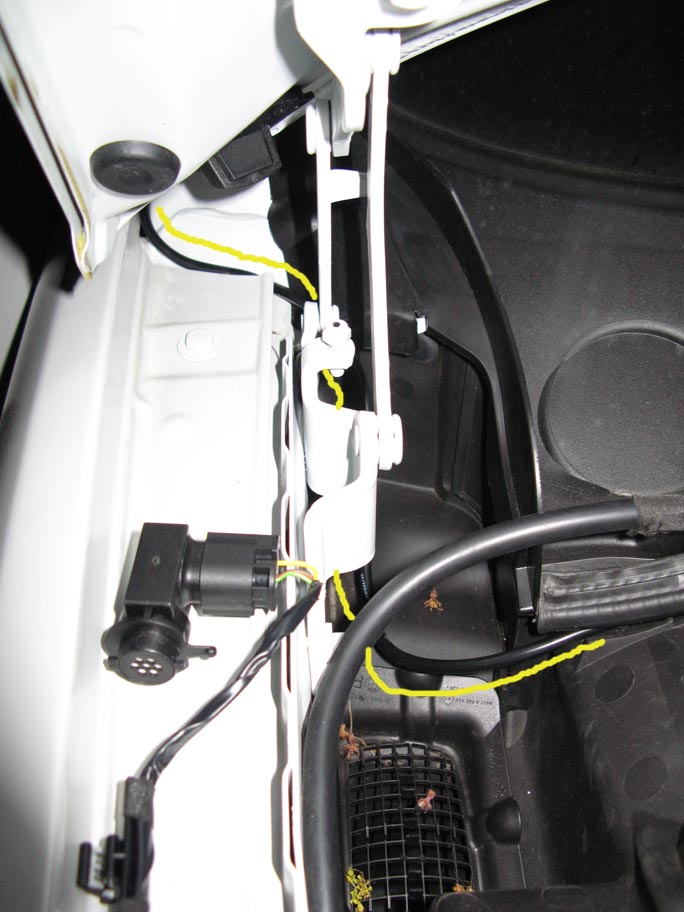 Here are the wires that I needed to connect together from the digital connector in the engine bay, and the actual boost gauge. I soldered all the wires together as I recommend nothing less. Electrical tape just wont cut it for long term safety. The blue wires went to ground and I attached it to the same hex screw in the fuse box area that I have my ground from my V1 attached. The brown wires went to power and I attached that to the same fuse tape I also had the V1 on. The white and black wires were nothing so those were soldered and electrical taped out of the way. What I dont have a pic of is running the wire from the boost gauge under the steering column, under the center console by ashtray, and around up into the fuse box. Im sure you can figure that one out. 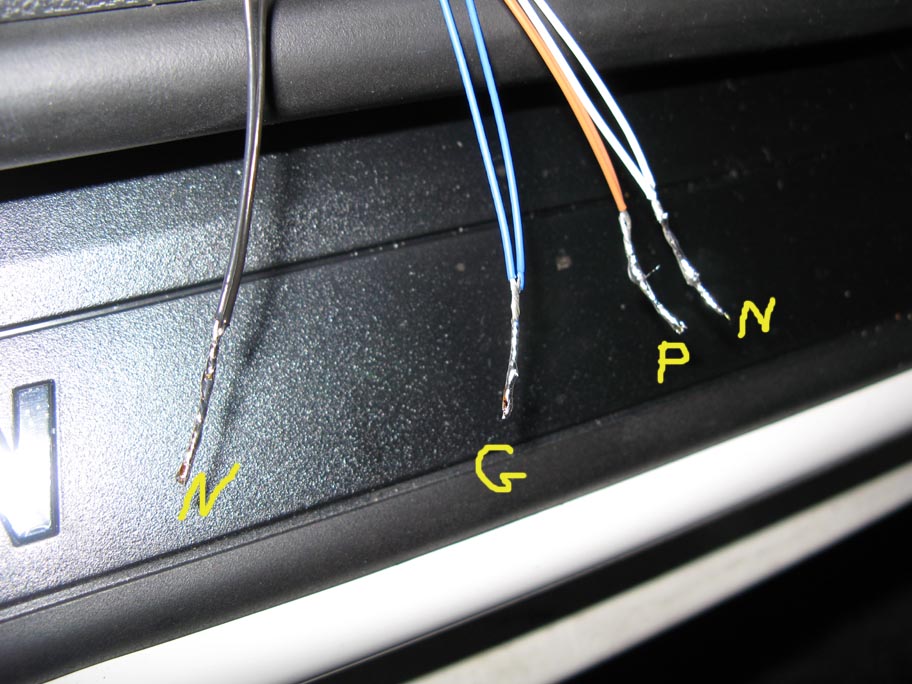 Now its time to put the vent back in and see how it looks. 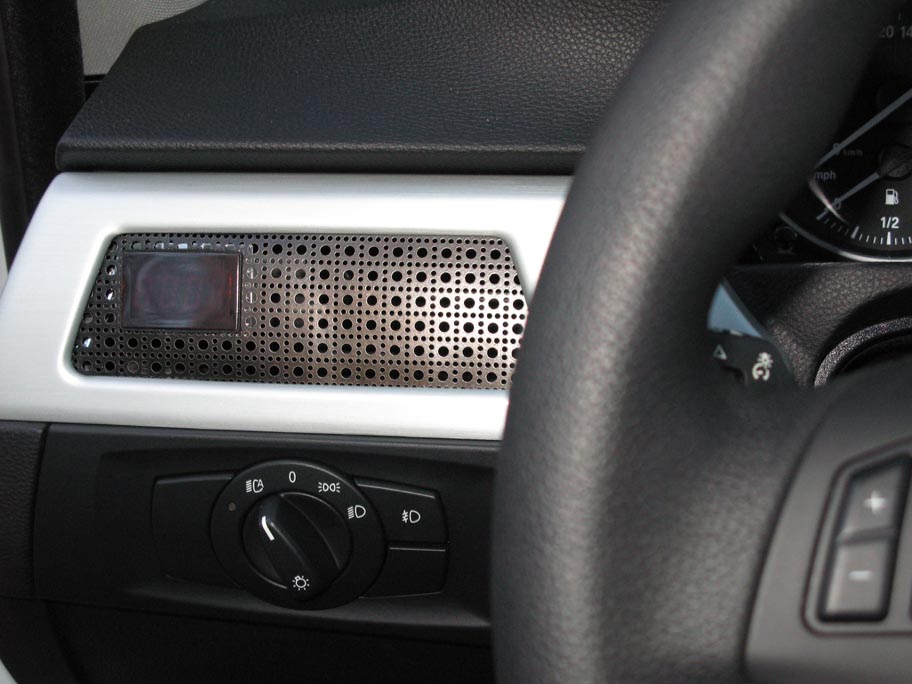 Lets start the car and pray... 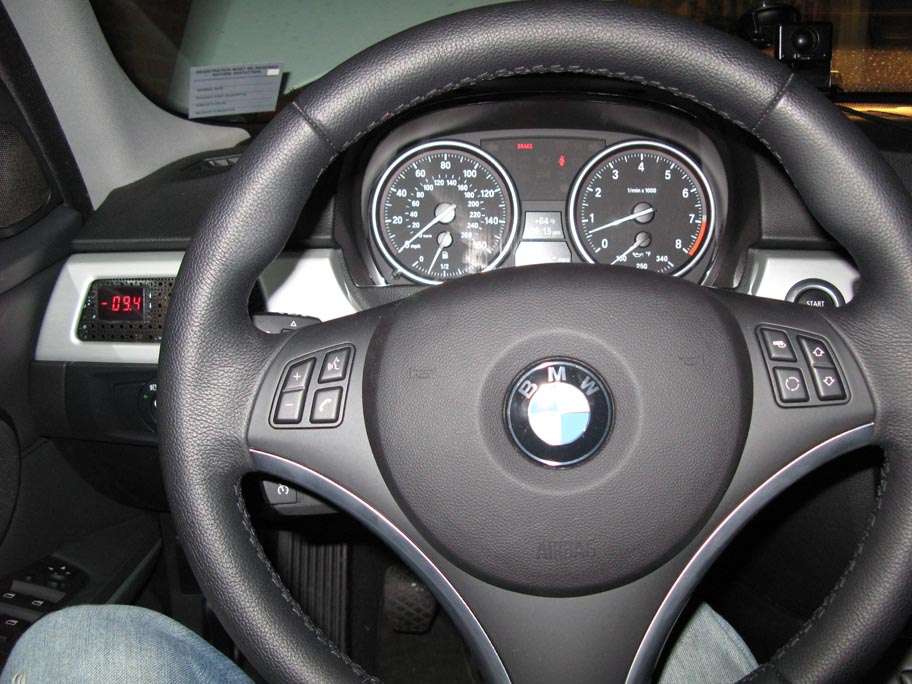 Heres a picture of what I see when its dark. 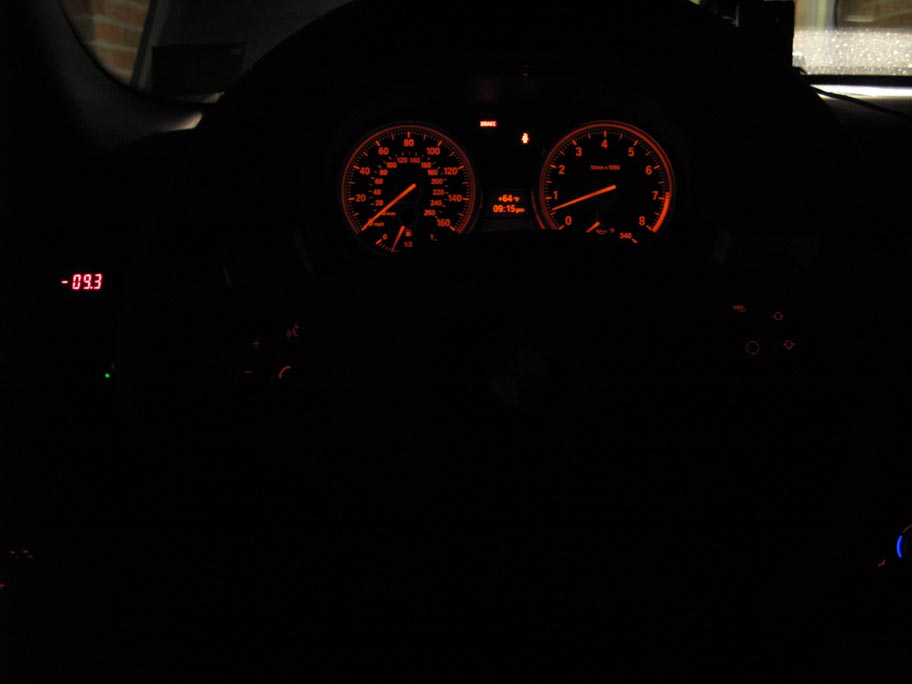 All in all Im pretty happy with the outcome. Ive seen a low of -11.4 of vacuum and a high of 12.9 of boost. I have the PROcede installed so that might have something to do with it. Any comments or questions are welcomed.
__________________
13 HD FatBob
17 A4 Glacier/Black 1st Edition/Pre+/Sport/EurocodeTMD/Racechip 16 S6 (gone),14 S6 (gone),14 S6 (gone),13 S6 (gone),10 S4 (gone) 07 335i(gone) Last edited by HyperM3; 05-04-2007 at 01:08 PM.. |
| 05-03-2007, 07:05 PM | #3 | |
|
Too many Alex's, from now on, call me Beaufort
342
Rep 6,188
Posts |
Quote:
__________________
13 HD FatBob
17 A4 Glacier/Black 1st Edition/Pre+/Sport/EurocodeTMD/Racechip 16 S6 (gone),14 S6 (gone),14 S6 (gone),13 S6 (gone),10 S4 (gone) 07 335i(gone) |
|
|
Appreciate
0
|
| 05-03-2007, 07:07 PM | #4 |
|
Banned
95
Rep 1,760
Posts |
<_< so is it readable or not
and i didnt really get your explanation of the wiring... you had to bring wires from the piece in the bay to wires from the gauge, and then ground and power them? and the other two are the send/recieve wires? |
|
Appreciate
0
|
| 05-03-2007, 07:11 PM | #5 | |
|
Too many Alex's, from now on, call me Beaufort
342
Rep 6,188
Posts |
Quote:
There were two sets of wires, both same colors I had to run one set through the inside of the car from the gauge itself. The second set came from the electrical connector on the vacuum line in the engine bay.
__________________
13 HD FatBob
17 A4 Glacier/Black 1st Edition/Pre+/Sport/EurocodeTMD/Racechip 16 S6 (gone),14 S6 (gone),14 S6 (gone),13 S6 (gone),10 S4 (gone) 07 335i(gone) |
|
|
Appreciate
0
|
| 05-03-2007, 07:14 PM | #6 | |
|
Banned
95
Rep 1,760
Posts |
Quote:
also the readability, i sorta meant do the numbers flash by really fast, or does it have a slower sample rate so a number sticks around for like half a second than reads the next |
|
|
Appreciate
0
|
| 05-03-2007, 07:16 PM | #7 |
|
Brigadier General
 
210
Rep 3,358
Posts |
Great job, you might want to consider changing that grill... reminds me of my grandmothers heater grill
 this place has some diffrent type's and you can order just a small peice: http://www.customcargrills.com/index.asp
__________________
 |
|
Appreciate
0
|
| 05-03-2007, 07:16 PM | #8 |
|
Major General
254
Rep 8,338
Posts |
yeah nice job, dunno about the lok of the mesh tho
__________________
|
|
Appreciate
0
|
| 05-03-2007, 07:17 PM | #9 | |
|
Too many Alex's, from now on, call me Beaufort
342
Rep 6,188
Posts |
Quote:
The numbers do flash by fast. I would have liked slower but then its not real-time accurate.
__________________
13 HD FatBob
17 A4 Glacier/Black 1st Edition/Pre+/Sport/EurocodeTMD/Racechip 16 S6 (gone),14 S6 (gone),14 S6 (gone),13 S6 (gone),10 S4 (gone) 07 335i(gone) |
|
|
Appreciate
0
|
| 05-03-2007, 07:21 PM | #10 | |
|
Too many Alex's, from now on, call me Beaufort
342
Rep 6,188
Posts |
Quote:
Hey, this was just the first trip navigating and found that the world ISNT flat. I know the mesh isnt to everyones liking and Im not the biggest fan either. Its just what I had available at the time. If I come across something down the road Ill take another stab at this.
__________________
13 HD FatBob
17 A4 Glacier/Black 1st Edition/Pre+/Sport/EurocodeTMD/Racechip 16 S6 (gone),14 S6 (gone),14 S6 (gone),13 S6 (gone),10 S4 (gone) 07 335i(gone) |
|
|
Appreciate
0
|
| 05-03-2007, 07:23 PM | #11 | |
|
Brigadier General
210
Rep 3,358
Posts |
Quote:

__________________
|
|
|
Appreciate
0
|
| 05-03-2007, 07:52 PM | #12 |
|
Whats that smell?
145
Rep 1,790
Posts |
Im confused. So where does the air go when you turn it on? Does it swirl around behind the dash board? I dont see any connection between the vent cover and the actual tubing back into the dashboard.
Also, if you turn on the heat, is it going to jack up the read-out? Sorry, you may have already answered this, I didnt read through the entire post. |
|
Appreciate
0
|
| 05-03-2007, 07:53 PM | #13 |
|
Moderator
132
Rep 6,775
Posts
Drives: TiAg E92 335
Join Date: Oct 2006
Location: Raleigh, NC
|
Very nice write-up! Thanks for taking the time to post it all up.
So do you think that you would be able to install a small round boost gauge or is there not enough space there? Also, do you see the wires in your door jam now? Just curious because I think I will be doing something similar, but with a non-digital gauge if it can fit. 
__________________
-Michael.
Berlina Black S2000 CR is now in the garage   l 19" Rial Daytona Race l KW V2 l Eisenhaus Race Exhaust l |
|
Appreciate
0
|
| 05-03-2007, 07:57 PM | #14 |
|
Colonel

292
Rep 2,414
Posts
Drives: E92 335i
Join Date: Dec 2006
Location: Alhambra, CA
|
|
|
Appreciate
0
|
| 05-03-2007, 08:05 PM | #15 | |
|
Moderator
132
Rep 6,775
Posts
Drives: TiAg E92 335
Join Date: Oct 2006
Location: Raleigh, NC
|
Quote:
__________________
-Michael.
Berlina Black S2000 CR is now in the garage l 19" Rial Daytona Race l KW V2 l Eisenhaus Race Exhaust l |
|
|
Appreciate
0
|
| 05-03-2007, 08:14 PM | #16 |
|
Too many Alex's, from now on, call me Beaufort
342
Rep 6,188
Posts |
You can see here that theres still a vent behind the dash directing the flow towards the mesh. I could still feel it coming through when I had the heater on tonight.
Theres no affect of the heat or cold on the gauge. As for where the wires are running, they are going straight down and to the left under the dash. Not in the way of any airflow.
__________________
13 HD FatBob
17 A4 Glacier/Black 1st Edition/Pre+/Sport/EurocodeTMD/Racechip 16 S6 (gone),14 S6 (gone),14 S6 (gone),13 S6 (gone),10 S4 (gone) 07 335i(gone) |
|
Appreciate
0
|
| 05-03-2007, 09:03 PM | #17 |
|
Administrator
40757
Rep 21,239
Posts |
__________________
Check on the Latest BMW News
Become a fan of Bimmerpost Facebook Follow us on Bimmerpost Twitter Subscribe to Bimmerpost Youtube Channel |
|
Appreciate
0
|
| 05-21-2007, 12:57 PM | #18 |
|
Colonel
76
Rep 2,104
Posts |
Nice
__________________
SaaS - The world of tomorrow is already here...www.saaschronicles.com |
|
Appreciate
0
|
| 05-22-2007, 07:00 PM | #19 |
|
Brigadier General

819
Rep 3,341
Posts
Drives: 2022 M3, 2022 X5 40i;
Join Date: May 2007
Location: Northeast
|
I'll take ghetto gauges for $400 Alex...
Great idea, but looks terrible. What you need to do is dremel out part of that brushed aluminum trim and put it in there. Otherwise find a new place because that's a pretty ugly setup for a stupid digital gauge. I would say it ruins the interior of the car the way it is |
|
Appreciate
0
|
| 05-22-2007, 07:37 PM | #20 | |
|
Too many Alex's, from now on, call me Beaufort
342
Rep 6,188
Posts |
Quote:
__________________
13 HD FatBob
17 A4 Glacier/Black 1st Edition/Pre+/Sport/EurocodeTMD/Racechip 16 S6 (gone),14 S6 (gone),14 S6 (gone),13 S6 (gone),10 S4 (gone) 07 335i(gone) |
|
|
Appreciate
0
|
| 05-22-2007, 08:04 PM | #21 | |
|
Banned
95
Rep 1,760
Posts |
Quote:
|
|
|
Appreciate
0
|
 |
| Bookmarks |
|
|


