E90Post


The Tire Rack
 
BMW 3-Series (E90 E92) Forum > E90 / E92 / E93 3-series Technical Forums > Wash, Wax, Detailing and Cosmetic protection/repairs > First steps in detailing! BSM 320d


Reply
 
Thread Tools Search this Thread
      05-21-2014, 10:07 AM   #1
Taruno
Private
4
Rep
69
Posts

Drives: BMW E90 320d 2007
Join Date: Feb 2014
Location: Bulgaria

iTrader: (0)

First steps in detailing! BSM 320d

Heya guys, a lil introduction:
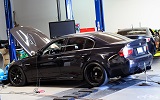
For my b-day a couple of weeks ago I bought myself a rotary buffer + a stanley toolset + some nice 3M polishing pads + 3M polishing pastes and Poorboys Natty's Paste Wax Blue

I got the car certified preowned at 50k miles(afetr my E60 got stolen), and it is amazing but the paint was apawling, marring, holograms, swirls and scratches.

BEFORE:
Name:  IMG_0692.jpg
Views: 577
Size:  734.7 KB

And now the DIYish part:
Materials used:


Polishing:

3M™ Perfect-it™ III Fast Cut Plus Compound (50417)
3M™ Perfect-it™ III Extra Fine Compound (80349)
3M™ Perfect-it™ Ultrafina™ SE (50383)

Wax / sealant:
Poorboys Natty's Paste Wax Blue

Car color: Black Sapphire Metallic
Top coat harness: Medium / hard

Rotary buffer:
Skil Masters 9955

Polishing pads:
3M green - abrasive
3M wavy orange- medium cut
3M wavy blue - extra fine

Clay - 3M™ Perfect-It™ III Cleaner Clay (38070)

The process:
1. Handwashing the car - letting it soak the car shampoo as long as possible (I polished just the front fenders + hood and bumper because of time constraints but next week it wiklll be doors and roof, and two weeks later trunk and rear fenders)

Let the car cool off - you really want a cool surface to work on especially witha rotary buffer

2. Get a spray bottle and mix in your clay lube - in my case i wanted to go as hard as possible at all the gunk that's in the top coat so went with kitchen soap with water at 2/8 ratio. I worked in small areas and took my sweet time but after the paintwork was a smooth as glass.

When you are done you will see alll the defects that were hidden by sealans waxes and oils and you will scream in horror
After claying:
Name:  IMG_0691.jpg
Views: 570
Size:  749.1 KB

3. Now I should say I had tons of additional holograms and marring after claying but I used the most aggressive clay by 3M and was prepared to see that(I am expected to polish it out, no :P )

4. Since this was my FIRST time polishing and I went the brave and stupid road of getting a rotary buffer(poartially due to the fact we don't get porter cable here in Bulgaria) I took my time watched many guides and spoke to 2 different detailing specialists that work with similar devices.

BE WARNED from here on starts the DO THIS AT YOUR OWN RISK part, especially with a rotoary buffer you can do insane damage to you car(not as easy as you might think but still you can do it) You can burn the paint, burn THROUGH the top coat add more marring and scratches and so on. [B]If you aren't a patient person and you think you can rush this part just pay a professional![/B

5. Polishing / compounding
To be on the safe side I started with the medium cut compount (80349) with the orange pad at speed 1(600rpm), after I got used to the technique and weight of the device I bumped up the speed to 3 (1600 rpm), hear me when I say you don't need anything faster! After this test my jaw dropped since the paint already looked 100000000 times better. Check it a 50/50 with just medium grade. Still a bit of marring and holograms but hardly any swirls
Name:  50h50.jpg
Views: 562
Size:  558.6 KB

I used the aggressive compound only for deep scratches and was extremely carful!

6. Glass finish
I switched up to the polishing paste (50383, it is very fluid and doesn't dry out fast, amazing fun to work with and the gloss , oh that gloss you just wanna lick that car
Name:  IMG_0698.jpg
Views: 542
Size:  699.0 KB

7. Wax
I kinda did something bad - I used a microfiber pad and the buffer to wax the car and added marring - so went back 1 step and repolished with the finnish paste. Waxed the car with the hands on method and voila:

Name:  IMG_0699.jpg
Views: 519
Size:  726.3 KB

This is just the first try, and only the front of the car, it took about 2 hours and I am pleased with the result. I can also safely say - rotary buffers aren't as scary as people make them out to be!
Appreciate 0
      05-21-2014, 10:39 AM   #2
grzes
Captain
Canada
33
Rep
655
Posts

Drives: 2009 bmw 335d LCI
Join Date: Feb 2014
Location: Alberta

iTrader: (2)

finish looks great you did a brave thing by doing all by yourself.
Great job!
Appreciate 0
      05-21-2014, 12:56 PM   #3
_Sinister_
Major
_Sinister_'s Avatar
United_States
72
Rep
1,181
Posts

Drives: Very Slow
Join Date: Jul 2013
Location: The High State

iTrader: (0)

looks great
__________________
_Sinister_
Appreciate 0
      05-26-2014, 12:04 AM   #4
Taruno
Private
4
Rep
69
Posts

Drives: BMW E90 320d 2007
Join Date: Feb 2014
Location: Bulgaria

iTrader: (0)

Thanks guys, gonna do the rest this week and post full car pics
Appreciate 0
      05-26-2014, 05:08 PM   #5
swagon
Major General
swagon's Avatar
No_Country
13518
Rep
8,163
Posts

Drives: F80 6MT
Join Date: Jun 2013
Location: .

iTrader: (0)

Definitely a brave man getting a rotary! I've probably burt thru my clear coat even with a DA...

Good luck, it's looking very good so far.
__________________
Appreciate 0
Reply

Bookmarks


Posting Rules
You may not post new threads
You may not post replies
You may not post attachments
You may not edit your posts

BB code is On
Smilies are On
[IMG] code is On
HTML code is Off


All times are GMT -5. The time now is 04:14 PM.


e90post
Powered by vBulletin® Version 3.8.11
Copyright ©2000 - 2024, vBulletin Solutions Inc.
1Addicts.com, BIMMERPOST.com, E90Post.com, F30Post.com, M3Post.com, ZPost.com, 5Post.com, 6Post.com, 7Post.com, XBimmers.com logo and trademark are properties of BIMMERPOST