|
|
|
|
 |
|
 |
BMW Garage | BMW Meets | Register | Today's Posts | Search |
 |

|
BMW 3-Series (E90 E92) Forum
>
3 Step Menzerna Correction - Pics and Details!
|
 |
| 05-30-2011, 11:17 PM | #1 |
|
Search or ban.


31
Rep 364
Posts |
3 Step Menzerna Correction - Pics and Details!
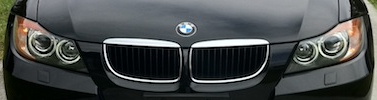
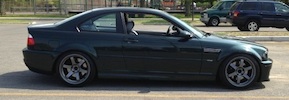
So I took some time out of the day today to start my 3 step correction process on my JB 3. I didn't feel like taking all day, so I decided to finish up the rear end as it needed the most work. My process consisted of the following:
- SIP - SurBuf Pad - 1 to 2 passes, depending on area - PO203 - Orange Pad - 1 pass - PO85RD - Black Pad - 1 pass - Sealed with BFWD / Will be waxing with CG XXX on top later on - Buffer used was a PC w/ 5.5in pads / I used XMT Pad Conditioner prior to polish application. - Car wash used was CG Citrus Wash and Gloss (2 bucket method w/ grit guards) - Used P21S TAW mixture to strip sealant/wax  Prior to starting the correction process, I had to remove the existing layer of sealant and wax on the paint. I did this by a) using a mixture of P21S TAW and water in my foam gun and then, b) proceeding with a highly concentrated mixture of CG Citrus Wash/Gloss, again in the foam gun. After letting the P21S dwell, then rinsing, and following up with the CG Citrus, letting dwell again, I hand washed using 2 bucket method (w/ grit guards of course). No point in adding more swirls and scratches to a finish that is already riddled with them! After the strip/wash, I dab dried with a MF waffle weave towel. BTW, If you're curious on how I washed my wheels, I decided to just use CG Citrus/Gloss, as I've maintained them well enough to where I don't need to use wheel cleaners. Now that the washing is out of the way, onto the correction process...  Here is what kind of finish I'm working with...not pretty...not at all...  The SIP with the SurBuf pad was much needed as I had some deeper scratches in the trunk that were being very stubborn. I initially tried SIP with an orange pad, to no avail. The SIP/SurBuf combo removed about 90-95% of the scratches. I don't have a paint meter, so I didn't want to try more than 2 passes even though I'm pretty sure I would have been ok. Better safe than sorry. Of course, along with taking out the deeper scratches, the SIP/Surbuf left marring that needed to be further corrected.  The PO203 with the Orange pad did well in removing most of the marring that was created by the first correction step. However, even though the major imperfections were gone, the paint still lacked the crystal clear clarity that I was going for. On to jeweling...  By the 3rd and final correction stage, I was starting to have a lot of dust buildup from the SIP and PO203 (along with small synthetic hairs from the SurBuf pads. They were brand new. I vacuumed them prior to using, but they still shed like no other.) The dust was quite annoying, as I had to wipe down the surface that I was working on every few minutes. I also didn't bother to tape up my rear window, so I had dust and polish all over it too. Needless to say, I used a generous amount of alcohol on this project (no, not the drinking kind!). The PO85RD with the black pad worked well in getting the finish to the desired clarity. No more swirls!  After the correction, I proceeded with a generous coat of BFWD over the whole rear end to seal the deal. While I was doing this, I decided to seal my headlights and wheels as well. I really like BFWD, as its easy on easy off. No matter how thick of a coat you put on, it always comes off smoothly. No mess.  Here are two pics of the final product.   Let me know if you guys have any questions regarding the 3 step Menzerna process, and by all means if you have any input, I'm always open to constructive criticism 
__________________
 |
| 06-08-2011, 10:33 PM | #6 |
|
Search or ban.
31
Rep 364
Posts |
Thanks guys. It's definitely rewarding to see the results after countless hours of detailing. I've learned a lot of new things from you guys, and I continue to learn something new every day here in the detailing forum.
A 3 step is definitely a pain in the ass, but think of it this way. You only have to do it once a year, if even that. This is taking into account that you've maintained in between with a sealant of your choice (wax, polymer sealant, etc).
__________________
|
|
Appreciate
0
|
| 06-08-2011, 10:57 PM | #7 |
|
Captain
 68
Rep 942
Posts |
Construcitive crit: So you did all this wonderful work .. just to take 2 after pictures !!! 2 !! R you serious !!
J/k lol .. no better feeling then putting in all that work and just sitting back and oogling , gj sir
__________________
 |
|
Appreciate
0
|
| 06-09-2011, 12:13 AM | #8 | |
|
Search or ban.
31
Rep 364
Posts |
Quote:
 I promise I'll have some good pics when I get my camera back in a few days. It still looks the same currently, just needs a wash!....and maybe another coat of BFWD.....and while im at it a coat of CG XXX.....lol. Don't judge me...addiction is a disease I promise I'll have some good pics when I get my camera back in a few days. It still looks the same currently, just needs a wash!....and maybe another coat of BFWD.....and while im at it a coat of CG XXX.....lol. Don't judge me...addiction is a disease 
__________________
|
|
|
Appreciate
0
|
| 06-09-2011, 02:58 PM | #10 | |
|
Search or ban.
31
Rep 364
Posts |
Quote:
__________________
|
|
|
Appreciate
0
|
| 06-27-2011, 10:53 AM | #11 |
|
Private First Class
 22
Rep 197
Posts |
I really like the work you did. I have some pretty bad swirls on my hood from a previous owner, so I too am going to have to start with an intense polish to get them out. I have a couple questions to help me undertstand this process as I'm quite new to it.
1. I've read over the literature for these polishes and it's really vague about how to use them. The adds for the Micro Finish polish say it can take out marring and 3000grit sandpaper marks. In your opinion could you skip the 2nd polish and just go straight from the SIP to the Micro Finish? 2. How did you decide what company to purchase polishes from and then where to start? ie how did you know you should start at SIP and not further down the line? 3. What is a SurBuf pad? I've never heard of it before. |
|
Appreciate
0
|
| 06-27-2011, 12:22 PM | #12 |
|
Lieutenant Colonel
 85
Rep 1,523
Posts |
Looks great with the Menzerna products! Were you able to get most of the swirls out? I'm looking to try something new to rid the swirls on my imola red.
__________________
 2002 Laguna Seca Blue E46 M3 6MT 2017 White C63 AMG Coupe 2002 Oxford Green E46 M3 6MT - Sold |
|
Appreciate
0
|
| 06-27-2011, 03:03 PM | #13 | |
|
Banned
27
Rep 872
Posts |
Quote:
 |
|
|
Appreciate
0
|
| 07-23-2011, 02:52 AM | #15 |
|
Private First Class
22
Rep 197
Posts |
I just did something similar on the hood of my M3. I had some deep scratches so I knew it would take some cut to get them out. Started with the Menzerna SIP on an orange lake country pad and that shined the paint but still left alot of scratches. Stepped up to SIP on Surbuf and that got rid of alot more, but still left a few of the RDS. I finally pulled out my bottle of Menzerna Power Gloss and used that on the Surbuf. That took out all the scratches but left some fine swirling of it's own. I then stepped down to SIP on the Orange Pad and that left a fairly nice shine with no swirling. I had some Chemical Guys P40 on hand so I finished with that on a White pad. It left a very nice gloss and no defects. I protected my work with a layer of Menzerna Power Lock.
It took me longer than it needed to as I was learning as I went. I now will tackle the whole car. The rest of the car is much better so a 2-step with SIP on orange folllowed by the P40 on white should do the trick. Now to find the time |
|
Appreciate
0
|
| 07-24-2011, 04:26 PM | #17 | |
|
Second Lieutenant
50
Rep 254
Posts |
Quote:
|
|
|
Appreciate
0
|
 |
| Bookmarks |
|
|