

|
|
|
|
 |

|
 |
BMW Garage | BMW Meets | Register | Today's Posts | Search |
 |

|
BMW 3-Series (E90 E92) Forum
>
Upgrading Rear Subframe Bushings --> M3
|
 |
| 02-02-2012, 05:44 PM | #1 |
|
Major
 38
Rep 1,079
Posts |
Upgrading Rear Subframe Bushings --> M3
Who here has changed out their rear subframe bushings themselves? Did you make your own tool or rent one? The tool itself looks incredibly simple to make but I'm trying to determine which dimensions of it are critical. I already have the M3 bushings but I can't measure the stock ones (If there are any dimensions that matter). Any input in greatly appreciated.
Thanks, Alex |
| 02-02-2012, 06:43 PM | #2 |
|
Major

88
Rep 1,404
Posts |
Yeah it's a simple tool, but I think renting the tool for $58 and change from HPA is far better than making one your own. Not saying it impossible to construct, but between tracking down info to build one, materials, and your "constructing the tool" time. You could have just rented the tool, and then your bushing installation-to-completion time would conclude earlier.
Unless you're the type of person who enjoys making their own tools, then disregard suggestion. hahaha Just my lonely .02 cents on the matter
__________________
Name: Blanca | 07 E92 | AW-Blk | ZSP | Alcon BBK | M3 Bits | VM RR Links | Koni | UUC Sways | V5 | Dinan CAI | ETS IC | Fge DV | ER CP | Cyba | Raden. Exh | Mod Step | Trunk Drawer | Perf LED Wheel | Illum Dr Sills | IS Shifter | Parrot | Philps D1S | 6000k fog | MTECH RR | CSL Trunk | Aero | Roof Spoiler | PSS on BBS RS-GT 19s
 |
|
Appreciate
0
|
| 02-02-2012, 06:54 PM | #3 | |
|
Major
38
Rep 1,079
Posts |
Quote:
|
|
|
Appreciate
0
|
| 02-02-2012, 09:44 PM | #4 |
|
Major
88
Rep 1,404
Posts |
Cool that, if you got the tools to make your own tools, then great. Go-Man -Go
__________________
Name: Blanca | 07 E92 | AW-Blk | ZSP | Alcon BBK | M3 Bits | VM RR Links | Koni | UUC Sways | V5 | Dinan CAI | ETS IC | Fge DV | ER CP | Cyba | Raden. Exh | Mod Step | Trunk Drawer | Perf LED Wheel | Illum Dr Sills | IS Shifter | Parrot | Philps D1S | 6000k fog | MTECH RR | CSL Trunk | Aero | Roof Spoiler | PSS on BBS RS-GT 19s
|
|
Appreciate
0
|
| 02-03-2012, 08:08 AM | #5 |
|
Lieutenant Colonel
 486
Rep 1,614
Posts |
Alex, if you can get this figured out, you might have a future revenue stream if you can make the tool for a good price. Just a thought...
P.S. I admire your ability to make this thing! |
|
Appreciate
0
|
| 02-04-2012, 08:19 AM | #6 | |
|
Major
146
Rep 1,160
Posts |
Quote:
Harold was gracious to allow more than 2 weeks for my rental. May have had something to do with my $2400 parts purchase, including bushings. To be honest, I don't see why everyone says the job's difficult. Just drop the subframe 4" and go to it....pneumatic wrench makes it go much faster. Don't forget to lubricate the threaded rod! I used an old, forgotten bottle of 20/50 motor oil. Lube ingoing bushings too - they go in easy that way - silicone, please.  Last edited by CALWATERBOY; 02-04-2012 at 08:25 AM.. |
|
|
Appreciate
0
|
| 02-07-2012, 03:42 PM | #7 |
|
Banned
114
Rep 2,428
Posts |
I made my own tool out of steel tubing, the beefiest Grade 10 Rod/nuts, oiled everything, and the bushing was still so tight that it broke the 5 rods getting the first bushing out. I said screw it and took the whole subframe out and pressed them out and in.
The tool HPA has must be crazy strong; I"m curious to know how is stronger than the one I made. |
|
Appreciate
0
|
| 02-13-2012, 07:20 PM | #8 | ||
|
Major
38
Rep 1,079
Posts |
Quote:
Quote:
To either of you: I understand how to make the tool remove the bushing, but how does it press it in? Also, how much space is there on the other side of the bushing, 4in? (between subframe and bottom of car) At this point, it sounds like HPA might not have the tool available in March when I need it, so I am definitely going to make my own now, so any help with the specs would be greatly appreciated. I'm trying to understand the exact function of each part of the tool. (It should be straight forward, really). From my understanding, only parts 2 and 3 are required for the rear subframe bushings, plus the corresponding washers and rod? 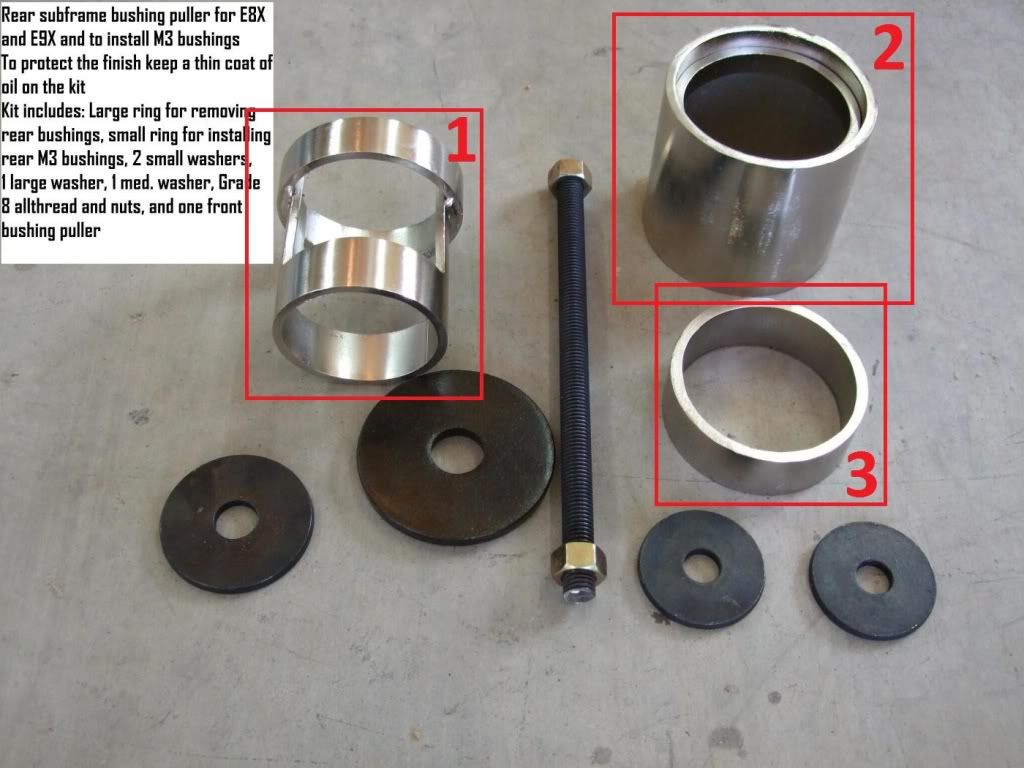 Last edited by akotten; 02-13-2012 at 07:28 PM.. |
||
|
Appreciate
0
|
| 02-13-2012, 09:09 PM | #9 |
|
Poor Kid with Dreams
28
Rep 702
Posts |
Here's pictures of the tools used:
http://www.1addicts.com/forums/showt...+bushings+tool Correct me if I'm wrong, but isn't tool number 1 in your pictures the front bushing puller?
__________________
 '07 BSM 335xi JB4, DCI, CX Racing I/C, ER Chargepipe, Meth, KW V3 - Pending Sale '95 Mustang GTS 347ci Ported TFS TW Heads,Custom Cam,Victor 5.0 IM,Tubular Front Suspension,Full Exhaust,Big and Littles |
|
Appreciate
0
|
| 02-13-2012, 09:12 PM | #10 | |
|
Major
38
Rep 1,079
Posts |
Quote:
|
|
|
Appreciate
0
|
| 02-13-2012, 09:33 PM | #11 |
|
Major
38
Rep 1,079
Posts |
I guess I'll just make that cylinder and weld in a ring? I'm not sure on the dimensions though (I have the bearings to measure from)....and what size is that large washer?
|
|
Appreciate
0
|
| 02-13-2012, 09:54 PM | #12 |
|
Major
38
Rep 1,079
Posts |
Found this helpful video. I should be able to find what I need locally now that I fully understand it. I might make 3 or 4 of these to try and help out the community.
|
|
Appreciate
0
|
| 02-13-2012, 10:19 PM | #13 | |
|
Major
146
Rep 1,160
Posts |
Quote:
Hey, lube the threaded rod, of course. BUT! Also butter up the ingoing bushing with silicone grease! That eases install big time. Shucks, I managed to sieze a nut on HP Autowerks' threaded rod....scored a thinner threaded rod + nuts @ Home Depot....lubed threads....buttered bushings went right in! Whew! Dropping subframe ~4" a must to install the forward bushings - though all come out from the bottom, forward M bushings go in from the top. The whole job was no sweat, other than the stressed Home Depot run & learning curve. Replaced the 'sport' sways w/M sways too. Heard the rear's a real bitch. Have no idea why anyone would say that - same dropped subframe provided scads of room and the hard part, snapping the 2 part bushings together, was easily done with quick fab of a jig. TIP: Use that silicone grease on the bushings & bushing housing too. Much easier to position on subframe. Hey, be good to yourself - do it the easy way! Did whole suspension w/Ground Control shocks/springs and M strut brace in my garage, a very good experience. I say: Know your ride. Doing these installs a great way to do that. . Last edited by CALWATERBOY; 02-13-2012 at 10:58 PM.. |
|
|
Appreciate
0
|
| 02-14-2012, 08:00 AM | #14 | |
|
Major
146
Rep 1,160
Posts |
Quote:
"Remove Subframe Bushings, special tool suggested which can be rented from HP Autowerks. I did not use special tool because it was not available, so I got a piece of 3.5" & 5" emt conduit and made a pc 1" and 5" tall of each. The talller pc was used to pull the bushings out and the shorter pcs were used to install. I also used a 5/8" threaded rod from a spring compressor and some large washers (2 that have smaller diameter than bushings to remove and 2 that have larger diameter than the bushings to press in) and used this with a impact to remove and press in the new bushings." |
|
|
Appreciate
0
|
| 02-14-2012, 02:58 PM | #15 |
|
Major
38
Rep 1,079
Posts |
I bought everything I need today, except the threaded rod. No one carries grade 8, and I'm not sure I'll have it by this weekend if I order from McMaster-Carr. Maybe I'll just rent a spring compressor tool from Oreilly's, since I need one anyways for the TC Kline, and use those for the threaded rod?
Edit: Just grabbed a B7 grade 6ft rod from Fastenal. I was skeptical, but it ate through a couple 18t hack saw blades just to cut it once haha. Last edited by akotten; 02-14-2012 at 04:42 PM.. |
|
Appreciate
0
|
| 02-14-2012, 06:53 PM | #16 | |
|
Major
146
Rep 1,160
Posts |
Quote:
Goes on threaded rod, of course. Life can be so pleasant with a few simple preparations! Last edited by CALWATERBOY; 02-14-2012 at 07:08 PM.. |
|
|
Appreciate
0
|
| 02-14-2012, 06:57 PM | #17 | |
|
Major
38
Rep 1,079
Posts |
Quote:
|
|
|
Appreciate
0
|
| 02-14-2012, 07:11 PM | #18 | |
|
Major
146
Rep 1,160
Posts |
Quote:
Included in HP Autowerks' bushing R&R kit - works very well. |
|
|
Appreciate
0
|
| 02-14-2012, 07:12 PM | #19 | |
|
Major
38
Rep 1,079
Posts |
Quote:
I get everything at Fastenal for cost since I'm a student at the local engineering college. I'll have to grab a few of these tomorrow: http://www.fastenal.com/web/products...4126495&ucst=t On another note. If there's interest, I may piece together a full kit to do the rear subframe bushings and attempt to offer it for less than what HPA charges to rent...or just let people borrow them if they pay for shipping. Eventually there should be enough in circulation that they can be borrowed.  Last edited by akotten; 02-14-2012 at 07:18 PM.. |
|
|
Appreciate
0
|
| 02-14-2012, 07:25 PM | #20 | |
|
Major
146
Rep 1,160
Posts |
Quote:
Plan to post my DIY sometime in the next few weeks; might have a few tips 'n' tricks not yet posted. One thing I know: Not much forum info on E93 - hope to help there. |
|
|
Appreciate
0
|
| 02-14-2012, 07:39 PM | #21 | |
|
Major
38
Rep 1,079
Posts |
Quote:
|
|
|
Appreciate
0
|
| 02-14-2012, 07:53 PM | #22 | |
|
Supreme Allied Commander

3837
Rep 54,348
Posts
Drives: F80 M3
Join Date: Mar 2007
Location: Santa Barbara, AP, Brembo, GIAC, Koni, Ohlins, Performance Friction, www.hpautosport.com
|
Quote:
|
|
|
Appreciate
0
|
 |
| Bookmarks |
|
|


