

|
|
 |
 |
 |

|
 |
BMW Garage | BMW Meets | Register | Today's Posts | Search |
 |

|
BMW 3-Series (E90 E92) Forum
>
HELP Rare N52 vacuum pump failure
|
 |
| 12-26-2014, 12:02 PM | #1 |
|
Captain
    40
Rep 679
Posts |
HELP Rare N52 vacuum pump failure
I need help, guys!
My brake booster vacuum pump attached to the motor under the alternator/oil filter housing/intake was leaking and throwing oil through the vaccum line port (not a good thing) onto the engine and alternator, and belts, ect...(also not good) so I have decided to replace the coolant hoses, vacuum lines, intake gaskets, fuel tank purge valve (car having trouble starting after fill ups) and the vacuum pump. (140,000 miles, by the way...the car has started hemorrhaging fluids so I decided to take control....) How on earth can I get that darned plastic/rubber cover seal off the front of the motor???? does it turn out, pull out?...Im stumped...wondering If I should get a new one anyway...Im sure its a dealer item only.....It does not appear to be leaking, and, once out, it looks like another complicated proceedure to take the pump off the gear that is cam chain driven. (so you dont loose the gear and bolts down into the front casting of the engine!) In over my head?...almost! Im either brave or really stupid, or a combination of both! Any ideas from the pros out there? thanks in advance JP |
| 12-26-2014, 12:22 PM | #2 |
|
EXPAT

65
Rep 889
Posts |
Are you talking about the air intake cover piece?
If yes, : I'd reach out to Efthreeoh. He's got like 250K miles on his N52 and does a lot of his own work. Last edited by roundle; 12-26-2014 at 12:33 PM.. |
|
Appreciate
0
|
| 12-26-2014, 02:16 PM | #4 |
|
Second Lieutenant
 
8
Rep 263
Posts
Drives: E46, E91, F21
Join Date: Apr 2014
Location: Northwest
|
If you are talking about the vacuum pump sprocket cover, which is also a radial seal, located at the front of the engine. You will need special tools to remove and reinstall it. (Oh and yes to answer your question, the seal will have to be replaced.) The tool basically screws into the seal and then the seal is pulled out with a secondary puller tool. The same special tools are used for re-installing the seal. Removing the pump itself is kind of a pain in the ass. But can be done. You'll need a few BMW special tools to make the job much easier.
Good luck with the job! Let us know how it goes! |
|
Appreciate
0
|
| 12-26-2014, 07:12 PM | #5 | |
|
Captain
    40
Rep 679
Posts |
Quote:
I can make a tool to hold the gear in place once I get that persnickety seal out of the way....Its getting the whole deal back in that worries me... does it "screw" in or is it simply pressed (hopefully straight) in place. The engine diagrams do not show any type of threads.....but they may be a bit simplified. heres a few pics: close up: 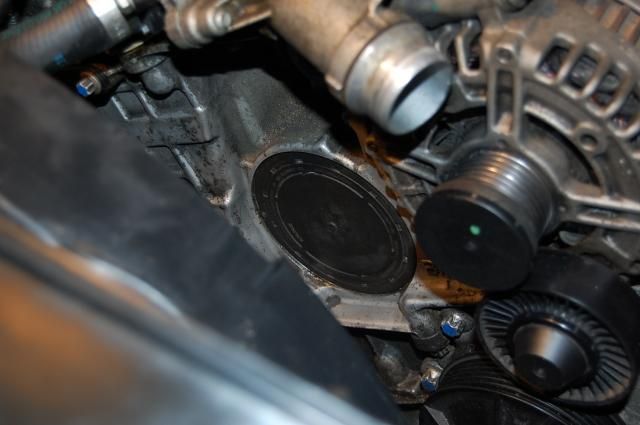 farther out:  back side (pump side) 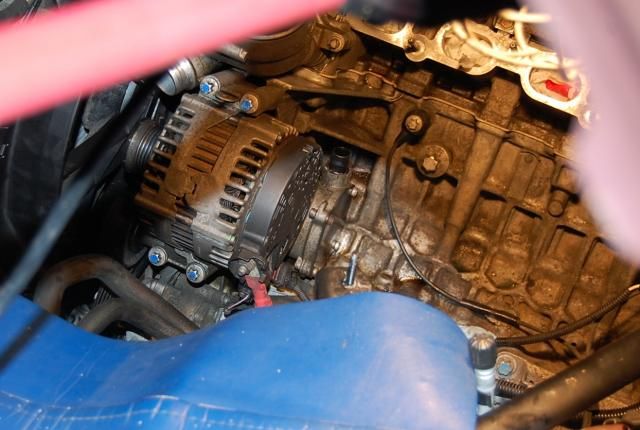 thanks very much, you guys! Ill check back in when I have more to share...going to get the pump Monday, and will stop in at the dealer parts dept at the same time. JP |
|
|
Appreciate
0
|
| 12-26-2014, 09:08 PM | #6 |
|
Second Lieutenant
 
8
Rep 263
Posts
Drives: E46, E91, F21
Join Date: Apr 2014
Location: Northwest
|
Essentially the screws bite into the old seal and pulls the seal. To install the seal, its just a reversal of removal, but without those screws. It essentially drives the seal in flat. Looks like you are committed and have everything under control so far.
|
|
Appreciate
0
|
| 12-27-2014, 04:41 PM | #7 | |
|
Captain
    40
Rep 679
Posts |
Quote:
Ill keep you guys posted. thanks JP |
|
|
Appreciate
0
|
| 12-28-2014, 05:17 PM | #8 |
|
Captain
    40
Rep 679
Posts |
Some progress, guys!
...I have continued to clean the front of the motor, removed the radiator fan and shroud for more room and was able to fabricate my own version of BMW's seal removal tool. 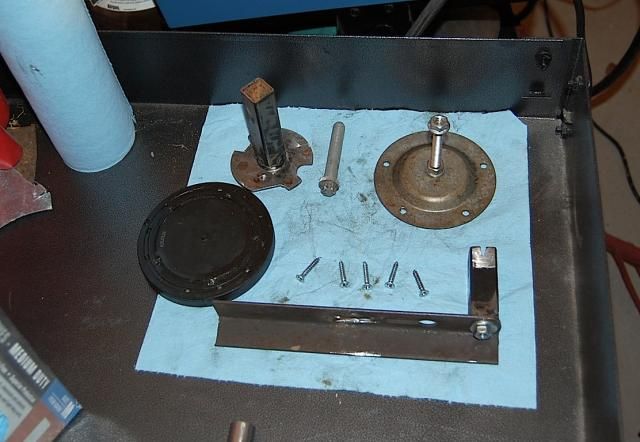 The pieces are clockwise from upper left: Puller mounting bracket and bolt: the bracket is made from a BMW (E36) seatbelt anchor post for the rear seat in a 4 door sedan and some square tubing. The bolt is the original bolt from the serpentine belt tensioner. I shaped the bracket to fit squarely into the recess that the belt tensioner was housed. Seal pulling disc: This was made from a circular steel table leg bracket (that I used to help support the rear bulkhead in my E36 BMW trailer the build is elsewhere in the forum) and a carriage bolt through the back of the unit. This already had the holes around the outside edge and was the PERFECT size for the screws to penetrate the seal. (found this out after the unit pulled the seal out and I looked at the back of the seal.) bottom bracket and bridge: the bottom bracket was made from more square tubing with a washer welded to one end for a bolt to bottom out on from inside. the bridge is from a bed frame with a grove cut into the center so the bolt from the disc could protrude through. It took several hours to fab this up...the results were very rewarding!...the self tapping screws that went into the seal held firm and didnt let go...but the first carriage bolt broke of all things, and I had to get another one.... The seal: This is a rubber covered metal unit and must be replaced as it is compromised when removed... This is closer to what it looked like assembled...it sat squarely on the engine block and pulled the seal out quite straight.... 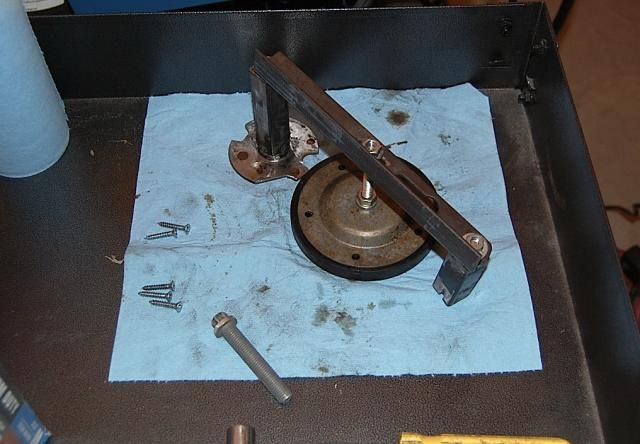 Now the hard part begins....getting that sprocket secured and those bolts out! wish me luck! thanks for everything so far you guys....so far so good! |
|
Appreciate
0
|
| 12-28-2014, 10:11 PM | #9 |
|
Second Lieutenant
 
8
Rep 263
Posts
Drives: E46, E91, F21
Join Date: Apr 2014
Location: Northwest
|
That is pretty dope man! Good stuff going on here! I think that if you have gotten this far the rest of the job will be okay!
 Keep us updated! |
|
Appreciate
0
|
| 12-30-2014, 07:51 AM | #10 |
|
Captain
    40
Rep 679
Posts |
So I fabbed up the retaining tool for the sprocket. I modified the original pulley mounting bracket that I made with a sliding slot and made another bracket that should hold the sprocket in place while I take the assembly apart. The tricky part was making the tool so I could still get to the bolts!...anyway ill post pics later today...
thanks for you encouragement, guys! JP |
|
Appreciate
0
|
| 01-01-2015, 09:55 PM | #12 |
|
Captain
    40
Rep 679
Posts |
finally going back together....
I am taking my time as its a light week at work, and getting this thing buttoned up on the car is kind of therapeutic in a way...each piece that goes back in is being cleaned, polished or repainted...all electrical connections are getting a little dialectric grease, bolts a touch of ani-seize compound, and everything torqued to specs..... filling the coolant system tomorrow, reconnecting the battery and giving it a try...I have some pics of yet another tool I made for this job and will post my final thoughts tomorrow.... thanks for the feedback, guys... JP |
|
Appreciate
0
|
| 01-03-2015, 08:16 PM | #13 |
|
Captain
    40
Rep 679
Posts |
DONE!....so far so good....coolant replaced and air bled out...brought up to temp and watched for thermostat to open and fans to cycle a few times. good on that end.(see electronic water pump air purge DIY elsewhere in this forum)
This is where the vacuum pump went; 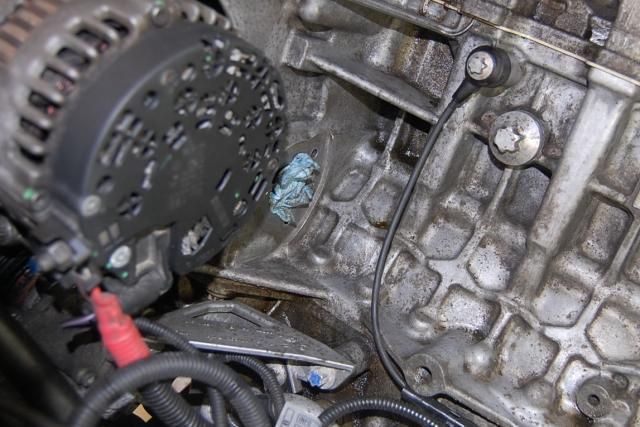 The old pump with the back cover off; 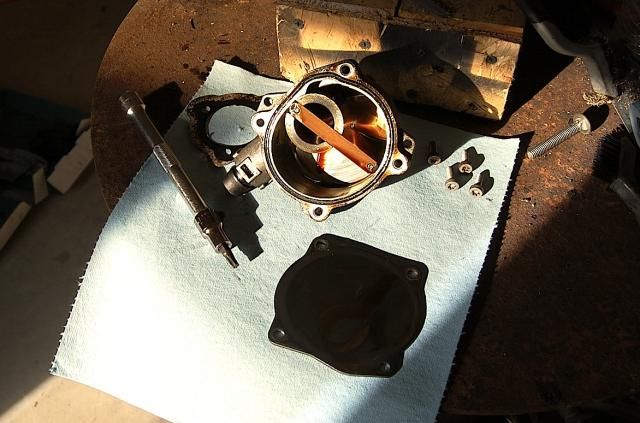 Sprocket retaining tool installed and holding the sprocket in place; 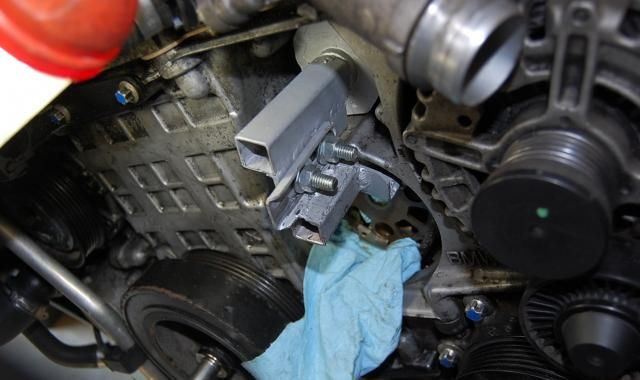 This tool worked great while I got the bolts out and swapped out the pumps. but I ditched it when it came time to get the sprocket back on the new pump shaft.... IMPORTANT: USE A 3/8 DRIVE T30 TORX bit (FOUND AT SEARS) instead of the common 1/4 drive bits. I actually broke one trying to get the 3 bolts out of the pump and twisted the flutes on a second one before making a special trip to find a stronger bit!...luckily for me, the first bit broke cleanly with no shards and I was able to use a magnet to get the bit still in the bolt out....) NOTE: TIS implies that you can leave the pump bolts in the engine housing behind the sprocket and simply says "secure bolts"...I ended up taking them out. they are long enough that they will not fall into the engine. I used a magnetic pick up tool. The old pump was a bugger to get out. Once out, the area needed a good cleaning...I was nervous that if I had left the bolts in place they would have been in the way of the cleaning process, gotten knocked around, or the threads could have gotten gritty...no good for re-torquing. One last tool was needed....the TIS does mention a tool, but its vague about it. I saw a hole in the bracket below and behind the sprocket that could have accepted a retaining rod...maybe that would hold the sprocket from torquing against the chain while tightening the sprocket bolt.....but I did not trust it...sooooo MORE TOOLS: I ended up making a sprocket retaining tool, seen on the right. The smooth studs fit inside the sprocket's spokes and hold it in place. the handle gave me leverage and the part sticking up sat against the flat part just outside the housing on the engine casing. (the tool is upside down in the photo...) 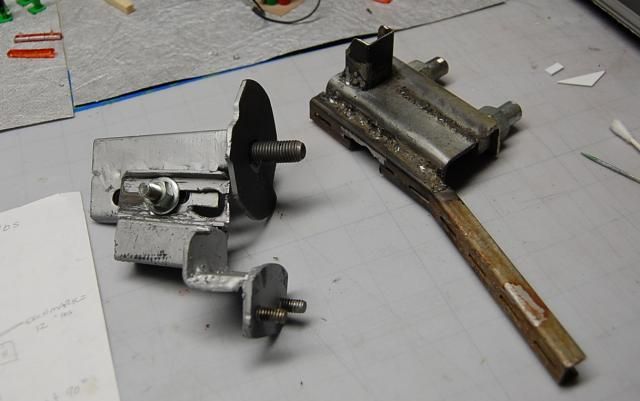 the New seal was put back in place with a small dead blow hammer made of lead filled rubber. I just put a light coat of non petroleum grease around the perimeter and tapped around the outside edge until it was seated flush with the engine casing. USEFUL NOTES: I like to know torque specs, of course for a project like this they are absolutely necessary. So I made a list of them, including a conversion chart for common values....I also found a way to basically check your torque wrench to be sure it is not too far out of calibration. 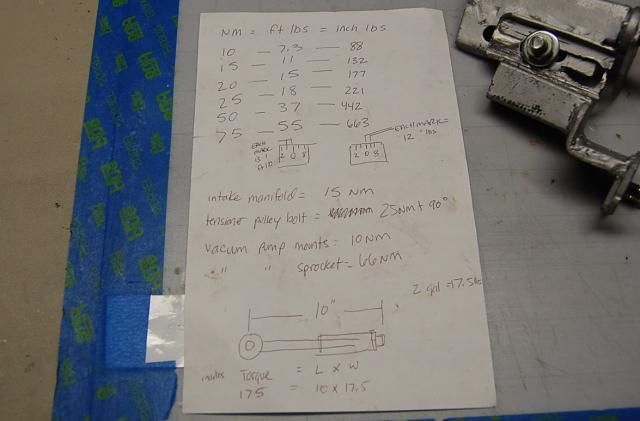 ODD THINGS THAT HAPPENED: -4X4 light came on after battery reconnected...went out after test drive...(I believe it is common for this to happen, I have read about it elsewhere.) -one injector was making noise, that has since quieted down. -Belt was squeaking slightly, that has since quieted down. I have not seen any leaks so far and the OFH, vanos ports, coolant lines, vacuum lines and pump are all clean.....Intake went back on nicely.... NOTES: This was a bigger project than I had initially figured on, but I forged ahead...with help from this forum, a good BMW parts dept with helpful staff, a good foreign car parts place, Bav Auto's UTube vids, Pelican parts DIY, Bimmerfest DIY, E90 forum DIY and feedback from this post....I was able to make it happen. thanks very much for your help and support, guys....I hope this info helps the community at large... JP |
|
Appreciate
0
|
| 01-19-2015, 12:48 PM | #14 |
|
Captain
    40
Rep 679
Posts |
UPDATE after 800 miles
So here is an update to the repairs I made...
after 800 miles or so the front of the engine is still dry (around all hoses, vanos seals, inlet pipes, heat exchanger, and radiator) The coolant leaks: I was getting at the water pump and thermostat area have also ceased. -I took the passenger wheel off, then removed the inner fender and really opened up the water pump area. I could then see all the hoses and clamps and had access to them with a long extension and a 6,7,or 8 mm socket....cant remember which, but I think it was 6mm for the factory BMW clamps. The vacuum pump for the brake booster: seems clean and leak free as well as the hard lines going to the booster. -a note here, brake pedal feel has improved a noticeable amount. There is less force needed to engage the brakes, so the pump was definitely on its way out. Oil was beginning to bypass that one way valve on top of the pump, and my theory is that there must have been reduced vacuum created by the pump which increases pedal effort, and failure of the one way valve caused the oil leak around the hard line where it connects to that valve. Intake Manifold gaskets holding up fine -Car starts better with no noticeable shaking, especially on restarts after coming out of a store for instance. PCV, CCV, emissions lines: -are dry and do not seem to be causing any problems or codes. Fuel Tank Vent Valve: -car starts fine after refueling now. Coolant Change and flush: -I squeezed the hoses as I poured coolant into the system and during the electric water pump purge cycles I noticed only very slight air bubbles. -coolant levels have stayed right where they need to be Oil Change: -replaced the o rings on the OFH cover and oil filter assembly, but forgot to change out the crush washer on the pan bolt...Ill keep and eye on it. so far so good. 4wd warning light goes out after first test drive: -went out after 1/2 mile or so. I had the car jacked up the tires off and on several times, the battery disconnected, ect....so I was expecting a few warning lights when I "plugged things back in" Thats it so far. I am cautiously optimistic now and will probably change out or at least carry another serpentine belt in the car. I may also change out the tensioner pulley as well as the alternator's plastic accessory pulley just for good measure..... thanks for the help along the way, guys.... JP |
|
Appreciate
0
|
| 01-19-2015, 08:17 PM | #15 |
|
Second Lieutenant
 
8
Rep 263
Posts
Drives: E46, E91, F21
Join Date: Apr 2014
Location: Northwest
|
Great to hear buddy! Good job work! As for the 4x4 warning light, it was probably due to the steering angle sensor not being initialized after reconnecting the battery. I'm pretty sure that it's going to be a non-issue.
 |
|
Appreciate
0
|
| 05-31-2020, 11:41 PM | #16 |
|
Private
 10
Rep 53
Posts |
I know this is a 5 year old post...
For removing and installing the seal, I'm sure I can figure out a way to do it without the special tool. What about the tool to hold the sprocket? Can the pump be removed without it? |
|
Appreciate
0
|
| 06-13-2020, 04:15 PM | #17 |
|
Private
 22
Rep 95
Posts |
Well I too a have been the victim of the rare vacuum pump failure. Went out a while ago. It just started making a noise tho, so for fear of catastrophic failure I’ll be doing the vacuum pump. I took it to my indy and he confirmed my diagnosis, but being a Volvo specialist, he doesn’t have the special tools. For kicks, I called my local bmw dealer, and they wanted to know why I wanted them to replace the vacuum pump because the mechanic there, has been there almost 20 years and has never replaced one... they wanted $630 for the pump and “if all goes well” 1100 for labor....
SO I’d be paying someone 1100 who has just as much experience as I do replacing an N51 vacuum pump lol I called Freedom Racing today and spoke with them, i ordered two kits: 1) https://www.freedomracing.com/n53-n5...l-kit-alt.html which is the removal and install tool. the second kit is the balance shaft adjustment tool kit, but it includes the locking pin tool for the chain. yes its kind of expensive to pay 100 bucks just to get the little locking tool, which you could probably make out of a coat hanger, but i figured 100 bucks is cheaper than dropping the chain. 2) https://www.freedomracing.com/221282...-tool-alt.html total cost for the tools was 315 bucks. add the cost of the parts and im still over 1000 bucks cheaper than what the dealer quoted me Last edited by JWT4700; 06-15-2020 at 09:36 PM.. |
|
Appreciate
0
|
| 06-17-2020, 08:34 PM | #18 | |
|
Private
 10
Rep 53
Posts |
Quote:
I'm sure the job is easier with the tool, but i thought I'd as that you can do it without if you wanna save some $$! |
|
|
Appreciate
0
|
| 06-22-2020, 06:20 PM | #19 | |
|
Private
 22
Rep 95
Posts |
Quote:
|
|
|
Appreciate
0
|
| 07-17-2020, 06:38 PM | #20 |
|
Private
 22
Rep 95
Posts |
So has anyone had a pump lock up? What went wrong with your pumps? I had what sounded like cam chain rattle...which it was... my pump locked up snapped the sprocket bolt, the inside of the pump was broken and full of broken pieces. The sprocket kept spinning, despite the pump being locked up, the shaft of the pump was pretty messed up, the sprocket is a bit worn but I think it will be ok. Pretty catastrophic failure... wonder what happened...pretty simple little pump
I think my plan is to just reassemble everything, can't get a new bolt until Tuesday but should be able to put it all back together. I'm still in a state of awe over the fact that the broken bolt never fell out and the sprocket never fell off... it's been like this for a little too long.... Last edited by JWT4700; 07-17-2020 at 09:33 PM.. |
|
Appreciate
1
johnnyorange52.50 |
| 07-05-2023, 08:18 PM | #21 |
|
Enlisted Member
 
0
Rep 31
Posts |
Quote:
|
|
Appreciate
0
|
 |
| Bookmarks |
|
|