

|
|
|
|
 |

|
 |
BMW Garage | BMW Meets | Register | Search | Today's Posts | Mark Forums Read |
 |

|
BMW 3-Series (E90 E92) Forum
>
RagingKileak's New Car Journal - 335i M-Sport
|
 |
| 06-06-2012, 12:41 PM | #89 | |
|
Brigadier General
 
191
Rep 4,655
Posts |
Quote:
There will quite likely be some 'slower' cars involved anyway but you will be fine. There will hopefully be guide cars front and back and I will also make a bit of a map etc for you all before we go! You'll be fine!! Matt |
|
|
Appreciate
0
|
| 06-07-2012, 02:43 AM | #91 | |
|
Colonel
 263
Rep 2,564
Posts |
Quote:
 Alpina_B3_Lux
__________________
Audi R8 LMX, BMW M550i xDrive (G30 LCI); gone: Alpina B3 3,3 (E46), BMW 335i, Audi R8 V10 manual, Audi R8 V10, BMW M235i, BMW 550i F10
|
|
|
Appreciate
0
|
| 06-07-2012, 04:46 AM | #92 |
|
Private First Class
 
14
Rep 133
Posts |
well i keep fitting you old parts to matts car making it faster than mine, until we get to the track
 and will see what the score is. and will see what the score is. looking forward to going!!! cant wait !
__________________
|
|
Appreciate
0
|
| 06-07-2012, 10:30 AM | #93 | |
|
Second Lieutenant
 9
Rep 277
Posts |
Quote:
 |
|
|
Appreciate
0
|
| 06-08-2012, 02:02 AM | #94 |
|
Private First Class
14
Rep 133
Posts |
i have thought about it lol maybe thats what i was fitting while i was in the wheel arch.
either that or i need a super charger on the m3
__________________
|
|
Appreciate
0
|
| 07-10-2012, 08:15 AM | #95 |
|
Brigadier General
191
Rep 4,655
Posts |
Forge DV's Fitted, 269 Alloys bought....
Hi all,
Just another quick update following a mod I did this weekend and ANOTHER new purchase. With Downpipes and InterCooler still sat in the garage to fit, I've been conscious of the amount of extras I have bought lately and not fit; including most recently a pair of Forge DV's and a set of BMW Performance 269 alloys. As Ant fits (or at the very least helps fit) almost all my mods, I thought this time I would give something a go by myself and DV's seemed like the sensible option considering that the new wheels need a refurb and some non RFT's ready before I fit them. So, around 20:30 on Friday night, I began. The first job with Forge DV's is to check which spring is fitted and which you think you will need for your car. As standard, the DV's come with the green spring fitted which suits between 5 and 15 psi, so should be fine for stock or lightly modified cars. My car hits 17-18 psi based on what BMS say about the JB4, so I had the choice of either fitting the yellow spring (rated at over 15 psi) or the green spring with one or more shims (which are like solid washers meant to increase spring tensity within the DV.) I chose yellow (which is what most other people with similar mods have chosen) and so far all seems well, which is good. The other thing of note is that opening the DV's to either fit new springs or service them isn't easy and it isn't well documented. For the new style of DV (which is what I received) the opening isn't obvious, but is actually located around the first 'line' above the bottom of the DV. To open the DV's, I used the pipework that had been sent with the kit as a 'grip' around the bottom port of the DV, then clung on to the top half like a bastard and twisted as hard as I could, being very careful not to bend or even touch the vacuum hose opening. This enabled me to unscrew them, which in turn helped with reducing the pressure and things get easier from there. The guide which is readily available from Forge will tell you what to do next - but it's important to use it and not just assume you know what to do, as there is a specific way the DV's must be pressurised when being put back together. Once done, it was around 21:00 and just beginning to dark. My garage is unlit, but I was determined to see this crazy plan through, so I knew I had around 1 hour max. This is the kit I received from Neil@JuicedUp:  This is the first shot of my car before I meddled with it. You will notice in my engine bay the CAI which (despite being right in the way) made accessing the DV's easier than it would be on a stock car: 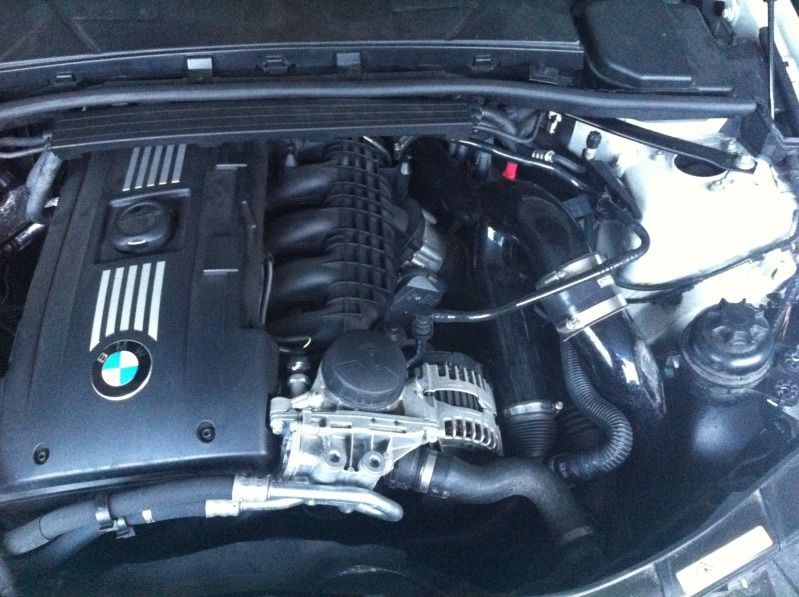 Here I have just started to undo some pipework: 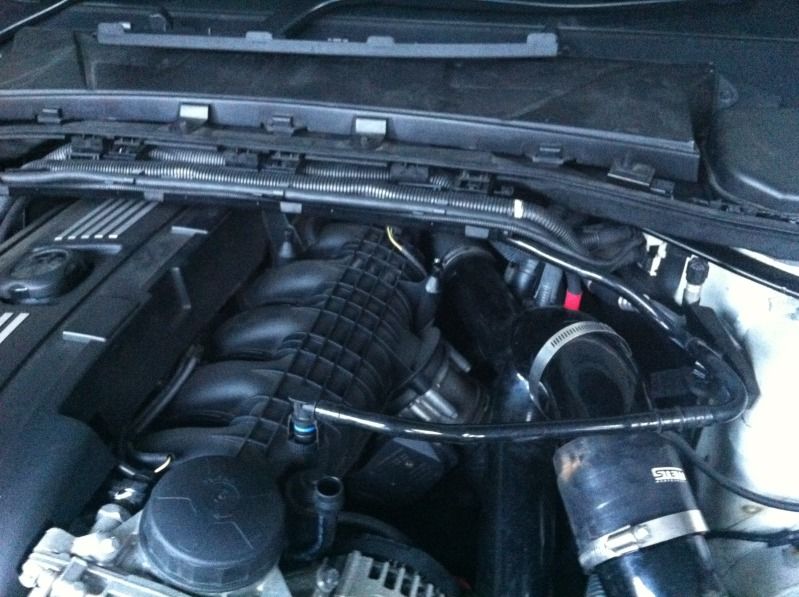 And now the CAI is disconnected. I basically unhooked the Y pipe from the main intake pipe and then loosened the band clamps on both intakes to allow me to move the Y pipe from left to right (whilst still remaining in situ.) You can also see the stock DV's in situ a bit on this picture: 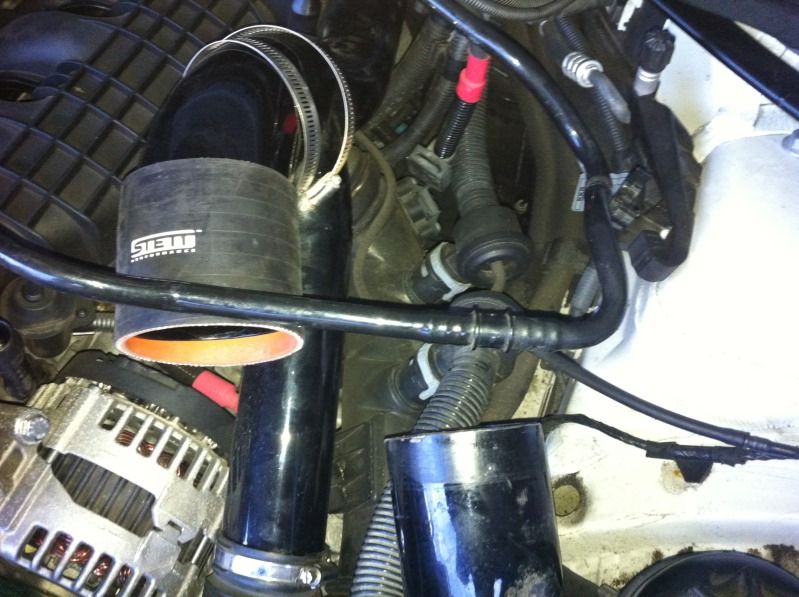 The next part of the install took place over about the next hour and I began to panic as it was really darkening, hence I didn't take many pictures. Bottom line is that you have 4 grey clips to undo, which hold the DV's in place at one end and connect the pipework up at the other. It's also important to disconnect the vacuum hoses from the DV's EARLY in this process, because whilst the hoses themselves are fairly tough, the connection to the inlet manifold can become disconnected if pulled and is HARD to get back in without lots more ferreting about in the engine bay. Here is a pic of one of the DV's with its vacuum hose still attached: 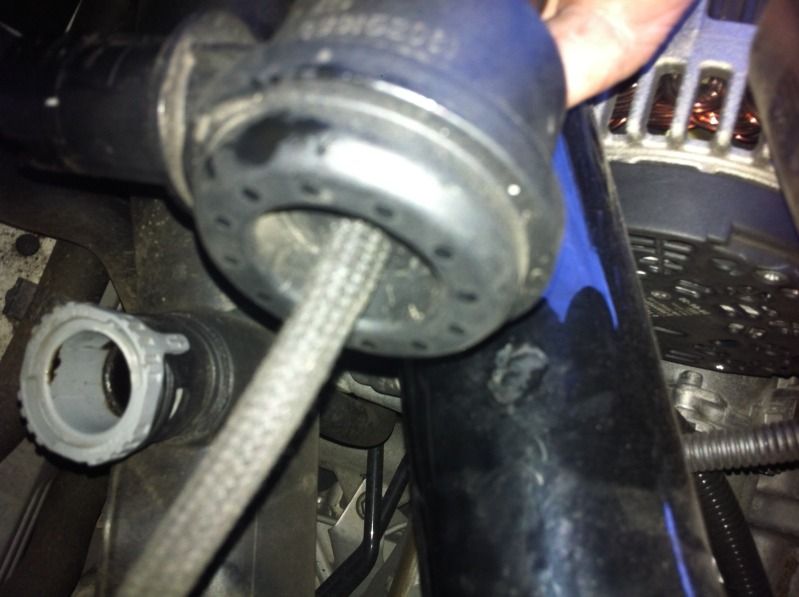 Speaking of the 4 grey clips again, I found three of them easy to get to and undo. The last one however (and the one which took probably 45 minutes alone) is the one at the rear of the engine bay, which resides about 6 inches back from the wiring loom. With hands live shovels (as I have) and no tool which really can assist, this was incredibly frustrating. In the end I used a piece of a very old weights bench (and a screwdriver) to hook the grey clip from back and front, then used my tools like extensions of my hand to push the clip at one side and pull from the other - 2000AD indeed!!!! Here are some pics of the troublesome clip, plus my improvised tool. 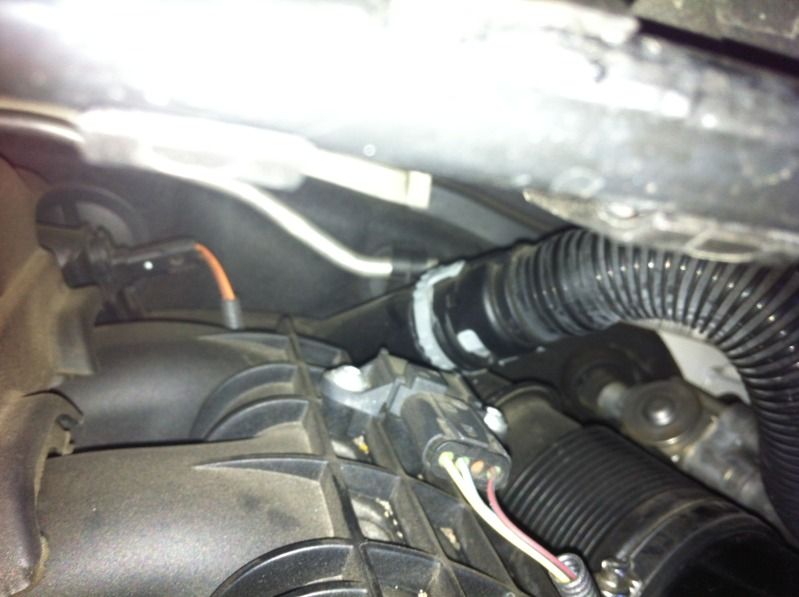 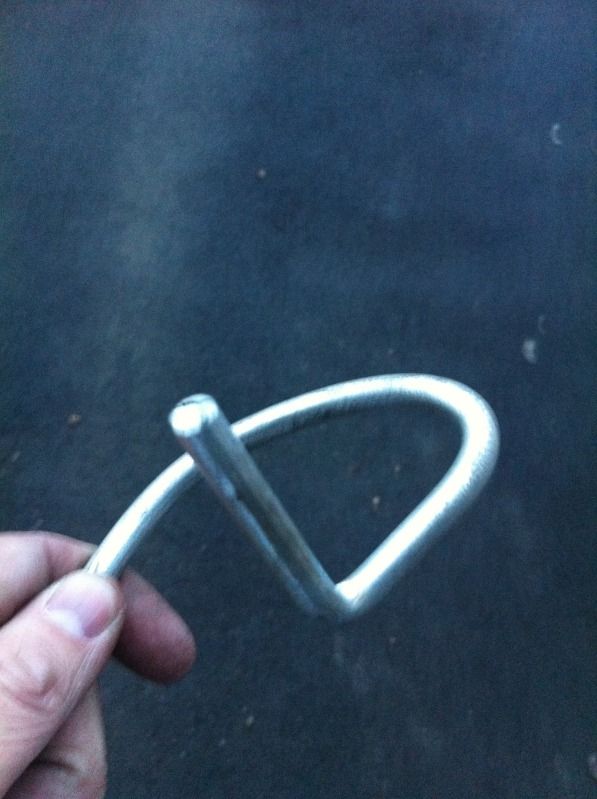 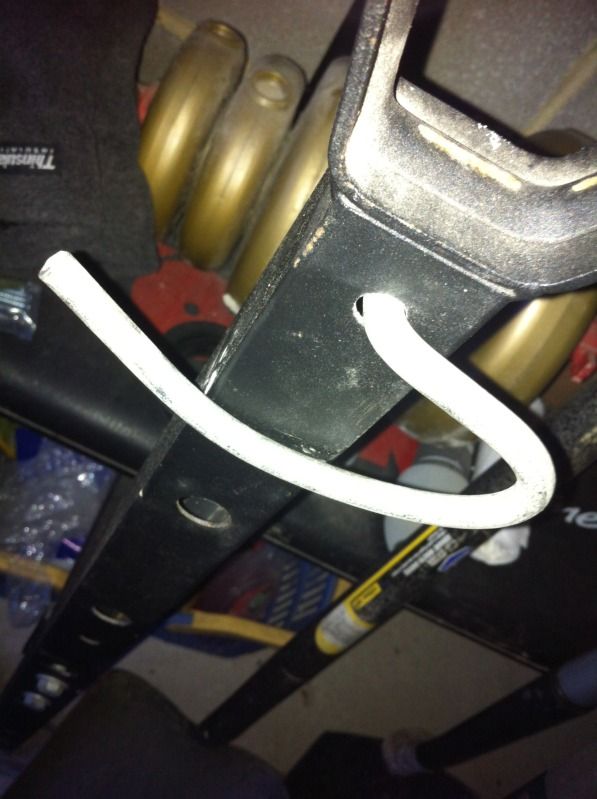 So at this point, I was able for the first time to put the old DV and the new one next to each other for comparison. You will see here just how dark it is getting now: 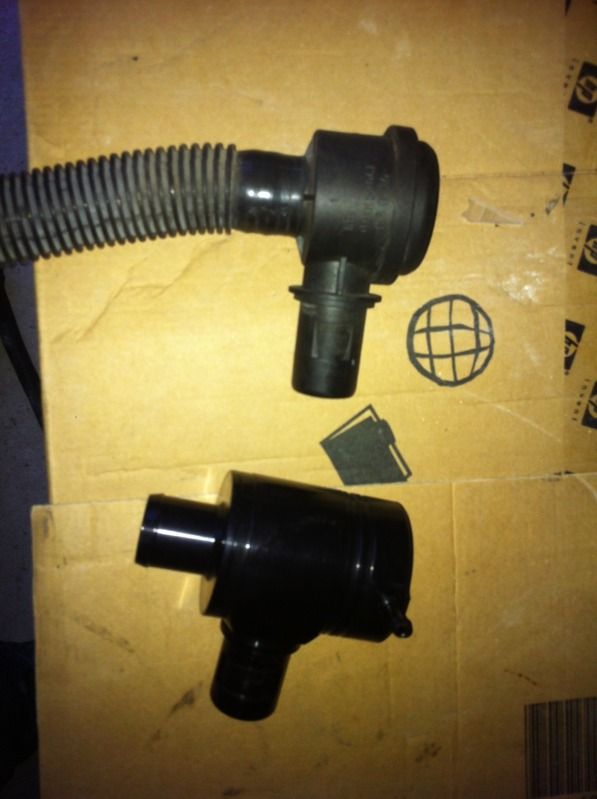 Fitting the DV's was a breeze once all the OEM kit was out. I just dropped the new parts in, put all the new pipework in, checked, double checked and then tightened everything up and made sure to connect anything I had previously undone. The outcome: 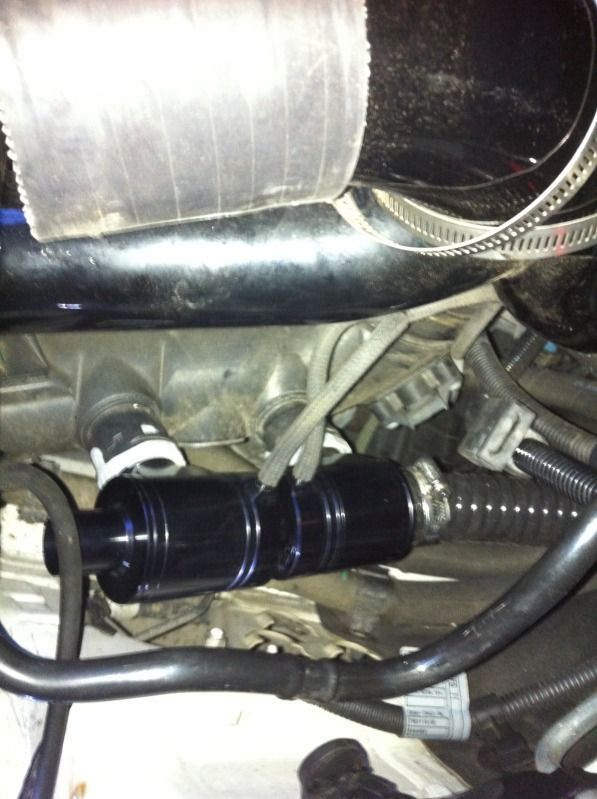 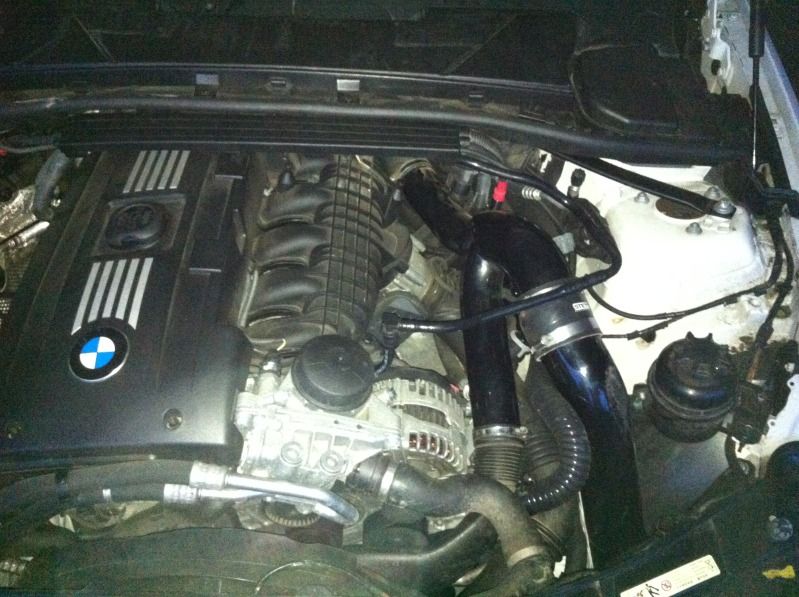 Once fitted, I was able to go for a test drive and I was delighted to hear the car fire up first time with no errors, weird noises or other ill effects. The car immediately felt more linear, with better throttle control and I felt like I noticed a bit more top end power but it could all be placebo effect. Bottom line is that I am pleased I fitted them DV's because I believe it is the right thing to do as I add more and more power-increasing mods. Just a quick additional teaser, but I also bought some BMW Performance 269 wheels from another forum member last week. It looks to me like they have been badly refurbed at some point and there is a little kerbing. The original BMW Performance logo has actually been painted over, the finish is a little bit off and there is some bubbling etc but I know a place that will have them as good as new in no time: 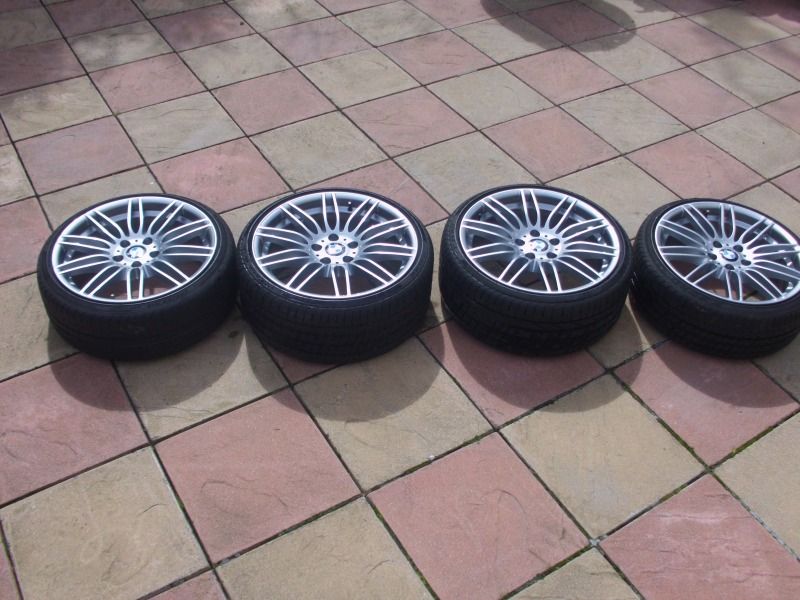 I have also bought some brand new Contact Sport 3 tyres from another member here for the rear and I will be looking for some fronts ASAP. I will get the refurb done and the new tyres fitted at the same time before my Nurburgring Trip in August. So, in the next 4 weeks I will be: Fitting new brake pads Refurbing BMW Performance 269 wheels and fitting them with non RFT's Fitting my ETS InterCooler Fitting Downpipes Possibly getting the coding done for my (already fitted) Alpine Kit And that will be it until the big spend on LSD/ARB's/Suspension. Thanks for reading. Matt |
|
Appreciate
0
|
| 07-10-2012, 09:13 AM | #96 |
|
First Lieutenant
39
Rep 394
Posts |
Good job!
Loving the 269 wheels and look forward to seeing them on the car
__________________
f87 M2 Competition
f36 435d M Sport e92 335i M Sport |
|
Appreciate
0
|
| 07-10-2012, 09:22 AM | #97 |
|
Lieutenant Colonel
 
76
Rep 1,518
Posts |
Good mods, I've got the Forge DVs in black too.
Have you got a link to pressurising the DVs? All I've read is the pen method to check that the DVs are working properly. I'm rebuilding mine this weekend as I've read a few places recommending you service them yearly. |
|
Appreciate
0
|
| 07-10-2012, 10:01 AM | #98 |
|
Major General
164
Rep 5,950
Posts
Drives: M3 Comp Pack / QQ+2 Tekna
Join Date: May 2008
Location: Stockport, Cheshire
iTrader: (1)
Garage List 2008 350Z GT Roadster [2.00]
2004 Honda S2000 [0.00] 2005 Nissan 350Z GT ... [0.00] 2006 E92 BMW 335i SE [9.00] 2003 Maserati 4200 [6.00] 2006 E90 330d M Sport [0.00] |
Things taking shape mate. Glad to see you got some performance wheels after all
 . .
__________________
Current -: MW E92 M3 Competition Pack / Qashqai+2 Tekna 1.6dci
Gone -: 370Z GT Roadster; BMW X3 3.0d xdrive M Sport; E46 330i M Sport Coupe; Mazda RX8 231; Nissan 350Z GT Roadster; BMW E90 330d M Sport; BMW E92 335i SE; Maserati 4200; Nissan 350Z; Honda S2000; Astra Coupe Turbo; Ford Probe |
|
Appreciate
0
|
| 07-10-2012, 10:43 AM | #99 | |
|
Second Lieutenant
9
Rep 277
Posts |
Quote:
 |
|
|
Appreciate
0
|
| 07-10-2012, 10:48 AM | #100 | |
|
Brigadier General
191
Rep 4,655
Posts |
Quote:
No not a link. I'll talk you through it as best I can... So once you have 'opened' the DV by unscrewing the bottom bit, you will see a silver piston style piece which (if you're very lucky) may pop out when you open the bottom of the valve. More likely, it will be stuck in there, but you will notice it is nicely greased and by poking it, it should move in and push back out again. By manipulating it gently from side to side with your fingers and also by blowing into the vacuum hole at the top (yes, really) you will find it eventually 'pops' as the air rushes into the side opening and behind the piston bit. At that point it will more or less fall out on its own or will become easier to manipulate. The only other piece in there is the spring and possibly a 'shim' if you (or whoever installed it) used one - this is unlikely. So, when you put it back together, pop the shim in first (if needed) then the spring which should sit nicely around the pistony bit. You'll find its tight at first but it is greased when new, so feel free to use a little grease as part of your servicing plan once you've cleaned the parts. Push the piston it so it compresses the spring and keep pushing fairly hard until you can see the top of your finger through the side opening of the outer case (the spring should be more or less fully compressed.) Now using the other hand (which is likely to be holding the outer casing) put one finger completely over the vacuum hose opening - this will pressurise the area above the piston and once you remove the pressure on the bottom of the piston, it should stay in place. Then with your now free 'pushing' hand, you can screw the bottom back on. Once fully in place, take your finger off the vacuum hole, you will hear a metallic 'clack' as the piston pops back against the base of the casing. And that's it - refit it and you're good to go. Rog - thanks, I think in the end it will be worth it!! Matt |
|
|
Appreciate
0
|
| 07-11-2012, 04:59 AM | #103 |
|
Colonel
112
Rep 2,621
Posts |
Good write up, I fitted mine last week too! Did a BMS Oil Catch Can at the same time.
I read the wrong install guide and fitted them with the chamber verticle rather than horizontal! Doh!  Refitted them last night as a result of this thread! Refitted them last night as a result of this thread! Did you not remove the HVAC filter and plastic cowl covering the back of the engine? If not it would have saved alot of time and agro!
__________________
Car: e91 330d with Viezu map
Gone but not forgotten: 2010 Jaguar XFR (Cat-back exhaust, pulley, intake mods and map), Highly Modified E90 335i LCI M Sport Manual (circa 480BHP/500lb ft) |
|
Appreciate
0
|
| 07-11-2012, 05:29 AM | #104 | |
|
Lieutenant Colonel
76
Rep 1,518
Posts |
Quote:
+1 on removing the cowl, takes 5minutes to remove and refit and gives you much more room. |
|
|
Appreciate
0
|
| 07-11-2012, 05:46 AM | #105 |
|
Brigadier General
191
Rep 4,655
Posts |
Unfortunately I don't have the relevant tools to remove the cowl - the number 15 torx or whatever it is.
To be 100% honest, if I had 'devised' my weights bench hook tool earlier, it would have taken all of 18 seconds. Remember I have no airbox to take out or put in, so the fact I can just put my hand in and reach the grey clip made it very tempting NOT to wait for Ant to come along with the right tool lol. Anyway all sorted now. Are you gents both running the yellow spring as well? Rgds Matt |
|
Appreciate
0
|
| 07-11-2012, 06:08 AM | #106 |
|
Lieutenant Colonel
76
Rep 1,518
Posts |
I've been running the yellow springs from day one with no shims.
For future reference, the only tools needed to remove the Cowl is and 8mm socket and a flat screwdriver to unplug the two connectors on each side. |
|
Appreciate
0
|
| 07-11-2012, 06:15 AM | #107 |
|
Colonel
112
Rep 2,621
Posts |
Yep Yellow Spring.
__________________
Car: e91 330d with Viezu map
Gone but not forgotten: 2010 Jaguar XFR (Cat-back exhaust, pulley, intake mods and map), Highly Modified E90 335i LCI M Sport Manual (circa 480BHP/500lb ft) |
|
Appreciate
0
|
| 07-12-2012, 09:30 AM | #109 |
|
Private First Class
14
Rep 133
Posts |
good skills pal
so thats now 2 jobs you have done with out me, dv's and grills. im going to be redundant shortly !
__________________
|
|
Appreciate
0
|
| 07-12-2012, 11:27 AM | #110 |
|
Colonel
263
Rep 2,564
Posts |
I'm happy seeing my CAI put to good use. Great work mate!
Alpina_B3_Lux
__________________
Audi R8 LMX, BMW M550i xDrive (G30 LCI); gone: Alpina B3 3,3 (E46), BMW 335i, Audi R8 V10 manual, Audi R8 V10, BMW M235i, BMW 550i F10
|
|
Appreciate
0
|
 |
| Bookmarks |
| Thread Tools | Search this Thread |
|
|


