

|
|
|
|
 |

|
 |
BMW Garage | BMW Meets | Register | Today's Posts | Search |
 |

|
BMW 3-Series (E90 E92) Forum
>
DIY: Front door lock actuator replacement (E90)
|
 |
| 01-17-2011, 06:53 PM | #1 |
|
Captain
 
139
Rep 804
Posts |
DIY: Front door lock actuator replacement (E90)
First of all, I just want to say that the instructions below were not written by me. The pictures were not taken by me. The user cisfinmark replied to one of my threads with this DIY guide when I mentioned I had door lock issues but he's no longer active (last login was in Oct 2010). I searched the forum and A LOT of people had this problem. His help to me was too great to just go unnoticed as a reply so I'm posting this so others can benefit from it as well.
Dealer charges were in the hundreds for those out of warranty. The actual actuator only costs $35... This DIY was a pain, took me close to three hours just because I was afraid to break certain parts. If i had to do it again, I can see myself doing it all under one hour. With that being said, i now will paste cisfinmark's reply. My comments will be in bold Problem: The driver's side door will not unlock with fob or central locking button. The actual key and door handles work fine for unlocking and opening this door. All other doors operate normally. Fuses 56 and 57 were fine. Fuse 56 was replaced with a 20 amp mini as suggested. http://www.bmwtis.com/tsb/bulletins/...p/B511907g.htm The actuator was ordered for $34.82 from Tischer GetBMWparts.com part# 51217202143 The tools used are pictured below. The Bentley service manual was also used as reference. The plastic trim tools worked really well. I got mine from ECStuning. I didn't have the Bentley manual, just the pictures posted below to go along with, and I managed fine, so it's not needed if you follow this guide. I also didn't have plastic trim tools, I just used my hands, a screwdriver, and force. I did scratch some of the paint inside though, but it didn't bother me that much since it's underneath the panels The driver's side window was brought down so that about 4-5" of glass remained visible. i followed this but i think the original poster meant bring the glass down so it's OPEN 4-5" because i was able to unclip the plastic hook from the window easier this way. Added Step: Disconnect the battery The "wood" trim was removed using the plastic trim tools starting toward the inside (right-hand-side of the photo). pull the trim from the side closest to the hinge since the other side (the side closest to the door lock) is a hook. The three Torx-20 screws were removed from the panel. these will fall out once you unscrew them all the way, don't worry if they don't, they'll fall out once you remove the panel To remove the door panel I started toward the top inside corner near the window speaker (right-hand-side of the photo), again using the plastic trim tools. I worked clockwise until all that remained was removing the panel from the upper clips. The fasteners hold up well as I removed the panel a number of times. Once the panel was removed over the unlocking button, the wires were unplugged, and the Bowden cable was unhooked (see photos). The tape in the picture of the black interior is where the hooks are. make note of where each cable goes. there are five cables: speaker, mirror, window control, flood light (bottom of door) and door handle hook. The unlocking button rod was pulled straight out of the actuator. The power cable to the windows has press-point and rotating lever to get it unhooked from the panel (see photo). I removed the door light and replaced the bulb with a wedge LED for good measure. The vapor barrier was completely removed. It goes back on nicely. use a sharp blade to help you cute the sticky butyl tape. you don't want it all bunched up and messy when you put it back together. No special tool was used to unhook the window glass from the window regulator. I just used the plastic trim tools behind the glass to pry the clip out enough to pull the glass up. See the photo with the circular hole in the glass to see what you're dealing with. this is the tricky part. there are two hooks that you'll need to unclip. if you find that you don't have enough space for your hands to go in and out to unclip the window just reconnect hte battery and power window cable and play with it to move the window to a comfortable position. TAPE the window glass to the top of the door so once you unclip it, it won't fall down and shatter the glass, i doubt this will happen but better to be safe. i have small hands and after 30 minutes, i was able to unclip both holes. this is the WORSE part out of this entire DIY. if you have big hands you're pretty much screwed imo. to get a good idea of where the hook is, look down into the hole of the glass, youll want to take your right hand position it behind the glass, grab the plastic clip and pull outwards and using your left hand, pull/push the glass upwards to unclip. Once the glass was out, I removed the two 10 mm nuts holding the outside window regulator guide to clear some space. you can't really remove the window regulator, just remove the two nuts and gently stuff it down and to the left out of the way. the tension cables will still be intact so it's kind of tricky to move it around, but as long as it's down as far as possible you'll have enough space. The door lock was removed by removing the small circular cover on the side of the door and removing the 4 mm Allen bolt. As far as I can tell, you must remove this first or the actuator will not come out. this is referring to the keyhole piece. the allen bolt should come out all the way, be careful it doesn't drop inside the door panel. With the door lock out you can can reach up from the inside of the door and unclip the wires from the actuator. There are two: one is on the bottom; the other is on the side. The wires are tied to plastic plugs that are pressed into supporting holes on the actuator. You can see these a bit in one of the photos showing the exterior door handle cable. To unhook the exterior door handle cable from the actuator reach from the inside of the door and grab the white plastic end and pull it out of its slot in the actuator. The second point of attachment should come off the actuator lever at the same time (see photo of cable end). Be sure to get both of slotted attachment points back on properly on the new actuator and confirm that the exterior handle works before closing things up. aside from the exterior door handle cable, there was another plastic clip that was attached to my actuator with no purpose other than to route a cord out of the way of the window i suppose. these was hard to remove, you just have to yank and twist it out. I then removed the actuator by removing the three Torx-30 screws. For comparison I've shown the old (left) and new (right) actuators from several angles. Also shown is the actuator and door lock, showing the point at which the door lock enters the actuator. The installation of the new actuator was reverse of the removal. The only issue I had was with with improper installation of the exterior door handle cable to the actuator (mentioned earlier). The battery was also a bit run down. Once you take the defective actuator out, you'll be confident enough to remember the steps to put everything back together. Just to make sure, I checked that the actuator was fixed before I placed the door panel and vapor barrier back on. |
| 01-18-2011, 09:27 AM | #2 |
|
Major General
 548
Rep 6,563
Posts |
 You are a life safer...I know this will be very helpful for those who are keeping their car out fo warranty. I love the part where you say no special tools needed. I have heard other say there is a special tool require for this. I see you used one of my photo, the black interior door panel  
__________________
under construction!  |
|
Appreciate
0
|
| 01-18-2011, 09:40 AM | #3 |
|
Captain
139
Rep 804
Posts |
haha, i wasn't sure where i got it from. i downloaded a bunch of pics last summer wanting to do it then but never got around to it. it helped a lot
yeah, i was working around and i can't imagine where the special tool would be needed, maybe somethign to unhook the glass from the window regulator? |
|
Appreciate
0
|
| 01-23-2011, 06:53 AM | #4 | |
|
Registered

0
Rep 2
Posts |
Quote:
I've done this twice in the last 2 weeks because: 1. When I tried to put the new actuator in, I found it was Right side instead of LEFT. Got the dealer to change it via post. 2. Yesterday, Got the new actuator inside the door and was trying to bolt it in place but I could not do it. Took it out again. Looked CLOSELY at the holes and saw there is no thread in the 3 boltholes. Smooth as a baby's bottom. Can't phone dealer til tomorrow and I am totally at a loss to know if I am making a mistake or is this is a faulty piece. Am I missing something obvious here? The dealer is the biggest one in Ireland. |
|
|
Appreciate
0
|
| 01-23-2011, 12:50 PM | #5 | |
|
Captain
139
Rep 804
Posts |
Quote:
when i used the screwdriver, i felt i was grinding way too much into the glass using it as a fulcrum point. but your description is exactly how it should be done, i was just a wuss :P 1. they sent you the passenger actuator instead of driver side? 2. mine bolted in easily so yours maybe defective? try pushing in with more force and then screwing the bolt in to make your own thread? |
|
|
Appreciate
0
|
| 01-24-2011, 07:34 AM | #6 | |
|
Registered
0
Rep 2
Posts |
Quote:
2. Correct. The dealer just told me it's a 'self-threading' bolt, so I have just made the threads now with the lock on the bench and am about to replace it. |
|
|
Appreciate
0
|
| 03-13-2011, 04:57 AM | #7 |
|
Lieutenant

21
Rep 549
Posts |
This job is very straightforward. Best of it all, you always have the spare actuator available to you can see where to put stuff.
I did this in about 1 hour, and did break some stuff. Or, what I broke was the 2 things that held an electric wire to the actuator. They hold a wire in place, so I just used some elastic silicone as a replacement. Anyhow, I could get the actuator out without messing with the window or the door lock thingie on the outside of the door. It took about 5 minutes of cussing to get it out, but eventually I found a way to slide it out. I did have to unscrew the guidance for the wire that rolls the window up or down. Then I could slide the actuator. See the photo I borrowed from the OP.  If you unscrew that guidance in the bottom so you can push it inwards, and just loosen it at the top, you'll get the actuator out through the lower section. As for disconnecting the window, I just unscrewed the actuatuor and with my hand, I could disconnect the rubber spongy thing attached to the window. It was farily easy to get it back in place, the window thing I mean. So there should be no need to remove the window or anything on the outside of the door. Cheers and thanks to the Op, since I probably just would have let Bmw fix it if I hadn't found this DIY. Last edited by slowSwede; 03-13-2011 at 05:29 PM.. |
|
Appreciate
0
|
| 03-31-2011, 11:52 PM | #8 |
|
Private
 17
Rep 97
Posts
Drives: F30328i x 2 (yes, 2)
Join Date: Mar 2011
Location: CA
|
Many thanks to the OP and Kronos.
Spent almost 4 hours on it this evening cos I didnt read Krono's post and wasted most of the time trying to pry the clips with all sorts of makeshift plastic trim tools I made from plastic spatulas and nylon aquarium cleaning blades. Also it was too tricky to just loosen the window guide-rails and push it in, the extra space created simply was not enough to get a hand in to disconnect the wires and cables connecting the actuator. SO, VERY IMPORTANT: "If you lower the window to 4" showing, the hole in the glass lines up with the oval hole in the black metal guide, allowing you to push any old screwdriver through both and push the white plastic clip out of the hole while you push up slightly on the lower edge of the window to release it. Slide it up and tape it at the top when it's free from both clips." Heed this and job could have been done within 60 to 90 mins. |
|
Appreciate
0
|
| 04-06-2011, 09:12 PM | #9 |
|
Bimmer Addict
17
Rep 230
Posts |
I also found this thread very helpful. Thank you all!
Once I figured out what I was doing, the install was a breeze. I couldn't squeeze the actuator pass the window regulator without unclipping the glass either. |
|
Appreciate
0
|
| 04-12-2011, 03:17 PM | #10 |
|
Registered
0
Rep 3
Posts |
I purchased the replacement actuator and the Bentley E90 service manual for less than what a dealer would have charged to fix this problem. This DIY helped a great deal as it clarified some steps in detail. Total time including preparation and cleanup was 3 hours. Thank you!
|
|
Appreciate
0
|
| 05-11-2011, 04:22 AM | #11 |
|
Captain

56
Rep 623
Posts
Drives: F10 530d M Sport, E87 118d M
Join Date: Apr 2008
Location: Bury, Lancs, UK
|
I note the OP quoted something like $35 dollars for the door actuator part and yet realoem have the part listed at over $170
http://www.realoem.com/bmw/showparts...41&fg=40&hl=17 What is the real price of this item. Some have said that BMW have reduced the price to reflect the quantity they now need to produce!!
__________________
F10 530d M Sport, September 2012 Individual Amazonite Silver, Oyster Dakota Leather, Auto, Nav Pro, Bluetooth + USB Devices, Expanded BMW Online, Comfort Seats, Sunroof, Sun Protection Glass Individual Satin Walnut Honey Brown Trim Interior Inside/Outside Mirror with folding and autodip, M Rear Spoiler
|
|
Appreciate
0
|
| 05-11-2011, 06:34 AM | #12 |
|
Captain
139
Rep 804
Posts |
i'm not sure why the part number is different for your car (330xi), but for my 330i, the part number in my original post is the correct one. i went to the dealership and asked if they could match it and they did. i'm actually surprised it was only $35 as well.
|
|
Appreciate
0
|
| 05-12-2011, 02:07 AM | #13 |
|
Colonel
 
112
Rep 2,345
Posts |
Great DIY.
I just have some questions. Is there anybody that knows if its possible to remove these two things... The leather on the sides 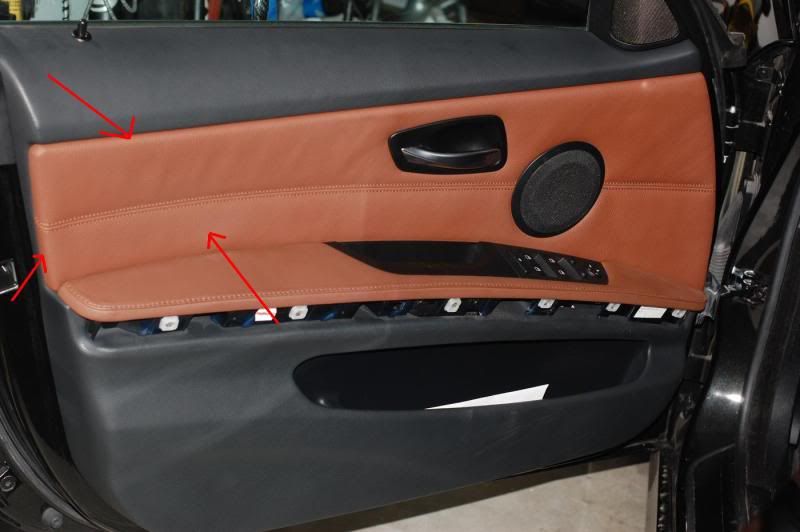 and the doorhandle 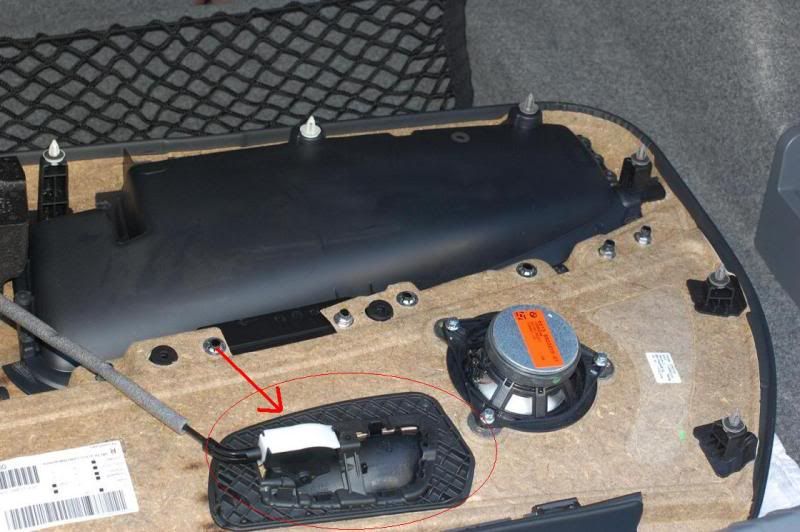
__________________
05´ BMW E90 325i JB | BBS LM 8.5X19 ET29 Front, ET27 Rear | H&R Sport | Koni Sport | Blacklines | BMW Performance Grill | Mtec Super White Halogen Fogs | OEM M-Tech steeringwheel | OEM M-Tech gearshift knob | OEM M-Tech handbrake handle | OEM manuel leather sportseats, now fully functional | OEM BMW Performance short shift | Rear output power | Complete LED interior lights
|
|
Appreciate
0
|
| 05-22-2011, 10:11 PM | #14 |
|
MATTE
47
Rep 515
Posts |
This may seem a bit unrelated but since someone in here is bound to have removed a door panel before, is it possible to take the exterior door handles off of the panel completely? If so, how can I go about doing that. I own an 06 330i
|
|
Appreciate
0
|
| 07-03-2011, 10:49 PM | #15 |
|
Registered
0
Rep 2
Posts |
Thanks a bunch!
Thanks for posting the information and parts number. I was able to do the job in 2.5 hrs.
I broke the wire guide to the actuator and left it loose. So far no problem. |
|
Appreciate
0
|
| 07-10-2011, 01:12 PM | #16 |
|
Registered
1
Rep 4
Posts |
Mechanic in LA?
Anyone know of a mechanic in the Los Angeles area who will do this replacement (I'm not quite as mechanically inclined as some of you folks are)? I'm having the same problem -- driver's side door will not unlock from either the central locking button or from the remote. This was after I replaced the 56 fuse when the rest of doors stopped working, which fixed the problem with the other doors but didn't fix the driver's side door. Thanks!
|
|
Appreciate
0
|
| 07-24-2011, 08:54 AM | #18 |
|
Registered
0
Rep 3
Posts |
Passenger side replacement
I just finished a door lock actuator replacement on the passenger side. The first time was a pain in the a**http://www.e90post.com/forums/images...es/mad0260.gif. Now that I have done it once, the next time would be much easier.
Got the parts from Tischer; passenger (right) door lock actuator part number 51217202146 ($69.41). I also ordered some extra door panel clips, part number 51418224768 ($0.59/each). The clips are pretty easy to mangle during door panel removal, so I bought 10 just to be safe, and ended up using a few. Just a couple of differences on the passenger side: 1. To remove the passenger door panel you must pry off the vertical plastic door handle and remove an additional screw (T20). 2. It helps to have a second person to unhook the window from the power window clips. I lowered the window about 4 inches before starting. From this position, you can reach behind the bottom of the glass and release the clips from the back. If one person does this while a second person lifts up on the window, then it comes out very easily. 3. On the passenger side there is no need to remove the exterior door handle cover. Thanks for the good right-up and pics. I wouldn't have tried without them, but now that it's done, I would do it again. |
|
Appreciate
0
|
| 07-26-2011, 03:55 PM | #19 | |
|
Lieutenant
29
Rep 425
Posts |
Quote:
|
|
|
Appreciate
0
|
| 07-27-2011, 05:04 AM | #20 | |
|
QUICK LITTLE BLACK BAVARIAN BEAST

0
Rep 9
Posts
Drives: BMW 328i BAVARIAN AUTO
Join Date: Jun 2011
Location: IN A LITTLE BAVARIAN VILLAGE
|
Correct! I just changed my actuator out it was to easy...
Quote:
 You are a 100% right WARNING! DO NOT REMOVE WINDOW OR UN~HOOK IT SIMPLY LEAVE IT DOWN FOR THE SOLE PURPOSE OF GETTING THE DOOR PANELING OFF ONCE THE INTERIOR DOOR PANEL IS OFF IMMEDIATELY ROLL THE WINDOW UP ALL THE WAY THE ACTUATOR EASILY SLIDES BETWEEN THE WINDOW GUIDE RAILING LOCATED ABOVE THE SPONGY THINGY ON THE LOWER PART OF THE DOOR THE KEY LOCK(REMOVE COVER LOCATED SIDE OF DOOR) IS HELD IN BY ONE ALLEN KEY SOCKET HEAD BOLT DO NOT REMOVE THIS BOLT OUT ALL THE WAY OR IT WILL FALL AND YOU WILL BE SLEEPING IN YOU'RE VEHICLE CRYING OUT WHY LORD WHY! OTHER THAN THIS THIS DIY IS ABSOLUTLEY EASY JUST MAKE SURE TO CRANK DOWN ALL BOLTS AND CLEAN MATERIAL WITH BMW NATURAL INTERIOR CLEANER I'M THANKFUL TO THE PEOPLE WHO POSTED THIS AWESOME DIY WITH PICS! THE PART HERE IN CANADA COST ME $78.00 INCLUDING TAX AND IT WAS ON A 2007 328I E90 GOOD LUCK AND THANKS AGAIN I SAVED HUNDREDS You are a 100% right WARNING! DO NOT REMOVE WINDOW OR UN~HOOK IT SIMPLY LEAVE IT DOWN FOR THE SOLE PURPOSE OF GETTING THE DOOR PANELING OFF ONCE THE INTERIOR DOOR PANEL IS OFF IMMEDIATELY ROLL THE WINDOW UP ALL THE WAY THE ACTUATOR EASILY SLIDES BETWEEN THE WINDOW GUIDE RAILING LOCATED ABOVE THE SPONGY THINGY ON THE LOWER PART OF THE DOOR THE KEY LOCK(REMOVE COVER LOCATED SIDE OF DOOR) IS HELD IN BY ONE ALLEN KEY SOCKET HEAD BOLT DO NOT REMOVE THIS BOLT OUT ALL THE WAY OR IT WILL FALL AND YOU WILL BE SLEEPING IN YOU'RE VEHICLE CRYING OUT WHY LORD WHY! OTHER THAN THIS THIS DIY IS ABSOLUTLEY EASY JUST MAKE SURE TO CRANK DOWN ALL BOLTS AND CLEAN MATERIAL WITH BMW NATURAL INTERIOR CLEANER I'M THANKFUL TO THE PEOPLE WHO POSTED THIS AWESOME DIY WITH PICS! THE PART HERE IN CANADA COST ME $78.00 INCLUDING TAX AND IT WAS ON A 2007 328I E90 GOOD LUCK AND THANKS AGAIN I SAVED HUNDREDS |
|
|
Appreciate
0
|
| 07-27-2011, 08:05 AM | #21 | |
|
Major General
548
Rep 6,563
Posts |
Quote:
__________________
under construction! |
|
|
Appreciate
0
|
 |
| Bookmarks |
|
|


