

|
|
|
|
 |
|
 |
BMW Garage | BMW Meets | Register | Today's Posts | Search |
 |

|
BMW 3-Series (E90 E92) Forum
>
New Suspension and Quaife LSD installed - DIY
|
 |
| 01-26-2012, 11:29 AM | #45 |
|
The Engineer

26
Rep 329
Posts
Drives: AW 07' 335i
Join Date: Jul 2010
Location: St. Louis MO
|
I am going to ask the dumb question here. When you are loosening the driftshaft nut you are turning to the passanger side correct? I have been fighting it and I want to make sure I am going the right way before I screw something up.
|
|
Appreciate
0
|
| 01-26-2012, 01:12 PM | #47 |
|
The Engineer
26
Rep 329
Posts
Drives: AW 07' 335i
Join Date: Jul 2010
Location: St. Louis MO
|
Yes I know you go clockwise but that changes depending on which way you are looking at it. Anyways I figured it out. Turn towards the passanger side of the car (clockwise if you are faceing the diff with the front of the car behind you. That nut is a B!TCH!
|
|
Appreciate
0
|
| 01-27-2012, 07:23 PM | #49 | |
|
Private First Class
 38
Rep 119
Posts |
Quote:
|
|
|
Appreciate
0
|
| 01-28-2012, 03:53 PM | #50 |
|
Enlisted Member
 0
Rep 45
Posts |
Just finished my Wavetrac. I had no problems with getting the diff into the case. If something doesnt look quite right, I was working with the case upside-down... The recesses were cut so the diff fit perfectly if you did it this way. I also had both sides of the bearings and snaprings out, maybe that was your issue?
 IMG_0730 by pstynoski, on Flickr And your pic reposted for comparison 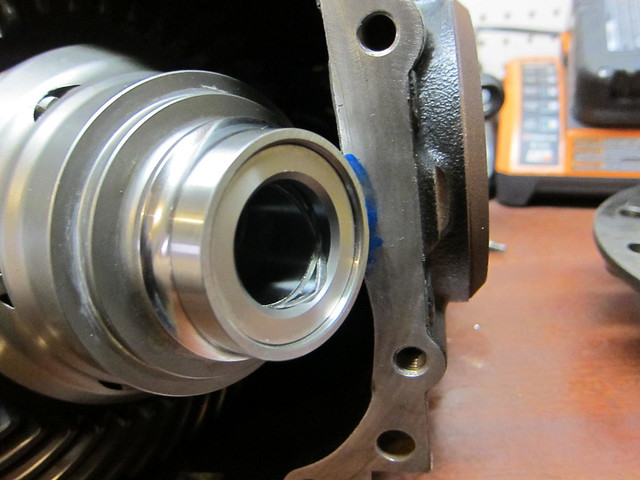 Last edited by illinipo; 01-28-2012 at 04:17 PM.. |
|
Appreciate
0
|
| 10-03-2012, 02:43 PM | #51 |
|
Private First Class

6
Rep 132
Posts |
This is an awesome thread, it really demistifies the upgrade to LSD into our cars.
 I am going to jump into it and add a Wavetrack to my car. Shipping to/from Puerto Rico adds another $600 to the cost if I were to do a core swap....and I can't justify a $3k mod. Plus, I enjoy the challenge of doing things myself. I do need recommendation for selecting a bearing puller..... The bearing puller I have won't work for this job, can someone post a pic of the puller used to remove the bearing races from the stock differential center piece? or recommend me which bearing puller to use? thanks
__________________
2011 e90 N55 (now 100% stock) & e36 2.8L SCCA ITR race car
Last edited by n55PR; 10-03-2012 at 02:48 PM.. |
|
Appreciate
0
|
| 10-03-2012, 02:52 PM | #52 |
|
Enlisted Member
0
Rep 45
Posts |
I did the job without a bearing splitter. Careful application of some heat on the race and a cheap soft metal screwdriver (Craftsman works if you can get it there) did the trick to get enough space to use an air conditioning pulley remover.
 |
|
Appreciate
0
|
| 10-03-2012, 03:00 PM | #53 |
|
Private First Class
6
Rep 132
Posts |
Hey, thanks for the answer and the pic.
What year is your car? is it Manual or A/T?
__________________
2011 e90 N55 (now 100% stock) & e36 2.8L SCCA ITR race car
|
|
Appreciate
0
|
| 10-03-2012, 03:43 PM | #55 |
|
Private First Class
6
Rep 132
Posts |
I was curious about the size of the core, the newer A/T models have a smaller differential housing.
Did you have to adjust the backslash and get different C clips or did the stock ones kept the backslash within spec. Thanks for the quick responses.....promise no more questions!
__________________
2011 e90 N55 (now 100% stock) & e36 2.8L SCCA ITR race car
|
|
Appreciate
0
|
| 06-09-2014, 02:19 PM | #57 |
|
Registered
0
Rep 3
Posts |
I'v just bought a Quaife dif to go into my 130i (in the UK) The instructions i have said that the dif came with just 3 of the silver hex bolts installed because to fit it into the housing (on some cars) you needed to disassemble the two halves of the quaife, then re-assemble them in situ, inside the housing, then install all the hex bolts that came pre-locktited.
Perhaps that would have removed the need for the grinding. http://www.birdsauto.com/parts/L8733000018 then click on download product information. - Birds are the UK quaife distributors for BMW cars Having said that, my unit has come with all the bolts pre-installed. Apparently they've re-designed the quaife to make sure it fits straight in without disassembly. I guess i'll find out in a couple of weeks when i fit it! |
|
Appreciate
0
|
| 03-23-2015, 06:47 PM | #60 |
|
New Member
0
Rep 5
Posts |
[QUOTE=1fastbmw;9323344]So after a long winter I collected all my suspesion components and decided to take on the install myself after recieveing several quotes ranging $3,000-3,600 in labor. My wife went to Disney for the week with the in laws and I took the time to spend some quality time in the garage. After alignment is complete I will post a more detailed review but after a quick run around the block the ass end is very well planted and the the car accelarates hard and straight, No nosie from the diff, shocks seem more compliant but at the same time a defects in the road surface seems to be transmitted back into the car a little more, slightly higher cabin noise, probably from stiffer bushings. All in all the car seems very tight.
Koni FSD's BMW Performance Yellow Springs M3 Frt Control Arm Kit M3 Rear Bushings M3 Rear Guide Rod Kit M3 Rear Upper Link Kit M3 26.5 mm Frt Sway Bar M3 20 mm Rear Sway Bar Dinan Rear Shock Mounts Dinan Frt Camber Plates E85 Z4s FRt & Rear Bump Stops Quaife LSD 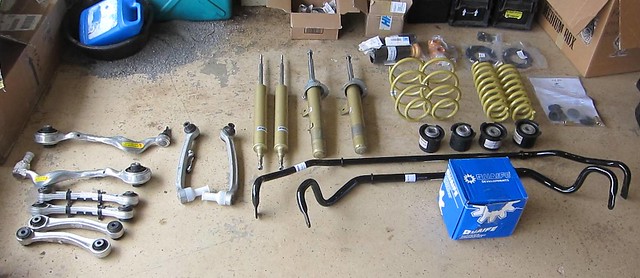 Car before install 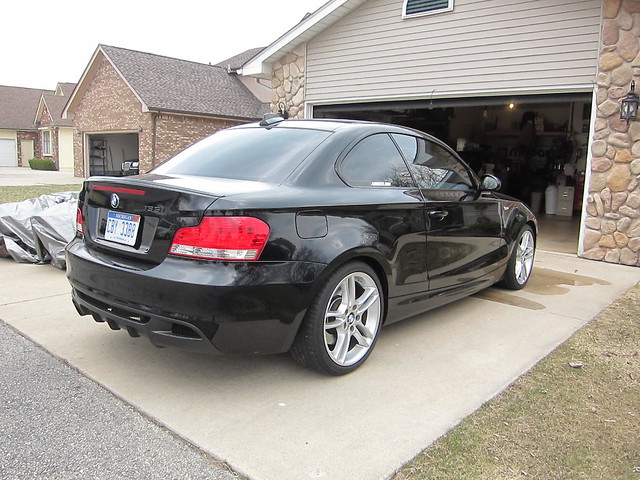 Garage 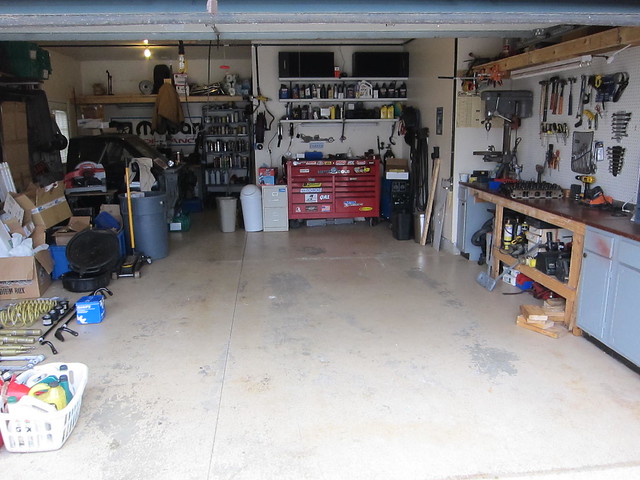 Install took 1 long day and 3 evenings after work to complete the suspension and LSD install. I would estimate it took 5 hrs for the frt suspension and 12 - 14 hrs to complete the rear with installing the Quaife LSD into my housing myself (of course mine was bolted). The good news is the install was not very difficult and can be done at home by a skilled individual with access to the right tools. Frt M3 Components went in with ease, the Dinan Camber plates were simple and seem to be quality parts. The frt struts did take some work to get them out without scratching / banging the fenders but nothing to complicated, taping fenders advised. There are several DIY's posted on the Frts already so I skipped over that, below I listed the order of which I preformed the work on the rear and some of the key points to watch for. This is How I completed and by No Means I can gaurantee this process, but it should help everyone understand the process. Suggested Items to purchased before starting 1. Bentley Service Manual for 3 series ($100) 2. New Bolts to attach axle shafts to differential ($15) 3. 2 quarts of 75w90NS diff Fluid (must NOT have slip additive used on most LSD's), could not find local had to order from Summit. ($25) 4. DOT 4 Brake Fluid ($3) 5. Silicone Sealant for Diff Cover ($5) 6. AR Design Drive Shaft Wrench ($50) 7. New Axle Seals (mine came with LSD from HPA) Other Helpful Post Rear Bushing Tools http://www.1addicts.com/forums/showt...+bushings+tool http://www.1addicts.com/forums/showt...+bushings+tool Helpful Hints http://www.1addicts.com/forums/showt...+rear+bushings Priceless LSD Install Details from Former_Boosted_IS http://www.e90post.com/forums/showthread.php?t=365404 Steps to remove and install 1. Raise the entire car in the air and ensure jack stands are positioned properly. 2 sets of tall jack stands and good floor jack strongly suggested. 2. Remove Rear Wheels 3. Remove axle back exhaust (I did not remove midpipes) 4. Disconnect Sway Bar Links from Sway Bar 5. Remove Rear Shocks (requires removing trunk liners to access upper mounts), set aside upper mount components. 6. Remove Rear Coil Springs. Support lower control arms with jack under shock attachment and remove nut/bolt from knuckle lower jack and remove spring. Make sure you disconnect leveling sensor from drivers side lower control arm prior to lowering control arm. Leave lower Isolator in control arm and set aside top isolator. 7. Swap out Rear Arms one at a time with M3 components, Do not final torque until later. 8. Remove all rear fasteners (1 bolt / 3 nuts) on heat shield below exhaust and bend down slightly. 9. Disconnect Axle Shafts, using parking brake to hold from spinning while braking bolts loose. Support Axles with wire or hanger.  10. Disconnect Drive Shaft, require a special thin 50 mm wrench which AR Design makes and can be purchased from Harold at HP Autowerks. Need to turn clockwise to loosen. Pics borrowed from Former_Boosted_IS    11. Support Diff with Jack, Strongly suggest using a trans jack. 12. Remove 3 bolts holding diff in, Right Frt bolt has exhaust hanger with nut that must be removed if not removed with exhaust. 13. Lower diff slightly, pull backwards to disengage the drive shaft spline and lower completely and set aside. Do not put to much downward force on drive shaft. 14. Disconnect Middle Brake Lines (rubber lines that go from body to subframe) and plug lines right away, I used vacuum caps to plug. 15. Remove 2 bolts that attach bracket from frt side of sub frame to body on both sides. 16. Support Sub Frame with Jack, again suggest trans jack for stability and used a 4x4 wood block under frt of sub frame to maintain level. 17. Remove 4 bolts holding sub frame up. 18. Lower Sub frame about 4 inches, you can put additonal jack stands under wheel end / knuckle for stability. 19. Remove Subframe Bushings, special tool suggested which can be rented from HP Autowerks. I did not use special tool because it was not available, so I got a piece of 3.5" & 5" emt conduit and made a pc 1" and 5" tall of each. The talller pc was used to pull the bushings out and the shorter pcs were used to install. I also used a 5/8" threaded rod from a spring compressor and some large washers (2 that have smaller diameter than bushings to remove and 2 that have larger diameter than the bushings to press in) and used this with a impact to remove and press in the new bushings. All the original bushing are pressed in from the bottom but the M3 the 2 rear bushing press into the bottom and the frts press in from the top. I used soapy water to lubricate the new bushings when installing. This maybe the toughest part. Removing Bushing - Pic from cpt97m3 post Pressing In 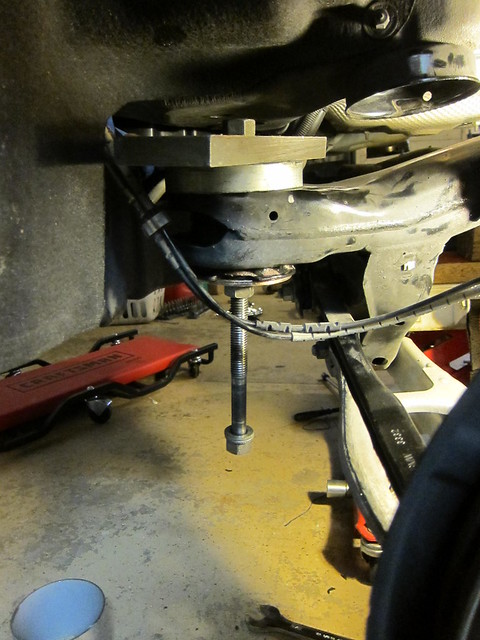 20. Remove Rear Sway Bar while subframe is lowered. 21. Install M3 Swaybar, grease bushing to help rotate bar when installed. You can now connect end links and hand start nuts. 22. Lift Subframe back into position 23. Hand Start all Fasteners on frt brackets, then hand rear sub frame bolts. Torque Frt Bolts and then torque rear bolts. 24. Reconnect Brake Lines. LSD Install into Diff Housing a. Remove Rear Diff Cover and Drain Fluid, clean and measure and note backlash using magnetic dial indicator, should be around .004". Pics borrowed from Former_Boosted_IS  b. Remove both Axle Shaft, I used slide hammer and pop them off. Pics borrowed from Former_Boosted_IS 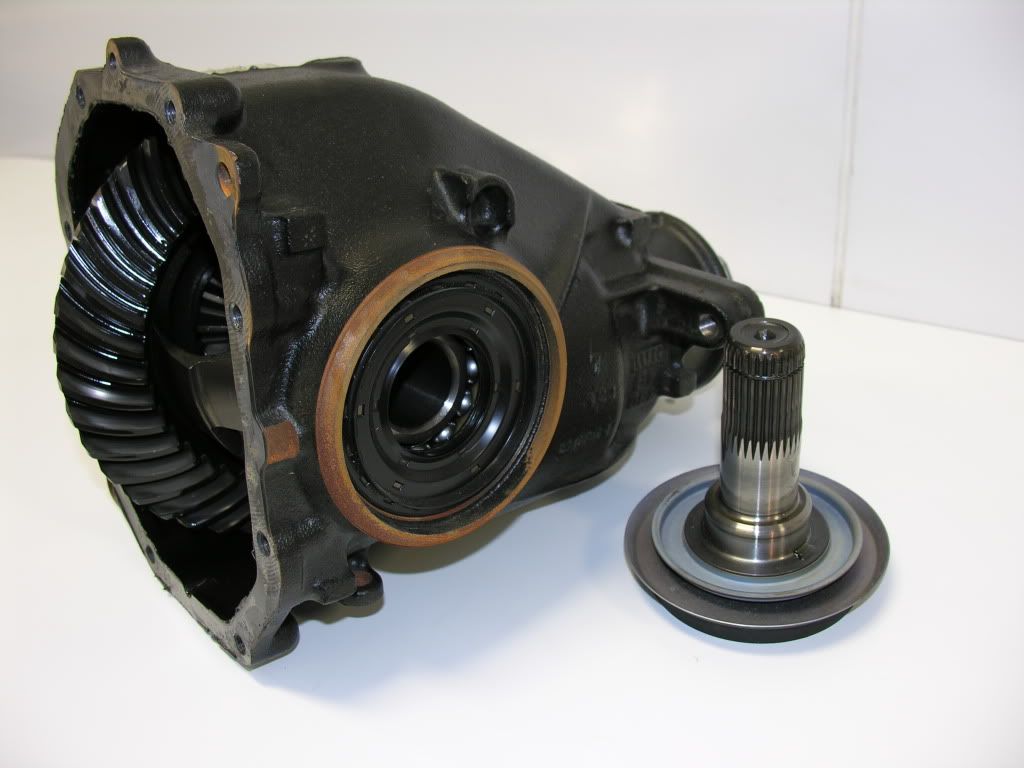 c. Remove Axle Seal, Seal puller or large screwdriver will work. d. Note C-Clips that Retain side bearings have laser engraved dimensions on them, this is how back lash is set. Mark Case on each side what size clip went in, I used masking tape. It is critical this go back in the same way the cam out. 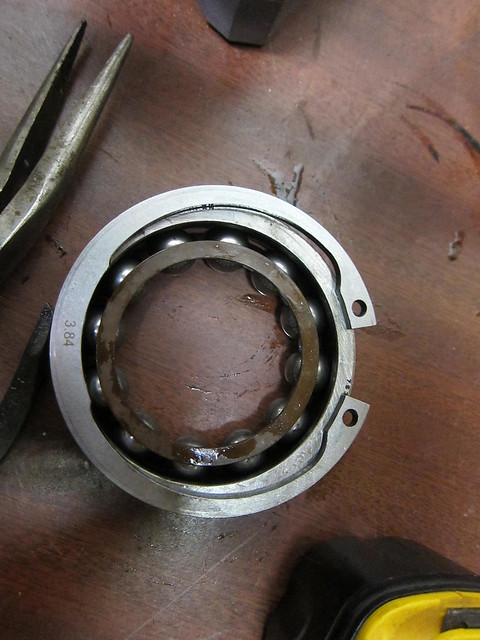 e. Remove C-Clips one at a time, Large needle nose pliers (12-16" long) work very well. f. Remove Side Bearings, again very important they go in the same side, keep with associated C-Clip. 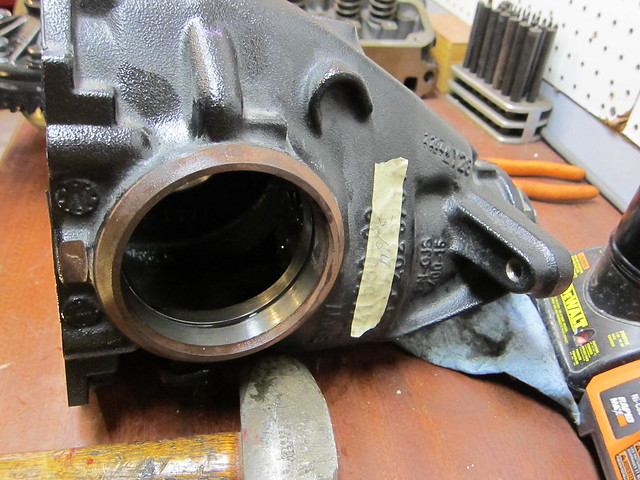 g. Rock Center section out of case 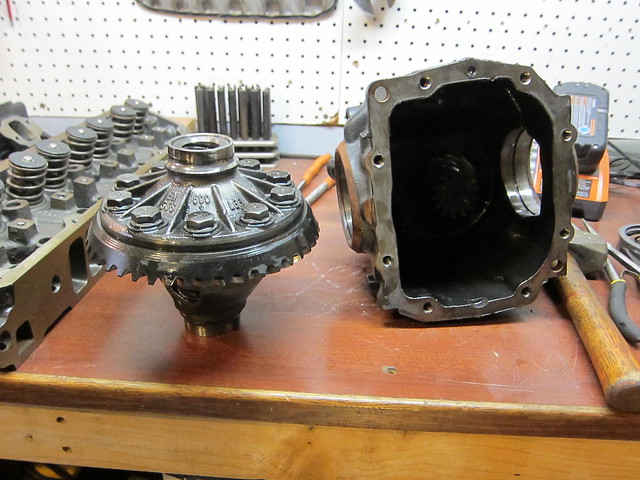 e. Remove Ring Gear, hold in vise with alum jaws or wood blocks and impact off bolts. Bolts are standard RH Thread so counter clockwise to remove. f. Remove Bearing Races from stock center section and transfer to new LSD. Remove and install one at a time taking caution not to mix up where the race goes. Need to use bearing puller and Hyd Press or Arbor Press to remove.  Pics borrowed from Former_Boosted_IS 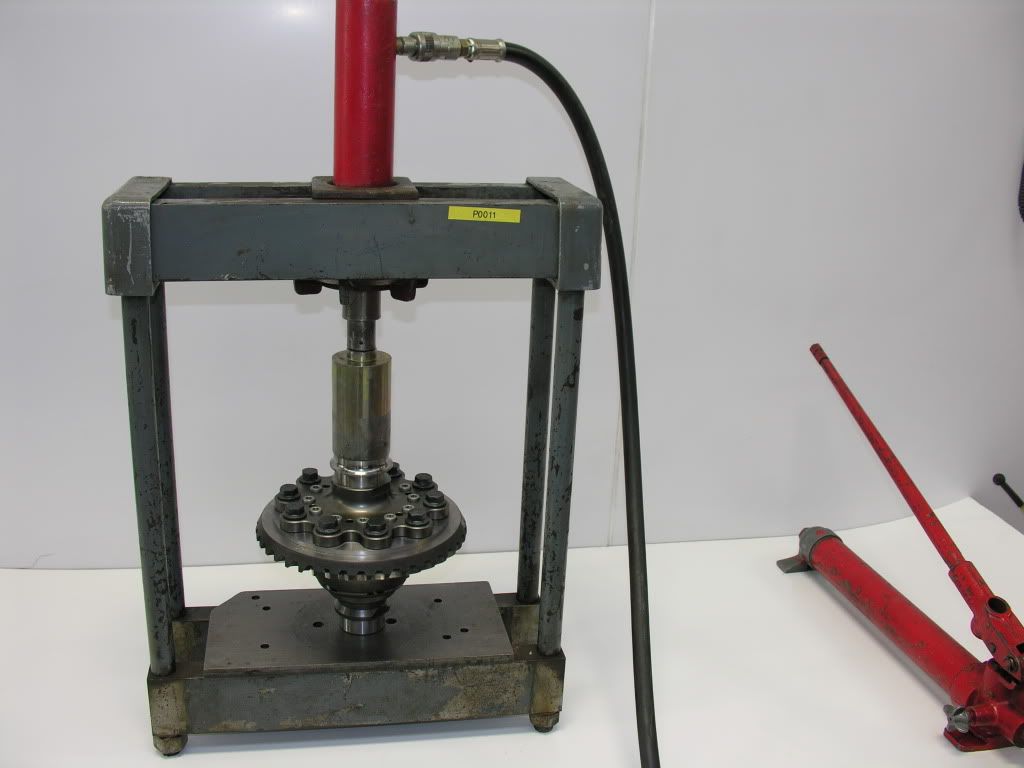 One Side the race is flush with the case so you must use a chisel and hammer to slowly and gently walk the race down by driving the punch between race and case, rotate around the entire race one tap at a time. This will allow you to remove the race slightly and grip with bearing puller. g. Press Races onto new LSD making sure they are fully seated. h. The Quaife LSD was shipped with only 3 bolts holding the unit together and new bolts with loctite in a bag. But the LSD in the vise again with alum or wood blocks. Leaving 3 bolts in place, I torqued all others to 30 ft.lbs. using a cross bolt pattern and then retorqued to 40 ft.lbs. Then remove 3 bolts that came in unit and torque those to the same. (you should double check this I found the info somewhere on the web) i. Install Ring Gear, clamp in vise, clean all bolts and apply blue loctite, torque all bolts to 100 and then 125 ft.lbs. using cross bolt pattern (again you should double check this I found the info somewhere on the web) Silver hex head bolts in picture below are what step h. refer to 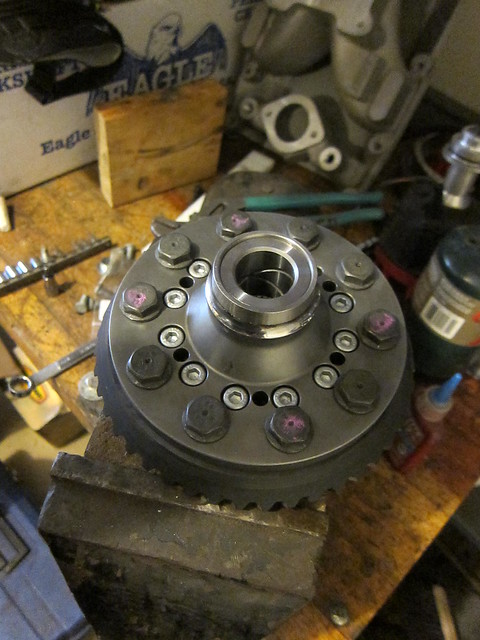 I used a 5.5 mm socket to keep LSD from spinning in vice while torqueing 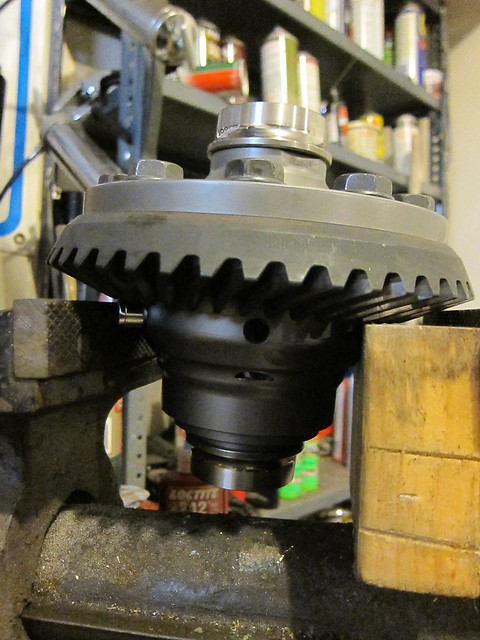 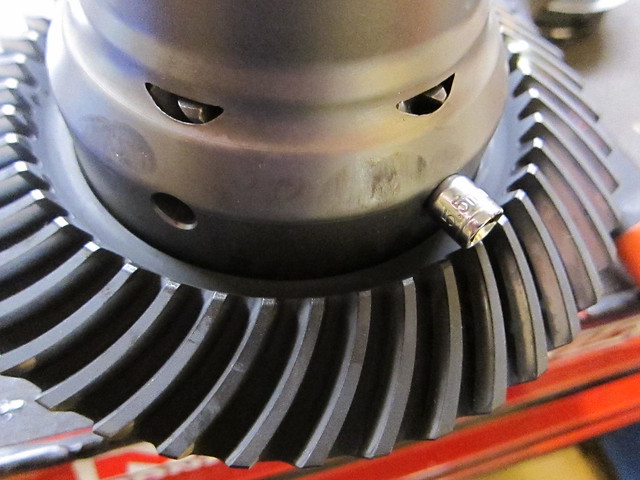 j. Install LSD into carrier, this is where things got interesting because it does not fit. Grinding of the case is required to fit the larger Quaife unit, nothing in the instructions tells you this, but after searching for awhile I discovered this has to be done. To preform this I 1st removed 2 ring gear bolts, leaving 1 in place between them, put the housing on its side, ring gear side down and load LSD unit, the 2 bolts that are removed should be facing out and this allowed the LSD to be lowered about 3/16". Mark housing where the right bearing race hits. Using a die grinder slowly remove material to clearence for race to pivot into case. I found that an area about 2" wide had to be ground down about 1/8"-3/16" all the way back to the bearing hole to rock the unit into place. 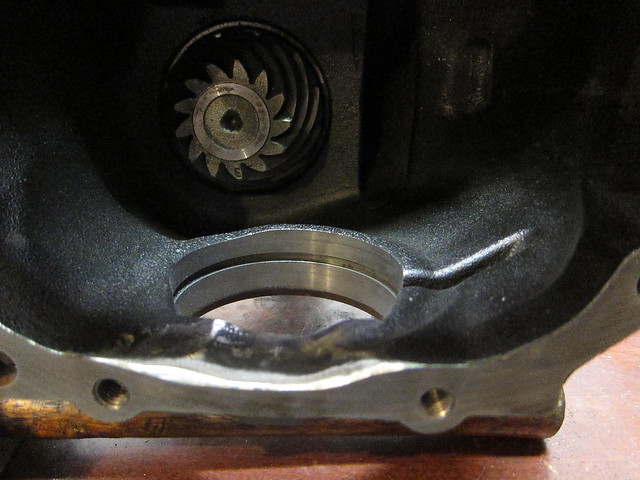 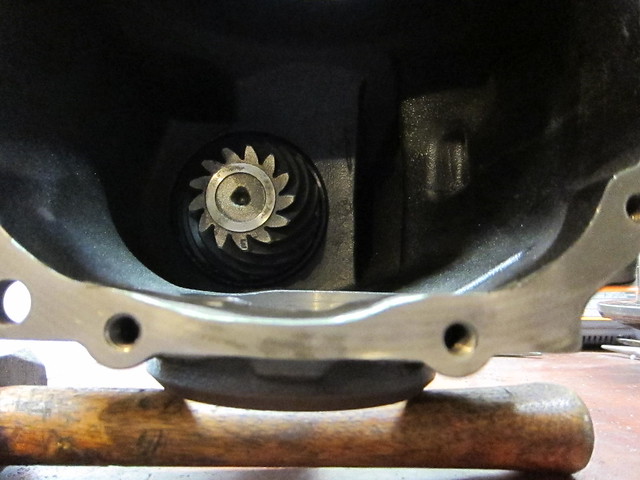 This should be done slowly and with several test fits to ensure you only remove the min amount of material required. While grinding fill case with rags, covering pinion and keep LSD, bearing and C-Clips away from area. Be sure to clean housing extremely well, suggest washing and blowing with compressed air several times before fitting LSD. I also painted the areas I ground on before reassembling. k. With LSD unit in housing reinstall and torque 2 ring gear bolts, a impact work very well here, take caution that the ring gear is clear to the pinion during this step, you do not want any nicks in the gears. l. Reinstall Side Bearing on Ring Gear side and install C-Clip. Make sure you install correct clip. Ensure C-Clip is fully seated in grove, you can tap around with punch, when fully seated the clip has 3 features that should sit flush with the bearing race, 1 on each end and 1 in the middle. m. Flip housing over and install other bearing and C-Clip, this one will need to be tap down with hammer to fully seat, I used a pc of Pipe that I also used during bushing install to tap it into place. Take extra time to ensure this clip is seated correctly. n. Check Backlash should be .002-.005" if greater you will need to source different size C-Clips. Mine measured .004" before and after and from what I understand everybody seems to be ok with factory clips. But this must be correct or noise or damage will be the result. o. Install New axle seals, you can use that same pc of pipe again to tap this into place, use the original witness marks or rust line to try a seat it to the same depth as the stocks seals were. p. Reinstall Axle shafts 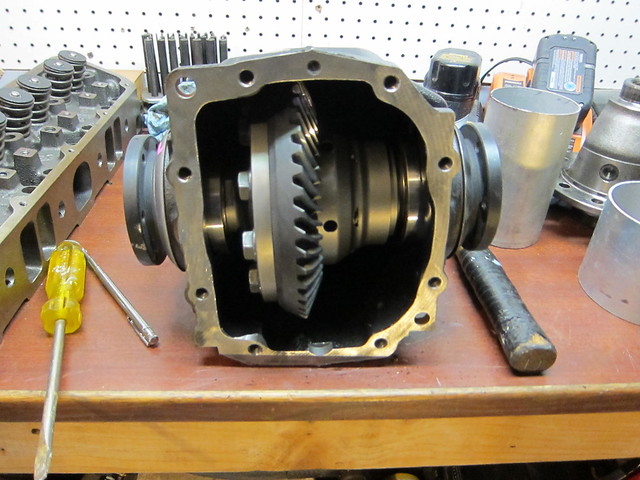 q. Reinstall Rear Cover, both surfaces must be cleaned and dried, apply silicone sealant and retorque fasteners. Let stand for 1-2 hrs r. Fill diff w/ fluid, I used Redline 75w90NS because my dealer on had only bulk and wanted $140 gallon. I heard others say BMW fluid may reduce noise. Back to Reassembly 25. Reinstall Fully Reassembled Diff with fluid pre filled. Raise with Jack, Have diff tilted slightly up in the frt to help align to drive shaft spline push diff onto drive shaft, raise unit into position. I found it easier to hand start rear bolt and nut and then align and hand start frt to bolts. Front 2 bolts must be torqued 1st to 100 NM before torquing Rear Bolt and Nut to 165 NM, Make Sure you torque the nut not bolt. 26. Apply blue loctite to drive shaft thread and torque drive shaft to 75 NM, remember to turn counter clockwise to tighten. AR wrench comes in handy with torque wrench. 27. Reconnect axle shafts, replacing bolts recommended, use blue loctite and torque to 52 NM. 28. Reinstall Fasteners for Heat Shield 29. Install New coil Springs, reuse upper isolator, ensure coil ends align properly to isolator pockets. Use Jack under control to compress coil and hand start bolt and nut. Do not forget to reconnect rear leveling sensor on drivers side. 30. Install Rear Shocks, I installed Dinan Rear Shock Mount kit at this time which replaces upper isolators and steel sleeve to give the shock 1/2" more travel. Torque to 38 NM. 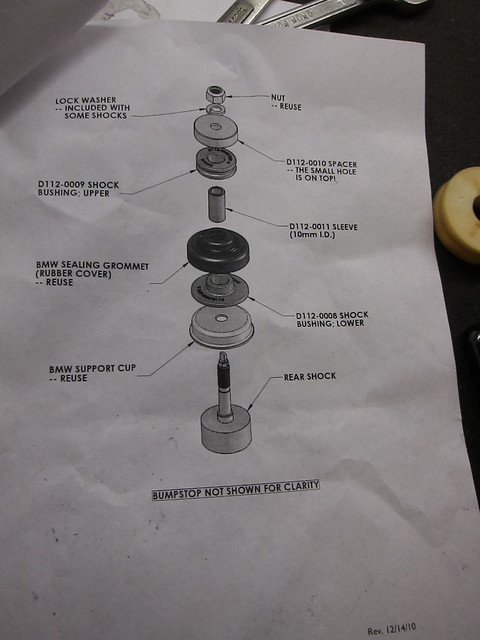 Stock 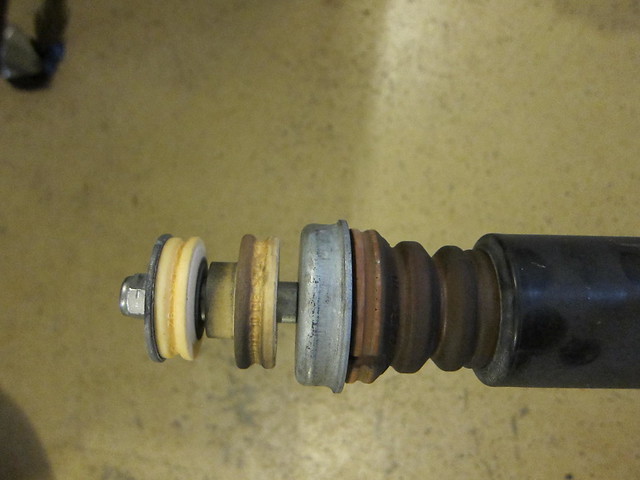 Dinan 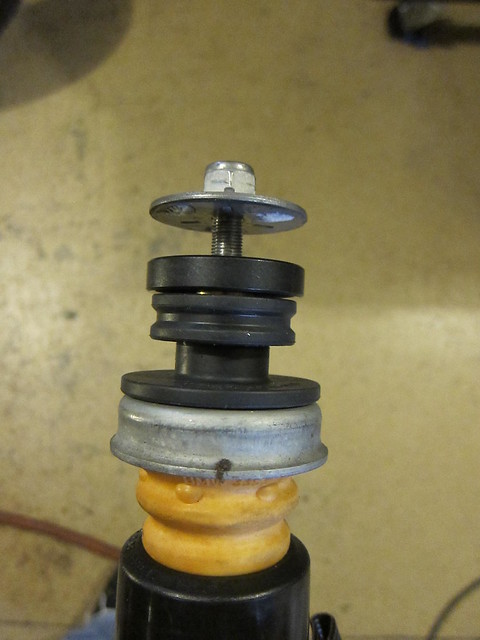 31. Using jack put block of wood under the rotor hat and jack wheel end up into ride height position and torque all bolts on M3 Links to 100 NM and lower swing arm to 165 NM. Repeat for other side. 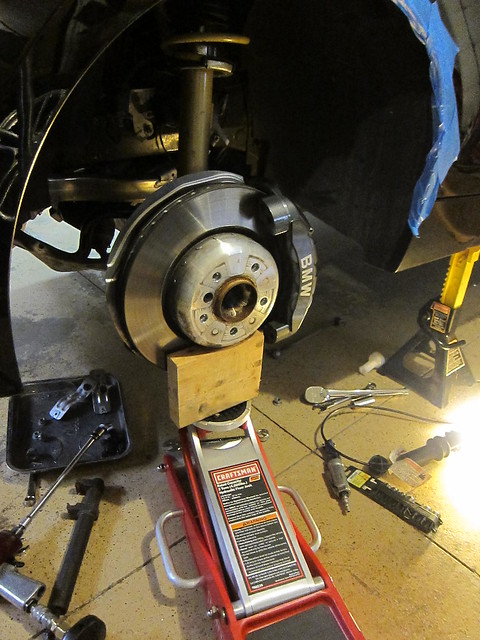 32. Torque sway bar links. 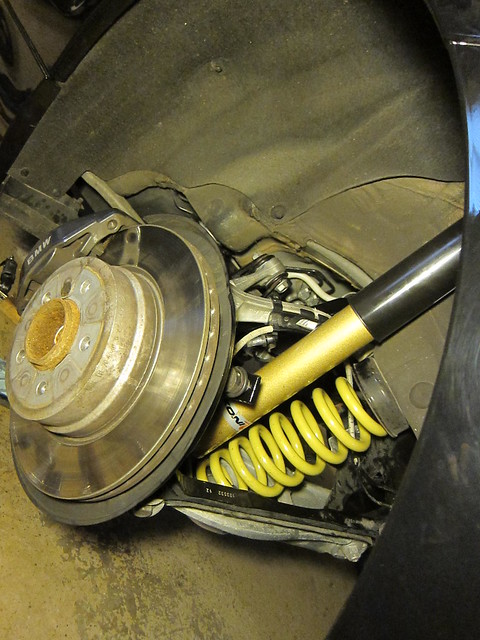 33. Bleed Rear Brakes, I left rear lines crack loose with cap removed from reservoir and ensured it stayed full for about 10 mins, which seemed to bleed them fairly well. Make sure to spray all brake components with brake clean quickly to ensure no paint is damaged. 34. Reinstall axle back exhaust. 35. Reinstall Rear Wheels 36. Lower Car 37. Take for alignment Alignment targets suggested by Harold at HP Autowerks Front toe 1/16" in total Camber as much as you can, but not more than -1.5 for street use Rear toe 3/16" in Rear camber -2 Post Install Picks (on cloudy day and cheap camera) 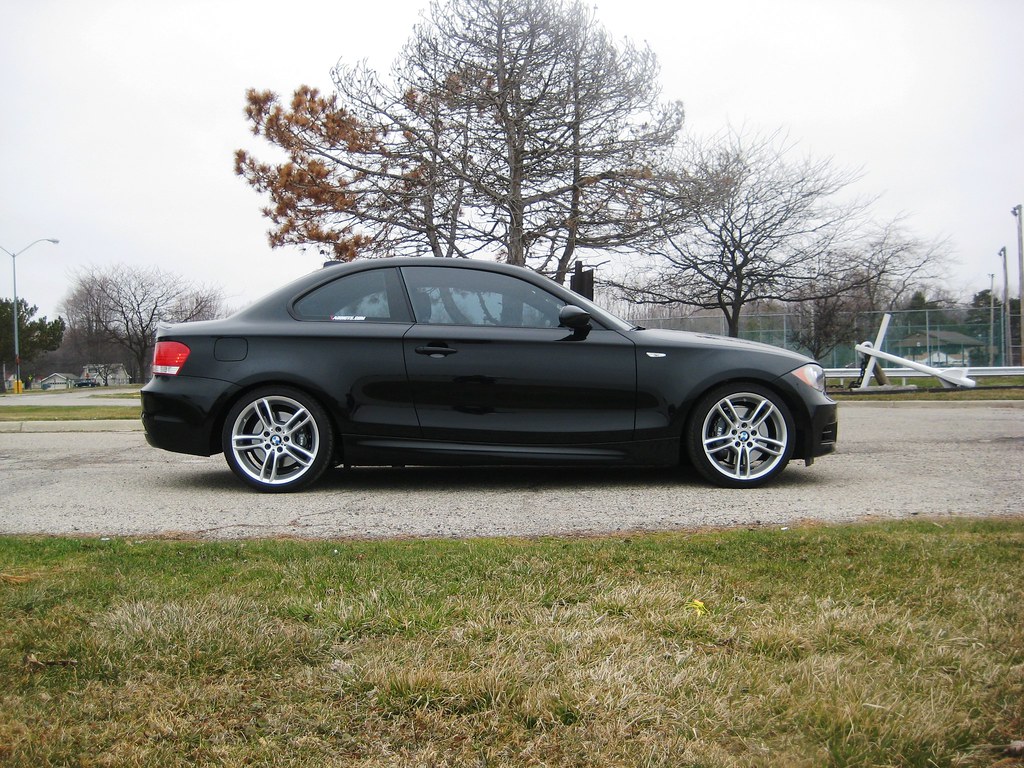 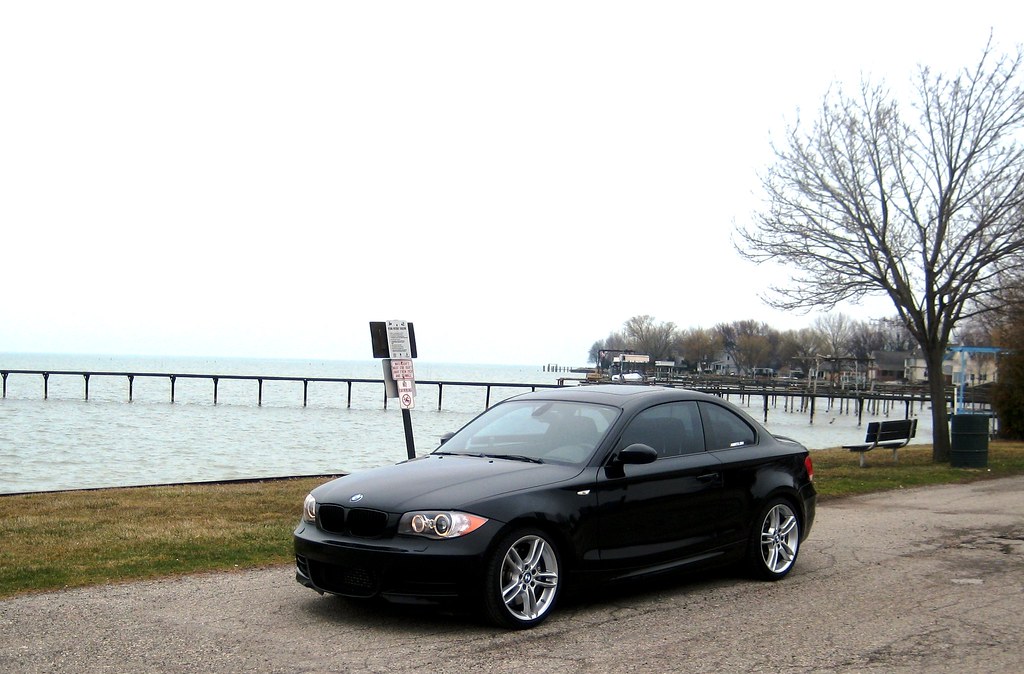 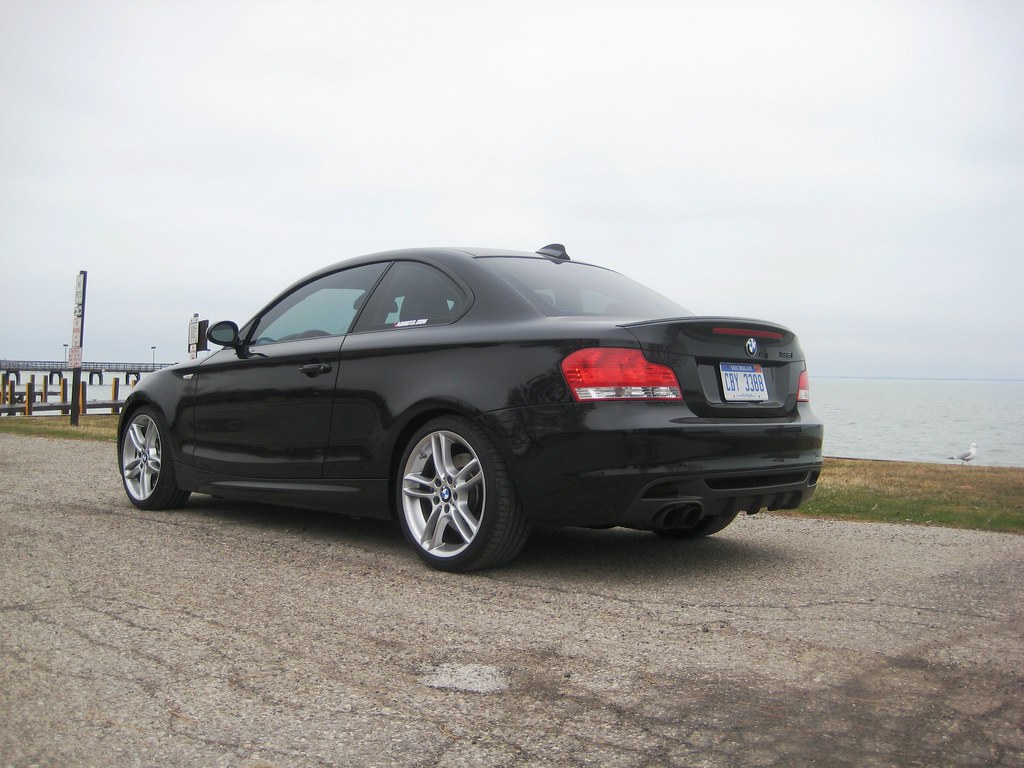 I will add better photos of the installed suspension after I wash car and get aligned. To say the least I cant wait until I can take this out for a true test drive, I have until next Tuesday for the alignment.[/QUOTE did you reuse your old bearings? or did you get new ones? and if you did where did you get them? thanks |
|
Appreciate
0
|
| 03-27-2015, 08:04 PM | #61 |
|
Custom User Title

412
Rep 1,337
Posts |
This has been by far one of the top five threads of all time I have read on here.
Major thanks to the OP for sharing his adventure and heads up. This has inspired me to upgrade to an LSD. Any suggestions or advice for an AT E92 N52? I would be very grateful for any guidance or suggestions. 
__________________
|
|
Appreciate
0
|
 |
| Bookmarks |
|
|


