

|
|
|
|
 |

|
 |
BMW Garage | BMW Meets | Register | Today's Posts | Search |
 |

|
BMW 3-Series (E90 E92) Forum
>
DIY: Sticking Steering Column Lock Fix
|
 |
| 01-31-2011, 11:45 PM | #1 |
|
Brigadier General
 231
Rep 3,561
Posts |
DIY: Sticking Steering Column Lock Fix
Below are instructions to disassemble your steering column and grease the steering column lock mechanism to prevent sticking on startup/shutdown as is a common problem with these mechanisms. For cars in the US, 06 MY E90s are affected; locking columns are replaced with non-locking columns at no charge under warranty (Service Bulletin SI B32 07 06). Outside the US, the range of affected cars is much wider.
I have read that aftermarket batteries can lead to these problems as such a battery provides a lesser voltage to the mechanism, leading it to stick (or not go to completion), leading to an error and not allowing you to start the car. My car has an aftermarket interstate battery (purchased it this way), which will be replaced with an OEM one in the near future, if you are due for a new battery, hold off on this procedure until you replace it--and of course post results below! This is my first DIY, so be gentle  I was largely motivated to do this DIY as I just found out how embarrassing it is to offer a girl a ride in my car and not have it start for a minute because of this stupid lock I was largely motivated to do this DIY as I just found out how embarrassing it is to offer a girl a ride in my car and not have it start for a minute because of this stupid lock  Anyway, onto my experience (with the car, of course Anyway, onto my experience (with the car, of course  ): ):Step 1 - Tools Used Nothing special, you need a standard ratchet, E10 external torx socket for the column bolts, and I highly suggest a T10 torx ratchet as it is ideal for the pinch bolt. I used a craftsman 5/16" all-purpose (incl. torx) ratchet. I used a dremel and flathead to remove the security bolts from the lock cover, didn't find another way to do this unless you want to order a bit/bit set online. (will be updated in near future, didn't take a pic of these) Step 2 - Set up good lighting to the steering column area 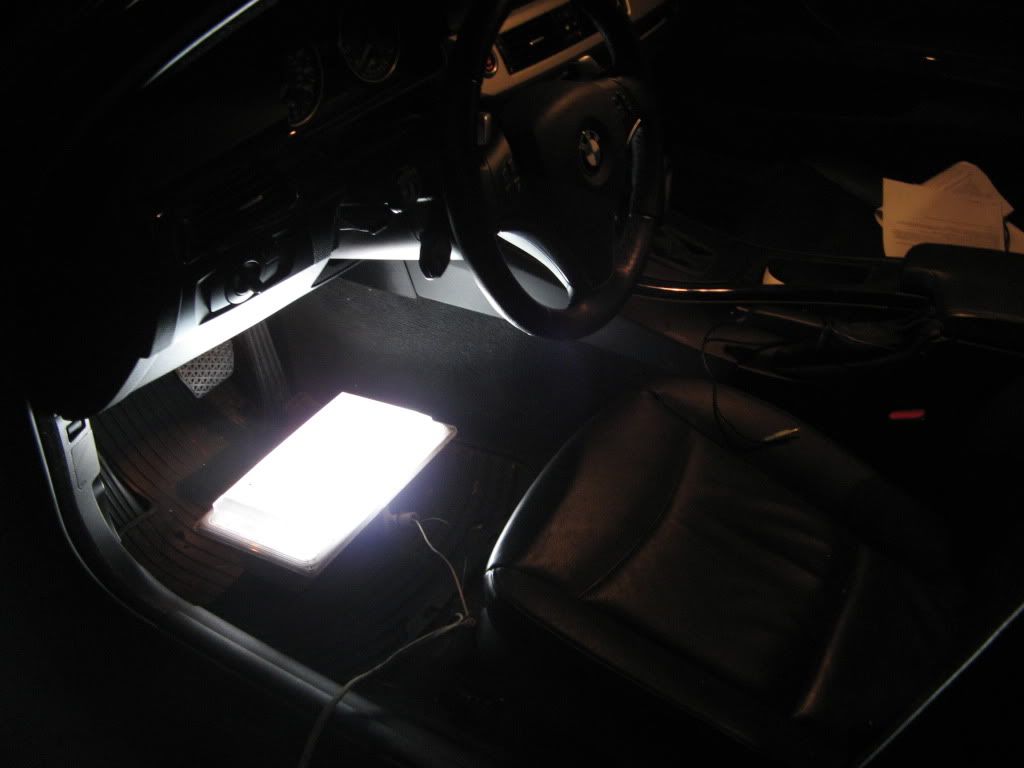 Step 3 - Move seat back all the way 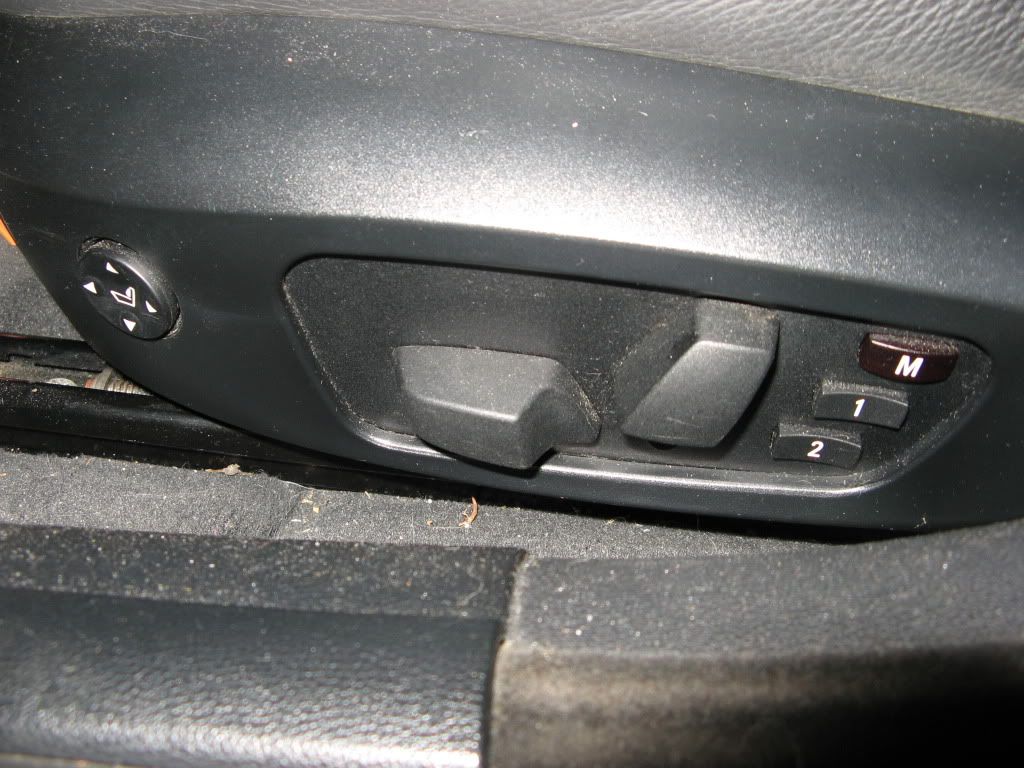 Step 4 - Disconnect negative battery terminal in trunk  Step 5 - Remove steering wheel airbag - Feel for a pin towards the rear of the steering wheel and push it towards the center of the wheel, this will release one side of the airbag at a time. Refer here for help 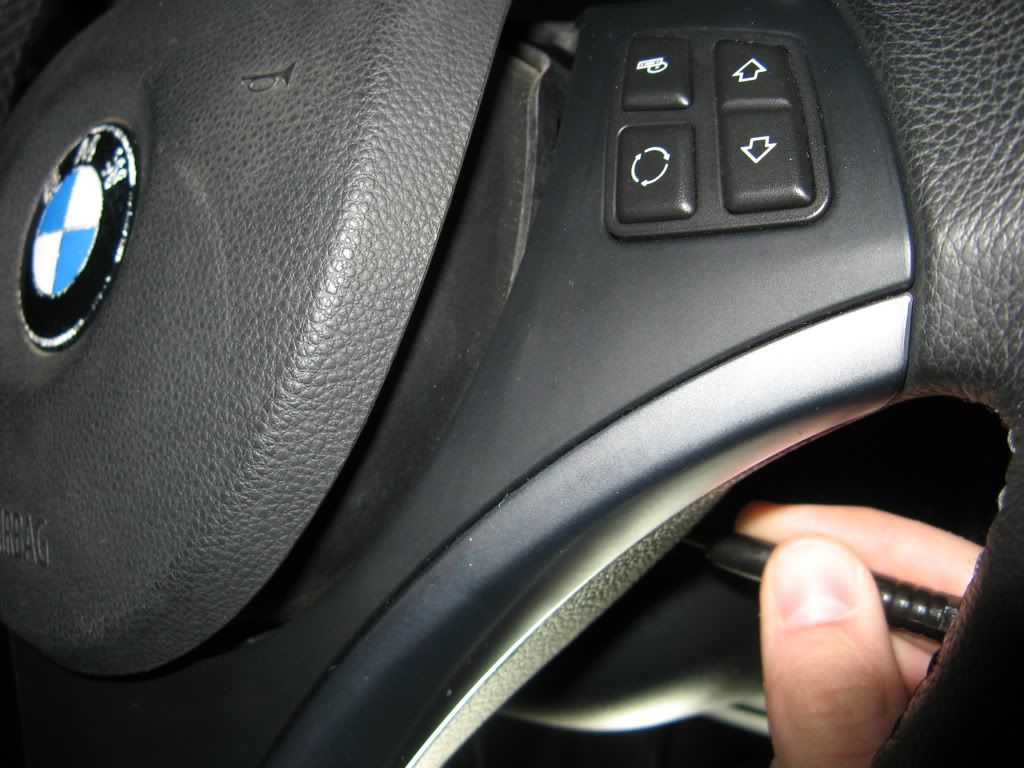 Step 6 - Disconnect airbag and MF/paddle harness, remove steering wheel by removing center bolt 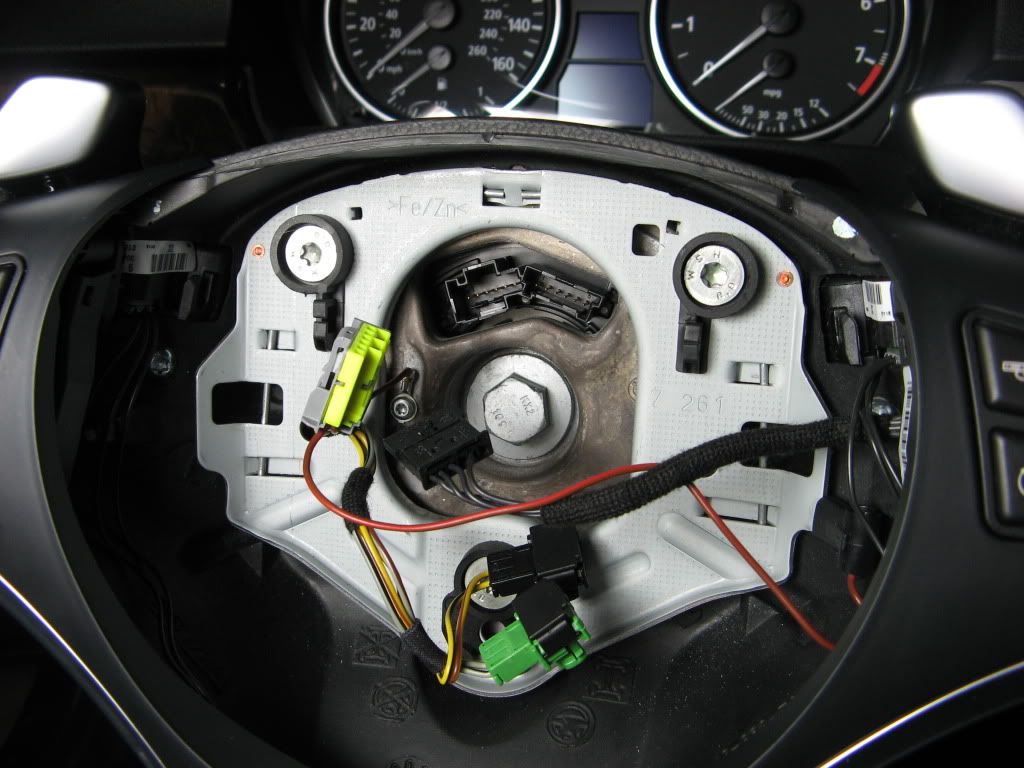 Step 7 - Remove lower steering column shroud Use a small flathead to gently push out the bottom half of the shroud, near the edge. It should pop out with a little force. Next, repeat for the other side. Once both sides are popped, release the column adjustment lever and raise and extend the column. Bottom part of shroud should easily come out. 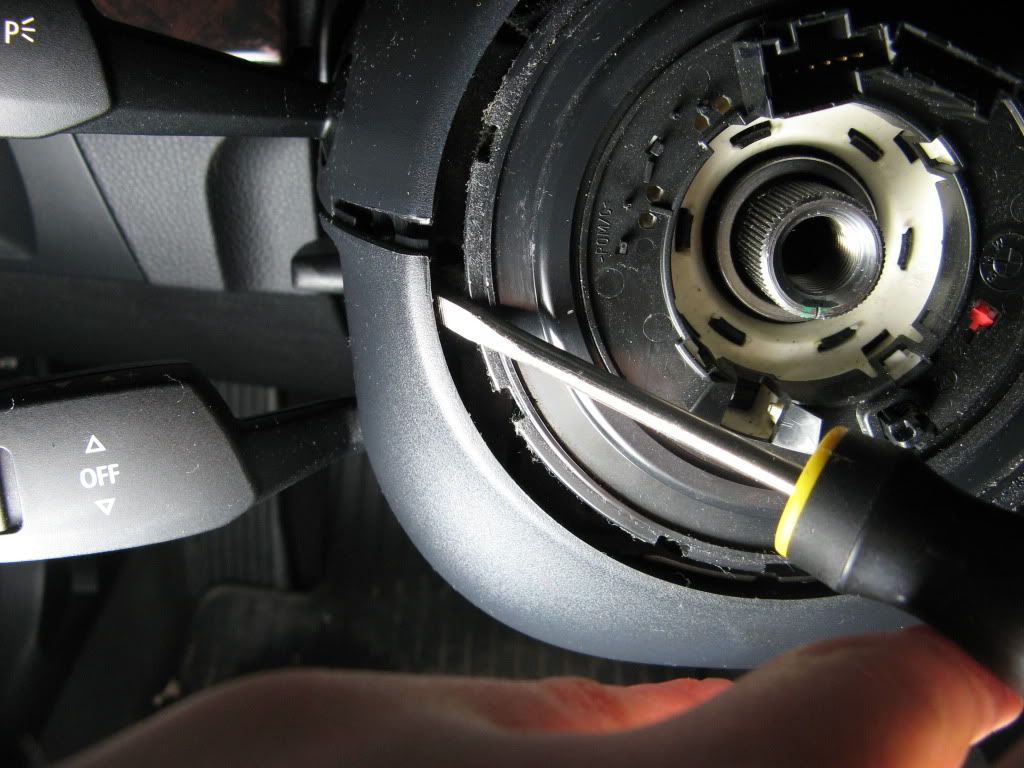 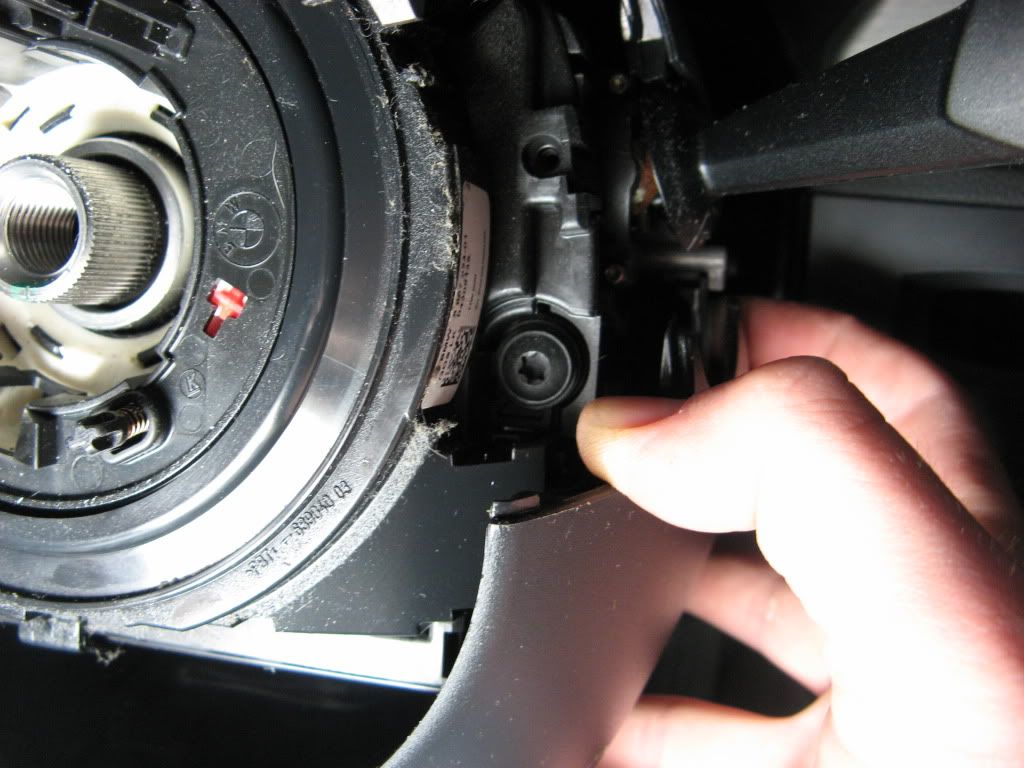 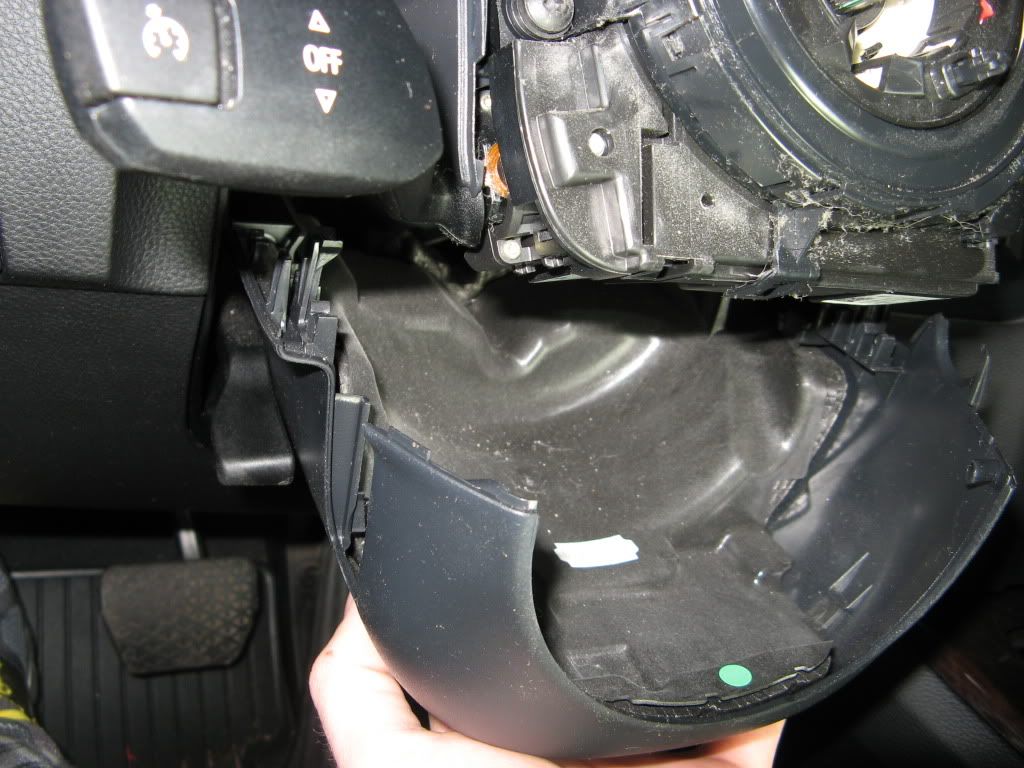 Last edited by yakev724; 02-01-2011 at 12:28 AM.. |
| 01-31-2011, 11:45 PM | #2 |
|
Brigadier General
231
Rep 3,561
Posts |
Step 8 - Unscrew the lower kick panel
There should be 3 torx bolts as pictured, as well as one just in front of the brake pedal (my car was missing this one  ) )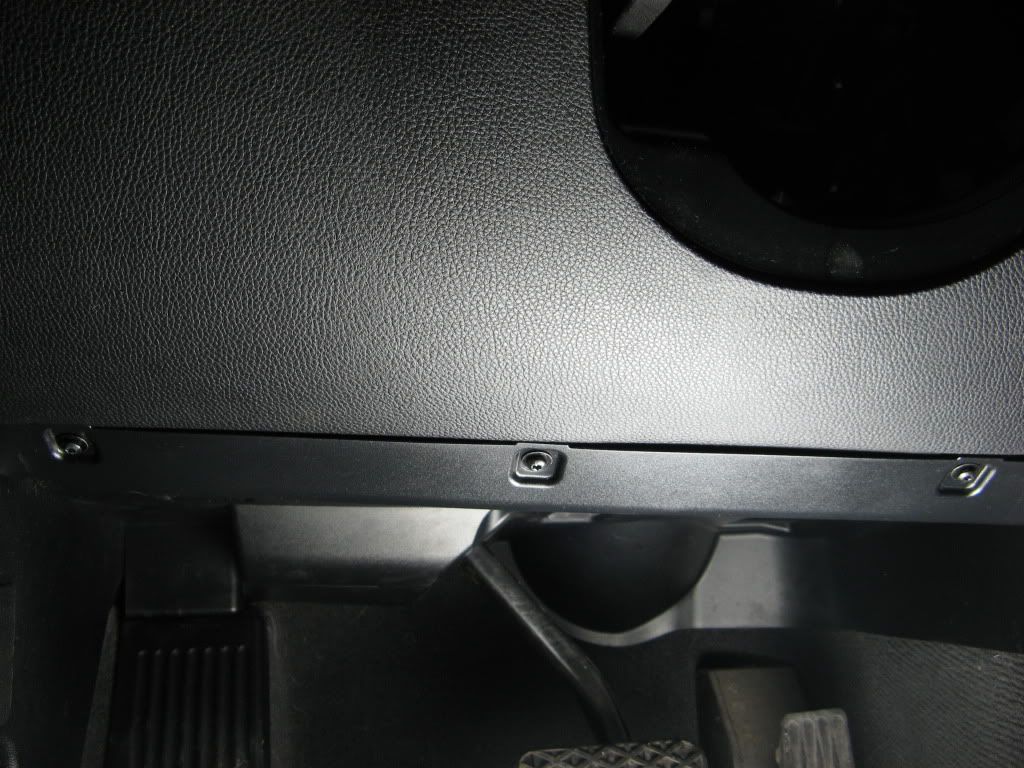 Step 9 - Remove the lower kick panel Disconnect the speaker, footwell light, bluetooth antenna (front left), and the 4th module. The bluetooth antenna, I couldn't find a simple way to disconnect it so just removed the entire thing. Once these 4 units are disconnected, the kick panel can be easily removed. 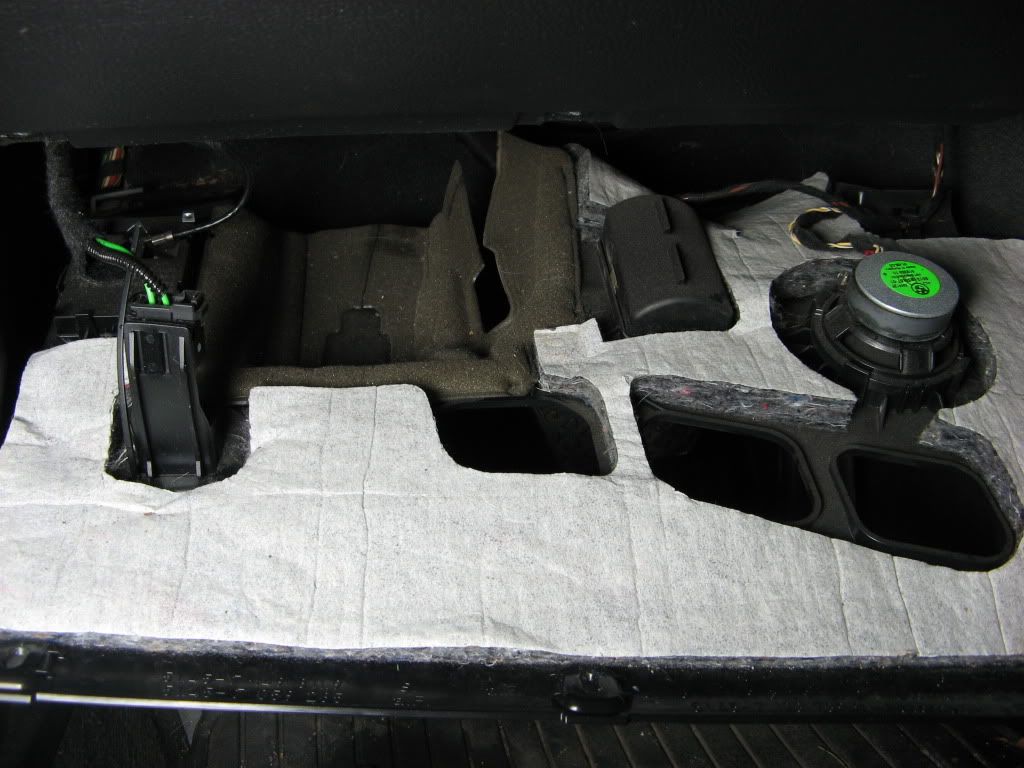 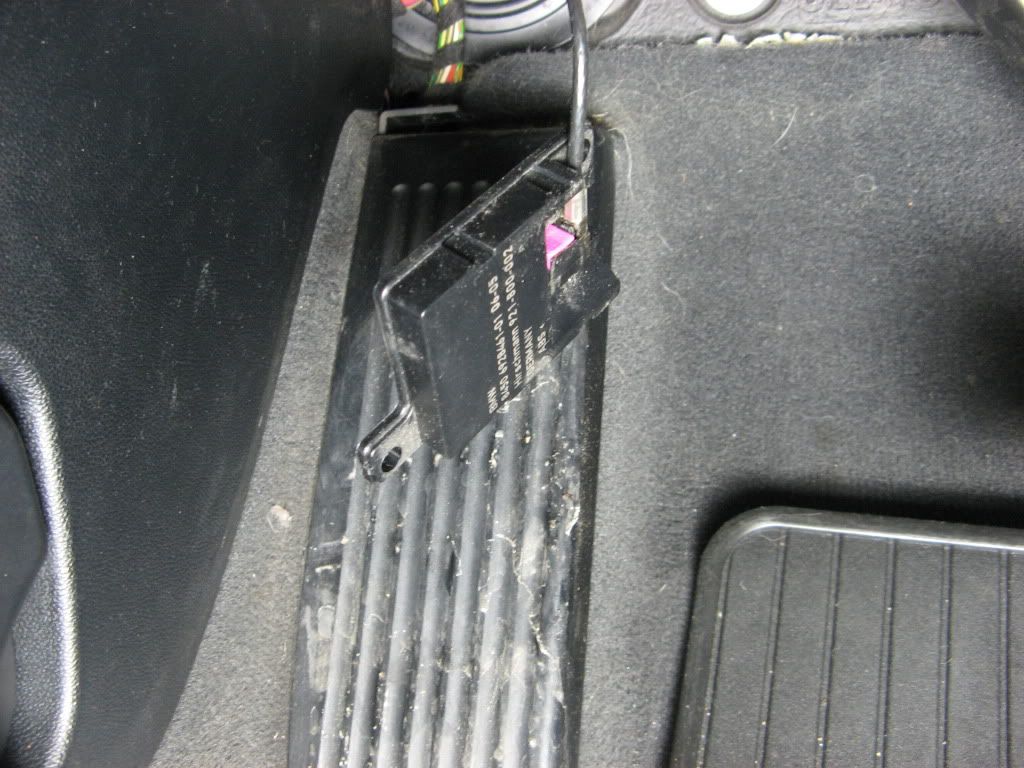 Step 10 - Remove the rubber steering column shaft boot 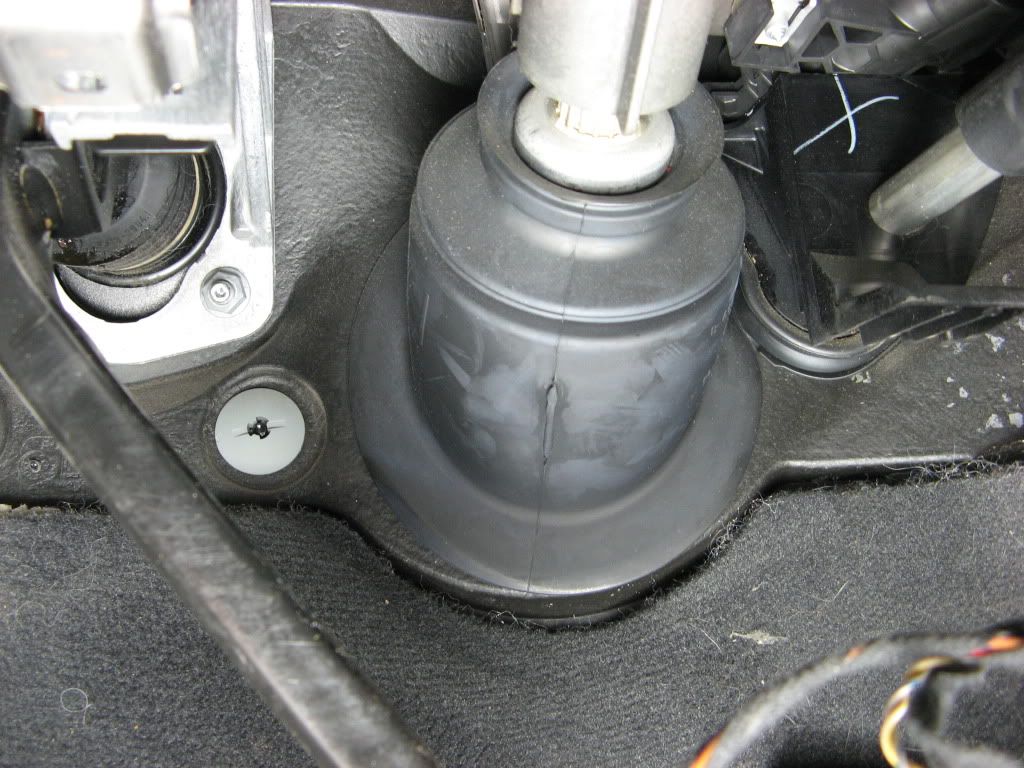 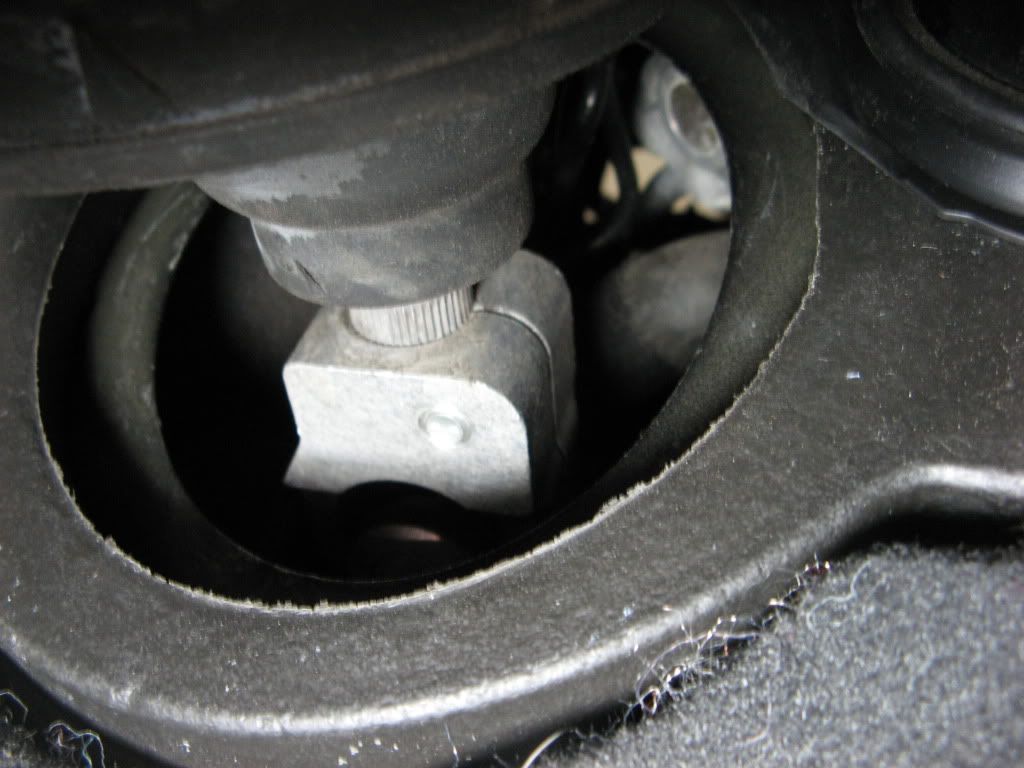 Step 11 - Jack up front left wheel and turn wheel approximately 5 degrees This is done to make the steering column shaft pinch bolt (exposed in step 10) accessible for easy removal. As seen above, when first exposed, it's difficult to remove, there's almost no space (forget about engine bay, tried that route, even less *******. By turning the wheel physically, you rotate this pinch bolt. Below are original wheel position, final wheel position, and final pinch bolt position. 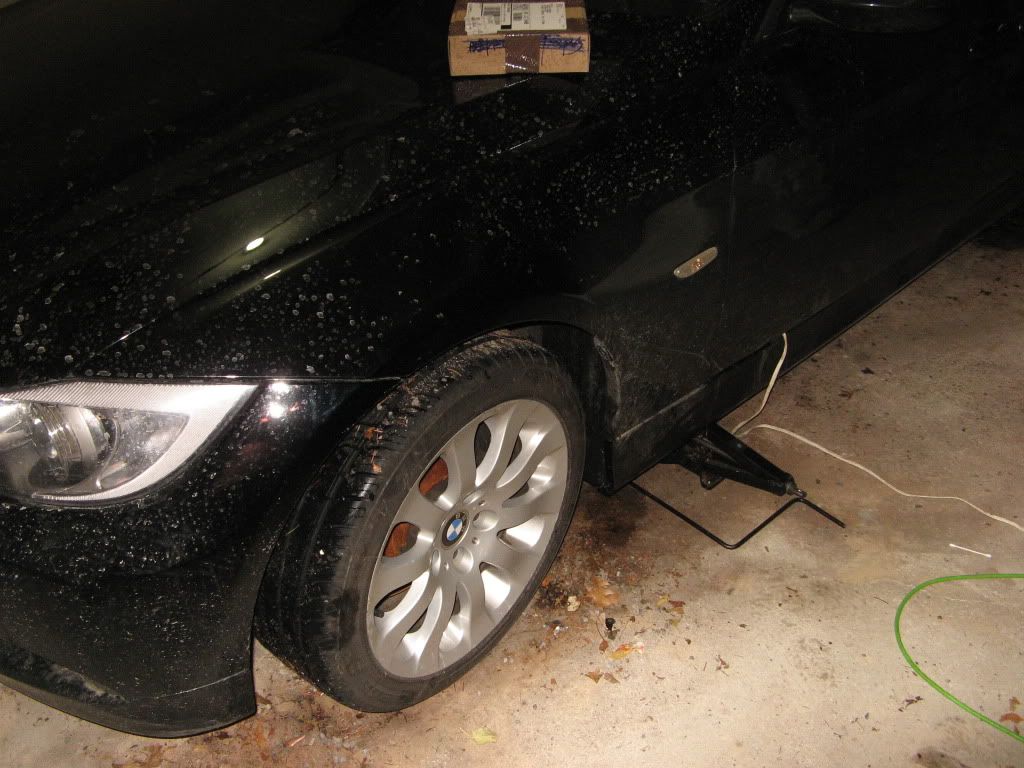 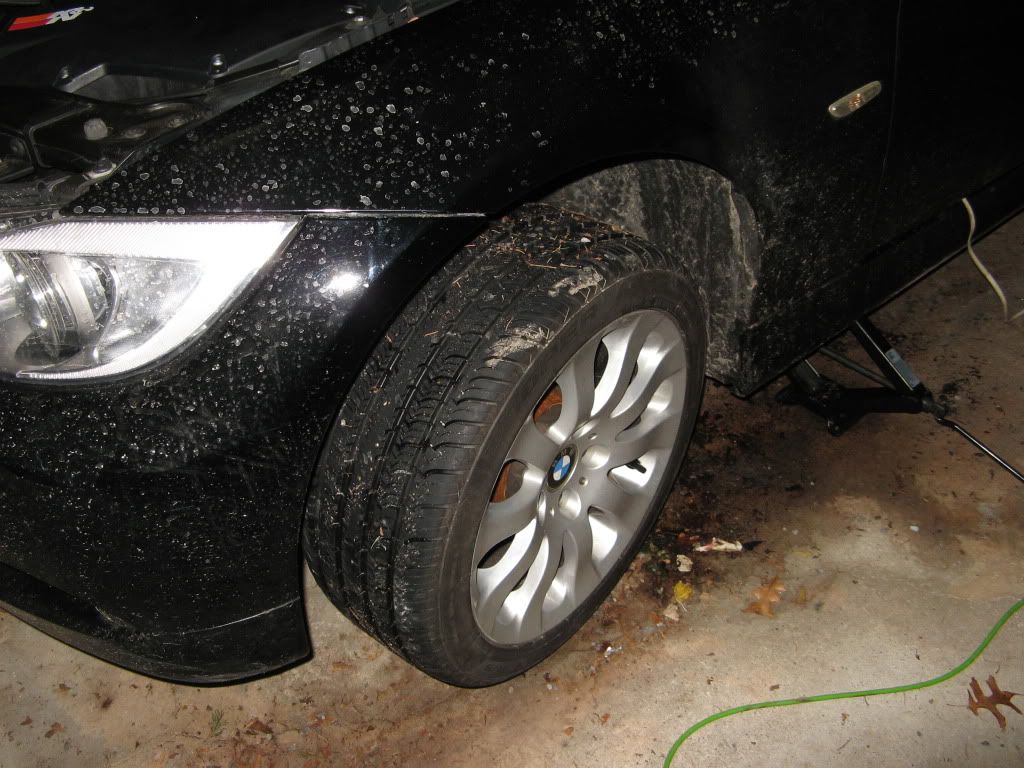 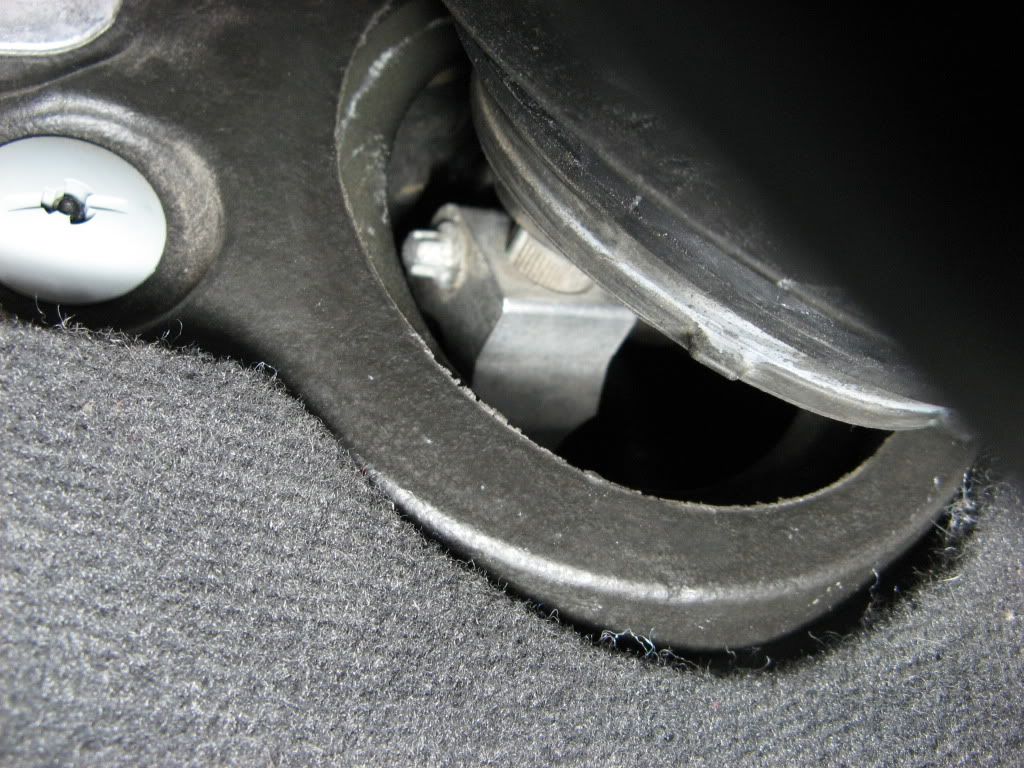 Step 12 - Remove pinch bolt Be careful not to drop it behind the firewall!!! If you do so, you'll need to remove most of the left-side plastic underside shield to reach in and grab it. 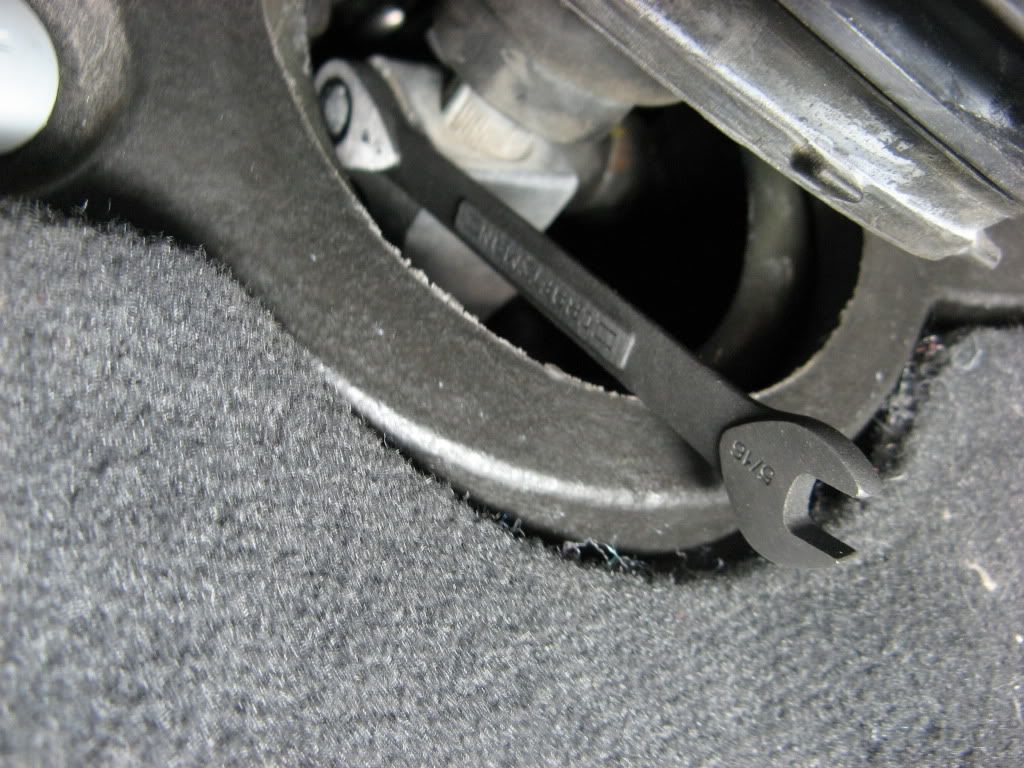 Last edited by yakev724; 04-10-2011 at 11:45 PM.. |
|
Appreciate
0
|
| 01-31-2011, 11:46 PM | #3 |
|
Brigadier General
231
Rep 3,561
Posts |
Step 13 - Remove clock spring connectors
Remove the 2 connectors just behind and to the right of the clock spring, the outermost one requires you to rotate a lever 90 degrees, don't force anything. 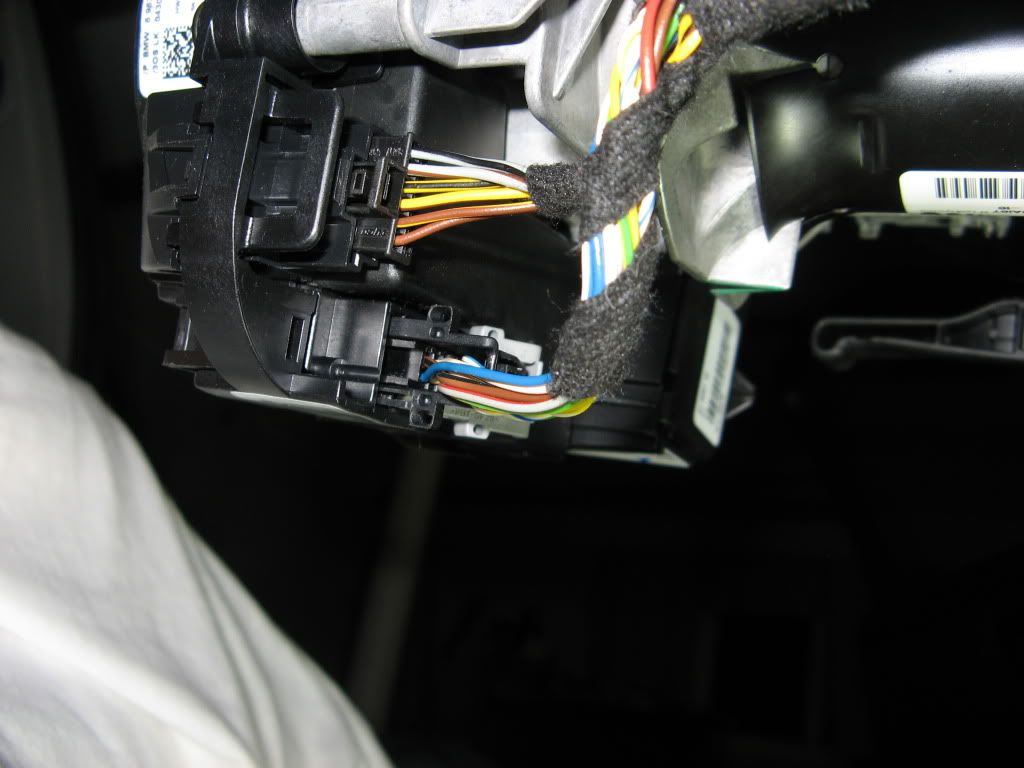 Step 14 - Remove steering column bolts Remove the 4 E10 External torx bolts from the top of the steering column. Make sure to the support the column once you get to removing the last 2, it is rather light but be careful not to damage any plastic trim.  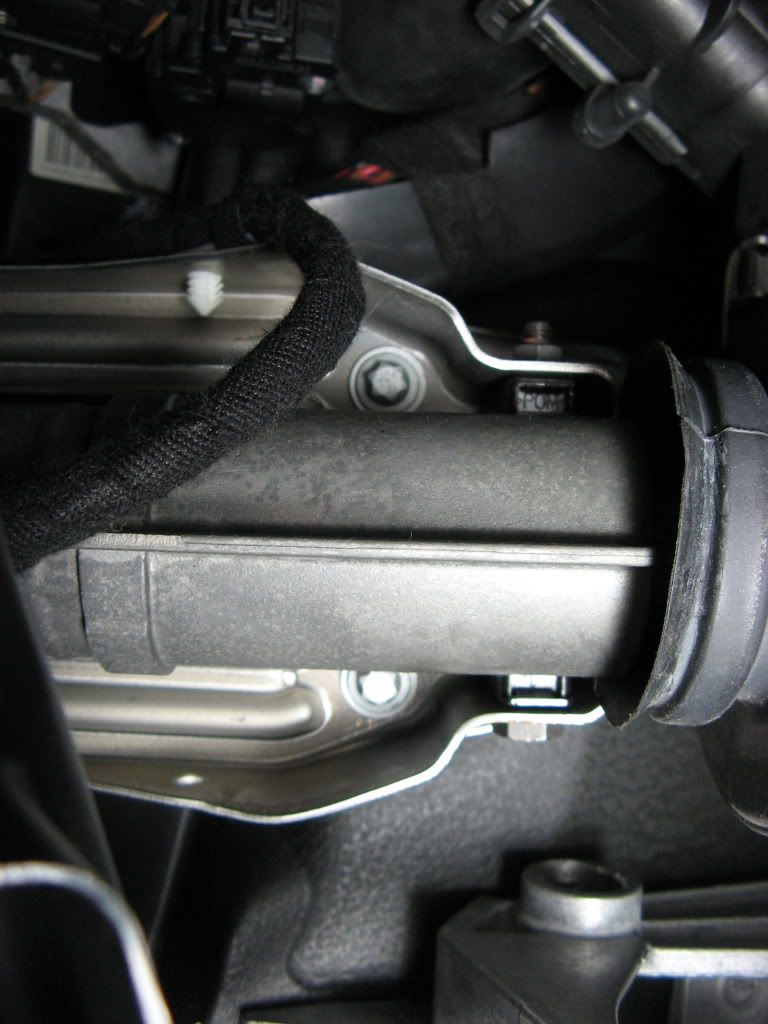 Step 15 - Remove steering column lock connector Located on the left side of the column, about halfway down. Be careful not to break the connector as I did by accident. 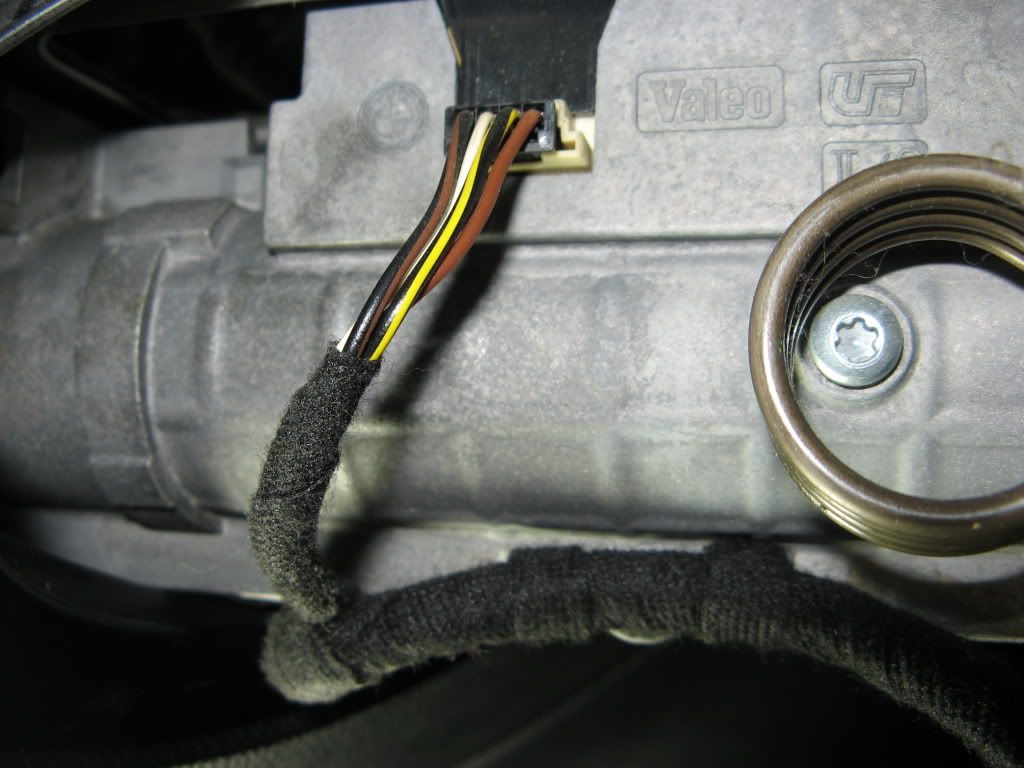 Step 16 - Remove 2 wire harness clips along column  Step 17 - Remove steering column 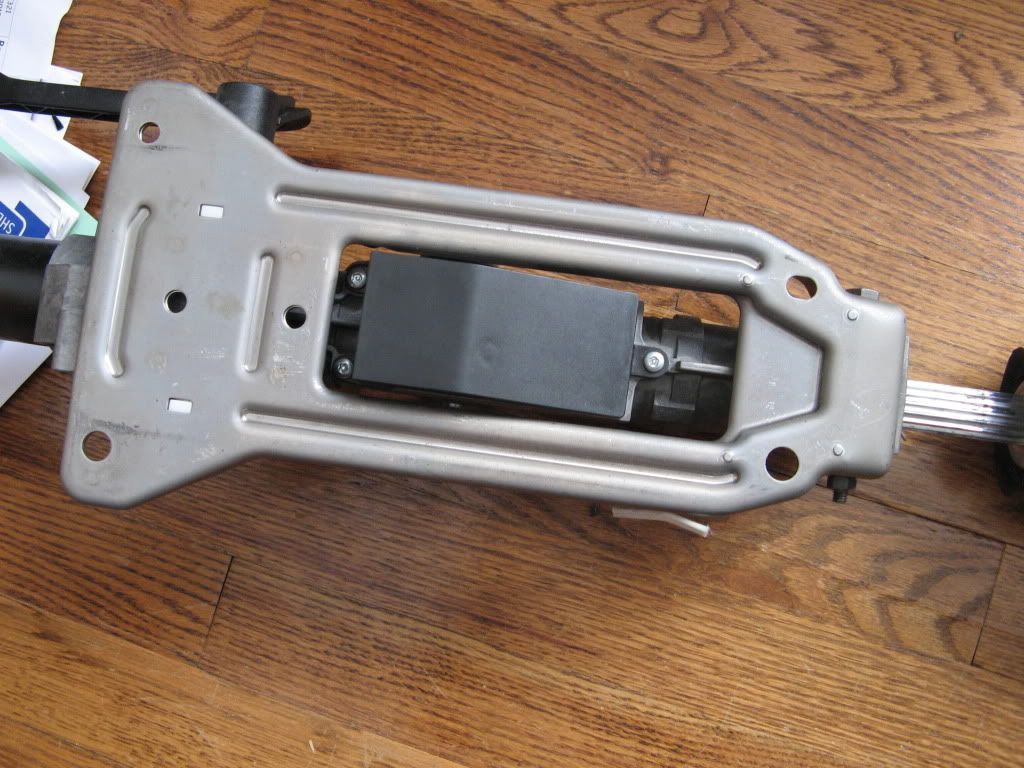 Last edited by yakev724; 02-01-2011 at 12:08 AM.. |
|
Appreciate
0
|
| 01-31-2011, 11:46 PM | #4 |
|
Brigadier General
231
Rep 3,561
Posts |
Step 18 - Remove 3 "Torx Plus Security" Bolts
Note that these are 5 pointed! Individual bits are sold on eBay, as well as sets online, but I decided to dremel these out as I wasn't about to order an expensive bit set and wait for it to ship in. Below are photos of how I dremeled them out. If you go this route--few pointers: Use glasses so you don't get sparks in your eyes. Be careful not to dremel too deep so you don't break the head of the screw. There is very limited space, so use the column adjustment lever to slide it around the locking mechanism "box" to provide the most space. Attack each bolt with the best angle to dremel out a nice groove for a flathead. The one screw is simple, for the 2 adjacent ones, I had to dremel as close to the plastic cover as possible without touching it for best effect. On the second of the 2, I made a small foil cover to protect the plastic from sparks. The screws aren't on very tight--they can probably be unscrewed with the ideal pliers or ideal flathead size screwdriver to fit between the ridges in the original screws. 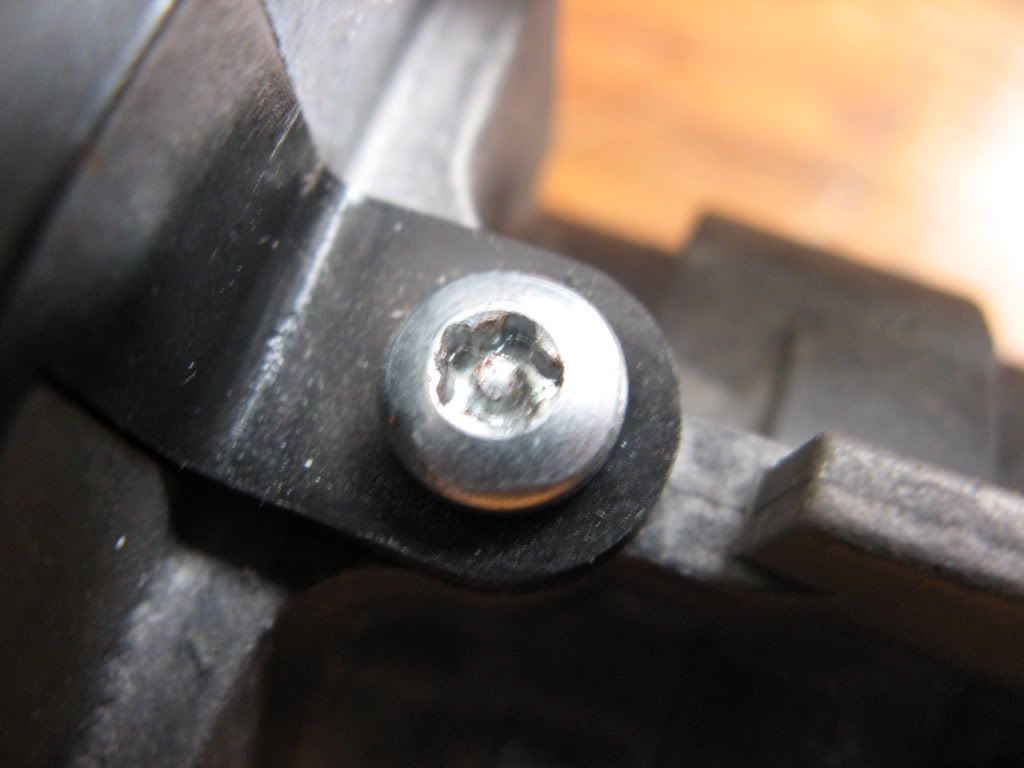 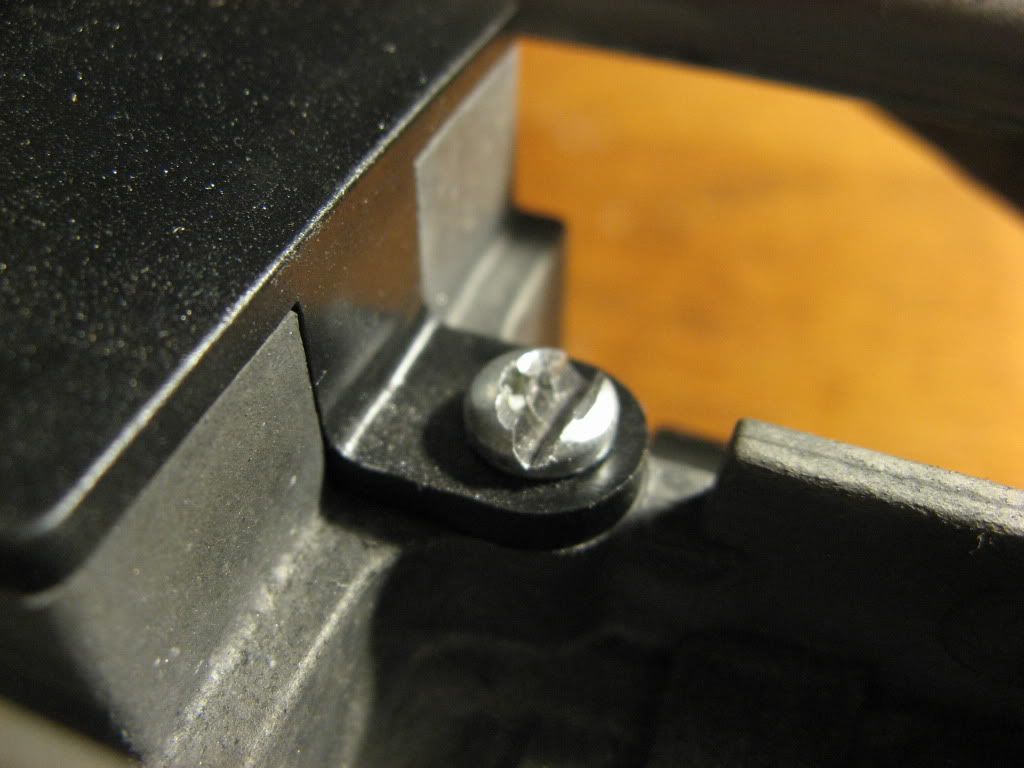  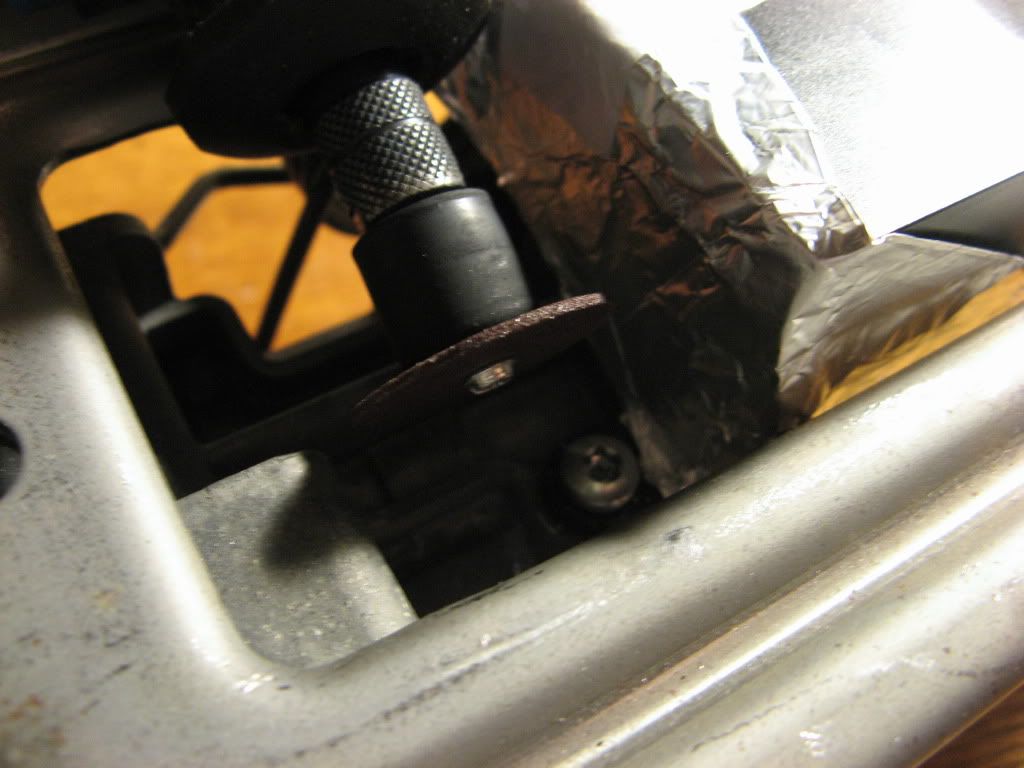 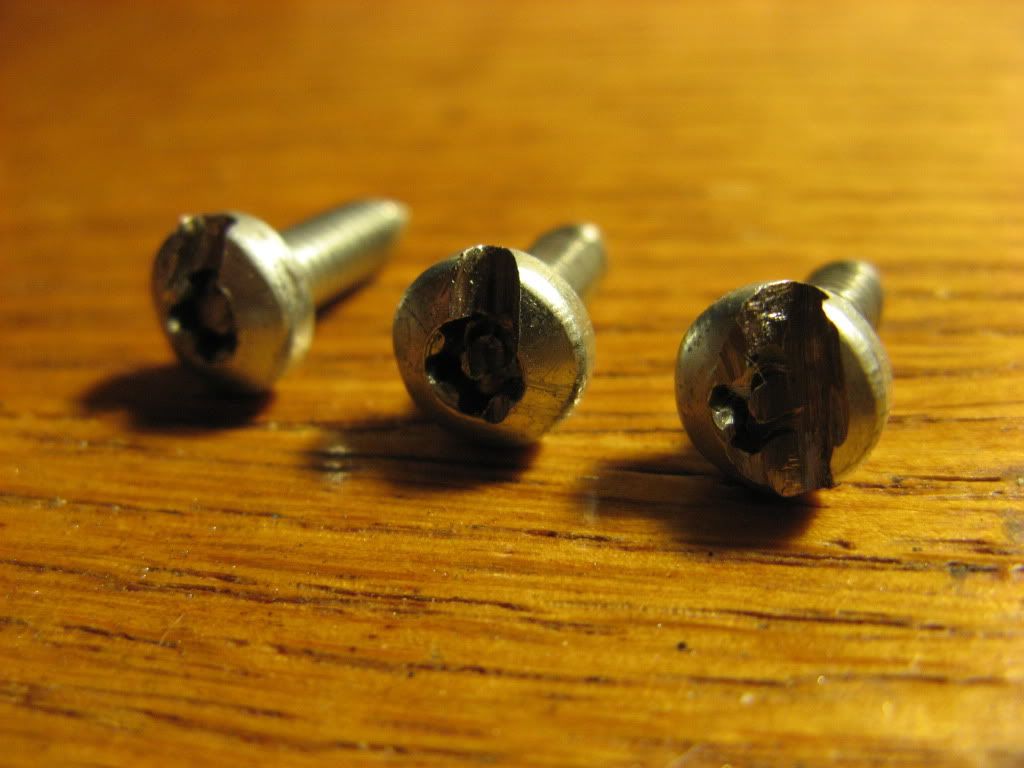 Step 19 - Remove plastic cover and mechanism Entire mechanism will simply slide out once cover is removed 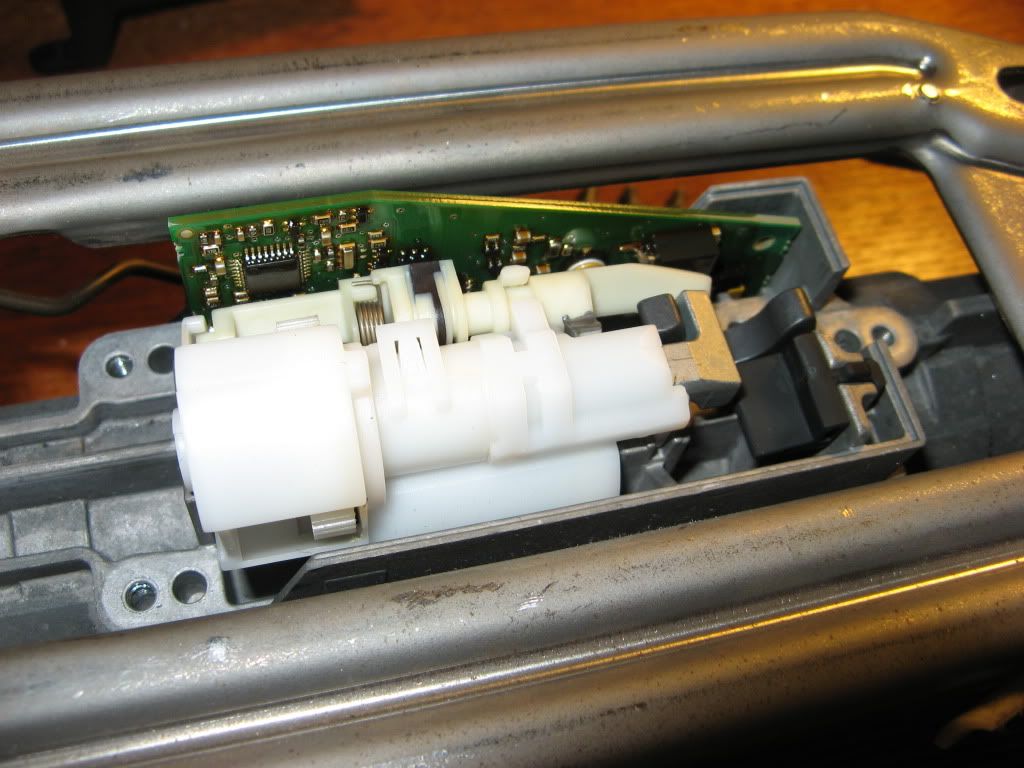 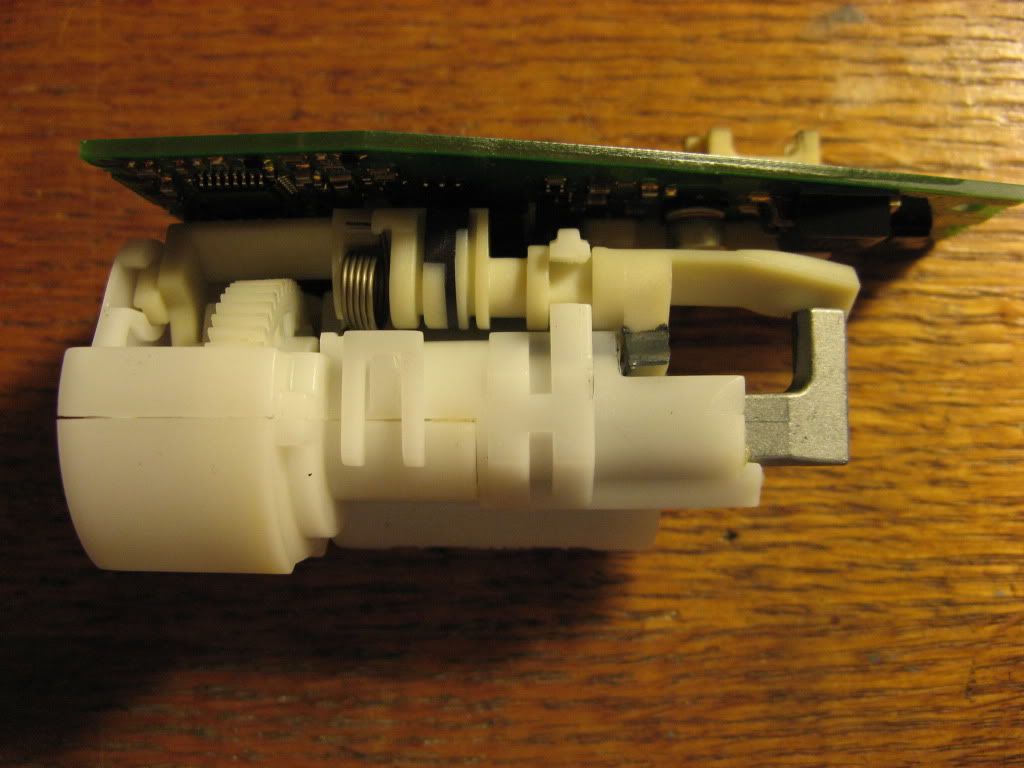 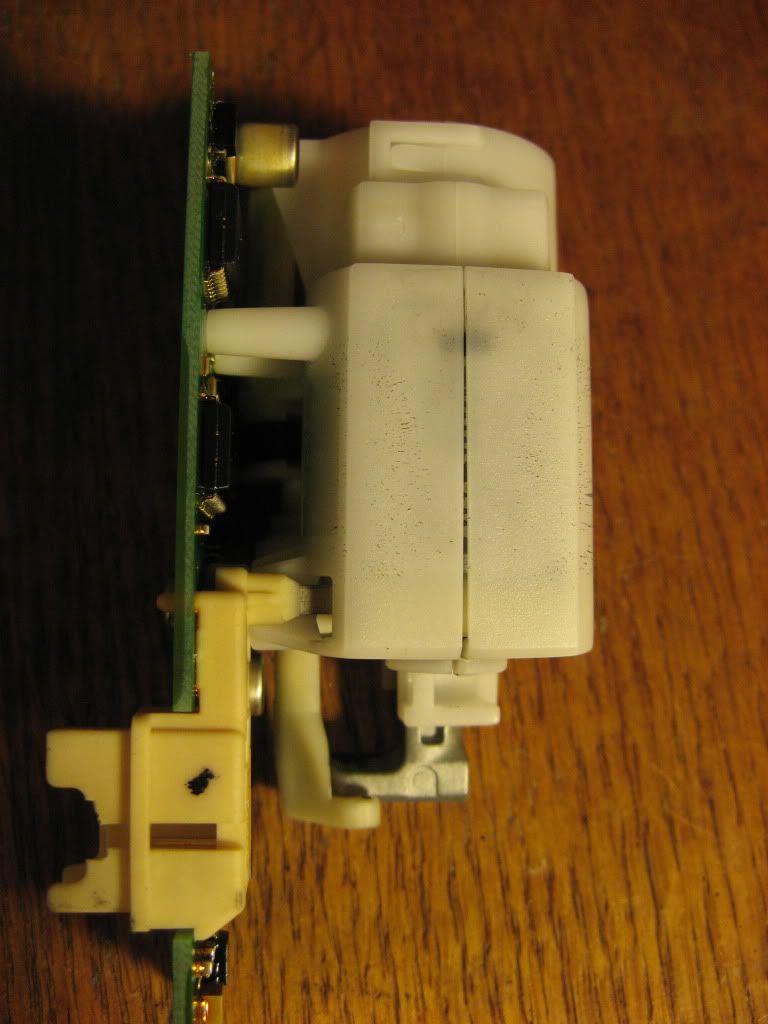 Step 20 - Unclip mechanism housing and dissassemble All parts are clipped in, pretty easy to take apart and reassemble, below is photo of all parts 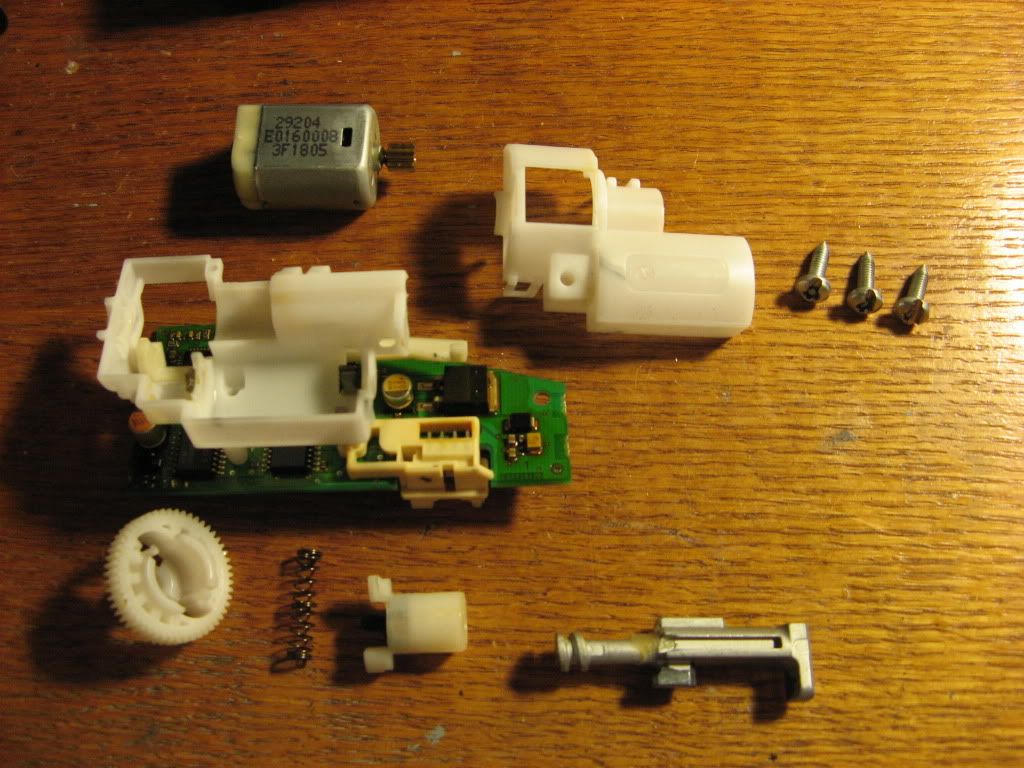 Step 21 - Clean, lubricate and assemble I used rubbing alcohol to clean everything out, then used grey poly-lithium grease on the motor gear (as well as big plastic gear it locks into), then white spray CRC lithium grease on everything else. Results Upon assembly, I can't say anything changed. After playing with the mechanism for about 10 minutes, however, it moved to completion about 90% of the time. 2 days after completing this, mechanism works almost flawlessly and has worked this way since. Additional photos of physical lock in steering column (electronic mechanism moves this). This can't be easily removed, if I can have my car coded to ignore the steering lock, I'll remove my column and drill this out to remove it permanently. Locked 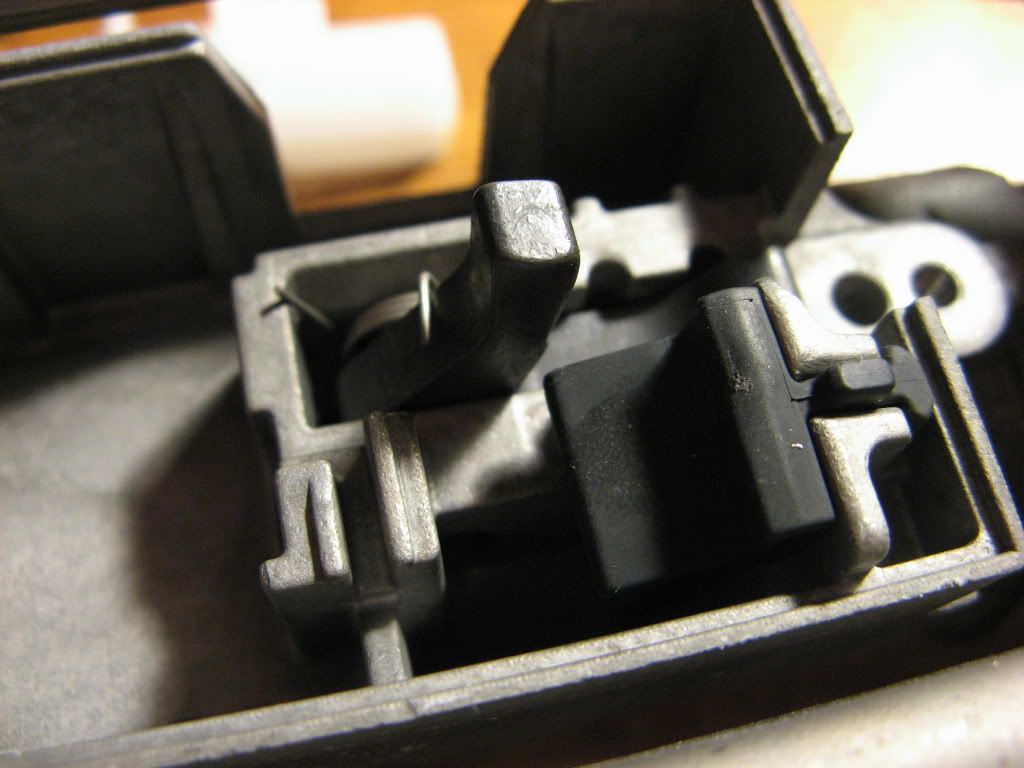 Unlocked 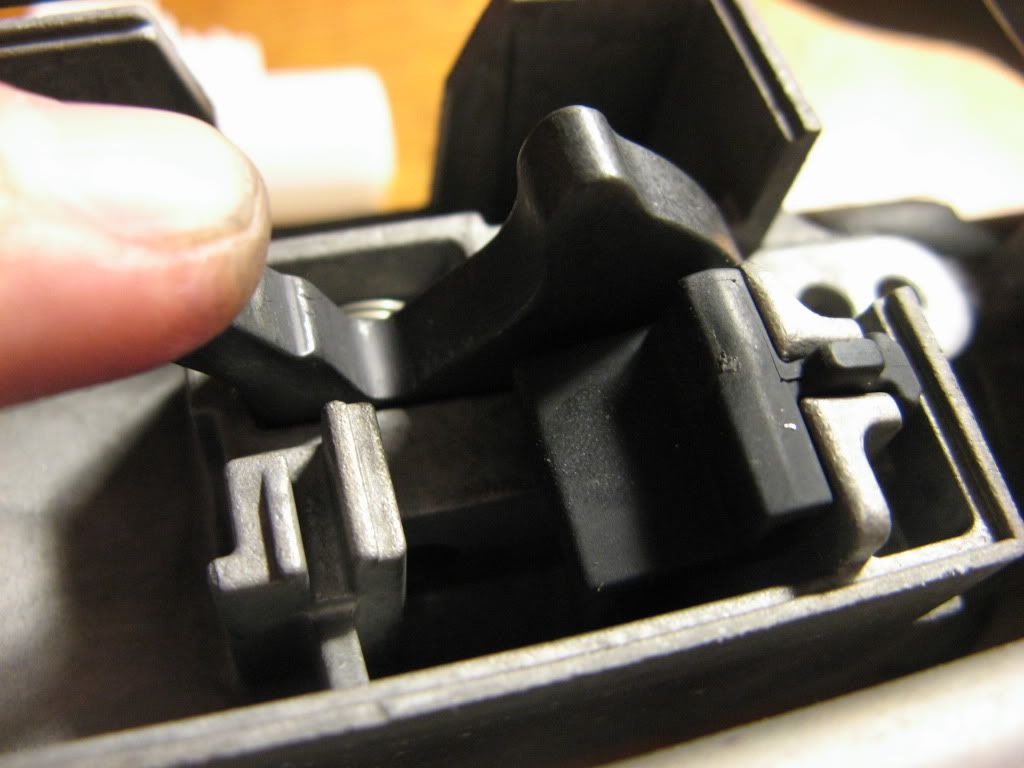 Last edited by yakev724; 02-01-2011 at 06:12 PM.. |
|
Appreciate
1
StradaRedlands4933.00 |
| 02-01-2011, 12:10 AM | #5 |
|
Brigadier General
231
Rep 3,561
Posts |
Update 1
From having the mechanism apart, it's pretty clear that it can be disabled very easily--by either physically leaving the lock in the open position or by disconnecting the lock circuit from it's cable. Neither of these are a solution, as the car will recognize that the mechanism hasn't gone to completion and will show the lock error. In the near future, I will try to see if I can have my car coded in the same way as if the column was replaced with one without a locking mechanism (as BMW did in their SIB). Before coding, lock will obviously need to be in the open position so column isn't permanently locked. This will likely work, but to be 100% sure it will never lock, I'll then reopen the column and remove the lock itself for the last time. I'll update the thread if I get this to work, it would be a nice permanent solution. Update 2 Bentley manual shows that the lock is wired directly to the Car Access System (CAS). 2 Lines in the CAS TRC Code seem responsible for the lock--makes sense that there would be one signal for full engaging and one for full disengaging: ELV_AUT_FCT aktiv ELV_RESET_FCT aktiv Coding cable is in the mail! Last edited by yakev724; 02-08-2011 at 11:07 PM.. |
|
Appreciate
1
StradaRedlands4933.00 |
| 02-06-2011, 11:19 PM | #6 |
|
***** noob


1369
Rep 10,479
Posts
Drives: 325xi>M235i>428GCx Mspor
Join Date: Sep 2005
Location: Boston
|
nice, that looks like a lot of work
i have the steering wheel lock icon/light on 24/7 but my car still starts fine without any issues
__________________
2006 325xi (Sold)
2014 M235I (Current) 2015 428xi Gran Coupe (STB) |
|
Appreciate
0
|
| 02-08-2011, 11:03 PM | #7 | |
|
Brigadier General
231
Rep 3,561
Posts |
Quote:
|
|
|
Appreciate
0
|
| 04-07-2011, 03:26 PM | #8 |
|
***** noob
1369
Rep 10,479
Posts
Drives: 325xi>M235i>428GCx Mspor
Join Date: Sep 2005
Location: Boston
|
well...i guess I'm out of luck now. my car is at the parking lot at work and it wont start
use to be a "Yellow" sterring wheel lock icon, now its a "Red" icon. reading your directions....the part where I have to jack up the car and turn the wheel, how can i turn the wheel? just push the rim? Is that possible?
__________________
2006 325xi (Sold)
2014 M235I (Current) 2015 428xi Gran Coupe (STB) Last edited by ska///235i; 04-08-2011 at 07:09 PM.. |
|
Appreciate
0
|
| 04-07-2011, 07:00 PM | #9 | |
|
Banned
15
Rep 324
Posts |
Quote:
|
|
|
Appreciate
0
|
| 04-08-2011, 11:29 AM | #10 |
|
***** noob
1369
Rep 10,479
Posts
Drives: 325xi>M235i>428GCx Mspor
Join Date: Sep 2005
Location: Boston
|
Update....jump start didn't work so I'm going to try this diy
little update on my problem....i do have the lock icon all the time but it seems that my battery is dead (car is almost 6 yrs old and I drive short distance) so I'm going to jump start later today or tomorrow to see if it'll work. I heard that if your battery is low, there isnt enough voltage to move the lock mechinism.
__________________
2006 325xi (Sold)
2014 M235I (Current) 2015 428xi Gran Coupe (STB) Last edited by ska///235i; 04-08-2011 at 07:10 PM.. |
|
Appreciate
0
|
| 04-13-2011, 04:25 PM | #11 | |
|
Enlisted Member

2
Rep 36
Posts |
Quote:
|
|
|
Appreciate
0
|
| 04-13-2011, 06:41 PM | #12 |
|
***** noob
1369
Rep 10,479
Posts
Drives: 325xi>M235i>428GCx Mspor
Join Date: Sep 2005
Location: Boston
|
you should be fine...
__________________
2006 325xi (Sold)
2014 M235I (Current) 2015 428xi Gran Coupe (STB) |
|
Appreciate
0
|
| 04-14-2011, 11:23 AM | #13 |
|
New Member
0
Rep 6
Posts |
I also have the exact same problem as we speak on a 07 E92xi. The car was not driven for weeks and the time I was out of the country the alarm went on (that's what some friends where the car was, told me). It probably drained the battery, because I couldn't open the doors with the remote and I used the key to get inside. I tried to jump it yesterday with my E46 and I got the red icon with the message "Electric steering wheel failure...". So I couldn't start it. The battery is new but aftermarket. I'll try to charge it this weekend and to figure out if that's the cause. I just hope I don't need to change the column as other did it.
|
|
Appreciate
0
|
| 05-13-2011, 05:41 PM | #14 |
|
USC Gamecocks #1

14
Rep 177
Posts |
thanks for the DIY.....I just got this error on my 06 E90 this week. I took the challenge to remove the lock device and clean it up. I never had the red symbol just the yellow one. Every time I put the key in the ignition the wheel releases like it's supposed to do.
Has anyone successfully coded their car to disable the lock mechanism. I'm hoping to not have to take this to the stealership to get the column replaced and recoded. After I reinstalled everything the damn light still comes on..................Is there a delay before this will not be an error or am I just doomed???? |
|
Appreciate
0
|
| 05-13-2011, 05:56 PM | #15 |
|
***** noob
1369
Rep 10,479
Posts
Drives: 325xi>M235i>428GCx Mspor
Join Date: Sep 2005
Location: Boston
|
software alone will not fix the issue, i had to pay out of pocket for this BS
i want to complain to bmwna, this should be a lifetime warranty
__________________
2006 325xi (Sold)
2014 M235I (Current) 2015 428xi Gran Coupe (STB) |
|
Appreciate
0
|
| 05-15-2011, 12:36 PM | #16 |
|
Brigadier General
231
Rep 3,561
Posts |
Mine eased up after about a week.
Haven't had the symbol since a few weeks after making the DIY...though it's possible higher temperature helps the battery produce a slightly higher voltage, pushing the mechanism with more force. I'll be replacing my battery later this summer when I have some cash (currently an aftermarket one of unknown age). I got nowhere with coding. I even have a trace file (full features/programmability) of an 06 with the column replaced by the dealer, but anything I've tried (combining that file with mine) hasn't led to anything. My guess is it needs to be programmed with Progman. My biggest deal with this is the following: I suspect that when BMW replace columns, the new ones don't have a lock mechanism at all. Essentially this should be the same as disconnecting the lock mechanism from the column (4 wire connector) and physically removing the lock. Very interested to see if this can just be coded and disconnected without paying $$$ for a new column and labor. If anyone has a connect at a dealer, please try this! |
|
Appreciate
0
|
| 05-30-2011, 03:00 AM | #18 | |
|
New Member
0
Rep 15
Posts |
Quote:
ELV_TESTER nicht_aktiv |
|
|
Appreciate
0
|
| 05-30-2011, 10:48 AM | #19 |
|
***** noob
1369
Rep 10,479
Posts
Drives: 325xi>M235i>428GCx Mspor
Join Date: Sep 2005
Location: Boston
|
when my car couldnt start with the Red color steering lock icon.....my tech rebooted (or whatever he did) the program/software or the ecu. he was able to start my car, and the red icon was gone. he said i will still need to replace the column or the error would eventually come back. After a new column, he did not have to re-program the car.
i think program has nothing to do with this...but who knows
__________________
2006 325xi (Sold)
2014 M235I (Current) 2015 428xi Gran Coupe (STB) |
|
Appreciate
0
|
| 05-30-2011, 11:26 AM | #20 | |
|
Brigadier General
231
Rep 3,561
Posts |
Quote:
If your column was replaced with the same exact one (with the lock), no programming is required. If however you get a column without the lock, I think you will need programming. The result should be the same as simply disconnecting the lock mechanism with the white connector. But disconnecting this without reprogramming the car gives you a yellow lock symbol and car doesn't start. If this was a possible solution, I'd just physically remove the lock forever. Unfortunately coding is req'd, and anything I've tried doesn't work to disable the mechanism. Hopefully my dealer can help. |
|
|
Appreciate
0
|
| 06-02-2011, 01:40 PM | #22 | |
|
Private

6
Rep 56
Posts |
Quote:
Thanks for the Your DIY! some information I saw in the E90 electrical system... The steering unlock procedure: 1. The CAS2 senses the detection of a valid remote control_ID trasmitter. 2. The CAS2 Enables the unlock function. 3. The ELV performs the unlocking the steering procedure. 4. After the unlock procedure is done,the unlocking status is sensed by the Hall sensor, Hall sensor status reports to the CAS2 as a feedback. 5. The CAS2 switching off ELV module power. The steering locking procedure: 1. Lock request to CAS2. 2. ELV module switched on. 3. Locking the steering by the ELV. 4. Locking Hall sensor feedbacks from ELV to CAS2. 5. CAS2 switching off ELV control module power. Is it possible if we disable the Lock and unlock function by coding and remove the lock, we may need to fake or delete the Hall sensor status reported function to the CAS2? Since I do not have the tool I don't know. |
|
|
Appreciate
0
|
 |
| Bookmarks |
|
|


