

|
|
|
|
 |

|
 |
BMW Garage | BMW Meets | Register | Today's Posts | Search |
 |

|
BMW 3-Series (E90 E92) Forum
>
DIY - Replacing Camshaft VANOS Solenoid
|
 |
| 02-07-2011, 07:43 PM | #1 |
|
Captain
 111
Rep 728
Posts |
DIY - Replacing Camshaft VANOS Solenoid
This DIY explains how to replace the VANOS Solenoid, with failure commonly detected through the following codes.
2A82 Inlet-Vanos variable cam control test 2A87 Outlet-Vanos variable cam control test 3100 boost-pressure control, deactivation Suggested Code to Failed Part Correlation: 2A82 Intake VANOS solenoid 2A87 Exhaust VANOS solenoid Disclaimer: Please search and read existing threads. OP takes no responsibility for mis-diagnosis. Replacing the suggested part may not fully resolve the issue. However, this is a good starting point. If you are throwing a bunch of codes in addition to the ones listed, please troubleshoot accordingly. OEM P/N: 11367585425 Both intake and exhaust solenoids are identical, with the same p/n. INSTALL TIME: <30 mins after engine has cooled STEP 1: Wait until the engine is cold! The location where the VANOS solenoids are is VERY HOT! Remove microfilter panel and engine cowl. Refer to PROcede and JB installation instructions. Not part of this DIY. STEP 2: Remove Engine Cover Note: Picture below shows the engine cover removed. The point is to highlight the location of the 4 screws. The rear left screw (looking by standing from the front of the car) is the hardest to see (bottom left in this picture). 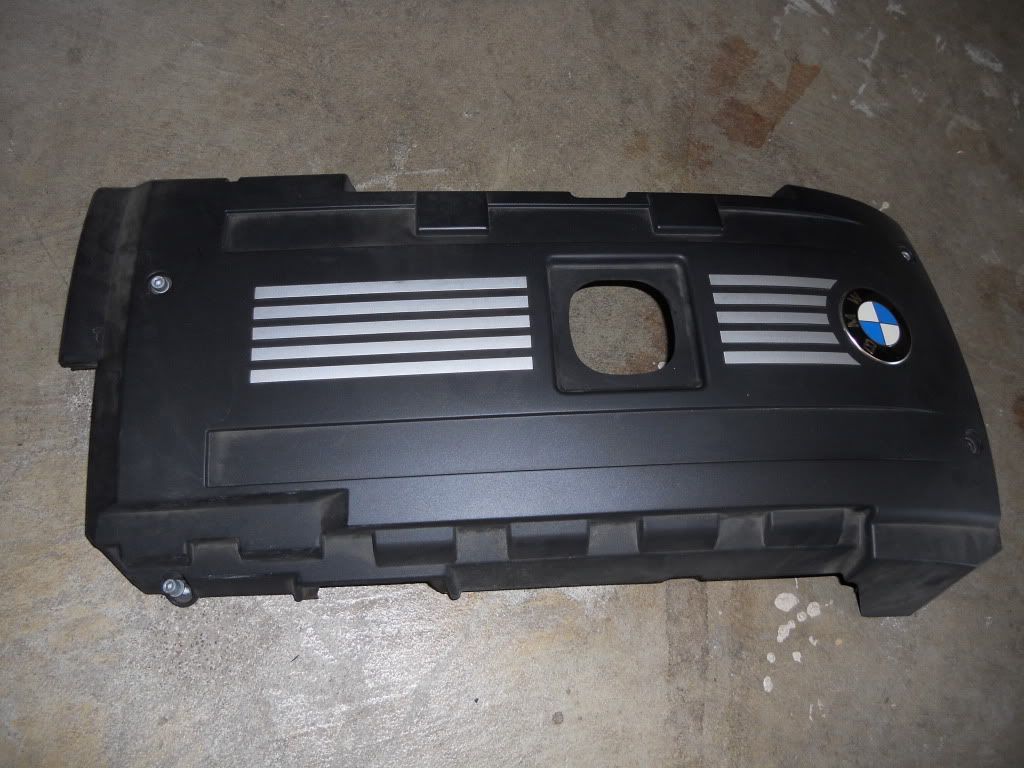 STEP 3: Remove Snorkel Requires a T-20. Remove the 2 screws (left and right) as seen in the pictures, and pull the snorkel out. Note where the ratchet is for location of screws. 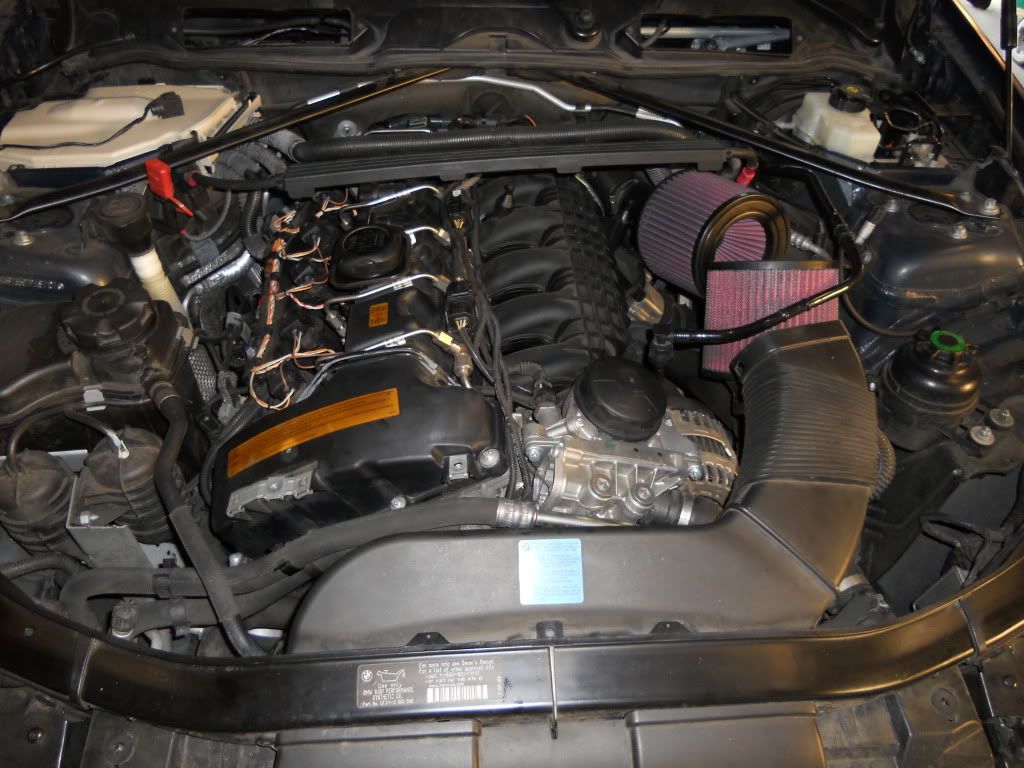   STEP 4: Location of VANOS Solenoids. Look where the brown rag is where the snorkel used to be at the bottom of the picture.  Solenoids removed. - Top hole is for the Intake solenoid - Bottom hole is for the Exhaust solenoid Brown rag positioned to capture dripping oil and prevent oil from accidentally getting onto the removed connectors.  STEP 5: Remove the connectors. The connector pictured is for the Intake solenoid, which goes into the top hole of the picture. If you forget which is which, don't worry. Notice how the cable goes to the left. This is an easy way to identify the intake solenoid cable. The other cable goes down and is not easily pulled out.  To remove, simply press down on the silver clip as shown and pull out. When re-inserting, be sure to press down on the clip again to slide back in.  STEP 6: Remove solenoid. Notice the solenoid has a retaining clip that is fastened by a screw (that hole you see on the solenoid). Remove this screw. The picture shows that the metal retaining clip is actually part of the solenoid assembly! Do not try to pry this apart from the solenoid when removing! After removing screw, turn clockwise by 1/8th of a turn, and pull. It will pop out. Catch the dripping oil on your rag.  I was only throwing the 2A87 code (Exhaust Solenoid). But I removed both to compare. The top solenoid is the Intake one, and the bottom is the Exhaust one. I could NOT tell which one was bad just by visual inspection!  I reused my existing intake solenoid, and replaced the exhaust solenoid with the new one shown. Ensure the o-ring is pushed all the way down to the bottom of the solenoid. TIP: Re-insert solenoid by positioning about 1/8 turn clockwise to the mounting hole. Push straight in and you will feel a pop when it is fully inserted. Once inserted, rotate counter-clockwise to line up retaining clip to mounting hole, and secure the screw.  Reverse the above steps to finish up. Sorry, I didn't take a picture of the solenoid actually inserted. But based on the above pictures, you can easily figure out the solenoid location. That in itself took me a few mins, as it was initially partially covered by the engine cover and snorkel. Hope this helps! UPDATED 6/14/11 - TIPS from other DIYers: 1. Instead of replacing w/ a new solenoid, try cleaning the solenoid w/ compressed air first. 2. (N52) Engine cover does not have to be removed to get to the solenoids. 3. (N54) "My car does not have an oil cooler so I didn't have to remove the snorkel." 4. Suggest removing and replacing solenoids one at a time (starting w/ bottom solenoid). "If both solenoids are out, it is very easy to accidentally drop one of the small mounting bolts into the openings, which would be really bad since the screw would now be in the casing for the cam chain drive."
__________________
  PROcede | AMS FMIC | AR Catless DPs | AR Oil Cooler | BMS DCI Wavetrac LSD | KW V3 w/ Swift Springs | M3 Front Suspension Last edited by orionredwing; 06-14-2011 at 07:10 PM.. |
| 02-15-2011, 12:05 AM | #3 |
|
Captain
111
Rep 728
Posts |
My symptoms were mild. Every once in awhile, under WOT, this code would throw, causing the half engine light / limp mode to come up. For me, it only occurred occasionally under WOT like after 10-20 mins of continuous redlines (aka on the track). For more serious cases, some people have reported it triggers everytime they go WOT.
Basically, you're accelerating hard, it triggers, and you go into limp mode until you reset your car. Nothing else happens. Sometimes, it would cause misfires, and your car would shudder until you pull over and reset.
__________________
PROcede | AMS FMIC | AR Catless DPs | AR Oil Cooler | BMS DCI Wavetrac LSD | KW V3 w/ Swift Springs | M3 Front Suspension |
|
Appreciate
0
|
| 02-18-2011, 11:56 AM | #5 |
|
Captain
111
Rep 728
Posts |
After the engine has cooled down sufficiently to not burn your hands, the install takes <30 minutes (taking it slowly and being methodical). If I was in a hurry, I can probably do it in ~10 mins now that I've gone through it once.
Good question. I've updated the main post.
__________________
PROcede | AMS FMIC | AR Catless DPs | AR Oil Cooler | BMS DCI Wavetrac LSD | KW V3 w/ Swift Springs | M3 Front Suspension |
|
Appreciate
0
|
| 02-25-2011, 02:44 PM | #6 | |
|
Lieutenant

42
Rep 487
Posts |
Quote:

__________________
|
|
|
Appreciate
0
|
| 03-23-2011, 09:00 AM | #7 |
|
New Member
0
Rep 16
Posts |
I'm just getting 2A87... can I just replace the exhaust solenoid or should I do both? I can always replace the intake one later if it faults. Recommendations? thanks!
Last edited by BMWE9X; 03-23-2011 at 10:03 AM.. |
|
Appreciate
0
|
| 04-29-2011, 07:53 AM | #8 |
|
Brigadier General
 138
Rep 4,764
Posts |
Great DIY - Thanks!
|
|
Appreciate
0
|
| 05-01-2011, 12:44 PM | #10 |
|
Major
 36
Rep 1,252
Posts |
WOT = Wide Open Throttle, basically mashing the gas pedal.
OP, thanks for the write up! I replaced both solenoids this weekend. My car does not have an oil cooler so I didn't have to remove the snorkel.
__________________
2012 528XI Saphire Black
Stock for now 2007 e92 335i - Monaco Blue Injen DCI w/ Cyba Scoop - M-Tech Rear - ///M3 Rear Lip Spoiler - ///M5 SMG Shift Knob & iDrive Knob - BMW Performance Hand Brake - BMWCCA Member |
|
Appreciate
1
Reverend_Wrong24.00 |
| 05-10-2011, 11:52 PM | #11 |
|
First Lieutenant

15
Rep 337
Posts |
Great DIY, thanks for taking the time to do this... My code reader arrived today and I saw 2A87 and 3100 which led me here. 5 minutes on Tischer's site ordering the new exhaust VANOS solenoid and I'm well on my way to fixing my issue. Thanks again!
|
|
Appreciate
0
|
| 05-11-2011, 11:46 AM | #12 |
|
Second Lieutenant
12
Rep 272
Posts |
Thanks for the DIY. I was throwing an intake vanos code and I removed it and cleaned it with compressed air. Haven't thrown the code again, if I do then I will just replace it. But the free fix is working for now!
__________________
 |
|
Appreciate
0
|
| 05-19-2011, 05:00 PM | #13 |
|
Second Lieutenant
23
Rep 251
Posts |
Really good write up. My exhaust vanos was throwing codes. I replaced the exhaust vanos with a newly ordered one from Tischer (cheapest I've seen so far), and cleaned the intake vanos with some carb cleaner. (didn't get any on the connector part, and let it dry) After that, my car stopped shuddering and acceleration is back to normal.
|
|
Appreciate
0
|
| 06-02-2011, 11:54 AM | #14 | |
|
Major
37
Rep 1,035
Posts |
Quote:
Odd thing is ive had my procede back with v5 and it hasnt done it in a while so idk... good to keep in mind though. |
|
|
Appreciate
0
|
| 06-11-2011, 12:05 PM | #15 |
|
Banned
190
Rep 3,415
Posts |
Great write up. This DIY led me to diagnose my fault code that came up this week. Thanks for posting it.
The Bentley manual suggests switching the positions of the solenoids as a test to see which is bad (this doesn't make sense if code 2A82 is intake and 2A87 is exhaust). The manual also says the solenoids can be cleaned with shop air, which is what I did. I also used CRC Electro Cleaner to clean them up as well. Also, the engine cover does not need to be removed to get to the solenoids (at least on the N52 engine). You can get to them with the cover in place. One last tip. I suggest removing and replacing the solenoids one at a time. If both solenoids are out, it is very easy to accidentally drop one of the small mounting bolts into the openings, which would be really bad since the screw would now be in the casing for the cam chain drive. If I may augment the procedure a bit: I think it is best to remove and replace (or clean and replace) the bottom solenoid first. Then remove and replace the top solenoid second. Following this sequence will prevent accidentally dropping a mounting bolt into the front of the engine. Last edited by ENINTY; 06-11-2011 at 06:36 PM.. |
|
Appreciate
0
|
| 06-12-2011, 08:03 PM | #16 |
|
Private
 12
Rep 97
Posts |
I'm getting 2A82 along with Limp mode (3100). The car has been throwing 2A82 even before a tune was ever installed. It only happens under full WOT about 50% of the time.
I'm going to replace the the intake solenoid and seals when the part arrives. I'm worried that that wont fix it due to other research and claimed fixes. Has anybody ever eliminated fault code 2A82 by simply changing the solenoid???????????
__________________
2007 335i
Mods: JB4, BMS DCI Intake, HPF FMIC, Forged DVs, ceramic Tint, Black Emblems, 93 Octane |
|
Appreciate
0
|
| 06-13-2011, 07:18 PM | #17 | |
|
Private
12
Rep 97
Posts |
Quote:
__________________
2007 335i
Mods: JB4, BMS DCI Intake, HPF FMIC, Forged DVs, ceramic Tint, Black Emblems, 93 Octane |
|
|
Appreciate
0
|
| 06-14-2011, 07:11 PM | #18 | |||
|
Captain
111
Rep 728
Posts |
Thanks guys for all the positive comments.
Quote:
Quote:
Quote:
__________________
PROcede | AMS FMIC | AR Catless DPs | AR Oil Cooler | BMS DCI Wavetrac LSD | KW V3 w/ Swift Springs | M3 Front Suspension |
|||
|
Appreciate
0
|
| 06-15-2011, 03:14 PM | #19 |
|
Private
12
Rep 97
Posts |
Great to hear the faults were eliminated with this fix. My solenoids will be here Friday. I hope it doesn't turn out to be the ledger. Thats gonna cost me $600 with parts and a N54 timing kit.
 I will repost after install with results. Wish me luck I will repost after install with results. Wish me luck
__________________
2007 335i
Mods: JB4, BMS DCI Intake, HPF FMIC, Forged DVs, ceramic Tint, Black Emblems, 93 Octane |
|
Appreciate
0
|
| 06-16-2011, 05:46 AM | #20 |
|
Banned
190
Rep 3,415
Posts |
I'd just like to comment again on the usefulness of this post. If you use the Bentley manual for diagnosis of the 2A82 or 87 fault code, it really doesn't lead you to look at the VANOS solenoids as the culprit. This post, along with the Bentley led me to first consider the solenoids as the issue.
Now after 600 miles that I've put on my car since I cleaned and replaced my solenoids all I can say is the car is running better than ever. I have a theory that swapping the solenoids positions (from exhaust to intake) is actually a good practice. I think the solenoids "work in" to the control position they are located and go through a repetitive range of motion that lends them, over time, to get clogged. Swapping them to the opposite cam now allows them to run a different cam control routine in a different range of motion which allows them to function as "new" parts. I'd recommend what I did as the fix. Clean the solenoids with cleaner and shop air, and reinstall them in the opposite location. This procedure is so easy, that if the code does pop up again in the opposite location, a new part is justified and easily installed. This will procedure also lets you diagnose the problem further because if you swap the solenoids and the same code shows up (i.e. it doesn't follow the solenoid from the exaust side to the intake side, or vice versa) then the cam position sensor for that cam (which close by in the head) is the next part failure to consider. |
|
Appreciate
2
1er_vert106.00 johnnyorange66.00 |
| 06-30-2011, 11:11 PM | #22 |
|
Private First Class
 
9
Rep 179
Posts |
Thanks for the DIY. Had this issue with my car yesterday. It only has 40k miles on it and was idling really rough, took it to the dealer and they replaced it. Even though it was under warranty, I was curious and asked how much it cost. SA said probably around $2000 to fix.......can you believe that??????
|
|
Appreciate
0
|
 |
| Bookmarks |
|
|


