*** Edit: this post is long and has a ton of nested quotes. It does not display in its entirety using the Bimmerpost app! ***
Quote:
Originally Posted by ||||||||||

This will be long, so please bear with me..
|
No problem, the more detail the better.
The most challenging and time consuming part of my response will be to clean up the formatting of your post.

Let me start by saying kudos to you for sticking with it and investing the time to learn to do this yourself. This process will help you begin to build a fundamental understanding of the BMW software that will serve you well in the future when you begin to explore advanced use cases.
Quote:
Originally Posted by ||||||||||
To start off and to answer your question, I don't know anything about Windows command line syntax. I did my best with this install, and with the exception of a few steps, everything went flawlessly and exactly as described on the DIY tutorial. That said, I uninstalled everything and started over from the point at which you install Standard Tools. I also double checked the cable settings in Device Manager, and everything is 100% as prescribed, so no issues there.
BTW: My original post stated I was having issues with the step where you have to copy the group Daten files..i.e. here:
Quote:
Originally Posted by 808AWD325xi
Copy the group files from the SP Daten E89 folder to C:\EDIABAS\ECU.
Code:
C:\>copy X:\E89\ECU\*.GRP C:\EDIABAS\ECU /v
80 file(s) copied.
|
This was my own stupidity, as I still had the Daten folder as a RAR and hadn't unzipped it yet (hope I stated that correctly). Once I did so, all the Exx folders popped up, and I was able to do what I needed with the E89 folder, so no issues there anymore. |
Yes, that is stated correctly.
Quote:
Originally Posted by ||||||||||
Going through the install again, everything went exactly as it should have, until I got to this step:
Quote:
Originally Posted by 808AWD325xi
Go to the E89\DATEN directory and execute the LADEN.BAT script.
Code:
C:\>cd X:\E89\DATEN
X:\E89\DATEN>laden.bat
You’ll receive errors at the end of the script due to the missing C:\EC-APPS\CARSERVER directory, ignore them. When the cmd.exe dialog box appears, click on Continue.
 |
Before I continue, I want to say that I am not even sure I was executing the commands correctly. I simply copied and pasted what was written in the Code boxes, hit enter, and it typically popped up a confirmation that it was successful (i.e. copying files) just as the Code box said in the thread, so I assume I was doing it correctly? Also, before I continue, I wanted to double check, in this step..
Quote:
Originally Posted by 808AWD325xi
|
..I used the E89 Daten files opposed to the E60 that the DIY link stated he used, is this correct? |
Yes, that is correct. You need to use the daten folder which is appropriate for your chassis. Because you have an E90, the proper folder is E89. Check out this thread for a complete chassis guide:
http://www.e90post.com/forums/showthread.php?t=642883
With regards to the
copy command(s) used throughout the DIY, it is very important that you modify the drive letter and path to the source files (i.e. X:\E89\ECU\*.GRP) as necessary to reflect where you have stored the source files as explained in the DIY:
Quote:
Originally Posted by 808AWD325xi
Please note: This section of the DIY could be improved for neophyte Windows users. It assumes that you understand command line syntax. In this context, X: denotes an unknown drive letter (i.e. the USB thumb drive that you saved your INPA CFGDAT and SGDAT folders to.) For example, if in Windows File Explorer under This PC your USB thumb drive is denoted as Drive E:, then you should use E: instead.
Code:
C:\Users\808>copy E:\CFGDAT\*.ENG C:\EC-APPS\INPA\CFGDAT /v
14 file(s) copied.
If you chose to store the CFGDAT folder in another folder named MyStuff, then you would have to include MyStuff in the source path.
Code:
C:\Users\808>copy E:\MYSTUFF\CFGDAT\*.ENG C:\EC-APPS\INPA\CFGDAT /v
14 file(s) copied.
The drive letter and path to the source file(s) is dependent on where you stored the files.
|
You cannot simply copy and paste the example code. If you do that, the
copy command(s) will fail and ultimately your BMW Standard Tools 2.12 installation will not work properly because the requisite files will not be located in the folders where the software expects to find them.
The Windows Command-Line Reference explains the
copy command syntax and includes usage examples:
https://technet.microsoft.com/en-us/...=ws.11%29.aspx
Once you have had an opportunity to review the Windows Command-Line Reference, if anything is still unclear, please ask any clarifying questions that you may have.
Quote:
Originally Posted by ||||||||||
Okay, back on track..so as far as executing the Laden file, the Code provided didn't do anything for me, and in fact made no sense to me (not even sure what it does?) so I went into the folder directly, double clicked the laden file, and a command script box popped up, ran hundreds of lines too quickly to read, then went away. If this is correct, and all I need to do, then I am good to go on this step, but the weird thing is, I didn't get the errors that the DIY stated I should receive. The command script box just came up, ran the lines of code and then went away after 5 or so seconds.
|
My apologies for any inconvenience, you actually discovered a minor bug in the DIY which I have since corrected in the original post. The
cd command syntax in the DIY was incorrect. I accidentally omitted the
/d parameter.
cd is the
Change
Directory command. The Windows Command-Line Reference explains its syntax and includes usage examples:
https://technet.microsoft.com/en-us/.../cc731237.aspx
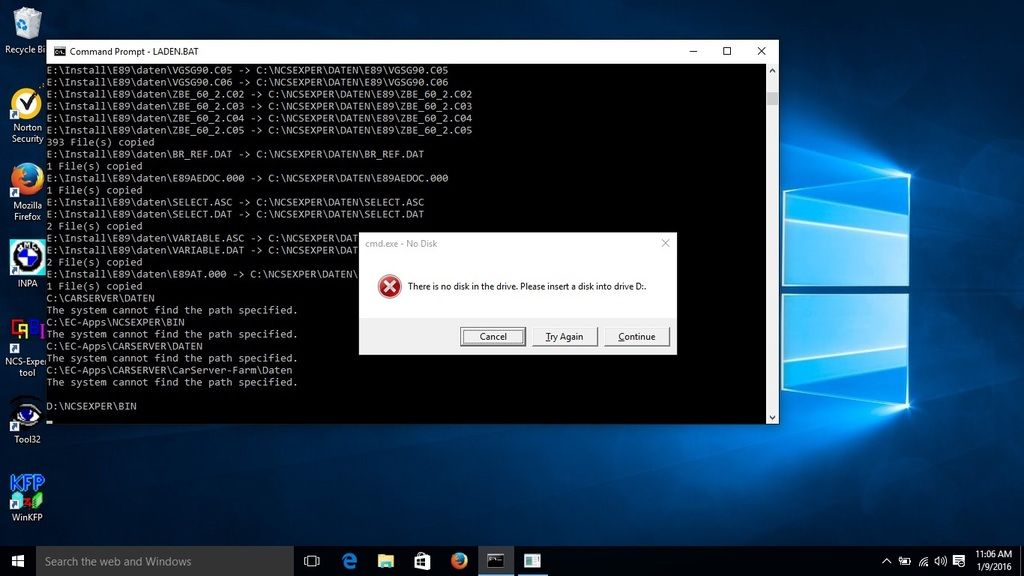
At that step in the DIY when you execute the LADEN.BAT script, you should have had a Command Prompt window opened with Administrator privileges (as seen in the screen capture below) and entered the following two commands:
Quote:
Originally Posted by 808AWD325xi
Go to the E89\DATEN directory and execute the LADEN.BAT script.
Code:
C:\>cd /d X:\E89\DATEN
X:\E89\DATEN>laden.bat
|
Once you have changed to the proper directory (also known as a folder), then you enter the name of the script to begin execution. In this case, the name of the BMW provided script is LADEN.BAT.
You can tell from the command prompt in the screenshot below that my SP daten files were stored on drive "E:" in the folder "\INSTALL\E89":
Hence, I would have had to enter the following two commands in order to execute the LADEN.BAT script:
Code:
cd /d E:\INSTALL\E89\DATEN
LADEN.BAT
Similarly to the
copy command(s), you would have also needed to alter the drive letter and path of the
cd command to reflect the drive letter and path where you stored your SP daten files.
Because you navigated to the SP daten folder with Windows File Explorer and double clicked on the LADEN.BAT script, that is why you did not see the errors in the screenshot above.
Hopefully that makes sense. Once you have had an opportunity to review the Windows Command-Line Reference, if anything is still unclear, please ask any clarifying questions that you may have.
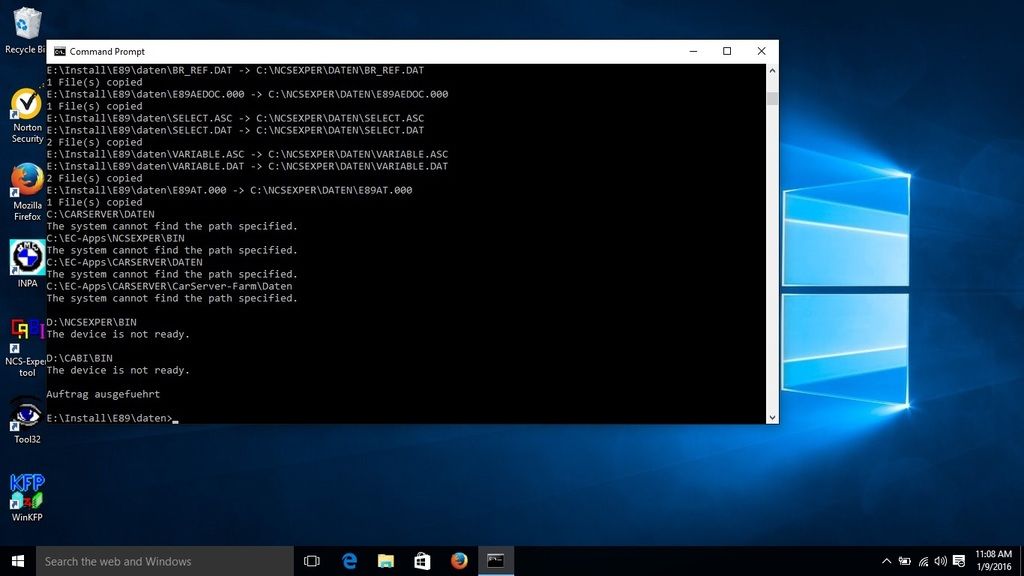
The most important thing that the LADEN.BAT script does is populate the C:\NCSEXPER\DATEN and C:\NCSEXPER\DATEN\E89 folders as partially seen in the screenshot above. Check your C:\NCSEXPER\DATEN folder, it should have (7) files in it (not including the E89 sub-folder.) If it does, the script likely executed successfully.
Quote:
Originally Posted by ||||||||||
My next issue came at the end on this step:
Quote:
Originally Posted by 808AWD325xi
Install the patched 32-bit NCS Expert.
|
The code provided here was very confusing to me, and caused me issues:
Quote:
Originally Posted by 808AWD325xi
Example:
Code:
rename C:\NCSEXPER\BIN\NCSEXPER.EXE NCSEXPER.OLD
rename C:\NCSEXPER\CFGDAT\NCSEXPER.TXT NCSEXPER.GER
copy NCSEXPER.EXE C:\NCSEXPER\BIN /v
copy NCSEXPER.TXT C:\NCSEXPER\CFGDAT /v
|
The first line is where my issue with the German version of NCS Expert not working anymore came in. As soon as I copied and pasted that line into the Command script screen, the link stopped working. After running these first two lines, I noticed this issue, so I changed them back (ran the code in reverse) and the original NCS Expert program worked again. The second two lines of code did nothing for me, and I am not sure if they are important steps, but I still have not accomplished them..? |
Yes, these are very important steps, if you want your NCS-Expert to be in English.
Once the
rename commands have been executed, NCS-Expert will not be accessible momentarily until the
copy commands have been successfully executed. This is because the binary executable that the Windows desktop shortcut points to has been renamed, but the shortcut has not been updated. Once the English version of NCS-Expert has been copied into its place, the desktop shortcut will once again function.
As previously explained earlier in this reply, the drive letter and source path of the
copy command(s) will have to be altered depending upon where you placed the files after unzipping the NCSEXPER32_ENG.zip file.
Alternatively, you could just use the
cd command and change directories to whichever folder the files are stored in
prior to executing the
copy command(s).
Quote:
Originally Posted by ||||||||||
The very next step, regarding copying the NCS Expert PFLs gave me trouble originally, but I got it figured out. Didn't do it with code in the COmmand screen, but I copied and pasted them into the correct folder manually, and the profiles are now popping up on NCS Expert as they should, so we are good there. Also, I took the 32 bit version of NCS Expert and placed it in the main NCS Expert folder in place of the german version, and clicking on the original desktop link pops up the english version and the profiles are all there, so this issue seems to be fixed now.
The very last step I was able to do no problem, it worked for me.
So to recap, everything seems to be installed. INPA works, is in English, and the cable being plugged in illuminates the Ignition and Battery icons. NCS Expert is in English now, and the profiles are showing up. The submenus are also in english thanks to moving the txt file over as stated in one of the links where you download the files earlier on in your DIY. All programs SEEM to be working just fine, but I still cannot read my car.
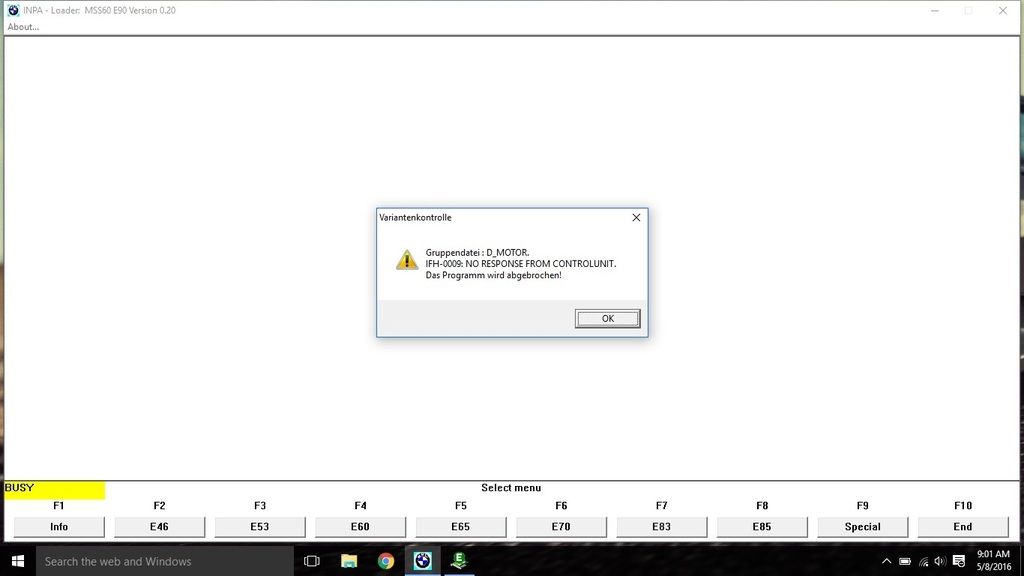
Below is the error I am getting (this happens after selecting S65 M3 from the Engine menu for my car, and it tries to connect, but fails)..
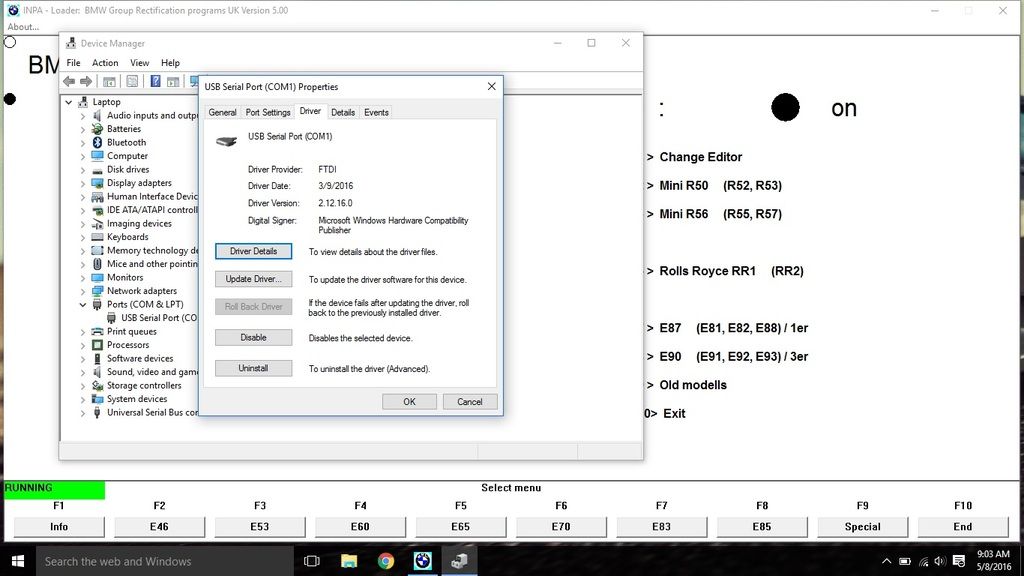
Here is a screenshot of the driver version installed for my cable
This is a link the cable I purchased..
http://www.ebay.com/itm/331749200840...%3AMEBIDX%3AIT
Here is a shot of the EDIABAS screen and the INPA screen to show that it is connected and working properly (for what it's worth, I have the EDIABAS screen open in the background, as I know not doing so can cause connectivity issues)
Not really sure where to go from here..everything seems to be installed properly, it just won't connect to my car. The only thing I can think of us that for my car (2011 BMW M3) the cable has to be modded (I've read something about jumping a couple of the terminals with a small wire for certain years?) Or maybe I missed an important step in the process somewhere that isn't allowing INPA to communicate? I'm not sure if I am able to read the car with NCS Expert or any of the other programs. I am not as well versed in them and don't want to take a chance of doing damage to the ECU w/ NCS Expert by not knowing what I am doing. |
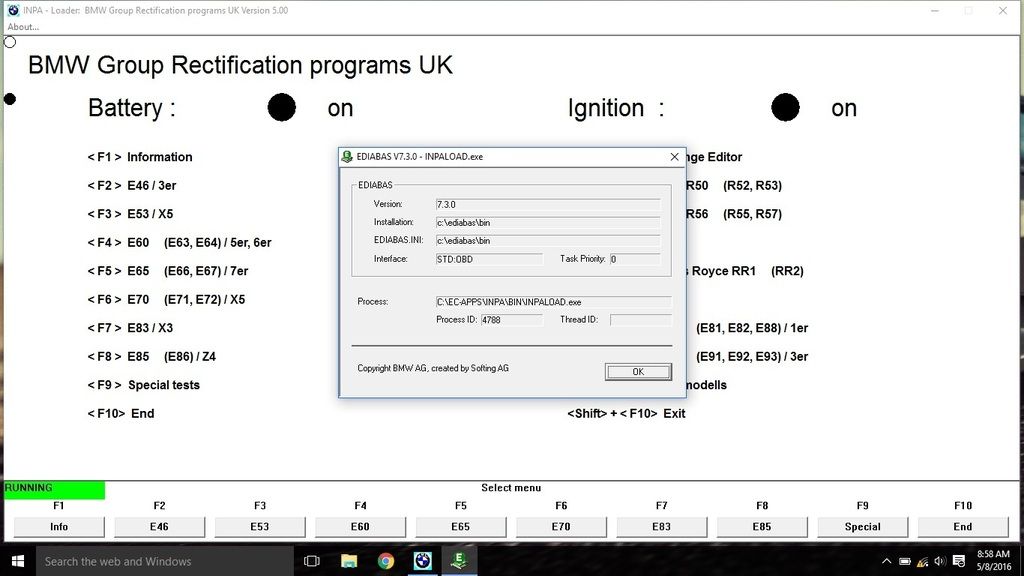
If you want to see if INPA is broken, try displaying all installed modules as outlined in question #5 of my FAQ:
http://www.e90post.com/forums/showpo...48&postcount=2
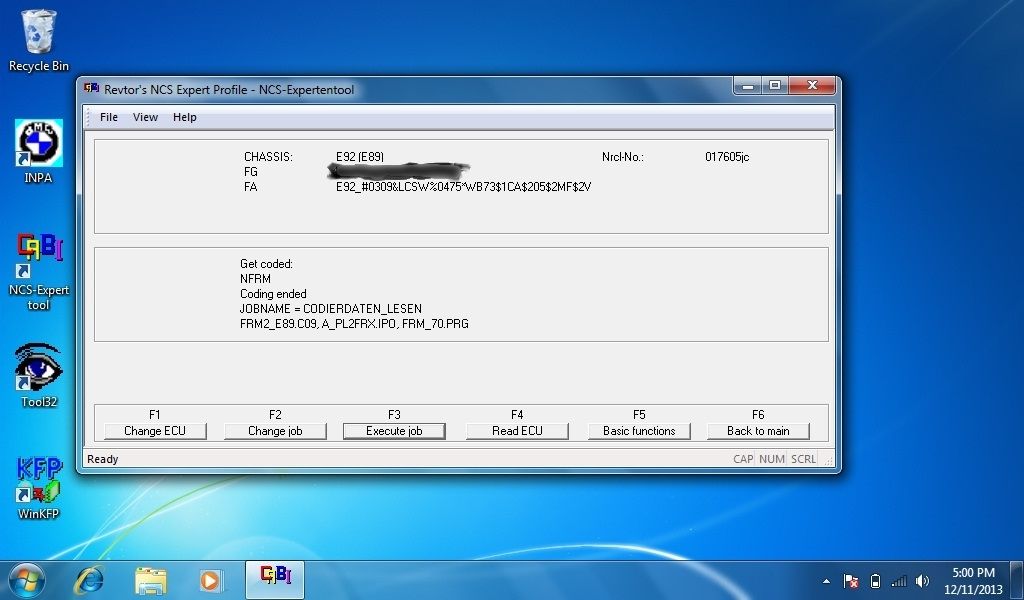
A simple test with NCS-Expert to see if communication with the car is possible is to read the VIN (FG) and vehicle order (FA). Launch NCS-Expert and load the "EXPERT MAN" profile. Click on F1, F3, select the E89 chassis and click OK, select the CAS ECU and click OK. A screen similar to the one below should be displayed. The information in the lower box under "Get coded:" will not be present. Finally, close NCS-Expert:
I think that it's very likely that you missed an important step in the process because you were copying and pasting the
copy commands. That simply will not work as previously explained.
That being said, if I were you, I would reinstall Windows and start over. That is the only way I would feel 100% confident that the software is installed correctly.