This procedure documents work I performed on my 2007 E90 335i N54. Your results may vary - undertake any DIY project at your own risk. If you see an error or omission, I would very much appreciate a heads-up so I can fix it.
To begin, I made sure I had the correct parts - I ordered by VIN to get the best results. I needed a new set of (2) aluminum bolts. For my 2007 E90, I got the starter and bolt set through getbmwparts for $386, but that was counter pick-up (no shipping) and that includes an $80 core charge, which I will get back. So that's a total of $306. If you do this job, just always make sure to use the original box your starter came in when returning the core or you won't get refunded! Same goes for most any core item.
I recently replaced my intake manifold gaskets because I had my valves blasted. So I didn't get a new set of manifold gaskets. Otherwise, I recommend buying a set - pretty cheap, and not worth trying to reuse old gaskets.
I needed an assortment of metric sockets (regular and deep), and an assortment of extensions.
Specialty tools I didn't have on hand - factor the cost of these tools into your price estimates:
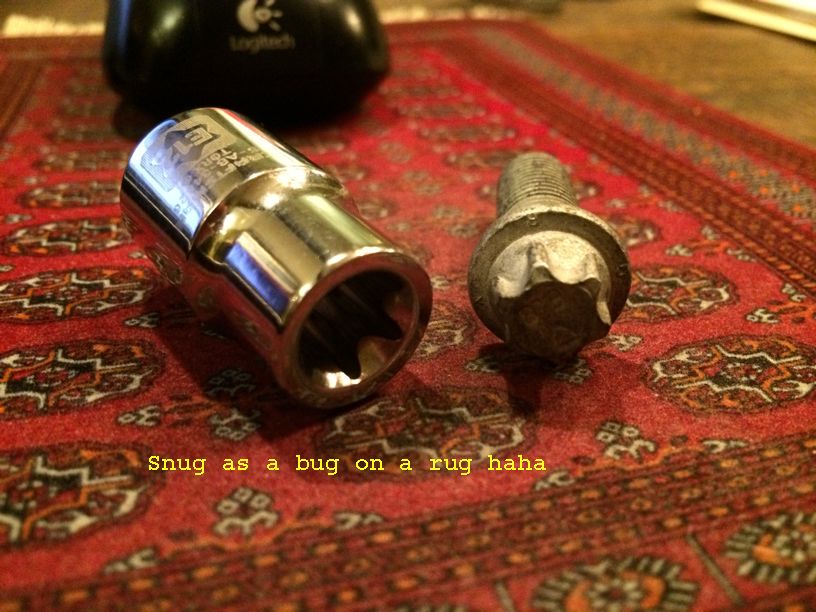
My old starter was attached with E12 Torx bolts. My new bolt set was E14 Torx. And here is the IMPORTANT part. Use only E-Torx sockets!! I know that most 12-pt socket sets fit these E-Torx, but there is just a little play. For example, a 10MM 12-pt socket fits the E12 Torx bolt. But NOT snug. Play is a BAD thing here, particularly on the rear-facing bolt. If I stripped that bolt head, I honestly don't know how I'd recover. A lot of places don't even sell E-Torx sockets anymore. But I found a 42-piece Craftsman socket set at Sears that came with E6 through E16 Torx sockets. $99, on sale for $29. Woohoo!

Those E-Torx sockets BITE that bolt head and do not slip!
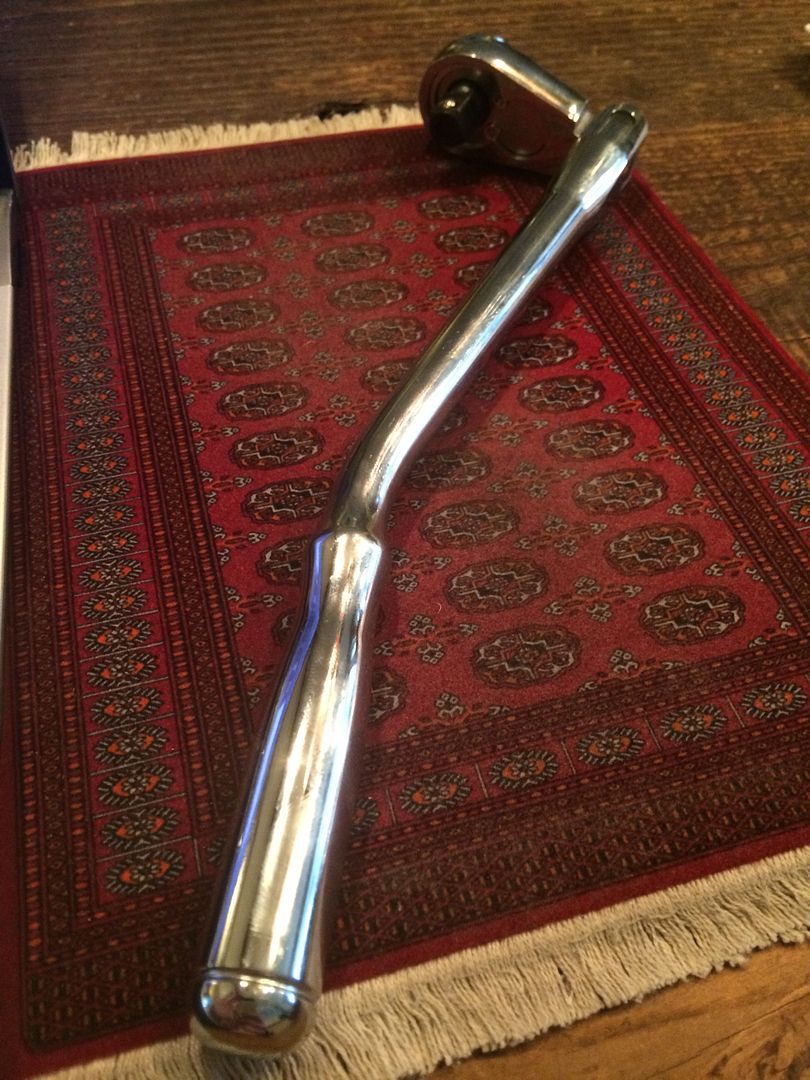
I needed a ratchet with a swiveling head to get to that rear-facing bolt. No other way to do it. I made sure it had a slender head for clearance. I got this one from Sears, item #944835 for $31. The curved handle worked great, but the head was BARELY slender enough.
A swiveling, extending mirror came in handy when removing electric connectors underneath the throttle body.
Tear-Down.
Precaution - when I remove a nut or bolt, I take great care not to drop it! Nothing worse than having to stop a project, jack the car up and drop the underbelly pan to retrieve it!!!

1. I began by disconnecting the negative battery terminal. Whenever I do this, I always unlock all the doors and put my rear seat down. This way I can't accidentally close the trunk and lock myself out so I can't reconnect the battery! If I didn't have fold-down rear seats, I'd either train a trunk monkey or put something over my trunk latch (tee-shirt or something) to prevent this from happening.
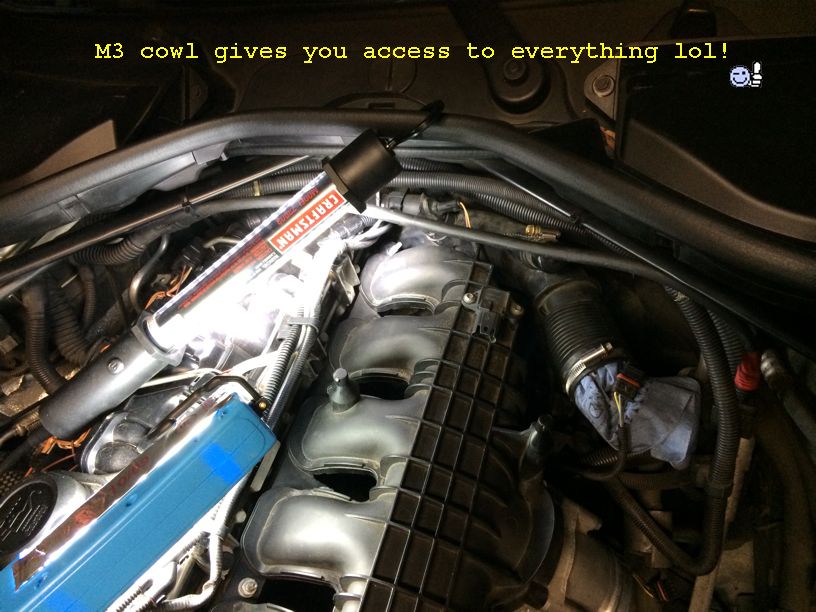
2. To access the starter, I needed to remove the cowl, engine cover, air filter box and intake manifold/throttle body, in that order. I don't have the procedure here for the cowl because.....I converted my E90 over to the M3 cowl so I didn't have to remove mine whoohoo!
That M3 cowl gives you access to everything - highly recommended (see here:
http://www.e90post.com/forums/showpo...0&postcount=35)! But if I had the original cowl, I'd check out this post:
http://www.e90post.com/forums/showpo...0&postcount=10.
3. With the cowl out of the way, the engine cover was easy. I took off the oil filler cap assembly (
http://www.e90post.com/forums/showthread.php?t=791674 step 15b), then removed the four bolts that hold the cover down. Once I had the cover off, I temporarily reinstalled the oil filler cap to keep debris from falling into the engine.
4. I don't have the procedure here for the fresh air filter box and chargepipe, since my car has a DCI and aftermarket chargepipe/BOV. But if I had the OEM setup, I'd consult my OFHG DIY for the procedure:
http://www.e90post.com/forums/showthread.php?t=791674. Start with Step 5. But it's FAR easier when you have the cowl off. For example, in my DIY, I use a pry-bar to get leverage up under the cowl. You don't have to do that if you have the cowl off.
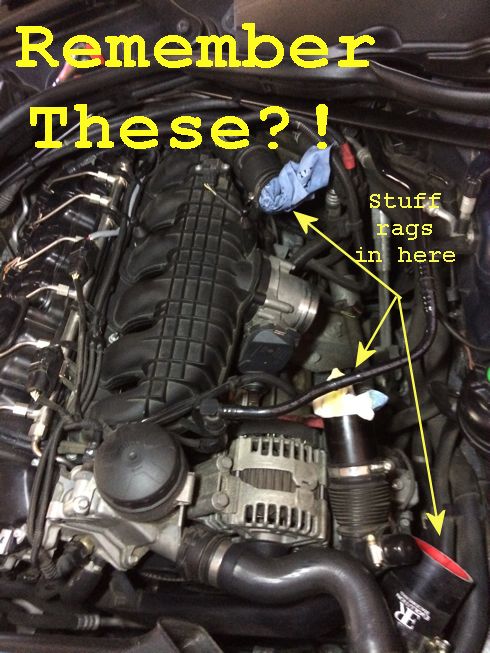
Anyway, once I got my cold/charge filter/induction system off, I made sure to plug both turbo fresh air pipes (fore and aft) with towels, and also my charge air induction pipe (fore, up from intercooler).
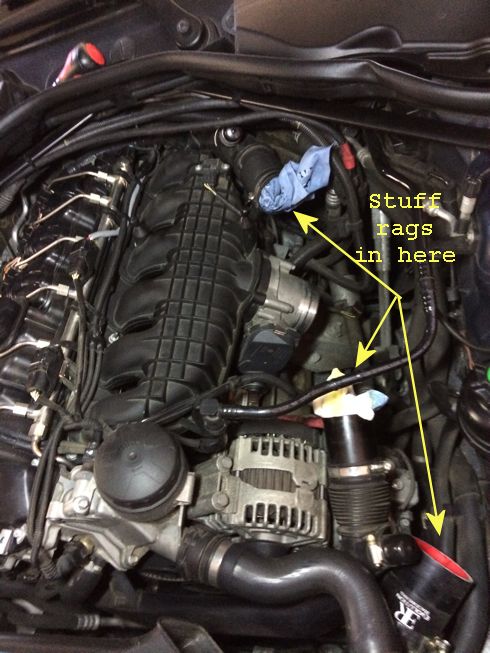
BUUUUuuuuttttt - I HAD TO REMEMBER TO NOT FORGET ABOUT THESE TOWELS!! The road to misery is paved with those poor souls who now own new turbos because they forgot they had towels stuffed in there.

Next time I think I'll put a piece of colored painter's tape on each of these pipes just as a visual reminder!
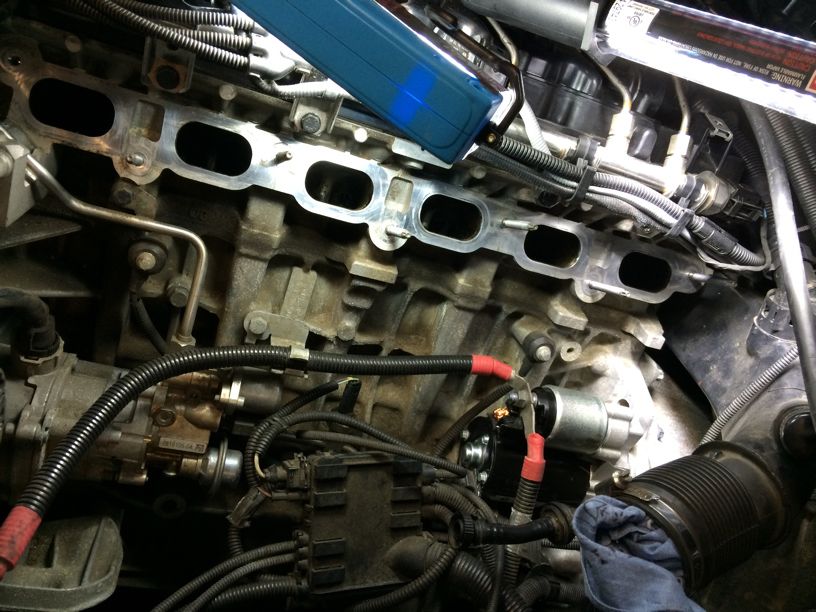
5a. For the manifold, I started by disconnecting the sensor on the top of the manifold. Then I disconnected the hose connected to the right-side of the throttle body. I've heard people say they broke the connector trying to remove it, but mine came off easy. It's a squeeze-and-pull connector, just like the VC vent hose and the brake vacuum fittings. Note that if you follow this hose back toward the firewall, it has a rubber hanger that connects it to a bracket on the bottom/rear of the manifold (almost directly under the top circle in the diagram below). Slip this hanger off the bracket so the hose is no longer connected to the manifold. There is also a wire that hangs off that bracket with a plastic push-screw. Pull that wire off the bracket.
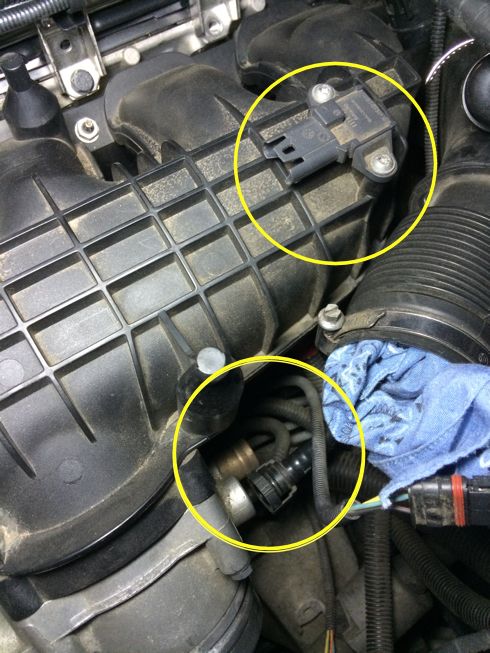
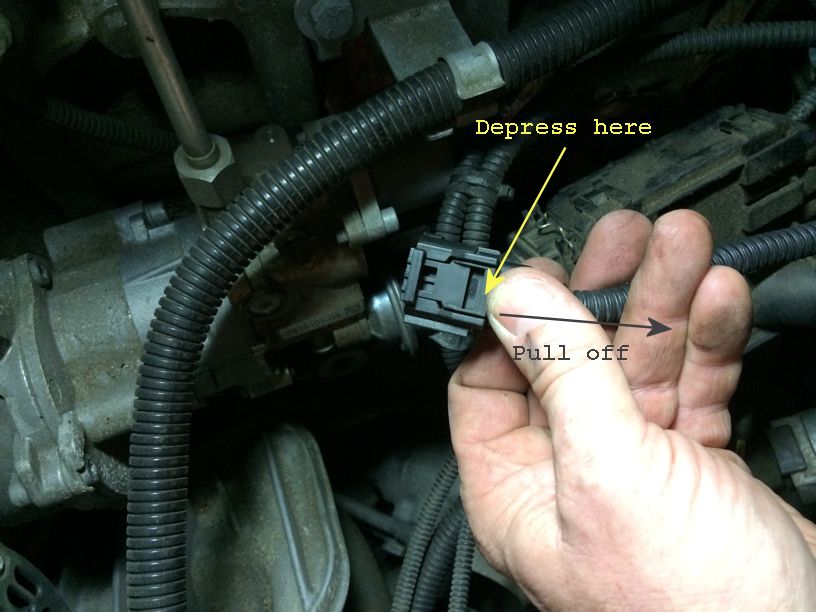
5b. Next there was an electrical connector underneath the throttle body. It was kind of tricky, and here is where I used a mirror. But if you know what to do, you don't even need to see the thing in order to get it off. On the back side of the connector (the side that faces the engine block) there is a large tab you depress to clear the locking cleat. If you depress that tab on the wire-side of the connector (not the throttle body side where it slides in) you can then wiggle/pull the connector loose from the receptor on the throttle body - you will be pulling toward the rear of the engine bay. I found it easier to wait on this and disconnect it AFTER I had the manifold completely free from the cylinder head stud bolts. Here is a pic of the connector, taken with an extension mirror. Notice that the locking cleat that you see on the bottom (facing the ground) is NOT the one to disconnect! If you disconnect that lock, you separate the connector into two separate parts, one of which is a spring-leaf electrical connector (and I'm sure you can see where this could go bad - ask me how I know).

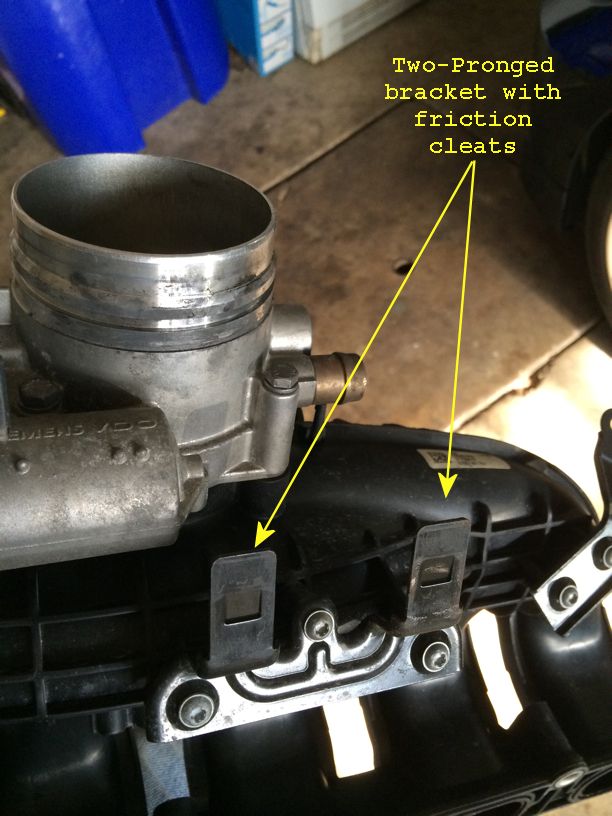
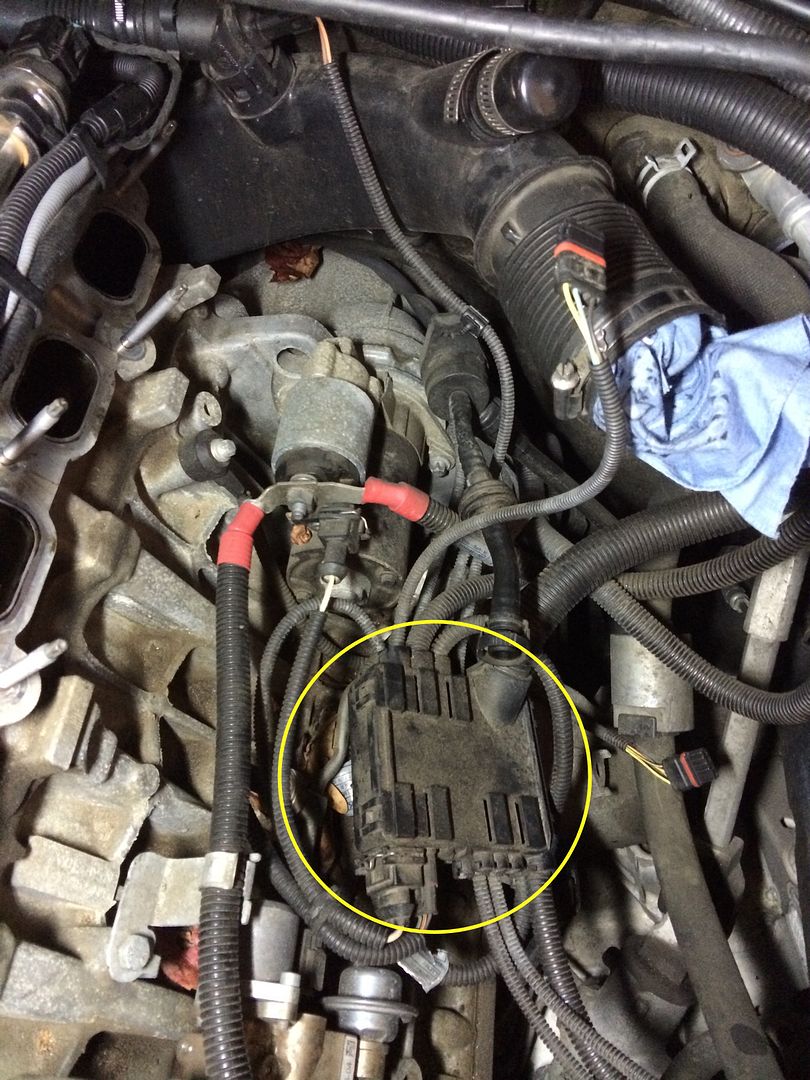
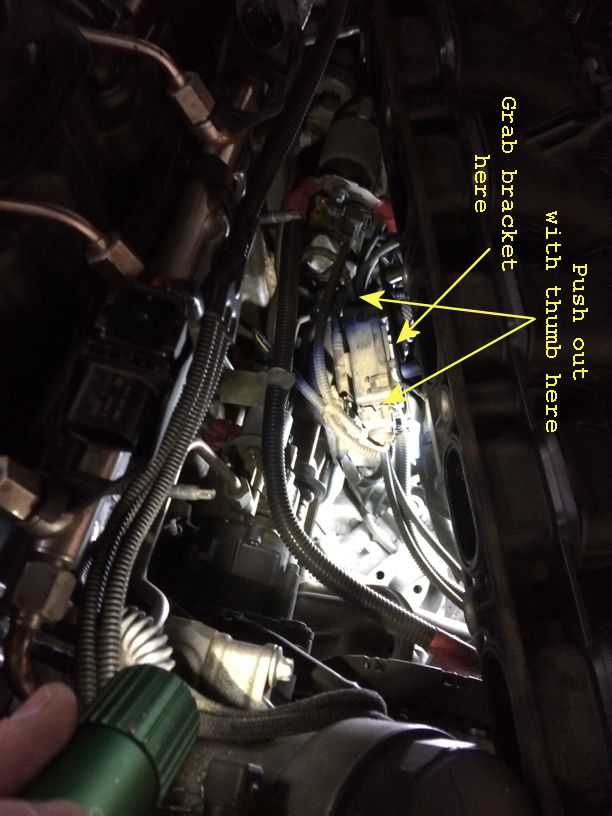
6. Next, I had to get the cabling junction box off the bottom of the manifold. This is tricky. The top of the j-box has seven slotted tabs (three on one side, four on the other) that simply push onto a two-prong bracket bolted to the bottom of the manifold. But those prongs of course have little locking friction cleats on them, so it takes some force to slide the thing off. In theory you should just be able to grab it and slide it off by pulling away from the manifold toward you. Not so easy. Some ppl have used screwdrivers to pry it. I actually found it easier to wait until I had the manifold completely clear of the cylinder head stud bolts, and attack it from the rear by *pushing* it off the prongs. That way I could grab the bracket and use my thumb as a lever to push each side past its cleat on the prong, one at a time. Then I just slid it off. Here are some pics that may help visualize - first of the pronged bracket on the manifold, and then of the tabs on top of the j-box. Below that is a pic showing how I attacked it from the rear side after the manifold was free. With these visuals, you should have a good idea of what needs to be done.
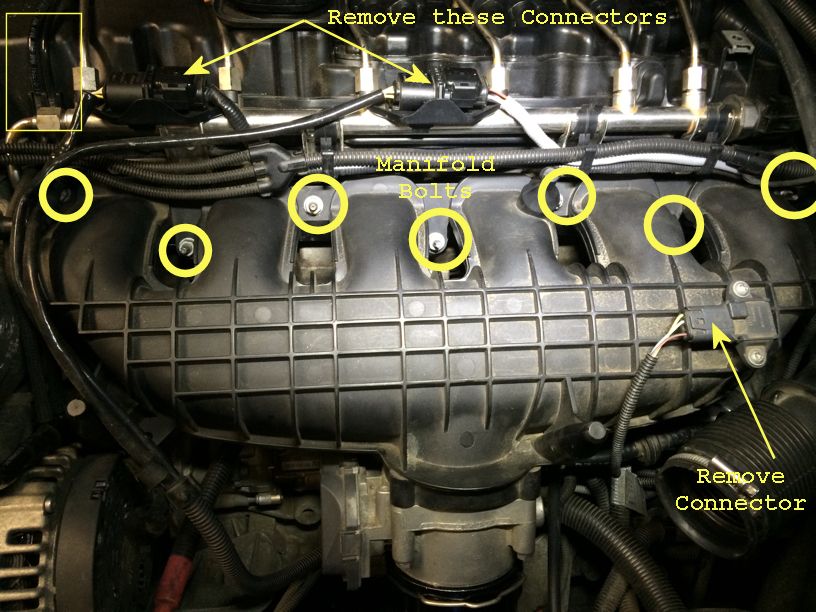
7. Next, I removed the six nuts and one bolt that hold the manifold in place. In this photo, the yellow rectangle highlights where my vacuum canister hoses seat into grooves in the valve cover - popping these out freed up some room. Also, disregard the "Remove Connector" direction for the electrical connector on top of the manifold (I already did this in step 5a):
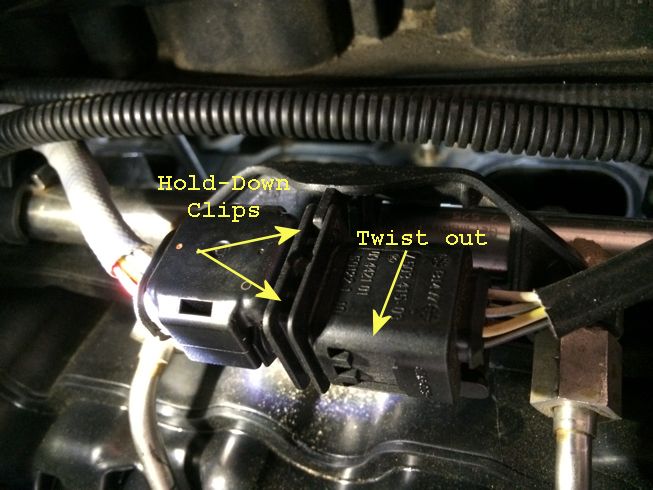
The manifold will pop right off at this point, but I lost some hair trying to maneuver the thing up and over the stud bolts to completely free it up - it's a tight space. It took some wiggling and maneuvering to get the manifold to clear the rear turbo air pipe (which doesn't flex much). To make it easier, I cleared some stuff. First I removed the two connectors on top of the fuel-rail shown above. They twisted out of their holders, and then I depressed the clip on the bottom to remove the connector.
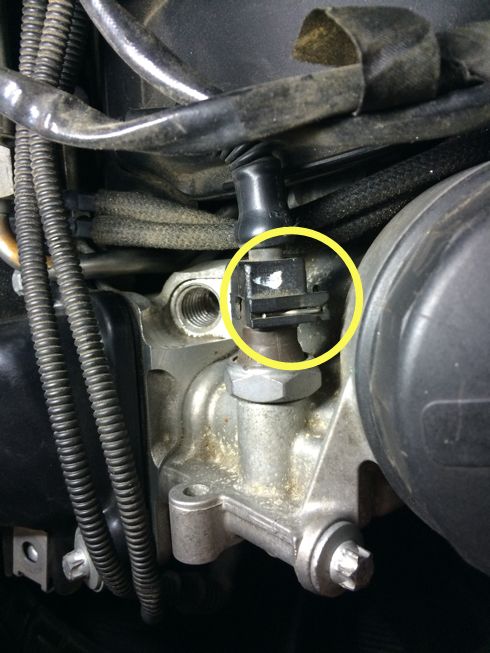
I also removed the oil pressure sensor on the OFH - it's a standard clip-style connector. I had to be very careful prying that clip as they are known to spring off there never to be found again.
Once I got all that stuff disconnected, I had more clearance to get the manifold cleared off the bolt studs. Once I got it off, I inserted some towels into the valve openings to prevent debris from falling into the engine. At this point, I would have had to disconnect the sensor underneath the throttle body, but I had already done this step earlier (step 5b). I disconnected the j-box from under the manifold by accessing it from behind (see step 6).
8a. I was now clear to remove the manifold from the engine bay. If I had bought a new gasket set, I'd have tossed the old gaskets and inserted the new ones. I set the manifold aside in a clean, safe place until I was ready to reinstall.
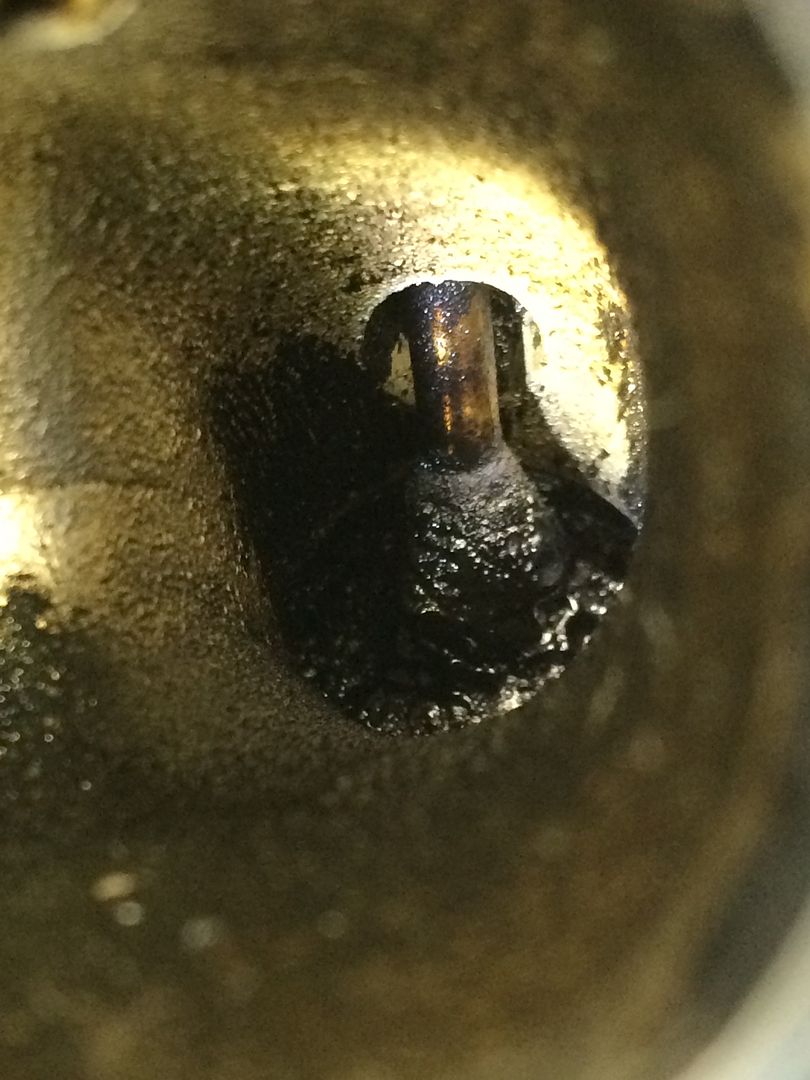
8b. And now you see what 10k miles does to your valves. I had these blasted clean-as-a-whistle 10k ago!
9. Behold that shitty old starter that caused me to waste my Saturday in the first place lol

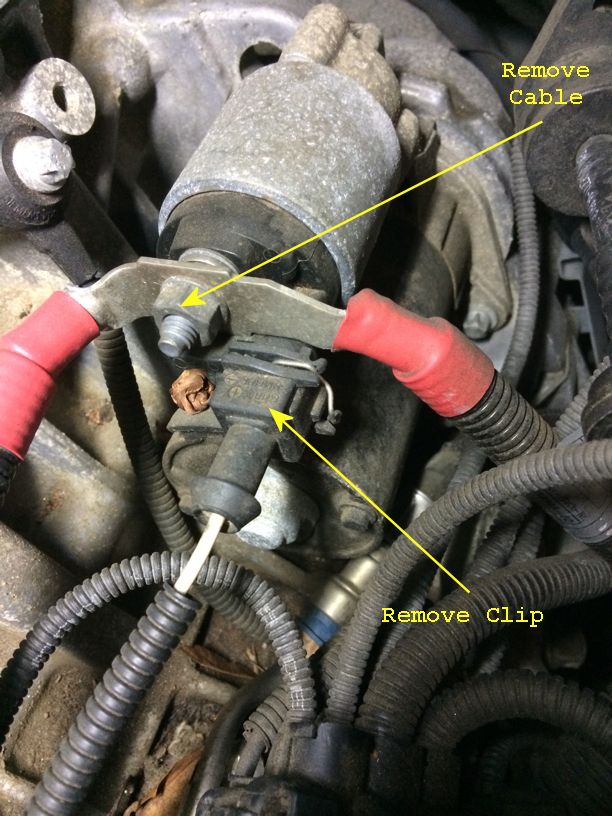
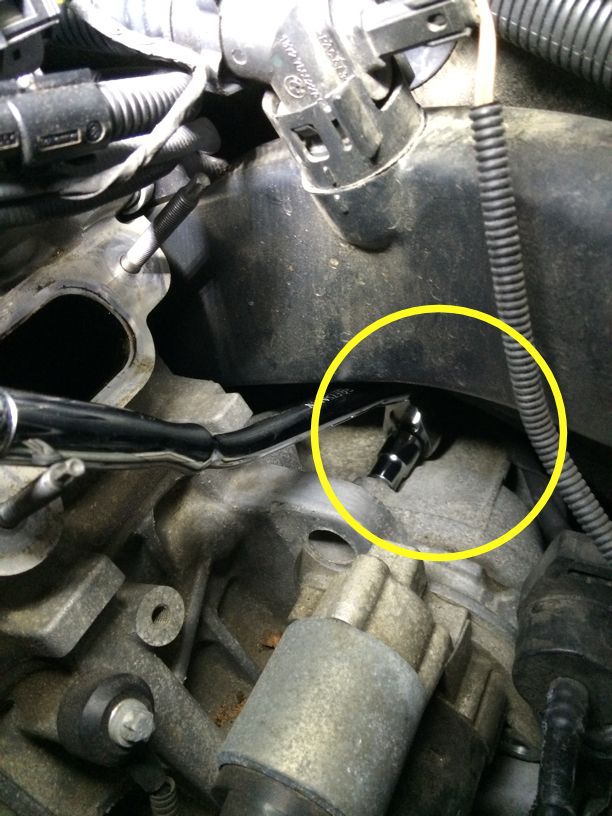
I began removing the starter by removing the electrical connector. It is one of those wire-clip designs, so I had to be VERY careful prying the clip. It can go flying never to be found again. I disconnected the battery cable from the starter post. The nut on the starter post looks suspiciously like the manifold nuts, so I put mine immediately onto the new starter post to avoid confusion. Next, I removed the old starter. There are two bolts that are inserted in an opposing pattern: the small bolt on the front right inserts fore-to-aft, and the longer bolt on the left rear inserts aft-to-fore. I started with the rear bolt so the starter was held firmly into place while I worked that more difficult bolt. And here is where I needed that swivel-headed ratchet - you can't get that rear bolt off without it. And as previously mentioned - I used real E-Torx sockets so I didn't strip that bolt head! I tossed the old bolts in order to avoid reusing them.
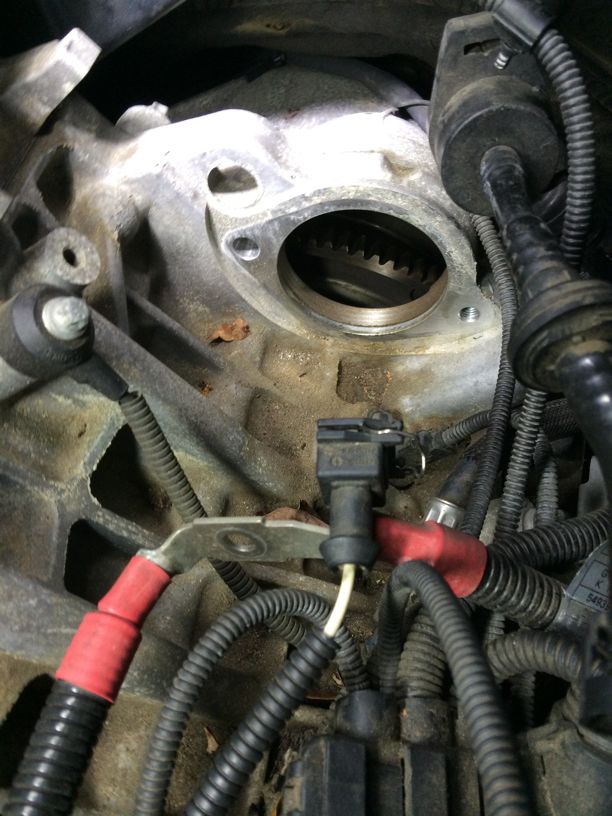
10. I installed the new starter. I don't have torque specs for the starter bolts. I don't even know how you'd get a torque wrench on that rear bolt anyway. I just torqued mine PDT. Of under-torque and over-torque, I think the bigger risk is over-torque. I didn't want to snap a head off those aluminum bolts!
 Reassembly:
I reassembled the car in reverse order. Here are the steps I took, with some important things to remember:
a. Reconnect cable and electrical connector to starter.
b. Reinstall intake manifold (torque is only 15nm). Make sure to remove all the towels stuffed in the valve openings! Fortunately, the stud bolts have a nipple on top that makes is a breeze to set the nuts without losing them. For myself, I hand-tighten, then snug in a pattern radiating outward from the center, then tighten to spec in the same pattern. NOTE - before you do this step, it might be easier to get the manifold into position, then reconnect the j-box and electrical connector.
c. Reconnect the fuel-rail connectors. Plug the connector in, then push the assembly back into the holder.
d1. Reconnect the oil pressure sensor.
d2. Re-seat the turbo vacuum lines into the grooves in the valve cover.
e. Reconnect the j-box to the manifold. Just slide the tabs over the prongs and push it in all the way.
f. Reconnect the electrical connector under the throttle body. Remember the larger locking tab faces the engine block.
g. Reconnect the hose to the right-side of the throttle body. This is the one EVERYBODY forgets! I started my car up and 30 seconds later the tach plummeted erratically - I knew exactly where to look! (But remember that hose has a rubber hanger that slips over the bracket on the bottom rear of the manifold? Reconnect that hanger onto the bracket first. And don't forget to also reconnect that wire to the same bracket by re-inserting that push-screw into the bracket) Then the hose simply pushes onto the throttle body until it clicks.
h. Reconnect the sensor on the top of the manifold.
i. Reconnect your fresh air filter/chargepipe assembly. MAKE SURE TO FIRST REMOVE ALL THE TOWELING INSERTED TO PROTECT THE AIR PIPES!!!!
j. Reinstall the engine cover.
k. Reinstall the cowl.
l. Reconnect the negative battery terminal.
m. Reset the date.time.
n. Start the car and drive by the nearest stealership honking the horn.