This will show you how to change your orange gauge cluster to a nice, cool white color. It's pretty cheap as well. You need a soldering iron with a sharp tip, some soldering flux, and maybe some solder.
Here is a picture of my cluster with all but 6 of the LEDs replaced:
View post on imgur.com
I left the center display the stock LEDs so you can see the difference!
You will need to buy the LEDs of your choice. I chose white LEDs, as I liked the color, but you can do any color you desire as long as they make LEDs for it!
If you want to change all of the orange to your desired color, you should order around 35. You will have a few left over if you don't mess up, but they are cheap and you will most likely damage one or two unless you are really good at soldering small components.
Here is a list of some LEDs you can buy that will work, in different colors:
Now for the tutorial!
Start by removing the two screws holding the gauge cluster in. They are a common smaller torx size, but I forget which.
View post on imgur.com
View post on imgur.com
With the screws removed and the steering wheel tilted all the way down, tilt the gauge cluster forward starting at the top. Once it is tilted a little bit, you will be able to pull it out towards you.
View post on imgur.com
Once the cluster is out, look at the back. There will be one plug connecting it to the car. There is a lever on the plug which needs to be rotated up to allow the plug to come out:
View post on imgur.com
Remove the plug and the cluster should be free. To start disassembly, look at the back of the gauge cluster. There will be 4 silver torx screws of the same size that held the cluster in the dash. Remove those 4 screws. I had two already removed in the picture below:
View post on imgur.com
You will then need to gently pry the snap-fit tabs holding the front lens assembly to the back of the gauge cluster apart. There are I believe 6 of these black tabs. Work your way around slowly and gently bending them back and slightly separating the two parts. It should eventually easily come apart once all the tabs are released.
Now go back to the front of the now-separated cluster assembly:
View post on imgur.com
You will need a knife or small screwdriver to pry the needles off their pegs here. Be very gentle and don't pry on the needles themselves, only on their circular hubs in the middle. Also be sure to put something between the tool you are using to pry (the knife in my picture) and the black gauge background. This material scratches really easily, and you don't want to do that!
View post on imgur.com
View post on imgur.com
It's not easy to see here, but the plug housing that was connected to the car is the only thing holding the circuit board and gauge face to the black housing in back. You can try to wedge something between the plug housing and the black back to help release them, or just gently tug the circuit board and black housing apart and it will eventually pop off. Don't pull too hard or you could break something, but it should eventually come off with just the right amount of force.
View post on imgur.com
View post on imgur.com
Now that the circuit board and gauge face is separated from the back housing, there are only 4 white tabs holding the gauge faces to the circuit board. Slightly pull those out and the gauge face should come right off, leaving you with the guts!
View post on imgur.com
Now gently pull up the tabs locking the LCD cable in place, and the LCD and white backing plate will come right off. You're then left with the bare circuit board. Whew!
View post on imgur.com
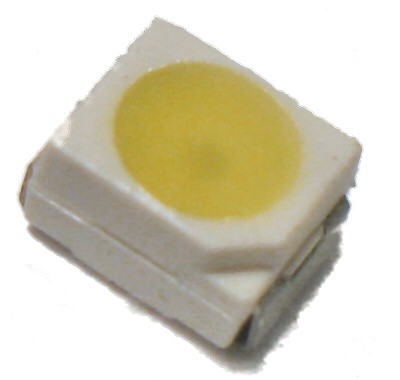
Now the hard part. All the LEDs outlined in the red areas below are the stock orange ones. If you want everything orange to be a different color, you need to gently remove these with your soldering iron. I would recommend only doing 1 at a time and then replacing it, because the polarity needs to be correct. The LEDs have a small indention in one corner, and you need to make sure the LEDs you solder on have the same indention in the same corner. If you don't, they won't light up!
View post on imgur.com
 After you desolder one of the stock LEDs, i recommend running your soldering iron over the solder pads to smooth out the remaining solder. Then put some flux on the entire area the LED will cover. This will help hold the replacement LED down while you solder it. You'll also probably have to hold it down with tweezers, because it will move when the solder starts going molten and sticking to it. A loupe or magnifying glass may be necessary if you can't see close up. These LEDs are very small (2.8x3mm!) and you will need a steady hand and good eyes to make sure the 2 solder points are done well.
Here is what mine looked like with all but the center display LEDs changed:
After you desolder one of the stock LEDs, i recommend running your soldering iron over the solder pads to smooth out the remaining solder. Then put some flux on the entire area the LED will cover. This will help hold the replacement LED down while you solder it. You'll also probably have to hold it down with tweezers, because it will move when the solder starts going molten and sticking to it. A loupe or magnifying glass may be necessary if you can't see close up. These LEDs are very small (2.8x3mm!) and you will need a steady hand and good eyes to make sure the 2 solder points are done well.
Here is what mine looked like with all but the center display LEDs changed:
View post on imgur.com
Once all the LEDs are done you can hook it up to the plug in your car to make sure they all light up. If they do, on to reassembly! It's basically the exact reverse of disassembly, so I'm going to skip most of it here. The only part I want to touch on is the needles.
After gently pushing the needles back on their posts, hook the cluster (without the lens back on yet) up to the wire and start the car. Then kill it. When in accessory mode on a cold car, all the gauge needles should be pointing to 0. There should be a little resistance from the motors holding them in place, but you should be able to move them to align to 0 if they don't. There is also the cruise control ring which goes behind the speedo area. You should have this turned so the white mark that indicates the cruise control speed is just barely hidden when the car is off.
After all that is done and the cluster is reinstalled, marvel at your new shiny cluster!
View post on imgur.com