

|
|
|
|
 |

|
 |
BMW Garage | BMW Meets | Register | Today's Posts | Search |
 |

|
BMW 3-Series (E90 E92) Forum
>
DIY: Brake Pad Change e90 / e92 335i
|
 |
| 11-19-2011, 12:22 PM | #1 |
|
I sweat pheromones
206
Rep 2,103
Posts |
DIY: Brake Pad Change e90 / e92 335i
UPDATE: To see images, make sure to use Chrome as your browswer AND download the extension "Photobucket Hotlink Fix"
I know there's already a DIY on this topic. However, I think this is a much easier way to change pads. Why do I say that? Well, I've changed 335i pads about 10 times. So, I think I've become somewhat of an expert on the matter. Let me say this, I'm mainly covering the pad change itself. Some things will be left out but I'll make *NOTE* of it. And like every DIY, DO THIS AT YOUR OWN RISK. Tools/Supplies: - Jack & Wheel Chock - Torque wrench set at 88lb/ft - Socket wrench with 7mm Hex bit (+4" socket extension if available) - Screwdriver - Disc Brake Pad Spreader - CRC Brake Quiet and Brake Cleaner - Pad and Sensor if needed 1) Pop hood and remove cover exposing brake fluid reservoir. Unscrew cap to reduce pressure. 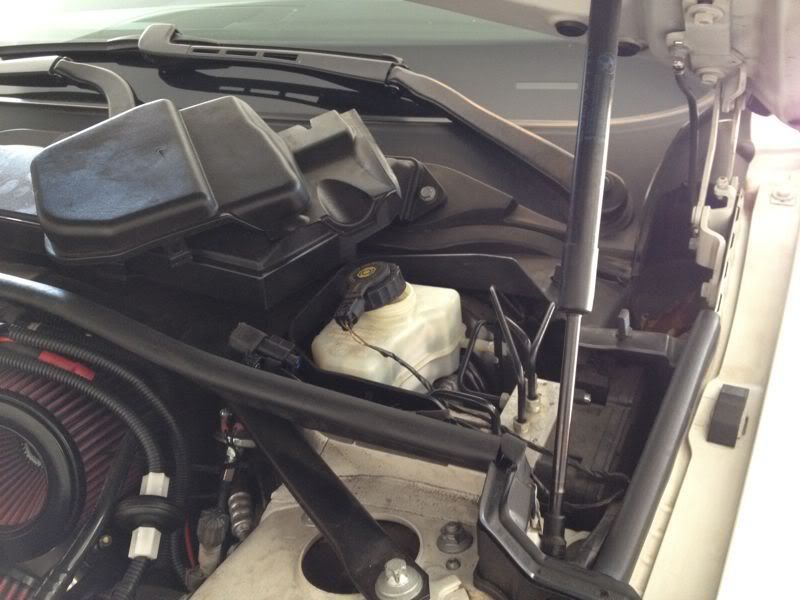 2) Let's start with the rear. Remove the springs using your screwdriver for leverage. Use two hands. These clips like to 'spring' out. 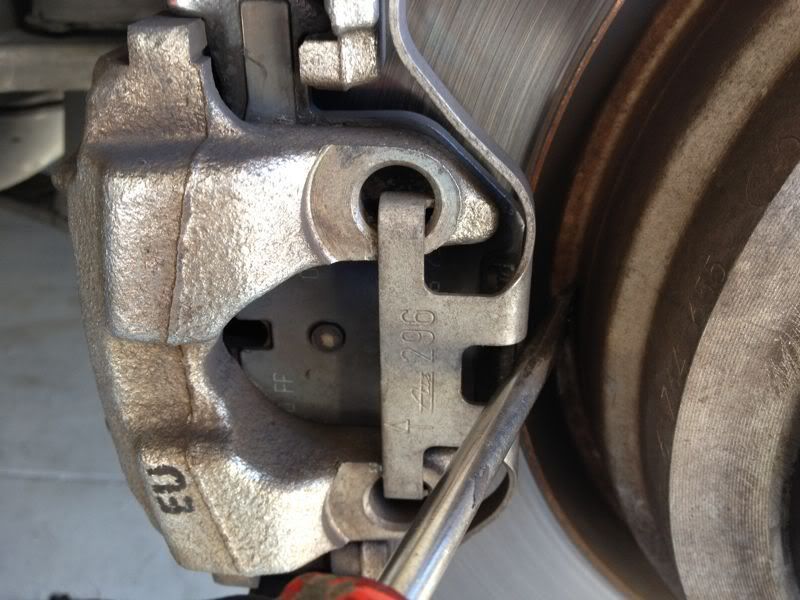 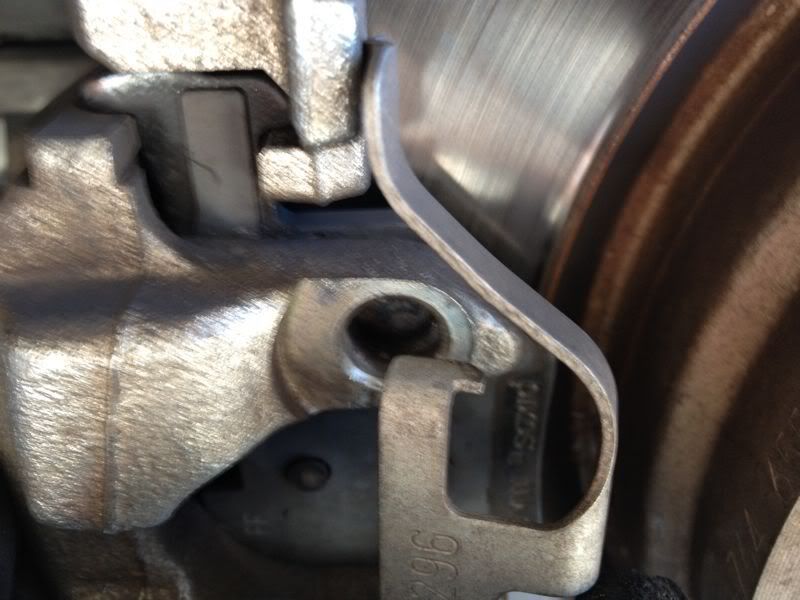 3) On the back of the caliper, you'll find two plastic caps. (1 top and 1 bottom). Pop them off with the screwdriver. 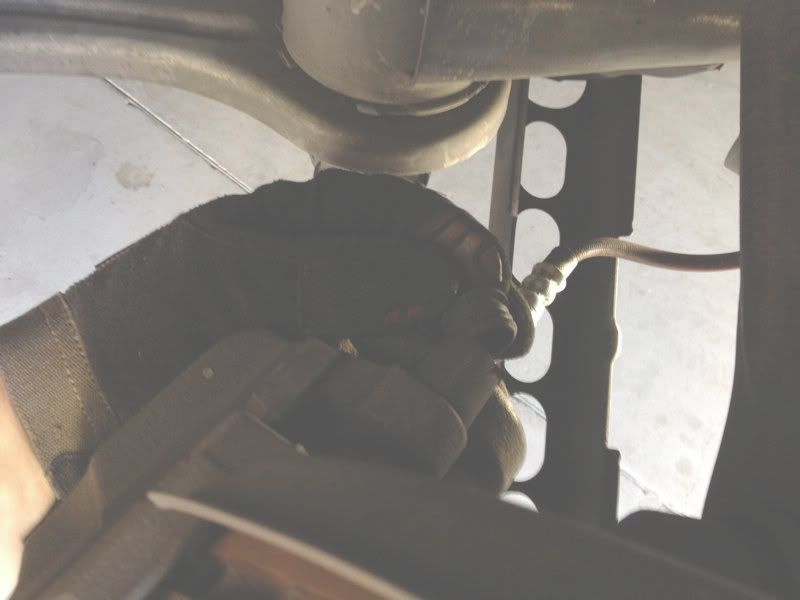 4) Using your socket wrench, fully loosen the two bolts. Although you do not have to remove them, you will need them pulled out enough so that the caliper can slide off. 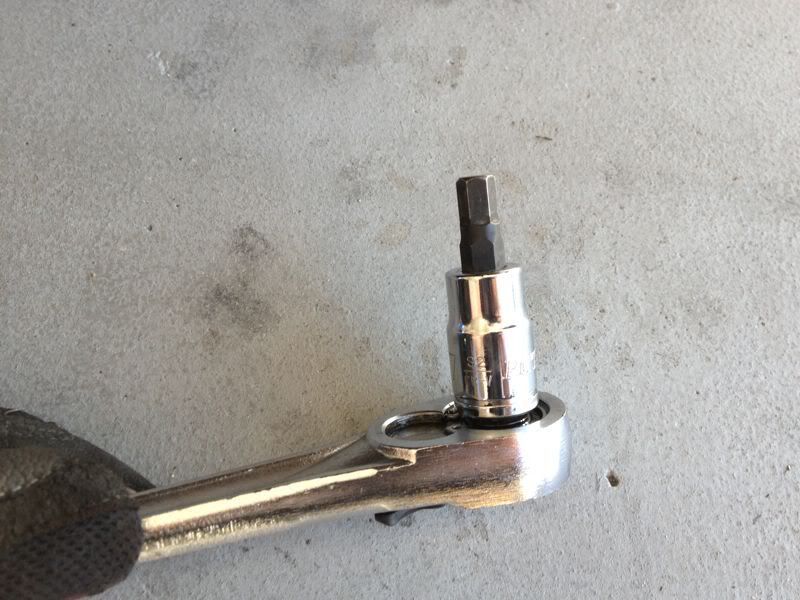 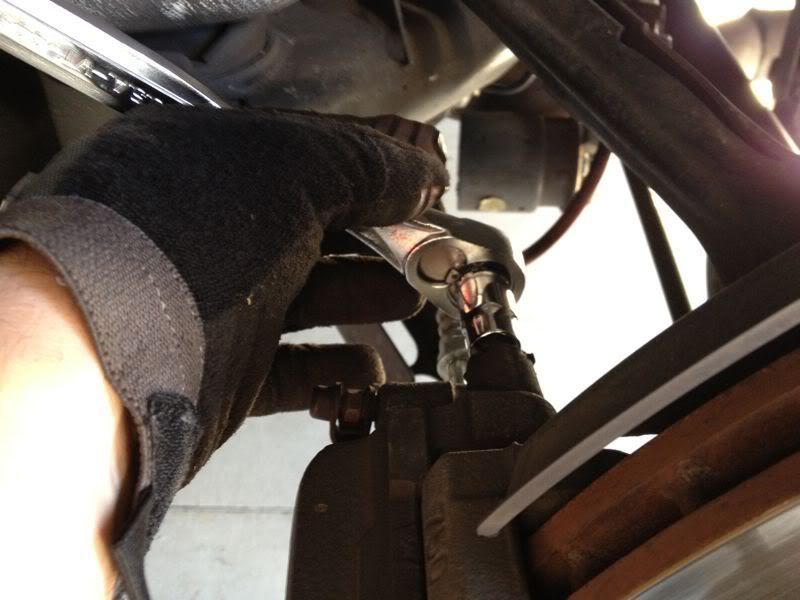 5) Now, if your rotors have an edge on them, you will not be able to simply slide the calipers off. Instead you'll need to compress the piston a little first. Do this by pulling on the caliper. Here's how I get leverage. See that little gap, that's how much I needed to pull before being able to slide the caliper off. 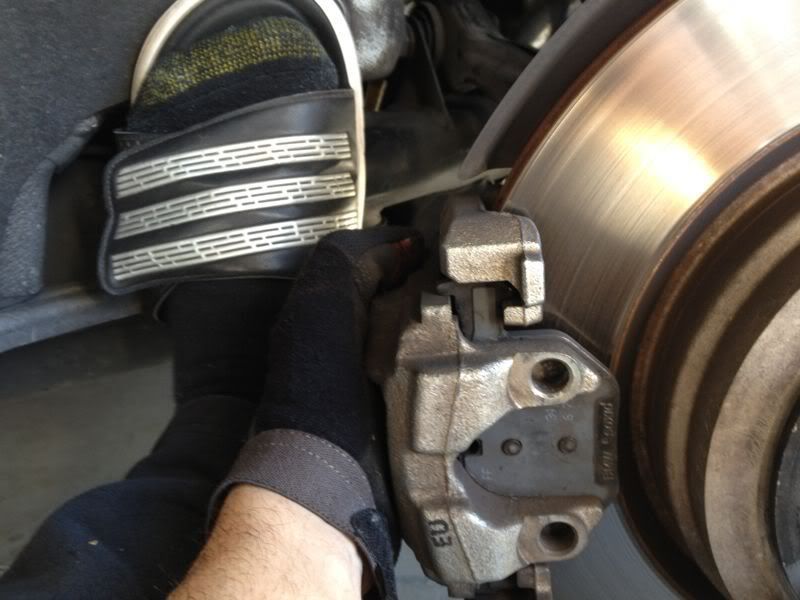 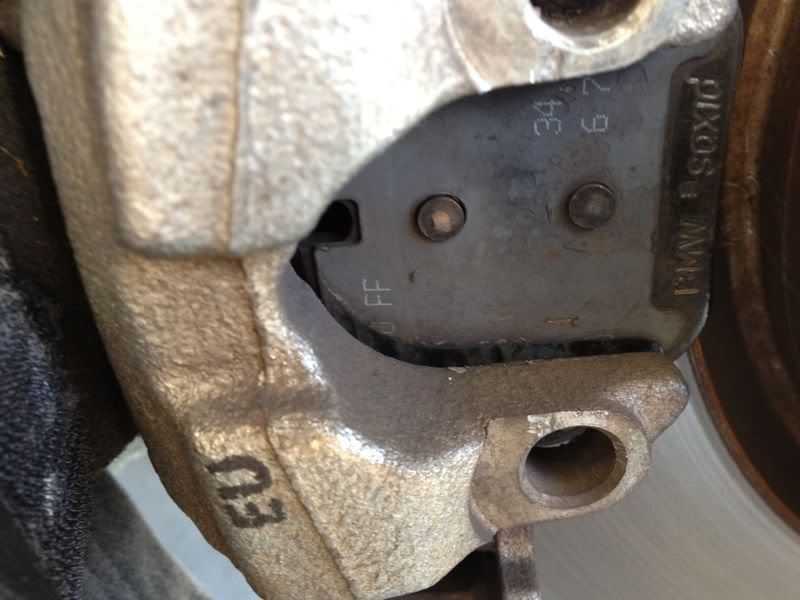 6) Get something to hold up the caliper. You do not want to damage the brake lines. I used an old box. The pads can now be easily removed. Take off the front pad. Leave the back pad on for now. 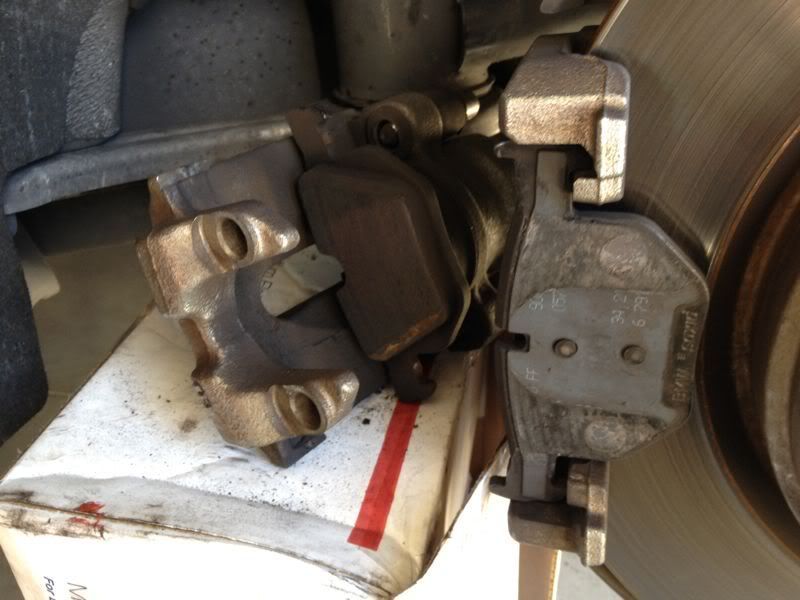 7) Use your pad spreader with the back pad in place. Spread until it stops. Don't use excess force. Remove pad/spreader and see how the piston is fully depressed. Check your brake reservoir. Ensure your fluid never overflows. You'll want to check this after every corner. *NOTE* If you wish, this is where you can use the brake cleaner. Follow the directions on the can. IIRC, they recommend not spraying the piston's rubber boot. 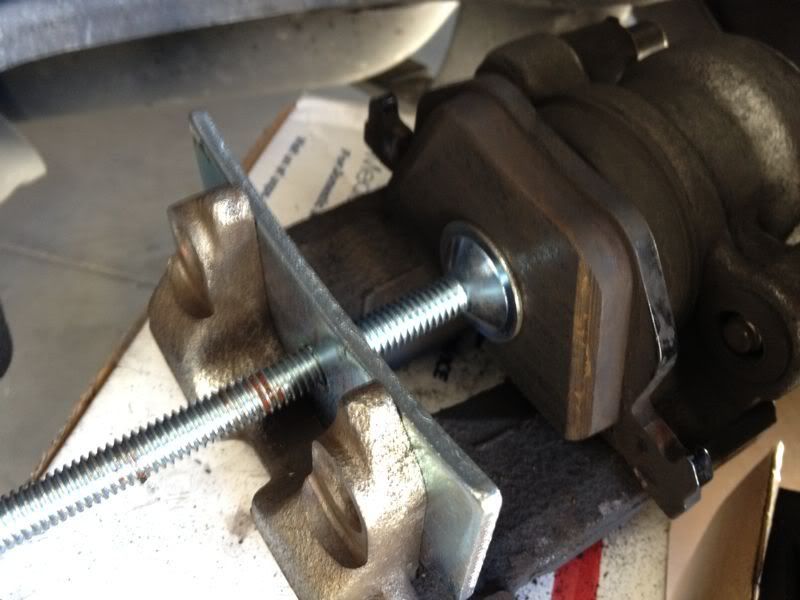 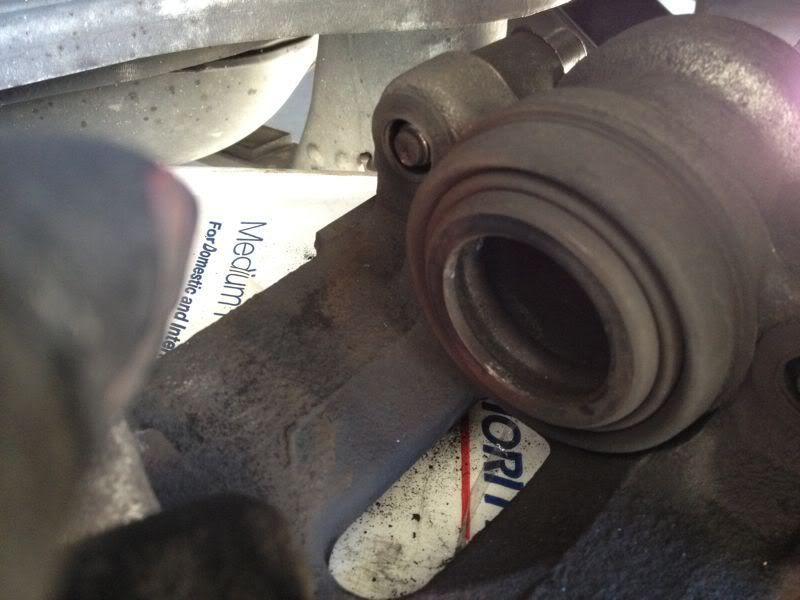 8) Get your Brake Quiet and apply to the backside of the pads. You want to use it wherever it'll make contact with the caliper. Don't worry about the color. It will change blacken soon. 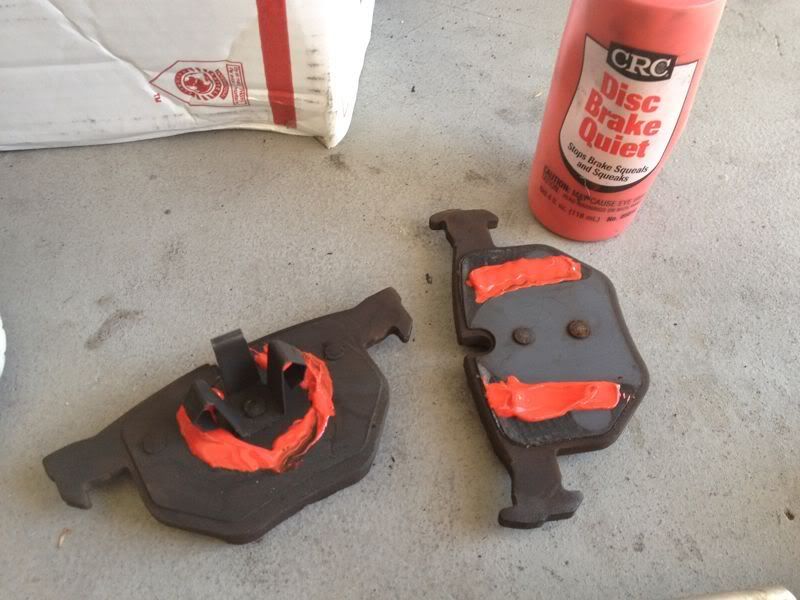 9) Install the pads and pop the clip back in. Tighten bolts securing caliper. Replace caps. *NOTE* If needed, replace your brake sensors. They clip in. Pretty simple to install. They are about $15 and there's one for front and one for the rear. 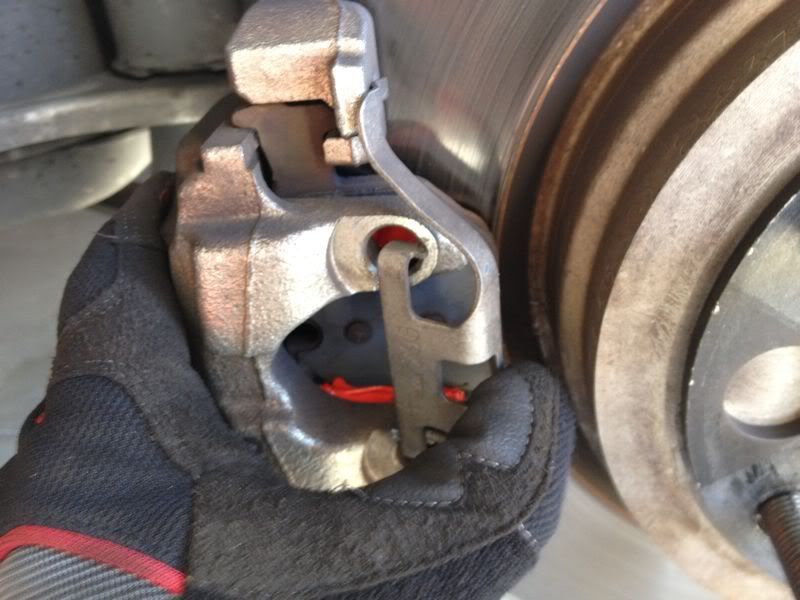 10) After finishing the rears, do the fronts. Remove clip. Remove caps and rear bolts. I use the 4" wrench extension to work around the brake lines. Pull on caliper again. You'll need to compress the piston more on the front. Look at the image. Blue arrow needs to clear the red line. 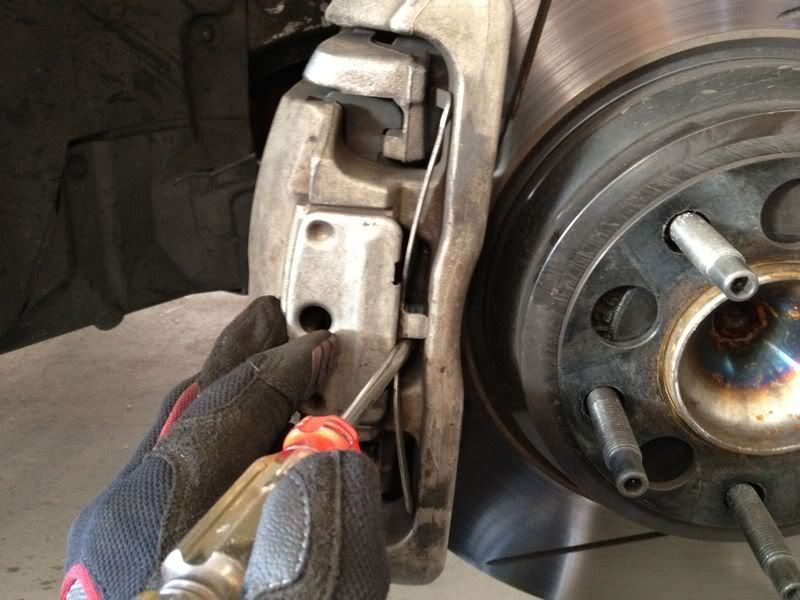 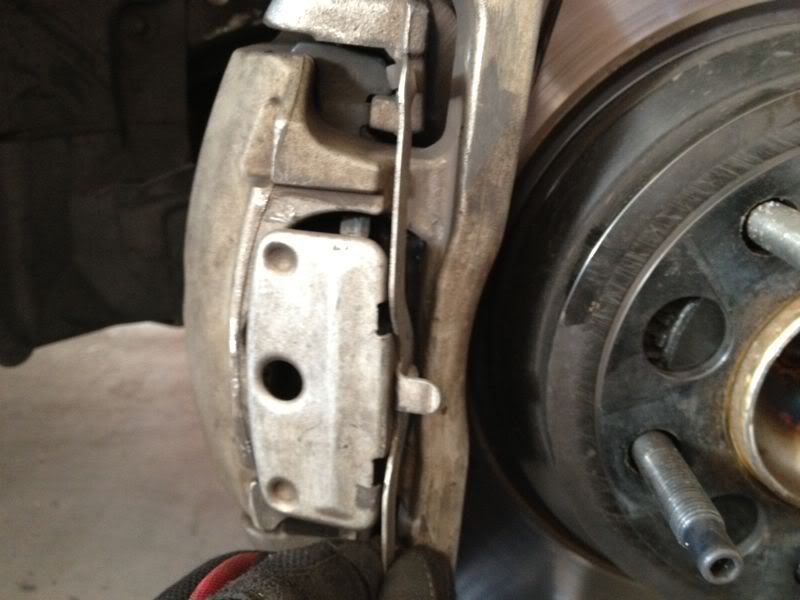  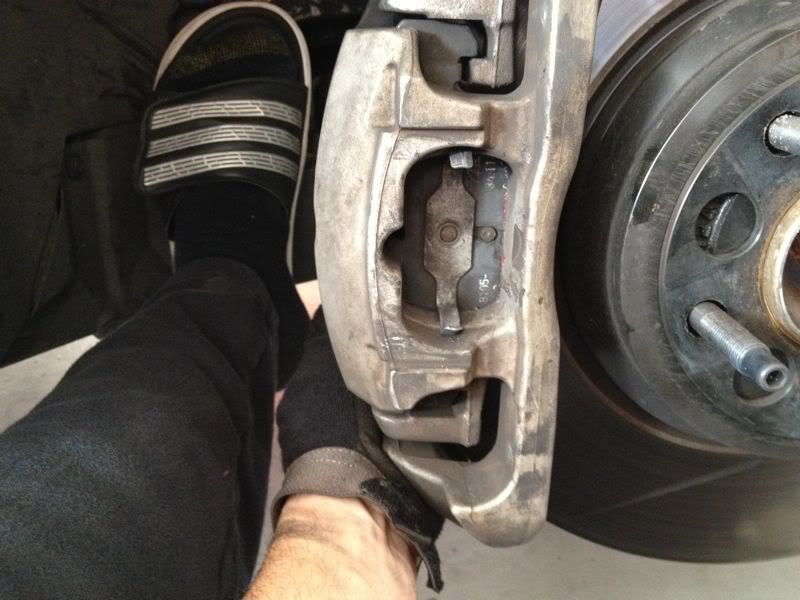 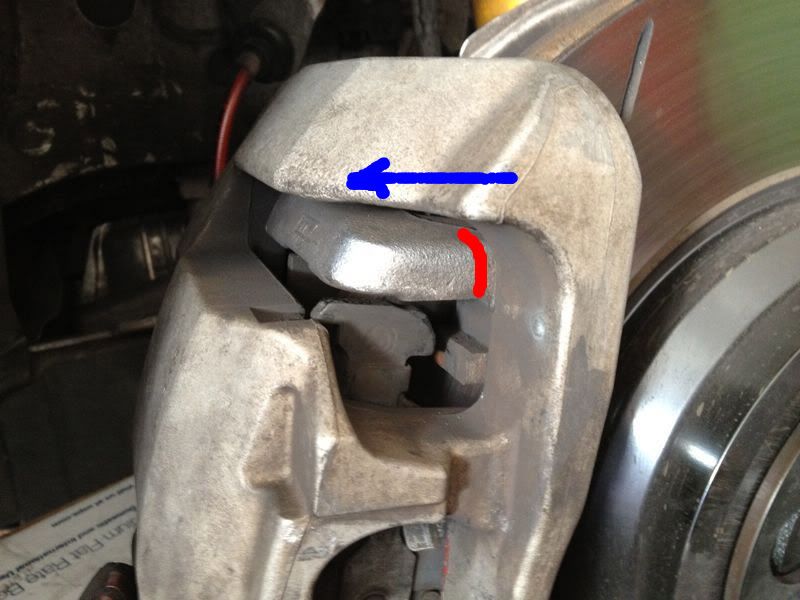 11) Secure caliper. Remove the front pad leaving the back pad in again. Compress piston with spreader. 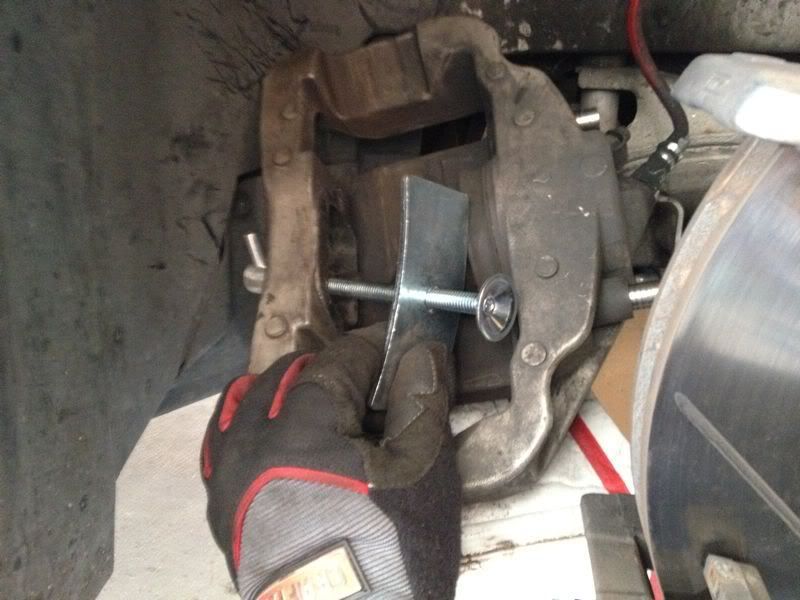 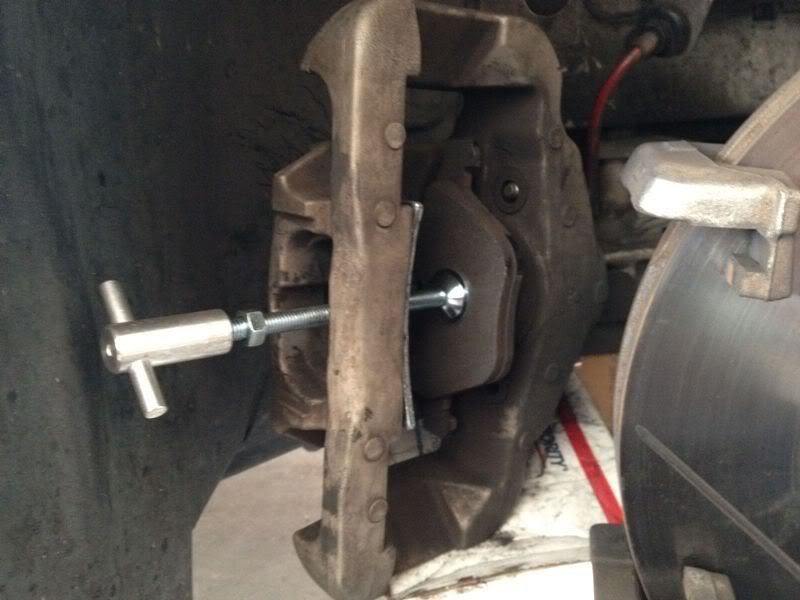 12) Apply Brake Quiet and pop pads back in. Watch for splash. 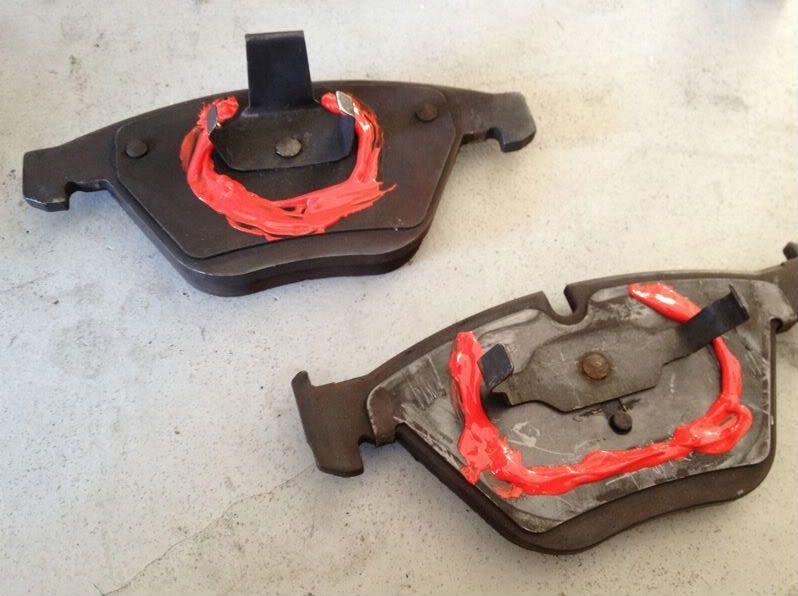 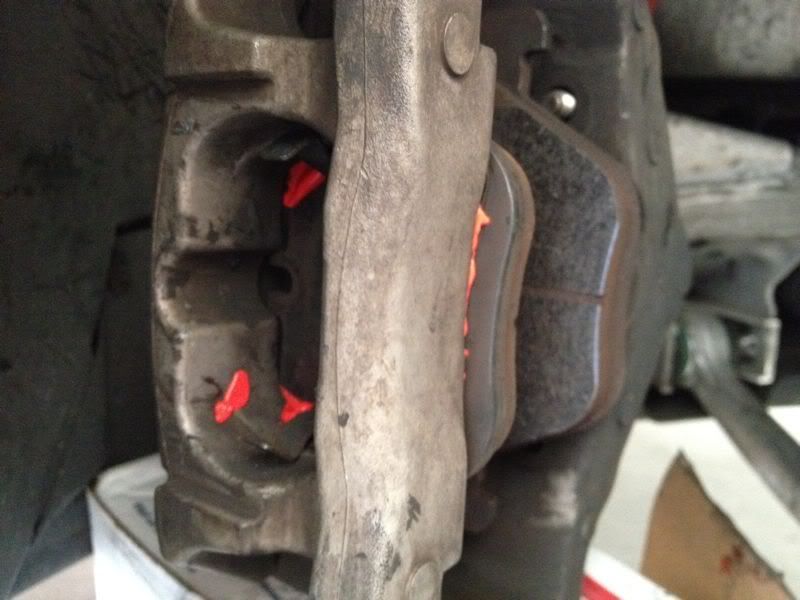 13) Pop clip back in. Tighten bolts and replace plastic caps.  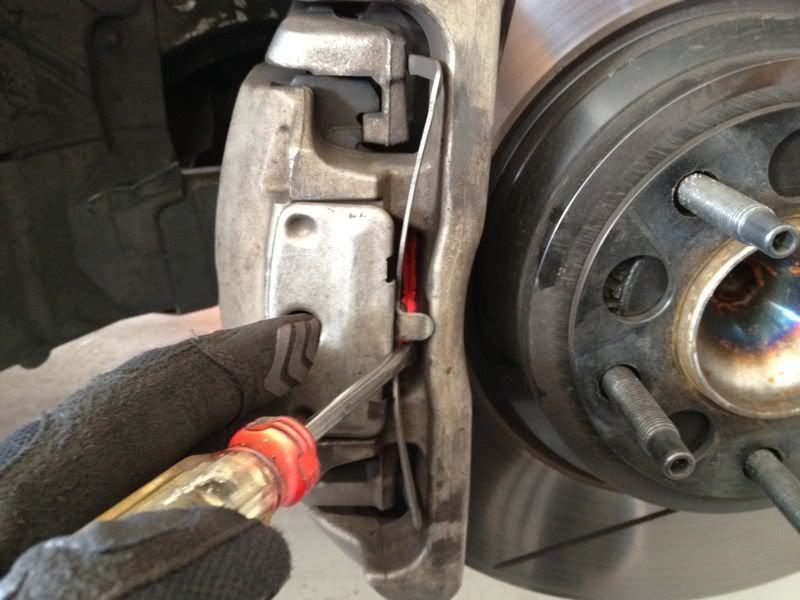 14) Once finished, torque all wheels to 88 lb/ft. Tighten brake reservoir cap. Get in car and pump brakes until hard. Turn on car and pump again until hard. Take a slow drive at first ensuring everything is fine. Once you determine everything is okay, it's time to bed in your brakes. Companies use slightly different methods but they're all relatively the same. Here's a link to Stoptech. 15) There is no step 15. That's it. After doing this several times, I can do each corner in 5-10 minutes. Quick and Easy. No need to pay someone. Happy motoring. Last edited by dbjb; 05-07-2018 at 07:10 PM.. |
| 12-31-2011, 02:11 PM | #3 |
|
Banned

6
Rep 121
Posts |
Excellent DIY, with great pictures. Did my rears for the first time, plus sensor, in about 2 hrs start to finish, car up to car down. Thanks man, I'll be doing the fronts later this week.
|
|
Appreciate
0
|
| 01-03-2012, 06:16 PM | #6 |
|
Banned
6
Rep 121
Posts |
Just did the front pads in about 1.5hrs start to finish, first time. Also replaced sensor.
So ppl are aware, the rear sensor (passenger side) connects to the car behind the wheel well cover. And the front sensor (driver side) connects in a box mounted to the wheel well. Pretty easy to route the sensor, and just try to use the factory mounting clips. |
|
Appreciate
0
|
| 01-12-2012, 08:04 PM | #7 | |
|
I sweat pheromones
206
Rep 2,103
Posts |
Thanks all.
Quote:
|
|
|
Appreciate
0
|
| 01-13-2012, 09:48 PM | #8 |
|
Milan

3
Rep 158
Posts |
I just did the front brakes on my E90, easy job. I had the dilema what kind of brake pads to buy. I had decided to go with Akebono (ceramic) for around $60 and new sensors for about $15. Stealer wanted $36 for sensors and $3.75 for the METAL CLIP.
 After around 300 miles you can see the difference of dust. Dusty wheels are original BMW brakes on rear. I already have the pads for rear so this Saturday is the D-day. Brakes are perfect but the look on wheels makes me mad why BMW uses the crappy one's. Just to share my choice. |
|
Appreciate
0
|
| 05-08-2012, 12:35 AM | #9 |
|
New Member
5
Rep 26
Posts |
I replaced my front brakepads, sensor, and rotors two weeks ago and this DIY was very helpful. Went with HPS brakepads and I'm happy with the results. Next are the rear brake pads and sensor.
Thanks for the DIY  |
|
Appreciate
0
|
| 10-22-2012, 04:35 AM | #10 |
|
bleeds purple and gold
21
Rep 165
Posts |
I did my rear pads today and forgot to remove the brake fluid cap. I pushed the piston back and finished the replacement realizing I forgot that step. Did I ruin something?
|
|
Appreciate
0
|
| 03-08-2013, 07:01 AM | #11 |
|
Private
 
13
Rep 51
Posts
Drives: 2019 330e Sport Pro
Join Date: Dec 2011
Location: Oldham, Lancs
|
Help!
How do you know if a replacement sensor is required?
And how do you know which brake callipers are fitted? Everywhere I look I have two different options - Teves and another one... |
|
Appreciate
0
|
| 11-14-2013, 07:20 AM | #14 |
|
Second Lieutenant
 19
Rep 224
Posts |
Sorry to bring an old thread up, my front brakes are starting to give. Sometimes on slow roll (we're talking about 10/15km/hr at a stop light or something) you can hear a slight scraping. What kind of brakes have people used? Ideally something that works well, can't justify BBK yet as my car is stock.
|
|
Appreciate
0
|
| 01-23-2014, 03:05 PM | #15 | |
|
Private
4
Rep 97
Posts |
Quote:
|
|
|
Appreciate
0
|
| 01-24-2014, 05:50 AM | #16 | |
|
Second Lieutenant
19
Rep 224
Posts |
Quote:
|
|
|
Appreciate
0
|
| 01-24-2014, 11:02 AM | #17 | |
|
Private
4
Rep 97
Posts |
Quote:
|
|
|
Appreciate
0
|
| 01-29-2014, 09:52 PM | #18 | |
|
Captain
40
Rep 679
Posts |
Quote:
ceramic pads are great for low dust. most folks that use them like them. some say they are noisy, but I dont see how, really....when ordering a new set of pads, ask your retailer what he recommends...tell them what your priorities are, like low dust, or low cost, or original equipment....and they can best advise from there.... good luck with it JP |
|
|
Appreciate
0
|
| 03-01-2014, 04:37 PM | #19 | |
|
Private
12
Rep 85
Posts |
Quote:
The two wires inside the housing are situated such that one wire wears thru when the pads are about 50% gone. The other wire wears thru when the pads are (for all intents and purposes) 100% gone. When the first wire wears thru, the car computer notes the mileage since the last brake pad change and doubles it to figure out when to warn the owner about the brake pads needing replacement. When the second wire wears thru, the car computer turns on the "BRAKE" light (the same one that indicates the parking brake is on) and it also turns on the red Service lamp that looks like a car on a lift at a service shop. I think this system is quite ingenious, and I happen to like the way it works. About two months ago, our 325xi 's computer began showing that our rear brakes would need service in 1600 miles, then 1300 miles, then 1000, maybe 600, 300, and finally zero miles. The zero mark occurred about two weeks ago, but I decided to let it ride until the second wire broke. That occurred about a week after the zero mile mark (maybe 300 miles of driving for us). Today, I replaced the rear brake pads and rotors. I don't see any reason to replace the pads and not replace the sensor. Well, if one were to do that, it would render the computer portion of the brake check system useless. i.e. If the second wire in the sensor was not worn thru yet, and one put new brake pads on the car, then the sensor would only be good for telling when the pads were 100% worn (i.e. when the second wire did finally break). Of course, if one does not want the luxury of the computer and the function of both wires, replacing the sensor is not necessary. I have heard of people who say the old sensors break when transferring them to the new pads, but I did not experience that. Here are a couple pictures of the sensor. Old sensor on the right, new sensor on the left. Old Sensor installed in the slot in the pad. Notice how the sensor is worn just like the brake pad. One funny thing about all this is, I had my car in the shop late last year, and the BMW service guy says "the rear pads are getting thin". As if he's trying to sell me a brake job. But, as he should well know, this car has the Condition Based Service computer (which is the purpose of the sensor we are talking about), so there's no reason to mention the brake pads: the car will tell me when she's good and ready to tell me about an upcoming brake job. Also, for what it is worth, the computer thinks our front pads still have about another year's worth of driving. So, although I purchased all the parts for both axles, I won't do the fronts until the computer says the 2nd wire has broken. I look at the thickness when I rotate or change tires, just to be comfortable! Last edited by Barrique_Red; 03-05-2014 at 12:58 PM.. |
|
|
Appreciate
0
|
| 08-10-2014, 06:59 PM | #21 |
|
Captain

38
Rep 627
Posts |
I did my rear pads and rotors today. Took me quite a bit of time since I had to hammer both rotors off. Took like 30 good sacks to get each off. Anyways when I was pushing back the piston I forgot to unscrew the brake resevoir. I think its affecting my front brakes now since they don't seem to be compressing when I got someone to step on the brakes. The ones I changed in the rears are fine tbougn . I can see them compress and decompress when I got someone to step on the brake pedal.
Anyone have any idea why my front brakes are compressing?do I need to bleed my brakes after a rear pad and rotor change? I bleed my brakes last year but all the other cars I did brakes on I never had to bleed the brakes to get it working properly |
|
Appreciate
0
|
| 08-14-2014, 03:55 PM | #22 |
|
Lieutenant
46
Rep 505
Posts |
Hi All,
I was trying to replace my rear discs and pads today but couldn't get the discs off no matter what I tried. I made sure that I took the grub screw out and made sure that the hand brake was off. I even took the carrier off that holds the calliper. Gave the disc loads of hits with a hammer pulled on it whilst pushing a screw driver behind it to try and leaver it out but it wouldn't budge at all. Does any one have any ideas about what I could try next. Thanks. |
|
Appreciate
0
|
 |
| Bookmarks |
|
|


