|
|
|
|
 |

|
 |
BMW Garage | BMW Meets | Register | Today's Posts | Search |
 |

|
BMW 3-Series (E90 E92) Forum
>
DIY Downpipe Install on 335xi - Almost but not quite
|
 |
| 01-08-2012, 11:42 AM | #23 |
|
Lieutenant
 
38
Rep 458
Posts |
Switched back to stock downpipes and exhaust for an upcoming emissions test, here are some pics and instructions to help those thinking of doing this themselves. Going from stock downpipes to aftermarket will be the same process.
Took me about 4.5 hours and that included switching the full exhaust, much faster doing it the 2nd time. Starting out. This was done solo with jackstands and hand tools. Jacked up the front first, then the rear, then put a few 2x4's on the jack and jacked up the front even higher so I'd have more space underneath while laying on the creeper. 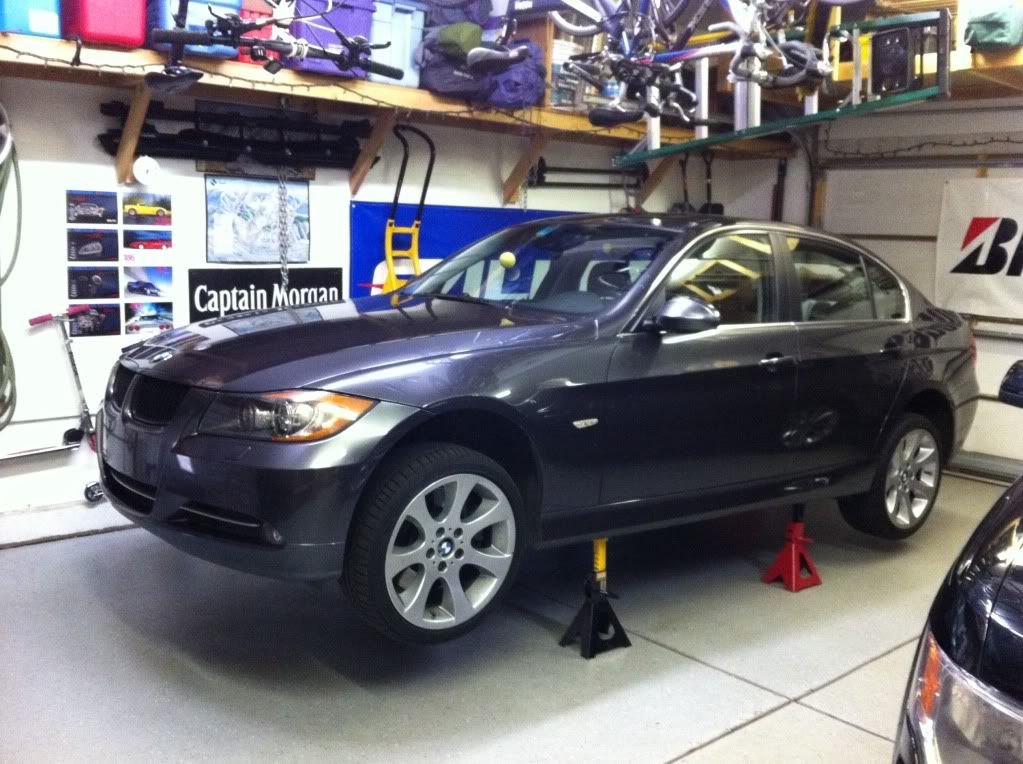 Drop the plastic pan under the transmission, metal pan under engine, plus (not pictured) the plastic front belly pan and small plastic pans behind the front wheels so you can get at all 6 subframe bolts. 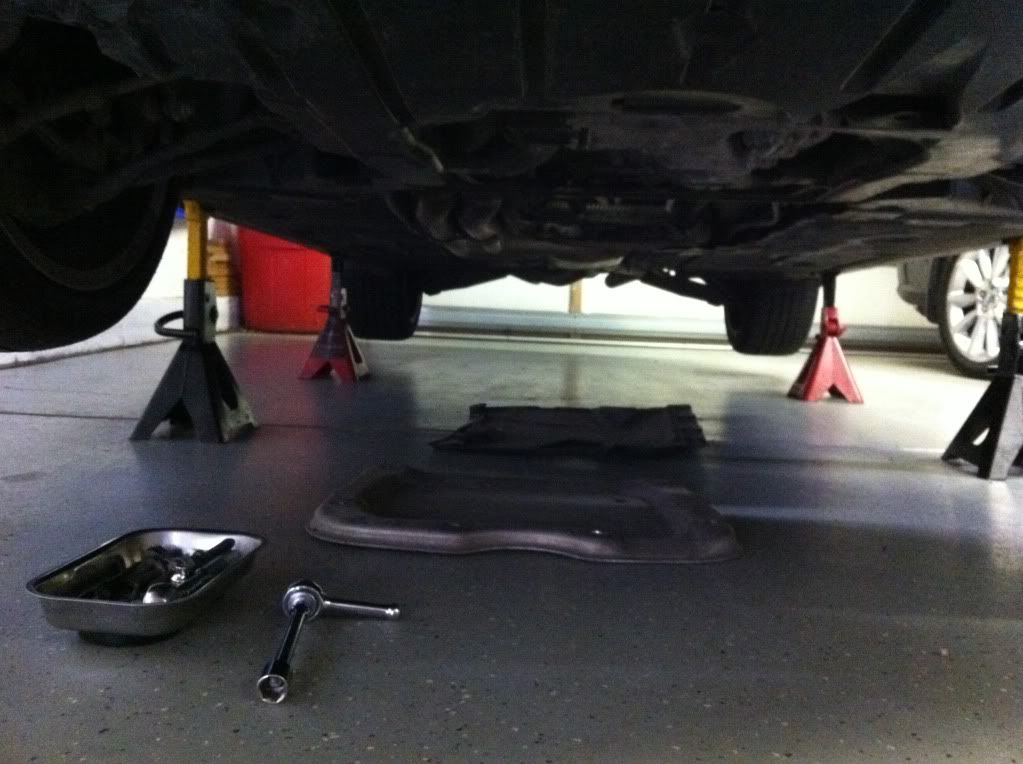 Front O2 sensors labeled F and R for Front turbo and Rear turbo so they don't get switched. 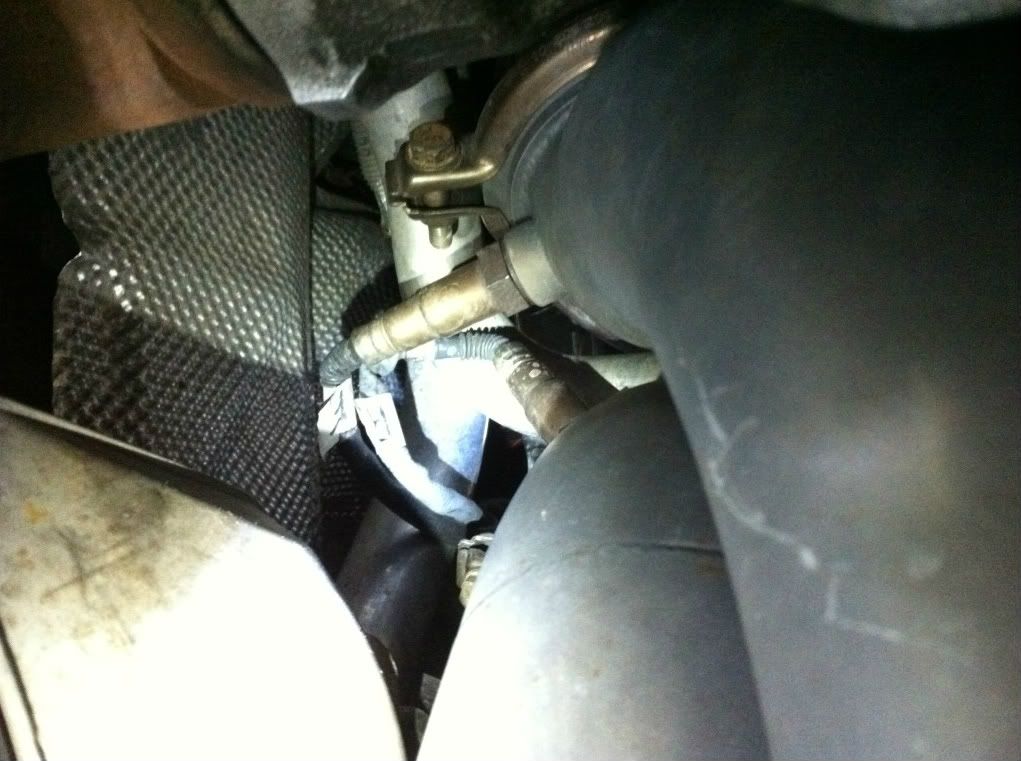 Rear O2 sensors labeled F2 and R2 so they don't get switched. 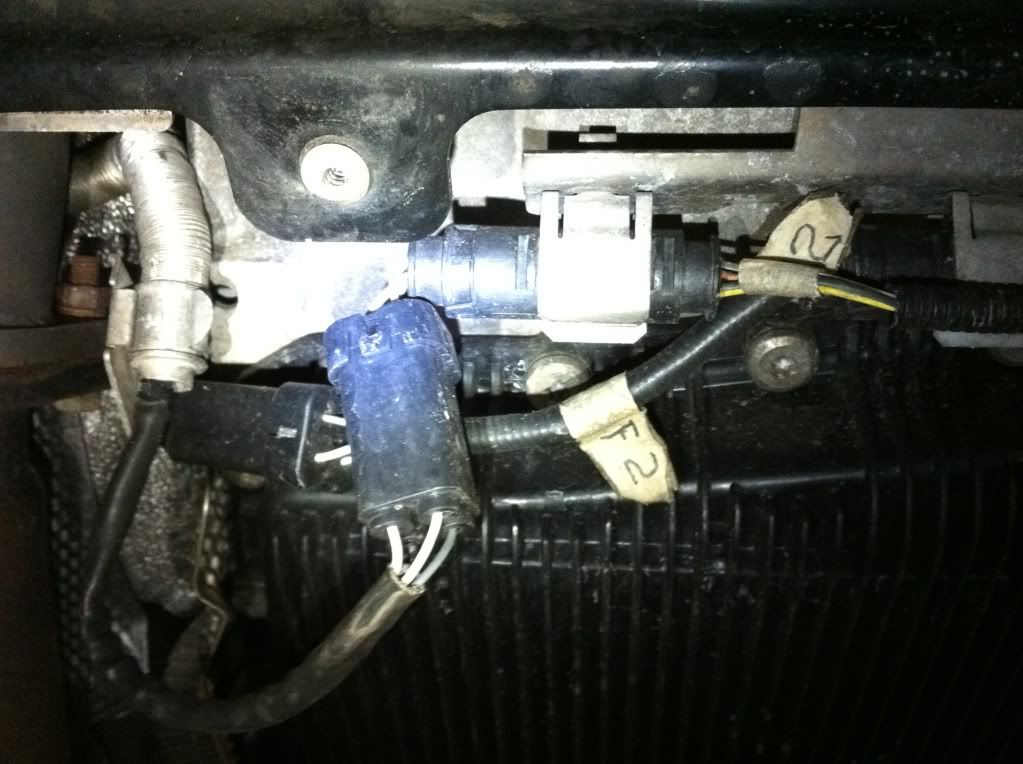 Disconnect the midpipes from the downpipes. Note how close the subframe is to the downpipes. I did this first so I'd have more room to reach the rear O2 sensors. Go ahead and remove all 4 O2 sensors and then loosen the v band clamps holding the downpipes to the turbos. I left the clamps hanging on the turbos with the bolts removed. Now the downpipes are loose, but won't come out as the subframe and front halfshaft are in the way. 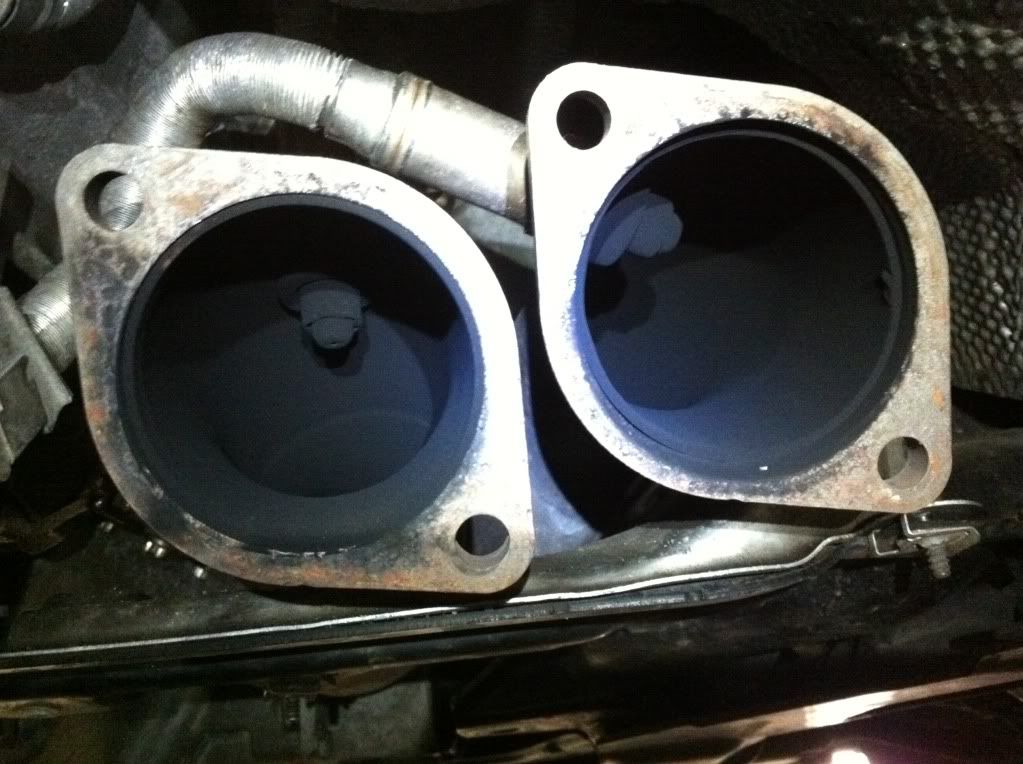 Jacks used to drop the subframe. Black jack with 2x4's is supporting the engine while the red jack is used to lower the subframe. There are 3 subframe bolts per side, 18mm head in the pic also, the rear bolt is the short one. 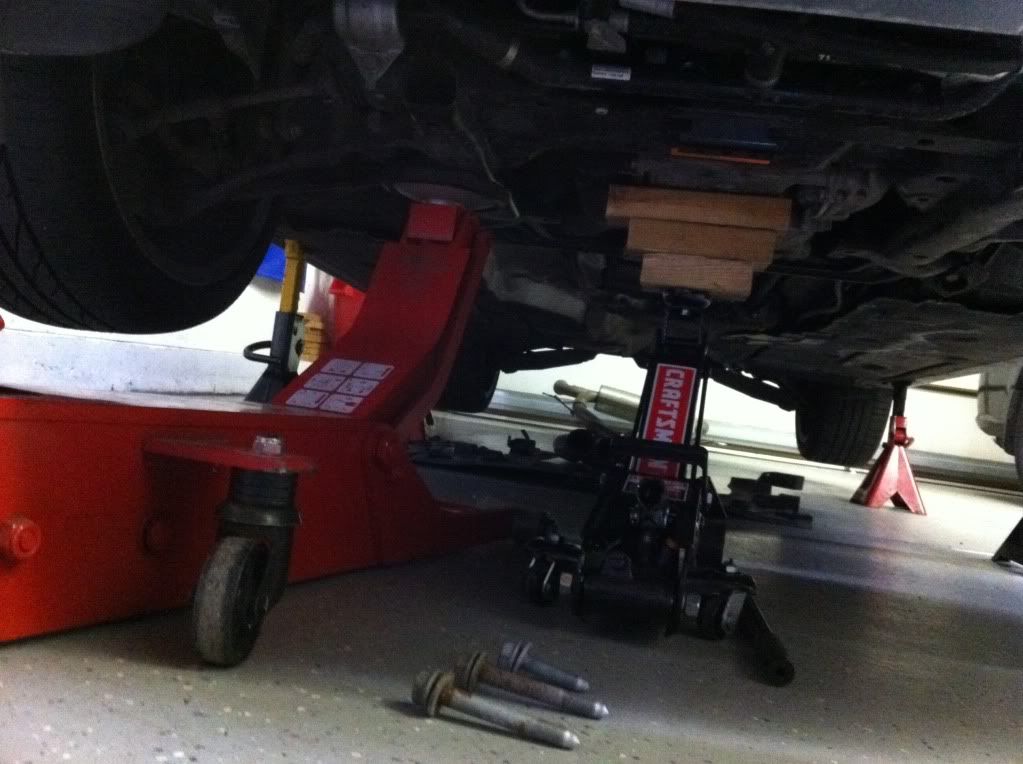 Passenger side motor mount, blue arrow is a motor mount bolt, already removed, and the red arrow is a subframe bolt. First remove passenger side motor mount bolts, then support passenger side subframe with jack and remove passenger side subframe bolts and lower subframe with jack. Then do the same to the driver side. 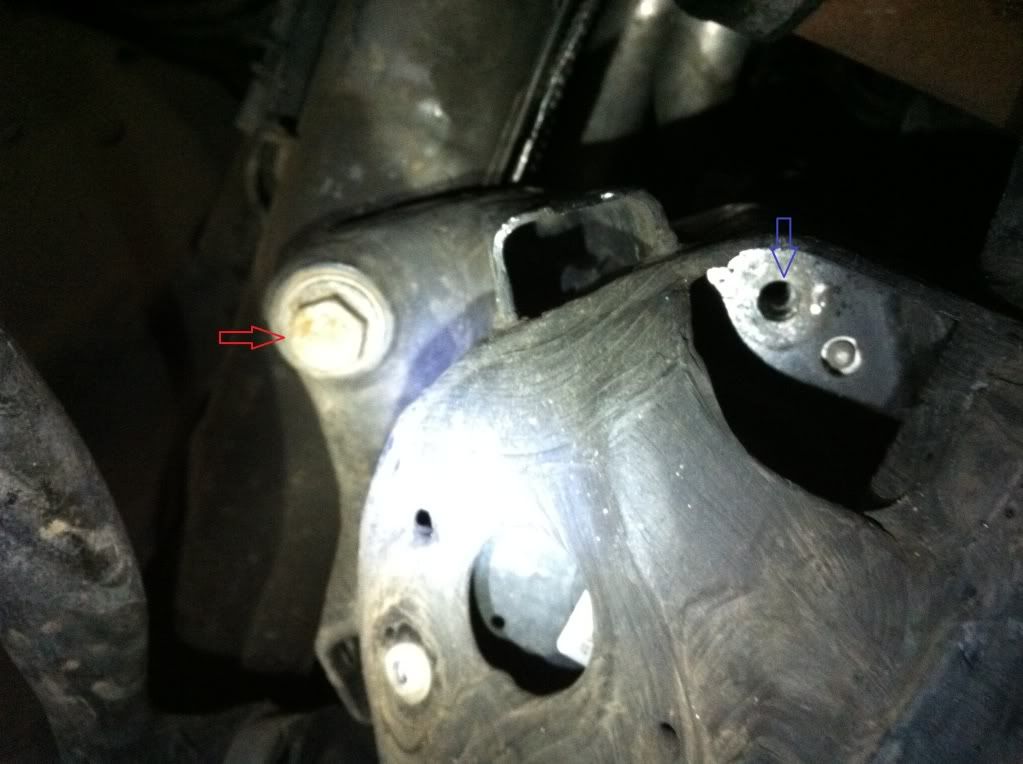 Driver's side motor mount, the blue arrows are the bolts for the motor mount, take these out to disconnect the motor from the subframe. The red arrow is one of the subframe bolts. 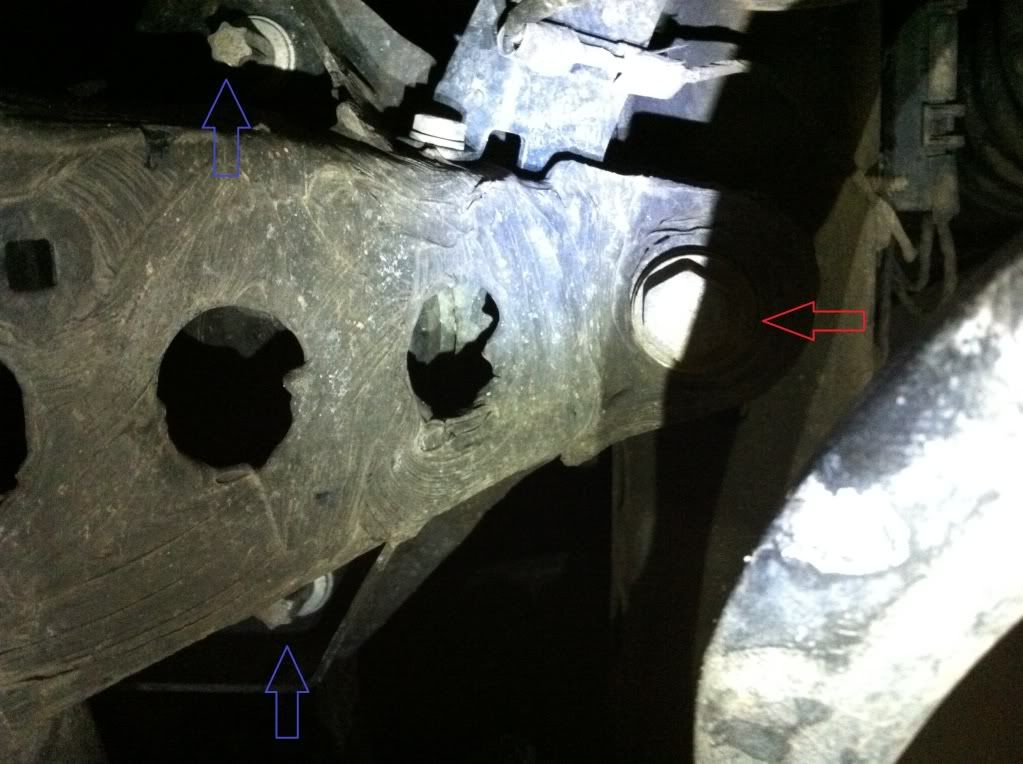 Here are 2 of the motor mount bolts. They are a reverse torx style and the socket I used was labeled E12. The first time I did this, I used a regular 6pt socket, then got a torx and reverse torx set after. 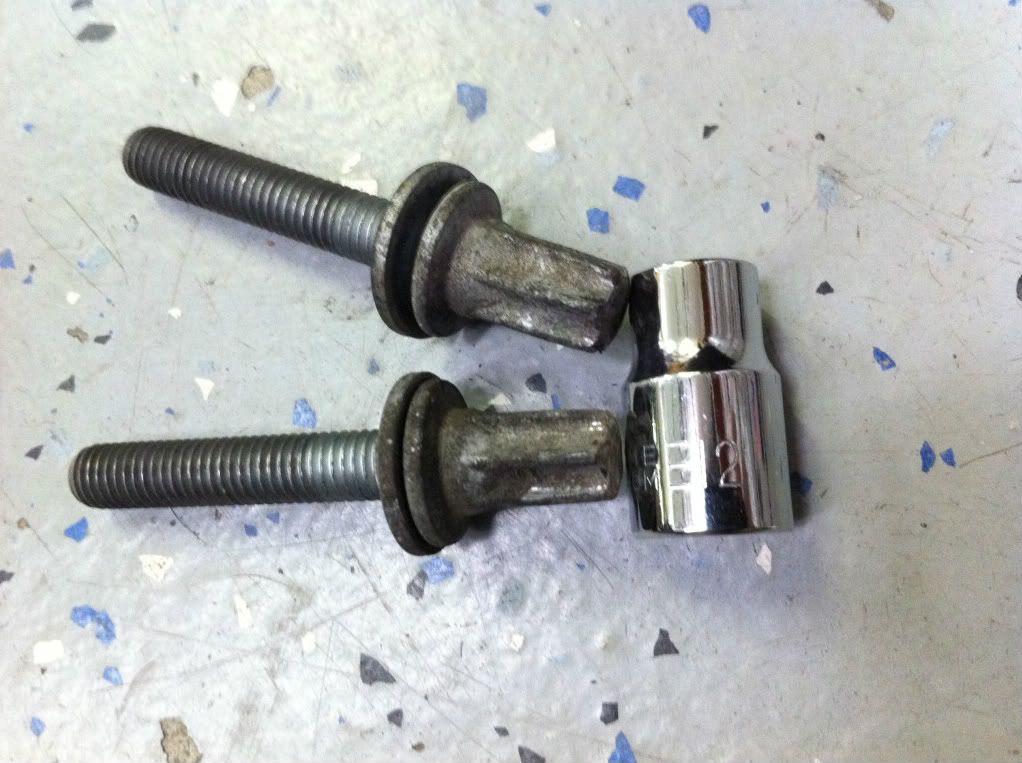 Once the subframe is dropped, it will hang by the suspension and only the jack supporting the engine is needed. Now you can see all the extra clearance between the downpipes and the subframe. One downpipe has already been removed. The red arrow shows one of the rear subframe bolt holes. 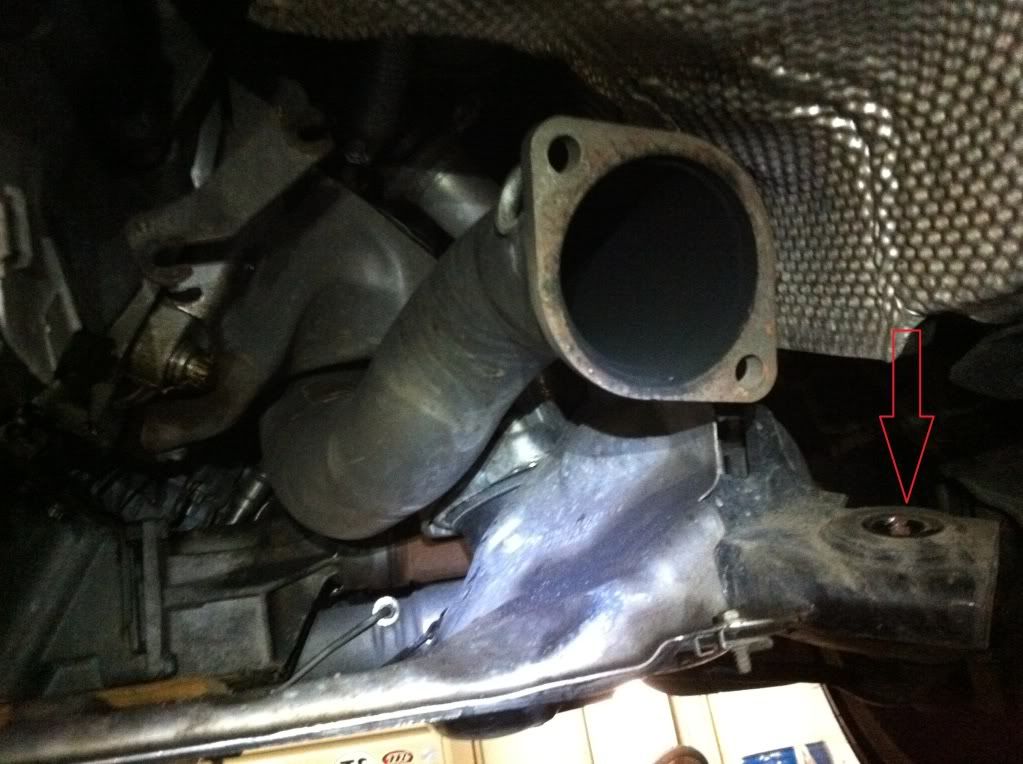 Downpipes are out. 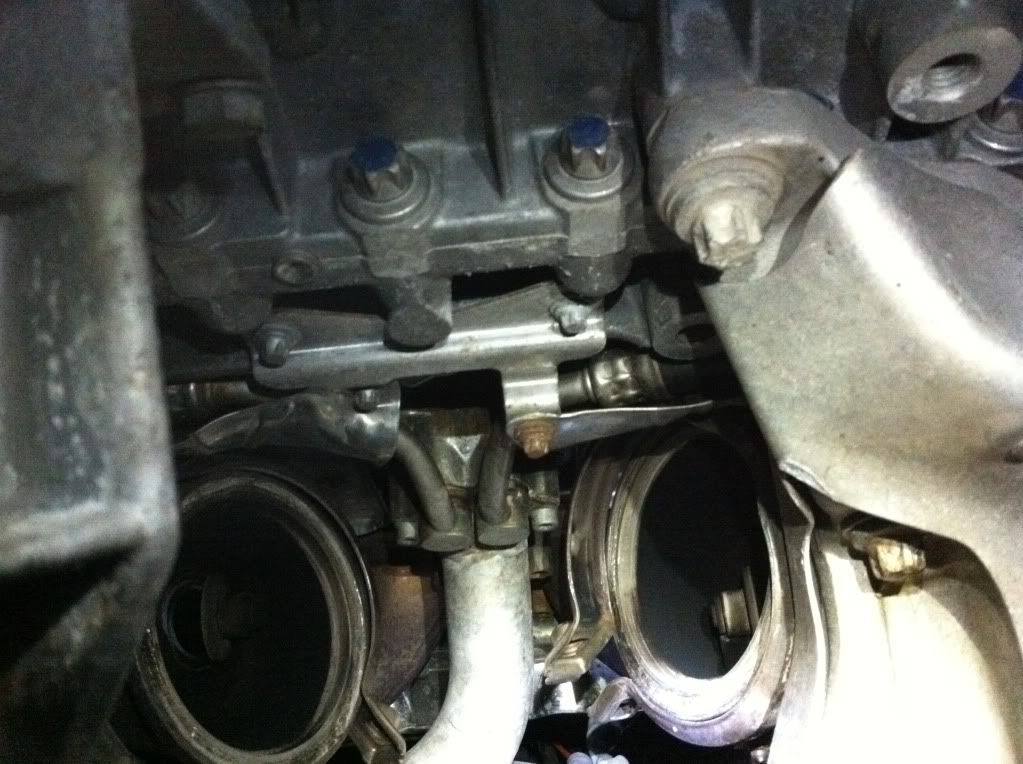 Coated AR downpipes after 1 year on a daily driver in Denver. They look great other than scratches from install/uninstall. 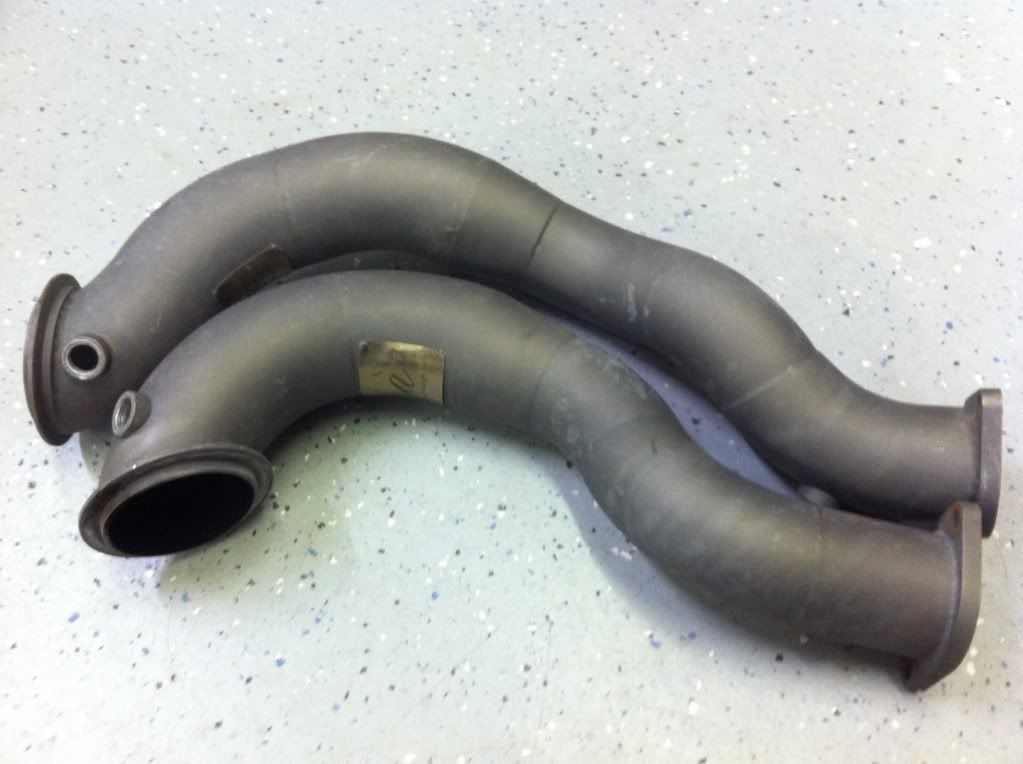 |
| 01-09-2012, 11:50 PM | #24 |
|
Captain

25
Rep 699
Posts
Drives: e90 335i f30 330i g20 m340i
Join Date: Feb 2010
Location: Texas
|
Thank you for that. Thorough and informative
|
|
Appreciate
0
|
| 01-13-2012, 10:35 PM | #26 |
|
To Punish and Enslave
34
Rep 243
Posts
Drives: with both hands on the wheel
Join Date: Jul 2008
Location: Under the hood
|
Can someone put mattsfeir's post into a sticky or something along those lines? I have the tools to do this and now I'm willing to put DPs on my car since I see that I don't have to cut them off.
|
|
Appreciate
0
|
| 02-03-2012, 02:15 AM | #27 |
|
Captain
119
Rep 771
Posts
Drives: LBB M2C, VO 1M, GSA 1200
Join Date: Sep 2007
Location: Frozen Tundra
iTrader: (0)
Garage List 2021 BMW X3M Compet ... [0.00]
2019 BMW S1000R [0.00] 2019 M2 Competition [0.00] 2018 BMW 1200 GSA [0.00] 2011 1M Coupe [9.75] |
Awesome job Mattsfeir!!
Started this thread awhile ago, but hadn't checked on it in some time. Glad I did. Will try this again once spring arrives. Wonder if mattsfeir could comment on any problems re-attaching subframe. I've heard some people describe difficulty getting it aligned properly. Also, it looks like two reverse torx bolts per engine mount for a total of four (passenger + driver side). Can these be reused or do they need to be replaced? |
|
Appreciate
0
|
| 02-03-2012, 10:15 AM | #28 |
|
Lieutenant
38
Rep 458
Posts |
No major problems reattaching the subframe, sometimes it won't line up exactly and you may need a pry bar to move it slightly. I'd recommend getting all 6 subframe bolts started first before tightening them all the way.
Regarding the torx bolts, I've reused them twice so far, honestly no idea if they're a one time use bolt or not. Matt |
|
Appreciate
0
|
| 02-03-2012, 10:35 AM | #29 |
|
Captain
25
Rep 699
Posts
Drives: e90 335i f30 330i g20 m340i
Join Date: Feb 2010
Location: Texas
|
Mattsfeir do you have a sound video of your car with the full exhaust set up? I'd be interested in hearing the borla mids and catback with CL DPs at high boost.
|
|
Appreciate
0
|
| 02-10-2012, 12:27 PM | #30 | |
|
Lieutenant
38
Rep 458
Posts |
Quote:
I'll probably be switching back to catless downpipes and exhaust mid March, can try to do some video then. |
|
|
Appreciate
0
|
| 02-11-2012, 12:28 AM | #31 |
|
Major
 38
Rep 1,079
Posts |
Thanks you for these pictures! I've really been putting off downpipes for a while now because I was scared of how much of a PITA it would be. This doesn't look bad at all! Thanks!!
|
|
Appreciate
0
|
| 02-11-2012, 04:12 PM | #32 |
|
Private First Class
 3
Rep 153
Posts |
I hated doing this job. i did it almost a year ago, was almost impossible to get any help because of the limited posts on the subject
__________________
AR~~~Injen~~~BMS~~~~Hks~~~~ETS~~~~~Mtech~~~~~Helix ~~~~~Bimmian~~~~Vorsteiner~~~~~WeissLicht~~~~
|
|
Appreciate
0
|
| 07-16-2012, 02:13 AM | #35 |
|
Captain
119
Rep 771
Posts
Drives: LBB M2C, VO 1M, GSA 1200
Join Date: Sep 2007
Location: Frozen Tundra
iTrader: (0)
Garage List 2021 BMW X3M Compet ... [0.00]
2019 BMW S1000R [0.00] 2019 M2 Competition [0.00] 2018 BMW 1200 GSA [0.00] 2011 1M Coupe [9.75] |
Finally got around to doing this. Lowing the subframe was probably the easiest part since the bolts are easily accessible. Put a bottle jack under engine and used a floor jack on the subframe. No problems lining up the subframe when reattaching.
Took about 5 hours. Surprisingy, the biggest time sink was attaching DPs to catback (supplied bolts over sized, and ultimately made trip to hardware store for better fitting bolts). Next time around I could probably get it done in 3 hours or so. |
|
Appreciate
0
|
| 07-18-2012, 12:31 PM | #36 |
|
Lieutenant
19
Rep 511
Posts |
can you guys revisit the question of whether or not it's necessary to do an alignment after dropping the subframe for this dp install? Thanks!
__________________
2008 E92 335xi | Cobb AP Stage2+ | AR DP | ETS FMIC | ALUFELGEN SF-71 DC Blk | HANKOOK V12 | UUC SSK | H&R Coilovers | AE Exhaust |
Are YOU Ready to Buy/Sell/Rent Property In The DMV? LET ME HELP YOU! |
|
Appreciate
0
|
| 07-23-2012, 01:48 PM | #37 |
|
Lieutenant
19
Rep 511
Posts |
doing this job this weekend hopefully - thanks for the DIY guys - looks like a PITA but should be worth it!
__________________
2008 E92 335xi | Cobb AP Stage2+ | AR DP | ETS FMIC | ALUFELGEN SF-71 DC Blk | HANKOOK V12 | UUC SSK | H&R Coilovers | AE Exhaust |
Are YOU Ready to Buy/Sell/Rent Property In The DMV? LET ME HELP YOU! |
|
Appreciate
0
|
| 07-24-2012, 01:47 AM | #38 | |
|
Captain
119
Rep 771
Posts
Drives: LBB M2C, VO 1M, GSA 1200
Join Date: Sep 2007
Location: Frozen Tundra
iTrader: (0)
Garage List 2021 BMW X3M Compet ... [0.00]
2019 BMW S1000R [0.00] 2019 M2 Competition [0.00] 2018 BMW 1200 GSA [0.00] 2011 1M Coupe [9.75] |
Quote:
 Here are some tips: 1. Make sure you have plenty of socket extensions and "U" joints to help loosen the more awkwardly positioned bolts. For example, the V bands are much easier to remove using a couple of extensions attached to a U joint. 2. Consider buying a 22 mm "crows foot" from autozone for removing the O2 sensors. This worked well in conjunction with a long extension and U joint. 3. Stock up on WD-40 and antiseize. 4. Drop the subframe first to get more room for removing bolts on the DPs. 5. When you drop the subframe, pay attention to the cooling hoses attached to the front of the subframe on the passenger's side. There is some slack in the hoses, so you can probably leave them attached. But if they seem to be getting strained, then I think you can easily remove them from the subframe by loosening a couple of bolts. 6. When reattaching the V bands, make sure the bolts have plenty of clearance with respect to the waste gate actuators (basically make sure the actuator rod won't hit the bolt on the V band). 7. Consider putting the rear O2 sensors on the new DPs before bolting them onto the turbos. The rear O2 sensors are in a tight spot, and it might be easier to get them at least hand tight beforehand. Remember you can disconnect the electrical junction of the O2 sensor to give you more slack (this also helps preventing the wires getting all twisted up when you take off the O2 sensors from the OEM DPs). 8. When you put the new DPs onto the turbos and catback, just hand tighten the bolts at first. Then make sure you have 1/8-1/4 inch clearance between DPs, the engine, and anything else. Then tighten the V bands. Lastly, tighten the attachment to the catback. The catback is the only part of the system with some minimal degree of slack, so tightening this part last will let you deal with any mild fitment issues. 9. When tightening the DP-catback connection, tighten each bolt in small increments (alternating back and forth between the two bolts). This is to avoid pinching the gasket which may result in an exhaust leak. 10. If at all possible, get a buddy to help. This will speed things along and make it more fun. 11. Use this opportunity to remove/replace your CDV. |
|
| 07-24-2012, 11:52 AM | #39 | |
|
Lieutenant
19
Rep 511
Posts |
Quote:
I already removed my CDV btw
__________________
2008 E92 335xi | Cobb AP Stage2+ | AR DP | ETS FMIC | ALUFELGEN SF-71 DC Blk | HANKOOK V12 | UUC SSK | H&R Coilovers | AE Exhaust |
Are YOU Ready to Buy/Sell/Rent Property In The DMV? LET ME HELP YOU! |
|
|
Appreciate
0
|
| 10-27-2013, 05:07 PM | #40 |
|
Private
 5
Rep 79
Posts |
Did this yesterday - thanks to everybody who contributed to this thread.
You'll probably want to get an alignment pin to line the subframe back up, it helped us ALOT... there wasn't a lot of safe places otherwise to pry the subframe back into place. My VRSF pipes might be slightly "bad" as far as the bends... I couldn't get them configured in a way that met "all" of the requirements, the pipes ended up touching one one point... doesn't seem to be causing a problem though. Did you guys have "Smelly" fumes from the PB Blaster burning off the exhaust like I do? I'm hoping that's all the "smell" is... and not a leak. |
|
Appreciate
1
gmore0.00 |
| 10-28-2013, 10:29 AM | #41 | |
|
boom
12
Rep 598
Posts |
Quote:
I wish I'd had an alignment pin, my bolts are torque'd in there but I get a pop in the front end on turns now and I think it's something to do with the subframe not sitting right. I'll probably try to get it up on a lift and see if it's something I can fix by dropping it down again. I also had a nasty smell for a bit, went away after a few days. One last thing, I had CP-E DP before on the same car and the sound was deeper both on acceleration and de-acceleration. No idea if there is a power difference, just something I noticed. |
|
|
Appreciate
0
|
| 10-28-2013, 11:46 AM | #42 |
|
Captain
39
Rep 656
Posts |
I have done this install on jackstands a few times and have done to about 3 hours to do the whole install. Must say, I prefer doing these DP's verse the RWD DP's as there is so much more room to work with.
|
|
Appreciate
0
|
| 01-22-2014, 01:54 AM | #44 |
|
No 55mph
1626
Rep 8,493
Posts |
So you have to go thru this process every year (catless OUT/cats IN - Emissions Test - cats OUT/catless IN) ?
That's insane  Can't you get a tune that eliminates the CEL & shows O2 readiness for the test? Or a Mini Cat O2 Sensor CEL FIX? http://www.bigdaddiesgarage.com/mini-cat-cel-fix.html Many different companies make these - just used this as example due to their good description/cutaway pics... Too bad these cars aren't as EZ as my OBDII T/A & Vette - they both have long tube headers that delete the cat's - simple matter in those cars to install O2 Sims in the after cat O2 sensor locations - sends appropriate voltage signal to computer to simulate installed/proper operating cats... Wonder why there is no such thing for BMW's? Would this work: http://products.vividracing.com/riss...1013506522.php
__________________
F32 435ix//MGM//M Sport-Prem-Tech-Driver Assist-Lighting-Cold Weather-Dyn Handling Pkgs//M4 Black Lthr Int w/M4 Alum Blade Trim//HK w/Bavsound Stg3//763M//M4 Euro LCI Tails//M4 Mirrors w/CF Covers//AWCarbon CF F/R Spoilers-Side Splitters-Diffuser 6WB/ID6 HU+HUD/IND M4 Alcantara Armrest//PURE S2 Turbo//AA FMIC+DP//ER CP+TIC//3.5bar TMAP/TS DV//AWE Tuning Exh w/Blk Tips//Turner MS CF Intake//BM3 Cary Jordan Tune//MPerf Diff//PrecRW Ignition Kit
Last edited by 1QuikWS6; 01-22-2014 at 02:40 AM.. |
|
Appreciate
0
|
 |
| Bookmarks |
|
|