|
|
|
|
 |

|
 |
BMW Garage | BMW Meets | Register | Today's Posts | Search |
 |

|
BMW 3-Series (E90 E92) Forum
>
Center Dash Vent Replacement
|
 |
| 09-14-2013, 08:03 PM | #1 |
|
Fuck it dude, let's go bowling.
883
Rep 2,479
Posts |
Center Dash Vent Replacement
NOTE: Please see post/comment #6 below. Apparently it is possible to pop out the hazard/lock/dct/mixer switch prior to working the trim off, which may make the job easier.
If you have a significant other (and/or kids) you likely have missing or broken interior parts. I've started replacing some - ordering from getbmwparts.com. Today I replaced the center dash air vent which had broken slider tabs (those black/silver tabs in the center of the vent that you can use to divert the air up/down and left/right. Those slider tabs are made of two pieces - extremely poor quality and design. It does not take much pressure to break them - the two parts will then separate. Once they're broken, you can forget about fixing them or replacing just the slider tabs - the entire vent must be replaced. This photo was taken of the old vent (after the new one was installed)... 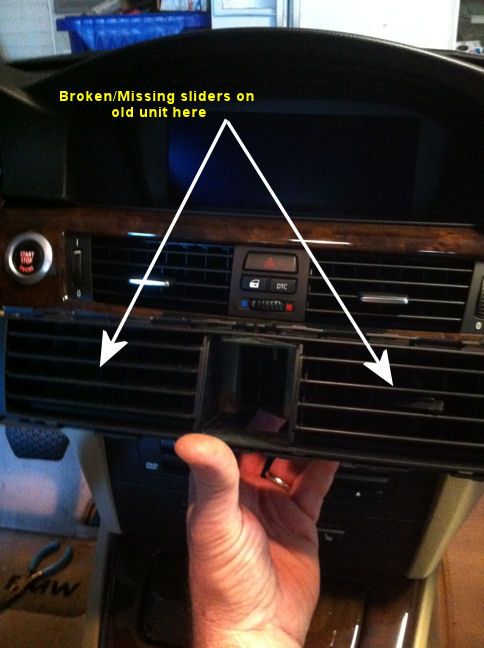 And here is the part in question - once the two sections separate, there is no putting them back...  This DIY should be applicable to the other vents as well. Note that this is my procedure that worked for my car - a 2007 E90 335i. Your results may vary, try this at your own risk. Here is what you will need for this job: - a new center air vent (part #64-22-9-130-458, $57.76 from getbmwparts.com) - a sturdy, hard plastic spatula or putty knife - a sharp awl - a small flashlight - an 8mm socket with handle driver - two flat-head screwdrivers - needle-nose pliers (not pictured) 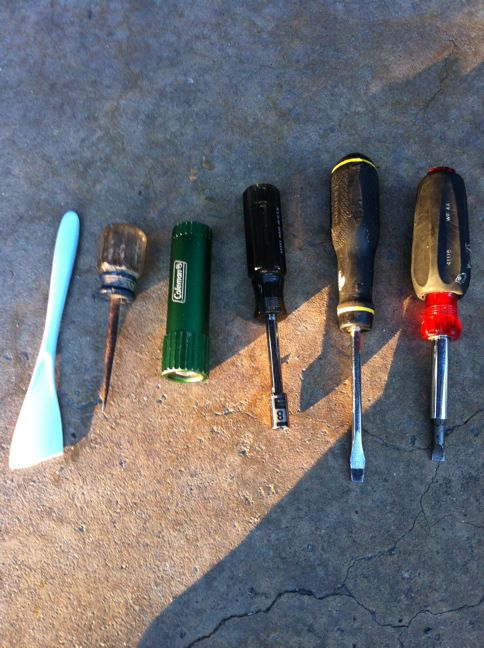 Start by removing the dash trim piece (wood grain, aluminum or other). Note that the starter button, vents and center switch plate are all attached to the trim panel, and will come off with the trim panel. Therefore, the wiring to the starter button and center switch panel will have to be unclipped before the trim can be completely removed. There are many DIYs on removing the trim piece. I didn't bother to try and record it all. Start at the side near the starter button. Insert the sturdy spatula between the dash and the trim, and start prying. Don't be afraid to use force. It will pop and then the rest is gravy, moving left to right. I was shocked how easy it is to pull the trim piece. Working from underneath, you will need to remove three wire plugs - two in the vent and one on the starter button. I started with the bottom plug on the center vent switch panel. The photo below shows the two vent plug receptors. 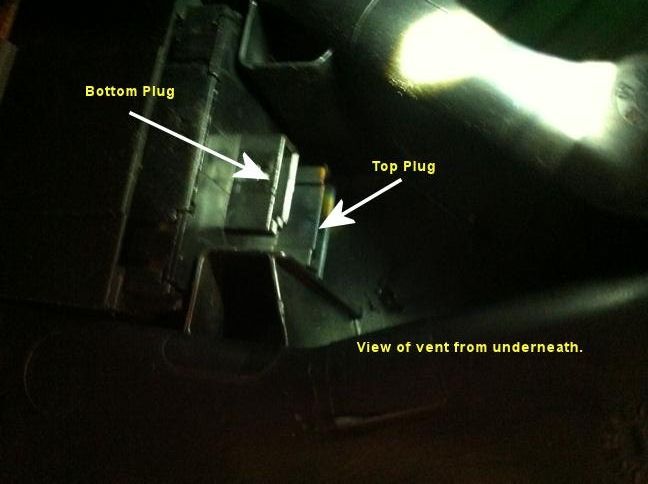 On the bottom plug I tried using needle-nose pliers, but there is a small tab that locks the plug into a slot in the socket. Fortunately, that tab/slot is on the underside - you can see it from below. I inserted my awl slightly between the slot and the plug, and used the sharp tip to pry the plug out. It was pretty easy. 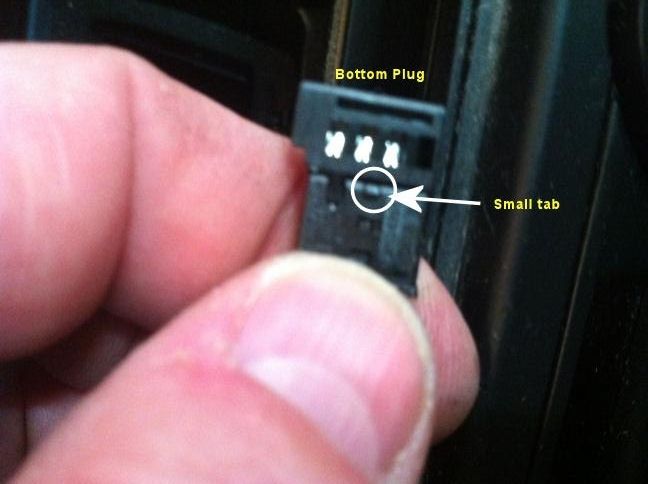 For the top one, you can forget about getting the awl up in there. I just wrestled it out with the needle-nose pliers. It wasn't that difficult. For the starter switch, just depress the tabs on each side and pull it out. Panel removed. 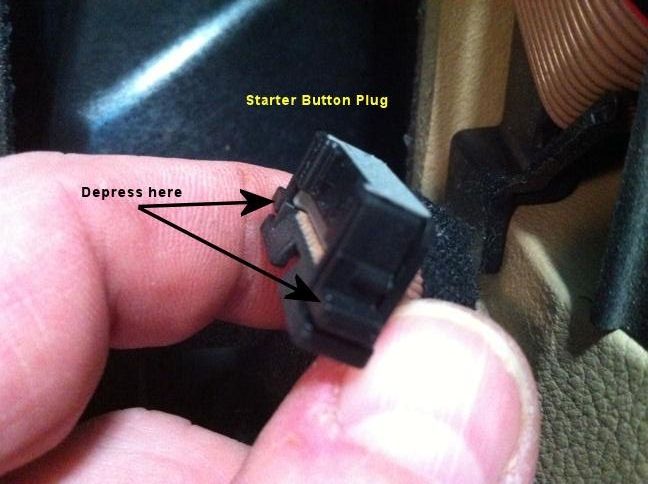 Now you need to separate the vent assembly from the trim panel. Look at your new one to see the tabs running along the top and bottom that lock it into the trim panel. On either end of the vent you will see it is bolted on with 8mm nuts. Remove those. 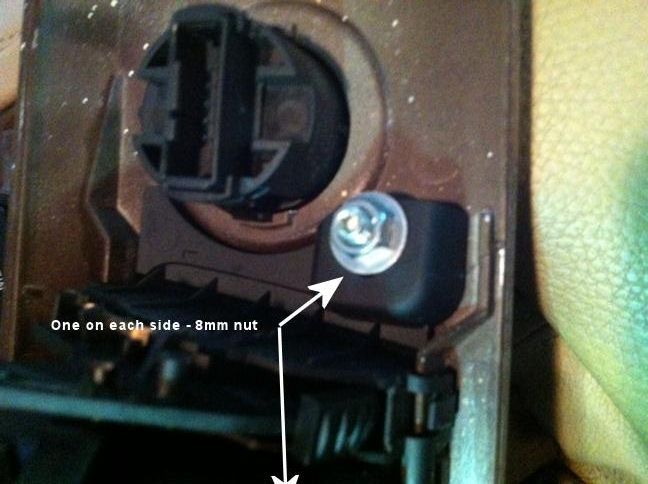 Then start prying the tabs on the top and bottom. I think it's best to start with the top, which is the hardest because space is tight. I used a screwdriver to pry the tabs out while rocking back on the vent. It popped out pretty quickly. 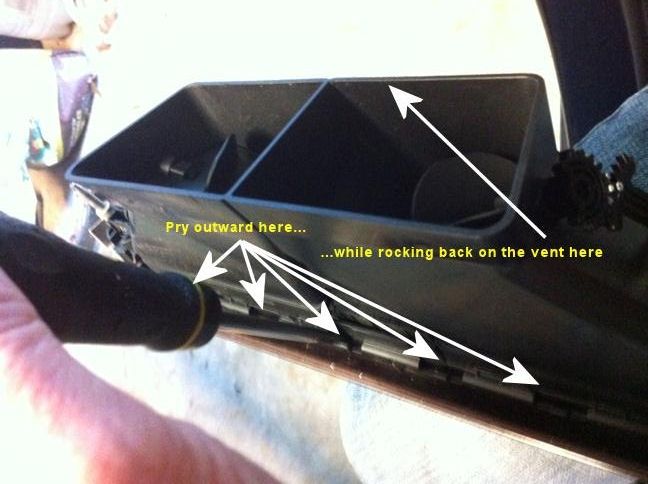 Once you have the top tabs popped out, be careful because they pop back in very easily! You can't use the rocking method on the bottom set of tabs because that will only serve to re-seat the front set that you just popped out. Use two screwdrivers - one to pry out on the tab, and the other to pry up away from the trim. Work your way along and it will pop out pretty easily. 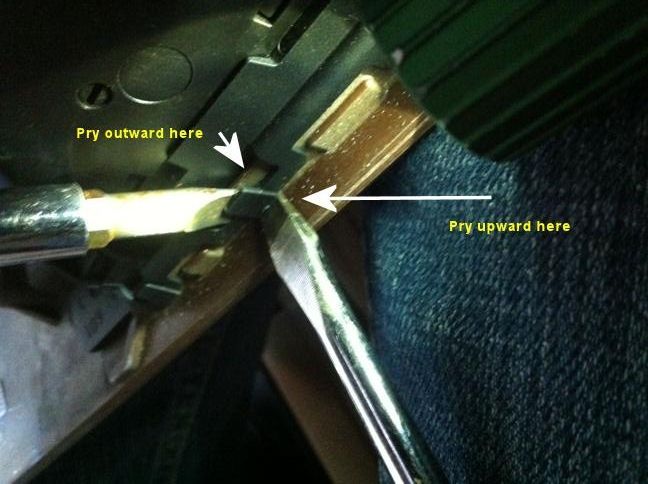 With the center vent removed, you just need to pop the switch assembly out. It is held in with metal pressure tabs - push from behind to pop it out of the front of the vent. There are no locking tabs, so just push. 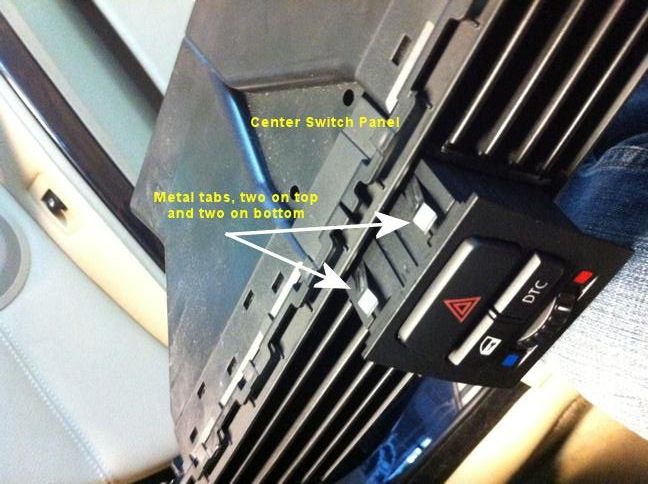 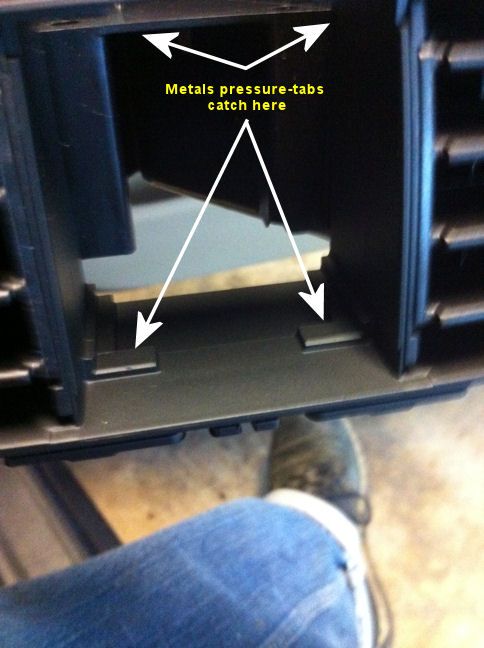 Pop the switch assembly into the new vent, and pop the vent into the trim piece. Use the nuts you removed from the old unit to bolt the new vent down on each side. Put the trim assembly roughly back into place - you need to reconnect the switches. I used the needle-nose pliers to insert the top vent switch, and then the bottom. Push in until they click (it's not loud). Push the starter switch plug back into its socket. Now working from the end on the passenger side, slide the trim piece pins back into their slots on the dash. It might take some wiggling to get the vents lined up - once they're aligned the trim piece just pushes right back into place. Enjoy your newly restored vent tabs. And keep the SO/kids out of the car!
__________________
1M. Previously: '13 135is; '07 E90 335i; '02 325i; '99 Z3; '98 328is; '87 L6; '77 320i
 Last edited by NGEE; 06-15-2017 at 05:30 PM.. |
| 02-23-2014, 07:29 PM | #3 |
|
Private
 20
Rep 95
Posts |
Thanks for this DIY!
I have the kenu airframe mount and would like to set up a live usb cable through the vents. If I were to want to fish a USB cable out of the vents from the fusebox, would I have to take the vent out with the nuts or just the trim? Would it also be easy to fish from that area to the fusebox? Can you mark the tab locations to pull the trim out? Thanks! |
|
Appreciate
0
|
| 02-23-2014, 10:23 PM | #4 | |
|
Fuck it dude, let's go bowling.
883
Rep 2,479
Posts |
Quote:
Not sure tho! Good luck - post back.
__________________
1M. Previously: '13 135is; '07 E90 335i; '02 325i; '99 Z3; '98 328is; '87 L6; '77 320i
|
|
|
Appreciate
0
|
| 02-24-2014, 01:12 AM | #5 | |
|
Private
20
Rep 95
Posts |
Quote:
 Also pretty cool to see and feel the seal of the ac vents when you open and close the flaps, gotta love engineering porn |
|
|
Appreciate
0
|
| 02-26-2014, 08:54 PM | #6 |
|
New Member
1
Rep 24
Posts |
i just replaced my trim in our E91, and there's a step that will make everyones life easier. you can actually pop out the hazard/lock/dct/mixer switch if you have a plastic trim tool or spatulas. just put one at the bottom and one at the top and pry them out, it'll come straight out, and you can unplug the two cables much easier, then you can start pulling the trim off as usual.
|
|
Appreciate
0
|
| 02-26-2014, 10:25 PM | #7 | |
|
Fuck it dude, let's go bowling.
883
Rep 2,479
Posts |
Quote:
__________________
1M. Previously: '13 135is; '07 E90 335i; '02 325i; '99 Z3; '98 328is; '87 L6; '77 320i
|
|
|
Appreciate
0
|
| 02-27-2014, 11:15 AM | #8 | |
|
Major
 
64
Rep 1,097
Posts
Drives: '11 335i E93 Alpine White
Join Date: Sep 2012
Location: New Braunfels, TX
|
Quote:
 Nice post! Nice post!I also found that it was easier to pull the center vent out and then just push out the hazard/lock/dct switch. Last edited by BMWE934me; 02-27-2014 at 11:21 AM.. Reason: add text |
|
|
Appreciate
0
|
| 02-28-2014, 04:27 PM | #9 | |
|
Private
20
Rep 95
Posts |
Quote:
I just installed the USB cable through the vents to the fusebox, will post a DIY as soon as I get the parts to power the usb cable in the fuse box :P Finished result: View post on imgur.com (still needs power) |
|
|
Appreciate
0
|
| 02-28-2014, 06:35 PM | #10 |
|
Major
64
Rep 1,097
Posts
Drives: '11 335i E93 Alpine White
Join Date: Sep 2012
Location: New Braunfels, TX
|
|
|
Appreciate
0
|
| 02-28-2014, 07:25 PM | #11 | |
|
Private
20
Rep 95
Posts |
Quote:
 |
|
|
Appreciate
0
|
| 02-28-2014, 08:04 PM | #12 |
|
Major
64
Rep 1,097
Posts
Drives: '11 335i E93 Alpine White
Join Date: Sep 2012
Location: New Braunfels, TX
|
I do what I can. Sometimes I get too into the mod and forget to take pics. But I do what I can with what I get. I do like the CIC, but I have never had the CCC to compare with.
|
|
Appreciate
0
|
| 03-13-2021, 10:46 PM | #14 |
|
Captain
 
403
Rep 754
Posts
Drives: 09 //M3 e90 Interlagos Blue
Join Date: Jan 2008
Location: Los Angeles
|
Replica replacement vent tab...now available. Not OEM. Shop around for a set of 3, 4, 5 tabs.
https://www.ebay.com/itm/NEW-Front-A...kAAOSwPlJfJ6e1 OR an improved vent tab design. https://www.venttabs.com/venttabs-bm...c-vent-repair/ Try not to laugh...it is so simple. Cheers |
 |
| Bookmarks |
|
|