

|
|
|
|
 |
|
 |
BMW Garage | BMW Meets | Register | Today's Posts | Search |
 |

|
BMW 3-Series (E90 E92) Forum
>
DIY: 335i N54 Front CrankShaft Seal Replacement
|
 |
| 08-28-2016, 05:55 PM | #1 |
|
Private
 47
Rep 66
Posts |
DIY: 335i N54 Front CrankShaft Seal Replacement
This forum has helped me tremendously so I wanted to contribute in some way.
The front crankshaft seal seats between the engine block and the front crankshaft hub that extends out. From what I've read the seal doesn't fail under normal operation, but when your serpentine belt breaks/shreds the pieces of belt damage your seal. This is really not a difficult job, but you do need the right tools which sadly cost like 7 time what the seal costs. I did this job on 2008 335i 6MT The BMW Workshop Manual was very helpful when doing this job. Parts Needed: a. Shaft Seal p/n 11117547842 b. Loctite Flange Sealant p/n L-5970 c. Loctite Primer p/n L-171000 d. KTC Tools - N54 Seal Puller and Pusher KTC Tools AMAZON Steps: 1. Use this DIY to REMOVE SERPENTINE BELT 2. Use this DIY to REMOVE RADIATOR FAN 3. Jack the front of the car up. ***General Note*** a. Be careful not to damage the radiator Once you've completed the steps above there'll be plenty of clearance to work on your seal. 4. Remove front pulley by removing the six E10 bolts that hold it to the crank shaft hub. When I was doing my research I found some post talking about having to remove the front crankshaft bolt. That is not necessary. DO NOT remove the front crankshaft bolt - the workshop manual above also explains this. Use a flat head screw driver to pry off the pulley. It doesn't require much to come off.  4.a. Once you remove the pulley the damaged seal reveals itself. In my case I had pieces of belt stuck in there and all over the place. So I had to remove the valve cover and oil pan to clean all the pieces of belt.   5. Time to remove the seal. The tool kit comes with two tools to remove the seal. I highly recommend using the screw type (shown below). The other puller uses sheet metal screws to bite onto the seal the then pull it out, but based on what I read that one tends to not work sometimes. For the screw type you want to assemble to puller bolt onto the puller hub, just a few threads. Then proceed to thread the puller (clockwise) onto the seal while applying inward pressure all by hand at first. You will feel the puller grab onto the seal. Once the puller is threading, then use a wrench to continue engaging. It will get hard to turn the wrench. That's your indication you're biting good.  6. Once the puller is well engaged onto the seal proceed to slowly turn the head of the puller bolt. You will see the seal start to come out. If after turning the puller bolt the puller disengages, go back and repeat step 5 and make sure thread more into the seal. The picture shows you the seal slowly coming out of the hub. And the seal fully out. You can see how much engagement the puller had on the seal. Remove the seal from the tool by cutting it using some sheet metal cutters. The puller has a groove to indicate where to cut as to not damage the threads.  This picture shows the tip of the puller bolt that pushes against the head of the crankshaft bolt. You can also see the space around the hub left by the seal.  7. Clean all surrounding areas with seal remover or break cleaner. Prep the areas for installation of the seal by coating the engine block side of with the loctite primer. Also apply a light coat of oil to the surfaces of the hub - the oil will help the seal slide into place. The primer is to help the gasket maker cure.  8. Install the seal pusher guide to the crankshaft hub. Only two bolts (180 deg apart) will go in. The guide has 4 holes and the hub 6. Apply oil to the guide as well. I didn't take a picture of the seal. It comes with a plastic sleeve. Install the seal WITH the sleeve onto the guide with the open end of the seal facing the engine. **Important** Align the two grooves of the seal with the joint line in the engine block. Now position the pusher tool over the sleeve and start cranking it in by hand using the supplied nut. The sleeve will remain stationary while the seal is being pushed in. Hand torque is enough to push the seal almos completely in, I only needed a wrench for the last few turns.  9. Complete installation by using the gasket maker to fill the two grooves of the seal that align with the joint line of the engine block. Apply primer over that last layer of gasket maker. What I did was to apply a bunch of gasket maker to the two grooves of the seal. The seal maker bottle is supper hard to squeeze out so it was easier to apply with using the long nipple adapter. Remember that plastic sleeve the seal came in? Well it helps keep the liner in place. Make sure the liner stays in place. I had to carefully push mine in a little bit with some picks. 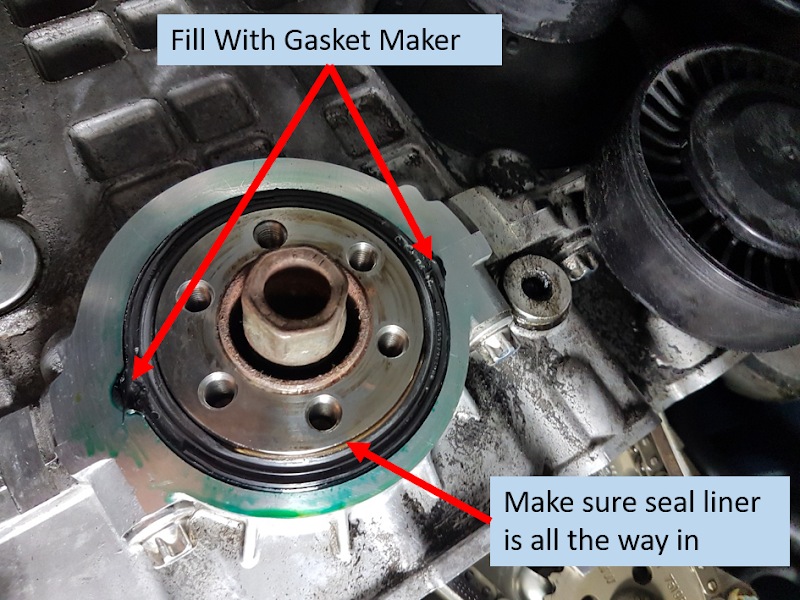 Allow the gasket maker to cure for a few hours. Reinstall your pulley using the original six steel bolts. Reinstall belt and the fan using the DIY's above. Hope this helps! Last edited by mr_malvo; 08-27-2017 at 02:17 PM.. |
|
Appreciate
6
|
| 05-21-2017, 12:29 PM | #4 |
|
Registered
0
Rep 1
Posts |
Do you have any leaks with that gasket maker? The recommended on the M5 through BMW is loctite 193140 the dealer said it is the same recommended for N54. The one shown in the picture is the one for the differential but If it works Ill go with that one as its 1/2 the price.
|
|
Appreciate
0
|
| 05-21-2017, 12:47 PM | #5 | |
|
Private
47
Rep 66
Posts |
I inspect the area at least once a month and had no signs of leaks after almost 10,000 miles of driving since the repair.
Quote:
|
|
|
Appreciate
1
feuer4275.50 |
| 06-20-2017, 01:21 AM | #6 |
|
Registered
0
Rep 1
Posts |
Mr. Malvo,
Thanks for the excellent DIY's. I have followed the dreaded serpentine belt giude previously. Long story short, I have yet another shredded belt after only 4 week repair (new tensioner, idlers, alt pulley, etc) . It seems during the first belt shredding, my seal was damaged but not profusely leaking (5 days into owning the car!).. so I repaired it without replacing the crank seal. However since I had spotlessly cleaned everything, it now seems that there is some seepage around the crank seal. Would you be willing to rent or loan the seal removal and install kit for an evening or two? I can certainly buy a kit, but prefer not to accumulate things that are used just once. Please contact me.. somie1@hotmail... or 954 - 9 one 4-- 4865. I'm in Fort Laud.. and can certainly loan compressor/paint sprayer/impact/media blasting kit.. etc. Thanks again! |
|
Appreciate
0
|
| 06-20-2017, 09:11 AM | #7 | |
|
Private
47
Rep 66
Posts |
Hey man, yes I can loan you the tools. I'll text you later today.
Quote:
|
|
|
Appreciate
0
|
| 08-28-2017, 09:01 PM | #11 |
|
Registered
0
Rep 2
Posts |
Hi Mr. Malvo,
I too have recently had a belt shred on me and now have a leak coming from the front crankshaft seal. It's been 2 months since the last guy posted about tool borrowing/rental, so hopefully he's already gotten the seal fixed. I was hoping that you would possibly be able to loan/rent it to me as well. Please email/call/text if you are able: z3man82@hotmail.com, 919-279- 3465. Thank you very much. Last edited by bigoltts; 08-28-2017 at 09:08 PM.. Reason: Added contact info |
|
Appreciate
0
|
| 08-28-2017, 10:08 PM | #12 | |
|
Private
47
Rep 66
Posts |
Sounds good. I'll contact you tomorrow.
Quote:
|
|
|
Appreciate
0
|
| 10-26-2017, 08:33 PM | #14 | |
|
Private
47
Rep 66
Posts |
Quote:
|
|
|
Appreciate
0
|
| 01-16-2018, 12:32 PM | #15 |
|
Registered
0
Rep 1
Posts |
I'd like to rent the tool if it's available. Lost my serpentine belt Monday and it took out the main seal
 my email is rkvarner43@yahoo.com and I'm in north Alabama. my email is rkvarner43@yahoo.com and I'm in north Alabama. |
|
Appreciate
0
|
| 02-23-2018, 02:58 PM | #16 |
|
Enlisted Member
 6
Rep 33
Posts |
OP- When you used the sealer to the key holes and the nipple, did you inject the sealer in the keyhole or put the sealer on the outside of the keyhole and then the primer over that?
I installed mine and the BMW sealant tube was too long, so I did it by hand and it looks like it's still leaking with the new seal on. I wonder if you have to inject it in the keyholes on the new seal? Thanks- |
|
Appreciate
0
|
| 02-23-2018, 04:31 PM | #17 | |
|
Private
47
Rep 66
Posts |
Hey there, you have to inject the gasket maker in the two grooves using the needle like adapter. The surface of the block should already be clean and coated with primer before you do so. Make sure to cover a little bit of the front face of the block, adjacent to the grooves, with both primer and gasket maker.
Seems that by just putting it on the front face a leak path remained thru the grooves. Also be sure to use a new seal and to let the gasket maker cure. Quote:
|
|
|
Appreciate
0
|
| 02-24-2018, 01:41 PM | #18 | |
|
Enlisted Member
6
Rep 33
Posts |
Quote:
|
|
|
Appreciate
0
|
| 02-24-2018, 05:25 PM | #19 | |
|
Private
47
Rep 66
Posts |
The nipple shown in the picture above came with the gasket maker.
The tip is .125" in diameter and 2" long. The tube is 6" long plus approx 2 more inches for a pusher tube (black). I think I had to angle it a little for it to fit between the block and the radiator. Quote:
|
|
|
Appreciate
0
|
| 03-13-2018, 09:36 PM | #21 | |
|
Enlisted Member
6
Rep 33
Posts |
Quote:
|
|
|
Appreciate
0
|
| 03-13-2018, 11:22 PM | #22 | |
|
Private
47
Rep 66
Posts |
Nice to know the loctite nipple worked - hopefully you have your new seal up and going. I did not use a metal one, just the plastic one that came with the BMW tube.
Quote:
|
|
|
Appreciate
0
|
 |
| Bookmarks |
| Tags |
| 335i, belt, crankshaft, n54, seal |
|
|


