

|
|
|
|
 |

|
 |
BMW Garage | BMW Meets | Register | Today's Posts | Search |
 |

|
BMW 3-Series (E90 E92) Forum
>
DIY: Change your gauge cluster light colors!
|
 |
| 10-07-2014, 11:10 PM | #1 |
|
Lieutenant
 
106
Rep 420
Posts |
DIY: Change your gauge cluster light colors!
This will show you how to change your orange gauge cluster to a nice, cool white color. It's pretty cheap as well. You need a soldering iron with a sharp tip, some soldering flux, and maybe some solder.
Here is a picture of my cluster with all but 6 of the LEDs replaced: View post on imgur.comI left the center display the stock LEDs so you can see the difference! You will need to buy the LEDs of your choice. I chose white LEDs, as I liked the color, but you can do any color you desire as long as they make LEDs for it! If you want to change all of the orange to your desired color, you should order around 35. You will have a few left over if you don't mess up, but they are cheap and you will most likely damage one or two unless you are really good at soldering small components. Here is a list of some LEDs you can buy that will work, in different colors:
Now for the tutorial! Start by removing the two screws holding the gauge cluster in. They are a common smaller torx size, but I forget which. View post on imgur.comView post on imgur.comWith the screws removed and the steering wheel tilted all the way down, tilt the gauge cluster forward starting at the top. Once it is tilted a little bit, you will be able to pull it out towards you. View post on imgur.comOnce the cluster is out, look at the back. There will be one plug connecting it to the car. There is a lever on the plug which needs to be rotated up to allow the plug to come out: View post on imgur.comRemove the plug and the cluster should be free. To start disassembly, look at the back of the gauge cluster. There will be 4 silver torx screws of the same size that held the cluster in the dash. Remove those 4 screws. I had two already removed in the picture below: View post on imgur.comYou will then need to gently pry the snap-fit tabs holding the front lens assembly to the back of the gauge cluster apart. There are I believe 6 of these black tabs. Work your way around slowly and gently bending them back and slightly separating the two parts. It should eventually easily come apart once all the tabs are released. Now go back to the front of the now-separated cluster assembly: View post on imgur.comYou will need a knife or small screwdriver to pry the needles off their pegs here. Be very gentle and don't pry on the needles themselves, only on their circular hubs in the middle. Also be sure to put something between the tool you are using to pry (the knife in my picture) and the black gauge background. This material scratches really easily, and you don't want to do that! View post on imgur.comView post on imgur.comIt's not easy to see here, but the plug housing that was connected to the car is the only thing holding the circuit board and gauge face to the black housing in back. You can try to wedge something between the plug housing and the black back to help release them, or just gently tug the circuit board and black housing apart and it will eventually pop off. Don't pull too hard or you could break something, but it should eventually come off with just the right amount of force. View post on imgur.comView post on imgur.comNow that the circuit board and gauge face is separated from the back housing, there are only 4 white tabs holding the gauge faces to the circuit board. Slightly pull those out and the gauge face should come right off, leaving you with the guts! View post on imgur.comNow gently pull up the tabs locking the LCD cable in place, and the LCD and white backing plate will come right off. You're then left with the bare circuit board. Whew! View post on imgur.comNow the hard part. All the LEDs outlined in the red areas below are the stock orange ones. If you want everything orange to be a different color, you need to gently remove these with your soldering iron. I would recommend only doing 1 at a time and then replacing it, because the polarity needs to be correct. The LEDs have a small indention in one corner, and you need to make sure the LEDs you solder on have the same indention in the same corner. If you don't, they won't light up! View post on imgur.com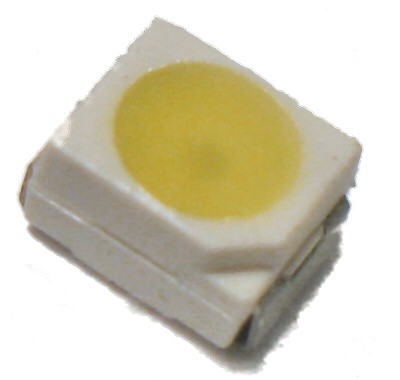 After you desolder one of the stock LEDs, i recommend running your soldering iron over the solder pads to smooth out the remaining solder. Then put some flux on the entire area the LED will cover. This will help hold the replacement LED down while you solder it. You'll also probably have to hold it down with tweezers, because it will move when the solder starts going molten and sticking to it. A loupe or magnifying glass may be necessary if you can't see close up. These LEDs are very small (2.8x3mm!) and you will need a steady hand and good eyes to make sure the 2 solder points are done well. Here is what mine looked like with all but the center display LEDs changed: View post on imgur.comOnce all the LEDs are done you can hook it up to the plug in your car to make sure they all light up. If they do, on to reassembly! It's basically the exact reverse of disassembly, so I'm going to skip most of it here. The only part I want to touch on is the needles. After gently pushing the needles back on their posts, hook the cluster (without the lens back on yet) up to the wire and start the car. Then kill it. When in accessory mode on a cold car, all the gauge needles should be pointing to 0. There should be a little resistance from the motors holding them in place, but you should be able to move them to align to 0 if they don't. There is also the cruise control ring which goes behind the speedo area. You should have this turned so the white mark that indicates the cruise control speed is just barely hidden when the car is off. After all that is done and the cluster is reinstalled, marvel at your new shiny cluster! View post on imgur.comLast edited by jellish; 10-07-2014 at 11:20 PM.. |
| 10-08-2014, 01:56 AM | #2 |
|
First Lieutenant
28
Rep 304
Posts
Drives: '11 335i
Join Date: Jun 2013
Location: Livermore, Ca
|
Well done! Kinda nervous but can't wait to give this a shot!
|
|
Appreciate
0
|
| 10-08-2014, 03:47 AM | #4 |
|
Colonel
 
853
Rep 2,792
Posts |
Looks good....would love to try this seems pretty straight forward but I may need to practice soldiering on a less expensive circuit board first haha!
How much would this cost someone who botched the job I'm curious lol?! |
|
Appreciate
0
|
| 10-08-2014, 10:45 AM | #6 |
|
Major
 150
Rep 1,100
Posts |
Very Good write up. Probably won't have the balls to do it myself but always nice to read and learn.
__________________
2010 335i Coupe- Monaco Blue Metallic
 |
|
Appreciate
0
|
| 10-08-2014, 11:05 AM | #7 |
|
Brigadier General
 
626
Rep 3,198
Posts
Drives: E92 325i MSport Coupe
Join Date: Apr 2012
Location: UK South East
|
Great guide! We're very lucky in the UK - we have a forum member who will do this for us for $30!!
Here's his build thread: http://www.e90post.com/forums/showth...ght=white+LEDs
__________________
E92 pre-LCI 325i - Ohlins R&T; H&R spacers; M3 strut brace; Swift thrust sheets; 3 x chassis braces; diff brace; N53 V-brace; 034 subframe inserts; BMS clutch stop; BMS CDV; RE g/box mounts; Delrin shift bushes; Saikoumichi OCC; Cyba scoops; BMW Perf Exhaust; HEL s/steel brake hoses; M3 rear spoiler; Recaro Sportster CSs; M3 white dash LEDs; LED Angels; LED side repeaters; BMW Perf black grille; CSL reps; SSDD carbon diffuser; Monster Wrap black roof/clear front
Last edited by Phil325i; 10-08-2014 at 05:30 PM.. |
|
Appreciate
0
|
| 10-08-2014, 04:43 PM | #8 |
|
Colonel
513
Rep 2,981
Posts
Drives: 2013 BMW F30 EBII
Join Date: Apr 2013
Location: Upstate, NY
|
Looks awesome....love the white! Can the clock and temp be changed to a different color also....? Thanks
__________________
Drives: 2011 Porsche 958, 1965 Chevy C10, 1988 Porsche 944 Sold:2010 e90 Montego Blue, 2013 F30 EBII, 2013 Tangerine Scream Ford Focus ST, 2006 Mini R50,2004 VW Touareg, 2012 Camaro Convertible, 2008 Porsche 911 Convertible, 2007 Corvette, 2004 BMW e64 convertible, 2000 Dodge Dakota, 1999 Ford F150, 1999 Porsche Boxster, 1999 Ferrari Modena, 1992 BMW e36, 1990 Nissan 240sx, 1979 Celica, 1974 Mustang II
My Build Thread |
|
Appreciate
0
|
| 10-08-2014, 05:24 PM | #9 | |
|
Lieutenant
106
Rep 420
Posts |
Quote:
|
|
|
Appreciate
0
|
| 10-08-2014, 07:22 PM | #10 | |
|
Major
66
Rep 1,097
Posts
Drives: '11 335i E93 Alpine White
Join Date: Sep 2012
Location: New Braunfels, TX
|
Quote:
|
|
|
Appreciate
0
|
| 10-08-2014, 07:27 PM | #11 |
|
Major
66
Rep 1,097
Posts
Drives: '11 335i E93 Alpine White
Join Date: Sep 2012
Location: New Braunfels, TX
|
Last edited by BMWE934me; 03-15-2015 at 12:13 PM.. |
|
Appreciate
0
|
| 10-09-2014, 02:14 PM | #12 |
|
Private First Class

12
Rep 193
Posts |
So awesome. Wish I had the balls and skills for this. All the power to ya man. Looks way nicer than stock orange
|
|
Appreciate
0
|
| 10-09-2014, 07:16 PM | #14 | |
|
Banned

28
Rep 228
Posts |
Quote:
Got steps on how to perform that on the center console, AC and radio? The gauges look involved and I'm sure the console, AC and radio is no walk in the park. BTW, looks great. |
|
|
Appreciate
0
|
| 10-09-2014, 07:25 PM | #15 |
|
Banned
28
Rep 228
Posts |
Do you know if I can get a used cluster to perform this experiment and it will work with my VIN on my car? or are the clusters programmatically tied to the vehicle?
|
|
Appreciate
0
|
| 10-09-2014, 07:48 PM | #16 | |
|
Major
66
Rep 1,097
Posts
Drives: '11 335i E93 Alpine White
Join Date: Sep 2012
Location: New Braunfels, TX
|
Quote:
The biggest problem, is the expense when you burn something up. Some components are much more involved than others. Color options are almost limitless. I am doing a Instrument Cluster with a blue and white theme. Similar to the one above, but with blue fuel and oil temp gauges. I'll finish the last 4 LEDs tomorrow when my replenishment's get here. Attachment 1102442 If I haven't run short on LEDs, its easy to do anything in a day. I'm building my LED inventory now. Need help, PM me. Last edited by BMWE934me; 03-15-2015 at 12:15 PM.. |
|
|
Appreciate
0
|
| 10-10-2014, 12:30 AM | #18 |
|
Major

96
Rep 1,030
Posts
Drives: 335 E92 DCT
Join Date: Jun 2013
Location: Sydney, Australia
|
Done this piss easy. Also changed the rings to M3 and M3 speed and revs. Keeped my 335i needles though, i prefer them
 |
|
Appreciate
0
|
| 10-10-2014, 09:37 AM | #20 | |
|
Lieutenant
106
Rep 420
Posts |
Quote:
|
|
|
Appreciate
0
|
| 10-10-2014, 08:05 PM | #21 |
|
Major
66
Rep 1,097
Posts
Drives: '11 335i E93 Alpine White
Join Date: Sep 2012
Location: New Braunfels, TX
|
I finally receive my LEDs today so I could finish up my cluster.
Unfortunately I can't capture the blue like it shows in person, but it's awesome. Attachment 1102765 Attachment 1102766 Attachment 1102767 Attachment 1102768 Attachment 1102769 Attachment 1102770 Last edited by BMWE934me; 03-15-2015 at 12:15 PM.. |
|
Appreciate
0
|
| 10-10-2014, 08:41 PM | #22 |
|
Captain
235
Rep 738
Posts
Drives: '11 328xi |'18 440xi GranCoupe
Join Date: Sep 2014
Location: Staten Island, NYC
|
Looks amazing man!
__________________
|
|
Appreciate
0
|
 |
| Bookmarks |
|
|


