|
|
|
|
 |

|
 |
BMW Garage | BMW Meets | Register | Today's Posts | Search |
 |

|
BMW 3-Series (E90 E92) Forum
>
VRSF Charge Pipe Install for N55
|
 |
| 08-21-2014, 10:57 AM | #1 |
|
Major
 123
Rep 1,166
Posts |
VRSF Charge Pipe Install for N55
This is a DIY for installing a VRSF Charge Pipe on an N55 335i, this may be applicable to other aftermarket Charge Pipes as well. Read thoroughly before taking anything apart, and feel free to PM or comment with any questions/concerns.
Difficulty: 1/5 Time: 20-40min Tools: - Torx T30 - Torx T20 - 10mm Hex Socket (extender would be useful) - Flathead screwdriver - A bit for the two Boost Sensor screws provided with your CP - Gloves (optional, things are pretty hot) VRSF CP First Stage: Removing Air Intake Remove OEM airbox lid by unplugging MAF sensor connector, unsnapping 4 clips holding it down to airbox, and removing the single screw holding it to the OEM rubber elbow. After you pull out the intake you will be left with a box that needs to be pulled out. The only thing keeping this box attached is two rubber grommets and some tubes attached in the rear. You will begin by detaching the 3 hoses behind the box by pulling up on them (Green Circles). There is a 4th small hose held down by a clip, unclip it. Now the box is only held down by two rubber grommets, push them down and pull up on the box (Red Cirlces) Second Stage: Removing stock Charge Pipe Now you should have access to the stock Charge Pipe. The pipe is held down in 3 locations as well as the attached boost sensor. First remove the boost sensor with a Torx T20. (pull it out gently, dont want to damage this) Next you will remove the stock Charge Pipe
Third Stage: Installing the VRSF Charge Pipe Place the new O ring on the new CP. (VRSF provided a new O, if you do not have one then transfer your old one over to the new CP) It is recommended that you oil up the O ring. Place a T-Clamp (or whatever you were provided) onto the smaller end of the Rubber connector, and ease it onto the connection pictured below. Attach the Charge Pipe and the other T-Clamp to the larger end of the rubber connector, do not tighten the clamps yet. Maneuver the top of the Charge Pipe to fit onto the top connection shown below, this may take some time just be patient. Place the piece that was originally keeping the stock CP connected at the top onto the new CP, this should keep the new CP in place so that you can connect the Boost Sensor and tighten the T-Clamps below. Attach Boost sensor. You should have been supplied two small screws with the new Charge Pipe that will be used to attach the Boost Sensor. Be very careful not to drop these screws, and to align them perfectly straight before screwing them in. (Providing same image, couldn't take a picture) Final Stage: Tightening T-Clamps If you do not attach the clamps correctly the CP will pop off during your first major boost peak. (This happened to me) The rubber connector must be pushed as far onto each connection as possible, after you are sure you cannot feed anymore pipe into either end of the rubber connector you will move each of the two T-Clamps to the furthest edge of the rubber connector. Make sure when you tighten the T-Clamp with the 10mm socket that the clamp does not move to the sides. If you are not sure if the clamp is tight enough then it is not tight enough, keep tightening until you cant anymore. It should look like this at the end. Congratulations: You have installed your new Charge Pipe!! Yank it around a little bit to make sure it is as secure as possible, then begin putting everything else back together. I highly recommend using a code reader such as Cobb AP to clear all codes then take it out for a good hard run and read codes afterwards. If you hear a pop then the rubber connector most likely popped off, just stay off the boost and return home slowly to re-attach it.
__________________
2008 e92 M3: Gintani Sport w/ Topspeed Catless X-Pipe, KW-V3
Last edited by 335m; 08-07-2017 at 02:20 PM.. |
| 09-08-2014, 03:16 PM | #3 |
|
Banned
104
Rep 1,059
Posts |
Quick question on this, the clip that holds the charge pipe to the throttle body, do you install it after you fit the charge pipe on throttle body or before? From the pics it looks like you attached the charge pipe first to the throttle body and then slid the clip over it.
This clip in red: 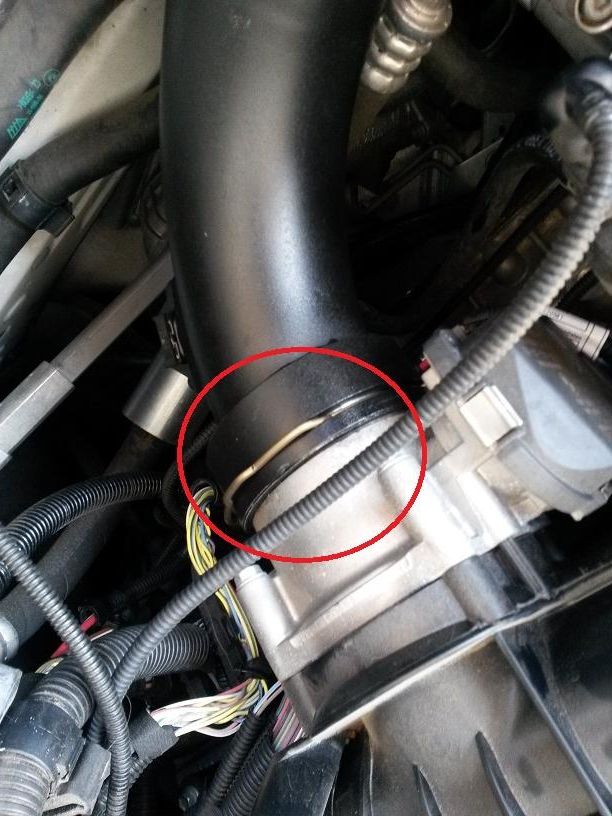 |
|
Appreciate
0
|
| 09-08-2014, 04:59 PM | #4 | |
|
Major
123
Rep 1,166
Posts |
Quote:
__________________
2008 e92 M3: Gintani Sport w/ Topspeed Catless X-Pipe, KW-V3
|
|
|
Appreciate
0
|
| 05-18-2015, 08:00 AM | #6 |
|
Master Bates

80
Rep 495
Posts |
Great DIY instructions! I finished my VRSF N55 install yesterday. Not too bad. Took a little over an hour with me taking my time and making sure everything is bolted down tightly.
One thing I would like to point out is that getting the boost sensor in the VRSF charge pipe takes a little wiggle. If you try to just push it in I felt like it may break and I definitely did not want to end up with that happening. It did however go in pretty easily by gently by twisting it back and forth. Took her out for a test drive and it all seemed to hold up well! I definitely feel more confident now with my tune.
__________________
CURRENT: 2020 G20 M340 xDrive Carbahn Tune
RETIRED: 2011 E90 335i xDrive Cobb AP3, PE Exhaust, Alpina TCU Flash, VRSF Charge Pipe 2017 Estoril Blue X1 M Sport JB4 |
|
Appreciate
0
|
| 05-18-2015, 08:15 AM | #7 |
|
Captain

91
Rep 664
Posts |
The only thing I would edit is the word c clip. The only c clip is the one that attaches to the throttle body. The other two are called t clamps. Just don't want anyone to get confused in the future.
|
|
Appreciate
0
|
| 05-18-2015, 06:44 PM | #8 | |
|
Major
123
Rep 1,166
Posts |
Quote:
__________________
2008 e92 M3: Gintani Sport w/ Topspeed Catless X-Pipe, KW-V3
|
|
|
Appreciate
0
|
| 04-02-2016, 11:52 AM | #10 |
|
New Member
0
Rep 16
Posts |
Sorry to bump an old thread, but does anyone know what size that screw is for the boost sensor? I have a used vrsf but do not have those screws and thinking about picking them up at a hardware store.
|
|
Appreciate
0
|
| 06-05-2016, 08:54 PM | #11 | |
|
Lieutenant Colonel

975
Rep 1,704
Posts
Drives: 22 X3MC MBB - C-17 Globemaster
Join Date: Jun 2014
Location: Pittsburgh, PA
|
Quote:
Did you find this out? I'm in need as well. |
|
|
Appreciate
0
|
| 11-13-2016, 07:26 PM | #13 |
|
Captain
157
Rep 772
Posts |
Thank you for this write up, it really helped me get my new CP on and my car is back to running great.
__________________
Mods: MHD Stg 2, xHP Flashtool Stage 3, VRSF 3" Chargepipe, Megan 4" Downpipes, Pure N55 Inlet, Outlet, VSRF 5" Stepped Intercooler, GFB Diverter, BMS N55 Intake, Michelin Pilot Super Sport Tires, BMS Sport Oil Cooler Valve, CF Spoiler, CF Kidney Grille, CF Mirror Covers, CF Eyelids, CF Wheel Hub Covers, CF Diffuser, M Sport Racing Strip, 20% Tints, and Golf Tee Mod
|
|
Appreciate
0
|
| 01-17-2017, 09:57 AM | #14 | |
|
3441
Rep 79,211
Posts
Drives: C6 Z06, 09 335i, 10 335xi
Join Date: Dec 2008
Location: www.TopGearSolutions.com
|
Quote:
Looks fancy? |
|
|
Appreciate
0
|
| 02-26-2017, 04:41 PM | #15 |
|
Lieutenant
84
Rep 317
Posts
Drives: 2011 E90 335xi Auto
Join Date: Mar 2016
Location: Denver
|
This was a perfect diy. Thank you it's installed and has held boost with no leak at WOT all day. Only one concern really. Did you feel the silicon connector? Like on the underside? Mine has a noticeable kink from the fit. Does yours?
__________________
2011 LCI E90 335xi Auto
| Wedge Performance Custom Tune | Pure Stage 1 | Dinan Free Flow Exhaust | VRSF CP | Secondary Cat Delete | K&N Drop-in | VRSF Catless DP | VRSF 5" FMIC| Stage 2 LPFP | |
|
Appreciate
0
|
| 05-08-2017, 01:53 PM | #17 | |
|
3441
Rep 79,211
Posts
Drives: C6 Z06, 09 335i, 10 335xi
Join Date: Dec 2008
Location: www.TopGearSolutions.com
|
Quote:
|
|
|
Appreciate
0
|
| 07-13-2017, 04:50 PM | #18 |
|
Lieutenant Colonel
975
Rep 1,704
Posts
Drives: 22 X3MC MBB - C-17 Globemaster
Join Date: Jun 2014
Location: Pittsburgh, PA
|
My charge pipe came with 2 bung holes completely open and no screws to plug them.... can anyone advise on this? Whats the deal?
|
|
Appreciate
0
|
| 07-14-2017, 04:57 PM | #19 | |
|
3441
Rep 79,211
Posts
Drives: C6 Z06, 09 335i, 10 335xi
Join Date: Dec 2008
Location: www.TopGearSolutions.com
|
Quote:
That being said they are just basic 1/8NPT Threads. You can find a bolt or fitting at any hardware store / plumbing isle. |
|
|
Appreciate
0
|
| 07-15-2017, 10:56 PM | #20 | |
|
Lieutenant Colonel
975
Rep 1,704
Posts
Drives: 22 X3MC MBB - C-17 Globemaster
Join Date: Jun 2014
Location: Pittsburgh, PA
|
Quote:
Last edited by thestimp; 07-17-2017 at 09:30 AM.. |
|
|
Appreciate
0
|
| 08-07-2017, 02:21 PM | #21 |
|
Major
123
Rep 1,166
Posts |
Removed links to bad Photobucket images and uploaded them via bimmerpost.
__________________
2008 e92 M3: Gintani Sport w/ Topspeed Catless X-Pipe, KW-V3
|
|
Appreciate
1
norsairius102.00 |
| 10-28-2018, 02:33 PM | #22 |
|
Registered
0
Rep 2
Posts |
O-Ring Placement
Like so many before me, my '12 E92 N55 with 60K has encountered:
- Seam fault on coolant reservoir - Failed Water Pump - Failed HPFP - Cracked Charge Pipe - Failed cup holder One small note on the charge pipe DIY, according the the OP's pictures, the O-ring looks like it is placed in front of the Throttle Body connection grooves on the CP. I think it should actually go in the first set of grooves. There are 2 sets of grooves, for both the OEM plastic as well as the VRSF replacement. The OEM had the O-Ring in the first groove, so that is the location I used too. Another hint too: start with the CP under the Throttle Body and lift up to connect. When I tried to start above and work down, it did not want to connect easily. 20-30 minute DIY. |
|
Appreciate
0
|
 |
| Bookmarks |
|
|