|
|
|
|
 |
|
 |
BMW Garage | BMW Meets | Register | Today's Posts | Search |
 |

|
BMW 3-Series (E90 E92) Forum
>
PowerFlex SubFrame bushing Full Replacement DIY
|
 |
| 02-10-2013, 02:04 AM | #1 |
|
DIYER
614
Rep 5,521
Posts |
PowerFlex SubFrame bushing Full Replacement DIY
Note: Not responsible for any damage to you or your car, this worked on my car so will work on yours.
***This tutorial assumes you know how to get your car secured on jack stands, if in doubt do NOT attempt this DIY! Tools Need not in pic (2 jacks if possible & block of wood, (1) for a safety catch in case jack stand fail (I saw this happen and will NEVER forget it)....safety 1st). The 2nd jack is for jacking up suspension up to ride height. Torque specs: Subframe bolts (65 Ft lbs) Strut bolts (25 ft lbs) Suggestions: I highly suggest a impact wrench. I used a 14MM 12Pt socket instead of a E18 on subframe bolts. If you can source a 3/34" inside diameter pipe you can skip a few spteps...I got tired of looking for one...I got each bushing out in less than 15 mins. Note: I was in the middle of a wavetrac install so my exhaust and differential where not in place, You may have to unbolt half shafts...I will update thread in a day or so. Rear bushings: 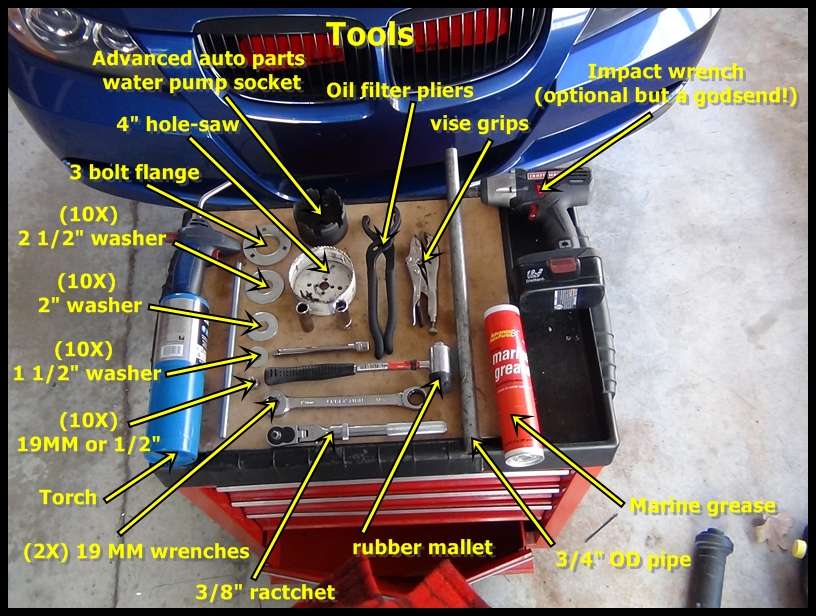 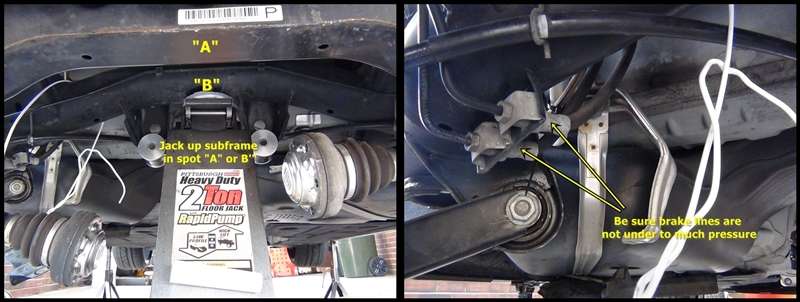 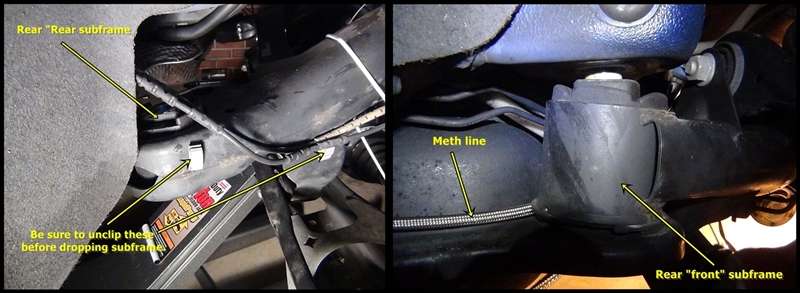  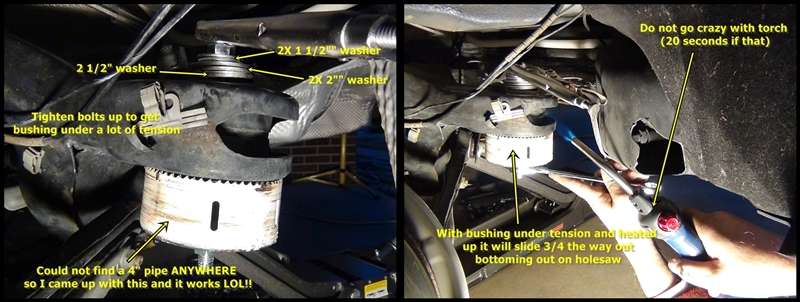  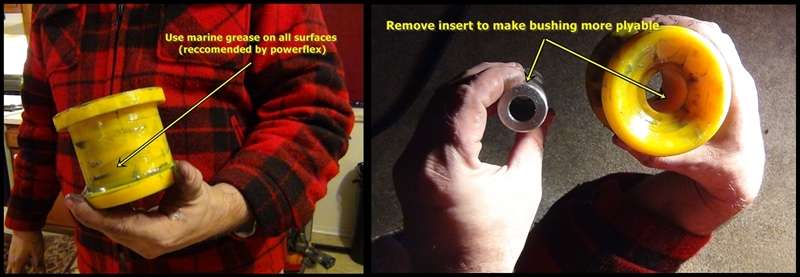 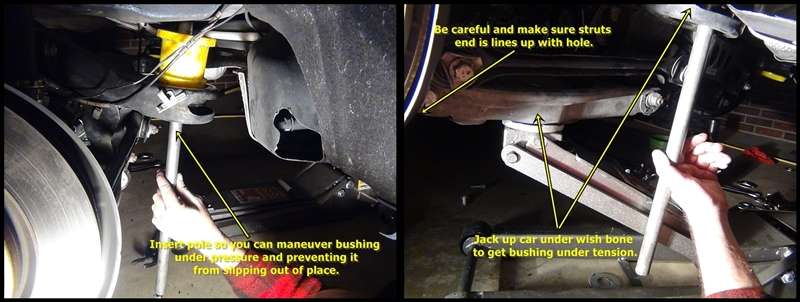 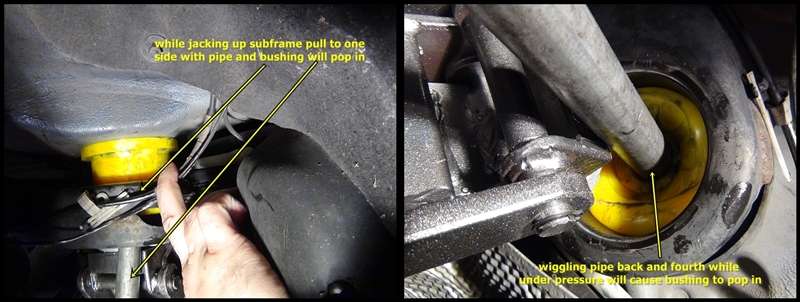  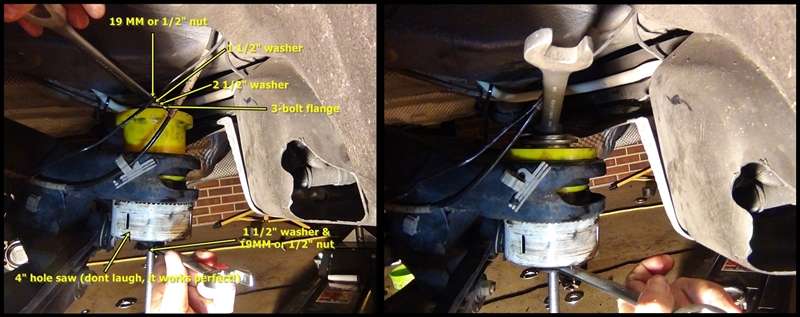 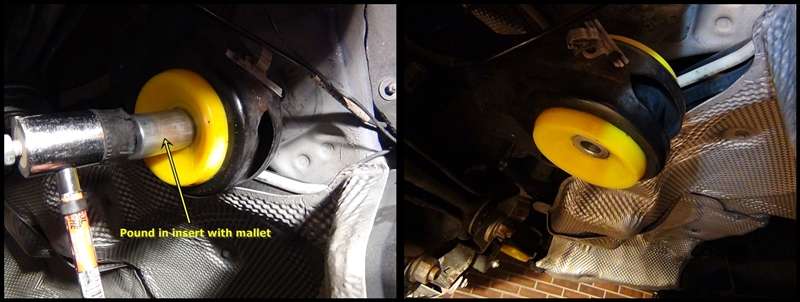 Front bushings: Click this link before beggining for correct orientation (thanks to "SteveAZ" for bring this to my attention) http://www.powerflex.co.uk/i/product_images/5-420fi.pdf 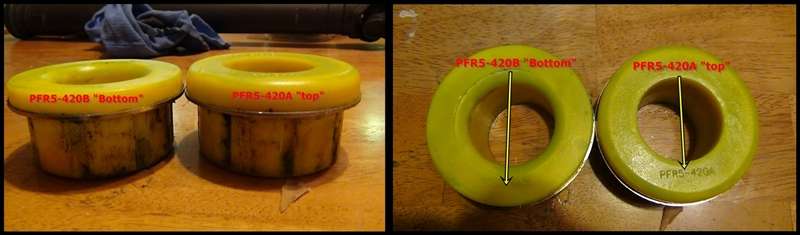 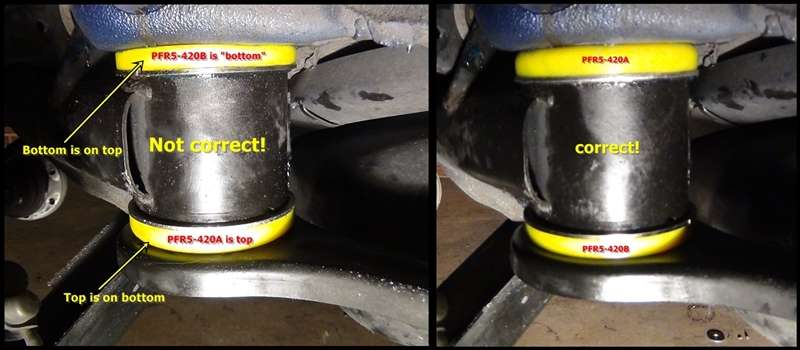 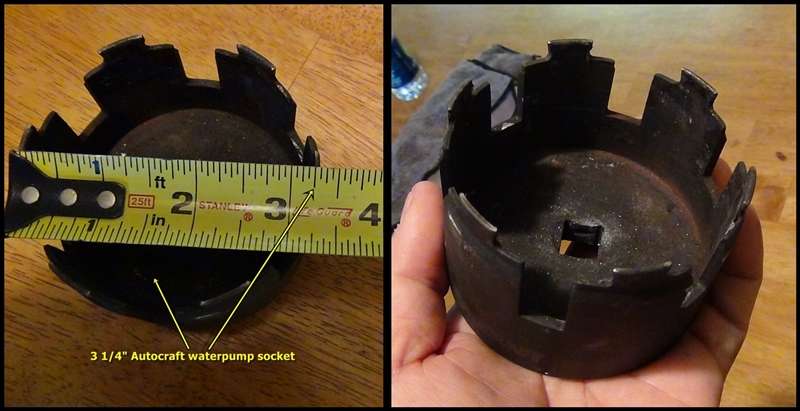 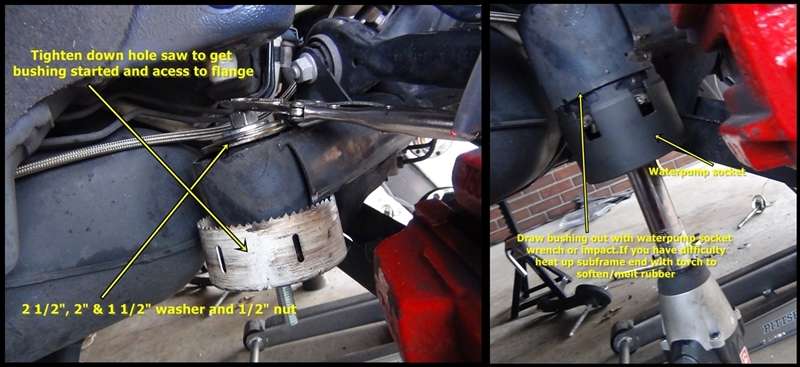 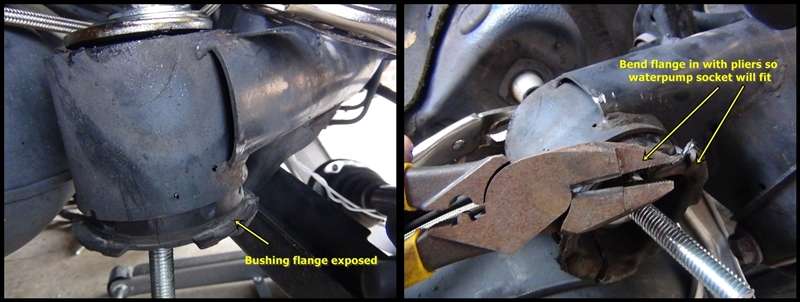 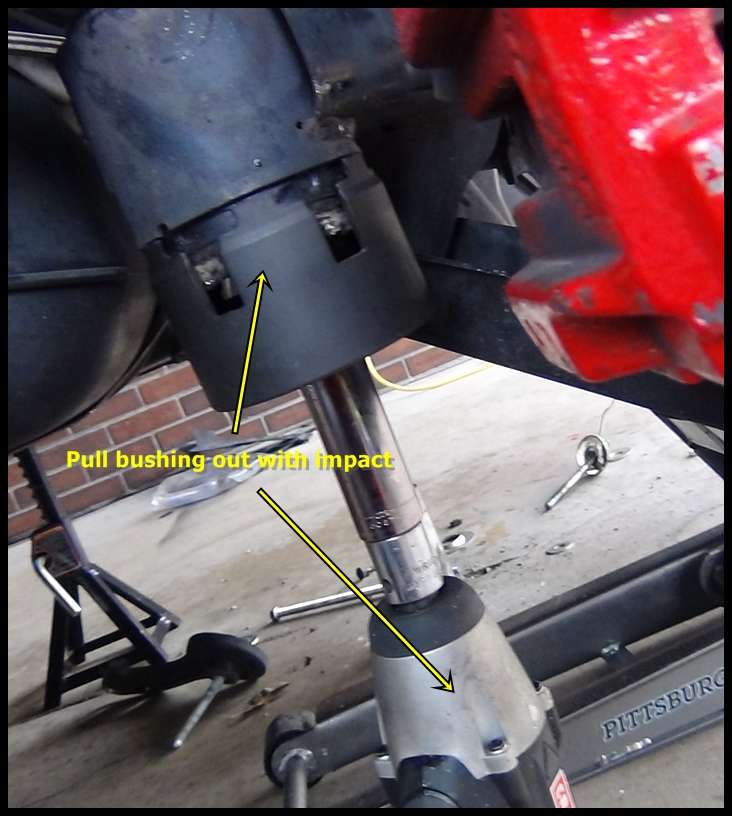 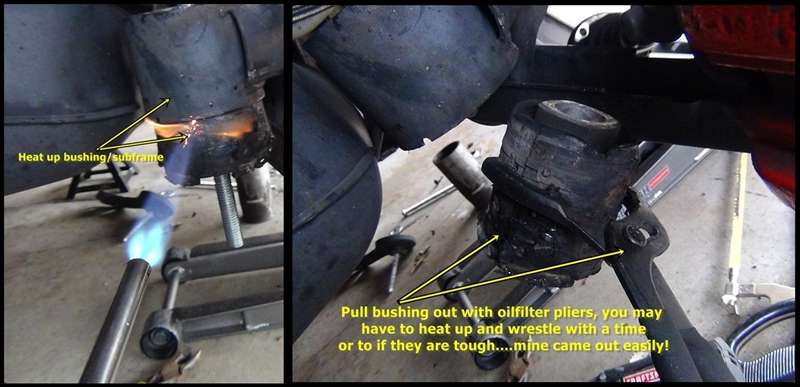 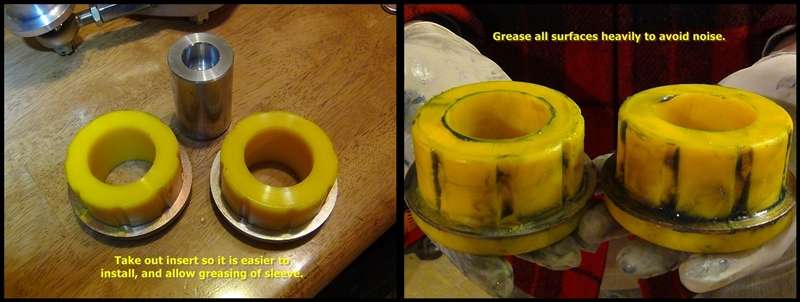 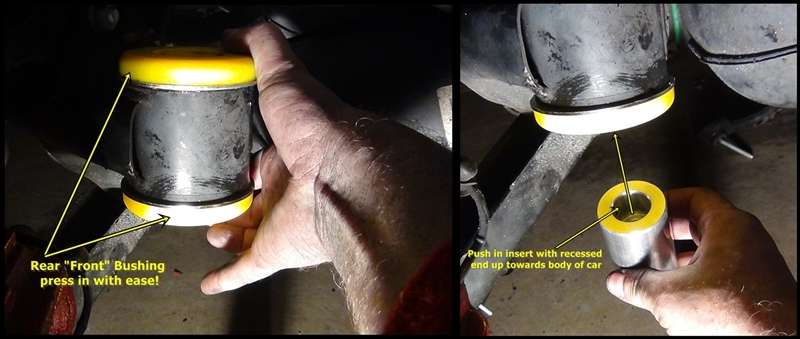 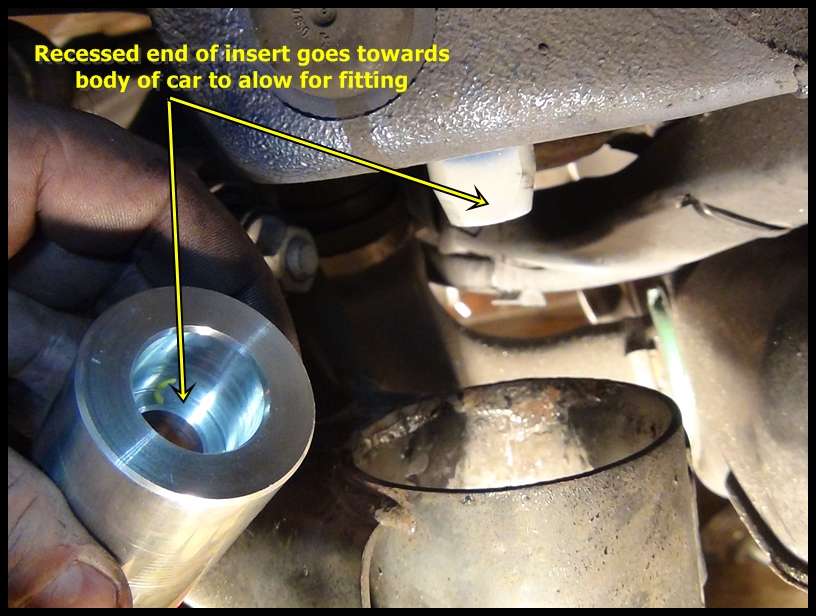 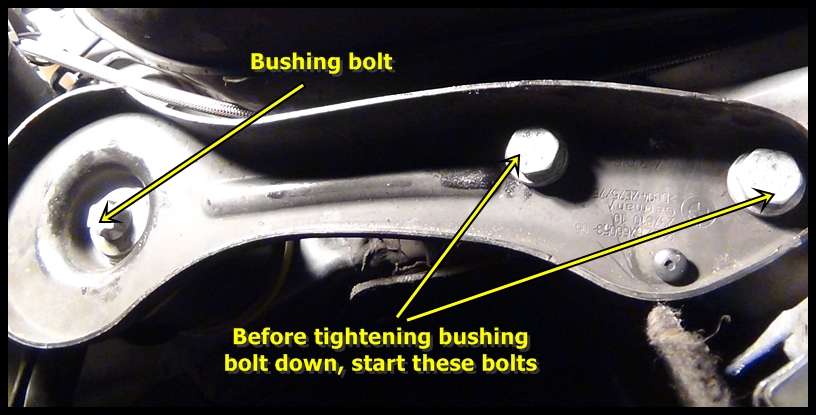 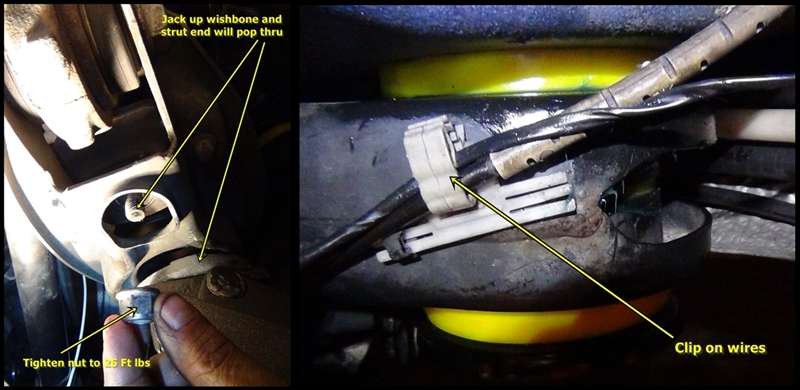 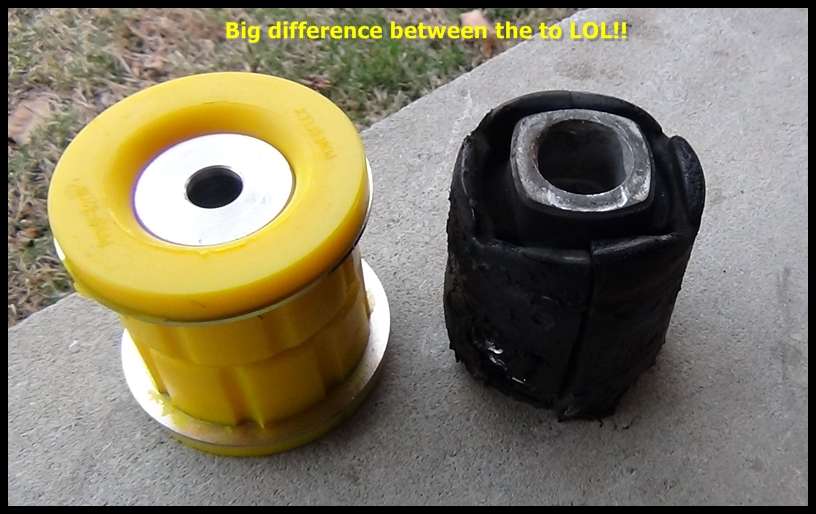  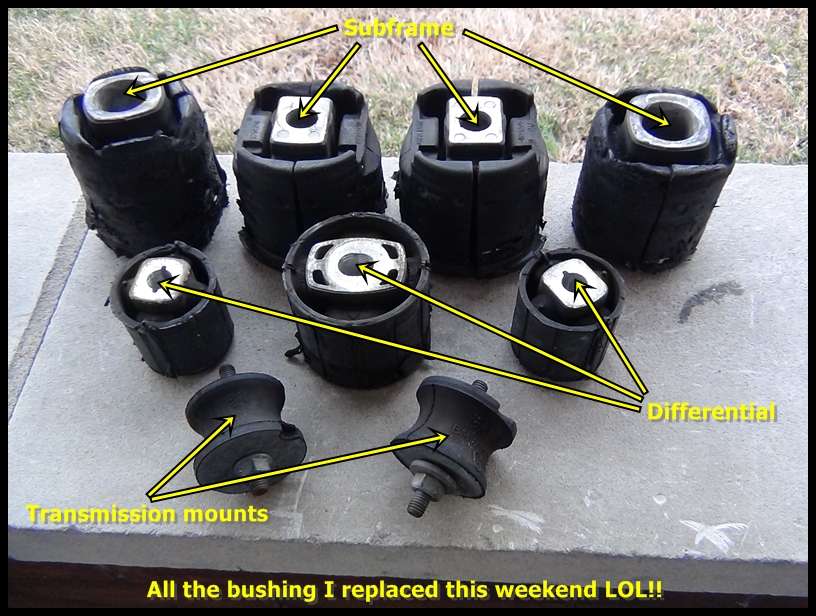 Reference pic of diameter of rear subframe bushing" 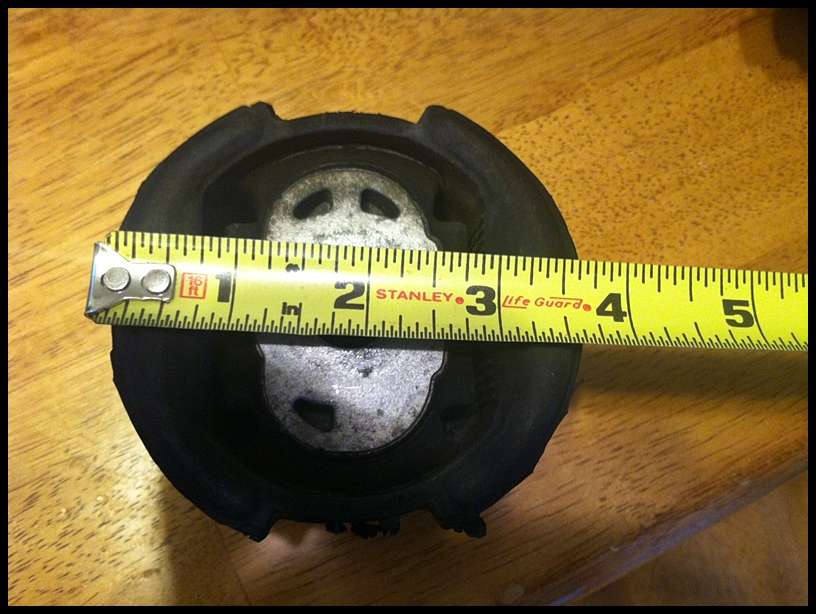
__________________
JB4 G5, Stage 3 LPFP, Stage 2 MOTIV PI, VM 6466 ST, Custom OCC W/ SS lines, ER FMIC, ER CP W/HKS BOV, M3 control arms, M3 guide rods, M3 upper links, M3 front & rear sway-bars, HPA rear toe arms, Wavetrac LSD, HPF Gen 2, DEFIV kit, KW clubsport, Delrin solid SF bushings, stoptech rotors, Rogue Tranny Mounts, 1M bumper, M3 CF hood, M3 fenders, M3 OEM sideskirts, Mtech rear bumper, CSL trunk, MORR VS8.2 rims 245/295
Last edited by robc1976; 03-21-2013 at 06:30 PM.. |
| 02-11-2013, 02:11 PM | #2 |
|
DIYER
614
Rep 5,521
Posts |
added reference pic of diameter of bushing to DIY at end

__________________
JB4 G5, Stage 3 LPFP, Stage 2 MOTIV PI, VM 6466 ST, Custom OCC W/ SS lines, ER FMIC, ER CP W/HKS BOV, M3 control arms, M3 guide rods, M3 upper links, M3 front & rear sway-bars, HPA rear toe arms, Wavetrac LSD, HPF Gen 2, DEFIV kit, KW clubsport, Delrin solid SF bushings, stoptech rotors, Rogue Tranny Mounts, 1M bumper, M3 CF hood, M3 fenders, M3 OEM sideskirts, Mtech rear bumper, CSL trunk, MORR VS8.2 rims 245/295
|
|
Appreciate
0
|
| 02-17-2013, 10:27 PM | #3 |
|
Lieutenant Colonel
 
202
Rep 1,950
Posts
Drives: 335i
Join Date: Apr 2011
Location: FortWorth, Texas
|
you are probably the best thing that happened to this forum. i like posting up DIYs as i go but don't mod my car as rapidly as you
 |
|
Appreciate
0
|
| 02-17-2013, 10:51 PM | #4 | |
|
DIYER
614
Rep 5,521
Posts |
Quote:
__________________
JB4 G5, Stage 3 LPFP, Stage 2 MOTIV PI, VM 6466 ST, Custom OCC W/ SS lines, ER FMIC, ER CP W/HKS BOV, M3 control arms, M3 guide rods, M3 upper links, M3 front & rear sway-bars, HPA rear toe arms, Wavetrac LSD, HPF Gen 2, DEFIV kit, KW clubsport, Delrin solid SF bushings, stoptech rotors, Rogue Tranny Mounts, 1M bumper, M3 CF hood, M3 fenders, M3 OEM sideskirts, Mtech rear bumper, CSL trunk, MORR VS8.2 rims 245/295
|
|
|
Appreciate
0
|
| 03-21-2013, 06:31 PM | #5 |
|
DIYER
614
Rep 5,521
Posts |
Edited first post with size of waterpump socket:
__________________
JB4 G5, Stage 3 LPFP, Stage 2 MOTIV PI, VM 6466 ST, Custom OCC W/ SS lines, ER FMIC, ER CP W/HKS BOV, M3 control arms, M3 guide rods, M3 upper links, M3 front & rear sway-bars, HPA rear toe arms, Wavetrac LSD, HPF Gen 2, DEFIV kit, KW clubsport, Delrin solid SF bushings, stoptech rotors, Rogue Tranny Mounts, 1M bumper, M3 CF hood, M3 fenders, M3 OEM sideskirts, Mtech rear bumper, CSL trunk, MORR VS8.2 rims 245/295
|
|
Appreciate
0
|
| 03-24-2013, 10:40 PM | #6 |
|
driver mod in progress
225
Rep 1,858
Posts
Drives: with both feet
Join Date: Feb 2011
Location: Redondo Beach, CA
|
Excellent work once again. I think this mod may be in my near future. Any feedback on on the feel / handling impact of these over OEM?
Also, how many miles were on your OEM bushings before being replaced? I ask b/c it helps provide context for the subjective handling improvement.
__________________
|
|
Appreciate
0
|
| 03-24-2013, 11:35 PM | #7 | |
|
DIYER
614
Rep 5,521
Posts |
Quote:
__________________
JB4 G5, Stage 3 LPFP, Stage 2 MOTIV PI, VM 6466 ST, Custom OCC W/ SS lines, ER FMIC, ER CP W/HKS BOV, M3 control arms, M3 guide rods, M3 upper links, M3 front & rear sway-bars, HPA rear toe arms, Wavetrac LSD, HPF Gen 2, DEFIV kit, KW clubsport, Delrin solid SF bushings, stoptech rotors, Rogue Tranny Mounts, 1M bumper, M3 CF hood, M3 fenders, M3 OEM sideskirts, Mtech rear bumper, CSL trunk, MORR VS8.2 rims 245/295
|
|
|
Appreciate
0
|
| 03-27-2013, 08:14 PM | #8 | |
|
driver mod in progress
225
Rep 1,858
Posts
Drives: with both feet
Join Date: Feb 2011
Location: Redondo Beach, CA
|
Quote:

__________________
|
|
|
Appreciate
0
|
| 03-24-2014, 03:44 AM | #11 |
|
Registered
4
Rep 3
Posts |
An alternative to removing the smaller front bushings
I just finished this DIY this last weekend. I pretty much exclusively used this page to do it with a few additions to make things a little easier.
I had trouble getting the rear "front" subframe bushings out. The bushings are taller, giving them more grip and the 4" hole saw doesn't have a lot of ground to stand on when extracting. I scratched my head for a while and even tried the water pump socket idea but with the bushing about 1 inch out (from the hole saw) the thing wouldn't budge. So.. I did the only thing I could think of. I stacked a bunch of washers (from the hole saw setup) on top of the bushing up to the metal part of the chassis the bushing bolts into. Then, I started jacking the subframe up at the front lower control arm. The force of the jack pushing up on the subframe and the weight of the car on the washers, the bushing will begin to move. This is when I applied heat using the torch and the bushing slides out like butter. I did have to go through a couple iterations where I had to add washers since the subframe came up and touched the car (max travel). With enough washers the bushing was easy to remove with my fingers or it would just fall off the car. The back ones could probably be removed the same way but getting the big powerflex back bushing is still tricky. Using the floor jack just inside the subframe (as pictured) and a pipe to guide it is really the best way to get it started. You will need the hole saw or something similar to pull the bushing all the way through. I used a 1/2" pipe flange I bought at home depot. Also worked perfectly for the back bushing. To anyone considering this mod, its really not that hard. I just finished it so you can PM me with any questions. The change is actually substantial. I am a bit overwhelmed with how much firmer the rear is. My car had 90,000 miles when I changed out the bushings. The old ones didn't look that bad. They looked about the same as the ones pictured here where about 99% of their damage was from me removing them. Good luck! |
|
Appreciate
1
AndyW667.50 |
| 03-24-2014, 11:20 AM | #12 | |
|
DIYER
614
Rep 5,521
Posts |
Quote:
__________________
JB4 G5, Stage 3 LPFP, Stage 2 MOTIV PI, VM 6466 ST, Custom OCC W/ SS lines, ER FMIC, ER CP W/HKS BOV, M3 control arms, M3 guide rods, M3 upper links, M3 front & rear sway-bars, HPA rear toe arms, Wavetrac LSD, HPF Gen 2, DEFIV kit, KW clubsport, Delrin solid SF bushings, stoptech rotors, Rogue Tranny Mounts, 1M bumper, M3 CF hood, M3 fenders, M3 OEM sideskirts, Mtech rear bumper, CSL trunk, MORR VS8.2 rims 245/295
|
|
|
Appreciate
0
|
| 09-04-2014, 07:39 AM | #13 |
|
Nomore

149
Rep 793
Posts |
Has anyone who has done this mod daily drive their car? My bushings are shot. (120kmiles). I want to change them out to improve handling. Do they create more vibration or any more stiffness?
How about these poly subframe bushings and poly diff bushings? Too much as a combo for a DD? |
|
Appreciate
0
|
| 09-04-2014, 11:32 AM | #14 | |
|
DIYER
614
Rep 5,521
Posts |
Quote:
__________________
JB4 G5, Stage 3 LPFP, Stage 2 MOTIV PI, VM 6466 ST, Custom OCC W/ SS lines, ER FMIC, ER CP W/HKS BOV, M3 control arms, M3 guide rods, M3 upper links, M3 front & rear sway-bars, HPA rear toe arms, Wavetrac LSD, HPF Gen 2, DEFIV kit, KW clubsport, Delrin solid SF bushings, stoptech rotors, Rogue Tranny Mounts, 1M bumper, M3 CF hood, M3 fenders, M3 OEM sideskirts, Mtech rear bumper, CSL trunk, MORR VS8.2 rims 245/295
|
|
|
Appreciate
0
|
| 08-20-2015, 08:28 AM | #18 | |
|
DIYER
614
Rep 5,521
Posts |
Quote:
__________________
JB4 G5, Stage 3 LPFP, Stage 2 MOTIV PI, VM 6466 ST, Custom OCC W/ SS lines, ER FMIC, ER CP W/HKS BOV, M3 control arms, M3 guide rods, M3 upper links, M3 front & rear sway-bars, HPA rear toe arms, Wavetrac LSD, HPF Gen 2, DEFIV kit, KW clubsport, Delrin solid SF bushings, stoptech rotors, Rogue Tranny Mounts, 1M bumper, M3 CF hood, M3 fenders, M3 OEM sideskirts, Mtech rear bumper, CSL trunk, MORR VS8.2 rims 245/295
|
|
|
Appreciate
0
|
| 08-23-2015, 02:29 PM | #20 | |
|
DIYER
614
Rep 5,521
Posts |
Quote:
__________________
JB4 G5, Stage 3 LPFP, Stage 2 MOTIV PI, VM 6466 ST, Custom OCC W/ SS lines, ER FMIC, ER CP W/HKS BOV, M3 control arms, M3 guide rods, M3 upper links, M3 front & rear sway-bars, HPA rear toe arms, Wavetrac LSD, HPF Gen 2, DEFIV kit, KW clubsport, Delrin solid SF bushings, stoptech rotors, Rogue Tranny Mounts, 1M bumper, M3 CF hood, M3 fenders, M3 OEM sideskirts, Mtech rear bumper, CSL trunk, MORR VS8.2 rims 245/295
|
|
|
Appreciate
0
|
 |
| Bookmarks |
|
|