

|
|
|
|
 |

|
 |
BMW Garage | BMW Meets | Register | Today's Posts | Search |
 |

|
BMW 3-Series (E90 E92) Forum
>
Help! Stripped aluminum head threads for mickey mouse flange / coolant
|
 |
| 04-16-2021, 06:39 PM | #1 |
|
New Member
7
Rep 7
Posts |
Help! Stripped aluminum head threads for mickey mouse flange / coolant
Hi all,
so I made a stupid mistake rushing to get a job done. I didn't have the aluminum flange pressed all the way into the head when I started to thread the bolts in. I chewed up the first few threads before I knew something wasn't right. I didn't go all the way in, so only the first 3 or so turns are chewed up. How can I salvage this? I know helicoil is a viable solution, but I really don't want to drill the holes bigger, and what if I get the angle wrong? Since it is only the first 3 or 4 turns that are chewed up, can I drill those out and hope that the bolt will grab the rest of the way? The bolt is M6x23. Left hole is worse than right...went a little deeper. Right one is probably only 2 or 3 turns. EDIT: Problem solved. Thread chasers worked well to clean up the bad threads. See post #3 and #15. 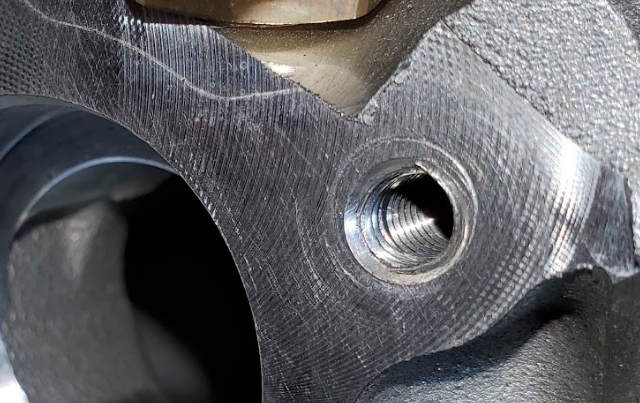 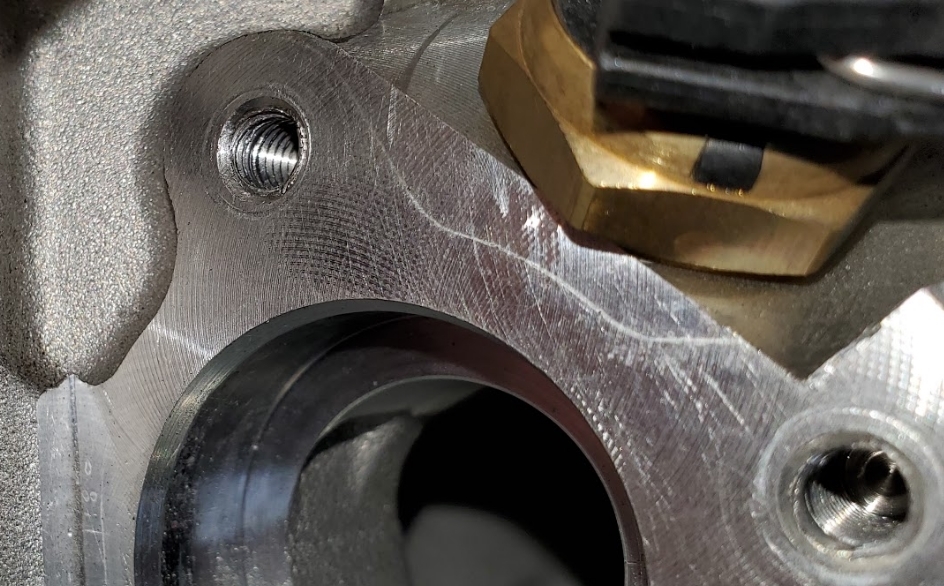 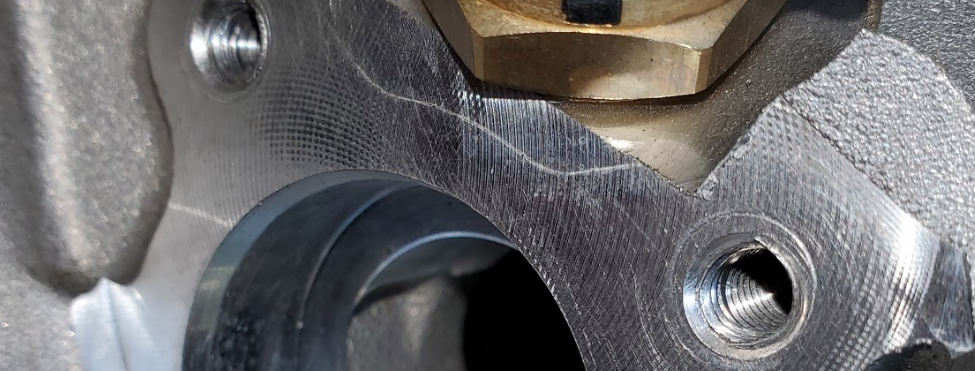 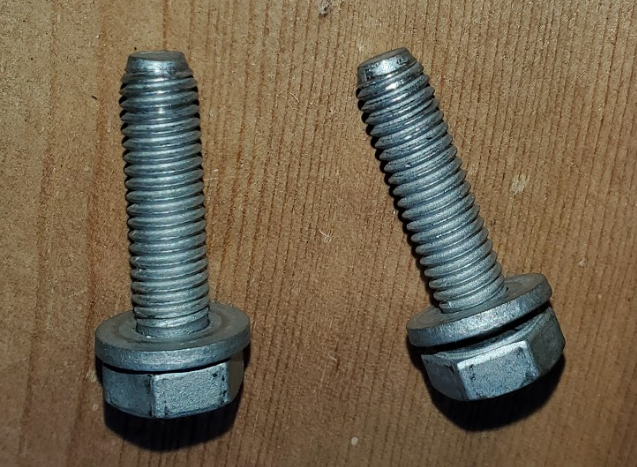 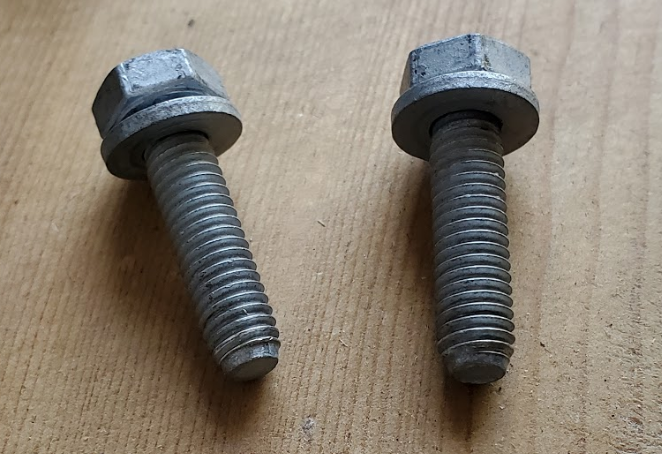 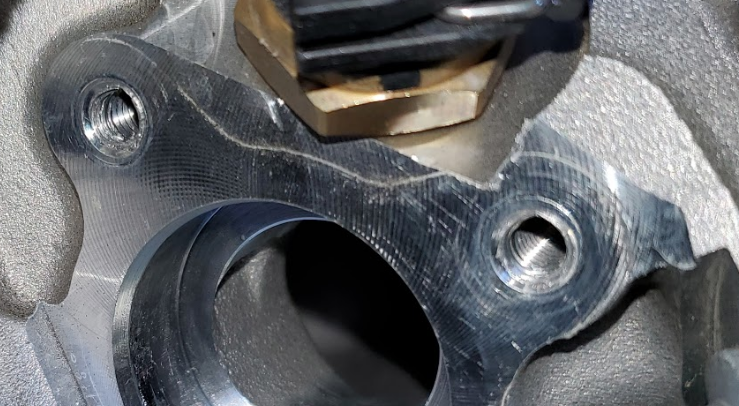 Last edited by e92xy; 04-17-2021 at 09:53 PM.. |
| 04-16-2021, 07:16 PM | #2 |
|
Is it the shoes!?
3884
Rep 5,112
Posts |
I would at least try a thread chaser to see if it can salvage and reform any threads that are still left. The bolt just needs to hold, and not very tightly either, so an imperfect thread isn't the end of the world. If the first few threads are messed up but the inner threads are fine, you don't need to worry too much about it.
Do not use a tap or you will cut off too much thread. Use a cutting oil or some other lubricant (3-in-1 will work just fine). If the chaser is really binding hard, stop and do not force it. I don't know what the next best recommendation is after that, but that's where I would start. Last edited by Welcome to NBA Jam; 04-16-2021 at 08:03 PM.. |
|
Appreciate
3
|
| 04-16-2021, 07:26 PM | #3 | |
|
New Member
7
Rep 7
Posts |
Quote:
Next best option is either going to be tap an M7 (stock bolt is M6), or helicoil in an M6. I have never helicoiled before so might want to buy an aluminum block and practice first. Might try this: https://www.amazon.com/Bolt-Thread-C...ct_top?ie=UTF8 |
|
|
Appreciate
1
Buug95917400.50 |
| 04-16-2021, 07:38 PM | #4 | |
|
New Member
43
Rep 23
Posts |
Quote:
I do not think you need to drill them out just yet. You should try running a tap through them. Your local Home Depot of hardware store may have what you need Here is one on EBAY, just am not sure if its the correct thread for you. https://www.ebay.com/itm/14365123810...b74faad4ec6cd3 When you go to Home Depot or hardware store, bring one bolt with you so you can compare the threads. And when holding the Tap holder (looks like a head of a drill with a T bar on it) make sure you hold at a right angel to the head and put keep plenty of oil on it was you work it in n back out. Put a rag or something in the water port so you don't get the metal filings into the head. You may have to buy two bolts that are a 1/4 inch longer if you do not feel you have enough threads to grip with the original bolts. When I replaced my mickey mouse flange I ran the bolts in finger tight to make sure they were aligned correctly and not tilted. Then used a 1/4 drive ratchet and very little effort. I forgot the torque setting on these bolts, but it was VERY LOW, as you are going into soft aluminum.
__________________
2014 Mercedes C300
2011 BMW 335ix 2004 Mercedes SL 600 V12 twin turbo Last edited by georgewny; 04-16-2021 at 07:44 PM.. |
|
|
Appreciate
0
|
| 04-16-2021, 09:06 PM | #5 |
|
Neo-Luddite

2614
Rep 1,401
Posts
Drives: '06 325i, 330i 6MT RWD Sport
Join Date: Nov 2020
Location: NJ
|
You can make a DIY thread chase by cutting slits with a cutoff wheel through the threads into the shank lengthwise of a 10.9 grade bolt, that's plenty hard enough to clean up this soft block and won't enlarge the hole any like a tap might.
|
|
Appreciate
1
feuer4275.50 |
| 04-16-2021, 09:12 PM | #6 |
|
New Member
7
Rep 7
Posts |
I ordered those ones off Amazon, they will be here tomorrow. I don't have a cutoff wheel but maybe time to grab one.
Won't be able to sleep tonight on this one. I really hope the thread chaser will work. It is the very first few threads that are damaged. In the YouTube video, this is exactly what he repaired, but I am always a skeptic. Not sure why there are no other thread chasers to be found anywhere....looks like it is not a common thing. Also I cannot believe a search is not turning up anyone else who ran into this. I think I only found one person and I think he went with a helicoil, but not sure. Those threads got damaged very easily, I barely did anything. Damn. Really hoping the thread chaser will work... |
|
Appreciate
0
|
| 04-16-2021, 09:16 PM | #7 | |
|
Neo-Luddite
2614
Rep 1,401
Posts
Drives: '06 325i, 330i 6MT RWD Sport
Join Date: Nov 2020
Location: NJ
|
Quote:
|
|
|
Appreciate
1
Efthreeoh17309.00 |
| 04-16-2021, 09:49 PM | #8 | |
|
Is it the shoes!?
3884
Rep 5,112
Posts |
Quote:
I couldn't thread the bolt by hand. I bought a new bolt and a set of thread chasers with the right size. The thread chaser cleaned it right up after working it a few times. Threads by hand now. The next week I picked up a set of quality taps and dies as well. We all hit a point where we need to start building our "oh shit" kit. I feel much better prepared with chasers, taps, dies, easy-outs, and left-hand bits. |
|
|
Appreciate
0
|
| 04-16-2021, 10:11 PM | #9 |
|
New Member
7
Rep 7
Posts |
Yea I've considering buying a block of aluminum, taps/dies, and helicoils just to mess around with for practice before attempting this fix.
Thread chaser will be delivered tomorrow by 10pm lol. Don't think any store has one local, they only have regular taps and dies which I think is not right for this application. The thing is the bolts want to go in sideways, so won't the thread chaser also go in sideways? Do I kind of have to force it in straight? I'll be nervous to do too much forcing. |
|
Appreciate
0
|
| 04-16-2021, 10:20 PM | #10 | |
|
Neo-Luddite
2614
Rep 1,401
Posts
Drives: '06 325i, 330i 6MT RWD Sport
Join Date: Nov 2020
Location: NJ
|
Quote:
|
|
|
Appreciate
1
E93Dude369.00 |
| 04-17-2021, 08:12 AM | #11 |
|
Is it the shoes!?
3884
Rep 5,112
Posts |
One helpful tip to prevent crossthreading: when trying to find the threads of any bolt hole, try to thread it in reverse. You'll hear and feel a click, and the bolt will recess ever so slightly. That click is the threads lining up. Do this a few times to confirm. After you hear the click, start threading it normally. Works every time.
|
| 04-17-2021, 09:03 AM | #12 | |
|
Brigadier General
 2440
Rep 4,330
Posts |
Quote:
It's actually in the Hp service manual. |
|
|
Appreciate
0
|
| 04-17-2021, 10:38 AM | #13 |
|
General
17309
Rep 18,733
Posts |
So this is not as simple as it seems. Using a thru-hole tap will work fine vs. a thread chasing M6 tap (hard to find at a store) or a bottom-hole tap designed to thread closed hole (i.e. has a bottom and not a thru-hole opening). But you have a slight issue, that with no experience tapping holes, makes it difficult to get this done correctly; you only have one shot. When you start cutting the top of the threads in the hole, there is a chance you'll not index the new threads with the existing threads. You have to be absolutely square with the surface of the cylinder head. The thru-hole tap is tapered and dull which allows to get into the good threads without cutting them and allows room to get the tap straight to the existing threads.
Tapping threads takes experience, which means you need to learn how it feels to cut threads; watching a video really doesn't help much, it's a tactile sensation. You are trying to restore partially damaged threads, which means you are cutting into a hole that already has the material removed from the original machining process of the cylinderhead. The trick is to go slowly and be patient and observe the cutting action. Chasing the threads should not remove much material. If your re-threading action is producing a lot of "chips" the (i.e. cut material) then you are not chasing the threads straight and are cutting a new set of threads in the hole. That is not good as there is not enough material in the hole to support a different angle of new threads because the original machining removed all of the available material in the hole to form the original threads. The flutes in the tap are there to allow room for the removed material (i.e. chips) to get out of the hole. The removed material has to move out of the way as the tap cuts. Cutting new threads into a blank hole requires the technique of occasionally backing the tap out to pull the chips with it. You are not doing that, so you do not need to use the backing-out technique. Just gently (lightly) push (place) the tap into the hole and let the tapered starting section of the tap get centered and true to the undamaged threads already in the hole. The tapered section is included on the tap body to allow the tap to naturally align squarely with the existing threads so when you do use the backing-out technique for cutting fresh threads in a blank hole, you don't start re-cutting the just-made threads as to reintroduce the tap to the hole. So your act of re-establishing the threads in the top, damaged section is essentially the second step of re-introducing the tap into the new threads after you've backed it out to remove the chips. Do not force the tap, let it do the work and thread into the material. Again, TAKE YOUR TIME. Once the tap cuts into the head a few millimeters through the damaged section it should join the undamaged threads and smoothly turn into the head farther with little to no resistance. If this is not the case then you are not re-cutting the damaged threads properly. If it gets hard to turn the tap, then you are not re-cutting the threads properly. Re-cutting the damaged threads should not require much effort (i.e. torque on the tap) because only a few courses of threads are damaged and not that badly. Hope this helps.
__________________
A manual transmission can be set to "comfort", "sport", and "track" modes simply by the technique and speed at which you shift it; it doesn't need "modes", modes are for manumatics that try to behave like a real 3-pedal manual transmission. If you can money-shift it, it's a manual transmission. "Yeah, but NO ONE puts an automatic trans shift knob on a manual transmission."
|
|
Appreciate
0
|
| 04-17-2021, 10:54 AM | #14 |
|
New Member
7
Rep 7
Posts |
Thanks. I was not planning to use a tap right away. Planning to try the thread chaser later today. I'm really hoping that will work. The YouTube video I posted above gives me hope since he demonstrated exactly my problem (first few threads going in sideways).
If it does come to using a tap, I was wondering how the new threads would match up to the existing threads. I have cut threads many years ago in high school but yes the feeling is lost. Which is why I would probably buy a block of aluminum to practice on before cutting my cylinder head. Worst case, don't you think I could drill out the first few damaged threads, leaving the deeper good threads? Would need to find a 6.5mm diameter bit. 6 might work. Worst Worst case, helicoil. |
|
Appreciate
0
|
| 04-17-2021, 09:47 PM | #15 |
|
New Member
7
Rep 7
Posts |
Happy to report that the thread chasers I posted above worked wonderfully. Hardest part was getting them started in straight. Had to use a little force and cut through the bad threads while ensuring it was going in straight. I used a plastic razor blade as a square tool to check that the bolt was straight with the cylinder head after each couple of turns. Two turns in, 1 turn out sort of thing to work the threads back into shape. When I was halfway through I even placed the mickey mouse flange back on to help me ensure everything looked square. That cylinder head surface is at an awkward angle and is easy to get wrong.
Also I used white lithium grease on the tip and in the groove of the thread chaser to help glide it in and remove the aluminum cuts. I cleaned the grease and re-applied after each couple of turns. Brake clean, a plastic pick, and compressed air to clean out the bore and threads every so often. The key is to feel constant torque after you break through the bad threads. If the torque keeps increasing, I think it would be cutting bad threads again. If anyone finds themselves in this unfortunate position, I hope this thread will help them. Surprised I was not able to find much out there of people stripping these, it was like butter for me. |
|
Appreciate
3
|
 |
| Bookmarks |
|
|


