

|
|
|
|
 |
|
 |
BMW Garage | BMW Meets | Register | Today's Posts | Search |
 |

|
BMW 3-Series (E90 E92) Forum
>
What Can I Do for You?
|
 |
| 02-03-2016, 03:36 AM | #45 |
|
Major Private First Class


449
Rep 1,327
Posts
Drives: 2010 E90 335i M Sport
Join Date: Mar 2014
Location: US, NA, Earth, Milky Way Galaxy
|
Hey Zach. I just compounded my car using ultimate compound and I noticed that in some areas (like the roof and the trunk), it left a haze behind that I can't seem to rub out. I even hit it with M205 polish and it still didn't take it out! I was using an orange foam pad and Porter cable DA.
Any suggestions on how to remove these spots? Clay bar it maybe? I've tried polish to no avail. Re-compound?
__________________
2008 E92 335i 6MT: FBO + MMP Silicone Inlets | Stage 1 LPFP | 335is clutch + MFactory SMFW | Custom BuraQ + MHD tune | 3.5Bar N20 sensor [SOLD]
2010 E90 335i M-Sport AT: 5" Stepped FMIC, Stage 2 LPFP - MHD V7 E60 Tune running 100% E85 - VRSF DPs |
|
Appreciate
0
|
| 02-03-2016, 08:53 AM | #46 | |
|
360
Rep 5,052
Posts |
Quote:
Here is an example of some crazy defects in jet black paint.... 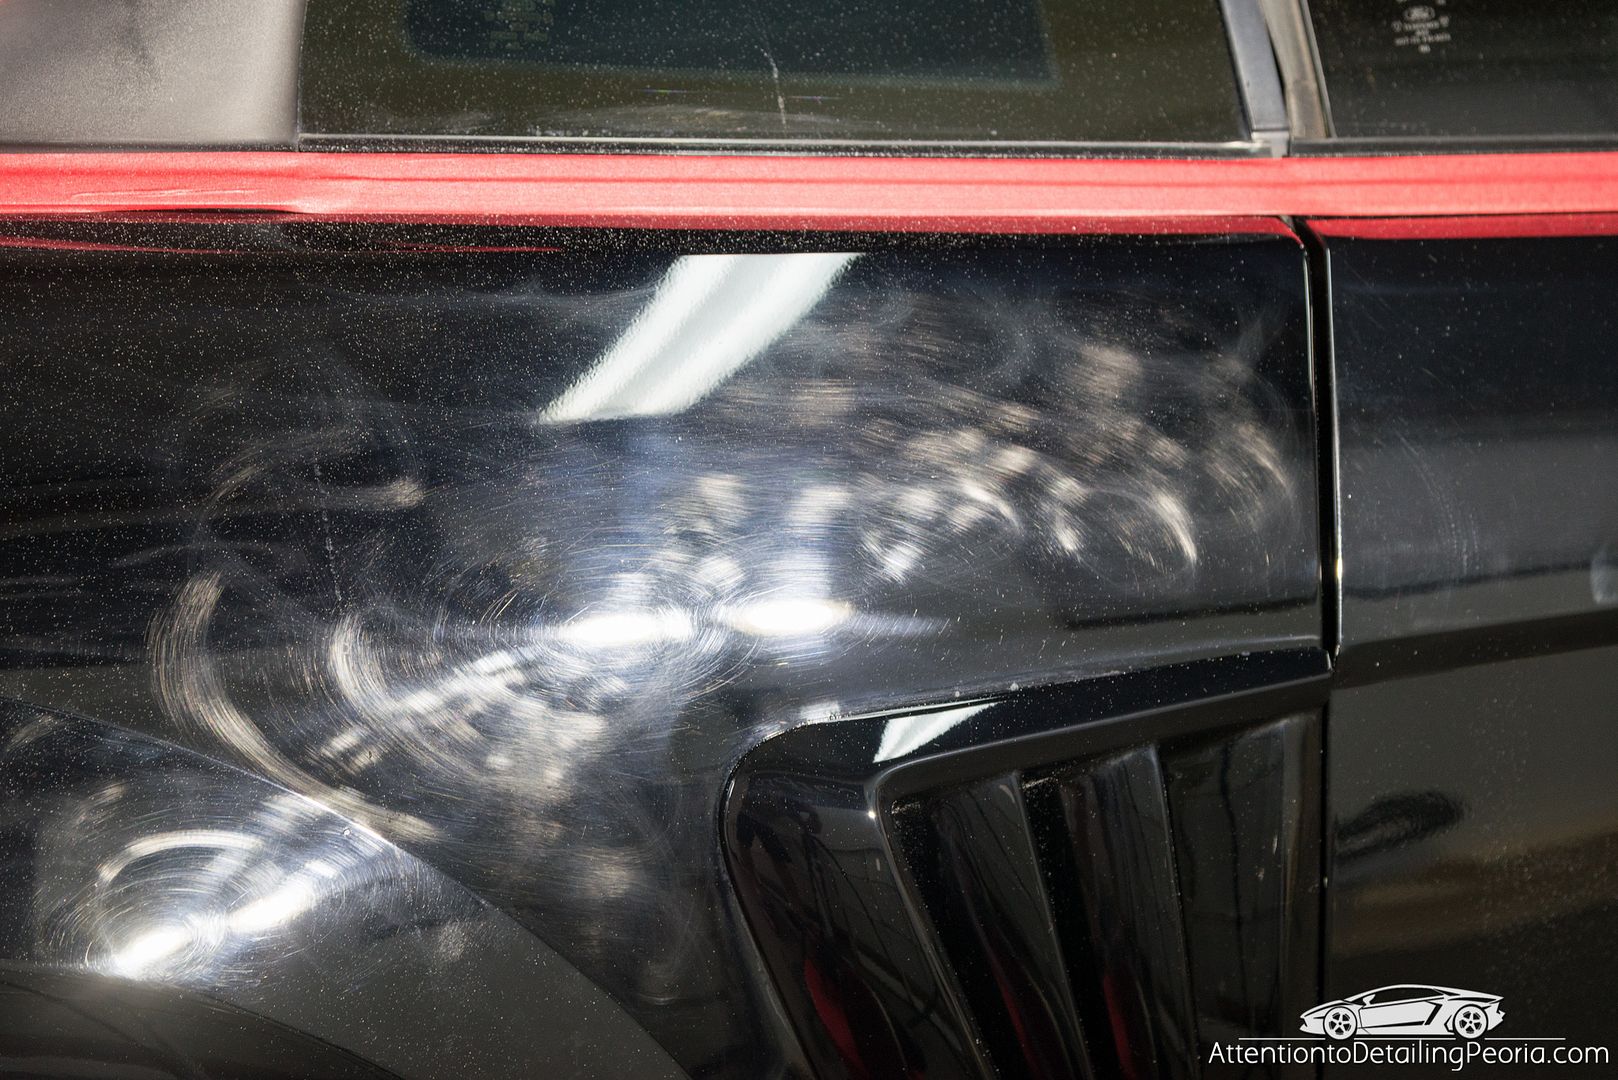 A heavy cutting process was needed to remove these defects, however it left a LOT of marring. No big deal, we know how to fix it... 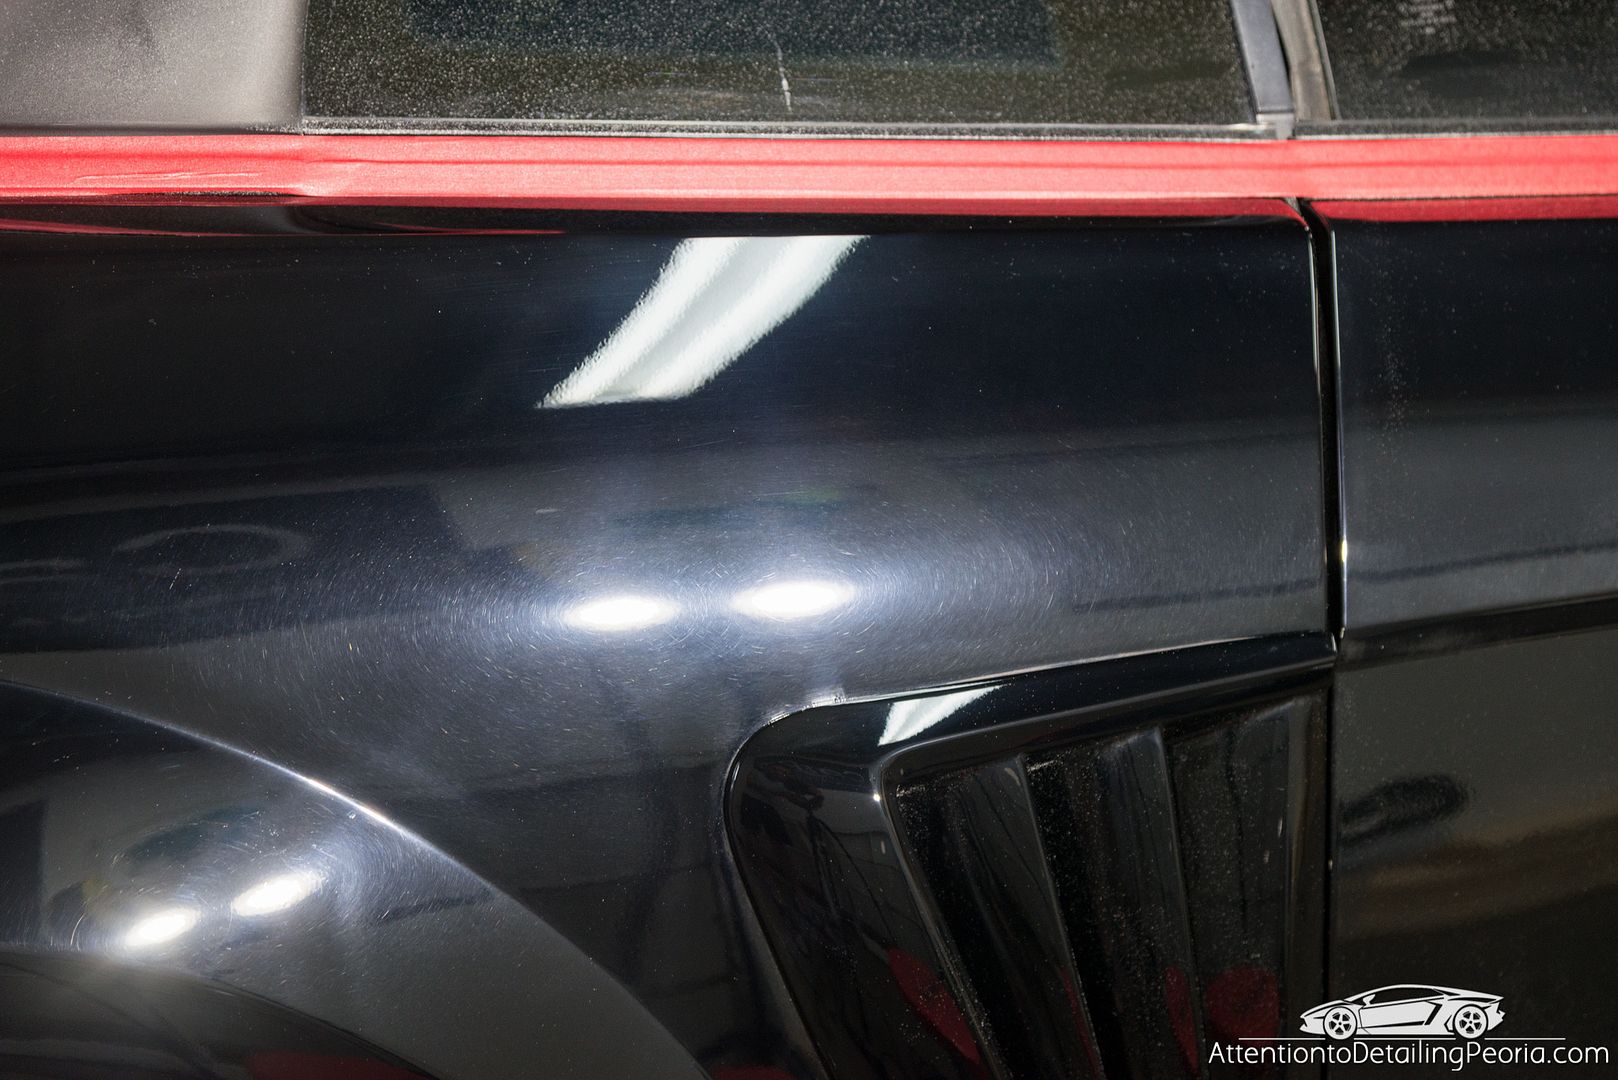 An intermediate polish and pad were used to refine the surface and remove the majority of marring, though you will notice the paint is still not perfectly clear.... 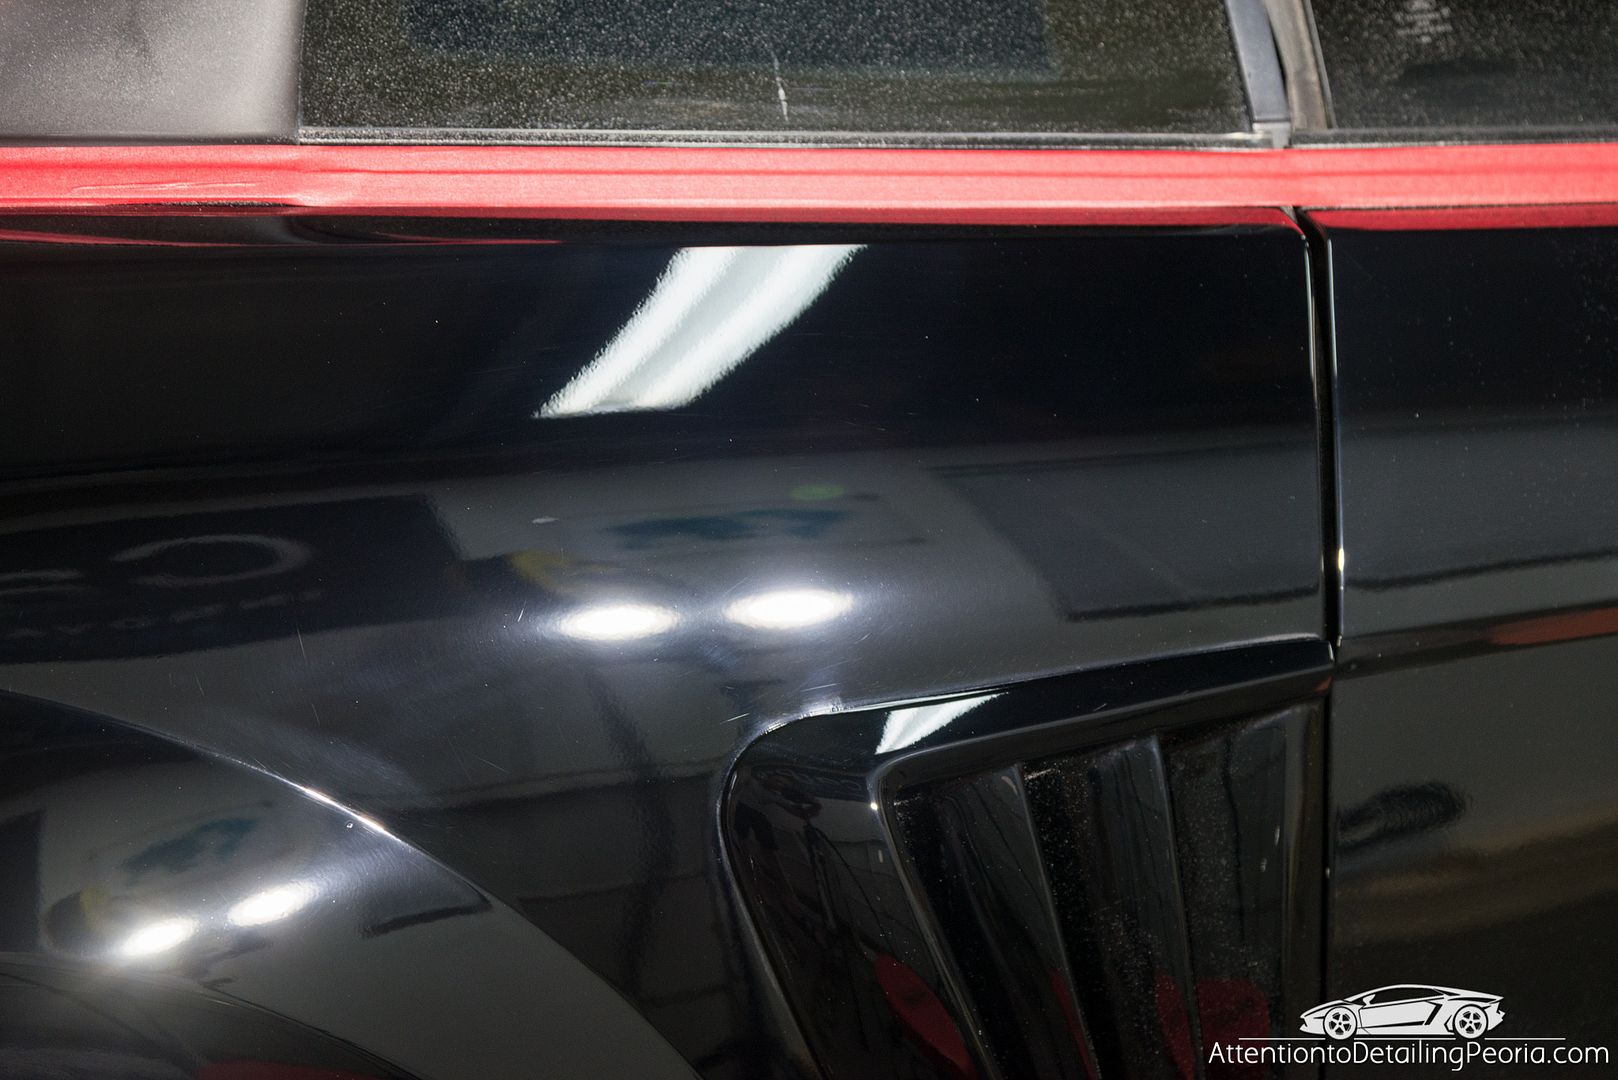 One final polishing pass cleaned up the remaining haze. 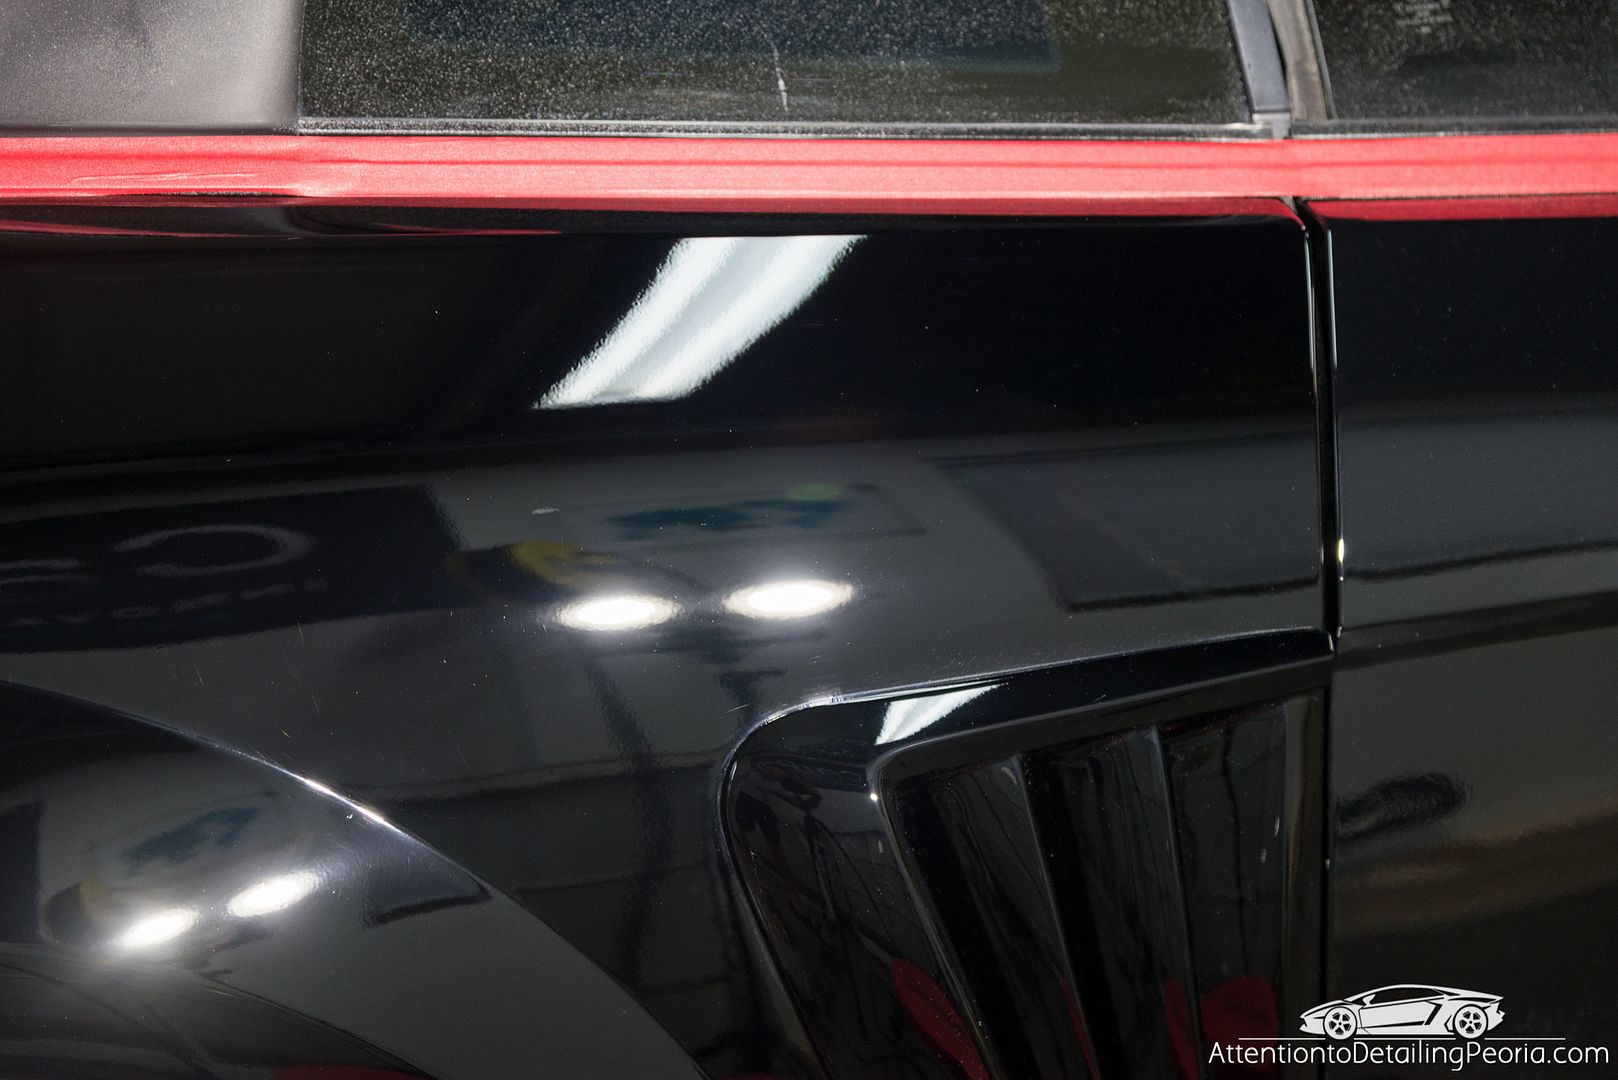 So, if your paint shows signs of micromarring, it is not uncommon, and actually expected after compounding in many cases. You will need to determine the appropriate polishing process to refine the finish and remove the haze. - What color is your car? (jet black? metallic black?) - What exactly have you tried so far? (just M205 on an orange pad?) - Tell me about your technique. (did you prime your pad, how many passes were you making, what was your machine speed, how much pressure were you using, how fast were you moving) - Pictures are worth 1000 words... if you have any photos that would be great! Zach McGovern Detailed Image Ask-A-Pro Blog Author www.AttentiontoDetailingPeoria.com |
|
|
Appreciate
0
|
| 02-03-2016, 11:52 AM | #47 | |
|
Major Private First Class
449
Rep 1,327
Posts
Drives: 2010 E90 335i M Sport
Join Date: Mar 2014
Location: US, NA, Earth, Milky Way Galaxy
|
Quote:
-My car is jet black. -I only have M205 as my polish but mulitple pads (blue, orange, black, yellow) -I primed my pad spreading the compound around with my hand each time (probably overused the pad considering it was used for half of the car). I used speed 5-6 on a Porter Cable DA. Pressed pretty hard where the wheel would stop spinning in some instances. Given that it's the roof, I couldn't apply as much pressure as say the trunk but it was still a good amount of pressure. -I'm going to take a picture right now..brb
__________________
2008 E92 335i 6MT: FBO + MMP Silicone Inlets | Stage 1 LPFP | 335is clutch + MFactory SMFW | Custom BuraQ + MHD tune | 3.5Bar N20 sensor [SOLD]
2010 E90 335i M-Sport AT: 5" Stepped FMIC, Stage 2 LPFP - MHD V7 E60 Tune running 100% E85 - VRSF DPs |
|
|
Appreciate
0
|
| 02-03-2016, 12:34 PM | #48 | |
|
360
Rep 5,052
Posts |
Quote:
When you are polishing to refine the paint, you want to go easier on the paint... especially jet black paint that will show any minor imperfection. - Grab a clean polishing pad (white if you have one, otherwise use a softer black pad) - Apply 3 pea sized dots of M205 (do not prime the pad) - Use moderate downward pressure, not light, but not heavy... definitely not enough to stop the pad from spinning as that is never good technique - Use slow arm speed - Use a machine speed of 4 - Make 3-4 passes over a 2'x2' area - Inspect your results Let me know how it goes. Zach McGovern Detailed Image Ask-A-Pro Blog Author www.AttentiontoDetailingPeoria.com |
|
|
Appreciate
0
|
| 02-03-2016, 03:20 PM | #49 | |
|
Major Private First Class
449
Rep 1,327
Posts
Drives: 2010 E90 335i M Sport
Join Date: Mar 2014
Location: US, NA, Earth, Milky Way Galaxy
|
Quote:
  Car before:  Car after: 
__________________
2008 E92 335i 6MT: FBO + MMP Silicone Inlets | Stage 1 LPFP | 335is clutch + MFactory SMFW | Custom BuraQ + MHD tune | 3.5Bar N20 sensor [SOLD]
2010 E90 335i M-Sport AT: 5" Stepped FMIC, Stage 2 LPFP - MHD V7 E60 Tune running 100% E85 - VRSF DPs |
|
|
Appreciate
0
|
| 02-05-2016, 08:21 PM | #50 |
|
First Lieutenant
 51
Rep 308
Posts
Drives: 2007 328i
Join Date: Dec 2014
Location: Chicago
|
Thanks zach for the scratch tips...
So I bought this set up from a local. I want to do the wife's car but I don't have a pad cleaner. What can I do to clean them till I can get something specific?  |
|
Appreciate
0
|
| 02-05-2016, 09:01 PM | #51 |
|
Major Private First Class
449
Rep 1,327
Posts
Drives: 2010 E90 335i M Sport
Join Date: Mar 2014
Location: US, NA, Earth, Milky Way Galaxy
|
I still couldn't get rid of these compound marks:
 
__________________
2008 E92 335i 6MT: FBO + MMP Silicone Inlets | Stage 1 LPFP | 335is clutch + MFactory SMFW | Custom BuraQ + MHD tune | 3.5Bar N20 sensor [SOLD]
2010 E90 335i M-Sport AT: 5" Stepped FMIC, Stage 2 LPFP - MHD V7 E60 Tune running 100% E85 - VRSF DPs |
|
Appreciate
0
|
| 02-05-2016, 11:43 PM | #52 |
|
Major Private First Class
449
Rep 1,327
Posts
Drives: 2010 E90 335i M Sport
Join Date: Mar 2014
Location: US, NA, Earth, Milky Way Galaxy
|
Before:
 During:  After:   Yay! I'm getting a hang of it.
__________________
2008 E92 335i 6MT: FBO + MMP Silicone Inlets | Stage 1 LPFP | 335is clutch + MFactory SMFW | Custom BuraQ + MHD tune | 3.5Bar N20 sensor [SOLD]
2010 E90 335i M-Sport AT: 5" Stepped FMIC, Stage 2 LPFP - MHD V7 E60 Tune running 100% E85 - VRSF DPs |
|
Appreciate
0
|
| 02-07-2016, 02:36 PM | #53 | |
|
360
Rep 5,052
Posts |
Quote:
Pad Cleaning During and After Polishing by Ivan Rajic Zach McGovern Detailed Image Ask-A-Pro Blog Author www.AttentiontoDetailingPeoria.com |
|
|
Appreciate
0
|
| 02-07-2016, 02:37 PM | #54 | |
|
360
Rep 5,052
Posts |
Quote:
Zach McGovern Detailed Image Ask-A-Pro Blog Author www.AttentiontoDetailingPeoria.com |
|
|
Appreciate
0
|
| 02-08-2016, 04:51 PM | #55 |
|
Captain

232
Rep 723
Posts |
Hi Zach,
I am trying to remove some swirl marks from my car (Please see the attached examples) I just bought the following from Chemical Guys 1) CHEMICAL GUYS BUF_209 - PORTER CABLE 7424XP COMPLETE DETAILING KIT http://www.chemicalguys.com/Porter_C..._p/buf_209.htm 2) V LINE POLISH & COMPOUND SAMPLE KIT (4 OZ) V32, V34, V36, V38 http://www.chemicalguys.com/V_Line_P...ap_vkit_04.htm I also have meguiars Ultimate Compound, Swirl X, and Carnuba Wax. What would the best combination of pads/polish to restore the finish? |
|
Appreciate
0
|
| 02-09-2016, 07:41 AM | #56 | |
|
360
Rep 5,052
Posts |
Quote:
Unfortunately there is no guaranteed product/pad combo that will work all of the time, every time, so I will refrain from telling you exactly what to try..... but I can coach you on how to determine exactly what you need to do. Every vehicle is unique when it comes to paint correction. The severity of defects and way the paint responds to correction can vary from vehicle to vehicle, even if they are the same year, make, model, and color... so we must approach each case like a new experiment. A "test spot" is a very important part of the paint correction process. It would be a shame for you to randomly select a 1 or 2 step process, work your way around the vehicle, then inspect your results only to find what you were doing was not producing the results you desired, right? So to avoid this, we perform a test spot or series of test spots on the vehicle to help determine and validate your process before you begin working on the entire car. (note: you should also be inspecting your results as you are working to ensure you're achieving uniform defect removal throughout the entire vehicle) A test spot is usually performed on the hood or trunk of the vehicle, as they are flat surfaces that are easy to work on... but if you have a particular area that you want to use, go for it. Simply tape off a section, choose a product/pad to try, and then inspect your results afterwards. Make changes as needed to either your product choice, pad choice, technique, or some combination of the 3 variables until you have achieved the desired results you are after. Please read these articles for more info! What is a “Test Spot” and why is it important? by Chad Raskovich Analyzing Your Test Spot by Zach McGovern Paint Correction: Pairing Products and Pads by Zach McGovern Let me know if you've got any other questions! Zach McGovern Detailed Image Ask-A-Pro Blog Author www.AttentiontoDetailingPeoria.com Last edited by Detailed Image; 02-09-2016 at 01:48 PM.. |
|
|
Appreciate
1
|
| 02-10-2016, 07:45 PM | #58 | |
|
360
Rep 5,052
Posts |
Quote:
I highly doubt you will remove any pitting/deep scratches from glass as it is very hard relative to automotive paint, but if the scratches are light then it may be worth a shot. Zach McGovern Detailed Image Ask-A-Pro Blog Author www.AttentiontoDetailingPeoria.com |
|
|
Appreciate
0
|
| 02-27-2016, 10:28 PM | #59 |
|
Captain
232
Rep 723
Posts |
Doing a 2step paint correction on my car ATM followed by liquid Carnuba wax. Have a few questions on how to maintain this look without having to do a paint correction in the near future.
- Best way to main this glossy look between waxes? - how can I remove dirt without taking off the wax - Should I be polishing before waxing the next time I apply wax? I usually do it once a couple of month, and try to avoid machine car washes Thanks! |
|
Appreciate
0
|
| 02-29-2016, 10:41 AM | #60 | |||
|
360
Rep 5,052
Posts |
Quote:
How To Properly Wash and Dry a Car by Todd Cooperider Product Review: Meguiars D156 Synthetic X-Press Spray Wax by Zach McGovern Quote:
For more durable protection, consider a polymer sealant like Blackfire Wet Diamond, which typically lasts 4-6 months instead of 4-6 weeks. For even more durable protection (years), consider a Nano Coating. Quote:
Clear Coat Preservation: Are You Polishing Too Often? by Zach McGovern Before applying a new layer of wax, simply make sure the vehicle is thoroughly washed and dried. If you live in an environment where the car is exposed to excessive airborne contamination, you may need to use a fine grade clay to remove bonded contaminates, however this is usually only something I recommend doing before polishing. Hopefully that helps! Let me know if you have any further questions. Zach McGovern Detailed Image Ask-A-Pro Blog Author www.AttentiontoDetailingPeoria.com |
|||
|
Appreciate
1
|
| 02-29-2016, 07:16 PM | #61 |
|
Captain
232
Rep 723
Posts |
Thanks so much!
Here is a sample of what I was able to achieve with my 2 step paint correction. I must say I amazed myself, especially since this was my first time attempting it. Thanks for your tips, this thread has been really helpful FYI I used v34 with Orange pad, followed by V38 on white, followed by Meguiar's Gold Class liquid Carnuba. |
|
Appreciate
0
|
| 03-07-2016, 08:08 AM | #64 | |
|
360
Rep 5,052
Posts |
Quote:
Are you simply washing the car and then applying a new layer of wax? or are you washing the car to prep it for a full detail in which the car will be decontaminated and then polished before applying a new layer of protection? Zach McGovern Detailed Image Ask-A-Pro Blog Author www.AttentiontoDetailingPeoria.com |
|
|
Appreciate
0
|
| 03-07-2016, 10:27 AM | #65 | |
|
Second Lieutenant
43
Rep 237
Posts |
Quote:
I want to remove any residue from the wax or sealant before putting on a new layer of a coating. |
|
|
Appreciate
0
|
| 03-07-2016, 10:47 AM | #66 |
|
360
Rep 5,052
Posts |
There is no guaranteed way to do this aside from polishing, but when we are prepping for a full detail you want to do a thorough car wash and decontamination process to help remove the dirt and some of the existing protection (if any is present). This includes a hand wash using a heavier concentration of shampoo, as well as chemical decontamination such as IronX and TarX, followed by mechanical decontamination using detailing clay or clay substitutes. This should help produce a mostly bare surface for you to examine prior to the correction process.
Zach McGovern Detailed Image Ask-A-Pro Blog Author www.AttentiontoDetailingPeoria.com |
|
Appreciate
0
|
 |
| Bookmarks |
|
|


