

|
|
|
|
 |

|
 |
BMW Garage | BMW Meets | Register | Today's Posts | Search |
 |

|
BMW 3-Series (E90 E92) Forum
>
Project 335i: umr's build log
|
 |
| 04-19-2021, 08:31 AM | #1 |
|
New Member

27
Rep 25
Posts |
Hello everyone, been a long time lurker here without an account, finally decided to register today and start this long overdue log.
Car is a 2008 E92 335i Sparkling Graphite Metallic, bought from Sydney October 2020 (barely squeezed the travel up to Sydney from Adelaide during the covid panic). [IMG]https://i.ibb.co/9W5zGb2/IMG-0264.jpg[/IMG] The car when picked up from previous owner. Bone stock, aside from the rear spoiler and antenna cover. Mods List
Maintenance
[IMG]https://i.ibb.co/8zqxD1G/IMG-1208.jpg[/IMG] How the car sits now. My photography skills aren't the best, but I will be posting more photos in the coming days. I will do my best to keep this thread up-to date. One of the main reasons I am starting the thread is for me to see the progress on the car - a place for me to look back at and see how far we've come. I have a lot of things in mind for the car, both maintenance and mods. I will try not to repeat the processes already done on other threads, namely Socket's extensive and in-depth log. Cheers! UPDATE 01/2022 [IMG]https://i.ibb.co/jgcVJGL/7d181bb1-d0...09c-b8f033.jpg[/IMG] [IMG]https://i.ibb.co/K63ym28/06c9f8d4-ba...7de-95ead5.jpg[/IMG] Last edited by umr; 01-24-2022 at 12:08 AM.. |
| 04-19-2021, 09:05 AM | #2 | |
|
Lieutenant General
 4542
Rep 11,903
Posts |
Quote:
Car looks great and mods are well thought out  Would love to see some more pics including the rear and interior Whats next on the list? window tint? suspension bits? fluffy dice?? Looking forward to following your journey ... subbed....  |
|
|
Appreciate
0
|
| 04-19-2021, 05:17 PM | #3 |
|
Private First Class

637
Rep 178
Posts
Drives: 2007 E91 323i M-Sport
Join Date: Jun 2019
Location: Brisbane, Australia
|
Nice looking car. Welcome to the forum.
 |
|
Appreciate
0
|
| 04-20-2021, 02:39 AM | #4 |
|
Slowpoke
245
Rep 291
Posts |
Welcome to the forum
Car looks great, hopefully she gives you lots of happy motoring. You have done well to read through Socket's thread!
__________________
build thread - OEM+ WIDEBODY | Factory Individual Audio, Active Steering, Comfort Access & M-Sport optioned
6MT swapped | Xtreme twin disk & SMF | Advan RSII | ST XTA | F82 M4 heated front seats | BMW Individual interior trims | CIC/Combox retrofits | Custom headlights | 1M/M3 mirrors | 335is auxiliary radiator | LCI tails |
|
Appreciate
0
|
| 04-22-2021, 09:15 AM | #5 |
|
New Member
27
Rep 25
Posts |
Manual Conversion
Thanks for the warm welcomes everyone.
A big update on the car. I initially wanted to purchase a manual 335i e92, but wasn't able to find a good example in my price range. So last year November (only 1 month owning the car!) I bought a manual conversion kit from the UK. I arranged collection and shipping via seafreight - arrived to Adelaide in roughly 3.5 months. The bloke I bought the parts from was great to deal with, as he packaged it all up very nicely using ratchets and shrink wrap. Why do a manual conversion? I like my car, a lot. I like the colour, low KMs (84k), great interior, I have done a lot of the maintenance and finally, it's fun! 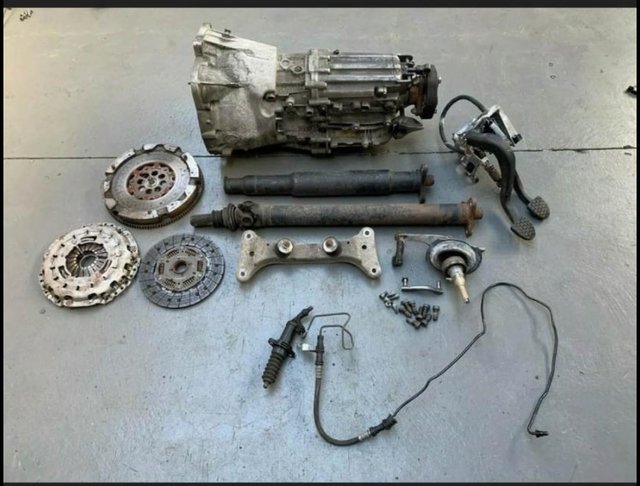 The manual swap Up until this point, I annoyed vtl a little bit as he guided me through the parts I would need to get this job done. Initially, the plan was to drive down to Melbourne and let Vincent do the work, but I was a little worried that I might get stuck there for a while if we needed a part and had to order online. So last week Saturday, I decided to tackle the job myself. And I was right - a lot of the parts I had needed to be refreshed/new. Below are some photos of my progress so far. I apologise if the photo sizes are big, I couldn't figure out how to resize them.  Exhaust and driveshaft out  Auto transmission out, it was a real workout to get the uppermost T14 bolt off the bellhousing. Definitely recommend another pair of hands to assist in bringing the transmission down to the ground and slide it under the car to clear it.  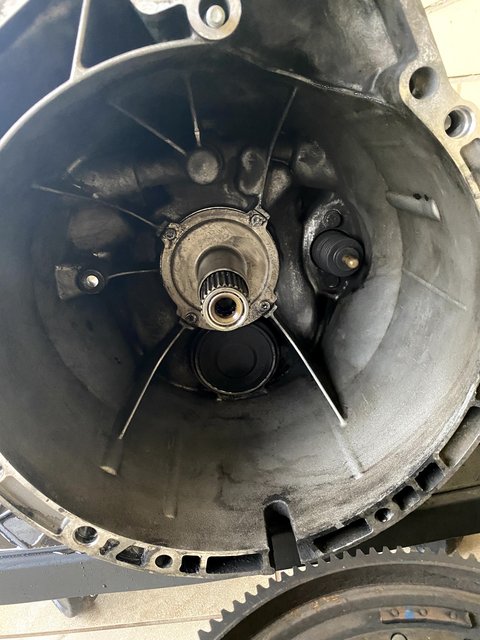 The manual gearbox definitely needed a good clean, before and after a quick spray of break cleaner in the bellhousing.  New slave cylinder and hardline on the gearbox. I do have a brand new clutch delay valve, but after some research, I think I will leave it off for now. 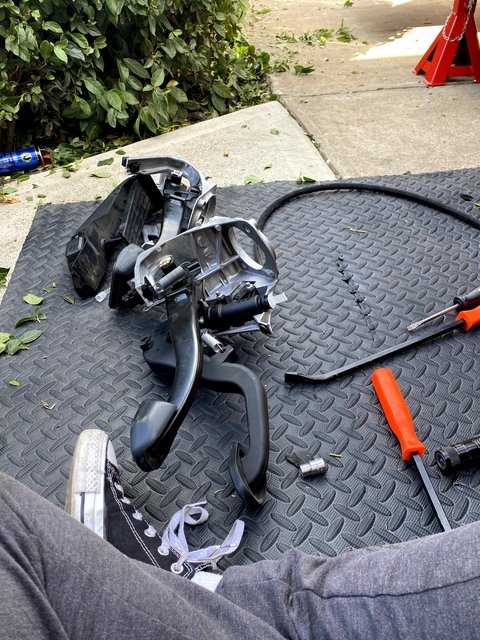 Getting the pedal assembly ready, brand new master cylinder, clips and springs. As well as a new hose to run to the reservoir, the old one was cut right in the middle and it was too short to comfortably reach the reservoir.  Quick test fit of the pedal assembly. I am waiting for a hydraulics shop to make me a flex line to replace the clutch hardline. I have heard some horror stories of people taking apart the interior to run the hardline, I wanted to avoid that and opt for a braided flex line. I haven't been taking a lot of photos, as there are plenty of threads and videos on how to do this, describing it step by step. I will keep updating this thread as I progress further with the project. |
|
Appreciate
3
|
| 04-22-2021, 05:25 PM | #6 | |
|
Captain

184
Rep 687
Posts |
Quote:
Are you thinking about a new Clutch plate and Dual mass flywheel while you're there? they're costly but might save you having to go back in 2 years down the track Agree with the clutch delay valve delete, took me a while to realise why the clutch didn't act exactly as I thought it should, BMWs fix for drivers who don't "feel" the clutch, particularly annoying if your changing gears quickly and the clutch slips because it's not where your foot tells you it is VTL is brilliant and it never ceases to amaze me how much time he puts in helping others, he'll always answer questions Socks is the same and there's a large group on here with plenty of expertise and experience, so drop questions up here and you'll always get answers and opinions oh and Nice Car, 84K is awesome she'll be around for some time with the maintenance you've done |
|
|
Appreciate
0
|
| 04-22-2021, 08:18 PM | #7 | |
|
New Member
27
Rep 25
Posts |
Quote:
The clutch plate has 3000km on it, it came with the manual swap and the previous owner had receipts proving their age. The flywheel has seen better days. I plan on changing to a SMFW and a spec3 clutch in a year or so. So I just need the flywheel to hold up a little more Currently, the only concern I have is the wiring. I have read forum posts and watched dozens of videos but still a little confused. I guess I just have to dig in and get starts with it - maybe it'll start making sense along the way. Cheers |
|
|
Appreciate
0
|
| 04-27-2021, 05:03 AM | #8 |
|
Major General
898
Rep 6,285
Posts |
Wow nice work on the MT swap, thats definately a huge DIY mod to undertake!
I'm biased but yeah back when I was looking in 2011-12 was very difficult to find a MT, but I'm glad I took my time to find a clean one and not go for the AT |
|
Appreciate
0
|
| 05-26-2021, 06:34 PM | #9 |
|
First Lieutenant
253
Rep 316
Posts
Drives: e92 320d sport plus edition
Join Date: Sep 2018
Location: South Australia
|
Getting right in there umr - well done!
I've done two manual swaps on old BMWs (my e21, then my e30 which also included dropping an the M30B35 while I was at it ) Obviously not the electronics headache of the e92, but just be careful of some of the internet fixes on that front. The e30 I ended up comparing a wiring diagram of a manual to an automatic and realised that the generally accepted way of bypassing the start lockout electronics on the net was an overly complicated hack, and ultimately you just had to run a single wire from the steering column to the starter and unplug the reversing light switch from one part of the harness and plug it directly into another part (which effectively converted the automatic wiring harness to being the same as the manual wiring harness).With my e92 I managed to find a factory manual so I wouldn't need to worry. |
|
Appreciate
0
|
| 05-29-2021, 04:57 AM | #10 | |
|
Lieutenant General
4542
Rep 11,903
Posts |
Quote:
Nice work.. Def not a simple mod.. well done |
|
|
Appreciate
0
|
| 01-23-2022, 11:55 PM | #11 |
|
New Member
27
Rep 25
Posts |
Update
There's been quite a lot of changes since the last update. Manual conversion was completed shortly after that update and it has since been running flawlessly. Many smiles and lots of fuel!
I have been paying particular attention to the interior, and making it a nicer place to be. One of the upgrades was changing out the stock e92 seats to F80 M3 Competition seats in Sakhir Orange.   There were a few resources online for wiring the F80 seat modules into an E92, however, none of them directly mentioned the competition seat modules from an LCI F80 - I found that the seat modules differed slightly. I looked at wiring diagrams from the F80 and had to create a wiring harness to go with the E92. Most of the guides online used F80 seats that had 2 main seat modules, but mine had 1 main and 1 smaller one, which made it difficult to figure out. In the end, I got everything to work. Seat heating, electric adjustments, and even the lights work! The lights are wired into the rear passenger footwell light, so they turn on when the car is unlocked. The piano black interior trims were also a nice touch, and goes well with the rest of the interior I feel. I purchased the steering wheel in hopes that I would grow into it and eventually be okay with it, but that was not the case - it was not the most practical, nor did it go along with the rest of the interior. The gauges on the center-console are wired in; voltmeter, water temp, and boost in PSI. |
| 01-24-2022, 12:06 AM | #12 |
|
New Member
27
Rep 25
Posts |
CIC retrofit & new steering wheel
Back to back updates!
I also got rid of the old CCC iDrive system and retrofitted a CIC system. There are a lot of instructiosn and guides online on how to undertake this. One suggestion I do have is try and get genuine cables and connectors. I purchased my USB adapter cable from a vendor in China - clearly not a genuine adapter. It caused a lot of headaches; it would not recognize the USB drive that was plugged in. I was able to find a genuine USB adapter from a local wreck, which worked out pretty well.  CIC iDrive retrofit completed with 2021 Maps Shortly after the iDrive upgrade, I installed a new M3 steering wheel. Feels much better than the cheap carbon fiber steering wheel I had before!  Restitched M3 steering wheel with brand-new trim This wheel was a massive upgrade, feels way better in hand and I swear it also made the car faster!  |
| 01-24-2022, 12:33 AM | #13 |
|
New Member
27
Rep 25
Posts |
Suspension upgrades
The stock suspension at this point was really shot, rear shocks were blown and sagging. It was about the right time to future proof the suspension for any performance related upgrades
 After many hours of research, I ended up with purchasing the MCA Pro Sport coilovers, mainly because they are an Aussie company with very good reputation. Not to mention Josh (owner of MCA) has been nothing but great to work with, even before I purchased my set.  Totally act like a child when opening this box  Unfortunately, I was too excited to get these on the car that I forgot to take photos of the installation. But they're on the car now! Before I got the wheels aligned, I also installed a set of M3 front & rear control arms.   |
| 01-24-2022, 02:59 AM | #14 |
|
Slowpoke
245
Rep 291
Posts |
 
__________________
build thread - OEM+ WIDEBODY | Factory Individual Audio, Active Steering, Comfort Access & M-Sport optioned
6MT swapped | Xtreme twin disk & SMF | Advan RSII | ST XTA | F82 M4 heated front seats | BMW Individual interior trims | CIC/Combox retrofits | Custom headlights | 1M/M3 mirrors | 335is auxiliary radiator | LCI tails |
|
Appreciate
0
|
| 01-24-2022, 04:49 AM | #15 |
|
Lieutenant General
4542
Rep 11,903
Posts |
Great work... glad to see N54 modding is still alive and well
|
|
Appreciate
0
|
| 01-28-2022, 03:10 AM | #17 | |
|
Lieutenant General
4542
Rep 11,903
Posts |
Quote:
 |
|
|
Appreciate
0
|
| 02-04-2022, 09:40 AM | #18 |
|
New Member
27
Rep 25
Posts |
The center console trim in my car had some scratches when it arrived from England last year. This may have been due to the packaging/shipping. But scratches and minor blemishes show up very easily on a Piano Black trim, and I was never really satisfied with how it looked.
I had played around with the idea of wrapping my interior trims before, previously wrapped my E36 interior in gloss black. This time I wanted to try something a bit different and something that would match the E90 interior. The M3 came from the factory with leather interior trims, and I've always like the look and feel. So I decided I would give wrapping the center console of my 335i in Nappa Leather. I looked around online and locally if I could grab a full or a half hide of nappa leather and came across this website: https://www.theleathershed.com.au/pr...ta-sheep-nappa I purchased a medium sized hide and it arrived in the mail within 4 days. I opened the package to the smell of sheep and was very surprised at the quality. A quick stroll to Bunnings and picked out this product on the basis of absolutely 0 research:  Kwik Grip Vertical Gel. I also picked up a couple different sizes of paint brushes to apply this product on the trim. At this point, I left the project for a while, wondering if I should get a professional leather trimmer to do the job, but never got around to calling places and getting a quote. Noting the size of a full hide leather, I decided to do the job myself on the spare center trim I had laying around.  The Kwik Grip gel was very easy to work with, and it held onto the leather very nicely. If you are doing this job, make sure to get a decent pair of brushes in 2 different sizes. One for the larger areas of the trim, and one for the small corners and edges.  I also wrapped the gauge pod in the same leather. I think it turned out really good!  The center trim and the gauge pod. I was able to get rid of the small outdents visible on the leather by wrapping a credit-card in a microfiber towel and gently spreading the glue around. I was able to get most of the visible glue dents to go away.   A couple of shots after I put it all back together Overall, I am very happy with how it turned out. It feels good to the touch and the leather can take quite a beating before blemishes/scratches show up, unlike the gloss black trim. As I wrapped the spare trim (which was some sort of wood), I still have the piano black intact if I ever want to give it a good polish and go back to it. But for now, I am happy with the results |
|
Appreciate
3
|
| 02-06-2022, 12:27 AM | #19 | |
|
Lieutenant General
4542
Rep 11,903
Posts |
Quote:
|
|
|
Appreciate
0
|
| 02-06-2022, 02:37 AM | #20 | |
|
New Member
27
Rep 25
Posts |
Quote:
|
|
|
Appreciate
0
|
| 02-06-2022, 06:39 PM | #22 | |
|
New Member
27
Rep 25
Posts |
Quote:
Any suggestions on spray adhesives that work well on leather? I know 3M makes one called Foam & Fabric. |
|
|
Appreciate
0
|
 |
| Bookmarks |
| Tags |
| 335i, build log, log, n54, n54 335i, sparkling graphite metallic |
|
|


