E90Post


Coby Wheel
 
BMW 3-Series (E90 E92) Forum > E90 / E92 / E93 3-series Powertrain and Drivetrain Discussions > NA Engine (non-turbo) / Drivetrain / Exhaust Modifications > +1mm Modified Intake Lift Valvetronic Supports- 'MILVs' N52


Closed Thread
 
Thread Tools Search this Thread
      04-12-2018, 06:51 AM   #617
CobraMarty
Major
CobraMarty's Avatar
619
Rep
1,402
Posts

Drives: 2007 328xi e90 + e92
Join Date: Sep 2010
Location: BimmerMILVs.com

iTrader: (7)

On the bottom of the Supports, there is a 'oil groove'. The oil goes out to the 2 rollers that ride on the 'ramps' of the supports. I am sure that is why there is no wear on the used supports.
Appreciate 0
      04-12-2018, 12:39 PM   #618
6ixSpd
Save the manuals!
6ixSpd's Avatar
6015
Rep
6,746
Posts

Drives: '16 M3, '23 718 Spyder
Join Date: Feb 2016
Location: 416

iTrader: (4)

About to install the MILVs now. Can someone show me the location of that 22mm crank bolt that I'm.supposed to turn to make the lines face away?

NVM got it.
__________________
'16 M3 | '23 718 Spyder


Past: E92 M3, F87 M2, E39 M5, etc
Appreciate 0
      04-12-2018, 01:15 PM   #619
Wally_84
Private
22
Rep
54
Posts

Drives: E90 330i
Join Date: Nov 2016
Location: Europe

iTrader: (0)

Quote:
Originally Posted by 6ixSpd View Post
About to install the MILVs now. Can someone show me the location of that 22mm crank bolt that I'm.supposed to turn to make the lines face away?

NVM got it.
I don't have the picture because I haven't done mine Milvs yet.
Best I can do to help is to share the info I've got from Marty.
If you have it allready then, well...at least I tried.

"23mm socket and ratchet on the front crank bolt and rotate clockwise when standing in front of the car looking at the engine.

The peak of the intake cam should be pointing up about 11:00-12:00 position, pointing just above the eccentric cam.

Here are some great photos of the install-
http://www.e90post.com/forums/showpo...&postcount=436

The bolts that broke were because
1-the washer was not fully inserted under the spring and
2-when the spring bolt was was loosened 5 turns and left like this overnight. This put a prolonged side load on the bolt head and broke it off.

The other way to make install easy is to buy the 'spring tool' off ebay for about $250.

Marty
"

Now I see that you got it already.
Mayby you will be willing to share some pictures of the crank position and some warning or two for all of us who have the job ahead of us?
Appreciate 0
      04-12-2018, 06:09 PM   #620
PORTMOODY
Captain
Canada
141
Rep
635
Posts

Drives: Coal Roller
Join Date: Mar 2014
Location: Vancouver, BC

iTrader: (1)

Quote:
Originally Posted by Wally_84 View Post
I don't have the picture because I haven't done mine Milvs yet.
Best I can do to help is to share the info I've got from Marty.
If you have it allready then, well...at least I tried.

"23mm socket and ratchet on the front crank bolt and rotate clockwise when standing in front of the car looking at the engine.

The peak of the intake cam should be pointing up about 11:00-12:00 position, pointing just above the eccentric cam.

Here are some great photos of the install-
http://www.e90post.com/forums/showpo...&postcount=436

The bolts that broke were because
1-the washer was not fully inserted under the spring and
2-when the spring bolt was was loosened 5 turns and left like this overnight. This put a prolonged side load on the bolt head and broke it off.

The other way to make install easy is to buy the 'spring tool' off ebay for about $250.

Marty
"

Now I see that you got it already.
Mayby you will be willing to share some pictures of the crank position and some warning or two for all of us who have the job ahead of us?
I'll give you some tips.
  • Crank Bolt is 22mm - Need a short socket
  • The cam lobes for the valve you are working on need to be past 12 o clock if youre facing the engine, more like 2 o clock
  • Do not force the supports in if they are not sliding in - the MILVs are steel and the head is aluminum - you will damage the surface it sits on if you force it in
  • If the Milv is not sliding in with minimal effort then get an extra set of hands and both of you push the rollers forward so you can wedge the milv in. Try oiling the bottom of the milv and the ledge to lubricate to help slide it in

Second shop emailed me and said they fixed the stripped hole with a timesert. Although they are concerned with the grooves I made, and the first shop worsened when fitting the MILV. What do you guys think about it from the pic?
Attached Images
 
Appreciate 0
      04-12-2018, 07:58 PM   #621
W37V
[Oo=||=oO]
No_Country
1103
Rep
2,470
Posts

Drives: e92n52 & f15n57
Join Date: Aug 2014
Location: DMV

iTrader: (0)

PORTMOODY
I think you should be fine. Just finish the install and stop being so unlucky
Appreciate 0
      04-12-2018, 10:58 PM   #622
6ixSpd
Save the manuals!
6ixSpd's Avatar
6015
Rep
6,746
Posts

Drives: '16 M3, '23 718 Spyder
Join Date: Feb 2016
Location: 416

iTrader: (4)

Marty's instructios were spot on. Going forward, I think it would help to identify the position the lobes should be in as per below.

Quote:
Originally Posted by Wally_84 View Post
Now I see that you got it already.
Mayby you will be willing to share some pictures of the crank position and some warning or two for all of us who have the job ahead of us?
See attached!
Quote:
Originally Posted by PORTMOODY View Post
I'll give you some tips.
  • Crank Bolt is 22mm - Need a short socket
  • The cam lobes for the valve you are working on need to be past 12 o clock if youre facing the engine, more like 2 o clock
  • Do not force the supports in if they are not sliding in - the MILVs are steel and the head is aluminum - you will damage the surface it sits on if you force it in
  • If the Milv is not sliding in with minimal effort then get an extra set of hands and both of you push the rollers forward so you can wedge the milv in. Try oiling the bottom of the milv and the ledge to lubricate to help slide it in
That's exactly what I ended up doing, that 2 o'clock position worked well.

Crank Pulley. Make sure the car is not in gear or else it will begin to creep forward as you turn.
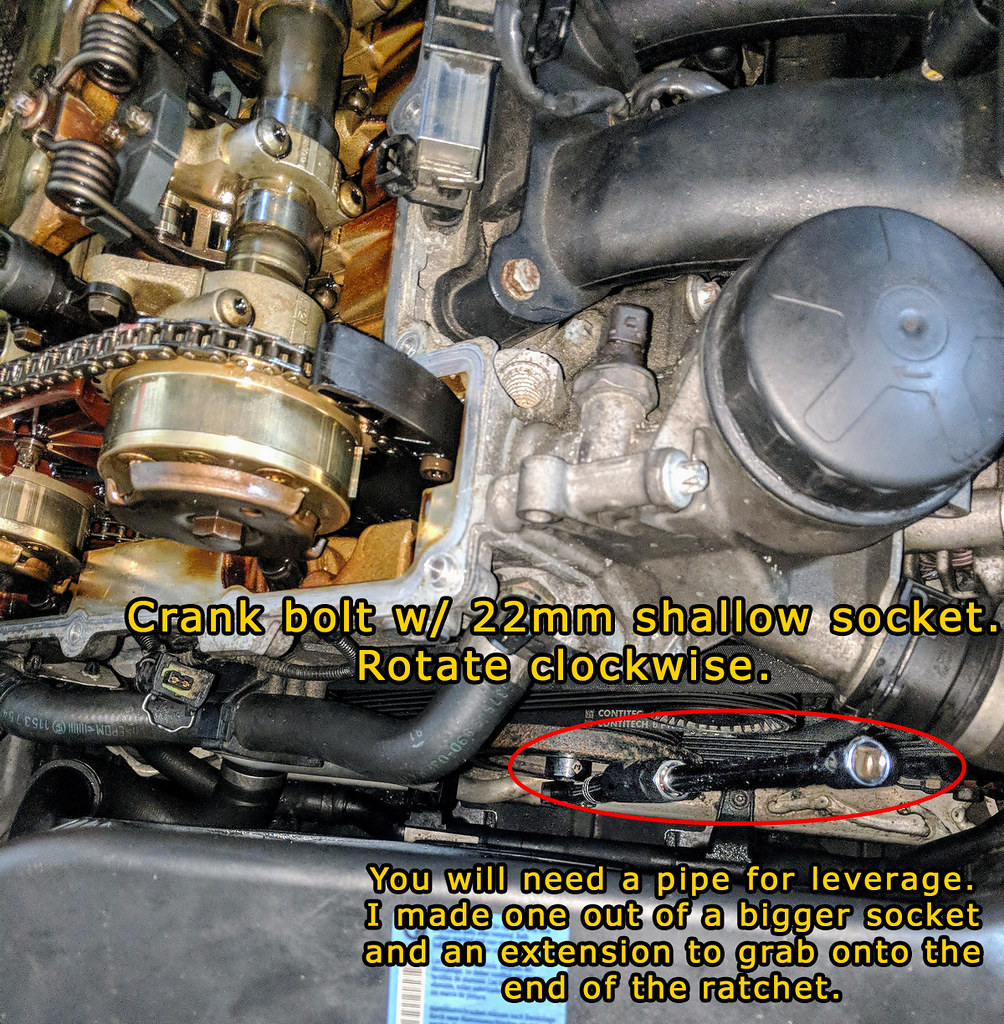


Lobe positions:


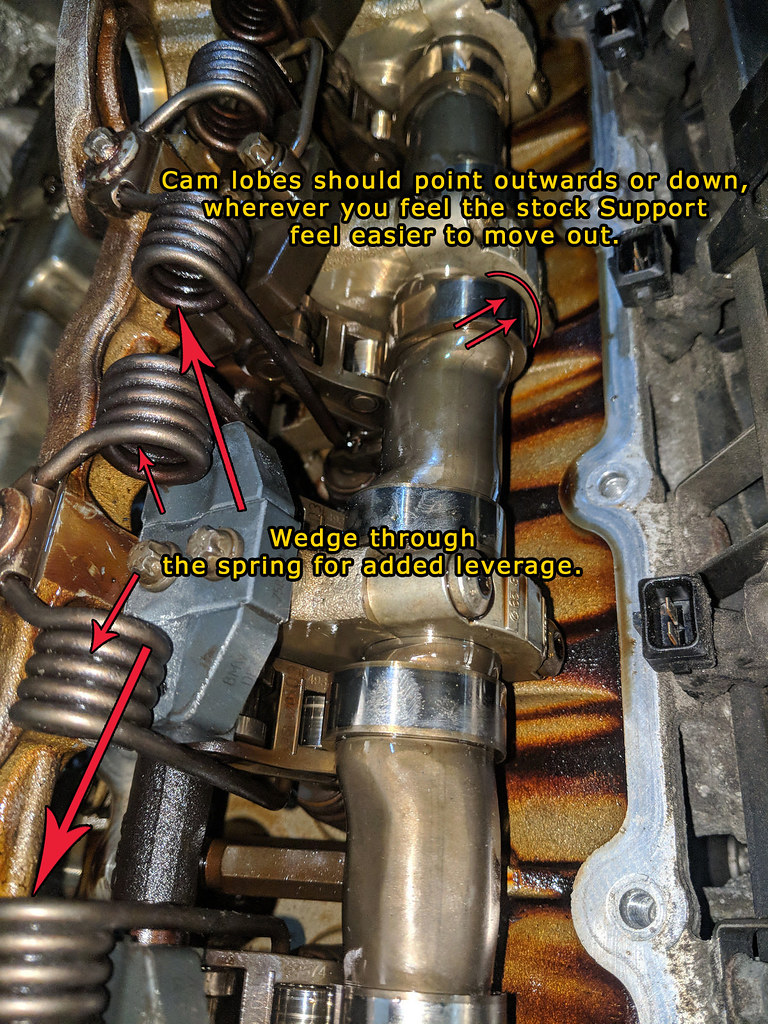
I had a bit of a nightmare midway through the MILV install after getting 3 of them in. I didn't realize that rotating the motor without any Support block present (stock or Marty's) would fuck shit up big time. I ended up popping the cam rocker and the spring out from two sides, one from CYL 4 and another at 6. This was one helluva scary moment, but I after 2 hours of cursing and trying different techniques, I managed to put the rocker back in position while locking it place with the spring arm and ensured the spacing was adequate from the spring arm to the assembly, as well as proper position at the bottom of the rocker and arm. I was minutes away from towing the car to a shop and dreading basically a camshaft re&re job ($$$)...

After buttoning everything back up I took her for a spin and she drives perfectly fine! Looks like my fix is holding and I didn't mess up anything in the valvetrain... Phew! So a word of caution if you're clueless to understanding how the valvetrain functions like me, lol: DO NOT rotate the engine after removing the stock support!

I also wedged a thin extension through the springs and lifted up to give a bit more clearance when pushing the MILV in. Be very careful if you do this, you don't want to unseat it from the arm below the rocker or you'll be shitting bricks like me.
__________________
'16 M3 | '23 718 Spyder


Past: E92 M3, F87 M2, E39 M5, etc

Last edited by 6ixSpd; 04-12-2018 at 11:33 PM..
Appreciate 0
      04-13-2018, 07:04 AM   #623
CobraMarty
Major
CobraMarty's Avatar
619
Rep
1,402
Posts

Drives: 2007 328xi e90 + e92
Join Date: Sep 2010
Location: BimmerMILVs.com

iTrader: (7)

Thanks for posting the pictures.
Appreciate 0
      04-13-2018, 07:17 AM   #624
6ixSpd
Save the manuals!
6ixSpd's Avatar
6015
Rep
6,746
Posts

Drives: '16 M3, '23 718 Spyder
Join Date: Feb 2016
Location: 416

iTrader: (4)

Quote:
Originally Posted by CobraMarty View Post
Thanks for posting the pictures.
No problem. I'll send out my stock supports to you soon.
__________________
'16 M3 | '23 718 Spyder


Past: E92 M3, F87 M2, E39 M5, etc
Appreciate 0
      04-13-2018, 09:16 AM   #625
PORTMOODY
Captain
Canada
141
Rep
635
Posts

Drives: Coal Roller
Join Date: Mar 2014
Location: Vancouver, BC

iTrader: (1)

To be honest, I really think its worthwhile for the inexperienced diyers like myself to get a spring tool that is proven to work and using it. The potential for really screwing something up without it is very high.
Appreciate 0
      04-13-2018, 09:22 AM   #626
PORTMOODY
Captain
Canada
141
Rep
635
Posts

Drives: Coal Roller
Join Date: Mar 2014
Location: Vancouver, BC

iTrader: (1)

Quote:
Originally Posted by 6ixSpd View Post

I also wedged a thin extension through the springs and lifted up to give a bit more clearance when pushing the MILV in. Be very careful if you do this, you don't want to unseat it from the arm below the rocker or you'll be shitting bricks like me.
I'd be weary of this given that it will also cause the retaining spring bolt to twist. This opens you up to the possibility of damaging that bolt/threaded hole. I would think pushing the rollers forward would be safer than leveraging the springs.
Appreciate 0
      04-13-2018, 09:25 AM   #627
PORTMOODY
Captain
Canada
141
Rep
635
Posts

Drives: Coal Roller
Join Date: Mar 2014
Location: Vancouver, BC

iTrader: (1)

@cobramarty is it possible to use a different spacer? One that spans as wide as where the retaining spring base touches the head. I notice that with the spacer, the spring will bow at the edges. I think if the spacer spanned the whole base and didn't cause it to bow down like that it would relieve even more downward pressure. Of course, this would only work if you could back the bolt off enough to slide something that wide under. Just a thought.
Appreciate 0
      04-13-2018, 10:00 AM   #628
CobraMarty
Major
CobraMarty's Avatar
619
Rep
1,402
Posts

Drives: 2007 328xi e90 + e92
Join Date: Sep 2010
Location: BimmerMILVs.com

iTrader: (7)

Anything is possible.
Maybe a 1/4" fender washer about 1" diameter with the groove cut into it. DO you think that would be better? Getting it into the center 2 cylinders might be tough.

Buying a spring tool off ebay is a good option. They are $250 shipped off ebay. Use it and then send it to me and I'll give you $200 for it. I could do this for 3 tools.
Then I could have a tool loaner service. $265 shipped and for tool deposit. Then $200 refunded when tool is returned.
Appreciate 3
6ixSpd6014.50
scanspeak353.50
      04-13-2018, 11:10 AM   #629
hassmaschine
Major General
United_States
3973
Rep
7,215
Posts

Drives: "NBO" 330i
Join Date: Jun 2014
Location: earth

iTrader: (0)

I should make a video on how to get those springs back on without the tool. It's a pain in the ass, but it can be done. Basically you just need an open end wrench (10mm or so), a flathead screwdriver, and some patience. Since I had a head I was going to part out anyway, I practiced a bit to see if it could be done.
Appreciate 0
      04-13-2018, 11:48 AM   #630
yupetc
Captain
390
Rep
661
Posts

Drives: 2015 X535i
Join Date: Feb 2013
Location: Houston, TX

iTrader: (0)

Hass, it would be nice if you can show a video on your practice. Everyone's got different turnouts so far. Be real good to see a fully explained standardized video so it can take our guess-work out the way when we're actually putting our hands on it. I'm still waiting on my VC gasket to leak. But in the meantime, I've been paying a lot of attention to this thread to see how all the installation turns out. Really scared at the moment from what I've seen so far.
__________________
2015 X535i - CP Piston, Manley Rod, ACL/King bearings, MILVs VRSF full charge Pipe, Wagner FMIC, Hybrid Turbo, MHD2+ VRSF DP, UR Front/Rear Sway Bars, Eibach springs, Bilstein B6
2015 MINI COOPER - Mahle Pistons, Max Rods, BMS intake, CTS charge pipe, Wagner Intercooler, ByteTronik Tune, VRSF DP
2017 540i - MHD2+, VRSF DP, TU Pump
Appreciate 0
      04-13-2018, 11:53 AM   #631
tom.gnade
Apex Forged 19", AA headers, MILVs, 3IM, Euro Intake, Swift Spec-R
United_States
87
Rep
255
Posts

Drives: 2013 328i coupe
Join Date: May 2016
Location: Forest Hill, MD

iTrader: (1)

Garage List
2013 BMW 328i  [0.00]
Quote:
Originally Posted by yupetc View Post
Hass, it would be nice if you can show a video on your practice. Everyone's got different turnouts so far. Be real good to see a fully explained standardized video so it can take our guess-work out the way when we're actually putting our hands on it. I'm still waiting on my VC gasket to leak. But in the meantime, I've been paying a lot of attention to this thread to see how all the installation turns out. Really scared at the moment from what I've seen so far.
Maybe Marty would be willing to help with installs for a fee for those of us near enough?
Appreciate 0
      04-13-2018, 12:12 PM   #632
atmosphericM
Basic Bimmer
United_States
518
Rep
935
Posts

Drives: E92 328i 6MT ///M
Join Date: Sep 2017
Location: B'ham

iTrader: (1)

Garage List
Is there no published manual that details the procedure of installing the ILVS, such as Bentley or BMW FSM? Or is it that we are just trying to do it not the "right" way... (i.e. take out way more components then reinstall). Usually, doing jobs like this isn't really hard... just time consuming.. when done by the book.
Appreciate 0
      04-13-2018, 12:34 PM   #633
Phyrexia
Resident Pedant
United_States
503
Rep
792
Posts

Drives: '15 335i 8AT
Join Date: Nov 2017
Location: Limbo

iTrader: (1)

Quote:
Originally Posted by atmosphericM View Post
Is there no published manual that details the procedure of installing the ILVS, such as Bentley or BMW FSM? Or is it that we are just trying to do it not the "right" way... (i.e. take out way more components then reinstall). Usually, doing jobs like this isn't really hard... just time consuming.. when done by the book.
These aren't really wear and tear parts. They get installed when the head is built and that's about it. I can't find anything in the TIS about them so far.
__________________
'15 F30 335i 8AT Estoril II/Black (12.218 @ 114.94mph)
MHD Stage 2+ 93 / XHP Stage 3 / M-Goodies / K&N Filter / ER CP / CSF IC / NGK 97506 / ER DP / Michelin A/S 3+
Appreciate 0
      04-13-2018, 01:09 PM   #634
atmosphericM
Basic Bimmer
United_States
518
Rep
935
Posts

Drives: E92 328i 6MT ///M
Join Date: Sep 2017
Location: B'ham

iTrader: (1)

Garage List
I figured as much but maybe they'd need to come out when replacing the 'cam' or entire valvetronic system, etc? I haven't done the mod myself obviously, nor have I even cracked into my engine so I'm not super familiar with how all of this valvetronic stuff works exactly. But yeah, I see what you're saying. Either way it seems like we will come to some conclusions here about best practices, happily.
Appreciate 0
      04-13-2018, 01:33 PM   #635
PORTMOODY
Captain
Canada
141
Rep
635
Posts

Drives: Coal Roller
Join Date: Mar 2014
Location: Vancouver, BC

iTrader: (1)

Quote:
Originally Posted by yupetc View Post
Hass, it would be nice if you can show a video on your practice. Everyone's got different turnouts so far. Be real good to see a fully explained standardized video so it can take our guess-work out the way when we're actually putting our hands on it. I'm still waiting on my VC gasket to leak. But in the meantime, I've been paying a lot of attention to this thread to see how all the installation turns out. Really scared at the moment from what I've seen so far.
Buy the tool in the link below and just remove the springs. Marty will refund you a portion. Well worth it.

Quote:
Originally Posted by atmosphericM View Post
Is there no published manual that details the procedure of installing the ILVS, such as Bentley or BMW FSM? Or is it that we are just trying to do it not the "right" way... (i.e. take out way more components then reinstall). Usually, doing jobs like this isn't really hard... just time consuming.. when done by the book.
If this tool works as easily as in the video, I don't see a more straightforward and simple way of doing this install. Just don't be a buffoon like me and over tighten any bolts.

Appreciate 0
      04-13-2018, 02:25 PM   #636
6ixSpd
Save the manuals!
6ixSpd's Avatar
6015
Rep
6,746
Posts

Drives: '16 M3, '23 718 Spyder
Join Date: Feb 2016
Location: 416

iTrader: (4)

I'm sure it's all placebo, but I swear the car feels like it has a smidge more pep to it... Stock tune though so I bet it's all in my head lol.
__________________
'16 M3 | '23 718 Spyder


Past: E92 M3, F87 M2, E39 M5, etc
Appreciate 0
      04-13-2018, 02:43 PM   #637
Taskmaster
Banned
Japan
2465
Rep
9,004
Posts

Drives: M235i 6MT / E92 328 Msport 6MT
Join Date: Nov 2013
Location: Florida

iTrader: (6)

Quote:
Originally Posted by 6ixSpd View Post
I'm sure it's all placebo, but I swear the car feels like it has a smidge more pep to it... Stock tune though so I bet it's all in my head lol.
If anything, it could be slower. Trust me, after the tune, there will be no mistaking it...
Appreciate 0
      04-13-2018, 02:45 PM   #638
6ixSpd
Save the manuals!
6ixSpd's Avatar
6015
Rep
6,746
Posts

Drives: '16 M3, '23 718 Spyder
Join Date: Feb 2016
Location: 416

iTrader: (4)

Quote:
Originally Posted by Taskmaster View Post
Quote:
Originally Posted by 6ixSpd View Post
I'm sure it's all placebo, but I swear the car feels like it has a smidge more pep to it... Stock tune though so I bet it's all in my head lol.
If anything, it could be slower. Trust me, after the tune, there will be no mistaking it...
I bet. If it wasn't for the 3.5 hour shitshow yesterday I'd have installed the manifold too and been ready for a tune. Ugh. Hopefully next week. Headers are en route too. Seriously, I can't wait for it all to be done and dyno it to see a full stock vs. full bolt on setup.
__________________
'16 M3 | '23 718 Spyder


Past: E92 M3, F87 M2, E39 M5, etc
Appreciate 1
Noir883.00
Closed Thread

Bookmarks


Posting Rules
You may not post new threads
You may not post replies
You may not post attachments
You may not edit your posts

BB code is On
Smilies are On
[IMG] code is On
HTML code is Off


All times are GMT -5. The time now is 03:18 AM.


e90post
Powered by vBulletin® Version 3.8.11
Copyright ©2000 - 2024, vBulletin Solutions Inc.
1Addicts.com, BIMMERPOST.com, E90Post.com, F30Post.com, M3Post.com, ZPost.com, 5Post.com, 6Post.com, 7Post.com, XBimmers.com logo and trademark are properties of BIMMERPOST