

|
|
|
|
 |

|
 |
BMW Garage | BMW Meets | Register | Today's Posts | Search |
 |

|
BMW 3-Series (E90 E92) Forum
>
The N54 Manifold Swap Thread
|
 |
| 02-26-2022, 03:33 PM | #1 |
|
Colonel
 3764
Rep 2,738
Posts |
The N54 Manifold Swap Thread
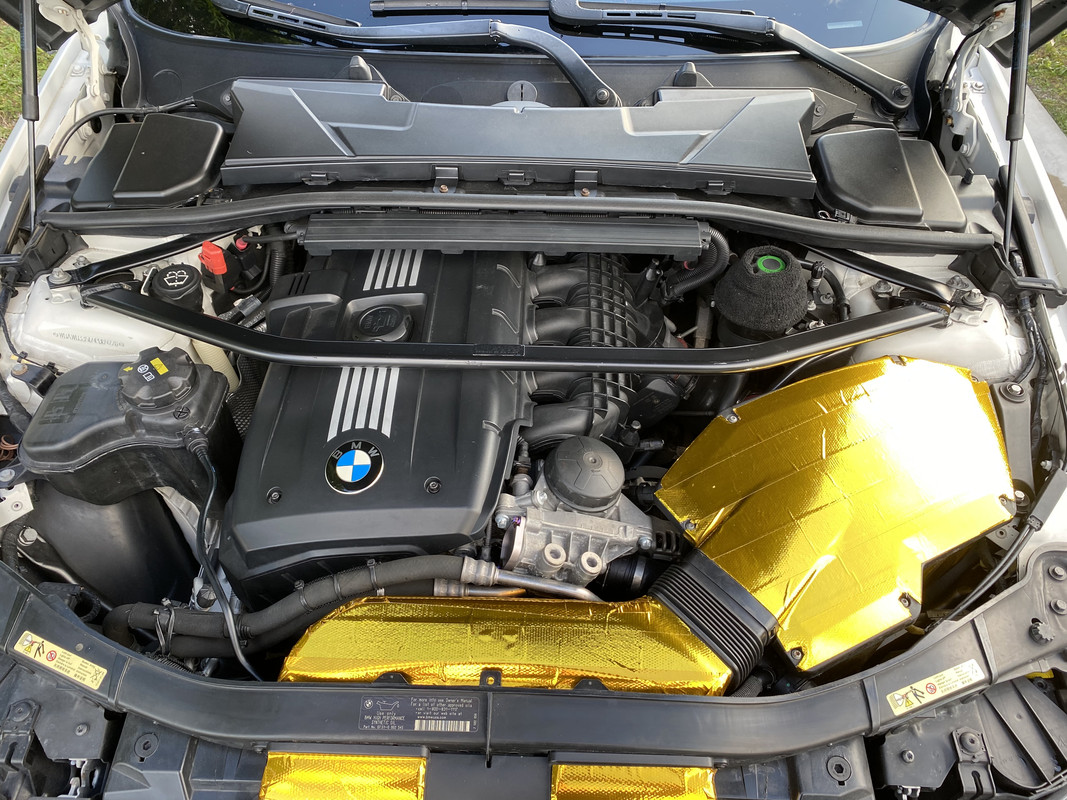 Why do a N54 manifold swap? *No parts to break (Looking at you Disa valves!) *Cheaper than 3SIM *More Peak Power and More Power at Higher Revs *N54 manifold makes the N52 engine feel and perform more like a Naturally Aspirated “M” engine with linear power delivery that rises pretty much straight to redline. You gain maybe 5 peak horsepower over a 3SIM but you will lose some low end torque vs a 3SIM. 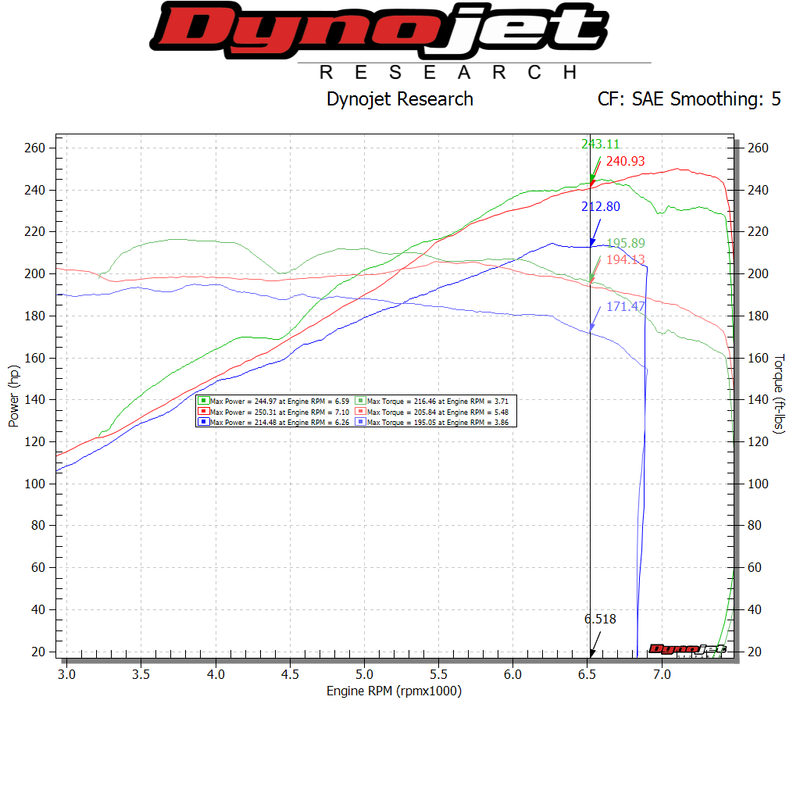 As you consider the N54 Intake Manifold swap you should keep this dyno in mind. The blue is a stock N52, the green bolt on’s with 3 Stage Intake Manifold (3SIM), and the red is a bolt on’s with N54 intake manifold. (Note: None of the cars in this dyno have MILV’s.) Now look at this dyno and consider that a 3SIM car and a N54 IM car are racing. When making an acceleration run with a manual and shifting at 7500rpms and entering the next gear at 5500rpms as it continues accelerating the engine is staying in the rpms where the N54 manifold makes more power for the entire run and will leave the 3SIM car it is racing behind. So looking at that dyno you can also see that the N54 manifold conversion isn’t going to be for everyone. In my opinion I would not consider it if you have an automatic transmission. If you have an automatic then stop here and definitely do the 3SIM swap instead. Automatic transmission won’t be able to rev to the upper rpms where the N54 makes more power because it will shift gears before 6800rpms, and you also can’t do a diff swap to pick up any of the torque you lose on the lower rpms because it already has the more aggressive final drive ratio that comes with the automatic. So again, forget it if you have an automatic transmission. Now speaking of that, for those with rwd and manual transmission I also would seek to pair N54 manifold with a 3.73 differential from an automatic transmission rwd (~$250 delivered off eBay and direct bolt up) or a 3.91 differential from a xdrive automatic ($~250 delivered off eBay and requires a trim of the pinion shaft and swapping the pinion yoke from a rwd onto it.). The reason I say this is again because you lose some torque with the N54 manifold in the lower rpms vs a 3SIM and the higher final drive differential swap will bring that torque back. In my case I was coming from a 3SIM to the N54 and after swapping to a 3.91 I didn’t get the sensation of losing anything in the lower rpms. Also it must be mentioned that the N54 manifold swap pairs especially well with other engine breathing mods, both intake and exhaust. In my opinion currently the most powerful and best performing versions of a N52 engine will have: -Upgraded Airbox (5-15hp) In my opinion this is ideally the stock Airbox with a charcoal delete and a K&N drop in filter, or even better the very cost effective Euro Intake (<$200 delivers off German eBay) with a K&N cone filter (adding a secondary intake tract like a E46CSL or “Dinan style” intake from the fog light area is very easy with these air boxes and produces dyno proven gains.) More pricey airbox alternatives that offer probably no larger gains than the first 2 I mentioned are any sealed Airbox with a secondary intake (from behind the headlight like the AFE, from the cowling area like the BMW N52 performance intake, or from the bumper like the Dinan Intake.). *Note: Run of the mill “non sealed” cold air intakes are garbage and not preferable to even the modded stock Airbox above in my opinion.* -N54 Manifold and Throttle Body (5hp) -MILV’s (8-10hp) -Catless Headers (15-20hp) -Secondary Cat Delete (7-9hp) -Muffler (1-3hp) A strong N52 with all these mods (and a good tune) could expect to make in the neighborhood of 255-260whp at around 7000rpms. To give some idea, in my case I have all those mods and raised the rev limiter to 7500rpms. After installing my 3.91 differential I’m running the 1/4 mile approximately 1 second and 6mph faster than when my car was stock. (These figures are before I started weight loss mods, so only due to the power and differential mods.) Who can tune the manifold swap? I’ve only ever used Bob Bishop from Stage FP. I’m sure there are other tuners as well but I believe Bob has done more of the N54 manifold tunes than anyone and I personally have put 50k **very hard** miles on the set up with zero codes or issues so I feel comfortable recommending him although I know there are plenty of great tuners who are up to the task. I have no idea what Stage FP are charging now but my tune 3 years ago was approx $600. You can find Stage FP on Instagram @Stage_FP What parts are needed for the N54 Manifold swap and what do they cost? ~$70 on eBay for a N54 manifold ~$40 on eBay for a N54 throttle body ~$20 in parts from lowes for N54 manifold mods ~$10 in parts from auto parts store for PCV hose mod ~$50 in parts from Amazon.com for Airbox to N54 TB connections How hard is the N54 Manifold swap? On a scale of 1-10, I would say it’s a 6. There is some fabrication you will have to do, but nothing hard it’s just time consuming. The N54 manifold isn’t a direct fit on the N52 head and the alignment needs to be adjusted by modifying the parts (I use an angle grinder). Also the N54 manifold has no hole to bolt the PCV (elbow with heater) although it does have a provision to make a mount for it. This requires some drilling and dremel work. All told you will spend about 3 hours working on your N54 manifold to prep it for the actual swap, but it’s just plastic and easy to work with. Besides these issues it’s just assembling the parts on the list and doing pretty much the exact same work you would do if you were swapping a standard Intake Manifold to 3SIM, or replacing a starter on your N52. So you can look at tutorials on those jobs to get an idea of the work you will have to do to remove and install a Intake Manifold once you have your N54 manifold ready.
__________________
Last edited by Biginboca; 02-27-2022 at 10:22 AM.. |
|
Appreciate
10
e90yyc2425.00 Torgus3781.50 ornicar136.00 Papa Popov315.00 stilesg5719.50 AdrianE3627.00 gT-BMW203.00 Donethat339.00 fazm616.50 chilledn5265.00 |
| 02-26-2022, 03:34 PM | #2 |
|
Colonel
3764
Rep 2,738
Posts |
N54 Intake Manifold Swap Parts Shopping List:
BMW N54 Intake Manifold P/N 11617564679 BMW N54 Throttle Body P/N 13206012076 *There are 2 versions of N52 throttle body, the 2006 cars have an oval shaped electrical plug and the 2007 and up is a Square Shaped Plug. If you have a 2007 and up N52 you likely have the square plug and the N54 Throttle Body is a direct swap, but if you have a 2006 then you will have to repin your Throttle Body wiring harness or splice a N54 connector onto your harness. If you have a 2006 N52 there is discussion about the throttle body situation in post #11 of this thread (scroll below the tutorial) so please look it over. 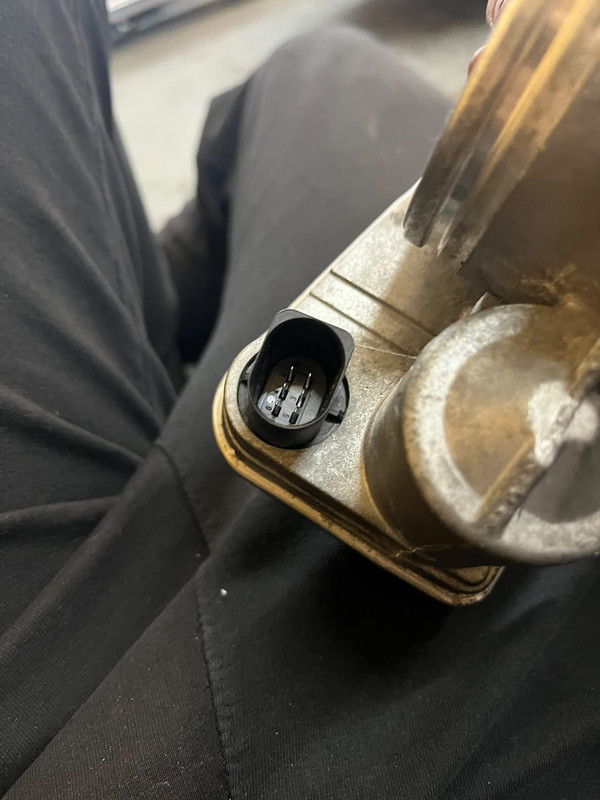 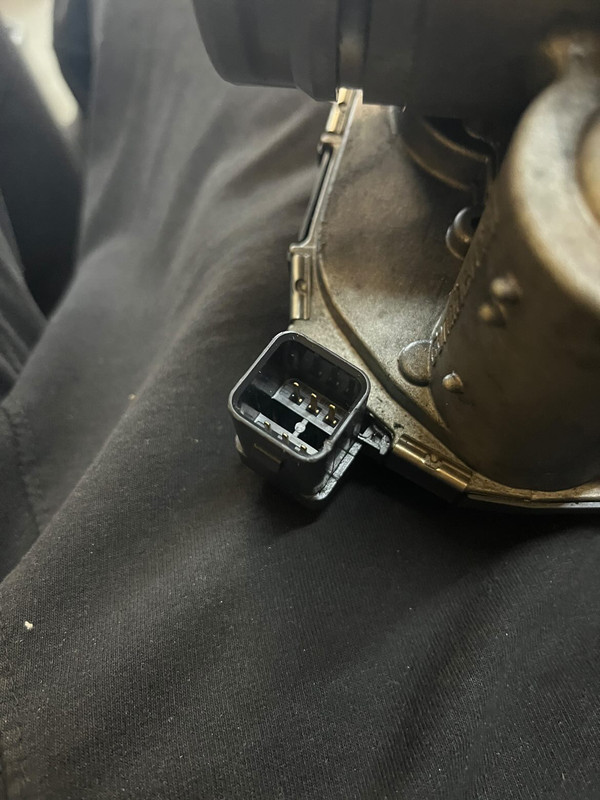 Amazon Parts for Connecting Airbox to Throttle Body  Hiwowsport 90 Degree Elbow 4-Ply Thickness 5mm High Performance Coupler Silicone Hose for Auto with 2PCS T-Bolt Clamp Black Color(ID:3.5"(89mm)) https://www.amazon.com/dp/B074V6K6LH...ing=UTF8&psc=1 Upgr8 Universal 4-Ply High Performance 45 Degree Elbow Coupler Silicone Hose (3.25"(83MM), Blue) https://www.amazon.com/dp/B00CB22I6Y...ing=UTF8&psc=1 HiwowSport 6'' Length Straight Alloy Aluminum Intake Tube Aluminum Hose Adapter OD:3.5''(89MM) https://www.amazon.com/dp/B07K2WG83F...ing=UTF8&psc=1 Lowes Parts for PCV Elbow Heater Fitting:  Hillman P/N 880446 (Nylon Spacers 3/4 x .385 x 13/64) Hillman P/N 883573 (Zinc Machine Bushing 1-5/8” x 2-3/8” x 14ga) Hillman P/N 126944 (Stainless Pan Head Machine Screw 8-32 x 3/4”) Hillman P/N 126895 (Stainless Nyloc Nut 8-32) *Optional: Hillman P/N 126875 (Stainless Flat Washer #8) Lowes Parts for Offset Mounts of Manifold to Engine Head:   Hillman P/N 880432 (Nylon Spacers 3/8 x .171 x 1) Autoparts Store for PCV Hose (from Valve Cover to Manifold) Modification:  2 x 1” ID Hose Clamps 12” Section of 3/4” Vacuum Line Parts for Plugging the unused Small Vacuum Line Port on the N54 Manifold on the N52. *Note: On the N51 there is a small vacuum line from the Valve Cover connected next to the throttle body that you will connect here so you will not plug this port. 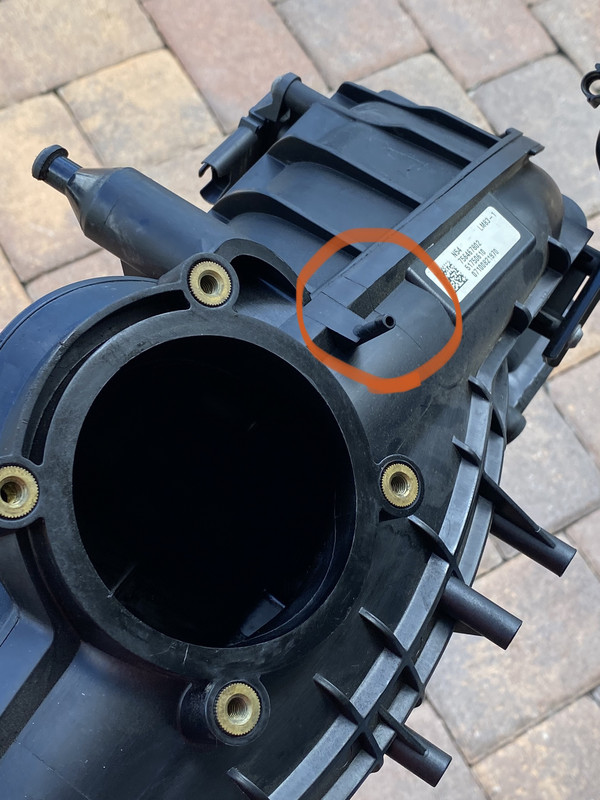 1 Small Screw (stainless preferred) A “Dab” of RTV or Silicone Additional Recommended Parts: 6 Black Intake Manifold to Head Gaskets for N52 and N54 manifolds BMW p/n 11617547242 1 Green Throttle Body Gasket for N52 and N54 Throttle Body BMW p/n 13547522361 Tools List Needed for Modifying the N54 Manifold to fit the N52: Drill and Drill Bits Angle Grinder Vice Grips or Bench Vice Dremel with Grinding Bit
__________________
Last edited by Biginboca; 03-03-2022 at 08:43 AM.. |
| 02-26-2022, 03:51 PM | #3 |
|
Colonel
3764
Rep 2,738
Posts |
N54 Manifold Swap Tutorial
To minimize car downtime on this swap I recommend prepping the N54 manifold as your first step. So these are the steps to prep the manifold for install… The N54 manifold will bolt right up to the N52 head but you will have intake leaks because the intake ports on N54 and N52 heads are situated at different heights. Here is a picture of a N52 and a N54 manifold both with string laid center to center over the mounting holes. You can see the runners sit at different heights above the string. 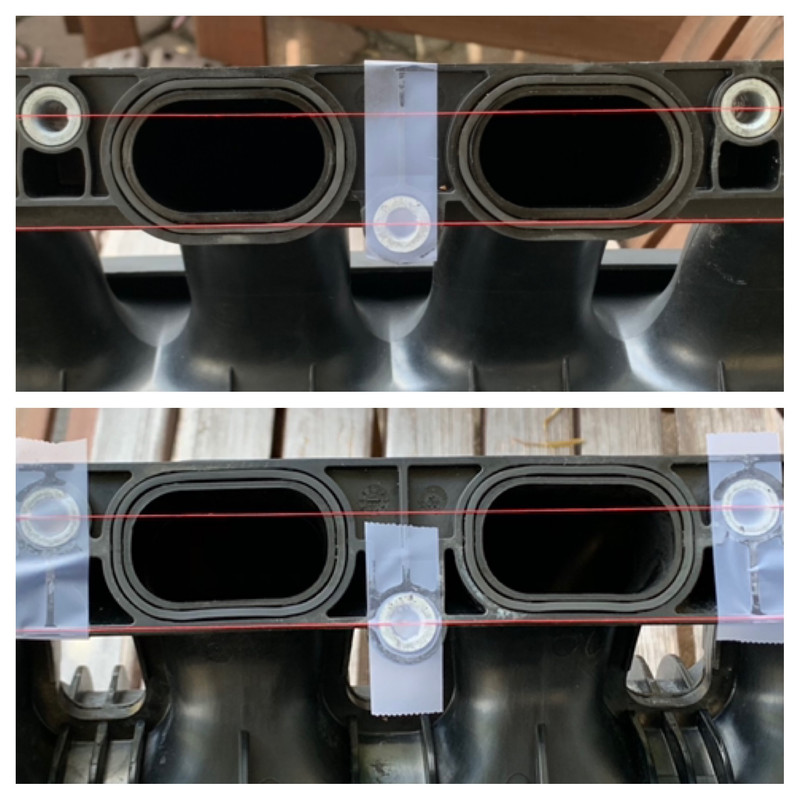 So we have to adjust the mounting height of the manifold on the N52 head to get it aligned. This way you won’t get lean codes and your ECU will properly meter the incoming airflow. (In my car I also actually measured more power after correcting the mount, so it’s definitely worth doing!) The solution I use is to make nylon shims to put inside the metal sleeves that come inside the manifold. First tap out the 7 sleeves using a long 1/4” socket and extension:  *Note the center sleeve is smaller ID and OD from the others. It is the only one which will fit in the center hole of the manifold and you will not make a shim for this sleeve. Along with these 7 sleeves gather 5 of the nylon parts and pull the front manifold bolt out of your car to use as a test fit. You might have to unplug the oil pressure sensor wire from the sensor but that is the only disassembly you will need to do on the car for getting this single bolt out. (Just remember to put this back on your car if you will be doing the swap later lol) 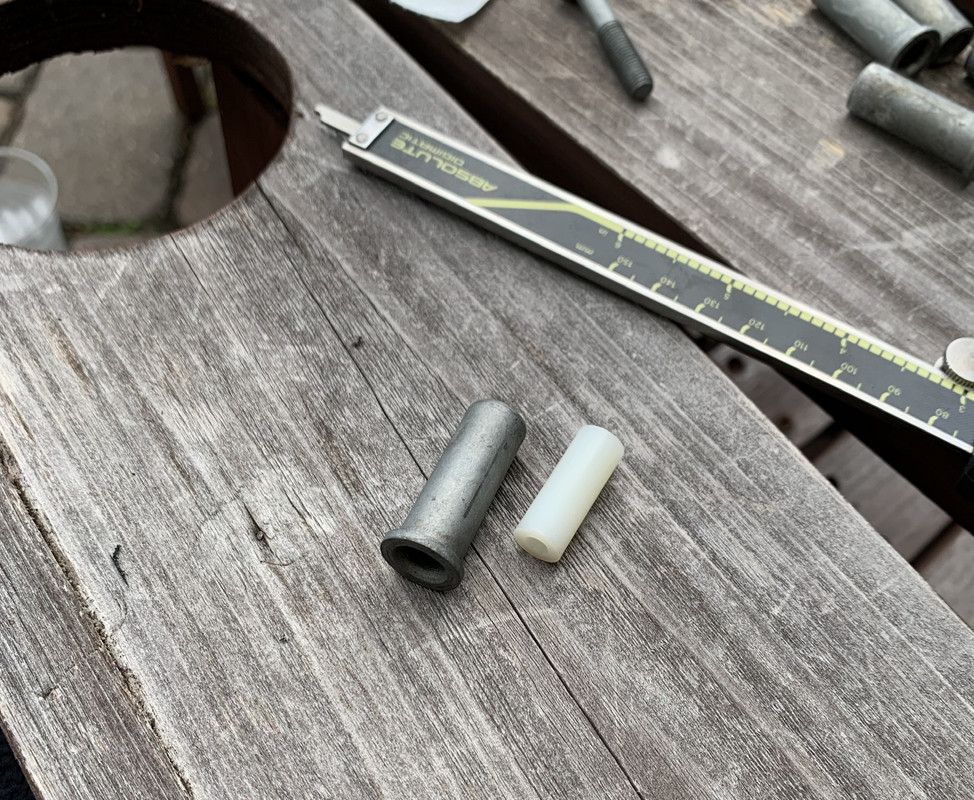  I use an angle grinder to make a channel along the sleeve holding it with a Vice Grip. This is the most tedious step of the manifold swap and will probably take 45 mins to an hour to get them all done. 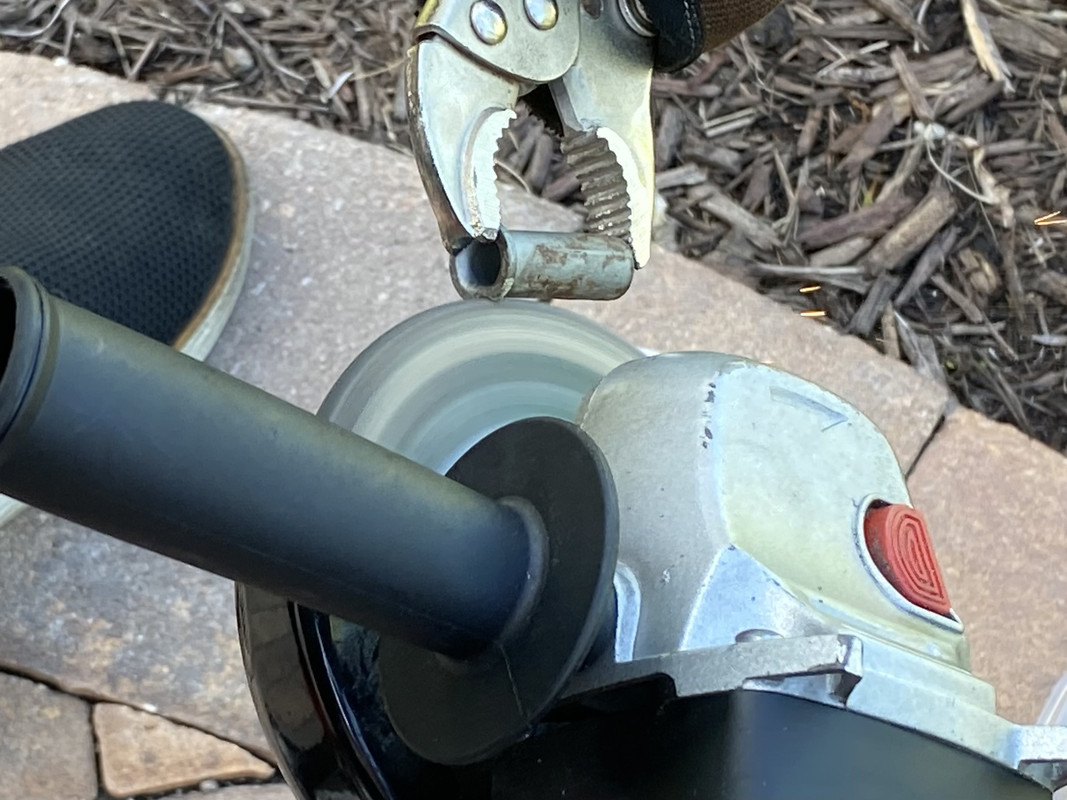 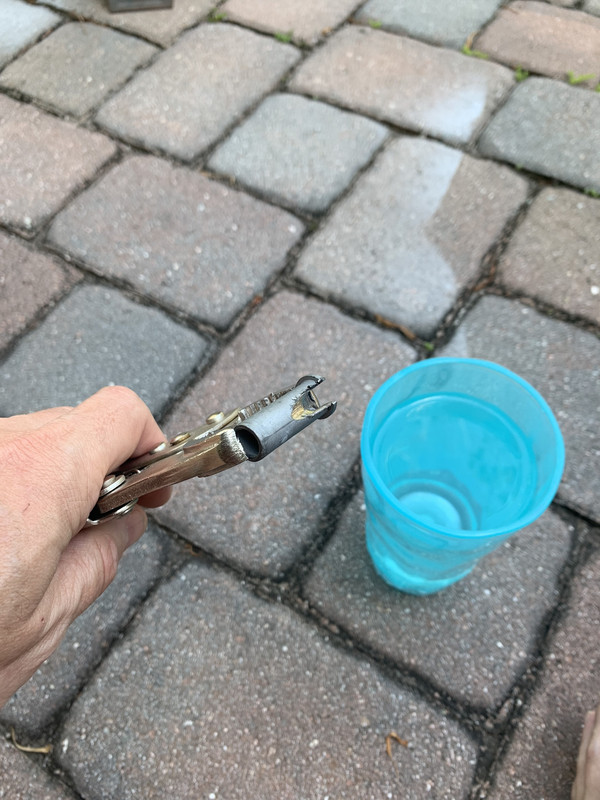 You are going to grind a channel straight down the entire side of the sleeve. Do this for all 7 sleeves making the channel wide enough for a manifold bolt to drop down into the sleeve through the channel you cut: 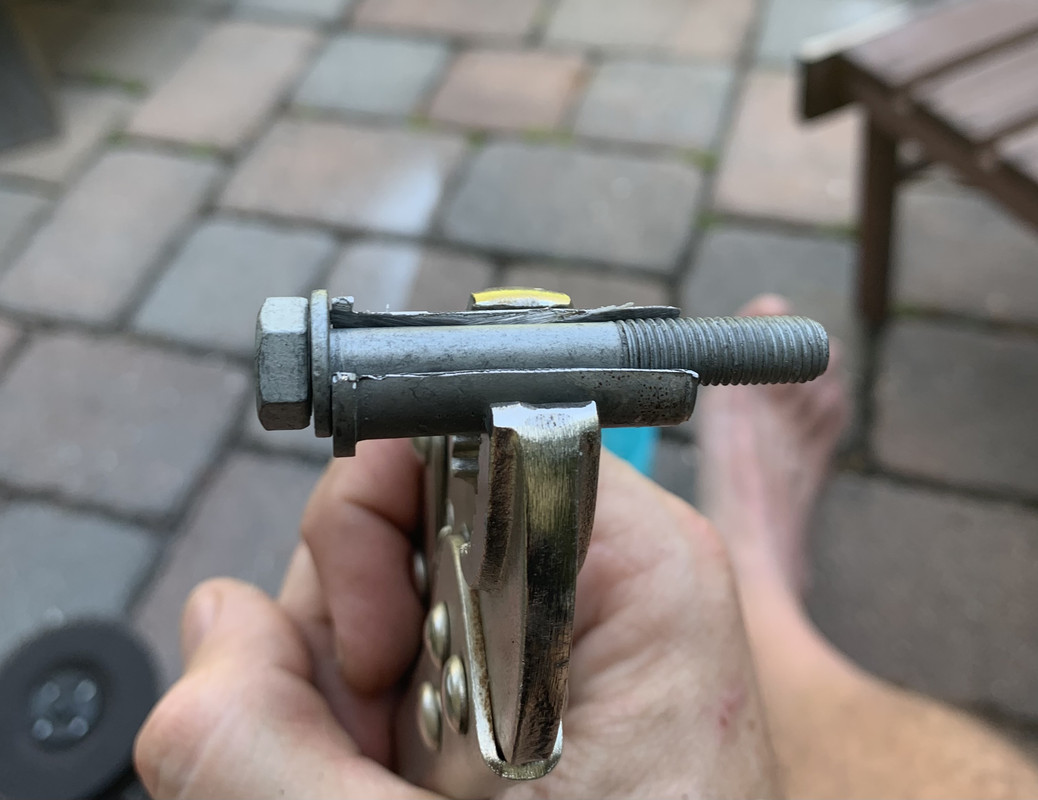 Now that the 7 sleeves are done you can start on the nylon shims. These I also use the angle grinder, just make a channel that almost touches the bottom of the ID on these (like the metal sleeves). The nylon cuts super easy so go light and be careful: 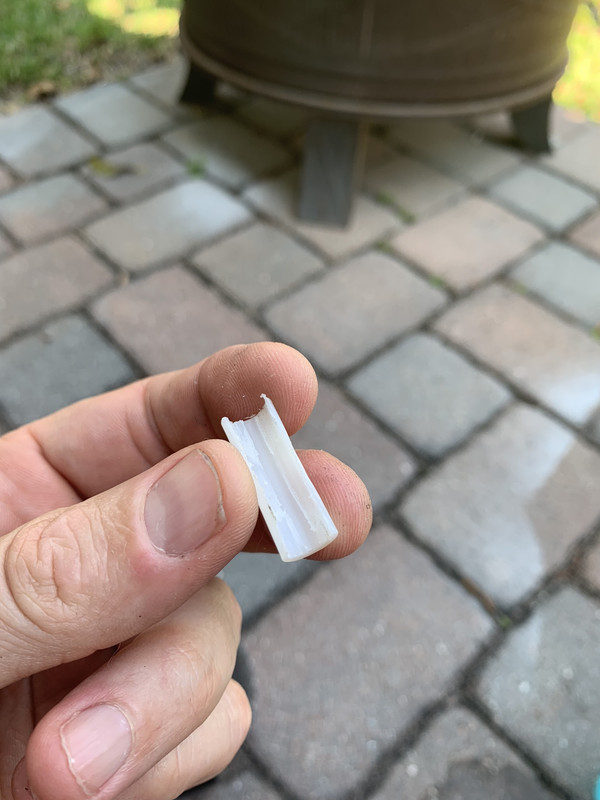 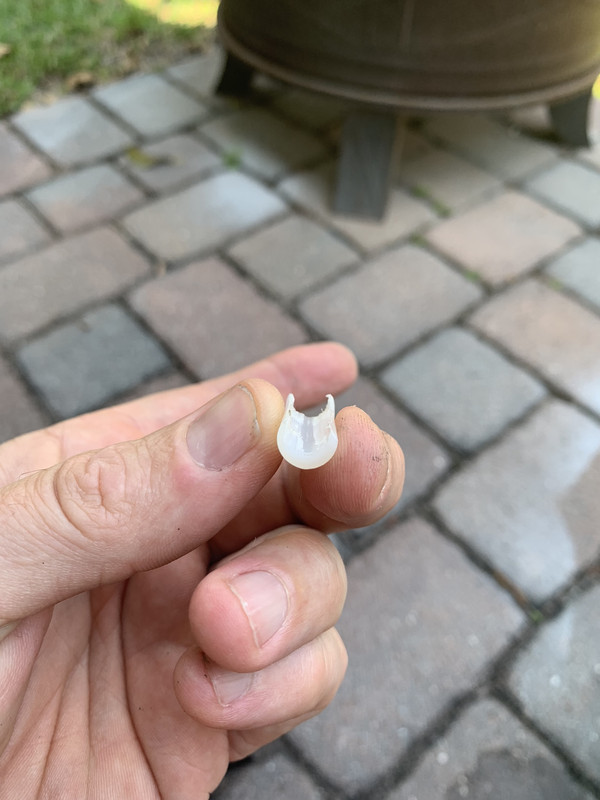 Notice how there is just a touch of the original ID hole showing untouched by the grinder. I try not to go any deeper than that original ID hole. Now you can press the nylon shims into 5 of the larger sleeves (not the single smaller sleeve that goes in the center of the manifold.). These press in easy by hand, and try to center them in the metal sleeve:  Once again test fit dropping a bolt into the sleeve/shim assembly from above make sure you can drop a bolt in and out from above. If not use the grinder again on the assembled parts (just a light touch up) so the bolt sits level in the sleeve and drops in and out though the channel: 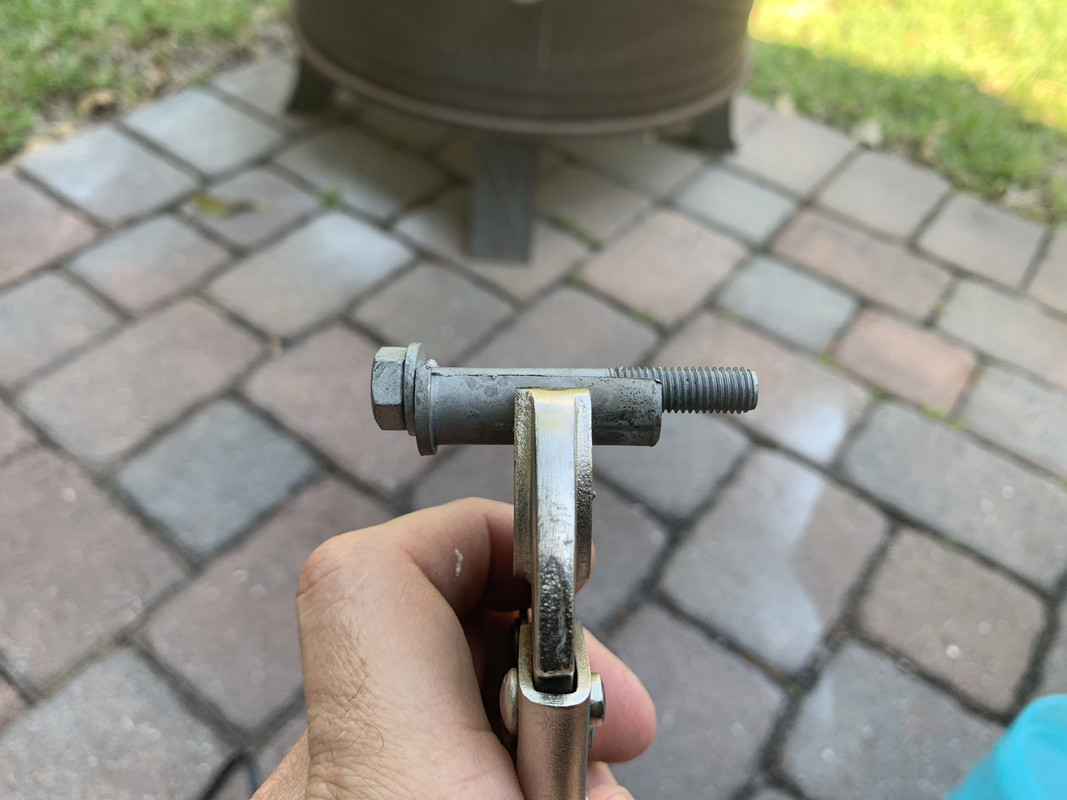 Once the bolt drops easy into all 5 sleeve shim assemblies you can install them back into your manifold with the channels you cut at the top. I put them in the outermost holes to align the manifold on the head when bolting it up, like this:   The last step of this shimming process is you now need to open the center hole with the smallest ID sleeve on the manifold upwards a bit. This is because it’s a smaller ID than the other 6 holes. I just lightly enlarge that hole in the plastic manifold upwards like 1/16” to allow the mounting bolt to sit at about the same height as it does in all the other holes. You can do this with a dremel and carbide cutter or small grinding bit, or even a drill bit and upwards pressure. We are only working with plastic after all. If you look closely you can see how I removed some material at the top of this single center hole in the manifold (again the one where the smallest sleeve fits):  The next step will be to make a place for the PCV Heater Elbow to attach to your manifold and make a mount for the elbow. Luckily BMW already made a place for the Elbow to attach they just didn’t finish it: 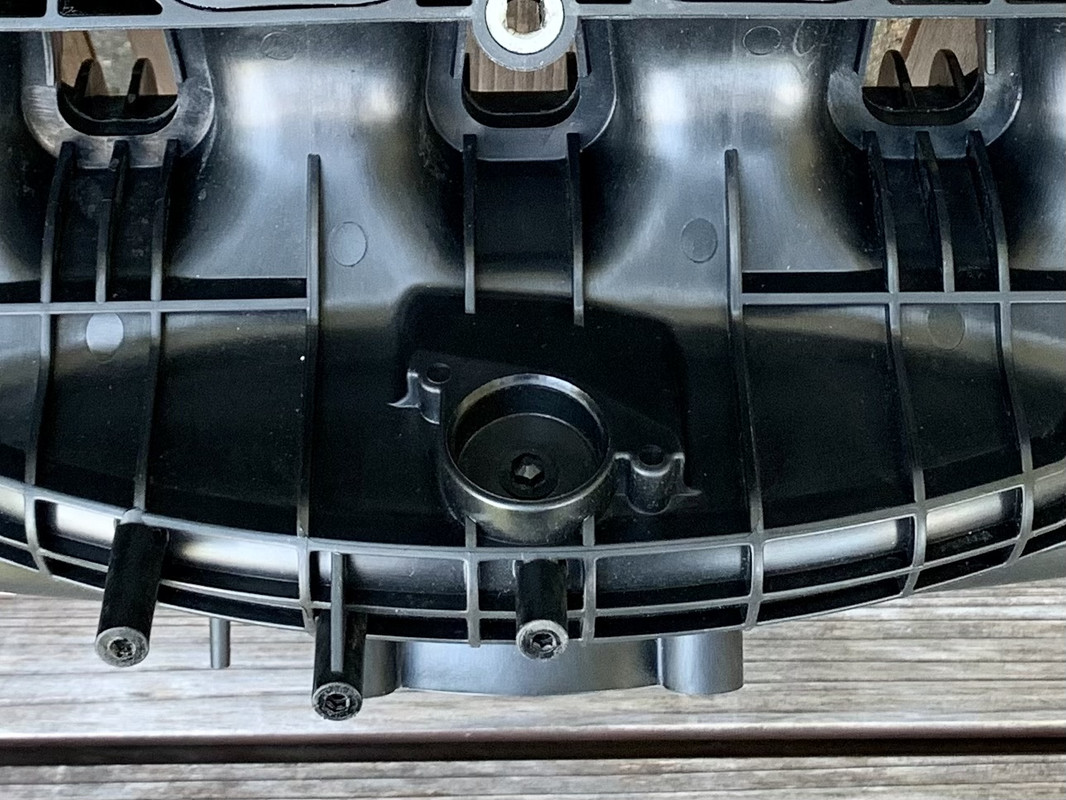 So for this part we need to just drill out the blank area and the 2 screw holes. It’s very important that you don’t damage the wall of the large center hole because the PCV Elbow has a gasket that seals on the outside wall of the hole. So don’t slip and screw up the wall surface of the hole only remove the bottom of it. I use a drill to make a few holes and then connect them with a dremel and a small grinder attachment or carbide cutter attachment:  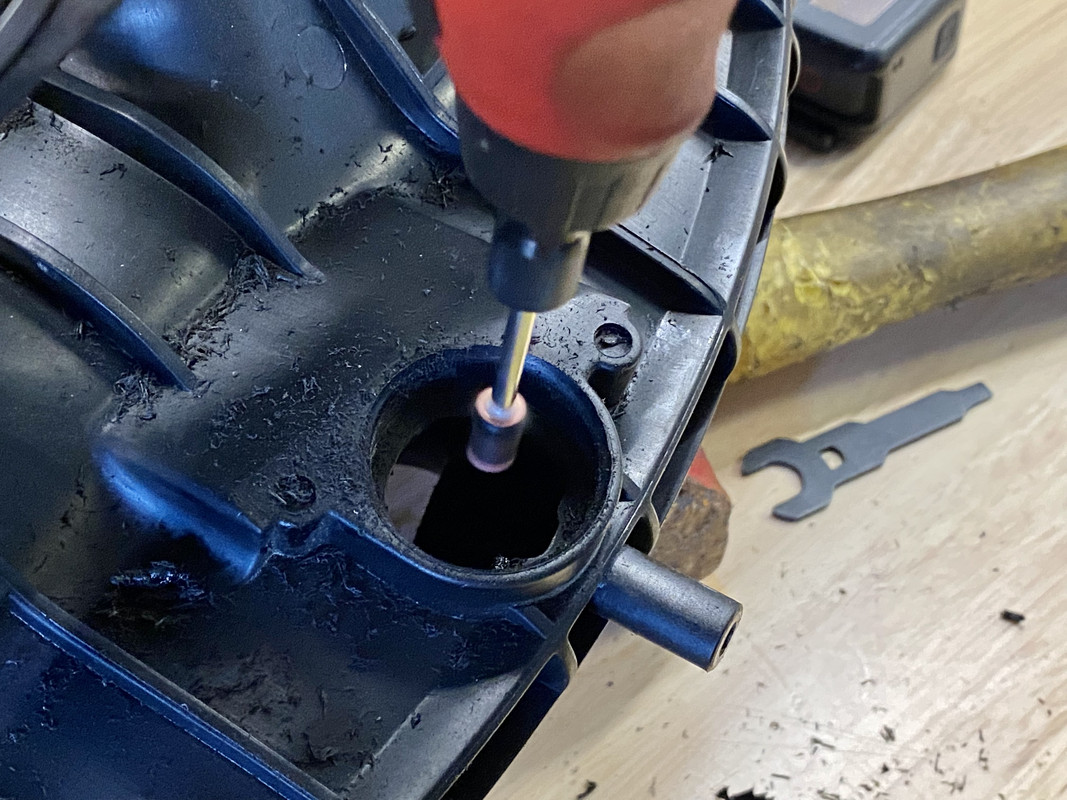 Then I use a 9/64” drill to open the 2 spots BMW left for the screws. The threads that go into these holes are about 3/4” long so make sure not to make the holes deeper than the screws, and try not to get misaligned and poke out the sides when you drill. Now if by chance you do screw up and poke too deep or out the side then I would say you can use some RTV in the screw holes when you mount the PCV Elbow for the final time and you’ll likely not have an issue (the manifold doesn’t see a ton of vacuum pressure.) This is the end result you are shooting for. A very small lip (maybe 1/16”) around the circumference of the hole and the 2 screw holes drilled and true: 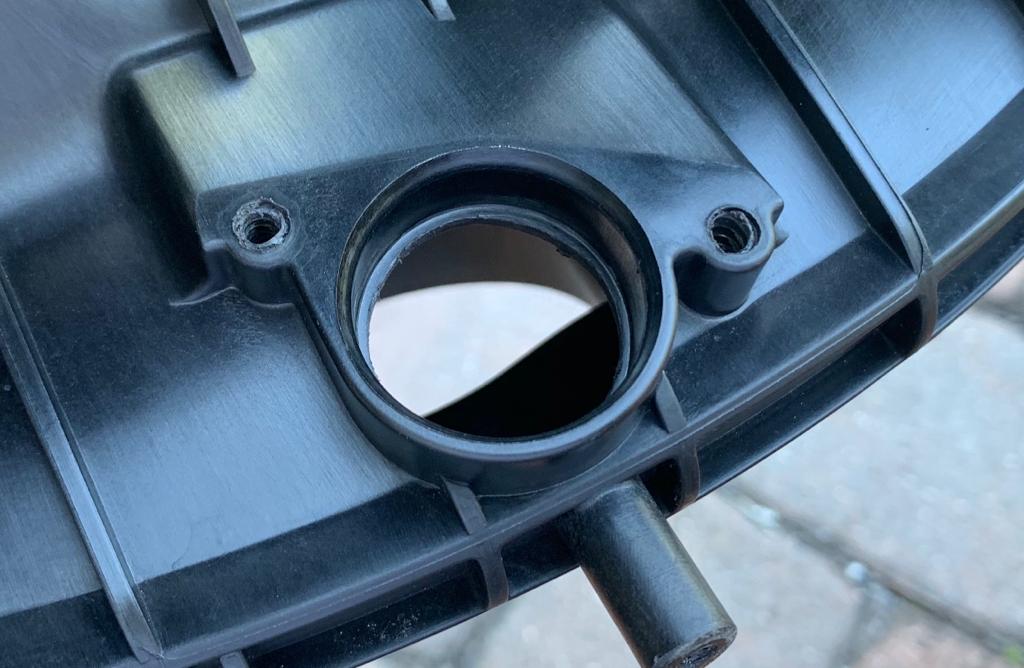 At this point you have done about as much prep as possible without taking your N52 manifold off the car. You have about 3 hours of work left once you get the old manifold out of the car, so get that out and know your car will be down until it’s done. ———————————————————— Once you have your original manifold out of the car there’s a couple steps left to prep the N54 for install. First we have to transfer the PCV Hose attachment “elbow” with the heater element. This installs on the location you opened up in the previous step and this is how it sits on the oem manifold:  Notice the place the wire plugs in faces forward and the PCV hose enters from above (when the manifold is on the car the runners are at the top). So now take that PCV elbow off your old manifold and do a test fit into your N54 and make sure it seats deeply and centered. If it doesn’t you might have to open up the large hole in the manifold a little more with your dremel. If you were to bolt this elbow in right now with the holes you drilled in the manifold you would find the PCV hose doesn’t enter at the correct angle and the wire is not going to be oriented to plug in on the side facing the front. I strive to stick with the OEM arrangement because I’m not sure if oil collects inside this fitting if the PCV plugs in from below, or whatever so I make a clocking ring for it to get it back to near OEM orientation. This is what these parts are for:   So the the first step is to center the PCV elbow on your large metal ring and mark 2 holes for the screws to attach it to the ring. Then screw the ring to the manifold using the 2 holes you just drilled and install the PCV elbow into the manifold (clocking it into the orientation in the pick below) and mark the second set of screw holes on the ring. This is what the ring will look like, you should have marked and drilled 4 holes:  Notice I have it slightly angled so the PCV hose attachment points a little to the rear, this is because the space is tight against the runner above the elbow for plugging and unplugging the PCV hose if the Elbow is perfectly upright, so I prefer to clock it a bit backward. (This will make sense if you look at the picture below.) 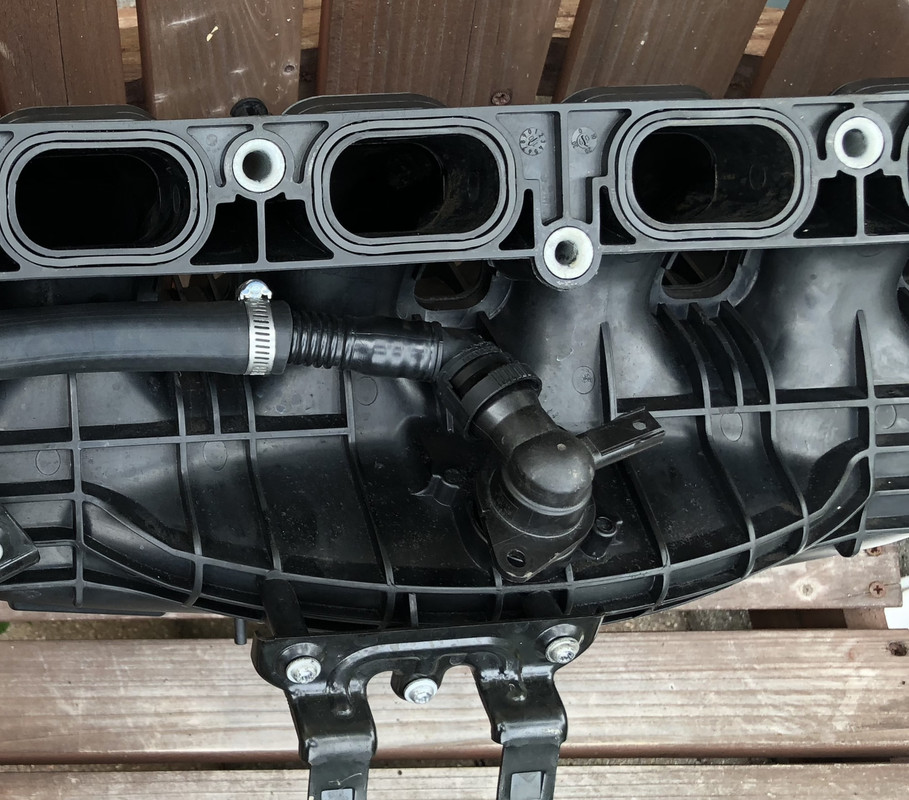 Once you have your 4 holes drilled you can use the stainless screws, nuts, washers, and nylon spacers to mount the PCV elbow to the manifold in the near factory orientation. 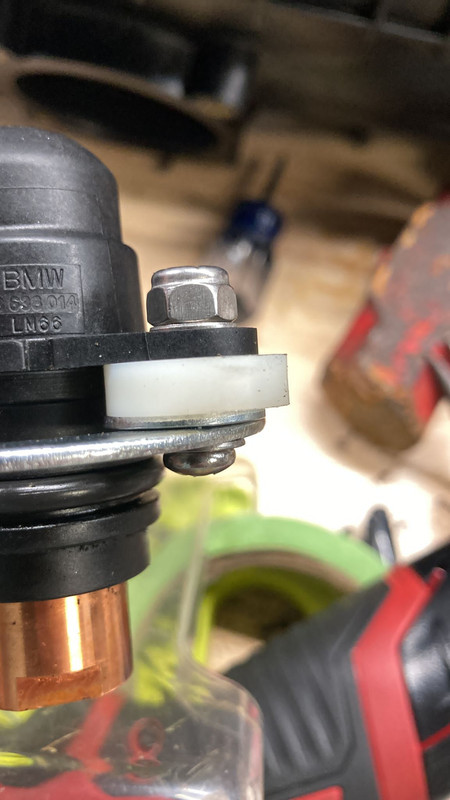 And this is the end result we are working towards for the PCV elbow install step of the swap. 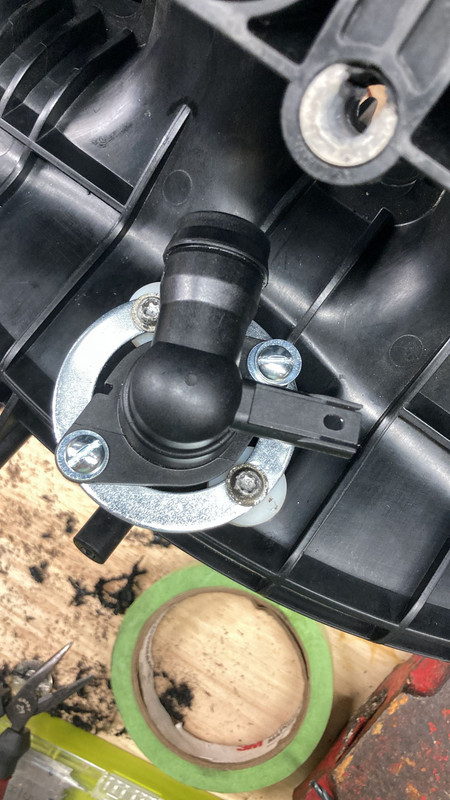 Next up we are going to adapt your old PCV hose to fit the new set up. If you have a hose which only had one manifold attachment then it’s likely already good to go. All the ones I’ve seen have had 2 fittings to attach to the manifold so I’ve had to cut out the middle fitting and then rejoin the hose without it. So turning this:  Into this: 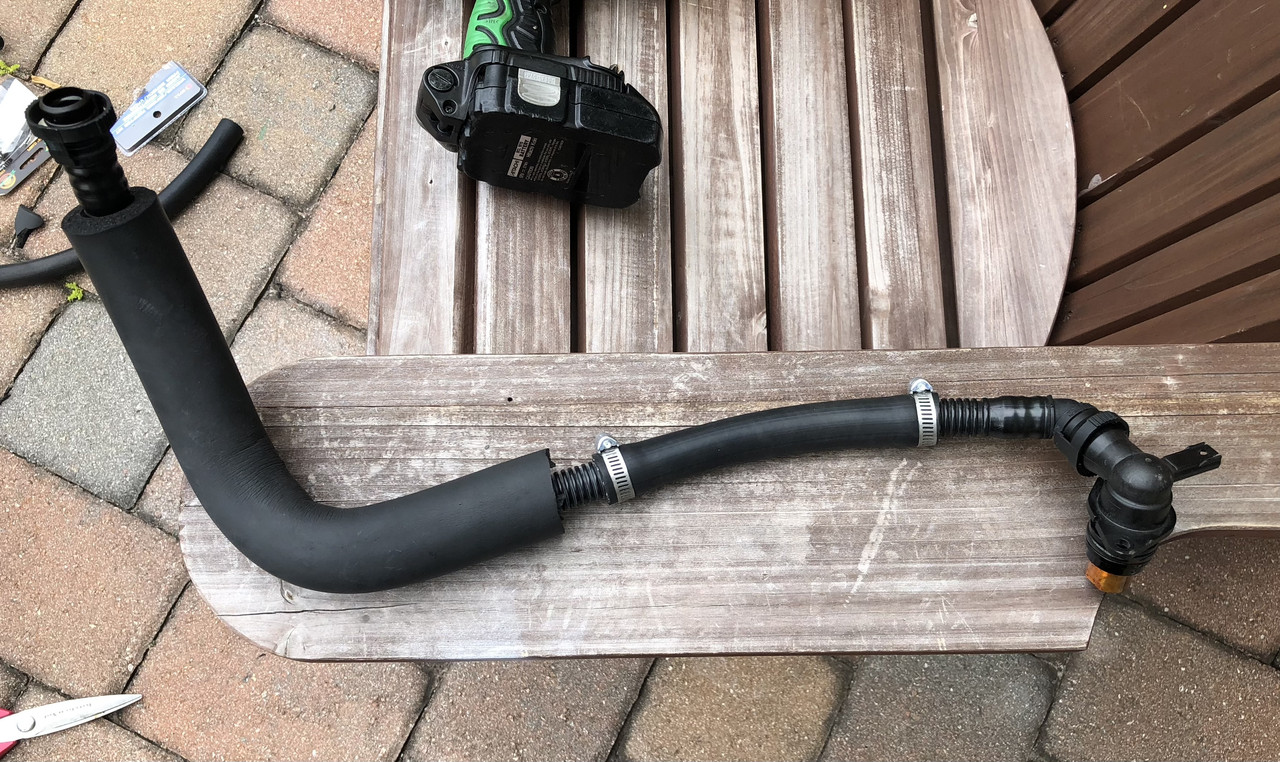 I do this with 2 hose clamps and some “purchase by the foot” vacuum line from auto parts store. They keep it on a spool behind the counter so you have to ask for it. I used 3/4” vacuum tubing and a couple hose clamps. Just push the ends you are joining inside a maybe 6” section of vacuum line (they should fit snugly inside) and then use some hose clamps to seal it. This is the end result: 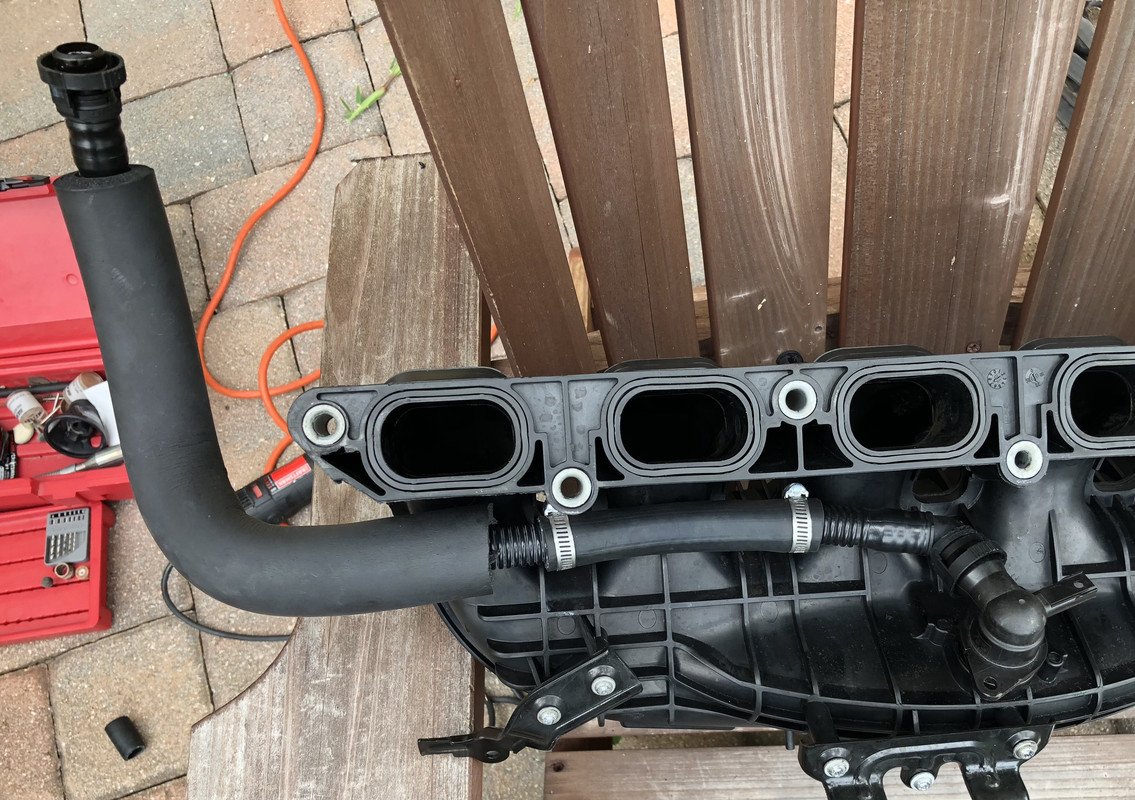 Only a few small details left and the N54 manifold can go into the car! The next step I do is I start transferring the junction box bracket and power wire brackets (the positive cables that pass over the engine attach here) from the old manifold. So just look at your original manifold and transfer as many brackets as you can. You’ll have to drill a few holes in brackets to get them transferred. Like the junction box bracket needs 2 new holes drilled in it but there is a place to mount it using the same screws under the N54 manifold. 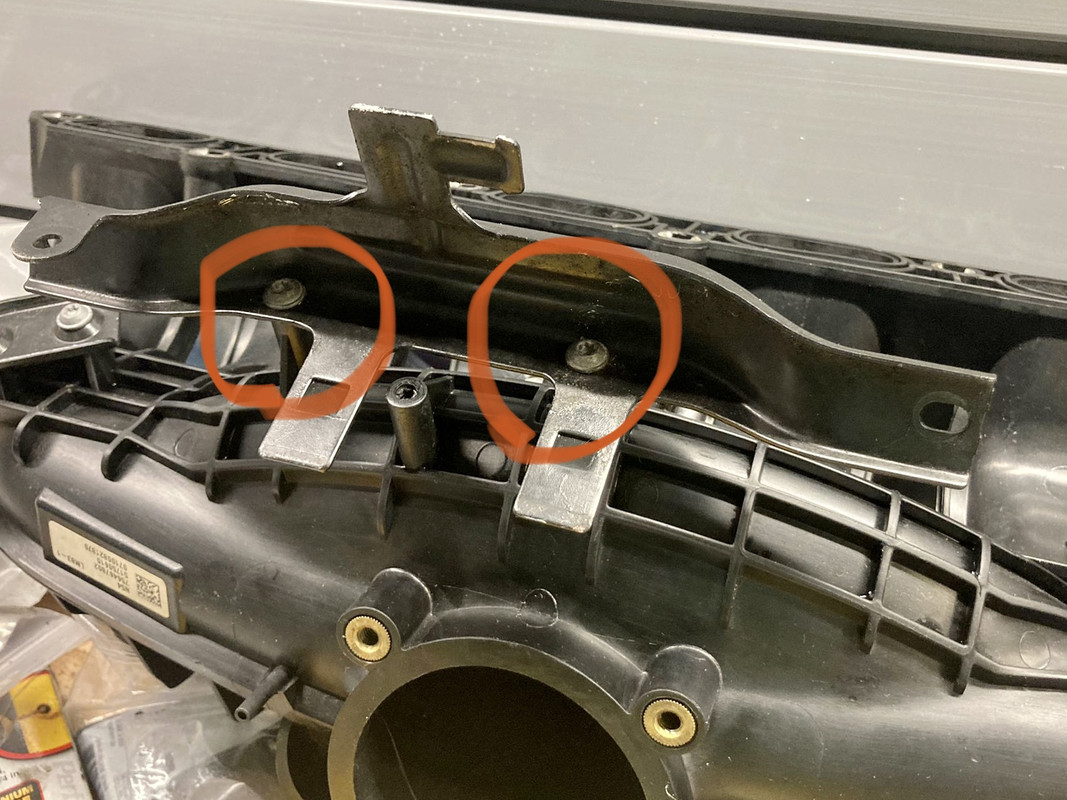 Once you have transferred the brackets swap the MAP sensor from the top of your N52 into the top of your N54 manifold. This is the sensor on top at the rear of the plenum on your stock manifold which attaches with 2 screws. This will bolt right in using the same screws. **Do not use the boost sensor that likely came attached to your used N54 manifold, make sure to swap the correct sensor from your old one** If you have a N51 congratulations, your N54 manifold is done and you are now ready to install your manifold in the car and build the Airbox to Throttle Body intake pipe. If you have a N52 the last step before install is to plug this Vacuum Line Port on the front of the manifold next to the throttle body. The N51 has a line to attach here but the N52 doesn’t. For this I just put some RTV (silicone might work also) on a small screw and just screw it into this hole. The plastic is soft and will accommodate most any small screw you have lying around. Bonus points if you use a stainless screw lol For N52 your manifold is now ready to bolt into the car and proceed to the last steps, making the intake pipe to connect the Throttle Body to the Airbox. ———————————————————————————- For this last step I used 3 pieces from Amazon which I linked in the post above, a 45* silicone elbow on the Airbox end, an approximately 3” long piece cut from the 3.5” ID aluminum tube, and the 45* 3.5” ID Elbow on the throttle body. Here’s what I ended up with: 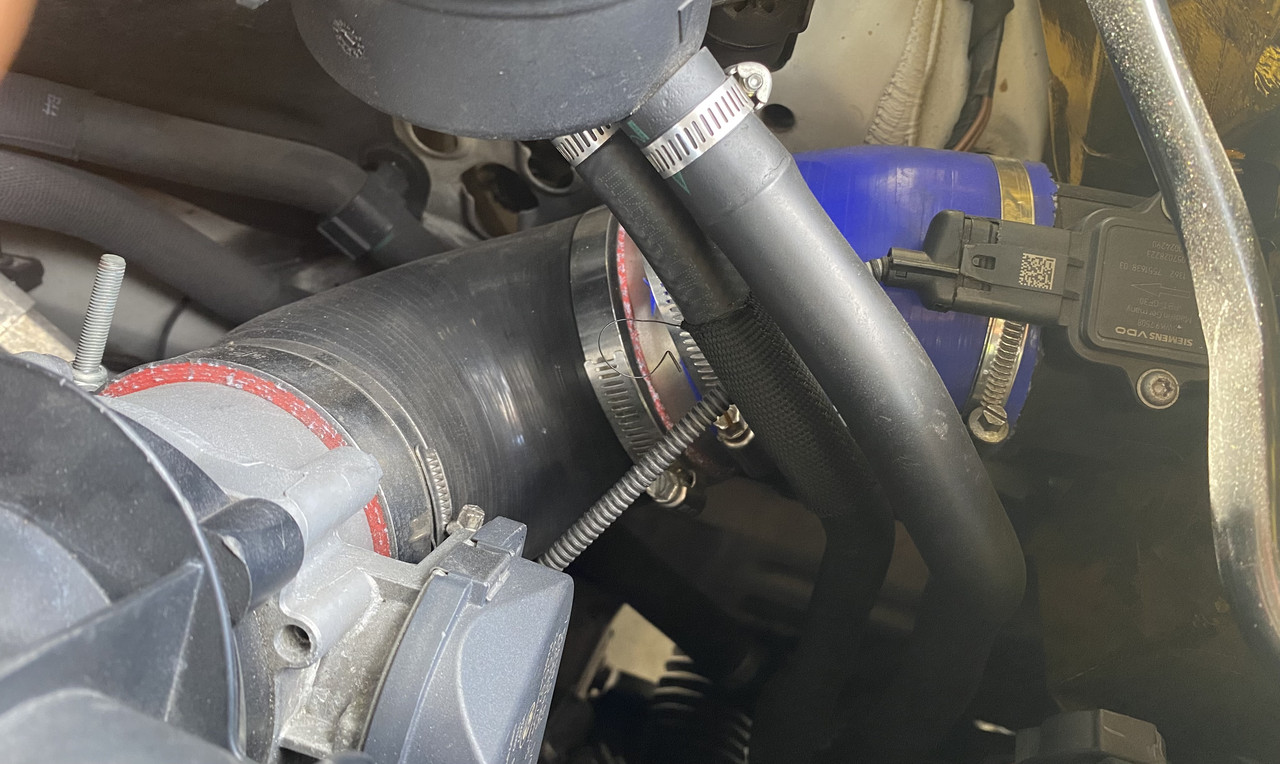 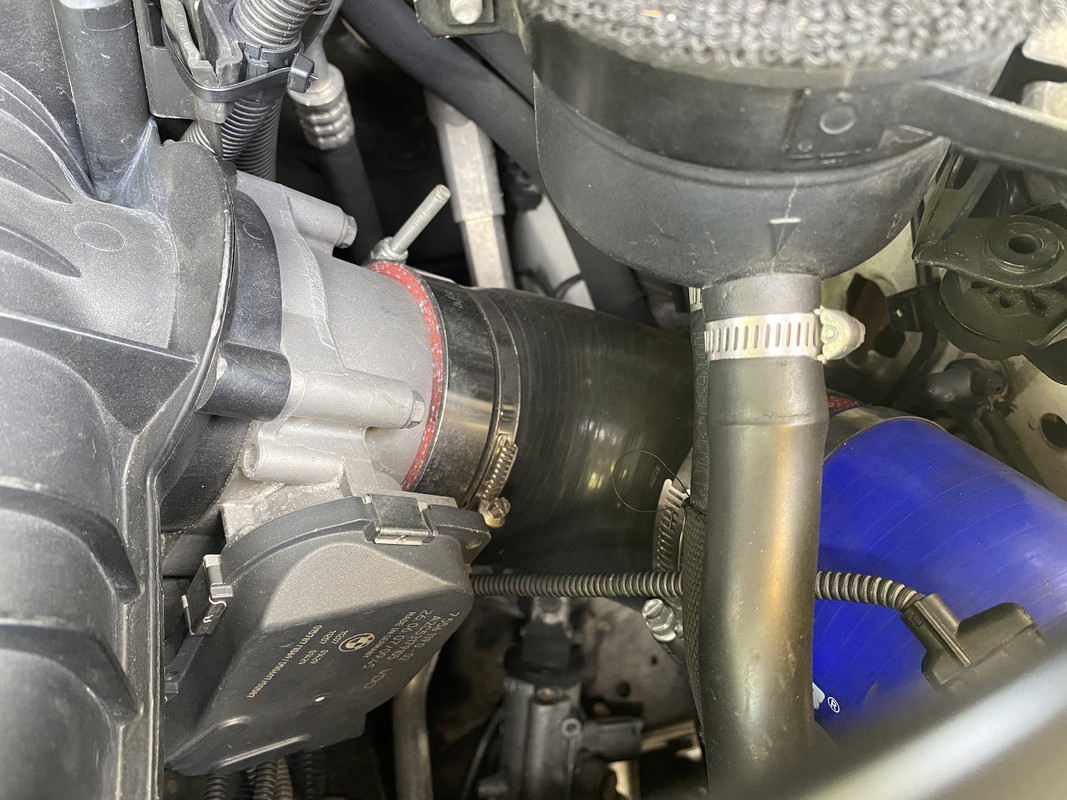 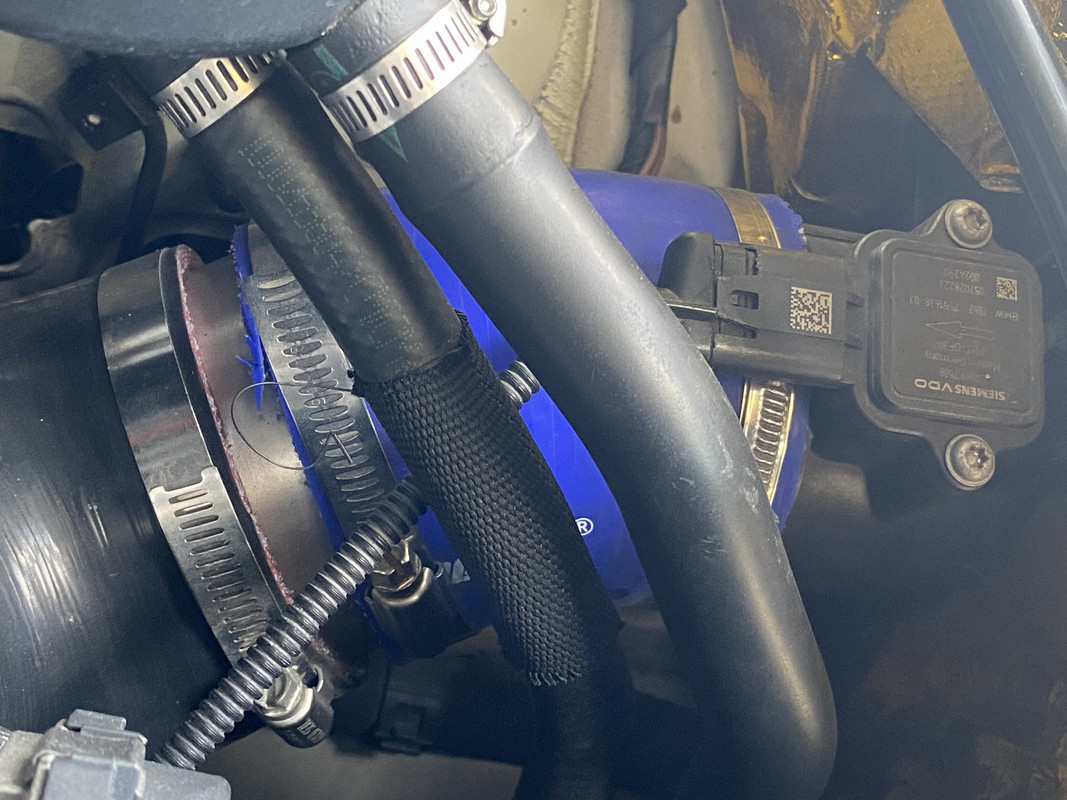 This is pretty self explanatory. I used 2 hose clamps on the TB end of the 45* elbow because it seemed to help make it fit better there. The 3.5” Aluminum tube can be tricky to get inside the 3.25” 45* Elbow. I sprayed some silicone lubricant on the parts and was able to get the elbow over the tube. If that doesn’t work for you maybe try heating the silicone some to soften it. One of the swaps I did with my buddy recently he just mated the 2 silicones directly and left the aluminum tube out. 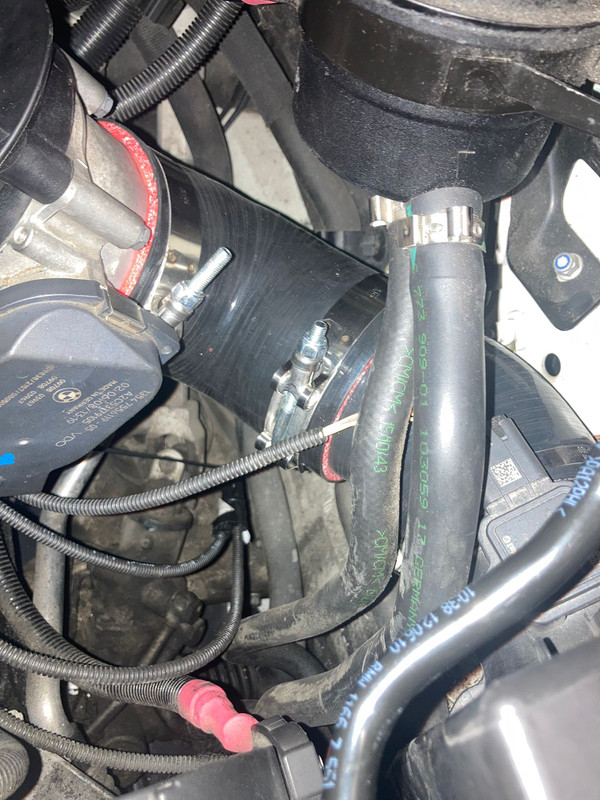 His comment was “I actually skipped the aluminum tube and just put one silicone piece in the other. Then I put a metal clamp around it to reinforce it from collapsing under vacuum.” I felt the aluminum tube was needed to keep the silicone from collapsing but he seems to not be having any issues without it. So there you go… Your N54 Manifold Install is now complete. Now install your tune and you should be good to go!
__________________
Last edited by Biginboca; 03-23-2022 at 01:35 PM.. |
|
Appreciate
5
|
| 02-26-2022, 07:48 PM | #4 |
|
Art Collector
2425
Rep 3,448
Posts |
Love your build. Great post. Currently dealing with the joys of failing DISAs, and as much as I like the idea of the N54 manifold if only for the lack of those stupid valves, I don’t spend enough time in those upper rev ranges where it really shines
 . .Do you really think a drop-in air filter will gain 5+ HP? I can’t find a Euro intake for a reasonable price, so K&N would be next-best option. But even that’s like $60 USD, which begs the question of whether it’s better to just pony up for the Euro box, haha…
__________________
When I'm dead, just throw me in the trash.
|
|
Appreciate
1
Biginboca3763.50 |
| 02-26-2022, 09:01 PM | #5 | |
|
Colonel
3764
Rep 2,738
Posts |
Quote:
You can read more about the dyno for those mods here: https://www.e90post.com/forums/showthread.php?t=1186611 When I talk about adding a secondary intake pipe this is what I’m referring to: https://www.e90post.com/forums/showthread.php?t=1696371
__________________
Last edited by Biginboca; 02-26-2022 at 09:08 PM.. |
|
|
Appreciate
1
e90yyc2425.00 |
| 02-27-2022, 01:16 PM | #6 |
|
Old Geezer

360
Rep 1,193
Posts
Drives: 08 E92 N53B30
Join Date: Jul 2007
Location: Budweis
|
N54 intake manifold on N53:
Maximum output 297.23 PS, maximum torque 307.02 Nm. Thicker line is N54 manifold with BigBore TB, Supersprint headers and Supersprint catless exhaust. Thinner line is N54 manifold only.
__________________
 Last edited by BudVlad; 02-28-2022 at 06:17 AM.. |
|
Appreciate
1
Biginboca3763.50 |
| 02-27-2022, 02:46 PM | #9 | |
|
Old Geezer
360
Rep 1,193
Posts
Drives: 08 E92 N53B30
Join Date: Jul 2007
Location: Budweis
|
Quote:
__________________
Last edited by BudVlad; 02-28-2022 at 02:19 AM.. |
|
|
Appreciate
0
|
| 02-27-2022, 07:12 PM | #10 |
|
Art Collector
2425
Rep 3,448
Posts |
BudVlad Damn almost 300 hp?
I know the N53 has some fundamental differences from the N52: DI, no Valvetronic, etc. Is there really that much additional tuning potential from these over the N52s? From what I understand you wouldn’t see those kind of figures with an N52. Genuinely curious to hear about this.
__________________
When I'm dead, just throw me in the trash.
|
|
Appreciate
0
|
| 03-01-2022, 10:20 AM | #11 | |
|
Major
 

858
Rep 1,363
Posts
Drives: 09 E90 335i M-Sport 6MT RWD
Join Date: Nov 2017
Location: Ontario, Canada
|
Quote:
Last edited by neilvan; 03-01-2022 at 10:53 AM.. |
|
|
Appreciate
1
Biginboca3763.50 |
| 03-01-2022, 11:08 AM | #12 | |
|
Colonel
3764
Rep 2,738
Posts |
Quote:
Maybe in Europe there was a 2006 N54 with the Oval Plug? The car was introduced there earlier than the US, but I’m just hypothesizing that the plugs may be different for 1st model year N54’s. I do know this, it is possible to repin an early N52 car with the oval plug to run the newer square plug because I’ve received messages from guys who have done it. (Installed a newer square plug N54 TB into an older oval plug N52 car.)
__________________
Last edited by Biginboca; 03-01-2022 at 11:33 AM.. |
|
|
Appreciate
0
|
| 03-01-2022, 11:41 AM | #13 |
|
Private
 56
Rep 92
Posts |
I think N54 only ever come with MSD80 so they all have the square connector. It goes straight to MSV80 ecus on N52K engines, i think they all have black engine cover and plastic vc with integrated ccv. For earlier N52s i think some splicing is needed.
But isn't the N52 TB usable on N54 manifold? I know N54 TB fits on 3SIM because i am using that now with zero issues. I know it is smaller ID but in a pinch I guess it would bolt on. The bad thing would be you would need to drill another provision on the manifold for the tank breather valve, cause N52 TB doesn't have one |
| 03-01-2022, 11:46 AM | #14 | |
|
Colonel
3764
Rep 2,738
Posts |
Quote:
__________________
|
|
|
Appreciate
1
|
| 03-01-2022, 11:49 AM | #15 |
|
Colonel
3764
Rep 2,738
Posts |
BTW I appreciate all info and corrections anyone can add to this thread! As you can see I’m still working on compiling all the info but in the end I hope this thread becomes the one place everyone can find answers they need regarding this swap.
__________________
|
|
Appreciate
1
ornicar136.00 |
| 03-01-2022, 11:55 AM | #16 |
|
Major
858
Rep 1,363
Posts
Drives: 09 E90 335i M-Sport 6MT RWD
Join Date: Nov 2017
Location: Ontario, Canada
|
Real oem shows the same throttle body part number (and linked square plug) for the earliest production month in North america and Europe. Seems like its only square.
Im trying to put an N54 TB on my 3 stage mani (07 MSD70 E61); The MSV70 plug looks like you can de-pin it but the factory MSD80 plug looks sealed. Im currently trying to see if the pins themselves are the same (just depin and buy a new square connector) or buy a male bosch DBW 6pin (the 2006 connector style) and make a short adapter harness with a cut continental pigtail from the scrapyard |
|
Appreciate
1
Biginboca3763.50 |
| 03-01-2022, 03:04 PM | #18 |
|
Old Geezer
360
Rep 1,193
Posts
Drives: 08 E92 N53B30
Join Date: Jul 2007
Location: Budweis
|
Comparison of N52/N53 TB and N54 TB. Plugs are the same. I used N54 TB for a while before I switched to N52 BigBore TB from Riot Racing.
__________________
|
|
Appreciate
0
|
| 03-02-2022, 12:04 AM | #19 | |
|
Second Lieutenant
 
136
Rep 265
Posts |
Quote:
The last photo is a N52 Elbow fitting on a N54 TB. |
|
|
Appreciate
0
|
| 03-02-2022, 03:58 AM | #20 |
|
Private
56
Rep 92
Posts |
I was wondering if there is space to machine the manifold holes themselves making them oval and slide the metal insert 1.5mm up in them and finally epoxing the inserts in place, instead of machining the inserts and adding nylon spacers.
Do you think it is worth a shot? Last edited by Jros; 03-02-2022 at 04:15 AM.. |
|
Appreciate
0
|
| 03-02-2022, 05:58 AM | #21 | |
|
Colonel
3764
Rep 2,738
Posts |
Quote:
What would really be ideal is if someone could just 3D print new inserts that mimic what I’m making with an angle grinder. Just print a new “U” shaped sleeve that can slide into the manifold. This would be very easy to do nowadays, but I’m too old to figure it out myself so still using the angle grinder.
__________________
|
|
|
Appreciate
1
chilledn5265.00 |
| 03-02-2022, 06:20 AM | #22 |
|
Private
56
Rep 92
Posts |
I would fill the extra space with epoxy, effectively locking the sleeve in position, as the hole was round again. I don't know if my wording makes that clear, my english is not the best
 Obviously having machined or printed already correctly shaped inserts would be the best approach I may try oval holes and epoxy filler soon |
|
Appreciate
1
Biginboca3763.50 |
 |
| Bookmarks |
|
|


