

|
|
|
|
 |

|
 |
BMW Garage | BMW Meets | Register | Today's Posts | Search |
 |

|
BMW 3-Series (E90 E92) Forum
>
DIY: Auto Trans Fluid and Filter Change for 328i/328xi
|
 |
| 12-14-2017, 12:12 AM | #67 |
|
Major
 

401
Rep 1,425
Posts |
|
|
Appreciate
2
lab_rat394.50 CornerGorillaPit238.50 |
| 03-03-2018, 02:54 PM | #68 |
|
New Member
2
Rep 6
Posts |
Thanks to OP for the nice DIY.
I just did my ATF again on my 2008 e90 328i with the GM tranny. I did it the first time at 120k, along with new filter and pan gasket. That first time I used Havoline synthetic Dextron VI from amazon. I chose this ATF because it was Dextron6 and it was cheap, only $62 for 12 quarts. This first ATF change made a huge difference in driveability compared to the old worn out lifetime BMW fluid, but it was still shifting smoothly with the original fluid, so I really only did it because I had read that I should do it. My wife was the main driver of the car and she was not complaining of any issues. After changing the fluid and filter and adding 5qts Havoline Dex6 I noticed a big improvement in driveability. More direct connection of engine to the road, my wife said it felt like a new car. Shifting remained smooth. But unfortunately it didn't last. Now 156k, after 36k miles on the Havoline ATF the shifting became jerky and ill timed and it flared a little while upshifting 2>3 and 3>4 on easy acceleration. I knew I had to change the ATF again. After a little more research I was ready to swap it again. My Bentley manual says the total ATF capacity for both the GM tranny and the ZF tranny is 9.5 liters (10 US qt.) "with torque converter drained." So this is the total ATF in the tranny. When we drain only the pan about 4 qts comes out. When we remove the pan and filter then 5 qts comes out. The rest of the old oil stays in the transmission, torque converter and the ATF cooler circuit. I looked online to find a way to "drain the torque converter," but I didn't find anything. On my Honda Odyssey I can do a flush by filling ATF dipstick and draining after the ATF cooler in the radiator so I get a complete flush. Maybe that's possible here too, but require further investigation, and breaking into the ATF return line from the radiator. So in order to get an (almost) complete ATF change we need to repeat this drain/fill procedure. Drop the pan and change filter the first time, to get the most old oil (5qt) out the first time, then just do drain and fill (4qt) a couple more times to further dilute the remaining old oil with new. Drive the car a few miles to thoroughly mix the old and new oil before each drain/fill. So after replacing 5 qts with new, we are left with 50% old oil still in there. Another 4qt drain (without filter) removes 2 qts new and 2 qts old. By adding 4 qts new then we replaced 2 qts of the old oil and we're down to 30% old oil still in there. Drain another 4 qts (.4*.3=.12) leaves 12% of the old oil remaining, replacing 88% of the old oil with new. Repeat this triple drain every 50k, that's gotta be good enough. Right? In the maintenance section of the Bentley manual it also says: "The ATF in both the ZF and GM units should be changed at service intervals no greater than 100k miles. 60k-80k should be considered a more acceptable maximum interval." and "When checking the fluid level it is critical that the temperature of the fluid be maintained at 30 - 50 degrees Celsius," (86-122F.) Use infrared thermometer or use BMW scan tool to access ATF temp sensor. In my world that means the aluminum ATF pan should feel slightly warm to the touch (that's <100F.) The last time I changed the ATF I only did one change (with filter) so I only changed 50% of the ATF. I think it broke down so quickly because half the fluid was up to 156k miles, and the Havoline probably is not as good quality as OEM "lifetime" ATF. Maybe if I did triple drain/fill with Havoline it would have lasted longer. So this time I bought two 5 liter bottles of Pentosin ATF from fcpeuro.com. I also considered Lubri-Moly 1800. I plan to change ATF on a triple flush every 50k, so it probably doesn't matter as long as I use a high quality brand, and not use the cheapest dextron I can find. ymmv. Turner sells BMW brand ATF for similar price as the Pentosin or Liqui-Moly. I still have the Havoline in there now, I just did one drain/fill today because I was struggling under the car with a quart bottle hand pump. Then we switched to my 200ml syringe pump, that was a little faster but much more messy. My nerves were shot after one ATF swap, so there's no way I could do that procedure 2 more times using these small hand pumps. So today I ordered a PowerFill Pro 2 gallon tank from Motive Products for $85. It is a pneumatic pressure tank that fills by opening the valve. I'll drain and fill 2 more times with Pentosin ATF next week. But all the shifting problems and flaring and jerky feel are totally gone with replacing only 4qts (40%) of the old oil, with cheap Havoline synthetic dex6. I have to assume it's the additives that are being used up and cause the shiftingf problems. OEM quality ATF will have more of these additives than cheap dextron so it can last longer. Just my opinion. Summary: - Definitely change your ATF! All oil is a sacrificial part - New ATF improves driving enjoyment dramatically, and that's what we pay for with a BMW, so regular ATF change is definitely worth the cost and effort. - Invest in a good ATF pump to make the job much, much easier. - Repeat the ATF drain/fill three times to achieve a 90% ATF change. 1x = 50% ATF change, and it doesn't last. - Final fill with engine running and ATF pan feels warm. Funny, my BMW dealer recently quoted me $1560 to change ATF in my wife's 2016 X3. 8 qts magic lifetime ATF @$125 ea plus new pan/filter $400 and labor. I'll be DIYing that one also, at 50k. Rich |
|
Appreciate
1
StradaRedlands4919.50 |
| 03-03-2018, 03:20 PM | #69 | |
|
Colonel
 2182
Rep 2,806
Posts |
Quote:
__________________
E82 / BMWP Springs / Koni Yellows / M front control arms / Adjustable front endlinks / M rear guide rods / Whiteline Poly RSFB
|
|
|
Appreciate
0
|
| 03-08-2018, 02:40 PM | #70 |
|
New Member
2
Rep 6
Posts |
Will do. I got the pump tank yesterday, it looks nice, quality tool.
I'll want to final fill with the fluid at minimum temp range of 86F (30C) so the most amount of fluid goes in yet still within spec. More fluid can hold more heat, so lower temperature and more additives. It's a thin aluminum ATF pan which conducts heat very well, so you can feel the oil temp in the pan. As long as it feels slightly warm to the touch then you're above 86F. Or just do it on a day that's >86F ambient. No need for IR thermometer. Found this advice about the 6L45 GM trans: http://etereman.com/blog/general-mot...5-transmission After the recent ATF change I do have the ticking sound from the tranny, I can only hear it at idle, and not at startup. I think it's from sucking air into the ATF pickup while starting it without enough oil in the pan. The car wasn't exactly level, it was tilted down at the rear by a degree or two so I couldn't get the full 4 qts into the pan before it started dripping out. I think I had about 3qts, but could have even been a little less. I could hear it suck air before I could get more fluid in, due to the poor handpump situation. I have not taken the car on the highway yet, so I assume it will go away once I get it up to speed as others have reported. I will check that the car is level next time, or even tilt forward a little. What do you guys think about this idea?: I do pseudo ATF flushes on my Honda every 30k. I drain and fill the pan with new ATF, then run the engine while catching used ATF from the cooler return at the radiator in a glass half gallon milk bottle. When bottle's full my helper shuts off the engine, I put 2 more qts of new ATF in the pan and run it again. Repeat a few times until the discharge from the cooler line looks clean. It uses the same amount of ATF as the total ATF capacity, 7qts. Original 2000 Odyssey trannys all died before 100k. I did dealer single drain/fill at 30/60/90k but they would only do it once while Honda recommends repeating it 3x. Mine started acting up at 110k. So I ditched the Honda ATF and started doing pseudo flush with full synthetic Valvoline at 120k, now mine's at 250k, original Odyssey 4speed with original stock ATF cooler. I just fed it good oil as often as Honda recommended and it lived. Imagine that! So I'm thinking I should be able to do similar pseudo flush on the e90, either 2qts at a time, or by continuously pumping ATF into the fill hole to keep it full while running the engine to push the old oil out of the cooler return line, probably 5 qts at a time to allow refill the ATF tank. Then the torque converter and cooler all get purged and less waste of new ATF compared to drain and fill 4x to get 95% new ATF. That wastes 6 qts and a lot of time to drive it and jack it up 4x. I just have to find the cooler return port on the radiator. Thoughts? |
|
Appreciate
0
|
| 03-23-2018, 04:32 PM | #72 |
|
Cometh
1090
Rep 1,302
Posts
Drives: Boy's Soul
Join Date: Jul 2016
Location: Boy's Hole
|
Thanks for the DIY and for everyone else's tips. I finally got around to doing this at 119k km (74k mi) as preventative maintenance. Despite the low mileage, shifting is noticeably smoother with the new fluid.
I drained 3.5L from the drain hole and another 1.5L when removing the pan and filter (5L total). I didn't follow the proper fill instructions and the pan was only 15C when I refilled ~5.7L (6 qt) of fluid before it began to drip out of the fill hole. I might have to revisit and see if I can get more fluid in when it warms up, but it feels strange to refill more than I drained. I have AFE midpipes so my exhaust bracket was removed. I used a 17mm ratcheting wrench to loosen the fill plug as there wasn't enough clearance for my socket wrench.  My factory fluid was a greyish pink. The magnet had a lot of metallic sludge on it so a filter change for your first ATF service is a good idea.  TIS 24 11 013 (link) states not to use any solvent for cleaning so I just wiped the pan down with a towel.  I used this common orange transfer pump to refill. No leaks or mess and makes quick work of the fill process as each pump transfers 200ml or so.  Writing the pan bolt sequence on the pan itself makes life a lot easier.  Other tips: 1. Use four of the same jack stands at the same height to ensure that the car is level. 2. Loosen the fill plug before the drain plug in case you can't remove the latter. Mine came off with ease, but I only have 74k mi and I also sprayed them with penetrating fluid first. 3. Leave a pan bolt threaded at each corner and tap the pan with a rubber mallet to break it loose. You can also gently pry a corner to get it started. Tools: - 8mm socket - under panel - 17mm ratcheting wrench - fill plug - 5mm hex socket - drain plug - 10mm socket - pan bolts - 1/4" dr torque wrench - Transfer pump - IR thermometer gun Parts: - Filter - BMW 24117593565 $60 (Filtran Germany, same as factory filter) - Gasket - BMW 24117572618 $55 (brand unknown, made in USA, same markings as factory gasket) - 6-7 qt Motomaster synthetic Dexron VI $6/qt (licensed) Torque specs: - Pan bolts - 9.5 Nm - Fill plug - 19 Nm - Drain plug - 14 Nm And the pan bolt sequence again:  Last edited by The Nightman; 03-24-2018 at 02:41 PM.. |
|
Appreciate
4
|
| 03-30-2018, 09:46 AM | #73 |
|
First Lieutenant
 205
Rep 349
Posts |
So when I got my e92 at 50k miles I had this weird grinding problem during torque demand when coasting, I replaced the transmission fluid and problem went away. Now after about 50k miles I have a similar problem but this time it looks more like sluggish shifting so I am planning to replace the transmission fluid again.
Just to be clear, there is no need to replace the pan, correct? Just the fluid, gaskets and filter. It is E92 N52. |
|
Appreciate
0
|
| 04-03-2018, 11:18 AM | #74 | |
|
Lieutenant

97
Rep 414
Posts |
Quote:
|
|
|
Appreciate
0
|
| 05-11-2018, 05:02 PM | #75 |
|
Second Lieutenant
65
Rep 218
Posts |
I thank the OP and others providing the tips on working with this transmission.
As far as the shift problems go, I installed a Sonnax Zip Kit to see how it works in reducing the 2-1 kick and other 6L45 problems such as high ATF temperature and fluid pressure. In my 07 it worked out well, getting rid of most of the problems. It might do even more had I replaced the parts for the ATF pump areas. But I did not pull the transmission and had no plans to do so. Therefore just whatever fixes for the valve body. Here is the thread: https://www.e90post.com/forums/showt...php?p=23170689 As far as removing the filter seal, I used a sprinkler nipple pipe. Placed the threaded part against the seal and pry by turning the pipe up 90 degrees and out pops the seal. As far as refilling the transmission goes, I remove the dipstick port plug on the right side of the transmission, dump the amount drained plus a little more (for setting the correct level) using a funnel and PVC tubing -- directly from the engine bay. Put the plug back in. Start the engine, shift through the gears and and then remove the check plug. It is so much faster this way. 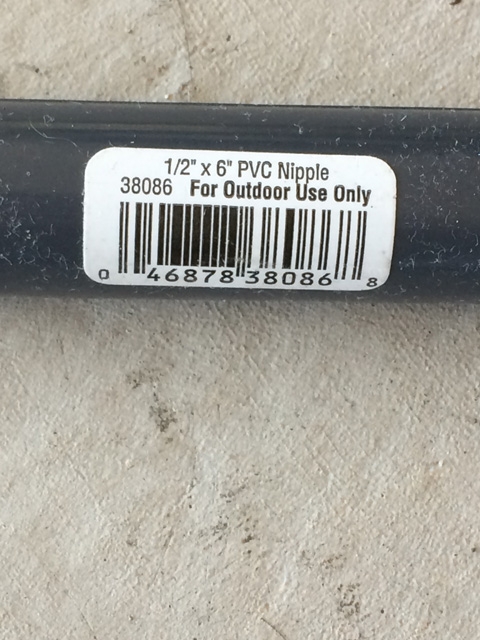 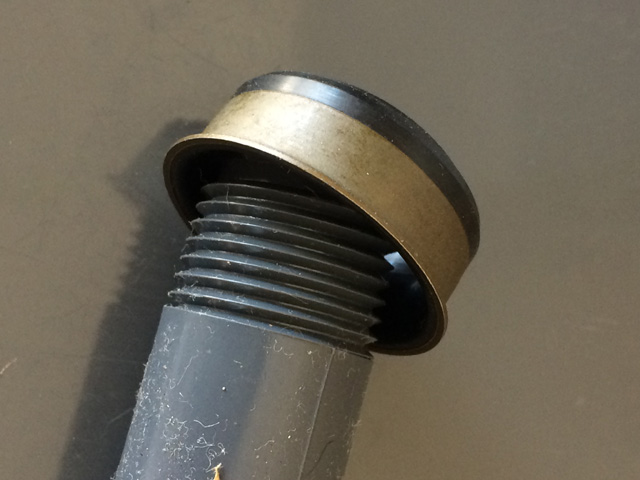 I also use an aftermarket filter (~$7) and pan gasket (~$12). GM transmissions are common place, and these parts are much cheaper than BMW's. You can use Supertech Dexron VI (~$6.20/qt) or Valvoline Maxlife ATF ($18/gallon), but Valvoline is suitable for Dexron VI, but it is not Dexron licensed iirc.  As far as the drain plug stripping goes, I replaced it with an GM (OEM) steel plug. ACDelco 24234212. It comes with a gasket for about $3 + shipping. I am not sure why BMW would drop a perfectly good OEM steel plug for an aluminum one.  Last edited by labrador; 05-11-2018 at 05:30 PM.. |
|
Appreciate
5
|
| 06-06-2018, 03:03 PM | #76 |
|
New Member
5
Rep 5
Posts |
Labrador:
This is great info=>I remove the dipstick port plug on the right side of the transmission Do you happen to have a pic of this port, I cant find on 08 328i. -- Assume you mean a different port from the Check Level port. Also, need to locate the radiator connector for tranny, that is how I flush in my Benz, it is so easy, just like a another poster said, maybe 30min max(has port to add fluid from engine bay, I run engine to dump 2 quarts at a time, turn off, add 2...repeat till runs out "new"). I cant believe these are such a hassle for a complete flush. thanks Last edited by Diesel315; 06-06-2018 at 03:23 PM.. |
|
Appreciate
0
|
| 06-07-2018, 07:10 PM | #77 |
|
Second Lieutenant
65
Rep 218
Posts |
Yes, the dipstick port has a plastic plug on the right side of the transmission, higher up on a ledge. The check plug on RWD 6L45 is facing the back, just above the pan.
The dipstick hole plug is like a close-ended tube with a loose plug in it. I think the plug expands the tube to seal. On first removal it might be a little difficult, but subsequently I can easily remove it with 2 fingers. Lifting up the plug, and then push up farther. The first time I believe I used a long screwdriver to push up on the plug. The access in that area is a little tight but doable. 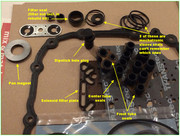 The ATF cooler lines are on the left side of the transmission, and on my 07 the pipes/hoses go forward to the lower driver side of the radiator. There's a cooler there. I did not want to mess with that connection. Here is an aftermarket dipstick picture. Clean the area, mine had lots of road dust accumulated around it.  Last edited by labrador; 06-07-2018 at 07:16 PM.. |
|
Appreciate
3
|
| 06-20-2018, 08:39 PM | #79 |
|
New Member
5
Rep 5
Posts |
FYI, changed filter, refilled-then started it and ran thru all gears a few times, drained again, did 3 more times-last one ran pretty clear red. I ended up using 3 gallons.
Car had 154k miles, fluid was dirty but still traces of red, no bad smell(mostly highway miles). With funnel setup it is easy, no need to pump in from underneath. |
|
Appreciate
1
E90Dom0.00 |
| 07-28-2018, 04:28 PM | #80 |
|
Major
2197
Rep 1,322
Posts |
Bump for a great writeup. I liked it better than Pelican Parts and pictures are better than Bentley (who always takes pictures of stuff out of the car so no context it seems).
I just did the dump and fill now, then will do the full monty in a few thousand hoping to dilute the old fluid. 4.4l is what I got with just the drain and refill. I am at 107k and the fluid actually looked pretty good, translucent dark red (about 50% darker than what I put in) but not milky or cloudy. So good news for those who have let this run a little long, it doesnt appear to be the end of the world. In a couple of weeks I will be doing the full monty, including dropping the mechatronics and replacing the seals between it and the rest of the tranny AND the selector fork that is prone to breaking and being misdiagnosed as "you need a new transmission". None of its broken per se but the parts are stupid cheap so its a "why not?" thing while pulling the pan off. I do a lot of long road trips and am not going to have a $20 part leave me on the side of the road. |
|
Appreciate
0
|
| 08-20-2018, 07:56 AM | #81 |
|
New Member
5
Rep 5
Posts |
Ryan, great info.
Please post some pics when you do this! I cant find a "6l45 selector fork" on a google search. Last edited by Diesel315; 08-20-2018 at 07:58 AM.. Reason: . |
|
Appreciate
1
ryan stewart2197.00 |
| 08-20-2018, 01:45 PM | #82 |
|
Major
2197
Rep 1,322
Posts |
I didnt really take many because I was in a rush, sorry. Job was pretty easy though. I mean once you get the pan/filter/mechatronics sleeve out its just 6 bolts holding the mechatronics to the transmission. Be prepared though, its probably about 15lbs and has tons of channels that hold on to transmission fluid so its going to drop what feels like another quarts worth of fluid every time you jostle and tilt it (think like those ball bearing mazes).
The only "challenge/catch" ist just making sure you have the selector valve/fork/whatever they call it catching the min from the gear selector when you put it back in. The sonnax part is this: https://www.sonnax.com/parts/4522-manual-valve-assembly Its solid metal instead of a plastic head that pops off. You could track down a GM independent shop/tuner and order through them or find it on ebay. Its kind of expensive though. Otherwise you can get the stock one for 1/5th the price (I paid a bit less but ECS was the one that came up on Google). https://www.ecstuning.com/b-genuine-...e/24337617803/ That is one I wouldnt blame anyone for waffling on. The price increase for the sonnax is pretty high and honestly, reading on the internet, its just a "risk" starting around 125k. Its not horrible common. But plastic fatigues and if you are shifting a lot or dealing in high temps its a time thing. But how long are you keeping the car? If replacing it means you shouldnt care for another 125k the stock might just see you out. Also dont forget these: https://www.ecstuning.com/b-genuine-...t/24277581598/ Those go between the mechatronics and the transmission and control flow for shifting. I suspect these are the reasons for my smoother downshifts after the change. Mine were pretty compressed compared to new, maybe the blow by meant they weren't putting up enough fluid pressure to efficiently trigger the shift. |
|
Appreciate
0
|
| 08-20-2018, 01:49 PM | #83 |
|
Major
2197
Rep 1,322
Posts |
Also here is a guy doing a complete teardown and description of the GM transmission in our cars:
And here he is talking about the valve issue itself, really watch this one because he shows the valve body and talks about what to clean from sensors and whatnot: Wish he was in Atlanta, you watch his videos he is a real "old school" everything can be repaired type of guy. Last edited by ryan stewart; 08-20-2018 at 01:54 PM.. |
|
Appreciate
1
CornerGorillaPit238.50 |
| 08-20-2018, 02:18 PM | #84 |
|
Major
2197
Rep 1,322
Posts |
Also, sorry to spam but one more note. Mess with the filter "o ring" while the mechatronics are out, it means everything is flush and its a lot easier to get up in there:
 Here is the underside of the mechatronics, you can see the sliding assembly that tells the transmission what gear you have selected, I Have laredy cleaned the metal paste off of it (same stuff you see on the magnet in the pan):  And on this ebay photo is the top, nothing up there but the mechatronics to transmission seals to worrry about. Two of them go in the mechantroincs and then the one with 4 sleeves in a row goes up in the transmission itself (you can see the 4 inlets in my first picture):  |
|
Appreciate
1
Skers 0577.50 |
| 08-22-2018, 07:59 AM | #86 |
|
Registered
0
Rep 1
Posts |
Hello, I am a new member here and plan on doing this with my 09 328i with 126,000 miles. Just to confirm a few things. I have the GM transmission is that correct? Also, I have some Valvoline Maxlife ATF fluid, would that be okay to use? Thanks
|
|
Appreciate
0
|
| 08-22-2018, 08:17 AM | #87 | |
|
Major
473
Rep 1,191
Posts
Drives: 2009 BMW 328i Wagon
Join Date: Apr 2009
Location: Asheville, NC
|
Quote:
|
|
|
Appreciate
0
|
| 08-28-2018, 03:52 AM | #88 | ||||
|
Colonel
626
Rep 2,100
Posts |
Quote:
Quote:
Quote:
Quote:
Just did this today on my 2011 E90 328i LCI Sedan and it was a nightmare of soft aluminum. Regarding the quoted tips, I WILL REITERATE TIP #2 as this made my heart sink: not sure if I just drew the short end of the stick or what, but my fill plug is Matt Damon Rounded. Used PBblast and let it sit. Took a box wrench to it and all the edges of the bolt just melted. Then come to find out a bolt extractor kit above 16mm is not exactly easy to find and all it did when I did get one was turn it into a circle. Only way that's coming out now is with a easy out tap...which would be fine since I had the new plug, but it looks like the transmission mount would have to be removed in order to get a drill in. So left it and remembered about this post and I went from down in the dumps to hopeful. Being able to fill from anywhere was a lifesaver...and given the other bolts condition, I think it's now my required method. Forget that I had to easy-out tap the drain plug that was also stripped, reason I was bummed at first was I hadn't tried to take off the fill plug before the drain plug... Yup so I had dumped several quarts of fluid from the tranny and I did not have the standard method available to refill. But finding this allowed me to proceed with the rest and it was fairly straightforward. I used all OEM stuff: - New bolts (did not threadlock) for the tray; - Bought 10, but used 6 quarts of BMW ATF Dextron VI ($7ea) - Did add the special quart of BMW GM6 Top-Treat TCC (part 83222161756) that was part of a SB os SI about rough shifts. Costly though at near $100 (fluids cost more in Hawaii because nobody is allowed to fly them at reasonable cost) - New drain bolt (I seriously want to put anti seize, keep it loose, and then tape it with duct tape as I don't want to have to tap it again. Kidding but that's the mindset I'm in) - New fill plug...would be useful if I could get it off - New filter and O-plug seal - New BMW gasket: seriously, get it for no other reason than it is packaged/shipped on a cardboard in a sealed bag that holds it flat so you don't worry about it getting twisted. If others are shipped flat too, then have at it. FEW OTHER NOTES: - Ghetto Home Depot PVS sprinkler tap for the gasket fit perfectly! My two cents: if you're using it as a slide hammer, get about 10" so you can build up momentum...current spec of 6" really only gives you a few inches to play with. That said, if you twist the threads up far enough and get a good grip, some rocking and pulling (you did build that T post) got it out for me. - Also REGARDING THE FILTER SEAL, don't use the filter neck top to tap it in there. It's plenty strong enough, but the reality is, that seal will basically allow it to pass through at some point (that's basically what you're doing when you install the filter fully). As mentioned use a socket similar in size (around 22-24mm) with a long extension then tap it into place (with a hammer). There is a small section butted up against the seal area so use as minimal a socket size as possible so you have room to play. Shine a light up there so you can see what I mean. Go slow and make sure the seal mates up well with the opening. - When you install the filter correctly, it actually may not look quite level as you can feel when it locks into the right position. - Use a drill to take out all the 8mm/10 mm bolts from the undercarriage and the tray. You don't need finesse taking those off. Save your forearm for the reinstalling and torquing to spec. Plus just save time. - This was my second ATF replacement...dealer did the first one at 36K mi...which may be part of the reason for my issues. Who knows, just spite talking... - Feels good so far. First couple of reverses felt a little hard, as previously mentioned. I could "almost" feel where my hesitation or rough transitions were afterwards, but it sorta almost got there and then smoothed out. Looking forward to more progress with mileage. - If you need to remove the exhaust hanger to gain more space next to the fill plug, it's easily removable with an E10 socket (three bolts to remove, two will need a 13mm(?) wrench to hold counter on the nut on the other side. Exhaust will still be well-supported and will not droop. - Fluid was messy with the pump, but it worked...might try the funnel method...but assume you have to "pinch it off." The version of pump with the bottle top screw like a soap dispenser would be cleaner, but most of those comes with thin tubes. Key to think about when you're about to fill from either hole would be "am I sure the hose will stay in...and is it kinked?" because you really need to think about your situation here: you're either standing under a lift with a bottle on the ground so you can use two hands to pump, or you're on your back and hoping that bottle doesn't turn over. Something to hold that bottle, like a tool holster would probably help you a lot - I'm not kidding, under a lift, a bottle holster would save you a lot of grief. Tube + funnel method is basically your beer helmet with good physics if you're on the ground — bring a clamp? - If you're using the dipstick port, remember that after the first 4 qts go in you'll probably run out of room, so you're still starting up the car. I figured pulling it out while starting would still make it gush like the standard fill plug so I closed it up and started the car. Remember that as you get the tranny up to temperature, you're also getting the exhaust (which is only a few inches away) up to temperature. Consider wearing the standard mechanics gloves vs the nitrate ones to protect yourself - if it has longer wrist straps all the better. I had a slight encounter and it was minor but it could've been a lot worse. It's a little unnerving trying to rush and unplug the dipstick port then rethread a tube into the port while everything is getting hotter. Consider fashioning some sort of hook to for the tubing that you could just hook the tubing up and into the port. Taking the port out itself will be hard enough, even though it actually doesn't sit too tight. - THINK OF THE DIPSTICK PORT LIKE YOUR TRUNK LINER PUSHPINS, IT'S EXACTLY THE SAME CONCEPT. So top gets pushed up first, then you try and push and pop the rest out. You could do it with a flathead, but this one will probably only need your fingers. - Military Auto Hobby shops are the best ($3/hr for me on a frame or drive-up, plus mechanics to consult and tools to borrow). Keep them supported folks! Well that's all I can regurgitate right now. I'll post more if I remember anything. Thank you to all who posted, especially those I've quoted plus OP. I've dolled out a few "Appreciates" for everyone's efforts. |
||||
|
Appreciate
1
StradaRedlands4919.50 |
 |
| Bookmarks |
|
|


