

|
|
|
|
 |

|
 |
BMW Garage | BMW Meets | Register | Today's Posts | Search |
 |

|
BMW 3-Series (E90 E92) Forum
>
DIY: N54 Turbo Wastegate Flapper Replacement
|
 |
| 04-12-2016, 10:08 PM | #1 |
|
New Member
10
Rep 15
Posts |
DIY: N54 Turbo Wastegate Flapper Replacement
Originally posted this to another forum, but it definitely wasn't the right audience. I hope you folks will appreciate it!
Project Overview I bought my 335xi with a blown engine. Upon reassembly, it would throw a 30FF (underboost) fault upon continued WOT for >6s. It also exhibited the audible wastegate rattle. Even when full vacuum was being sent to the wastegates, there was still slop in the lever indicating the wastegate wasn't closing completely. This causes low boost to be generated. Only the rear turbo is accessible on the 335. I followed other forum members' advice to move the adjustor nut, tightening the actuator arm. This eliminated the 30FF fault. However, after a track day, the 30FF error returned and this time much more severely. Any WOT would cause the fault. Diagnosis showed the wastegate lever was binding during closing due to the excessive play. The wastegate rod & bushing was completely worn out. I created a short video to highlight the failure: In late-2015, Turbo Lab of America began selling a wastegate rebuild kit. My kit cost $100 and included bushing, lever, flapper and shaft needed to repair both turbos. Disassembly Time: 10 hours I strongly recommend the guide created by "moo snuckle" here: http://www.e90post.com/forums/showthread.php?t=1087276 The only step I struggled with was removing the coolant fittings from the turbos. They had some rust in the joint and were quite stiff. The process which worked well was driving a small screwdriver into the gap around the fitting and twisting it to "pry" the fitting axially out of the bore. I only deviated from moo snuckle's instructions a few times: -Because my vehicle is AWD, I needed to remove the passenger side drive axle before removing the downpipes. -I unbolted the control arms at the subframe, by removing the M12x80 bolts/nuts. I left the tie rods connected and hung the power steering rack in place. I think either way would be OK. -I did not unscrew any O2 sensors. For the downpipes (upper O2 sensors) I disconnected the two connectors on the fuel rail and unrouted them around the cylinder head. This kept any wires from getting damaged during unthreading. Parts to Order Total Cost: $350 "BMW 335I 135I 535I N54 Mitsubishi TD03 Wastegate Rattle Flapper Rebuild Kit" (ebay) 18307553603 Exhaust Gasket QTY 2 11627509731 Flange Nut for Exhaust Flange QTY 4 18407502196 Flange Nut for Exhaust Header QTY 16 11627558906 Gasket ring for header seals QTY 6 11657606506 6mm E-clip QTY 2 11422246091 Oil gasket for turbo QTY 2 11427558936 O-ring QTY 12 11427563453 O-ring QTY 2 11657585746 Rear wastegate actuator QTY 1 11657585745 Front wastegate actuator QTY 1 This list includes all of the gaskets/o-rings which are touched during the disassembly. Additionally, it includes the exhaust nuts which are typically only used once. I also had to order front + rear wastegate actuators because the clevises on my turbos had worn oval. You may also opt to replace your vacuum hoses. Specialty Tools Required E-Torx socket set Drive Axle Puller (AWD only, rent from AutoZone) MIG or TIG welder Punch Set Torque wrench 0-20 ft-lb Power drill or drill press #28 drill bit To make your life much easier, I recommend investing in these two tools: Snap-On 3/8 Flex Head Ratchet (for tight, but tough-to-reach bolts) Snap-On 1/4" 72-tooth ratchet (for hard to reach, small bolts around the turbos) Wastegate Flapper Replacement Procedure Time: 2 hours (if it goes smoothly) From a high level, the procedure is: -Remove the vacuum actuator and clevis -Grind the old flapper assembly apart, allowing the flapper to be removed from the turbo -Drill out the retaining pin -Hammer the old bushing out of the housing -Hammer the new bushing into the housing -Weld a retaining pin in place -Weld new arm onto flapper Remove Vacuum Actuator and Clevis Use a 10mm wrench to remove the 3 bolts holding the vacuum actuator on. Use the same wrench to loosen the retaining nut on the threaded pushrod. Then, use a pick tool to remove the E-clip retaining the clevis on the wastegate lever. I recommend placing a ziplock bag around the lever while you remove the clip in order to catch it when it inevitably flies out. This step is simple so I didn't take any photos. Grind the old flapper assembly apart You need to mark the angle at which the lever is supposed to be positioned in the "closed" position. I used a small punch to hammer a mark at this angle. Next I used a standard angle grinder and ground until the weld was weak enough to pull apart with pliers. 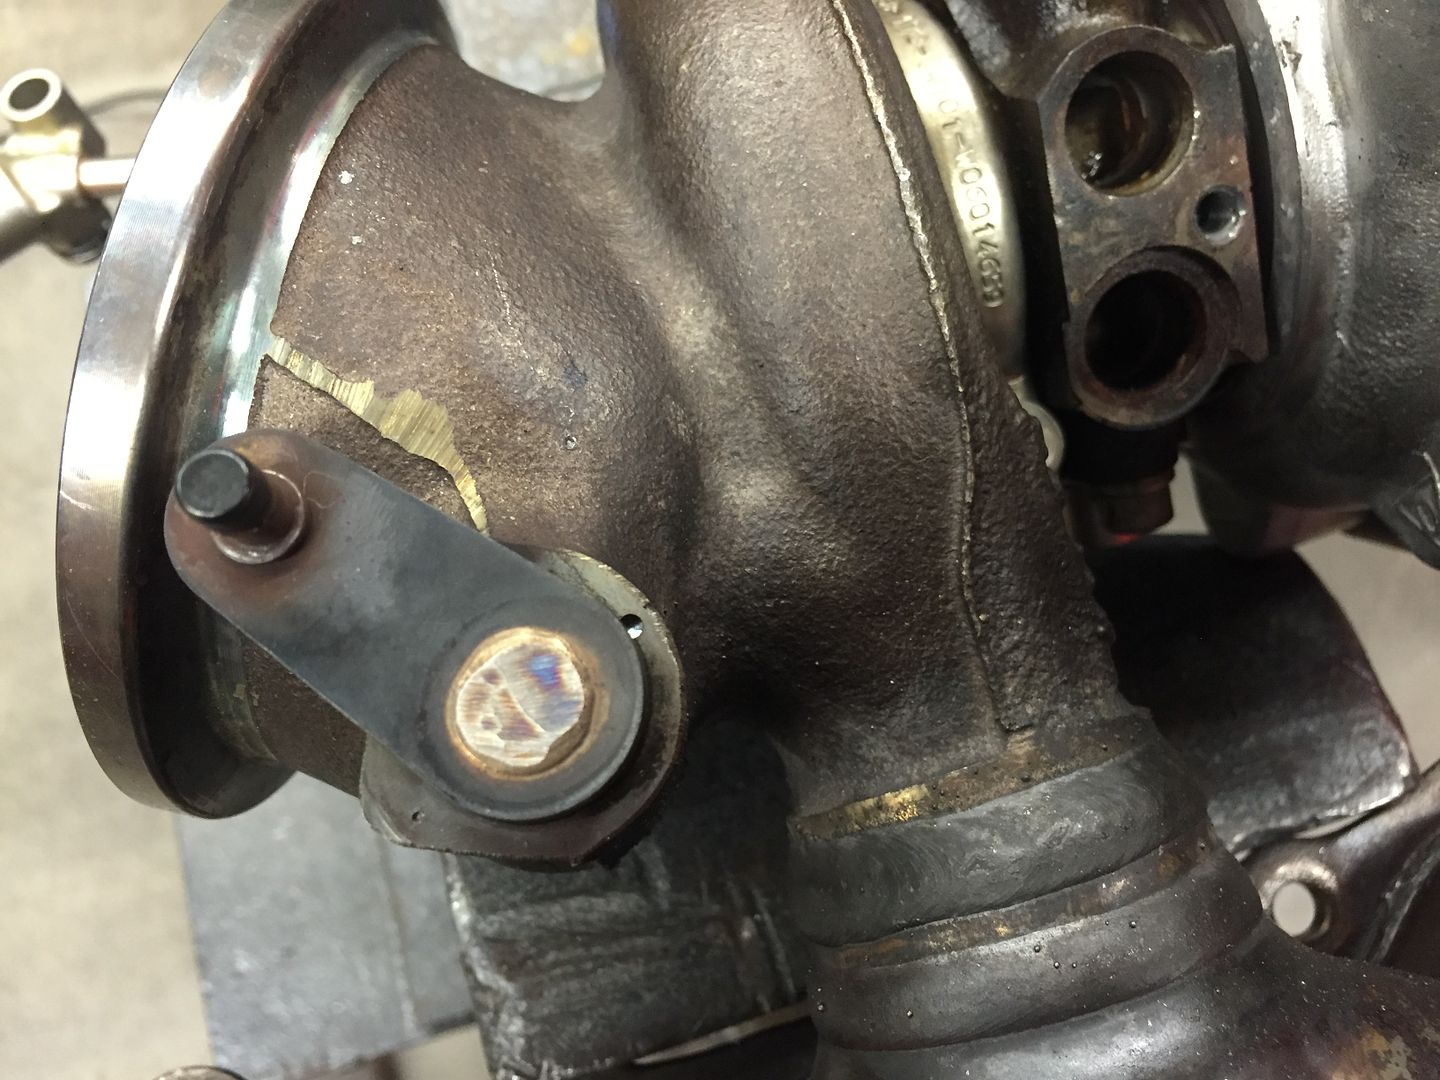 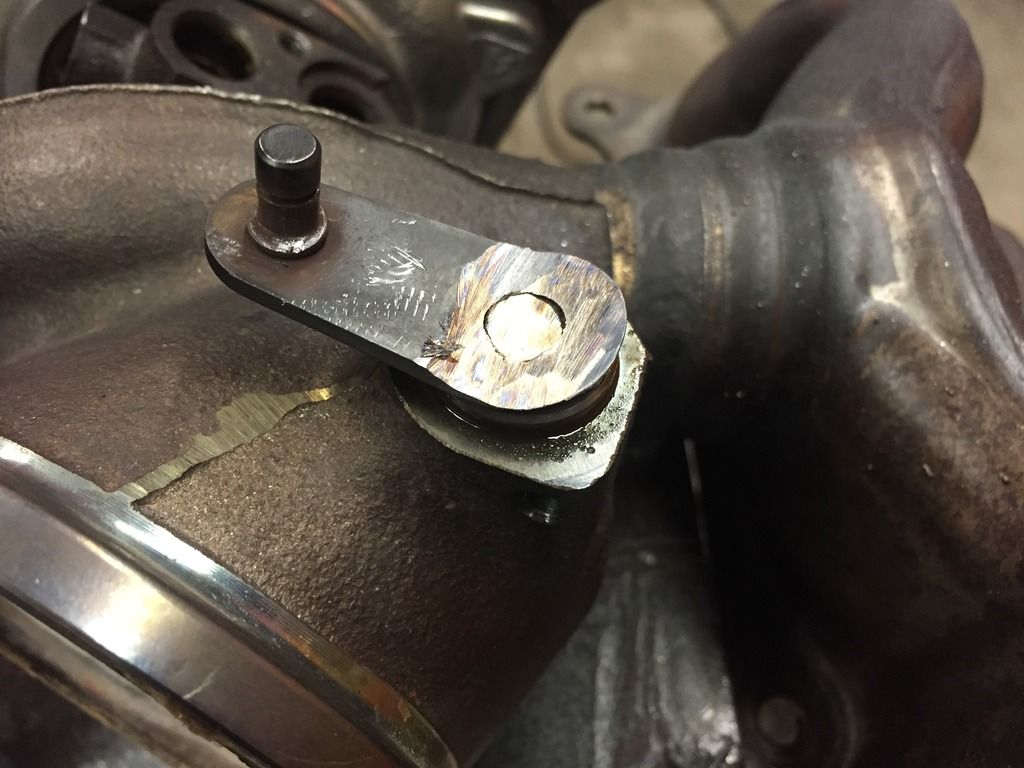 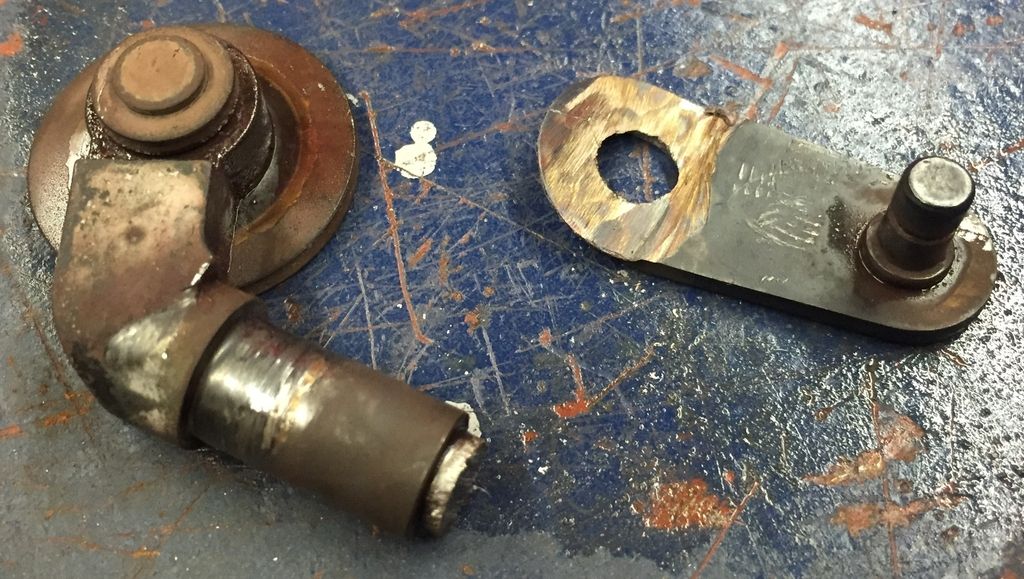 Drill out retaining pin I used a #28 (.140", 3.65mm) drill bit in a handheld power drill to drill out the pin. This drill matched the size of my replacement "pin" (actually a nail) closely. Be careful to get the drill aligned, although the bushing is pretty tolerant to a misaligned hole. When drilling, don't stop until you're certain you've drilled all the way past the bushing. You don't want the bushing getting held up for some reason while you're trying to hammer it out. 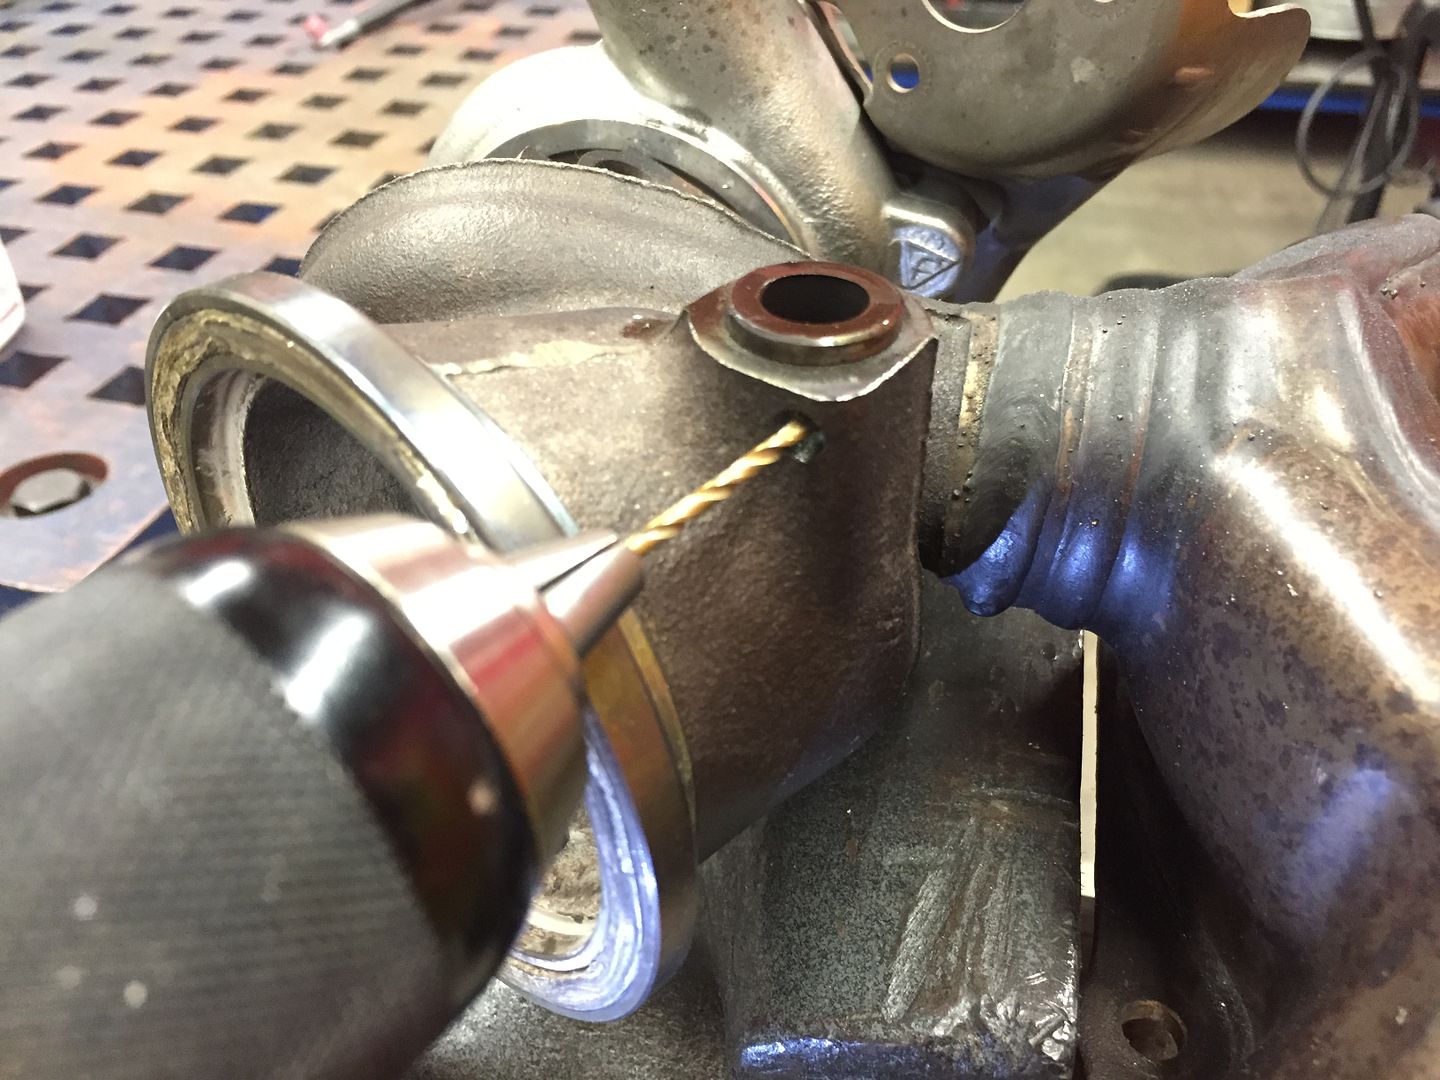 (photo below taken after a bit of pressing) 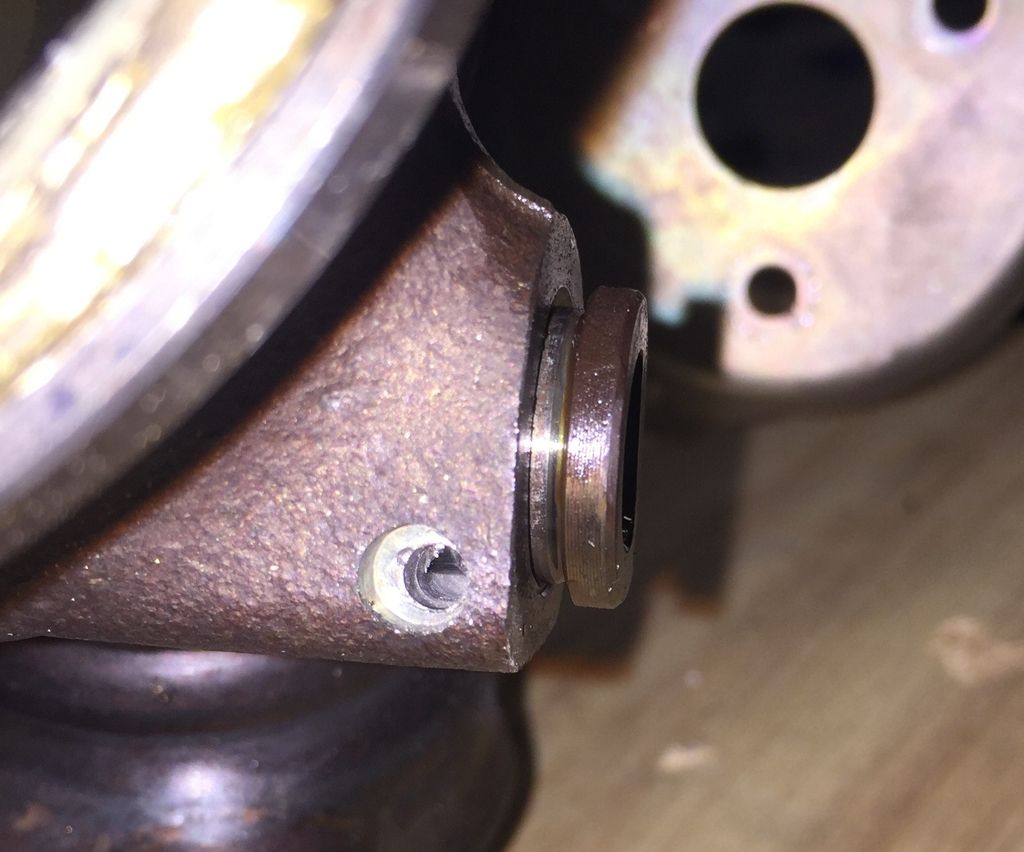 Hammer out old bushing This is the most challenging and risky part of the entire process. Place your turbo on a piece of plywood or other soft work surface. You need to hammer the old bushing out from the inside of the housing at a weird angle. Work slowly and carefully, avoiding mushrooming the inside of the bushing. Also, obviously avoid hitting the turbo housing with your punch tool. Once the bushing has started to move, you will have a shoulder on the outside of the housing that you can also work with. I was successful at this on only 1 of my 2 turbos (more to come on this later). 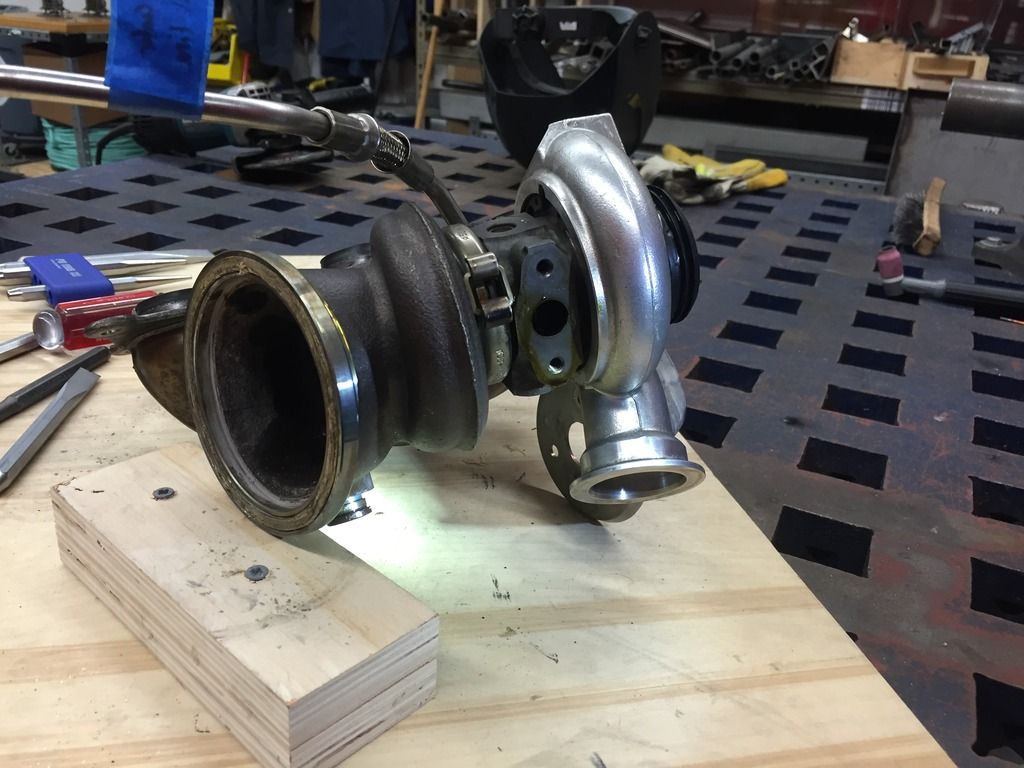 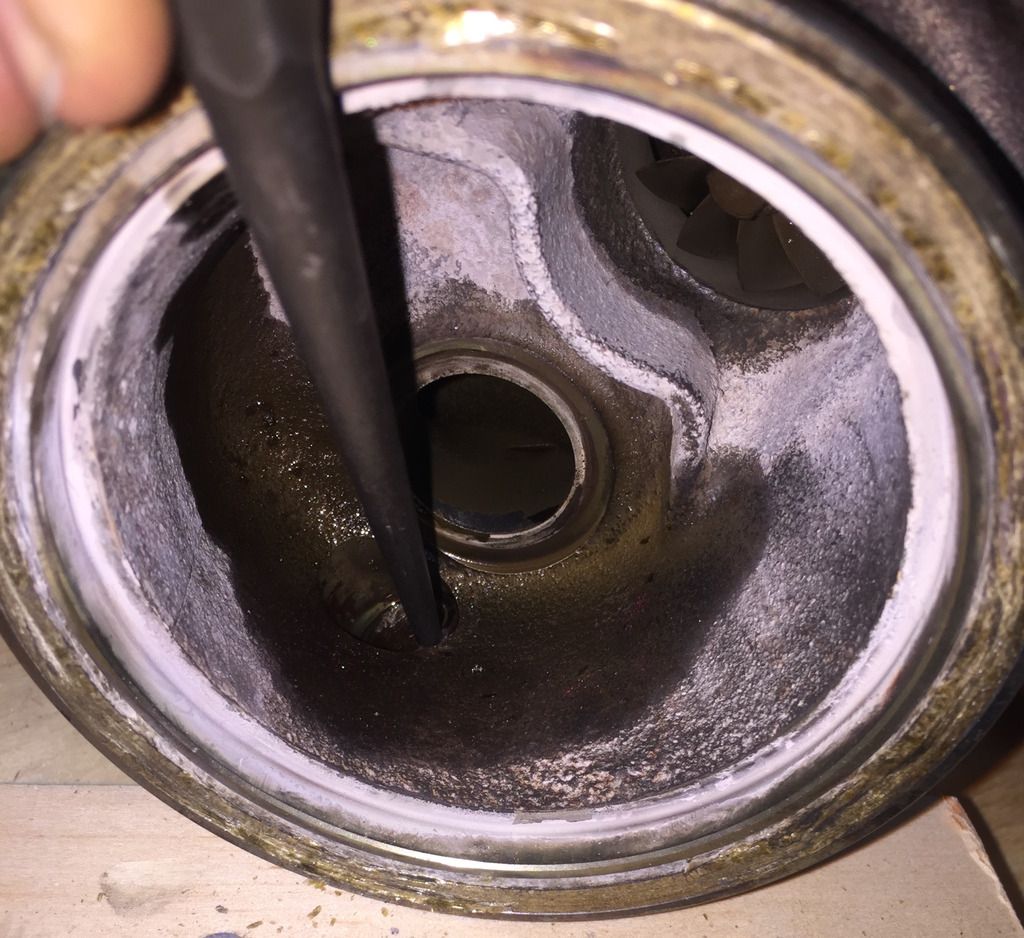 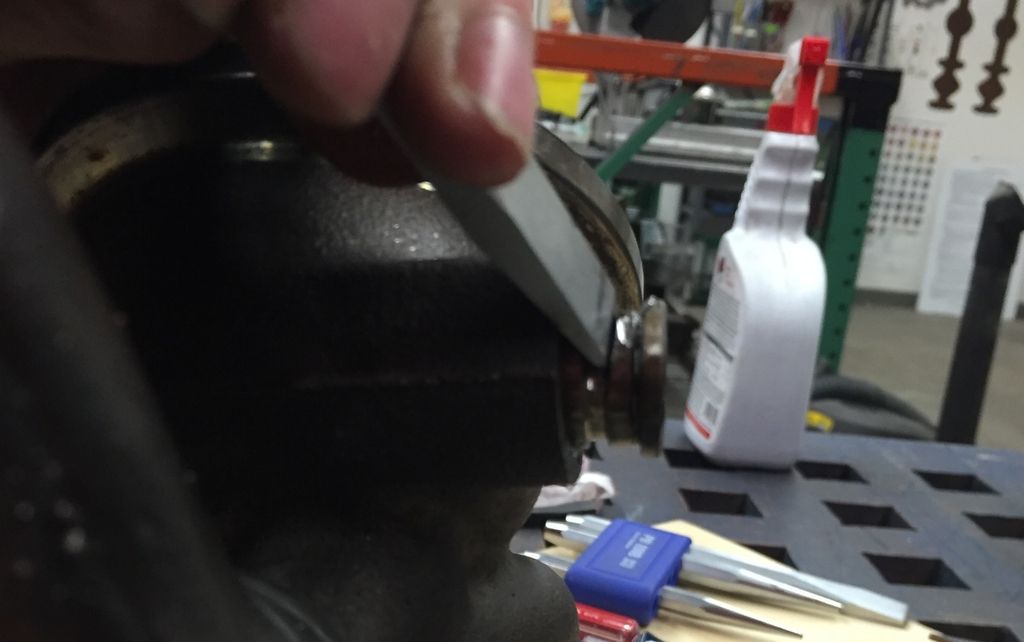 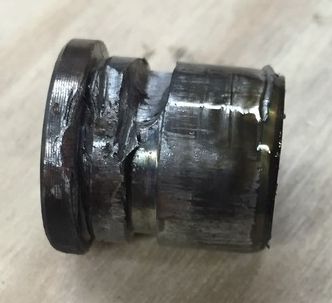 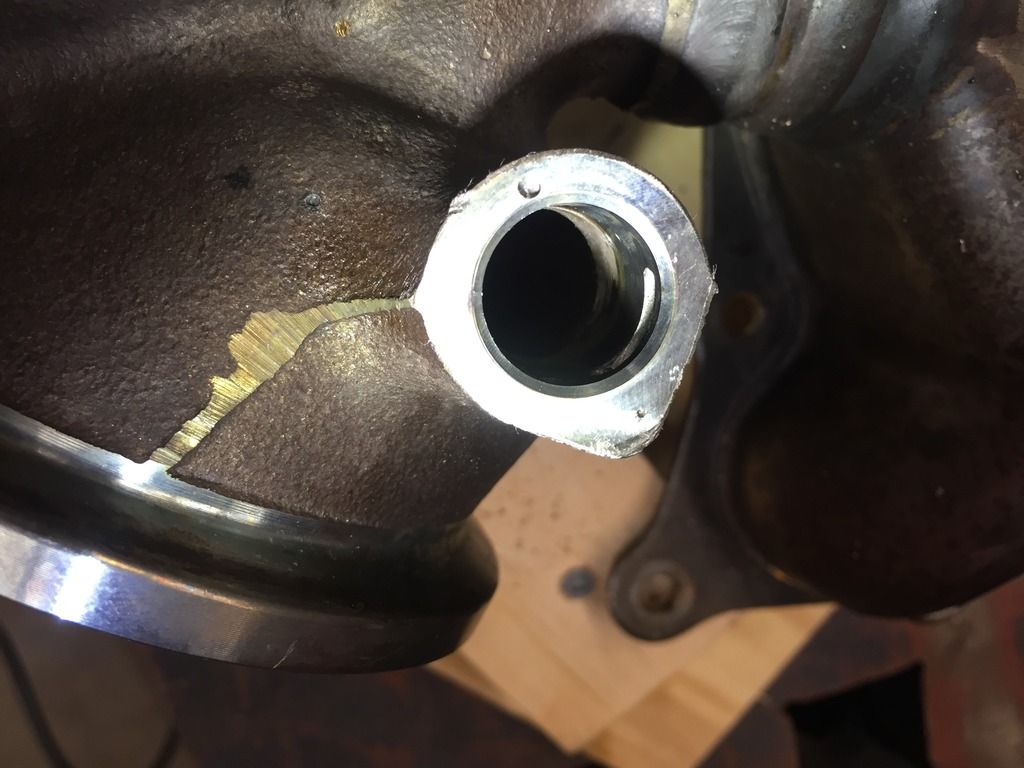 Hammer new bushing into housing On the first turbo I did, I used the hydraulic shop press. It was a crappy Harbor Freight unit, but it worked fine. On the second turbo, I used a hammer and gently tapped the new bushing in. In hindsight I don't believe a press is necessary for this step. 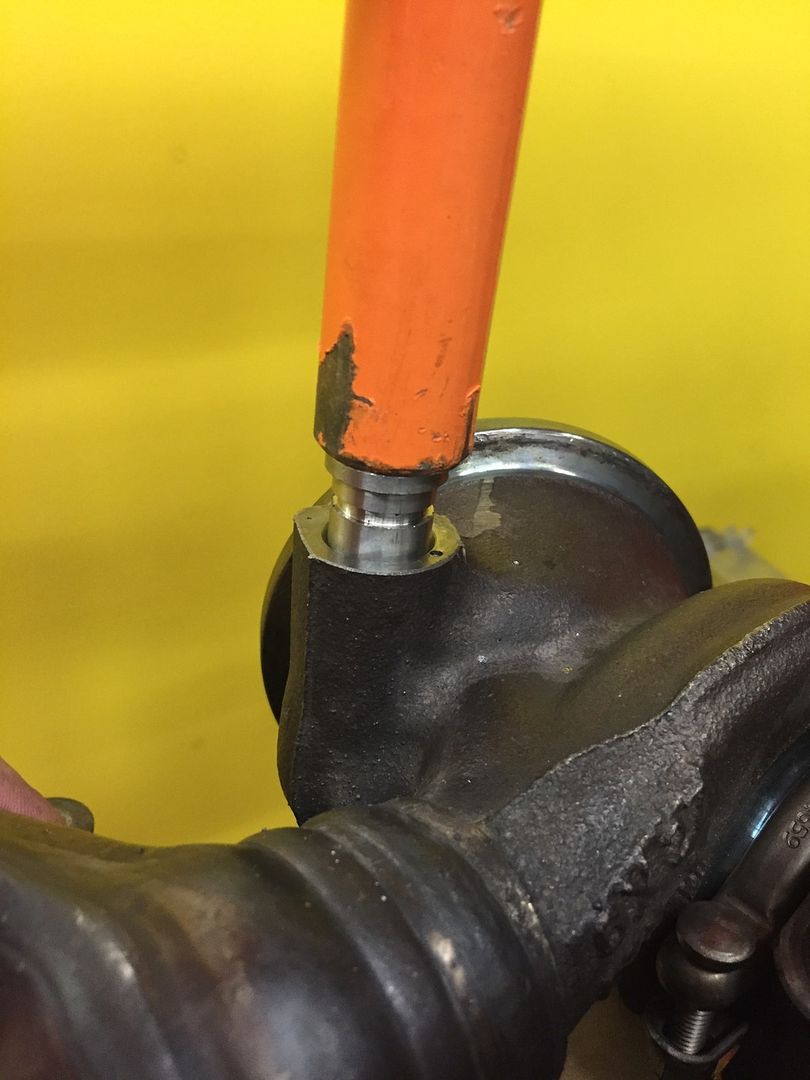 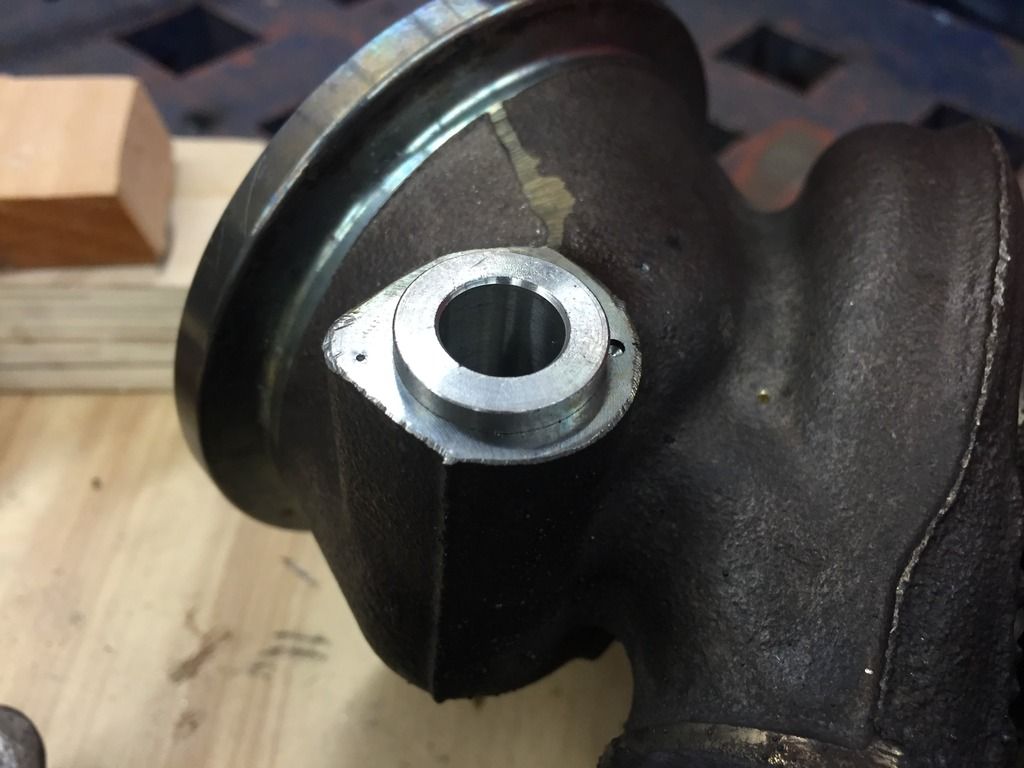 Weld a new retaining pin into place I used a garden-variety nail to capture the newly-installed bushing. The nail was a bit smaller than the hole drilled earlier. I ground the sharp tip off the nail but kept some of the chamfer. Then I cut the nail to the correct length so it would be flush with the turbo housing once fully installed. It was then tapped snugly into position using a flat-end punch. To weld, we first pre-heated the housing with a torch. Then TIG welded the pin in place. NOTE: before welding, test-fit the new shaft inside the bore. If it does not fit smoothly, take action now. I over-hammered my nail into the first turbo, deforming the bushing. I needed to go over that area with a small dremel too. 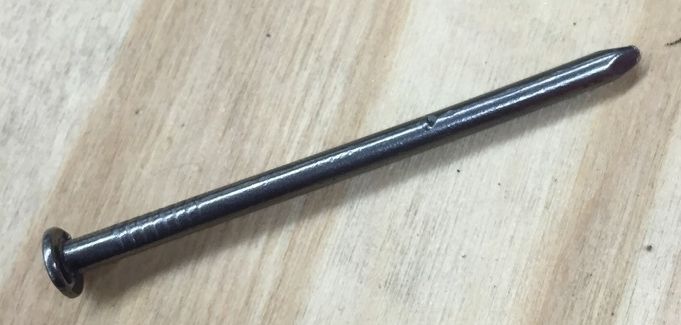 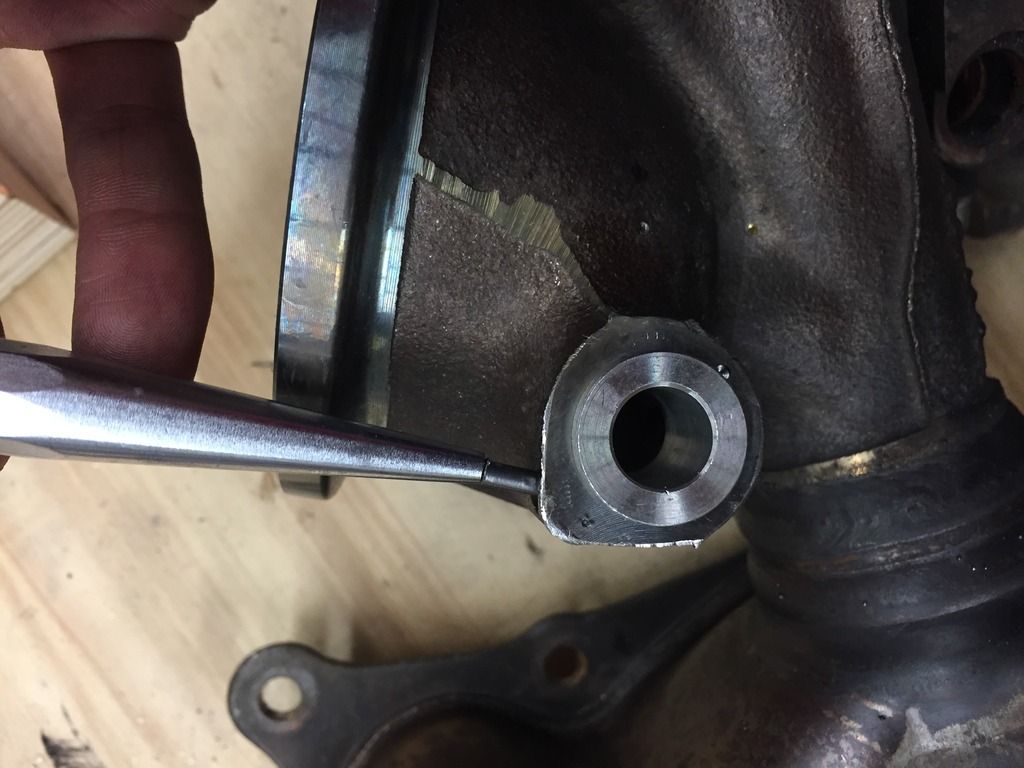 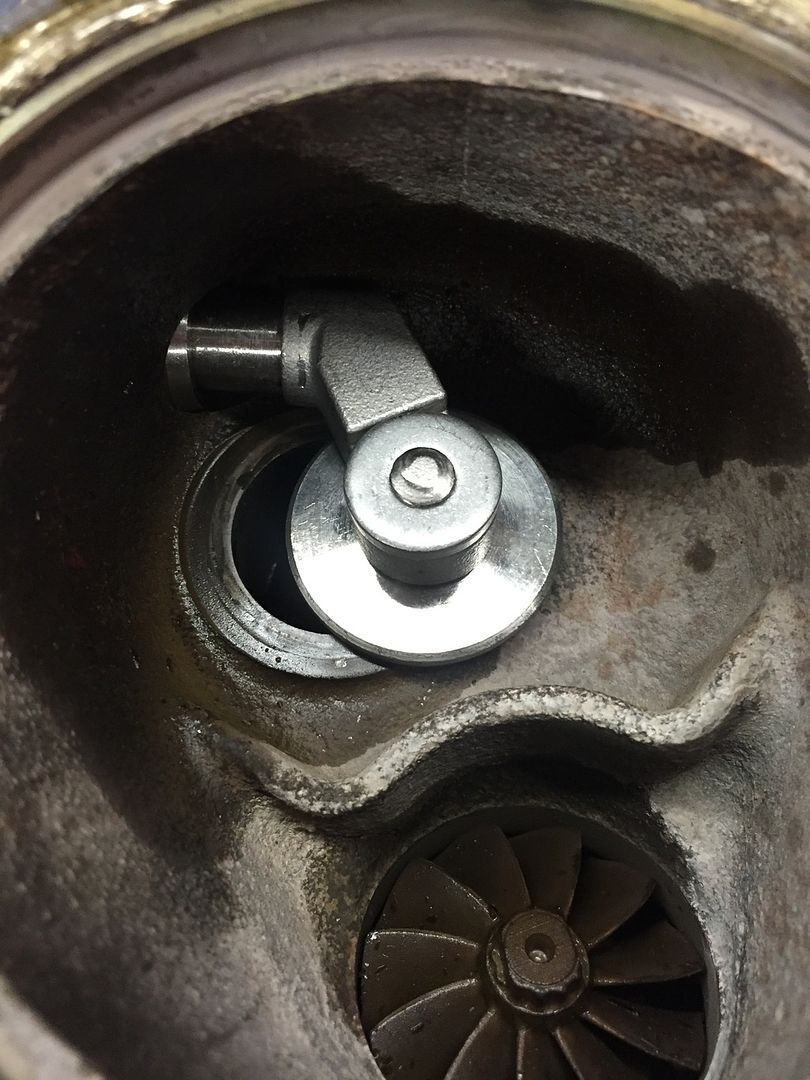 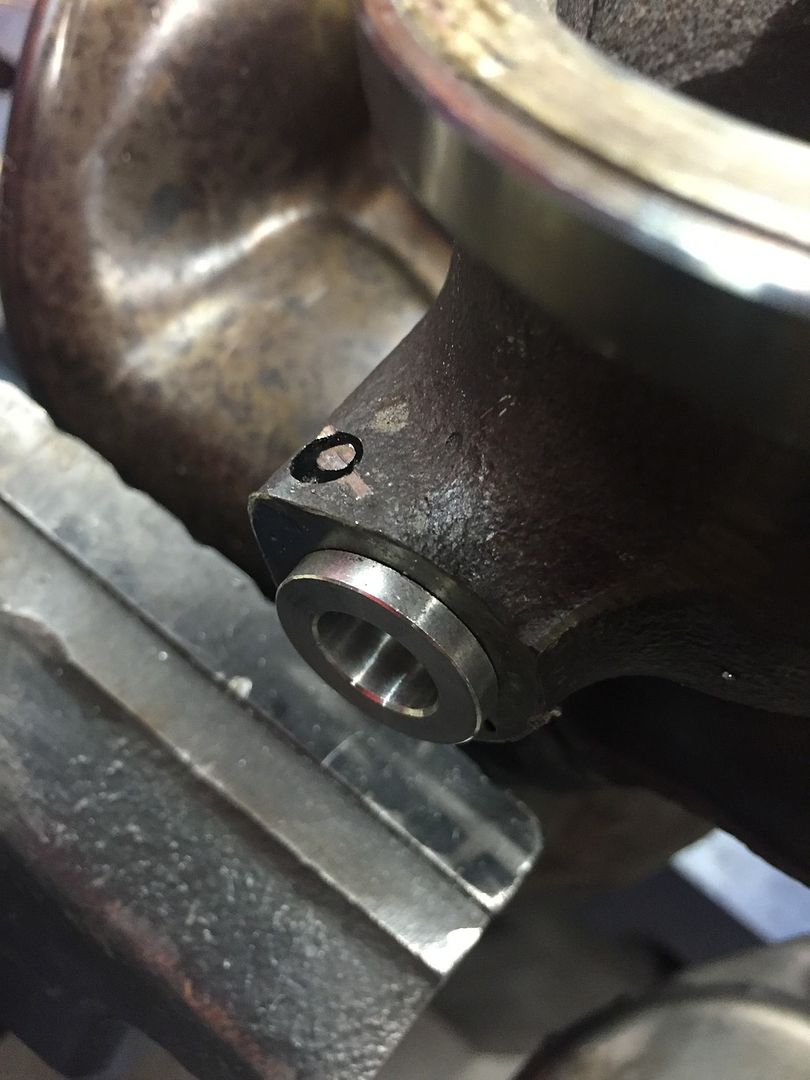 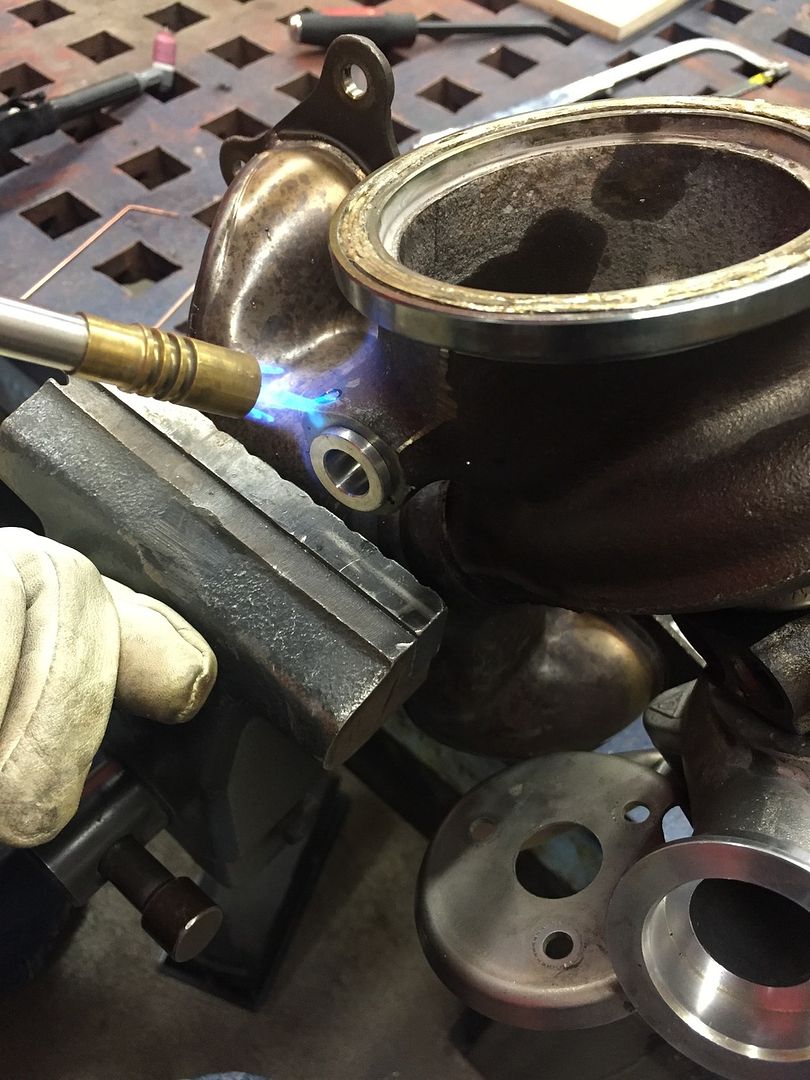 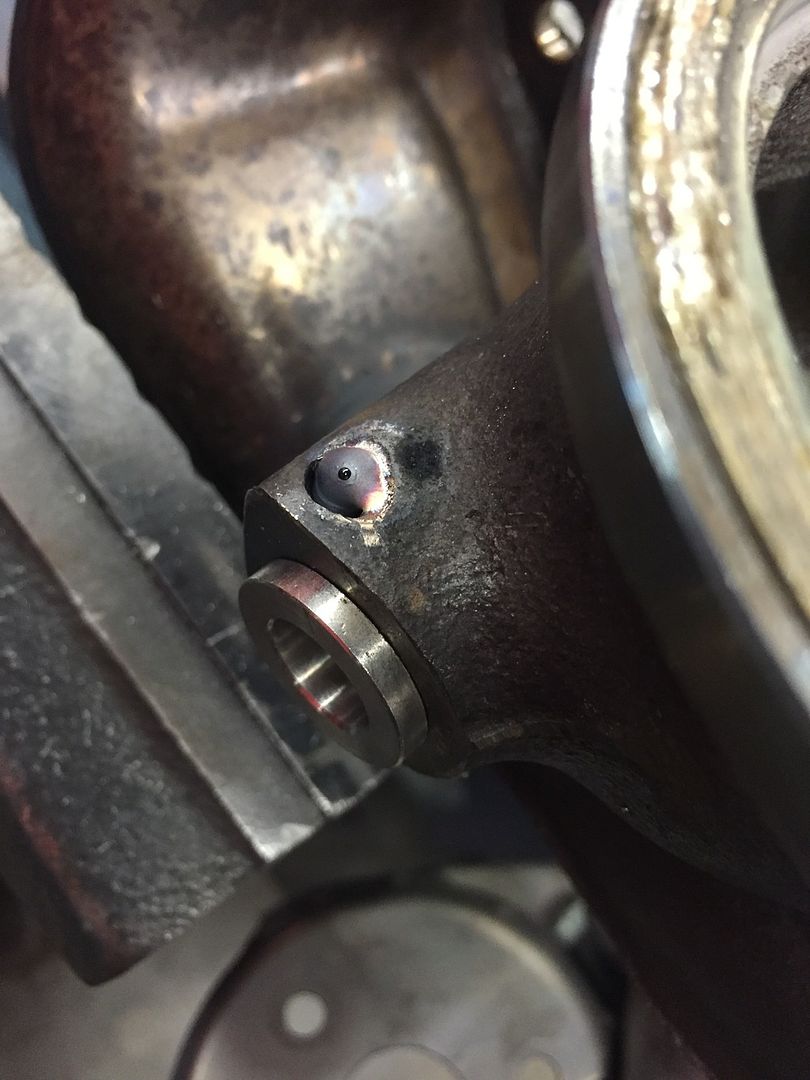 Weld new arm onto new flapper This is a two-man welding job, unless you have some pretty fancy clamping. I held the lever in the correct place with pliers while my buddy did the welding. We did the first test-weld on the old components previously removed. Once confident in the parameters, we moved onto the real deal. I recommend grounding on the turbo housing for only the first tack. Once tacked in place, I recommend grounding on the flapper! Otherwise current will arc from the bushing to the shaft and the bore will get damaged. I did this initially and I had to work the shaft around to free it up again. The second turbo came out better due to grounding on the flapper. 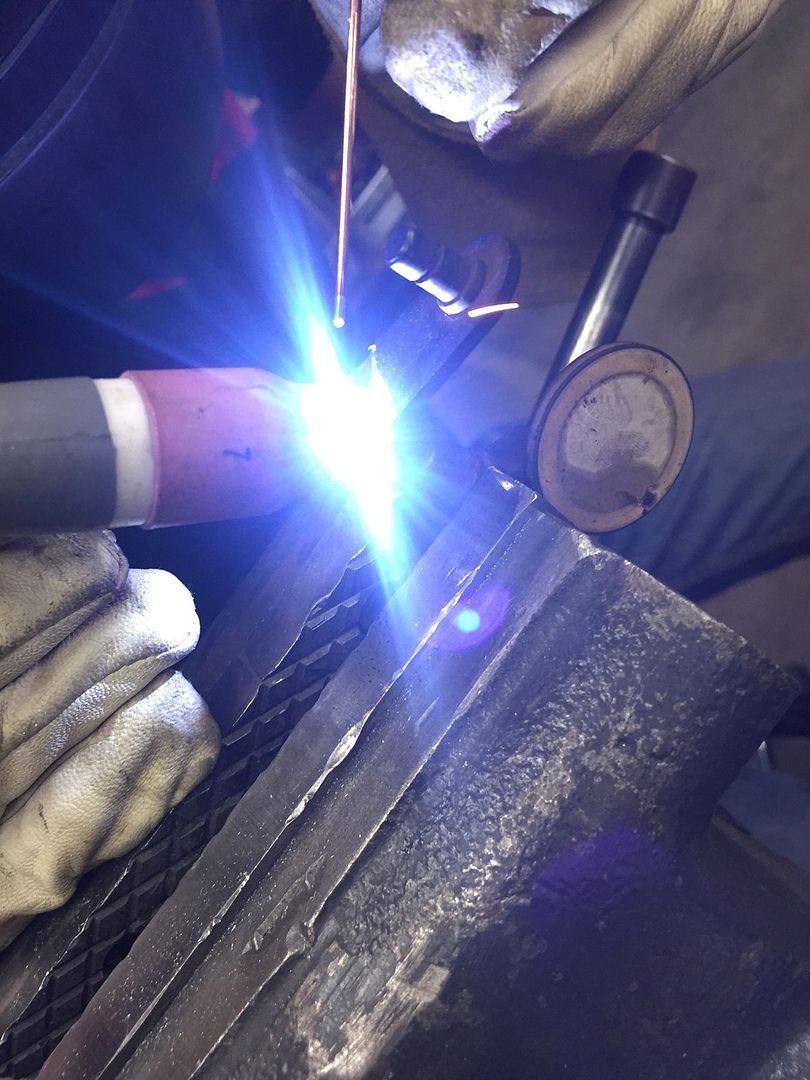 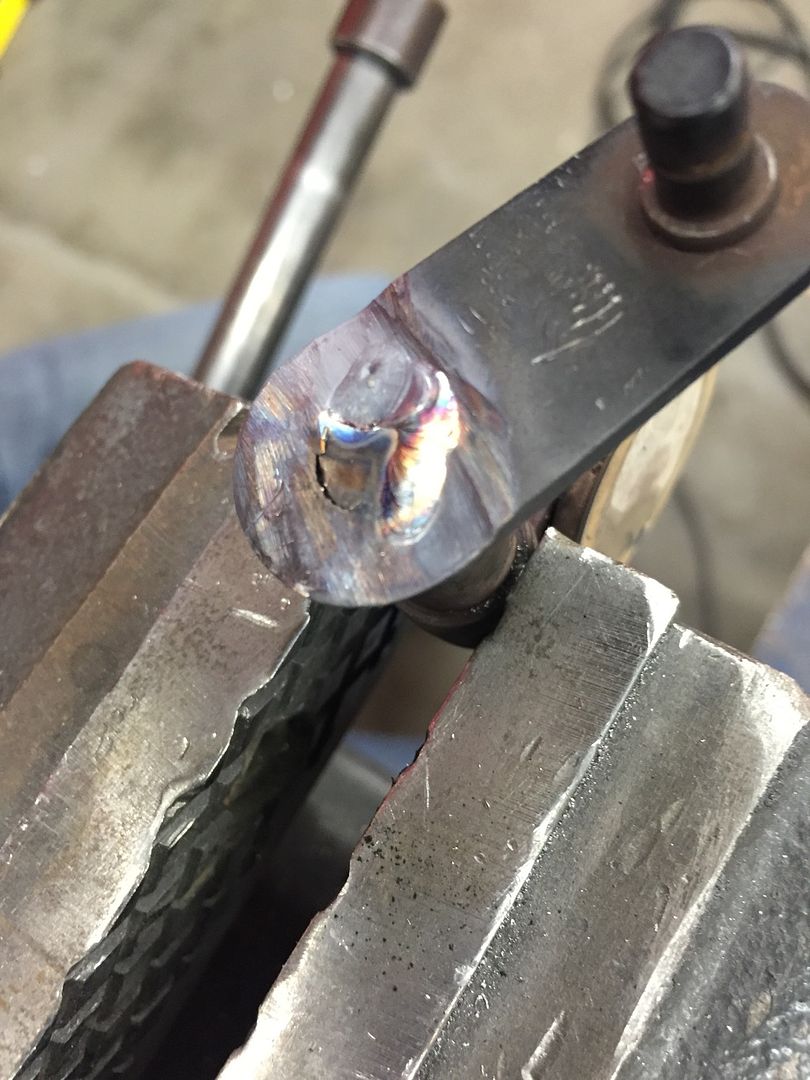 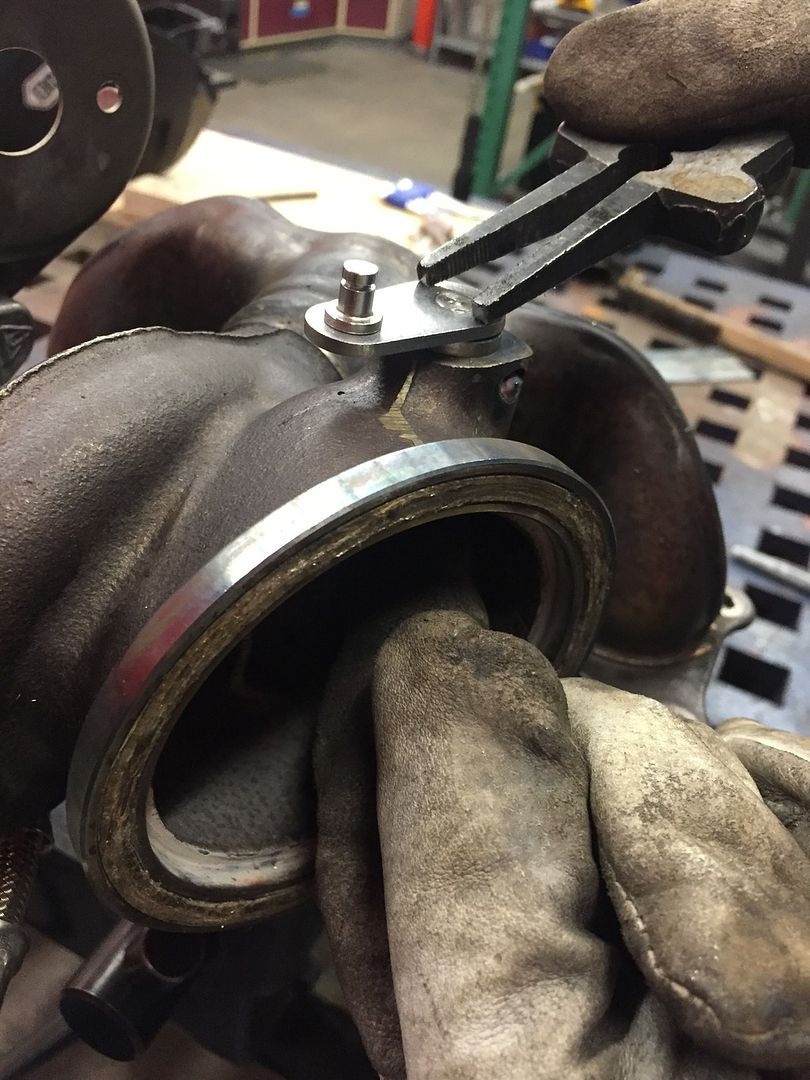 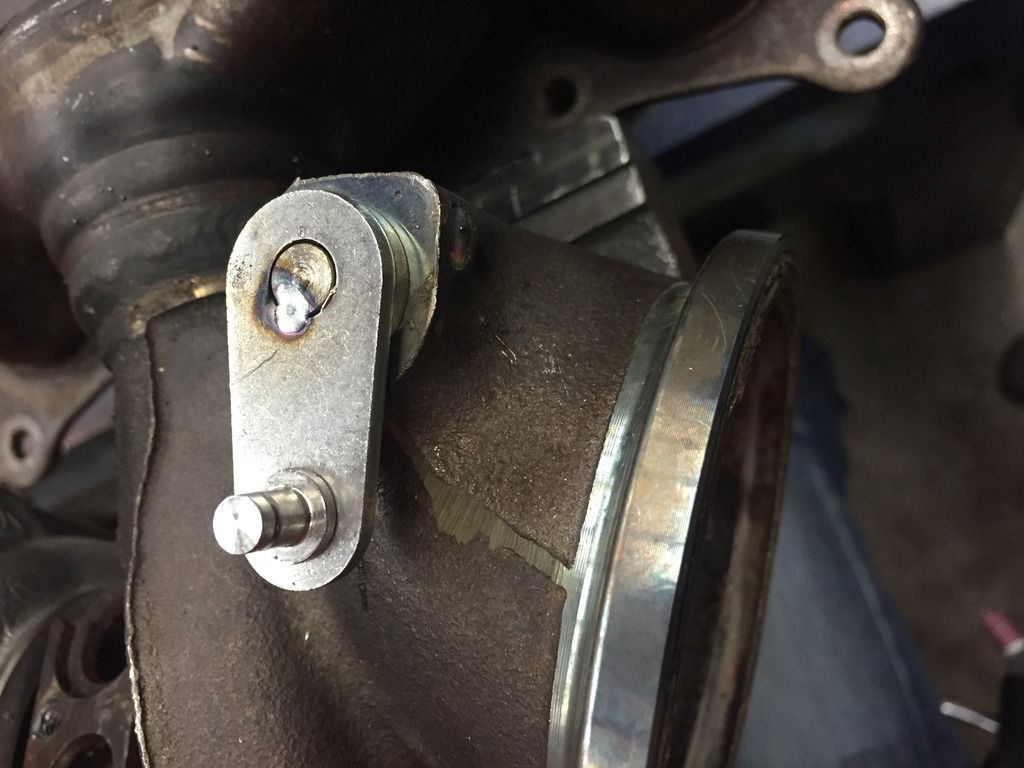 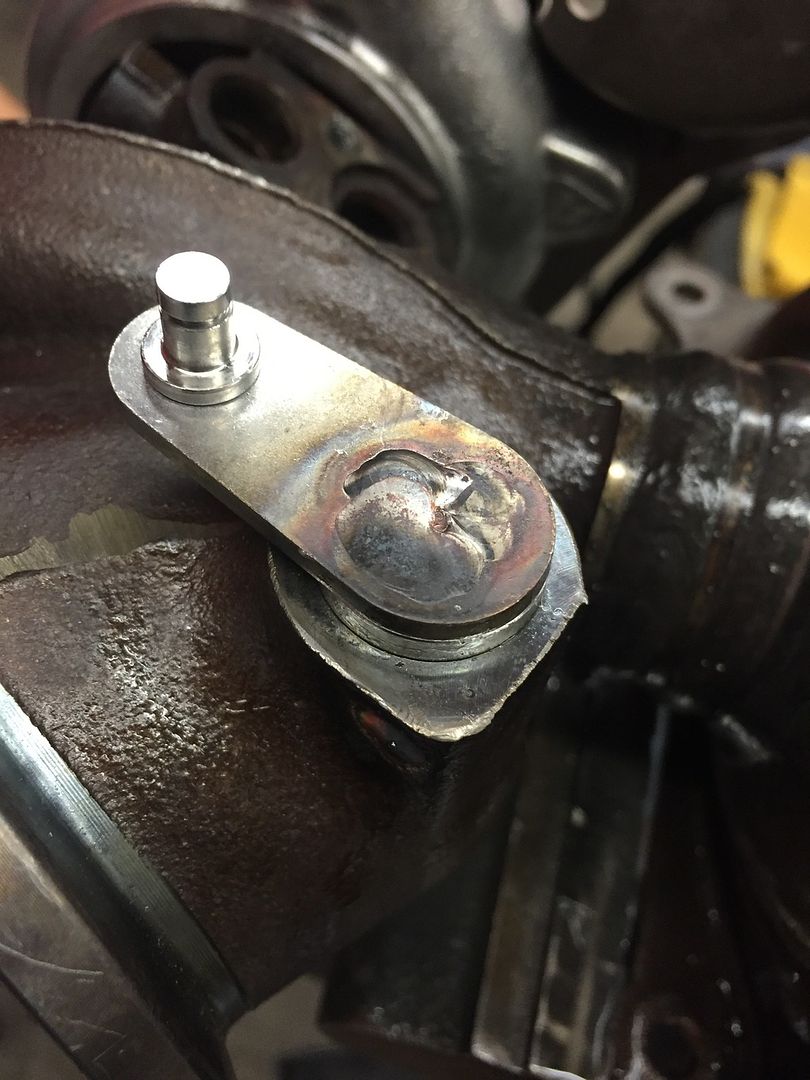 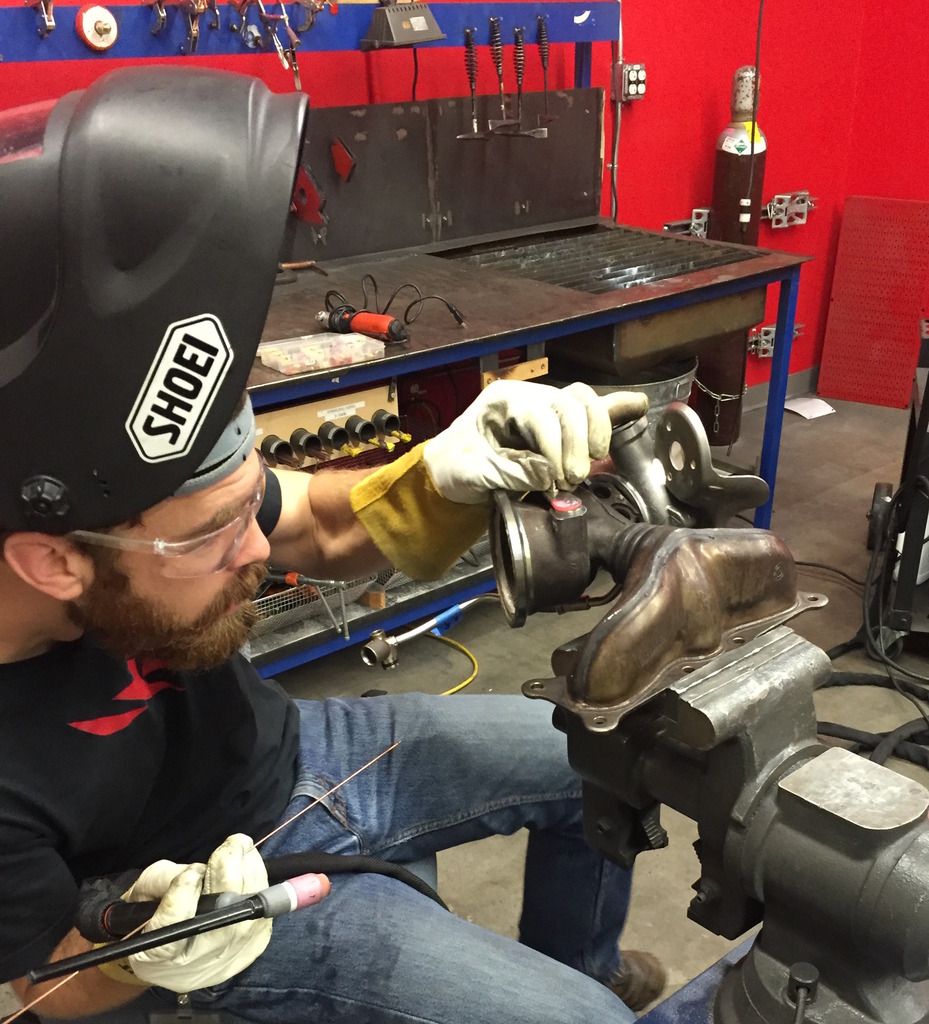 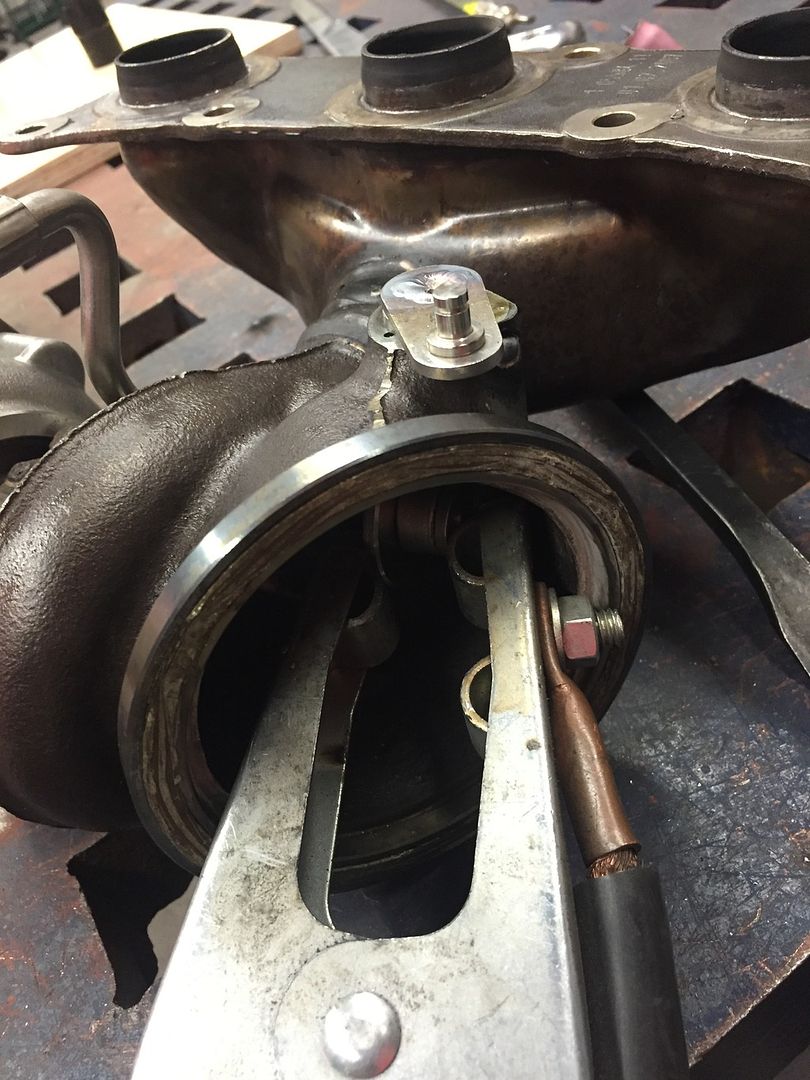 OR AT LEAST, THAT'S HOW IT'S SUPPOSED TO GO.... I ran into trouble on the 2nd turbo. I was not able to hammer out the bushing for some reason. I deformed the inside of the bushing enough such that I couldn't hammer on it firmly. Backup Plan A was to grind the shoulder off the bushing, and press it from the outside-in. I made a small arbor on the lathe to help keep the pressing axial. However, I could not budge the stuck bushing. It's unclear how much force I could apply before cracking the turbo housing, but it's not a number I want to find out. I'm also not sure why it was so stuck. 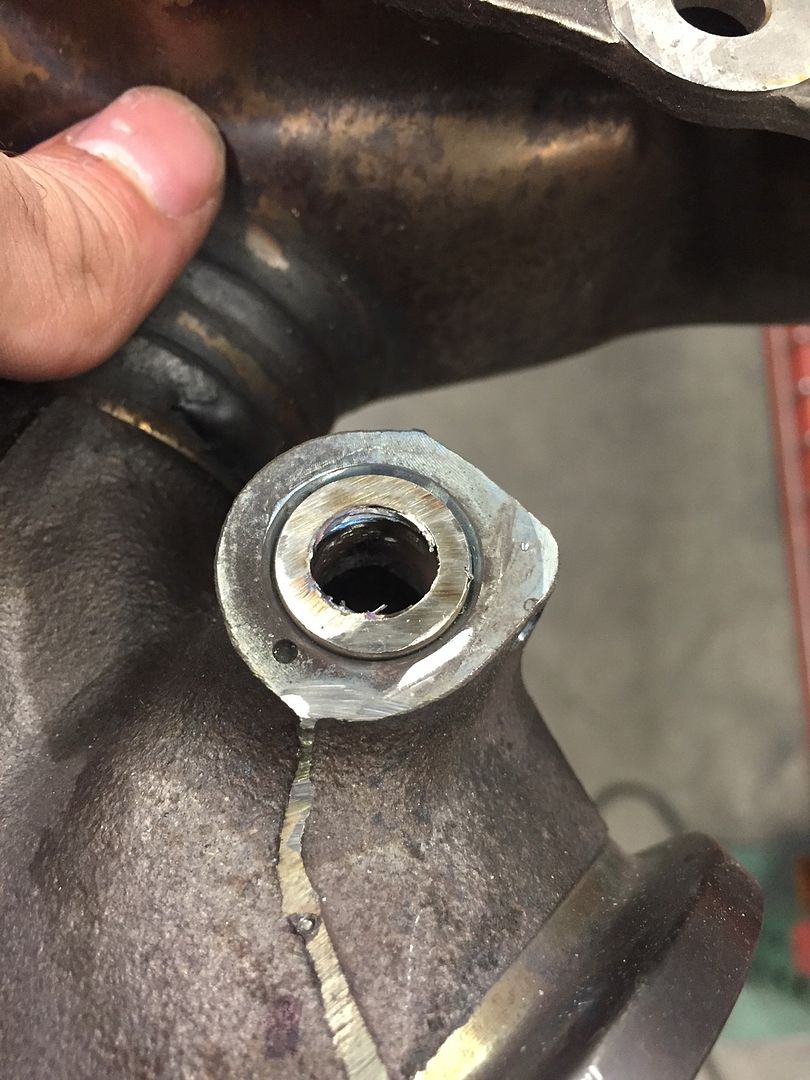 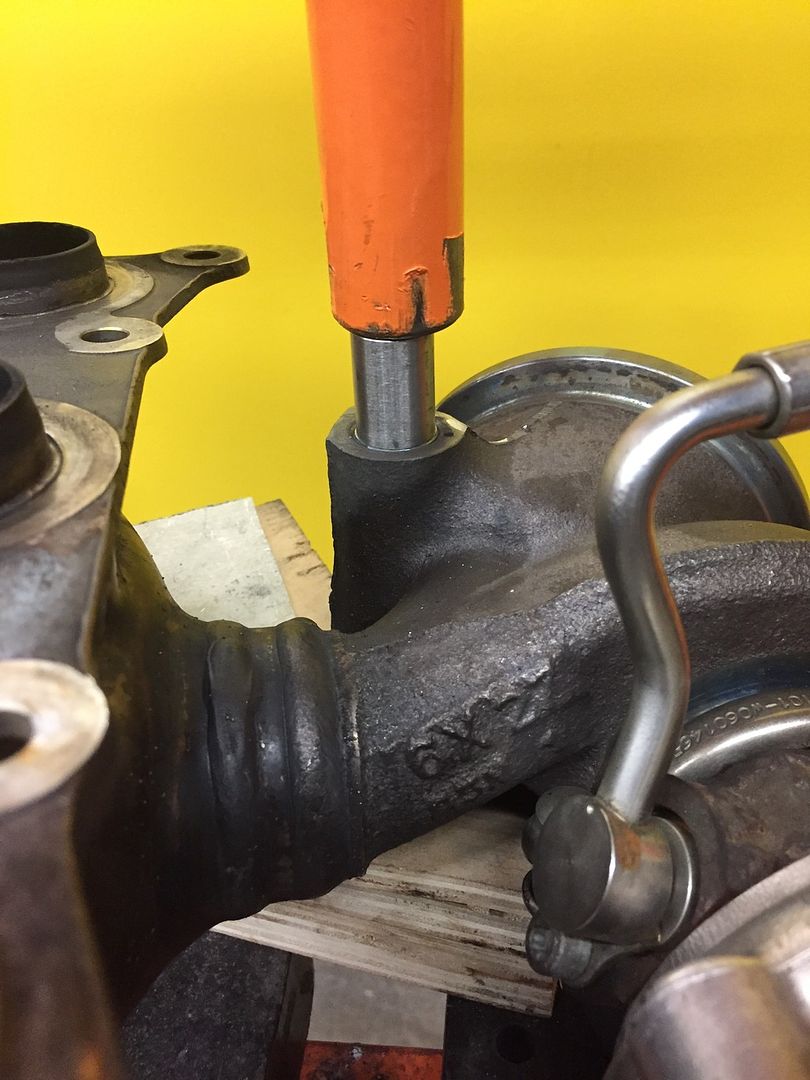 Unfortunately, the pressing didn't work either so I was forced to move to Backup Plan B, which was to drill the old bushing out. I clamped the turbo onto a Bridgeport table in an arbitrary location. I then adjusted the head to the precise position and angle needed for a pilot tool to fit into the bushing (the bushing ID is 0.465"). Once the pilot tool fit in, I knew I had position and angle perfectly dialed in. Then I used an adjustable boring head to slowly ream the ID of the bushing larger until there was almost no material left. At that point, I could gently tap the bushing out with a flat-bottom punch. 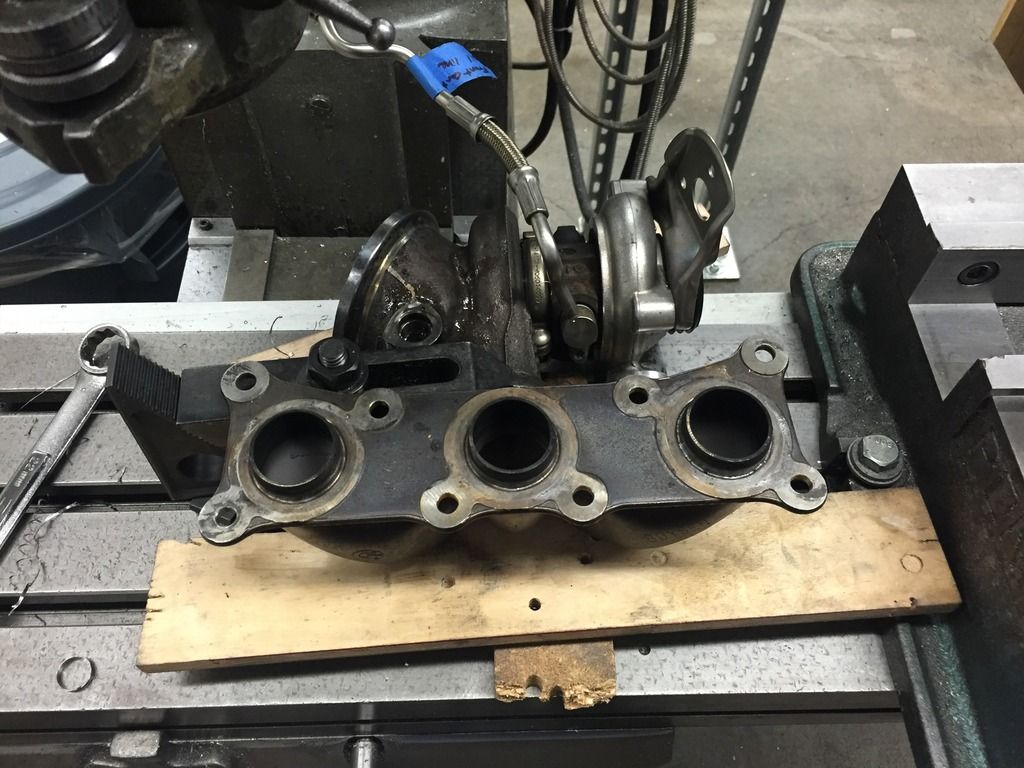 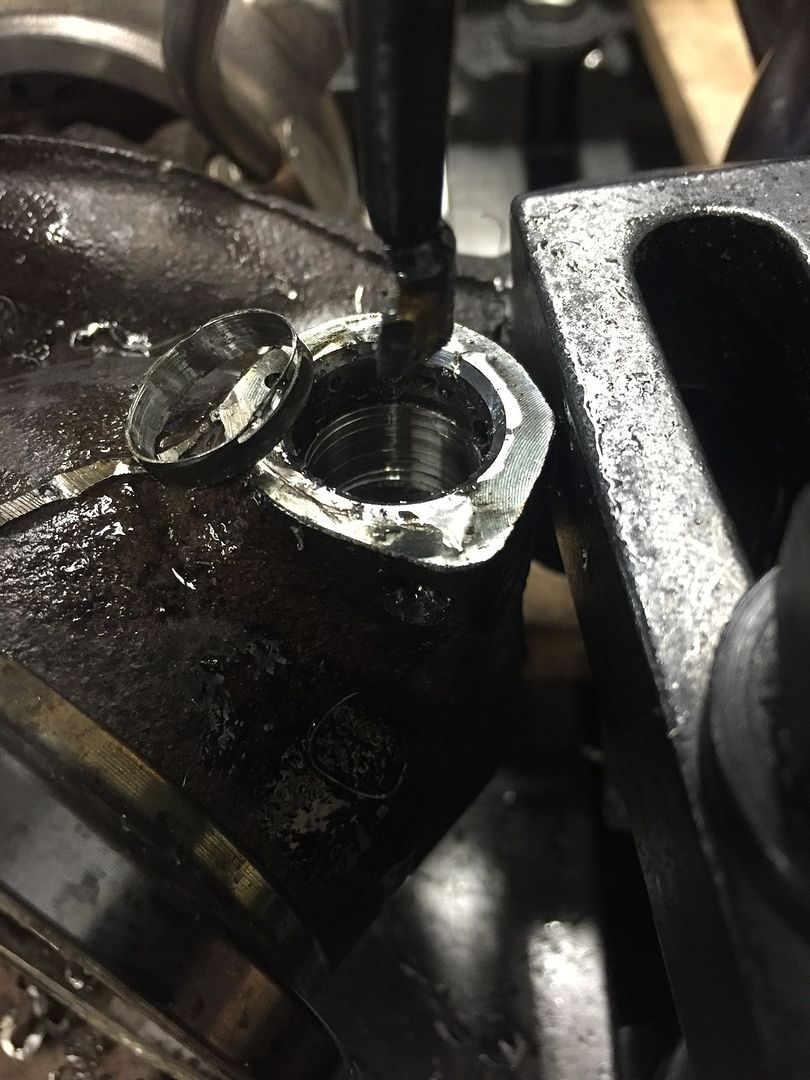 Reassembly Time: 14 hours Not much interesting to say here. Clean everything thoroughly and follow the Moo Snuckle's DIY above! Last edited by berga; 04-25-2016 at 11:49 PM.. |
| 04-15-2016, 11:25 AM | #2 |
|
Lieutenant
 
147
Rep 524
Posts
Drives: E82 135i
Join Date: Nov 2013
Location: Sacramento, CA
|
Nice work!
|
|
Appreciate
0
|
| 04-22-2016, 05:20 PM | #8 | |
|
Something Danger Zone
41
Rep 257
Posts |
Quote:
|
|
|
Appreciate
0
|
| 05-22-2016, 09:35 PM | #10 |
|
New Member
10
Rep 15
Posts |
I was also disappointed in the machining quality of the parts that arrived. The surface finish of the cylinders was somewhat rough and the corners weren't deburred. I also don't know what material was used.
Since you have access to machine tools, I might buy some Inconel rods from McMaster and machine your own parts. I don't think you could reproduce the flapper assembly itself, so you'd have to join your own machined shaft to the flapper assembly. Maybe a press fit? You should do it, and document the parts you make.  Other than that, they're holding up fine. I've maybe put 2000 miles on them so far. |
|
Appreciate
0
|
| 06-29-2016, 01:00 AM | #15 |
|
New Member
10
Rep 15
Posts |
I don't think you'd find many shops willing to do this. They'd be able to pull the turbos and re-install the fresh ones, but finding a shop to do grinding/pressing/drilling/welding will be tough.
|
|
Appreciate
0
|
| 07-04-2016, 03:12 PM | #16 | ||
|
Captain
37
Rep 656
Posts |
Quote:
Quote:
__________________
SUPER SLOW E90
|
||
|
Appreciate
0
|
| 08-10-2017, 10:56 AM | #21 |
|
Registered
2
Rep 4
Posts |
Can you post the pdf file please, photobucket is getting in my way
|
|
Appreciate
1
Drifter2090909.50 |
| 02-23-2018, 12:08 AM | #22 | |
|
New Member

5
Rep 28
Posts |
Quote:
|
|
|
Appreciate
0
|
 |
| Bookmarks |
|
|


