|
|
|
|
 |

|
 |
BMW Garage | BMW Meets | Register | Today's Posts | Search |
 |

|
BMW 3-Series (E90 E92) Forum
>
E92 N54 Engine Swap Build into E36!
|
 |
| 05-16-2019, 03:00 PM | #23 |
|
Private
 74
Rep 52
Posts |
Ok, so more progress today. Today we worked on the Brake Booster Vacuum Line and the Engine Ground, but also cleaned up a little the heater hose return from the firewall down through and across to the pump.
Not much to say on the booster vacuum line. Pretty self-explanatory and relatively easy hookup. Just needed to use, yes, another Oetiker clamp! Gotta love those. I did something similar for the heater hose, so make the hose a bit more single-pieceish. Engine ground was pretty easy too. Just make a large gauge wire that goes from the engine block to the body frame. I don’t think I picked an ideal spot for the engine frame unfortunately. I didn’t have the room I wanted to drill into the frame, so when we take the motor out, I might relocate it. The video tells all, here. Again – pretty self explanatory. As a courtesy, I watned to send you guys a pictogram of the power steering lines and how I hooked it up. Hope this helps. 
__________________
|
|
Appreciate
1
Silnismo225.50 |
| 05-18-2019, 01:41 PM | #24 |
|
Private
74
Rep 52
Posts |
Ok guys, so today we tackle the fuel system! I've decided to take the existing fuel system completely out and replace it with a known newer E46 M3 version.
So this is the old assembly from the E36 M3.  Here is the new E46 M3 Filter and Regulator. You can simply not use the regulator vacuum line. The regulator regulates the incoming fuel pressure to 5 bar, which should be more than enough for the N54.  And I labeled each of the 5 tubes (Pipes) going from front of the car to the rear of the car. Includes the 2 brake lines.  Now on to the video! It is pretty comprehensive in terms of what's entailed for the installation.
__________________
|
|
Appreciate
2
Silnismo225.50 lightmanek116.50 |
| 05-18-2019, 05:42 PM | #26 |
|
Major General
 5485
Rep 5,422
Posts
Drives: Beige G31 40ix m sport
Join Date: Feb 2016
Location: Kent, The Garden of England
|
Respect for being able to do the job but I don't get why someone would go to all that effort to strap in a N54 & keep it stock when it has less power & more reliability issues than the 321bhp s50.
Edit, just noticed that your an american, you guys only got the s52 
__________________
G31 40ix M Sport
E92 335i. E36 328is coupe E39 540i V8 6SP manual E34 3.6 M5. E34 525i sport. VW Jetta Mk2 GTI 16v. 1679cc 1967 resto-cal beetle Last edited by Chappers 71; 05-18-2019 at 06:32 PM.. |
|
Appreciate
0
|
| 05-24-2019, 08:37 AM | #27 | ||
|
Private
74
Rep 52
Posts |
Quote:
Quote:
It's more of the challenge for me than it is the power. I have an E30 S62 I did, and an E21 S54, both of which are pretty stupid fast. This will be more of a "very capable" and balanced daily driver E36.
__________________
|
||
|
Appreciate
2
Chappers 715484.50 RealJ221039.00 |
| 05-24-2019, 08:44 AM | #28 |
|
Private
74
Rep 52
Posts |
So now it's time to work the Air Conditioning Lines. That's right, this track E36 will have air conditioning. And honestly, modifying the lines to adapt to the E36 was not as difficult as one might think. The video below explains it pretty well, but overall you just want to match A to B, just like with the power steering lines, and the Drivetrain Positioning.
Some pictures of the final installation after welding them together.   And here is the air conditioning schematic. As you can see there is no explicit air dryer. That's because on the E9X, the dryer is built into the condenser. I explain it on the video, but it was a godsend because it saved a lot of space in the engine bay not having to mount a big bulbous air dryer! Hope you enjoy and learn something! 
__________________
|
|
Appreciate
3
|
| 05-28-2019, 11:50 AM | #29 |
|
Private
74
Rep 52
Posts |
Update for all ya'll guys! So I removed the engine - Took 25 minutes. Much easier to remove them after modifying the exhaust headers to clear the frame rail. Once I removed it, it was time for factory fixes. Up until this point, I've done just a handful of fixes.
Clutch, Release Fork, throwout bearing Turbo Wastegate Rattle fix and rebuild kit. That right there necessitated 3 videos, in order to cover it in the level of detail I needed. I understand there are so many Turbo wastegate rattle videos out there, but another one couldn't hurt, and there was some detail in previous videos (tips/tricks learned) that were not covered that I wanted to share with people, so I did have some info to share, which was nice. So let's remove the engine and inspect/replace the clutch: Once that was done, it was time to remove the turbos for bench reassembly. The 2 hardest parts of the wastegate rattle fix was: 1. Drilling out the pin with a HARD cobalt or titanium coated drill bit 2. Even harder was removing the old bushing. To remove the bushing, I needed Heat, a grinder, and finally a punch with a 5# hammer to finally push it through. But once that was done, the rest of the reassembly was key. The one big thing I learned from doing both these turbos is to mark the location of the existing wastegate lever arm BEFORE you grind it off and remove it. Very important or everything else will be off! The first video of removing the turbo, reworking is here: And the second video of reassembly with all new O-Rings, seals, is here: Finally, for those of you who want pictures, here are a few of the final shots reinstalled for your viewing pleasure!     Next up is final engine stock fixes and engine bay prep because you know what? Alpineweiss #300 paint has been acquired!! 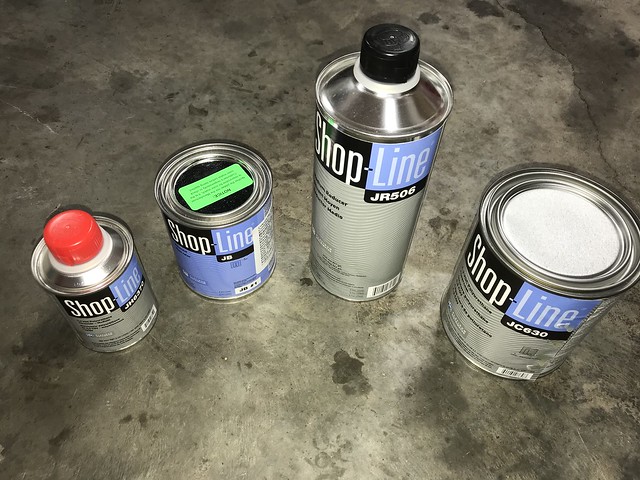
__________________
|
|
Appreciate
1
lightmanek116.50 |
| 06-04-2019, 10:32 PM | #30 |
|
Private
74
Rep 52
Posts |
Ok, some more progress on the E36 and the N54 Engine!
On the N54, we completed with installation of the coolant pump assembly, engine serpentine belt, tensioner, idler pulleys. I've heard about serpentine belts shredding and causing major problems by wrapping around the crank and that's no good. This is typically caused by a leaky valve cover gasket and/or oil filter housing gasket. Both of which will be replaced at a later date.   You can see all of the oil leaks here. Really bad. Happening for a while now. So I plan to powerwash the engine safely and replace all those gaskets.  I replaced the transmission output shaft with one that will work for this swap. It's from an E46 M3. Correct 96mm size to mate up to the existing E36 S52 auto transmission. Had the right spline count, size, and output seal size too. It was nearly perfect!  I fit the charge air pipe in. The video below shows why I was nervous about installing this, but I think I have it all figured out and have afforded myself the room I need to clear the frame rail.  I got the new clutch installed. I didn't have a clutch alignment tool, so I made my own and it worked out pretty darn well! I didn't even have a lathe to make it perfect. Just got lucky I guess.  I got the oil pan reinstalled with a new gasket! Installed a new guibo, some new shifter parts and I'm good to go! Take a look at the video below hope you like it!
__________________
|
|
Appreciate
0
|
| 06-05-2019, 08:51 PM | #31 |
|
Private
74
Rep 52
Posts |
Now it's time to prepare the engine bay for paint. As a shadetree mechanic, I did my best to shave the bay. The front left wheelwell housing had damage from what looks to be a previous accident. Appears to be something that can be rectified, and I did my best to use filler and smooth out the imperfections to be less imperfect!
First, we cut out the frame rail to make more room for the charge air intake tube for the rear turbo. Couple pictures for you to mull over. I know the welds need to be improved. I'm learning how to better weld sheet metal.  Top View  Here's a quick video of the work I performed up to date. Below is more work for engine bay prep! Then I powerwashed the engine bay. Some Before/After are pretty dramatic.    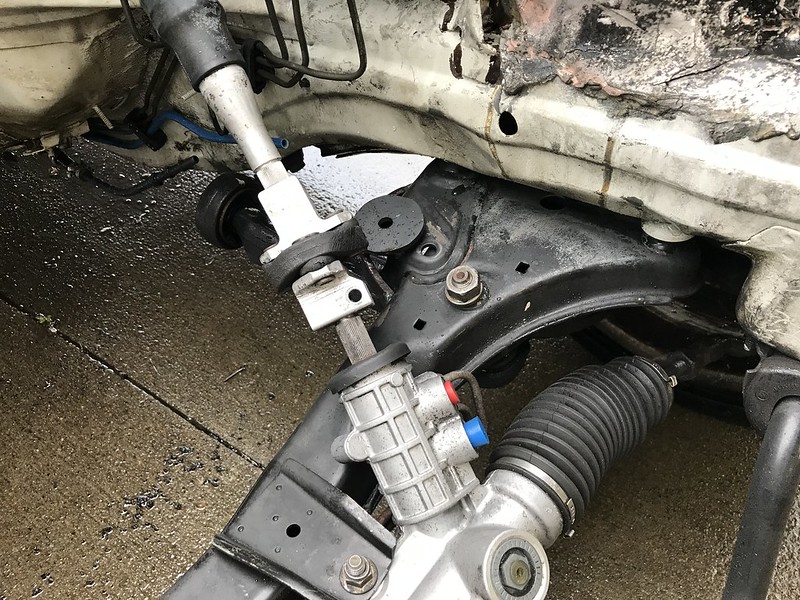 The above pic needed a lot of work, in particular the bondo that was revealed. 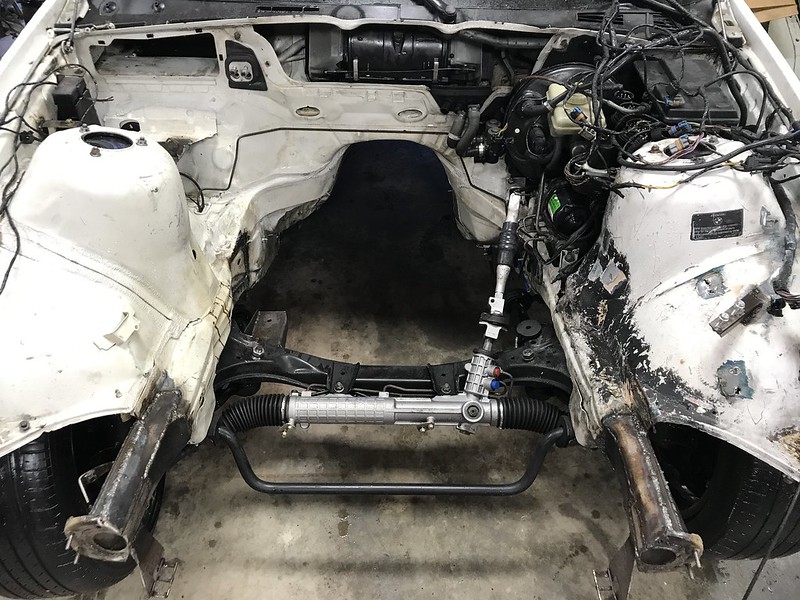 Powerwashing the engine. 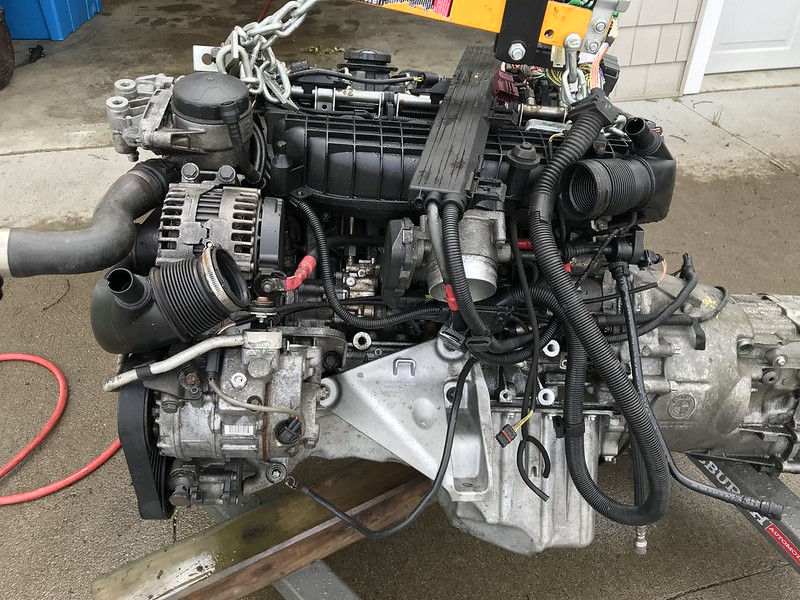 Next up is Paint - Let's get this bay prepped and painted! Standby for more progress tomorrow!
__________________
|
|
Appreciate
1
lightmanek116.50 |
| 06-14-2019, 09:49 PM | #33 |
|
Private
74
Rep 52
Posts |
More Progress!!! Let's see some paint huh!?
So I had to paint 4 Items: Front bumper Grill Support Core Support Engine Bay Most of the prep was pretty easy. I wasn't going for perfect, especially since the car is far from perfect, but more because I'm still learning! First, I performed some body fill on the parts:  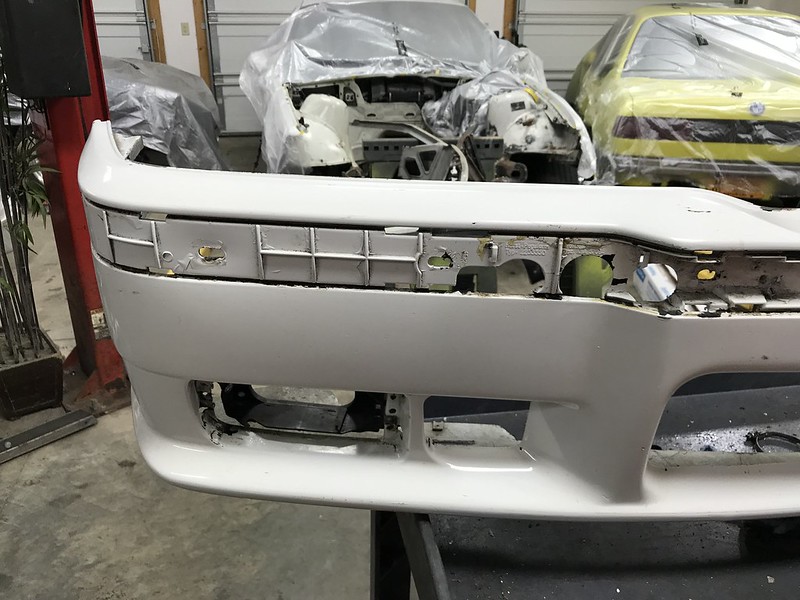    Put some seam seal on the welds:  Then I Primed them:  Then I painted them. Base/Clear 2 stage paint: I didn't do any color sanding, but that can be done later after the clear coat hardens a bit more.     Started Assembly:  I had an issue with the grill. It cracked, so I used come Q-Bond, which is a powder type material and when you put Krazy Glue on it, it instantly hardens. AWESOME tool for anyone who needs to fix a plastic piece or part that broke. Very useful.   So I primed and painted the grill and installed it in the grill support. 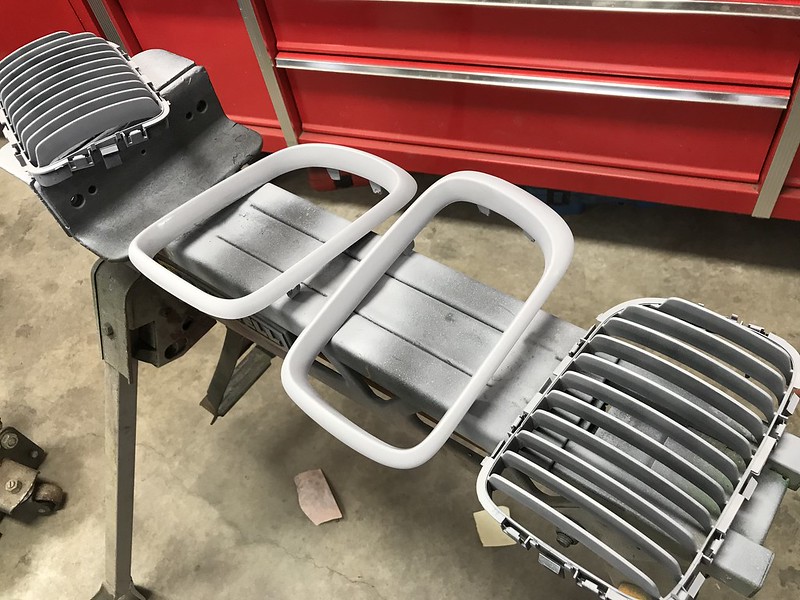   This video is kinda long, but it has some good info that you might like! Thanks for watching guys!
__________________
Last edited by Garageaholic; 06-14-2019 at 10:47 PM.. |
|
Appreciate
1
lightmanek116.50 |
| 06-17-2019, 04:36 PM | #34 |
|
Private
74
Rep 52
Posts |
Now that we got the paint on, time for final assembly! This was eventually broken out into a few videos. I did this because of the sheer work and level of detail I wanted to cover. Now, I broke it out as follows:
Prepping for Final Assembly: Rhino Liner Install on below the frame rails. I removed all of the masking from the engine bay. Reassembled the M3 bumper. I fixed the grill, painted it, and assembled it into the grill assembly. i also replaced the valve cover gasket and spark plugs. This was right before I decided to clean the N54 Intake Valves, which became completely gunked up due to the direct injection of the fuel injectors. Common issue on the N54 engines, or any turbo application with direct injection. I also started the oil filter gasket. I replaced all of the gaskets in the oil filter housing and you can see that through the next video(s) that I made. So this will help greatly reduce if not eliminate any more oil leakage. No real pictures of the aforementioned, but the video is a pretty good watch. E36 & N54 Prep for Final Assembly - YouTube Then I installed the clutch line, from the master cylinder to the slave cylinder. Did some dynamat installation for sound deadening, DME install, and engine install. Let's see how this puppy looks in the engine! Here's the video if you wanted to watch it! A lot more details here than what you see in the pics below. Hope you find both interesting. Now on to the pictures:  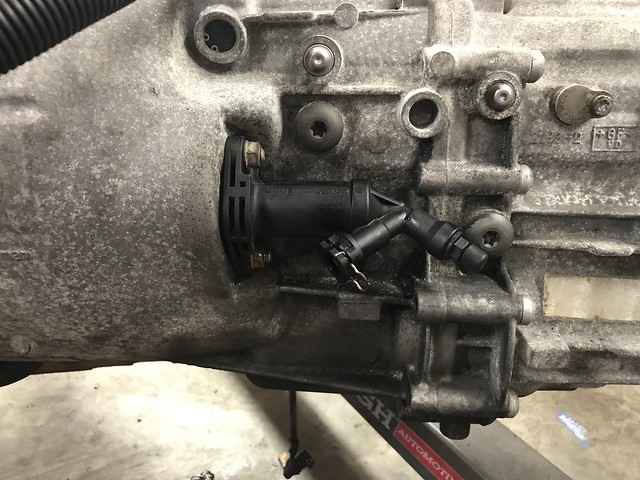 Installed the heater hoses, tightened them up because replacing/tightening them later will be very difficult!  A bit of art for the Battery B+ Terminal! Get ready to wire to it later!!  DME Installation in the stock E36 location. Much larger DME than the S52 that was in there before, so I needed to adapt it to fit. Turned out quite nice and pretty robust too!   Dynamat Installation Completed. Ready for Engine Install!   As promised, I beefed up the Transmission Mount. There were some comments about that, so here you go!   And Finally, the engine sits in the engine bay on its own weight, in it's stock location under the weight of the Poly Mounts! 
__________________
|
| 06-17-2019, 04:37 PM | #35 |
|
Private
74
Rep 52
Posts |
Now that we got the paint on, time for final assembly! This was eventually broken out into a few videos. I did this because of the sheer work and level of detail I wanted to cover. Now, I broke it out as follows:
Prepping for Final Assembly: Rhino Liner Install on below the frame rails. I removed all of the masking from the engine bay. Reassembled the M3 bumper. I fixed the grill, painted it, and assembled it into the grill assembly. i also replaced the valve cover gasket and spark plugs. This was right before I decided to clean the N54 Intake Valves, which became completely gunked up due to the direct injection of the fuel injectors. Common issue on the N54 engines, or any turbo application with direct injection. I also started the oil filter gasket. I replaced all of the gaskets in the oil filter housing and you can see that through the next video(s) that I made. So this will help greatly reduce if not eliminate any more oil leakage. No real pictures of the aforementioned, but the video is a pretty good watch. Then I installed the clutch line, from the master cylinder to the slave cylinder. Did some dynamat installation for sound deadening, DME install, and engine install. Let's see how this puppy looks in the engine! Here's the video if you wanted to watch it! A lot more details here than what you see in the pics below. Hope you find both interesting. Now on to the pictures: Installed the heater hoses, tightened them up because replacing/tightening them later will be very difficult! A bit of art for the Battery B+ Terminal! Get ready to wire to it later!! DME Installation in the stock E36 location. Much larger DME than the S52 that was in there before, so I needed to adapt it to fit. Turned out quite nice and pretty robust too! Dynamat Installation Completed. Ready for Engine Install! As promised, I beefed up the Transmission Mount. There were some comments about that, so here you go! And Finally, the engine sits in the engine bay on its own weight, in it's stock location under the weight of the Poly Mounts!
__________________
|
|
Appreciate
0
|
| 06-19-2019, 11:02 AM | #36 |
|
Private
74
Rep 52
Posts |
More updates to share!
Today was the dredded Intake Valve Cleaning! Due to the direct injection of fuel into the combustion chamber, there are emmissions standards that dictate that exhaust recirculation back into the intake be done to burn up any unburned gas, this creates carbon buildup on the intake valves, whereas in a port injection car (non turbo most frequently), the fuel injected keeps the intake valves clean, so no issues there. Regardless, we tried a number of techniques, physical scraping, Intake Valve Chemical cleaner, and finally we tried to soda blast. Didn't come out EXACTLY how we liked, but it wasn't too bad. Much better than it was! Before Shot:  After Shot - Again - not ideal, but better.  This was even after the soda blasting. Next time, walnut shells and a vacuum adapter!!  This one here: https://www.ebay.com/itm/Walnut-Blas...8AAOSwvMFa3737
__________________
|
|
Appreciate
0
|
| 06-20-2019, 01:58 AM | #37 |
|
Captain
 1039
Rep 753
Posts
Drives: E92 CT200h Cayman Boxster RC
Join Date: Mar 2019
Location: WI / AZ
|
Great build! I will have to catch up on the videos in my free time.
|
|
Appreciate
0
|
| 06-29-2019, 06:16 PM | #38 |
|
Private
74
Rep 52
Posts |
Some more updates! Final Assembly time has come. So exciting to see everything start to come together on these types of swaps. Today we work on all underside type assembly work. This includes the Shifter with Boot, Driveshaft, Reverse Switch Installation, Clutch Line, Steering column, heater hoses.
But that's not fun. Final installation pictures are fun. So enjoy! Remember I still haven't fired this thing up yet.    Assembled the front bumper to see how the intercooler fits. Fits pretty good!!      And finally, a couple videos of my detailed progress if you wanted to watch! In this video I cover a bit more on the engine side, including the infamous oil cooler gasket leaks. Show you how to fix that as well. Pretty straightforward.
__________________
|
|
Appreciate
1
type-dRew641.00 |
| 06-30-2019, 05:28 PM | #39 |
|
Private
74
Rep 52
Posts |
Today, I wired up the PWM Electric Fan. So First, to get my brain wrapped around all of the connectors, I clamped them together between 2 pieces of Delrin. Just to identify all of the I/O I was dealing with:
   The fan on this application from the 335i X-Drive is a 600W fan version (Not the 400W version). Regardless, there are 3 populated pins on the main connector. + (RT/SW), - (BR), and PWM Signal (SW/BL) Pin 8 on X60001.  The video below is 2 fold: The first part shows you how I wired it physically. The second half shows how to read the wiring diagrams on WDS and how I arrived at the conclusion for pinouts and relay wiring. Hope you enjoy and learn!
__________________
|
|
Appreciate
1
type-dRew641.00 |
| 07-01-2019, 11:33 PM | #41 | |
|
Private
74
Rep 52
Posts |
Quote:
__________________
|
|
|
Appreciate
0
|
| 07-01-2019, 11:54 PM | #42 |
|
Private
74
Rep 52
Posts |
It's Aliiiiiive!!
This is probably my most exciting post! We finally got it started! It took so many tries, updates, retries and failed attempts to finally get it started.
Generally speaking, I thought originally that I could start with just the CAS3 unit, Key/holder, Start Button and be done with it. But i've been told many conflicting theories, so it naturally made me quite nervous. Regardless, I pushed ahead and did the best I could with the wiring diagrams and advice from a few people I received on the subject. Regardless of all of this, I plan to have the DME flashed to remove EWS and get it tuned. This will be done by Kassel Performance in Pennsylvania. (https://www.kasselperformance.com/) They have been very informative of their products, technology, and even offered to help me with the wiring to get it started on CAS. Overall, I wanted to see if I can just get it wired on CAS. Because I have an S85 waiting for my E31 and need to know for sure if all I need is the matching CAS/KEY/DME set. This post is set out to confirm or deny that!! Here are a few pictures of the wiring. Yes, it's not organized, but due to wire lengths, splices, location of modules, it made it quite messy. Nevertheless, I know it's not very informative (yet), but more detailed wiring info is coming along soon!    Here is a shot of the A4010 Junction Box with the Main Relay there on the right.  This first video is me trying to get it started on CAS3, then failing, so I went back to the donor car to pull the A4010 unit with the A4010a body control module. Then in my second half of the effort, I wanted to see if you really need to have all that wiring shit there, like the junction box. So I started to step-by-step strip the wiring away from the junction box, and eventually eliminated it. Spoiler alert, it started only on CAS! Yes there will be fault codes, but there's ways around that with CAN Emulators. Again, I plan to have it flashed anyway, so I will work on an emulator another time, perhaps for my S85 E31. Here's a picture of just the CAS unit hooked to the engine. I deduced that the reason it didn't work originally is because there is this one EWS wire, not explicitly labeled on any of the N54 wiring schematics. It is a GN/WS wire that connects the CAS to the DME. Again, not in the schematics for the CAS, but it is there for the X60001 connector on the DME. So I took a chance and deduced that the wire, being the same color, gauge has to have something to do with the EWS. It was called "_ZRS" on the X60001 - Pin 7. 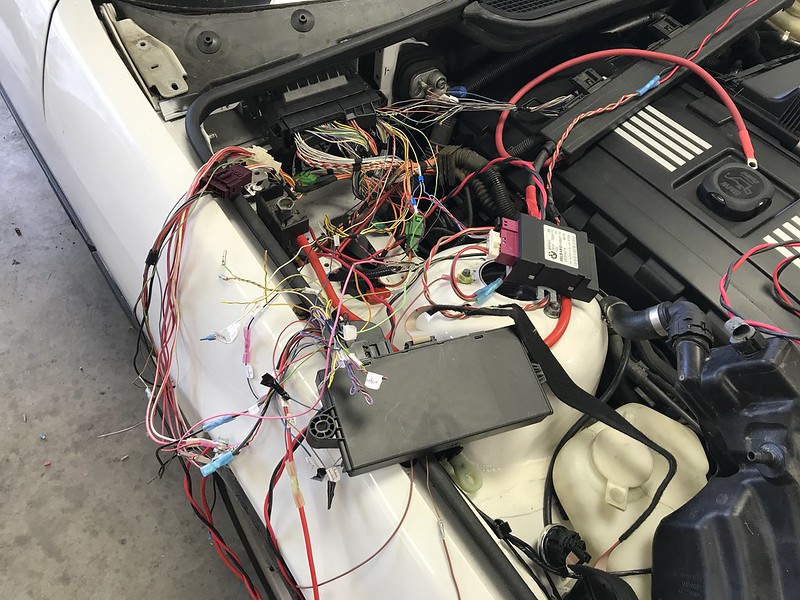 And here is a video of how I slimmed down the wiring to the basics. I hope you enjoy and learn something! And finally, I wanted to let you guys know that I do plan to issue a detailed integrators guide for the N54, specifically geared toward the E36. It will have detailed wiring, pinouts, part numbers, wire lengths, Exhaust Setup, Drivetrain alignment specs, cooling, A/C, P/S integration and much more. I hope you will find it useful when it comes out in July! Thanks again for watching! Frank
__________________
|
|
Appreciate
2
IllSic_Design2124.00 MMadzonga0.00 |
| 07-17-2019, 10:13 PM | #43 |
|
Private
74
Rep 52
Posts |
More updates!! Mostly good news, but still some setbacks
First, we reassembled the interior. Not much there, but we did put in a pretty cool steering wheel, meant for the E36. Just need to modify the slip ring to fit the different hub on the aluminum casting in the wheel. More on that later.  Did a little Vacuuming  Have some seat twist in the drivers side. Presumably completely messed up. Looks like some shoddy welding, that's for sure. 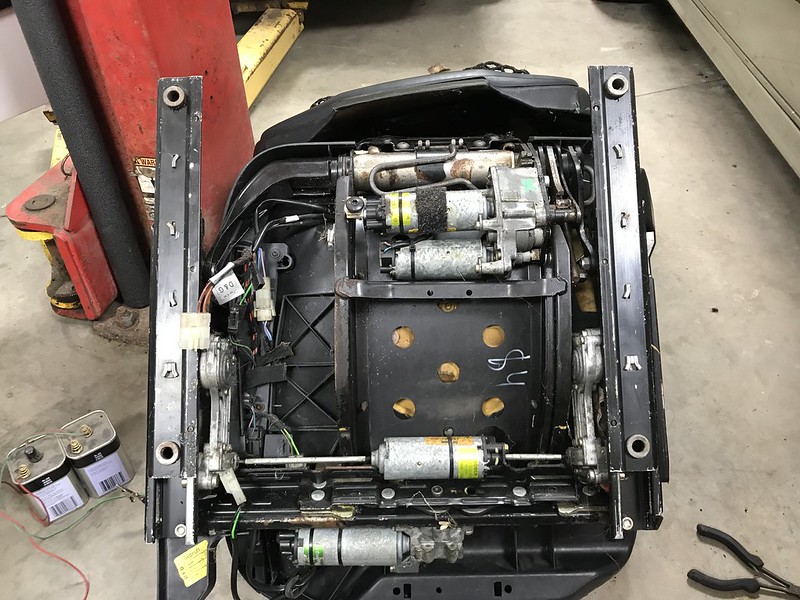  Got the reverse lights working completely!  And a quick video on the interior assembly. Nothing super exciting!
__________________
|
|
Appreciate
2
IllSic_Design2124.00 type-dRew641.00 |
| 07-17-2019, 10:21 PM | #44 |
|
Private
74
Rep 52
Posts |
Ok, Ok. I know that one was just a fluff post. Nothing really useful there. But here I have more to contribute. First TEST DRIVE!
part of that was bleeding the clutch. Including the slave and master cylinders. This was particularly frustrating. It took me 15-20 iterations to finally get it bled. I used a vacuum bleeder to such the fluid out of the bleed screw from the slave cylinder, kept pressure on the pedal while sucking, and continually added fluid to the reservoir so it didn't accidentally suck air in from above. After I got just a bit of pedal pressure, I pushed the pedal down, left it there since it was spring loaded, and then opened the bleed port. Then CLOSED the bleed port, and pushed the pedal 20-30 times. Then pushed the pedal down easy until it hits its resistance point. Lather, rinse, repeat. I installed the oil cooler tubing for cooling. Pretty straightforward. Used Large Vacuum hose and just bent it into place. Tied on the grate for the front bumper. Something I DEFINITELY should have done before installing the bumper, but it was still possible. Filled up with coolant, cycled the power steering and off I went. The engine was in Limp Mode for sure. No Turbo Spool, presumably due to all of the faults resident in the loss of comm between the DME and everything else.  After getting the CAS working (still DT's exist though), I was super excited. We did some more final FINAL assembly. Some pics below, but again nothing special.  Now it's time to complete the final assembly while I concurrently work with Kassel Performance for their much welcomed sponsorship to help pave the way and flash this DME for all to enjoy in the future! Car felt great though. Very tight, very comfortable. Can't wait to finish this thing! Thanks again all for watching and following
__________________
|
|
Appreciate
1
type-dRew641.00 |
 |
| Bookmarks |
|
|