

|
|
|
|
 |

|
 |
BMW Garage | BMW Meets | Register | Today's Posts | Search |
 |

|
BMW 3-Series (E90 E92) Forum
>
E90 Radiator Removal DIY
|
 |
| 08-16-2013, 11:24 PM | #1 |
|
New Member
11
Rep 17
Posts |
E90 Radiator Removal DIY
Hey everyone, I've searched high and low for a DIY on the removal of the radiator but came up with ZILCH! So here I am now, My wife's '07 335i sport(automatic) has a leak in the radiator and it needed to be replaced, I searched for a replacement and we both narrowed it down to a CSF radiator which was at a pretty good price (under $200), and it also came with a 2 year warranty (I'm all about the bang for the buck). We've decided to pick up a temporary Rad for the time being till we pick up the all Aluminum race rad
 which will come in handy when we continue to do other upgrades for more power, So I figure since i'll be doing the project more people here could use this info, and here we are, I'll try and give as much detail as possible so if I leave anything out or your needing more info just feel free to let me know and i'll try my best to help out. which will come in handy when we continue to do other upgrades for more power, So I figure since i'll be doing the project more people here could use this info, and here we are, I'll try and give as much detail as possible so if I leave anything out or your needing more info just feel free to let me know and i'll try my best to help out.Under $200 and a 2 year warranty, not bad 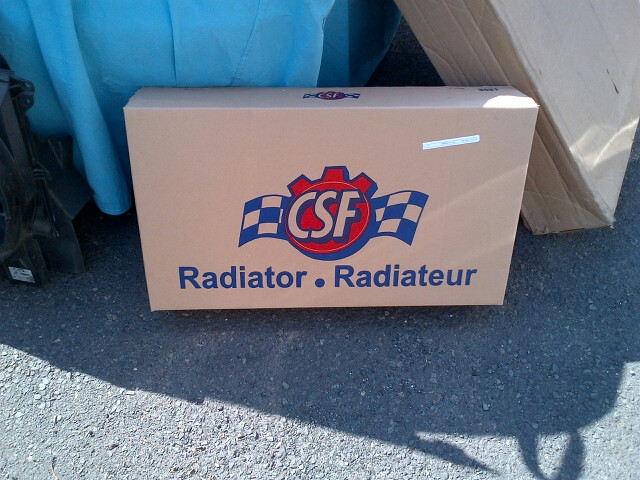 WARNING!!! Do not perform this while the engine and coolant is hot! Wait at least 2 hours for the coolant to cool down. I raised the vehicle on ramps, you can also use jack stands. Tools needed: Flat Head Screw Driver (to pop out clips and to pry hoses off if needed) T25 Torx Socket T25 Torx Bit Socket wrench 10mm Socket 8MM Socket (removal of under belly cover) Pliers (Coolant hose clamps) 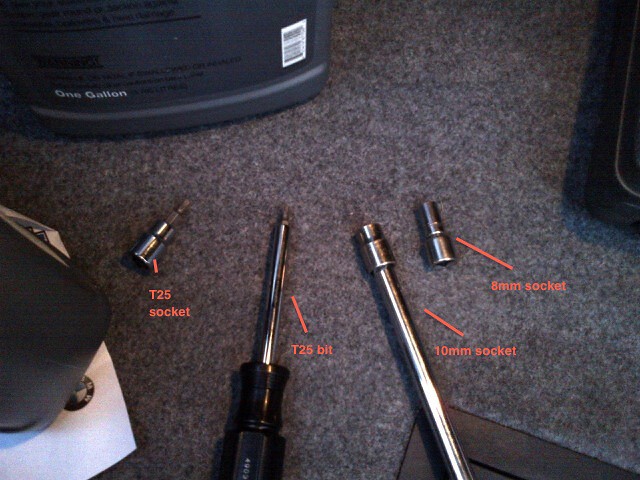 In order to remove the radiator 4 things need to be removed first, all in this order: 1) Under Belly Cover (Splash guard, 16 x 8mm screws to remove) 2) Air duct 3) Radiator Fan 4) Intercooler (in order to drain the coolant you'll need access the drain plug and other screws that hold certain hoses and parts in place) 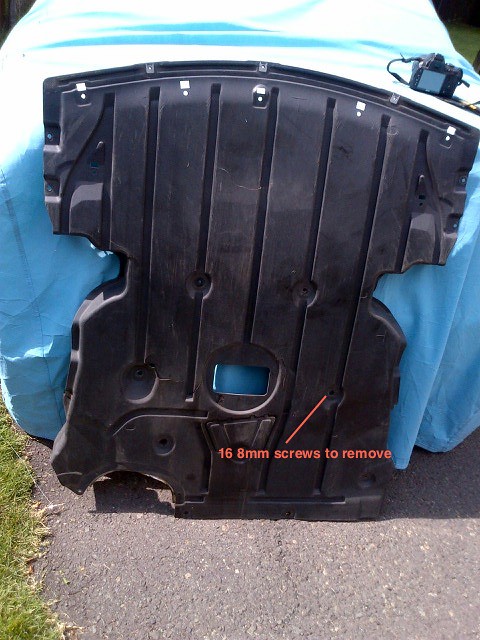 Now on to the good stuff  Step: 1) Disconnect the negative cable on the battery (to avoid any short circuit or triggering of any codes) 2) Remove the Air Duct: There are two T25 screws that hold the air duct in place to the front of the car, once those are removed reach to the back by the air filter and stick the screw driver into the clip and pry the hose from the air filter box (gently pry, the plastic it's pretty pliable so it'll move very easily. While your there, you might as well take a look at your air filter by unclipping about 5-7 clips and lifting the cover and exposing your air filter, if it's dirty, change it lol. 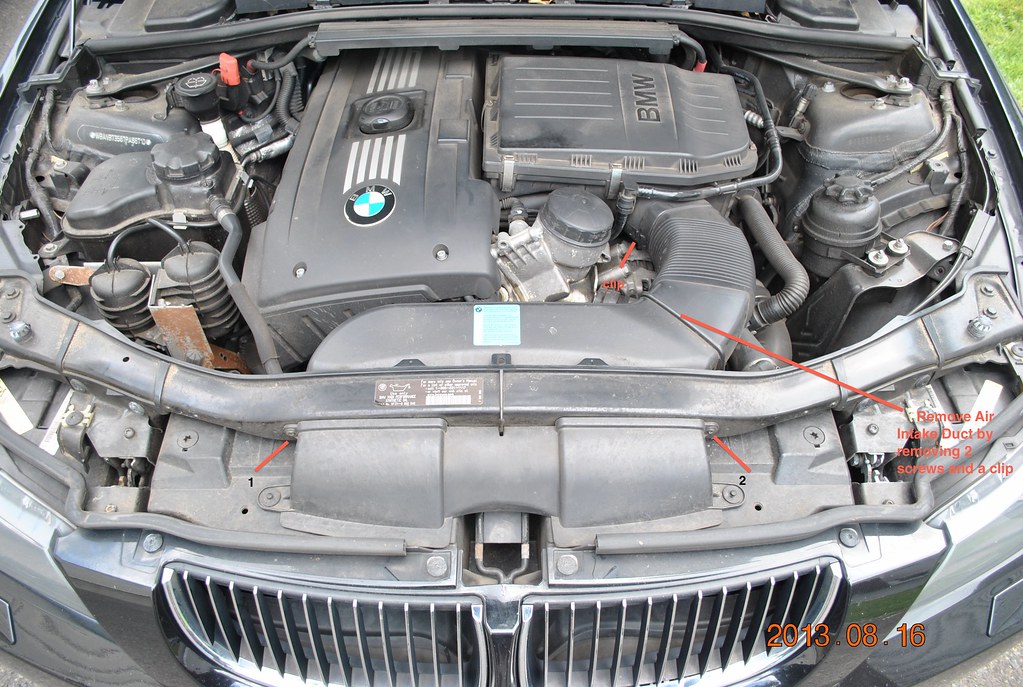 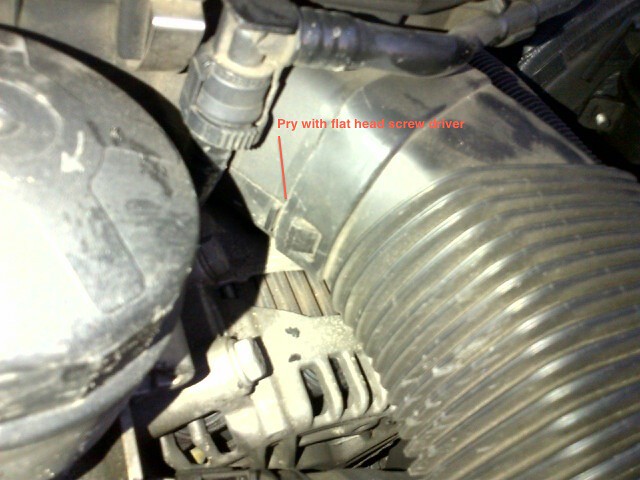 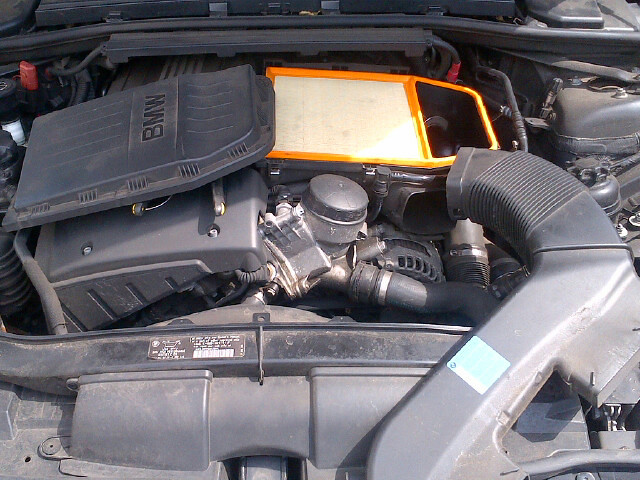 3) Remove the Intercooler: Remove 2 T25 Screws and 2 plastic clips (securing the Radiator support, Radiator, AC condenser, and Intercooler in place, both on each side of the intercooler (left and right).   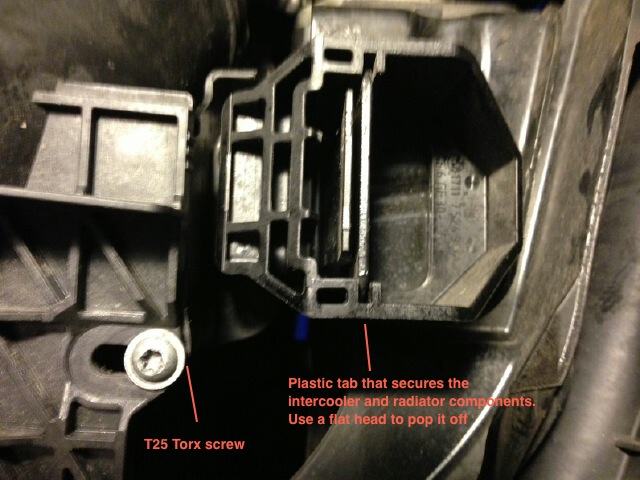 4) Remove Radiator Fan: Amazingly easy, 2 T25 screws (1 at the top of the fan, and the other at the bottom holding the cooler in place with the fan), and 2 clips hold this in place, both clips are on the drivers side, 1 which is holding the Charge pipe for the intercooler in place (I found it best to just loosen the clamp on the Charge pipe with the screw driver and remove the pipe out of the way), next clip just push in as you slide the fan up and out of the engine bay, and your done. 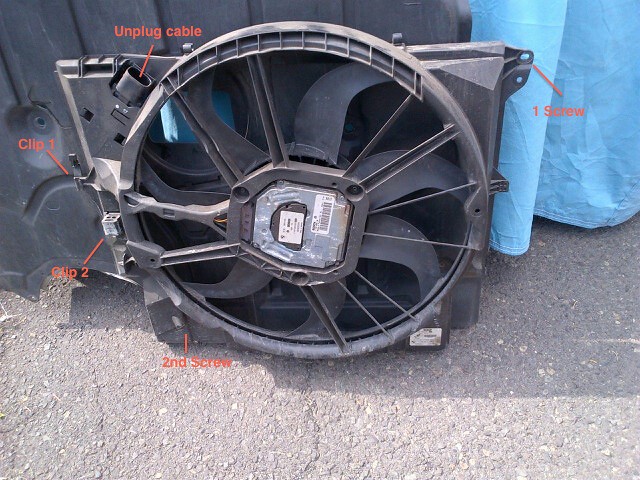 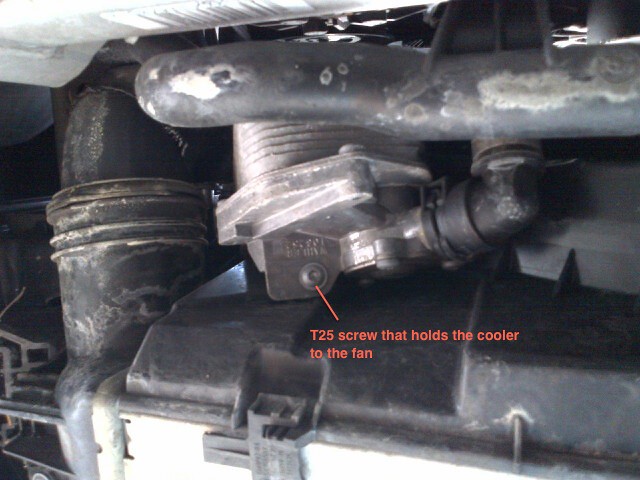 5) Drain the coolant: Unscrew the cap on the coolant reservoir and unscrew the bleeder screw, Then go under the vehicle and loosen and remove the Blue drain plug which will be on the drivers side of the radiator. While that drains continue to the lower Radiator hose which will be located on the passengers side of the radiator, There's a clip located on the connector, you'll need to pull it out to the "open" position (not completely removed) with a small flat screw driver, followed by the Upper radiator hose (loosen clip) located on the driver's side. This is just to make sure all coolant is removed so to avoid any leaking or spilling when removing the radiator. WARNING!!! the coolant vent pipe will most likely be old and brittle, so use caution when removing the vent pipe or expansion tank hoses! Now that the radiator is drained from the drain plug go to the radiator expansion tank and disconnect the coolant vent pipe from the coolant expansion tank hose by squeezing the clamp and moving it. Like my vehicle, most of you probably haven't done this maintenance before so both the radiator hoses(upper and lower) might be to tight to remove from the radiator(which was my case), if so just remove the hoses directly from the engine instead, which was easier to get to and squeeze off for me instead of removing it from the radiator(again, same principle as before, loosen clips on each connector and pull off)  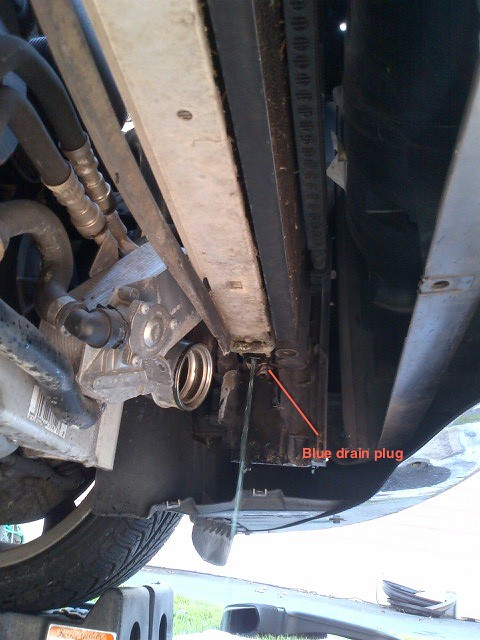 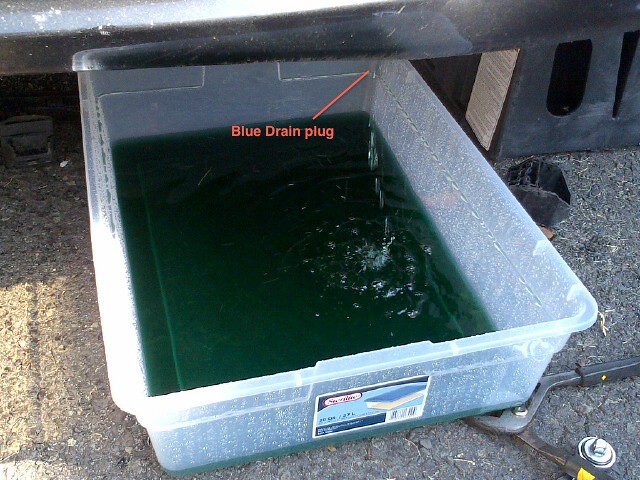 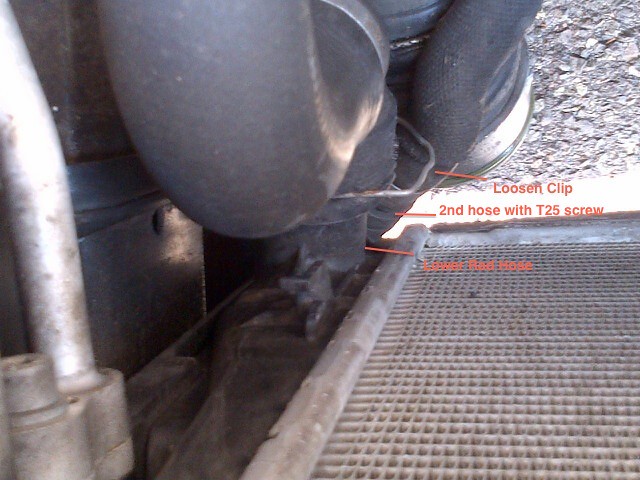  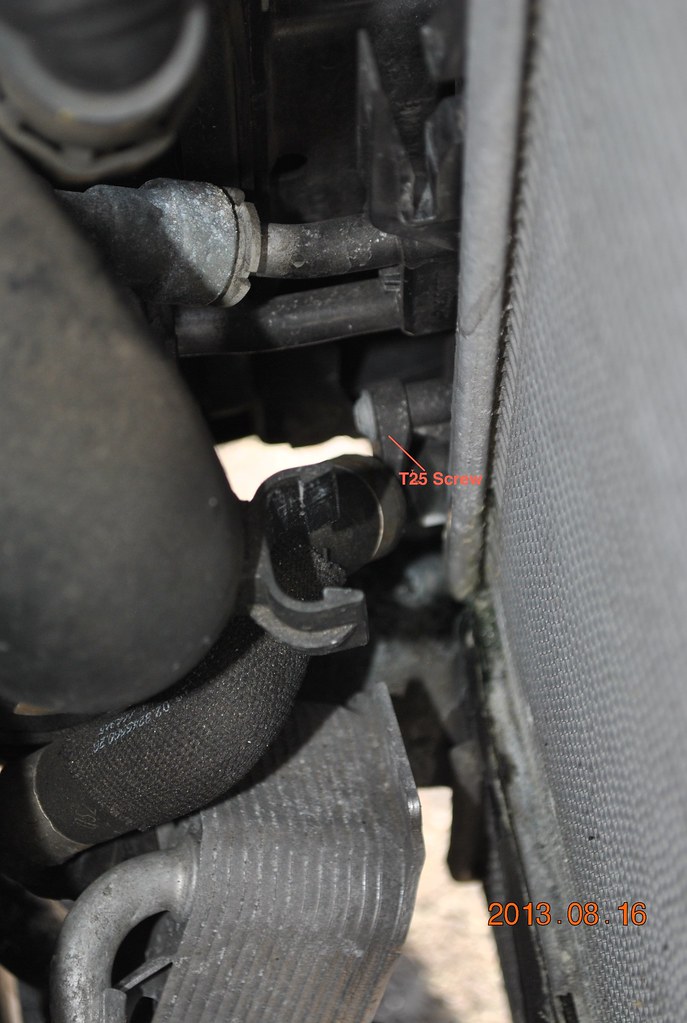 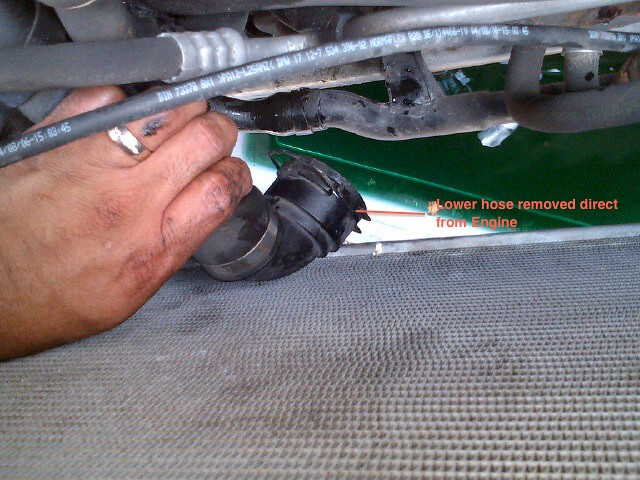 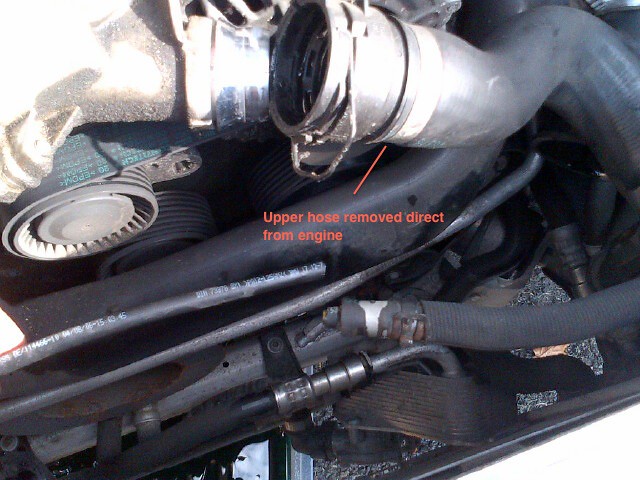 6) Remove the Radiator: There are 2 T25 screws securing the Radiator to the AC condenser at the top, followed by 4 hoses, Upper and lower radiator hoses which require a screw driver to squeeze the clip loose (not off), and 2 Cooler hoses with T25 screws securing them in place). Once the screws removed and clips are loosened you can remove the hoses, neither hoses should be rotated (they're locked in place), just pull up and down while pulling away from the connection. 7) Radiator is now free, just pull upwards and slide out. Now in order to install the new Radiator just do everything in the reverse order and once everything is done, fill the system from the Coolant Reservoir, then bleed the system and your down! Word of advice, when installing the new radiator you'll need to keep in mind that the radiator must slide into a locking position within the Radiator support or else the 2 top screws won't evenly match up. Also by now your AC condenser will be loose because the plastic support tabs from the Intercooler are off so you'll need to lift both radiator and AC condenser from the top of the vehicle and make sure they're aligned and in the locking position of the radiator support. Screw the Top 2 screws in first, then follow by installing all hoses in place, in order to lock back the hoses in place slide the metal clips back down into the "Locking" position before inserting the hoses back on the connecting mounts, once the clips are in the locking position just slide the hoses back in until you hear a "Clicking" sound, that'll let you know the hoses are secure. I was trying to make this as detailed as possible, so I apologize if it's long winded. I've tackled harder projects on a vehicle before, this is just a bit time consuming because of all the screws and angles you would have to get to in order to get every screw, so take your time, and got at it slow and you won't have any problems. Last edited by HFELIU; 08-20-2013 at 07:51 PM.. |
| 08-19-2013, 12:23 PM | #3 |
|
Lieutenant Colonel
 181
Rep 1,681
Posts |
Wish this was around a few months ago when I had to replace the AC condensor. And you're right about the locking tabs for the AC condensor and radiator. It took me a long time to get it all to line up so I could get it all to fit.
|
|
Appreciate
0
|
| 08-20-2013, 08:10 PM | #4 |
|
New Member
11
Rep 17
Posts |
Thanks, and I wish I could've helped sooner, I've been looking for a DIY for over a week with no luck, So I figured i'd get started on one and share the details, remember Knowledge is power
 ! ! |
|
Appreciate
0
|
| 08-16-2015, 06:01 PM | #5 |
|
Captain
 
28
Rep 743
Posts |
fallen intercooler left
Hello, I removed by bumper to swap out broken grille. To my pleasant surprise the left side of intercooler is fallen. It appears a bolt/screw is missing on the left to hold it up. I took a picture of the one on the right side.
Can anyone assist with p/n, anything else I should be concerned for? found a way to hold up with a zip tie. 2011 335D |
|
Appreciate
0
|
| 03-02-2016, 01:16 PM | #7 |
|
Colonel

453
Rep 2,973
Posts |
An update.
The intercooler does not need to come out. You can drain the radiator by removing he lower hose and a larger pan. The Bentley manual does not indicate removing the radiator. The CSF radiator is a tight fit but works great. Be ready for bruised knuckles and scraped up forearms.
__________________
Arctic Metallic\CF Splitters, Spoiler, Mirror Covers\LED Tails\LSD\Tinted\Coded\Apex Square SM10-19"\LED Angel Eyes\Gloss Black Grill\Integrated V1 & Galaxy Tab\M-Performance Brakes\Cobb Tuned\xHP Flash\Resonator Removed and ->
 is your friend. is your friend. |
|
Appreciate
1
|
| 03-15-2016, 09:07 PM | #8 |
|
Captain
239
Rep 714
Posts |
My lessons from this install.
-Be careful while attaching the coolant lines for the transmission. Tightening the fitting inserts too much caused them to leak. -The radiator drain plug comes in contact with the OEM Intercooler and not allowing full insertion of the driver side Intercooler mounting screw. Also, a few weeks after the install I've had the dreaded 2EF4 Map Thermostat Mechanics code. It's weird this issue surfaced not too long after the install and this thermostat is only two years old.
__________________
 |
|
Appreciate
0
|
| 03-16-2016, 05:51 AM | #9 |
|
Colonel

648
Rep 2,011
Posts |
I installed the Behr radiator which is supposed to be oem. Fit great, its made in south africa.it has a one piece drain plug as discussed in turner motorsports. Mine was for auto. Purchased for $178 from eeuroparts.
Orings...on the transmission connectors leaked. They had to be replaced.
__________________
335i e92 TPC 19Ts
|
|
Appreciate
0
|
| 06-09-2016, 09:56 PM | #11 | |
|
Second Lieutenant

44
Rep 249
Posts |
that O Ring that leaks
Quote:
Wondering on which o ring you're referring to? (part number 17111711987 ?) Is below the O ring in question? For automatic versions there is a plastic outlet which attaches to the radiator and goes to the atf cooler via a coolant hose. |
|
|
Appreciate
0
|
| 06-12-2016, 08:10 AM | #13 | |
|
Captain
239
Rep 714
Posts |
Quote:
__________________
|
|
|
Appreciate
1
jwebb335xi197.00 |
| 06-18-2016, 10:35 AM | #14 | |
|
Colonel
648
Rep 2,011
Posts |
Quote:
__________________
335i e92 TPC 19Ts
|
|
|
Appreciate
0
|
| 03-05-2017, 09:25 AM | #16 |
|
Colonel
2124
Rep 2,758
Posts |
I replaced the 2 o-rings suggested with brand new OEM o-rings(into new behr radiator) and my connections are still leaking. Do you think i tightened the screw holding the fittings too much? Im going to try messing with those if not ill try thicker o-rings from an auto parts store. The o-rings/fittings seemed to slide into my new radiator very easily also.
|
|
Appreciate
1
jwebb335xi197.00 |
| 03-12-2017, 11:09 PM | #17 | |
|
Major

197
Rep 1,070
Posts |
Quote:
Thanks much!
__________________
JWebb335xi
MHD / Wedge / 93 Octane/ xHP / FMIC / Inlets / Catted DPs / CP / DVs |
|
|
Appreciate
0
|
| 03-12-2017, 11:59 PM | #18 | |
|
Second Lieutenant
44
Rep 249
Posts |
Quote:
 Good news is that I certainly didn't have to undo these lines when replacing my auto trans radiator. |
|
|
Appreciate
1
jwebb335xi197.00 |
| 03-13-2017, 01:39 AM | #19 | ||
|
Major
197
Rep 1,070
Posts |
Quote:
__________________
JWebb335xi
MHD / Wedge / 93 Octane/ xHP / FMIC / Inlets / Catted DPs / CP / DVs |
||
|
Appreciate
0
|
| 03-13-2017, 03:42 PM | #20 | |
|
Colonel
648
Rep 2,011
Posts |
Quote:
BE EQUIPPED with an assortment box of o rings (or oem orings) tho, since they will leak. Someone above commented they leaked even with oem, mine came from a box. The hose connections on the top of the radiator will be TIGHT very Tight. be careful not to break hoses.
__________________
335i e92 TPC 19Ts
|
|
|
Appreciate
1
jwebb335xi197.00 |
| 03-13-2017, 06:49 PM | #21 |
|
Colonel
2124
Rep 2,758
Posts |
Yea mine leaked at first after replacing the radiator and those two O-rings with NEW OEM o-rings. Went to the store and car started to warm up and saw steam from under hood. Open it and there is water trickling out from both those O-rings spots, so I drive home and wait til the next day to check it/pull stuff apart and they are not/will not leak anymore. Odd, but has been fine since I made the original post.
|
|
Appreciate
1
jwebb335xi197.00 |
| 07-08-2017, 01:41 AM | #22 |
|
Captain
73
Rep 811
Posts |
Does the CSF radiator work with both auto and manual transmission?
I have to replace the condenser, thinking abour replacing the radiator as well, if i have to remove the radiator. |
|
Appreciate
0
|
 |
| Bookmarks |
|
|


