|
|
|
|
 |

|
 |
BMW Garage | BMW Meets | Register | Today's Posts | Search |
 |

|
BMW 3-Series (E90 E92) Forum
>
DIY E90 N54 Valve Cover Gasket
|
 |
| 01-30-2014, 03:38 PM | #68 |
|
Major
 

84
Rep 1,099
Posts |
So are you guys replacing all those bolts with new ones or just reusing them?
I'm thinking about just ordering 10 bolts in case i mess up a couple. My car has 53k miles. Should i just go ahead and order all the bolts just to be safe? |
|
Appreciate
0
|
| 02-13-2014, 01:57 AM | #69 |
|
Private First Class
 12
Rep 102
Posts |
Nice write up, I plan to do this valve cover gasket replacement soon, and have a couple questions…
1) where is the PCV located in the engine. 2) Do you have to move aside the ecu wire harness to get clearance of the top left corner (saw the video on this thread and wondering if its the same as in the 328 example) 3)after disconnecting the battery, fuel lines, sensors, will there be any codes that need to be reset/cleared or should everything start up without any codes on the dash. 4) any special tools that makes life so much easier during this install (such as special sockets, extensions, etc..) Thanks again for posting this DIY, really helps getting another set of instructions besides the manual |
|
Appreciate
0
|
| 02-13-2014, 06:56 AM | #70 | |
|
Captain

289
Rep 864
Posts |
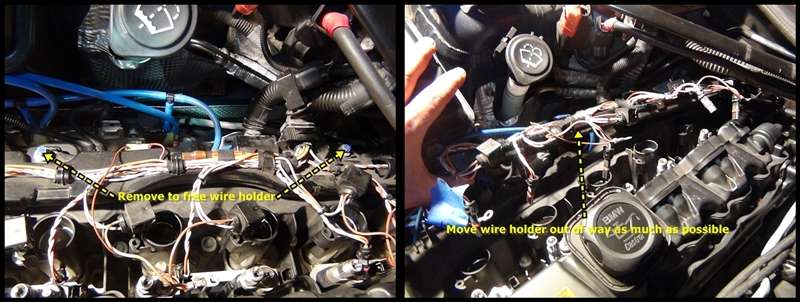
Wire Harness (2) Bolts
Quote:
|
|
|
Appreciate
0
|
| 02-21-2014, 12:56 PM | #71 |
|
New Member
0
Rep 5
Posts |
For parts you might take a look at www.realoem.com, put in the last 7 of your VIN and then pick out your part from the appropriate exploded diagram. ECS Tuning offers some of the parts, via a link on the page, but I don't buy from them always, depending on what I need.
Anyway, I just finished my valve cover gasket. 2008 335i with 67k on the clock. It was leaking around two spark plugs, and along the front lower edge. After I removed the cover (the most frustrating V/C I have ever tried to work on) I found the cover itself has a small crack, looks like an impact mark (car was damaged and repaired). I plan to fix that with a little JB Weld!!!! FYI, I worked on fork lifts and firetrucks when I was a mechanic, so I'm no stranger to aggravating jobs, but this one was intimidating at times. Did not remove injectors as someone suggested, and reused the bolts, without mishap. 90 inch pounds on the button. This thing's a hoot to drive, but it is so labor intensive, I'm about to end my long-term relationship with German cars. I grew up near where the Bimmer factory is now located in upstate SC, but brand loyalty and local manufacture only goes so far. . . For now, I'm goin' drivin!!!!! |
|
Appreciate
0
|
| 03-02-2014, 08:55 AM | #72 |
|
New Member
3
Rep 14
Posts |
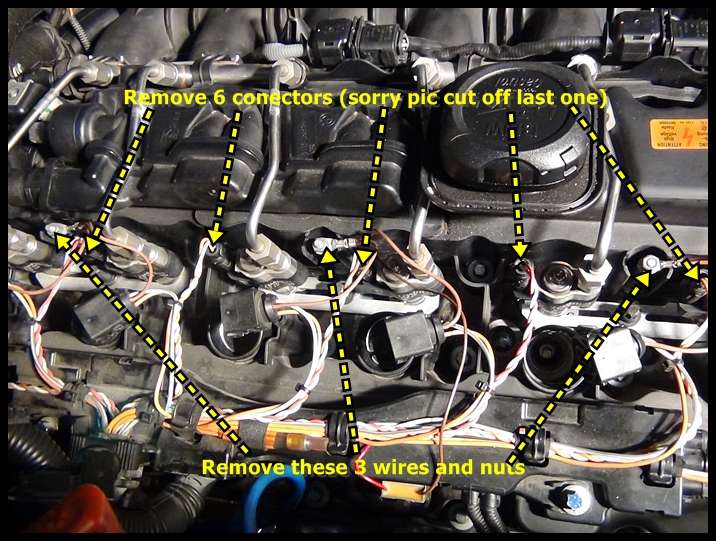
Very good guide. I was doing great until I snapped the ground wire bolt, (1 of the 3 nuts and wires on the image below) when I was putting it back together. Hopefully everything is okay after that's done.
 I need to figure out how to remove the broken bolt. Does anyone have an idea? I tried to fire up the car but the engine turned over and never started, I hope this is the reason. |
|
Appreciate
0
|
| 03-02-2014, 12:05 PM | #73 | |
|
Keepin It Real
35
Rep 563
Posts |
Quote:
Gotta ground it When there's a broken bolt or stud to be extracted , I've found that utilizing a set of " reverse " drill bits ( yes reverse ) along with a medium to big torque drill will almost always walk out the severed stud. It's a little miracle worker that reverse drill bit set. Start off with the smallest one that's seemingly strong enough , center it on broken bolt and just let the drill and bit do the work. Don't force don't press too hard and voila ! Removal successful. Good luck and keep the shiney side up ! - Z
__________________
 Never Mistake Activity for Achievement Parking lots  C Mod 84' |
|
|
Appreciate
0
|
| 03-07-2014, 02:04 PM | #74 |
|
Major
84
Rep 1,099
Posts |
Can sombody please tell me the part numbers for the following images pleasee
1. the circle thing covering the bolt right under the windshield 2. the part number for the bolts holding the wires in place thanks! |
|
Appreciate
0
|
| 03-09-2014, 01:02 PM | #75 | |
|
New Member
3
Rep 14
Posts |
Quote:
I'm trying to avoid taking to a shop because they will see I have no idea how to fix it and they will charge a s***t load of money to fix it |
|
|
Appreciate
0
|
| 03-16-2014, 03:37 PM | #77 |
|
Private First Class
19
Rep 123
Posts |
All,
So i attempted this job and like the poster above, had the same issue. I broke the top right bolt (one of the bigger ones) on the valve cover, I broke two bolts on the electrical harness attachment to the cover and I broke two of the 6 injector connectors removing the valve cover from the bay. Any help and ideas would be appreciated. Thanks! |
|
Appreciate
0
|
| 03-17-2014, 11:42 PM | #79 | |
|
Second Lieutenant
14
Rep 294
Posts |
Quote:
|
|
|
Appreciate
0
|
| 03-18-2014, 08:26 PM | #80 |
|
New Member
2
Rep 10
Posts |
I just did this job and only broke one of the injector securing tab and that's about it, just to make the job done you do have to remove the ecu cover and get the 3 wiring sets of the locking position, also the vc left corner near the firewall hits a metal line(ac I think) so keep an eye on that area and for sure someone to help you it's a plus. I also found easier removing the spark plugs sleeves before removing the vac and put them back after the cvs was back in, thanks for all the info on this DIY
|
|
Appreciate
0
|
| 03-18-2014, 08:43 PM | #81 |
|
Private First Class
19
Rep 123
Posts |
Hex-I broke two of the Injector connectors...do you plan on replacing them? Both plugs seem to fit in snugly and aren't lose..but I'm sure they aren't as tight with the tops missing from the female end of the holder. Thoughts?
|
|
Appreciate
0
|
| 03-19-2014, 08:15 PM | #83 |
|
New Member
2
Rep 10
Posts |
RV i just put a little of silicone on the top part (above the little gasket ), that's what a friend that is a master mechanic told me to do, it was pretty tide so I really doubt it will com loose, I hope this help you too
|
|
Appreciate
0
|
| 03-28-2014, 12:17 PM | #85 |
|
Private First Class
8
Rep 133
Posts |
...I think I didn't overlook it.
I'm looking for the torque of the bolts for the strut tower brace and as previously asked by someone. What's the torque on the fuel line fittings ? Thanks. . Last edited by allan; 03-28-2014 at 02:44 PM.. |
|
Appreciate
0
|
| 04-01-2014, 08:59 AM | #86 | ||
|
Keepin It Real
35
Rep 563
Posts |
Quote:
Save a few bucks and take your chances ? As with all things - You get what you pay for. Assurance. Also - do NOT use a driver larger than 1/4" to torque them down. Any larger ratchets and you're almost sure of a snapped head. Just my experience and two cents throwing in here. Left hand drill bit set on hand too !!! And flood the entire area under hood and especially at rear of head with lots of light ! It helps.
__________________
Never Mistake Activity for Achievement Parking lots C Mod 84' |
||
|
Appreciate
0
|
| 04-04-2014, 06:20 PM | #87 |
|
Private First Class
8
Rep 133
Posts |
 Just done. THANK YOU so much for the great instructions. Just done. THANK YOU so much for the great instructions.I would say it took me between 5-6 hours. Took my time. My biggest problem was to get the strut bold loose. Now I just hope it last a bit longer than the last one. . |
|
Appreciate
0
|
| 04-04-2014, 09:25 PM | #88 | |
|
DIYER
614
Rep 5,521
Posts |
Quote:
__________________
JB4 G5, Stage 3 LPFP, Stage 2 MOTIV PI, VM 6466 ST, Custom OCC W/ SS lines, ER FMIC, ER CP W/HKS BOV, M3 control arms, M3 guide rods, M3 upper links, M3 front & rear sway-bars, HPA rear toe arms, Wavetrac LSD, HPF Gen 2, DEFIV kit, KW clubsport, Delrin solid SF bushings, stoptech rotors, Rogue Tranny Mounts, 1M bumper, M3 CF hood, M3 fenders, M3 OEM sideskirts, Mtech rear bumper, CSL trunk, MORR VS8.2 rims 245/295
|
|
|
Appreciate
0
|
 |
| Bookmarks |
|
|