

|
|
|
|
 |

|
 |
BMW Garage | BMW Meets | Register | Search | Today's Posts | Mark Forums Read |
 |

|
BMW 3-Series (E90 E92) Forum
>
DIY-Replacing N52 tensioner, idler pulley and serpentine belt
|
 |
| 12-23-2011, 11:27 PM | #1 |
|
Lieutenant Colonel
 
201
Rep 1,714
Posts
Drives: 2011 335i
Join Date: Apr 2008
Location: Norwalk CT
|
Welcome everyone. As you may know i have up in the general section about changing my belt tensioner, belt and idler pulley. I completed this job successfully and will do the best i can to write my first DIY to replace the tensioner, serpentine belt and idler pulley on your N52 engine.
Parts you will need. Part Numbers Included Mechanical belt tensioner #11287530314 Torx bolt #11287530315 Deflection pulley (Idler pulley) #11287535860 Serpentine V-belt#11287628650 Tools you will need. Ratchet and various size bits. T60 torx bit to unload the belt tensioner Small hands are a plus This DIY will be strickly only for replacing the belt tensioner the belt and Idler pulley. It is your job to figure out how to take out the air box. Most of us know how to remove it. So easy a caveman can do it. 1. Ok the first step is to get to know where everything is in your engine. Here i marked where the idle pulley is located and the belt tensioner.  2. Removing the Air duct. To remove this get a torx bit and unscrew the two screws on each side then simply pull out the intake duct.  3. Taking off the serpentine belt. Here is where it gets annoying. The tensioners on are cars are really hard to unload. Get a t60 torx bit and place it in the torx star in the tensioner i will circle it in red. Now to make this easier stand behind your passanger front panel and place the ratchet in and turn clockwise while your other hand slips the belt of the tensioner. Now if you are turning it clockwise and it does not move then you need to put some elbow grease in, dont be paranoid just use some strength and you should see it start unloading. Our tensioners dont self lock so you have to have to use one hand to have it unloaded and your second hand to slip the belt off. This was annoying.   4. From here just remove the belt and put it aside. Just for good measure spin your tensioner pulley and if its spining freely and it sounds like it has sand in it the bearings are shot and it should be replaced, same goes for the idler pulley. 5. Removing the belt tensioner. So from here you are going to need a torx bit with a small ratched. Dont remember what size it was but im pretty sure you guys have somne great tools. take a torx bit to the bolt marked in red in the picture and turn it counter clockwise might need some strenght to get it undone. Now once you break the bolt use your hand and take it out while holding the tensioner, once the bolt comes out the tensioner can be pulled out. The tensioner is only being held by that one bolt that should also be replaced when replacing the tensioner. Put the old one aside.  6. Removing the Idler Pulley. To replace the idler pulley remove the protective cap with a flat head witch exposes the bolt that you have to remove. I think it was a 13mm. I dont have a picture of the bolt but will mark the cap. Turn the bolt counter clockwise to loosen the bolt undo untill the idle pulley is removed.  7. Installing the New Belt tensioner. Now when you get your new belt tensioner it will come unloaded and it will have a long pin leave this pin in until it is installed on the car. Put the tensioner the same way you took the old one out line it up, it can only go on one way get your new torx bolt and screw it in. Then just tighten the bolt down well. 8. Installing the New idler pulley. Your new Idle pulley will come with a new bolt also. Just match it up and just screw this pulley in where the old one was removed. This was the easist part of the install. Make sure the belt tensioner bolt is tightened as well as the idle pulley. 9. Installing the serpentine belt. Now for this make sure you look at that first picture i had in this DIY and draw out how the belt goes. You should be fine. The ribbed side of the belt goes down toward the bottom of the car. Make sure you have the ribbed parts positioned correctly on all the pulleys. 10. Loading the tensioner Now once you have the belt routed the correct way and all the pulley including the tensioner pulley. If you are a muscle head use the T60 torx bit just as if you where going to unload it turn it really hard clock wise then grab a set of pliers and pull that long pin that came with your tensioner once that pin is removed the tenisoner should load. Re-check that the belt is positioned correctly. Now just put back the intake duct and your intake box and then fire her up. CONGRATS YOU ARE DONE. IF ANY OF YOU HAVE ANY QUESTIONS JUST POST A COMMENT OR PM ME. IF YOU WOULD LIKE ME TO ADD SOMETHING TO THIS DIY THAT I MIGHT OF MISSED LET ME KNOW ALSO. GOOD LUCK MY FELLOW GREESE MONKEYS ENJOY YOUR NOISE FREE CAR ON COLD STARTS.    |
| 12-24-2011, 12:45 PM | #3 | |
|
Lieutenant Colonel
201
Rep 1,714
Posts
Drives: 2011 335i
Join Date: Apr 2008
Location: Norwalk CT
|
Quote:
|
|
|
Appreciate
0
|
| 01-04-2012, 07:13 PM | #5 |
|
New Member
1
Rep 10
Posts |
I am in the middle of trying to replace my tensioner pulley. The belt was making a noise, so I checked it out and found the head of the torx bolt has snapped flush with the assembly. I thought it would just slide out, but it only comes out about a quarter of an inch and hits something. Does the assembly slide straight in, or does it need to be angled to install it? Also, did you remove the fan shroud? Looks like mine has a transmission cooler that is attached to the bottom of the shroud with a torx screw. Real tight in there so going to take some doing to get it loose to remove the fan.
Here is a [rather large] image: 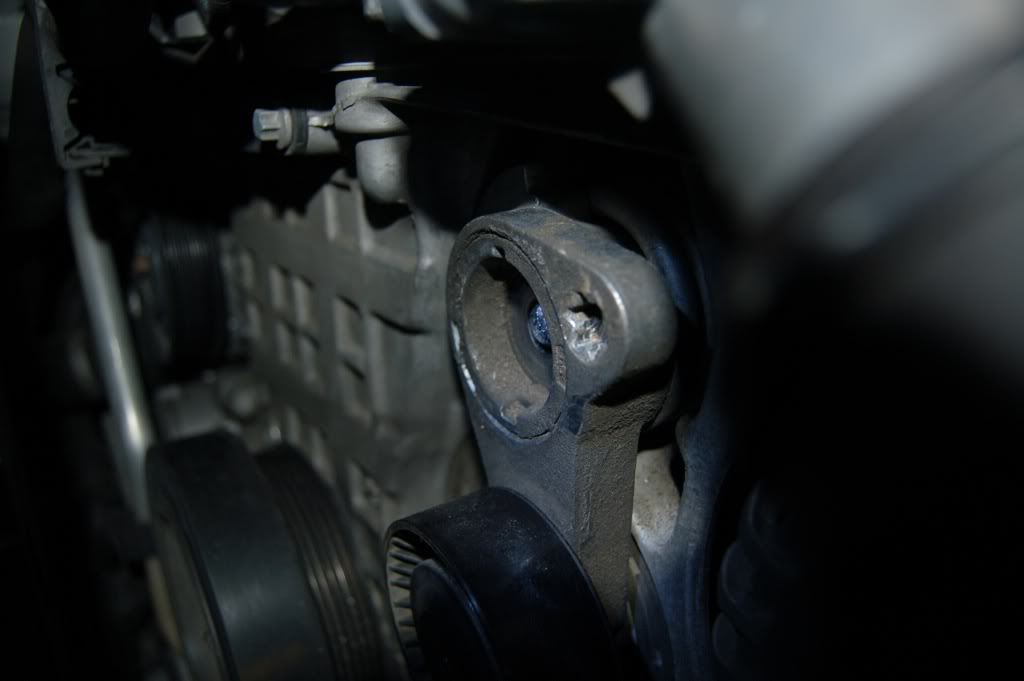 Last edited by loweran; 01-04-2012 at 08:28 PM.. Reason: added photo |
|
Appreciate
0
|
| 01-04-2012, 09:43 PM | #6 | |
|
Lieutenant Colonel
201
Rep 1,714
Posts
Drives: 2011 335i
Join Date: Apr 2008
Location: Norwalk CT
|
Quote:
|
|
|
Appreciate
0
|
| 01-04-2012, 09:54 PM | #7 | |
|
New Member
1
Rep 10
Posts |
Quote:
|
|
|
Appreciate
0
|
| 01-05-2012, 01:45 AM | #8 | ||
|
Lieutenant Colonel
201
Rep 1,714
Posts
Drives: 2011 335i
Join Date: Apr 2008
Location: Norwalk CT
|
Quote:
|
||
|
Appreciate
0
|
| 01-05-2012, 06:35 PM | #10 | |
|
Lieutenant Colonel
201
Rep 1,714
Posts
Drives: 2011 335i
Join Date: Apr 2008
Location: Norwalk CT
|
Quote:
|
|
|
Appreciate
0
|
| 01-05-2012, 08:33 PM | #11 |
|
New Member
1
Rep 10
Posts |
OK. Got the damn thing out. Had to remove the undercarriage plastic, which was like twenty screws. Then took out one little screw holding the transmission cooler to the shroud. Then pulled the fan out, breaking the clip on the way out of course. Then got some needle nose just for grins. Backed then bolt right out.
There was the tiniest rim left on the bolt holding the pulley in. Once I got it out, the pulley came right out. |
|
Appreciate
0
|
| 01-05-2012, 09:42 PM | #12 | |
|
Lieutenant Colonel
201
Rep 1,714
Posts
Drives: 2011 335i
Join Date: Apr 2008
Location: Norwalk CT
|
Quote:
|
|
|
Appreciate
0
|
| 01-25-2012, 06:37 PM | #13 |
|
Captain
 
40
Rep 818
Posts |
Thanks, great info and photos. Mine are shot at 80K miles, but in Phoenix, the A/C is on a lot, putting more load on these pulleys.
Tensioner pulley bolt is E16. If you're wondering if yours are shot, watch these videos. I checked mine by slipping off the belt, very easy to do if you have a T60 bit and a breaker bar. Last edited by AlanAZ; 01-25-2012 at 07:08 PM.. |
|
Appreciate
0
|
| 01-25-2012, 09:07 PM | #14 |
|
Lieutenant Colonel
201
Rep 1,714
Posts
Drives: 2011 335i
Join Date: Apr 2008
Location: Norwalk CT
|
+1 thanks for adding
|
|
Appreciate
0
|
| 02-20-2012, 10:29 AM | #15 |
|
Private First Class
 5
Rep 156
Posts |
Great DIY, thanks to the op. As alanaz points out, the use of a breaker bar to lengthen the handle of your socket wrench makes releasing the tensioner very easy, without it is a pain.
|
|
Appreciate
0
|
| 02-20-2012, 02:26 PM | #16 | |
|
Lieutenant Colonel
201
Rep 1,714
Posts
Drives: 2011 335i
Join Date: Apr 2008
Location: Norwalk CT
|
Quote:
|
|
|
Appreciate
0
|
| 02-22-2012, 09:52 PM | #17 |
|
Private First Class
3
Rep 107
Posts
Drives: 07 328i Jet Blk/Blk/6mt
Join Date: Dec 2010
Location: Lakeland, FL
|
Thanks for the excellent write up. Going to hit up Tischer's to get these parts ordered as I have a tensioner that needs replacing. Figured I'd go ahead and replace the Idler pulley as well since it's relatively inexpensive, especially compared to having the shop do it.
One question for those who have have already done this repair before. Did you find that the tensioner and pulley caps needed to be replaced as well or do these come off and on without any issue?
__________________
2007 -- 328I -- Jet Black -- Black Dakota Leather -- 6 Speed -- ZSP -- ZPP -- ZCW -- HiFi
|
|
Appreciate
0
|
| 02-23-2012, 09:31 AM | #18 |
|
Captain
40
Rep 818
Posts |
The tensioner is expensive, even from Tischer. You can get both for half the list price from places like RMeuropean (although I'm noticing it's out of stock -- you may need to wait a bit), just google the part number. Don't forget to order the bolt, it's one time use only. Best to replace both pulleys, and the belt if it hasn't been done.
http://www.rmeuropean.com/Part-Numbe..._85E85BAC.aspx Last edited by AlanAZ; 02-23-2012 at 09:42 AM.. |
|
Appreciate
0
|
| 02-23-2012, 07:50 PM | #19 | |
|
Lieutenant Colonel
201
Rep 1,714
Posts
Drives: 2011 335i
Join Date: Apr 2008
Location: Norwalk CT
|
Quote:
|
|
|
Appreciate
0
|
| 02-23-2012, 08:58 PM | #20 | |
|
Private First Class
3
Rep 107
Posts
Drives: 07 328i Jet Blk/Blk/6mt
Join Date: Dec 2010
Location: Lakeland, FL
|
Quote:
Thanks for the link, much appreciated! 
__________________
2007 -- 328I -- Jet Black -- Black Dakota Leather -- 6 Speed -- ZSP -- ZPP -- ZCW -- HiFi
|
|
|
Appreciate
0
|
| 02-23-2012, 09:02 PM | #21 | |
|
Private First Class
3
Rep 107
Posts
Drives: 07 328i Jet Blk/Blk/6mt
Join Date: Dec 2010
Location: Lakeland, FL
|
Quote:
https://www.trademotion.com/parts/20...agramCallOut=3
__________________
2007 -- 328I -- Jet Black -- Black Dakota Leather -- 6 Speed -- ZSP -- ZPP -- ZCW -- HiFi
|
|
|
Appreciate
0
|
| 02-24-2012, 12:37 AM | #22 | |
|
Lieutenant Colonel
201
Rep 1,714
Posts
Drives: 2011 335i
Join Date: Apr 2008
Location: Norwalk CT
|
Quote:
|
|
|
Appreciate
0
|
 |
| Bookmarks |
| Thread Tools | Search this Thread |
|
|


