

|
|
|
|
 |
|
 |
BMW Garage | BMW Meets | Register | Today's Posts | Search |
 |

|
BMW 3-Series (E90 E92) Forum
>
DIY Driver side window glass replacement
|
 |
| 08-12-2011, 05:22 AM | #1 |
|
First Lieutenant
 
58
Rep 361
Posts |
DIY Driver side window glass replacement
hey guys, as i was standing on a traffic light a guy who was cutting the grass with a handheld lawnmower launched a rock straight into my driver side window. it shattered to pieces of course. i ordered a new one for 82 eur from germany and went on to replace it by myself. heres a quick DIY and i hope it helps.
tools you will need:  first, you need to take off the panel on the door. theres already a DIY for that so im not gonna write that part. after you take it off you should see something like this:  the rubber goes over the whole door and covers the part where you see the window and other stuff so we need to take this rubber off. start at some point and just peel it off as it is covered on the ends with some kind of glue. dont worry you will be able easily to attach it again to the door. once you got it off heres how the rubber looks with the glue i was reffering to:  heres how the door looks once you took that off. 1 and 2 are the bars on which the 2 sliders are moving to roll the window up or down. number 3 is the part which you could take out so you can more easily vacuum the glass from the inside of the door.  next up is to take out the felt. i used this chance to apply the tint-protector on the felt (http://www.tintprotector.com/) on the image you can see where you should start and just pull it out.  after you are done you need to position the sliders where you can access them. so just roll it down a bit. check the image below  heres an image of the front slider and how to detach it.  the secure pin (1) is the first thing you have to take out. just pull it out. after that you need to take this tool and unscrew the bolt from the back side. turn clockwise to loosen.  after that its the tricky part to take out the screw from that white plastic. take out number 1 from the image, pull number 2 from the image towards you and you will have just enough clearance to slide the white plastic to the left. after that come from the back using a tool you previously used to unscrew it and push towards you so that the screw pops out of the white plastic. i hope i got this right and understandable because i didnt have the glass here and i managed much more easily to take this part out. important: the new glass comes with the black part so dont bother to take this off.  ok now, this is the next slider, the 2nd one, which you need to unscrew. i wasnt able to use the torx here because it was impossible to unscrew it but i used it later on to adjust the window.  use this tool to unscrew from the back. torx will start turning as well. dont worry about that and dont try to block it just unscrew from the back and thats it.  heres how it looks from the back  ok thats it. you should be able to pull out the cracked/broken glass out now. or if its completely broken even better  you are set to pop the new one in you are set to pop the new one in carefully slide in the glass into this guideline:  following the same process from here: attach the window with the slider. slide the white plastic inside the black part and slide it until you see the hole. then put the screw in and push it inside until it pops so you can secure it with the pin (do that at the end). pull number 2 from the picture towards you so you can slide in the screw. than add number 1 and screw from the back CCW. on the 2nd slider pop in the window inside, put the screw from the back and tighten with the torx. after this comes the part where you need to adjust the window so its straight and in the line with the door. you will need to play around a bit by adjusting the front and the back slider here. what i did is used the marker on both sliders so i know how to position it. you can see if its ok by checking with the other window or when you roll the window up it should be in a straight line from top to bottom as on the image here:  in my case the window goes a little bit over the line from the previous image. check here:  after you are done roll the window up and down so you see if everything is ok. i also drove the car a bit to check for wind noise. put the rubber back on and the panel as well and youre done |
| 10-08-2013, 09:48 PM | #4 |
|
Master Gunner
77
Rep 435
Posts
Drives: 2008 335i Sport
Join Date: Aug 2013
Location: Sandy Eggo
|
Even though this is an older thread, it's still really the only DIY on door window replacement in this forum so I wanted to update this thread with details that differ from the OP in regards to a 2008 US 335i Sedan. Their front door windows (not sure of the rears, but I'm assuming they would be similar to the fronts) are "snapped" into the white guides that are permanently attached to the tracks, unlike the OP's in which the glass/guides are bolted on.
To remove a door window, it must be raised approximately 105mm (4.1 inches) from the top edge of the door such that the guide latches, and more specifically, the holes in the glass that the guide latches snap into, are visible through oval openings in the black tracks. Then a flat-blade screwdriver is inserted at roughly 45 degree angle or greater through the oval opening in the black tracks, pushing away the locking tab visible in the holes of the glass, until the screwdriver is above the top of the white latch. Ensuring the locking tab of the guide is clear of the hole, simply lever the screwdriver up gently to lift the glass out of the guide. Repeat on the other guide, then tilt the back edge of the glass upward to pull the glass up and out of the door. Sorry, I didn't take pictures of the process. The instructions and lone illustration provided in BMW TIS were not clear enough to understand what needed to be done, so it was only after some minutes of scratching my head that I figured it all out. |
|
Appreciate
0
|
| 02-03-2014, 06:23 PM | #5 |
|
Second Lieutenant
25
Rep 294
Posts |
Very good DIY, thank you.
__________________
2012 X5 35D - Platinum Gray / Cinnamon Options: Sport, Tech, Cold Weather, comfort seats, leather dash, high beam assist, lane-departure warning, soft-close doors, two-row, self-leveling suspension, hi-fi stereo
Tracks driven (in any car): Nürburgring Nordschleife (05/2011), LeMans (ok, just the public part), Eagles Canyon Raceway, MotorSport Ranch Cresson, COTA Austin |
|
Appreciate
0
|
| 02-19-2016, 02:41 AM | #6 |
|
Registered
0
Rep 1
Posts |
Hey fellow DIY enthusiastics,
I apologise in advance if this is not the right thread to ask it, I spent some time searching the forum for my question but this is the closest. I want to replace the fixed window in the rear door. Any advice on that? Thanks. |
|
Appreciate
0
|
| 05-06-2017, 10:37 PM | #7 | |
|
Second Lieutenant
118
Rep 272
Posts |
Quote:
I snapped a picture of the rear-most clip. 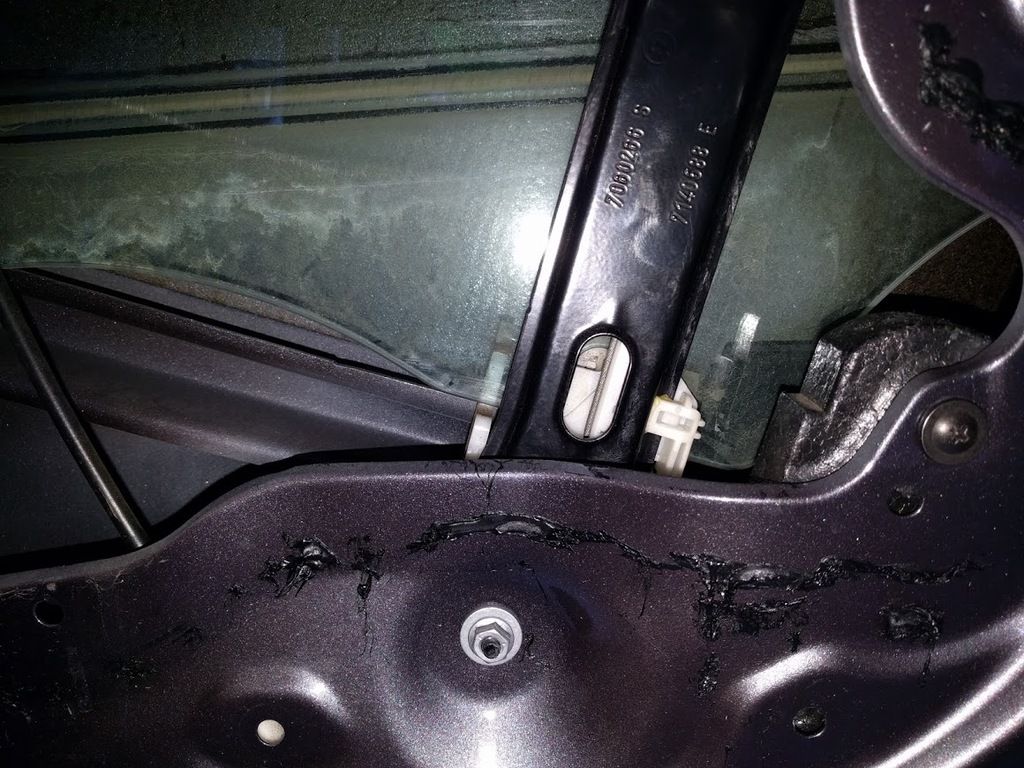 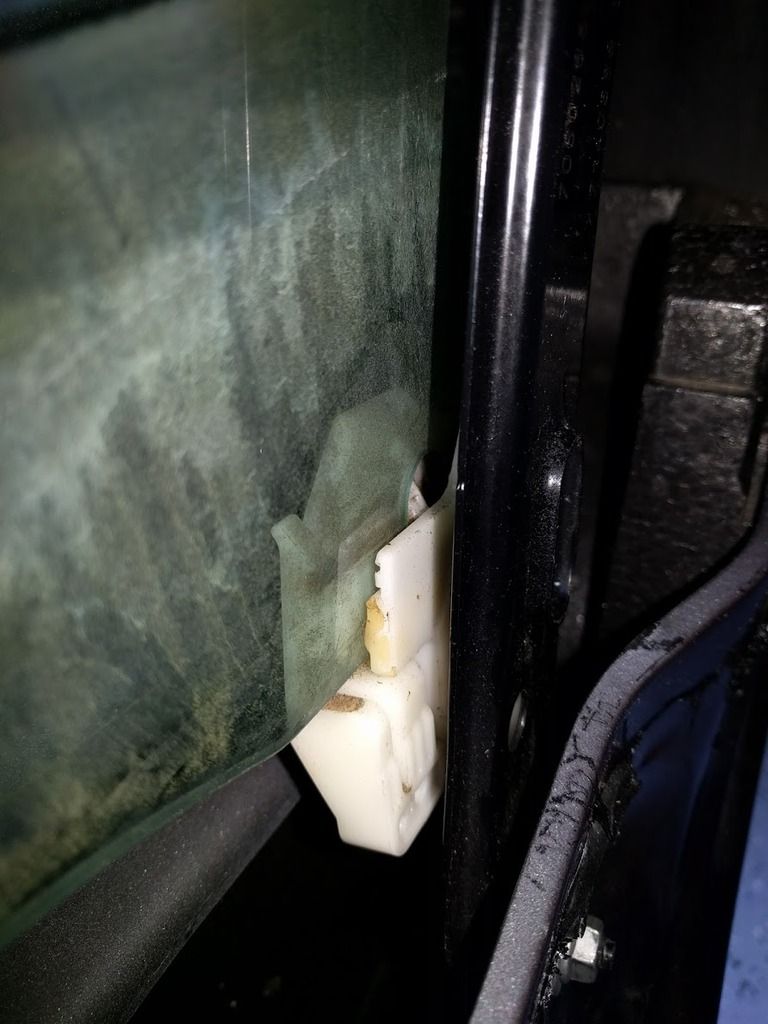 The front most clip is almost as easy to get to using a medium flat screwdriver. A few addendums, for those of you thinking of doing it yourself: 1. Only the door panel and the moisture barrier need to be removed. The window trim and tweeter speaker can stay. 2. The electrical connectors to be removed are the window switch, the speaker, the tweeter (off the speaker), and the puddle light. This is all in a wiring loom, with a push-connector just below the window switch on the interior of the door panel. All connectors are keyed and unique except the speaker and tweeter, so it is important to know which is which. 3. The door lock mechanism does not need to be disconnected, but the door panel will not stray far from the door as a result. Be prepared to have something nearby to prop the door panel to keep it out of the way and off the outside of the door. 4. The OP was working with a frameless setup. For those of us with frames, the glass comes out on the outside of the door (no other way, really), and goes in via the outside of the door too. One caveat: just as you are aligning the new glass into the right groove, the new glass will also need to be aligned into the side grooves too. If you get it wrong the window motor will struggle to get it up, as the window will be pulling the rubber side seal trim from the door. There is no other way to re-align it other than taking the glass out of the clips and resetting the alignment. 5. The door panel screws were T15, I think, and not T20 as the instructions on the other page suggested. |
|
|
Appreciate
0
|
| 05-27-2017, 12:59 AM | #8 | |
|
Brigadier General
 
681
Rep 3,696
Posts |
Quote:
For the life of me... i can't figure out how to get the white plastic holders/clips to release the glass so i can slide up/out the window. Please help. I also have another thread in the general section asking for help on this |
|
|
Appreciate
0
|
| 05-29-2017, 12:07 AM | #9 | |
|
Second Lieutenant
118
Rep 272
Posts |
Quote:
It took me a few tries to get the screwdriver in to the tab, and a few ups-and-downs of the window to get the ideal alignment to attack the tab. |
|
|
Appreciate
0
|
| 05-29-2017, 01:30 AM | #10 | |
|
Brigadier General
681
Rep 3,696
Posts |
Quote:
I did a test to see if i could fit the new actuator in thru that gap and i noticed it was tight but close enough. So i attempted to gently wiggle the old actuator out and the wiggle the new actuator in. I need two small zip ties to keep the wires from catching the window as it lowers to the last 1/2 of the bottom of the length. I made one major mistake in that i FULLY removed the lock cyl screw because the cyl wouldn't come out. In retrospect i should have just done like a few turns at a time and test pulling out the cyl. if the screw had come out... i should have screwed it back in because as soon as the cyl and screw was out... i wiggled the actuator to remove it and a metal bracket that holds the screw like a washer fell into the door and now its a PITA to put back... plus the screw no longer lines up with the cyl. That makes my cyl useless cuz it can slide in and out with no restriction and anyone can use a universal key (screw driver) to open my doors. on the plus side... i took this time to CLEAN the heck out of my door panel and pockets and window switches. Also cleaned all tthe rubber guides plus anything that would normally be hard to reach or see. Now with my new FCPEuro order kit $55 with free shipping of both Left and Right side actuators... my car door actually sounds quieter when closing and opening. I'm probably going to open up that panel again tomorrow to try to figure out how to put that bracket back in (sigh). I still love my n54, tho i hate all these tricks you need to do to fix these cars. One day i will make a bazillion dollars and just lease cars instead... but until that time i'll just DIY. I'm already planning my next project to pay someone to carbon blast my intakes, preemptively change the starter cuz its already torn down to that point, and change my spark plugs, cuz once again its already torn down. Parts are cheap... its the labor that kills you. |
|
|
Appreciate
0
|
| 08-17-2019, 11:10 AM | #12 |
|
Second Lieutenant
124
Rep 277
Posts
Drives: 2018 230i MSport
Join Date: Jul 2017
Location: Alabama
|
Thought I would update this a bit. This was the best thread I could find on replacing my glass, but it was very different behind the weather barrier.
Once I removed the door, I pushed in on the clip with a pry tool and the window switch tray comes out through the top. It's held in by two pegs in the rear and the clip on the front. Behind the weather barrier there is much less room to work than I expected. I removed the window stop at the bottom first. (The big black foam block). Remove the two screws and tilt it out and away by pushing the cables to the side as you go. If you only need to remove the glass that can be harder than it looks. I ended up stripping both window nuts and had to remove the regulator and rails to get at them with pliers from the back side to replace them. The glass can be removed by lowering the glass until you can see the screws in the circled areas. Insert a T20 torx and turn clockwise to loosen. IT IS REVERSE THREADED from the torx since it actually threads in from the backside of the glass towards you. I highly recommend using an adapter with the torx on a drill and set the clutch to about 10. The vibrations will help break the torque while you are pushing straight on. I stripped both because they were on very tight and I stepped up to a half in drive breaker bar. Once you break the torque you can reach your hand behind and finish unscrewing the nuts from the back side of the glass. If you need to remove the guide rails and regulator there are 7 10mm bolts to remove. The aft rail bolts are hidden. The top one is under a large rubber grommet at the top, and the lower behind a similar grommet on the side of the door at the bottom. 2 for each rail and 3 for the motor. To remove the electrical connector from the motor there is a squeeze tab on the back side, then the motor simply slides out from the rubber boot on the side of it. Take note the bottom bolt does not back out of the door so do that one last and pull the motor away as you unscrew the bottom bolt. Take note of which way the cable guides are before you pull out the regulator, so that you put it back in the same way. To reinstall the glass I just did my best to measure the gaps on the other window at various points and get it to match up. I spent nearly just as long trying to get the glass situated perfectly as it did removing everything. Good luck! Last edited by Clear_Blue22; 08-17-2019 at 11:24 AM.. |
|
Appreciate
0
|
| 12-08-2019, 02:10 PM | #13 |
|
Second Lieutenant

35
Rep 252
Posts |
Thank you so much for this DIY.
I have followed it to the tee and instructions are awesome. Only update I would make is to just hammer out the screw from the white piece. My only fear now is putting the glass in with the chunky black piece already attached. So am I getting this correct.... start putting the glass in from the front of car first where the chunky black piece in? The space seems pretty small... and I fee like this is where Im going to mess up. Any suggestions???? |
|
Appreciate
0
|
| 12-16-2019, 10:16 AM | #14 |
|
Second Lieutenant
35
Rep 252
Posts |
Finally Completed (due to weather). If anyone needs help with E92 window replacement follow this DIY and you can send me a message for clarification. THANKS TO OP. Saved me a pretty penny.
|
|
Appreciate
0
|
| 03-09-2020, 07:30 AM | #15 |
|
Private First Class
 56
Rep 110
Posts |
PM sent! Got stuck on removing the bolt from the white plastic... Wondering if anyone can provide some clarity around this. How does one pop out the screw from the white plastic?
"after that its the tricky part to take out the screw from that white plastic. take out number 1 from the image, pull number 2 from the image towards you and you will have just enough clearance to slide the white plastic to the left. after that come from the back using a tool you previously used to unscrew it and push towards you so that the screw pops out of the white plastic. i hope i got this right and understandable because i didnt have the glass here and i managed much more easily to take this part out." |
|
Appreciate
0
|
| 04-24-2020, 02:58 PM | #16 | |
|
Registered
0
Rep 1
Posts |
Quote:
Literally fixing mine now and cant for the life of me, get the screw out. Had to sign up to ask but do you have any images of removing the screw from the white plastic? |
|
|
Appreciate
0
|
| 07-03-2021, 12:03 AM | #18 | |
|
Cool Guy
26
Rep 139
Posts |
Quote:
|
|
|
Appreciate
0
|
 |
| Bookmarks |
|
|


